
When we first started our journey into self-growing, I was somehow convinced that raised vegetable garden ideas were about austerity.
Like, “Here’s four boards, here’s a level, a screwdriver, and a 12-page manual.” And it wasn’t inspiring at all.
And then we realized that a bed can be… whatever you want it to be. From pallets, from an old dresser, from a bathtub (yes, a bathtub!), on legs, without legs, with a grid, with a self-watering system, even in the middle of the kitchen. The main thing is that it should live with you, not against you.
So get inspired!
Here you will definitely find an idea for your garden.
1. How to Build a Raised Vegetable Garden with Pallets – No Tools Needed!
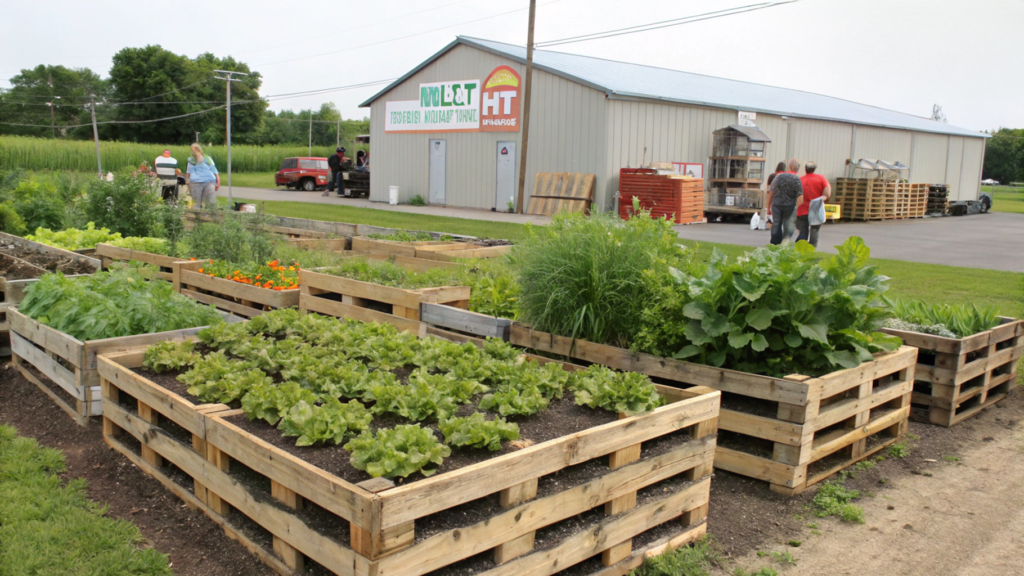
Not all pallets are safe for growing food. Some are treated with chemicals, so look for the HT label – this means the pallet has been heat treated (not chemically treated). Avoid the MB labeling – methyl bromide, the toxic stuff.
Where to find pallets? Construction store warehouses, farm stores and agri-businesses, and retail outlets where palletized goods are often brought in. Usually it’s enough to walk up and just ask. We were given away for free – just pick it up.
Step-by-step instructions: a bed of pallets without tools
1. Preparation of the place.
Right on the selected site lay the pallet flat – not on the rib, not vertically. Just as it is, planks down. The height turns out to be small – about 14-15 cm. This is the edge of the future bed.
To suppress weeds and retain moisture, under the pallet you need to lay a thick layer of cardboard or old cloth, for example, bags of feed. Or you can even several layers of newspaper.
This will be enough to keep the soil from coming in direct contact with the grass and to keep weeds from climbing up from underneath.
2. Arrange the pallets.
- One pallet – this is the easiest, fastest and budget option. The bed will turn out not very deep, but it is enough for greens and small root vegetables.
- You can use two pallets, stacking them on top of each other. In this case, you will get a bed height of about 30 cm, and you can already grow more demanding crops, such as cabbage, bush tomatoes or beets.
There is a nuance: the second (upper) pallet will have to remove a few boards so that there are no partitions inside, otherwise it will not be possible to pour the soil. For this purpose, a nailer or a hammer will suffice. We did it without fanaticism, literally in half an hour for one pallet. You can fasten two pallets with clamps or just wire.
3. Soil mixture.
Inside we do not pour not the first caught earth, but a normal mixture. We use a proven formula:
- 50% compost
- 25% coconut fiber or peat
- 25% perlite or vermiculite
If the compost isn’t fully digested – add a little organic fertilizer. Espoma Garden-Tone works well – mild, balanced, suitable for almost all crops.
4. Bed care.
Water more often than regular beds – there’s not much soil, it dries out quickly. Mulch – with straw, leaves, hay, even paper. Do not put the pallet in a puddle – if the site is often stagnant water, it is better to raise the site. Protect it from chickens and cats – for some reason they love pallets (we have one cat made a bed out of it)
What you can grow in a bed from a pallet.
If you use a single pallet (height of about 14 cm), will do:
- Leaf lettuce
- Arugula, spinach, chard
- Green onions
- Radishes (early maturing)
- Basil, dill, thyme
- Bush strawberries (low-growing)
These crops have shallow root systems. They are comfortable even with a shallow soil depth, especially if well mulched and not allowed to dry out.
If you collect a double pallet (about 30 cm deep), you can add:
- Beet
- Cabbage
- Bush tomatoes (‘Tiny Tim’, ‘Patio Princess’)
- Onions for turnips
If you want to give it a try, start with one pallet. No expectations, no investment. Just lay it down, fill with good soil and plant arugula. In three weeks, you’ll already be cutting the first leaves for lunch.
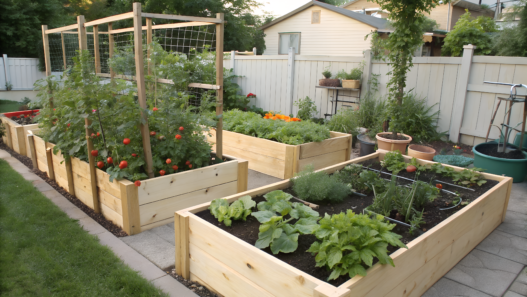
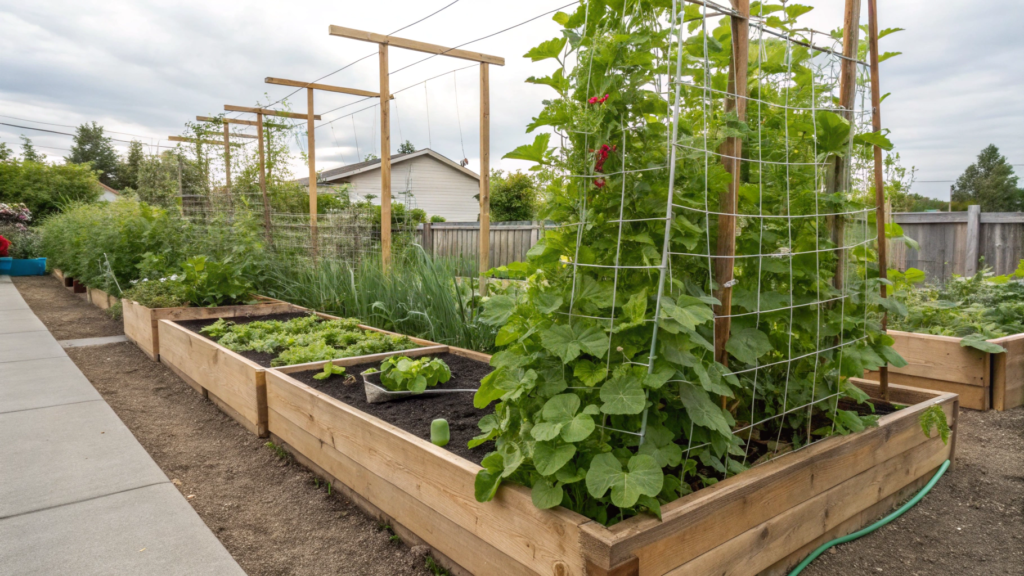
2. DIY Raised Bed with a Trellis – The Best Way to Grow More Veggies!
If someone had told me at the beginning of our vegetable gardening journey that a vertical support would change our crops, I would have…. probably rolled my eyes. Back then, we had one single bed of beans hanging over an old fence – and it looked, shall we say, wild.
But then we built a simple raised bed with a trellis, and that was it. Beans, cucumbers, peas, zucchini – took off in growth, the harvest increased, and the bed took up half as much space. Since then, I plan at least one vertical structure in every zone of the garden.
Why a raised bed with a trellis is really cool
You’re growing in two tiers. At the bottom – basil, chard, spinach. On top, beans, peas, cucumbers, pumpkins.
- The plants get sick less. They do not lie in damp soil – less rot and mold.
- More air, less pests.
- Better lighting. Leaves get more sun, which means more photosynthesis = more food!
On a small plot, this is a lifesaver. Especially if you, like we used to, cultivate every square meter with love.
What you’ll need
- 4 wooden boards (approximately 120×20 cm) – for the bed itself
- 2 laths of 180 cm + 1-2 crossbars – for the frame of the grid
- Mesh or twine – depending on the plants
- Screws, screwdriver, a little patience
- Optional: fabric or landscape film for the bottom.
- Soil, compost, and … seedlings!
If you don’t feel like assembling the frame yourself, you can get a pre-made one like this:
Raised Garden Bed with Trellis on Amazon – we tested such a structure in 2023, and it’s really sturdy!
How to make a raised garden bed with trellis – in steps
Step 1. Assemble the box for the bed
Classic: 4 boards are twisted into a rectangle or square. Height – from 20 cm, width – 60-120 cm, length – as desired. If you want details, see our guide to a budget bed for $20.
Step 2. Install the supports for the trellis
Along the back of the bed (along the long side), hammer in two vertical slats, at the corners. The height is about 180 centimeters.
Then screw a crossbar on top to make it stable.
Step 3. Stretch the netting or twine.
There are two options here:
- For heavy crops (cucumbers, pumpkins, watermelons) – metal mesh with a large mesh.
- For light crops (peas, beans) – twine in the form of a “ladder” is enough.
Step 4. Fill the bed and plant!
I like a cardboard-straw-compost layer, but you can just use good garden soil.
Plant low growing crops at the bottom – basil, lettuce, chard. And next to the trellis – cucumbers, beans, tomatoes.
What grows best on the grate?
- Cucumbers – they love the grates and the fruit stays clean.
- Beans – visually beautiful, plus productive.
- Peas – especially sugar peas, they’re easy to harvest.
- Tomato “indeterminate” – only need to be tied up
- Pumpkin and zucchini (but watch the load on the grid!).
Advice. Try to plant calendula or nasturtium at the base – they repel pests and hang beautifully from the sides.
You can add drip irrigation for better performance – this is especially important in the heat. You can also reinforce the frame with metal corners – if there’s a lot of wind or heavy plants. Make a removable net – to easily remove it for the winter.
You get the idea, make a simple raised bed, add 2 slats and string twine. Voila – you’ve just doubled the productivity of your bed.
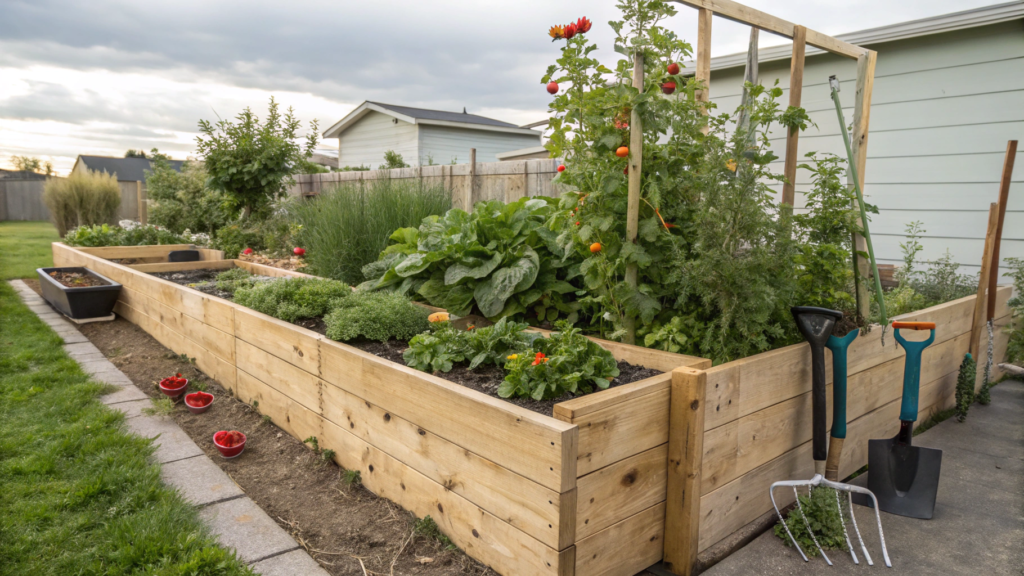
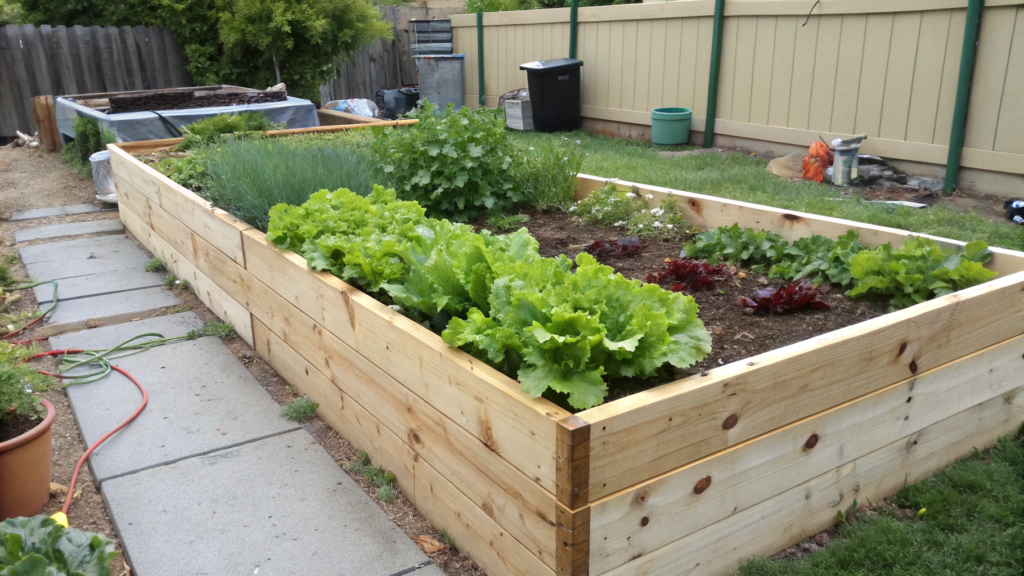
3. Cheap & Easy Raised Bed Garden – Perfect for Beginners!
How often have I heard: “I’d start a vegetable garden too, but I don’t have the money, the tools, or the experience…”
And each time I’ve answered: “Start with a simple and cheap raised bed. Realistically, it’s easier than it looks.”
Lindy and I went through it. And even our first primitive raised bed made of boards from an old barn gave us a harvest and confidence!
Why you should start with a raised bed (and not spend a ton of money)
- You’ll have a clear space, not scattered bushes on the lawn
- The soil in the bed warms up faster in the spring and is less likely to get trampled on
- Fewer weeds, easier to water, easier to maintain.
- And – you can do it all for almost nothing
What you can use to make a bed on a dime
Here’s a list of tried-and-true free or cheap materials that can be found near stores, or right on the property:
Cardboard and paper boxes – for a base (kills weeds and creates a foundation)
- Old boards, pallets, wood scraps – for borders
- Bricks, cinder blocks, even rocks – if there is no wood at all
- Old plastic crates or baskets – can be used as mini beds!
- Plastic bottles and pails – for a spot planting mini-garden
- Old furniture! I’m serious – we planted lettuce in a dresser drawer.
The easiest option: a bed without borders
You can just:
Remove the grass/put cardboard on the ground
Put compost/soil/hay on top.
Plant some herbs, radishes or onions.
Fence it off with something symbolic (rocks, branches, even fabric scraps).
It’s called sheet mulching or a “mud bed.”
Want sides? Here’s a super cheap way:
- Take four old boards or pallet panels
- Twist them into a rectangle (you can even just nail them together).
- Put them on the ground, put cardboard inside
- Fill with earth
Here’s another way – “ridge with a brick side”, which we once made literally from bricks found at the neighbors under the fence. Just laid them in the shape of a rectangle directly on the ground, without cementing, without fastening – and that’s it, the bed is ready!
We put a layer of cardboard inside, poured our favorite mix:
half – mature compost (it gives nutrition and structure),
a quarter – coconut fiber or peat (holds moisture).
A quarter – perlite or sand (for air and drainage).
Such a composition is light, loose and works even in the simplest beds.
Care here is simple:
- Keep an eye on moisture – soil in raised beds dries out faster than in regular beds.
- Water as the top layer dries out, especially in the heat.
- Be sure to mulch – we put hay, fallen leaves or even old newspaper.
- Once a month we sprinkle a little compost or diluted liquid fertilizer to support the plants.
And that’s it – no miracles, just simple actions and the desire to watch your greenery grow from nothing.
What to plant in such a cheap bed?
For starters, don’t go for finicky crops – choose ones that grow quickly and don’t require deep soil.
My favorites to start with:
- Lettuce, spinach, chard
- Radishes, dill, watercress.
- Herbs: basil, parsley, cilantro.
- Onions to feather, garlic for greens
Advice from me. Don’t expect perfect conditions. I know how it feels to feel “unprepared” for gardening. You think you need a beautiful plot, expensive materials, the right varieties…..
But all you really need is a small corner of land and the desire to plant something.
And then you’ll learn from every leaf.
4. How to Create a Self-Watering Raised Vegetable Bed – No More Daily Watering
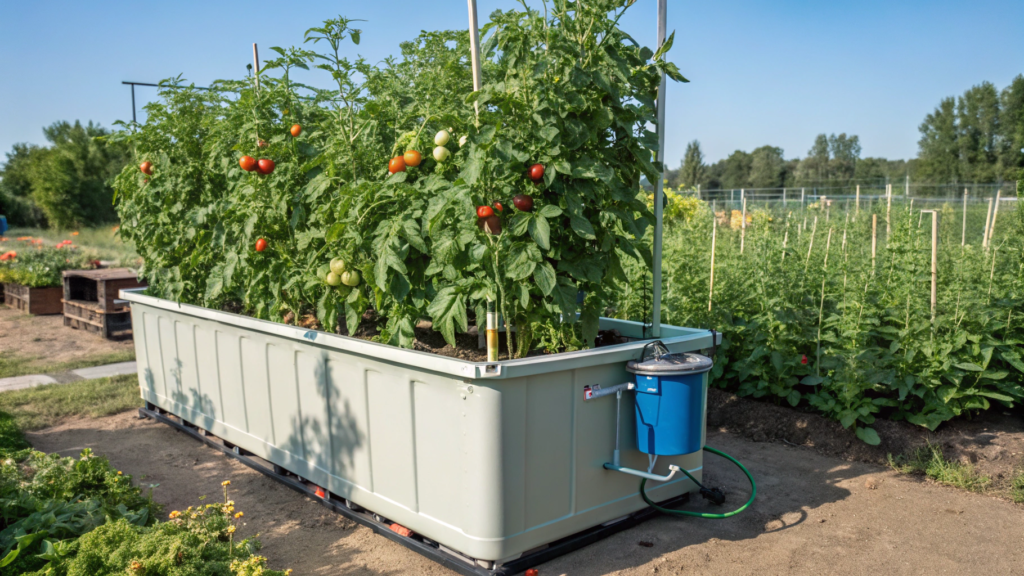
If you’ve ever grown tomatoes in a raised bed in a heat wave (we do it in Idaho!), you know how quickly moisture evaporates. Watered in the morning, it’s like it’s already dry by lunchtime. That’s why self-watering beds are a godsend. Especially if you’re short on time, forgetful, or just want a little less stress this summer.
How does self-watering work?
Imagine this: your bed has a reservoir of water at the bottom, and the plants take water from there as they need it, thanks to the capillary effect. That is, the moisture rises from the bottom to the top, keeping the soil moisture stable. And at the same time – no overwatering!
This, by the way, is based on scientific principles, which confirm that such a system can reduce evaporation by 60-80% and improve crop yields (especially in arid climates).
What you’ll need (everything is affordable and uncomplicated)
- A container or box (plastic or wooden – the main thing is that it doesn’t leak)
- Plastic bottles, pipes or boxes with holes – to create a reservoir
- Geotextile or landscape fabric (to separate water and soil)
- Tubing for pouring water (usually PVC)
- Good soil and compost
Want to go easy on yourself? There are ready-made options, for example:
Self-Watering Raised Bed Kit (Amazon)
How to assemble a self-watering raised bed
- Make a reservoir at the bottom. Put plastic bottles, pipe scraps, baskets, or even old plastic crates in the bottom of the box/bed. The main thing is to create a cavity where water will accumulate. You can make it 10-15 cm high.
- Install the fill tube. Pull vertically a pipe (PVC or rigid hose) that will go into the tank. Through it you will pour water. We just put in an old vacuum cleaner tube – it fit perfectly!
- Add the fabric and fill in the soil. Cover the tank with fabric – geotextile or just a thick agro-weave. This will keep the soil from slumping down. Put a good layer of compost/soil on top.
- Water once on top and wait for the magic to happen. Water the bed well from the top the first time to get the process started. After that – the water will come from the bottom. Just check the water level in the tank and refill as needed.
What crops grow particularly well in self-watering?
Tomatoes – they just love the constant moisture at the roots
Cucumbers – less bitter if they are not thirsty.
Peppers – sensitive to moisture fluctuations, and there are none here.
Lettuce and herbs – grow faster and juicier.
Green onions and garlic – great in any system, but no worries here at all
Useful little things to make your life easier:
- Cut a drain hole in the side (at tank level) so there’s no overflow
- Add mulch on top (straw, grass clippings, leaves) – it will retain moisture and discourage weeds.
- Use a moisture meter
When you used to get up at 6am in the summer to water your eggplants, and now you just top off the water every 4-5 days – it’s, well… awesome.
You start to see the garden not as a chore, but as a living space where everything works with you, not against you.
5. The Best Wood for Raised Vegetable Gardens (and What to Avoid!)
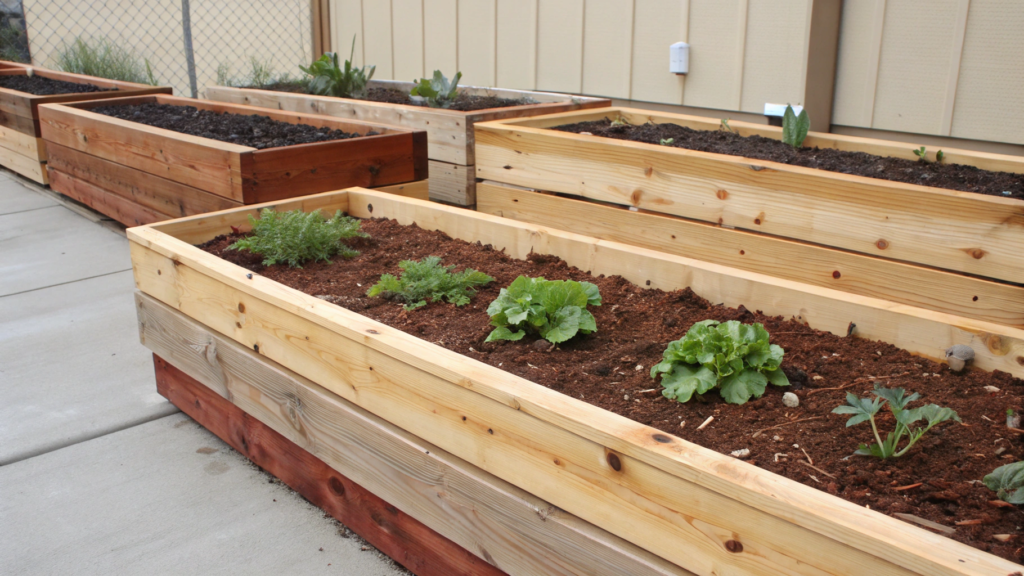
Of course, it’s best to know whatkind of wood you’re using for raised beds.
Some species are safe, durable, and work great in raised beds.
And others will rot in a season or, worse, can release harmful substances into the soil (especially important if you’re growing food!).
The best tree options for beds are
1. Cedar. This is my personal favorite! It is naturally resistant to rot, insects, and moisture.
It smells like a forest after a rain. And beds from it we have stood for 6-7 years without treatment at all.
Minus? The price. It is one of the most expensive trees. But at the same time – once done and forgotten.
2. Redwood. Expensive, like cedar, but very durable and beautiful. It tolerates temperature fluctuations well.
If you want to make a bed “for the ages” – this is your option. We have made a couple of decorative beds out of redwood and they are still as good as new.
3. larch. It is often used in construction in regions with a humid climate, because it is not afraid of moisture.
On the beds showed itself perfectly: over time will darken, but will not rot.
4. Pine, but… only if not treated! Very affordable, easy to find. We made our first beds from it.
BUT! It will rot quickly if you don’t protect it. You can use if you are ready to replace the boards in 2-3 years or impregnate them with natural oil (for example, linseed oil).
Wood that you should not use
Pressure treated lumber.
- Many store-bought boards look perfect: smooth, cheap, green. But they often have chemicals added to protect them from rot, insects, and mold.
- And if you’re growing vegetables and herbs – those chemicals can get into the soil, and then into your salad. Not something you want, right?
- Especially avoid boards labeled CCA, ACQ, MCQ – these are types of chemical treatments that contain copper, chromium, arsenic.
By the way, a University of Minnesota study confirms that treated wood can release toxic substances into the soil, especially in acidic environments.
Is it possible to use used wood?
You can. But:
Make sure it’s not chemically treated
Check for mold and rot
Old fence boards, barn paneling, leftover pallets – ok if they are clean
That’s what we did for the first 3 seasons, by the way: we collected leftover wood from people we knew. Some beds stood for 4 years!
And what to protect the wood, if it is cheap?
Good question! Here are three safe ways:
- Natural linseed oil – cheap, affordable, environmentally friendly
- Beeswax + oil (garden balsam) – makes the surface water-repellent.
- Liners – you can cover the bed from the inside with dense fabric or agro-film.
How we choose a tree now
- If we want “for years” – we take cedar or larch.
- If we want fast and cheap – pine with linseed oil treatment.
- If “just to try” – we take old pallets and don’t worry.
The main thing is to start. Because even the most modest bed from an old fence will give you more joy (and greenery) than a store made of plastic for $200.
6. How to Build a Raised Bed for Under $20 – The Ultimate Budget Hack!
You want to know the truth? Our first bed cost…. $0.
It was built out of old boards from a disassembled porch, cobbled together with landscaping tape that tore after a month.
But the lettuce grew like crazy on it. And we stood by that crooked bed every night and marveled as if it were an alien greenhouse.
Since then, we’ve tested a bunch of cheap and quick bed options. And yes, it’s realistic to make a cool design for $20 or less.
What you’ll need:
A wooden box with your own hands
| What | Where to get | Cost |
| 4 boards (approximately 1.2 m x 15-20 cm) | Building store / Marketplace | $8-12 |
| Nails or screws | Any hardware store | $2-4 |
| Cardboard / newspaper for the bottom | Free | $0 |
| Some soil + compost | Yourself / from neighbors / partially bought | $5-10 |
Bottom line. If the boards are used or they’re given to you – the whole project can cost $10.
Alternative materials (free or nearly)
- Old pallets – disassemble and use boards
- Cinder blocks or bricks – find near construction sites, warehouses
- Fruit/vegetable crates – can be placed in rows, covered with soil.
- Plastic containers – ideal for mini beds or herbs.
How to build a bed for pennies
- Find (or buy) boards. The standard option – 4 boards of 120 cm (or less). The height of 15-20 cm – this is enough for greens, radishes, onions, basil.
- Want to last longer? Soak the boards in linseed oil or use cheap agro-cloth as a lining.
- Twist the box together. Two screws per corner and you’re almost a gardener.
You can even do without screws – just connect the boards with twine or nails.
- Prepare the ground. Put cardboard or newspapers on the bottom – this will kill grass. On top – compost, humus, garden soil. You can find soil for free at your neighbors or for a couple of dollars on the weight.
What to plant in such an inexpensive bed?
Here are proven crops for the “economy bed”:
- Lettuce, rucola, spinach – fast growing, not capricious
- Dill, parsley, cilantro, basil – greens in general grateful
- Radishes, turnips, cress – give a quick harvest.
- Garlic for feathering, green onions – they require almost no care.
And you can also alternate planting – and take two harvests from one bed!
If you don’t want to pick with your hands… Here’s a prefabricated bed kit that’s really inexpensive: Budget Raised Garden Bed Kit (Amazon)
We bought one of these “to try out” last season – it stands, holds its shape, and looks decent. It’s a good start!
Expensive raised garden beds are beautiful. But… not necessary. Know this: you don’t need money. It takes cardboard, a board and you. And trust me, you’ll be surprised by the results.
7. The Secret to Growing Root Vegetables in Raised Beds – Avoid This Mistake!
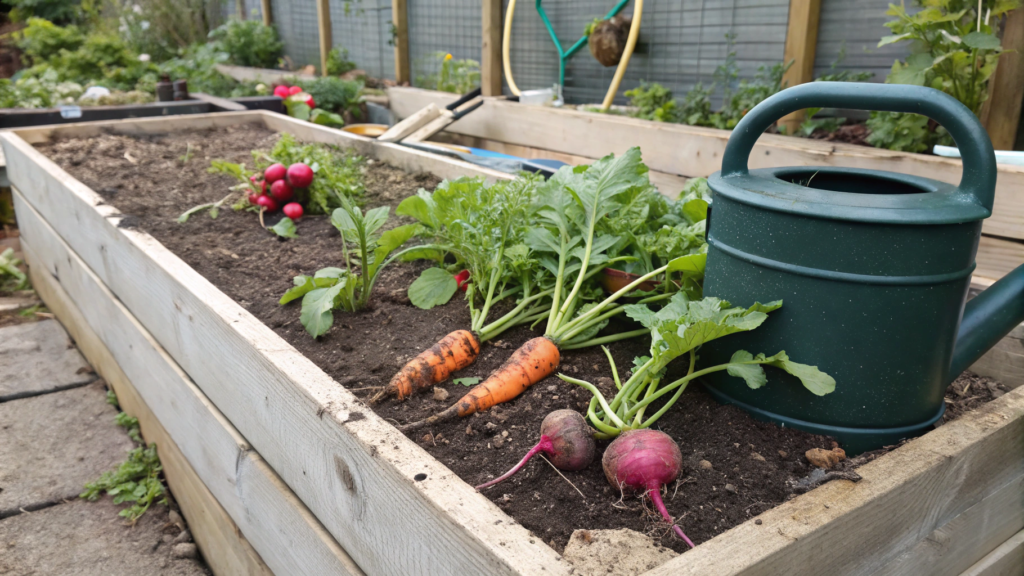
When you grow root vegetables in raised beds, everything seems perfect: loose soil, good drainage, controlled watering.
And then… you pull out the radishes, and he – with 12 “legs”. Carrots are crooked, beets look more like a heel than a vegetable.
What went wrong?!
The biggest mistake: shallow or dense soil
Here it is. That’s the one. Straight to the forehead.
Root crops need to grow DOWN, not up against compacted soil, rocks, or the bottom of a bed made of a piece of plastic.
If in the bed:
- Too little soil (10-15 cm)
- The soil is clayey or clogged
- There is too much unfermented residue
- Or the bottom is too dense and does not allow water to pass through.
…then the root crop simply curves, branches or stalls in growth.
And now – what to do correctly:
1. Make the bed deeper!
Minimum – 30 cm of loose soil. Better – 45-60 cm, if you want real elongated root vegetables (for example, Danvers carrots or Parma turnips).
Tip. Use two-tier beds or deepen the middle. We just move some of the soil from the edges inward, creating a “valley” – you get deeper soil and don’t need as much soil on the sides.
2. Choose the right varieties
This is where beginners often miss out. Not every carrot is equally happy in every soil.
For shallow beds:
Parisian, Little Finger, and Thumbelina varieties of carrots
Any kind of radish!
Detroit Dark Red Beets
For deep beds:
Danvers, Imperator, Nantes carrots
Bruvkva
Daikon
3. Make the soil Puffy (like a good cupcake)
Root vegetables love loose, airy soil with good drainage. Here’s our standard mix:
- 1 part compost
- 1 part coconut fiber or peat
- 1 part sand or perlite
If the soil is heavy, add more sand. If dry – more compost.
4. Don’t overfeed!
Root crops don’t like greasy soil, especially with too much nitrogen. Nitrogen → lush haulm → small root.
We once applied a lot of poultry manure – grew giant leaves and… nothing underneath. Now we only add compost, ash and a little phosphorus.
5. Keep the humidity stable
Too dry → cracks
Too wet → rot
Alternating → carrots in shock
If you have a raised bed – water goes away quickly. That’s why mulch is your friend:
- Grass clippings
- Straw
- Coconut mats
- Or fabric mulch.
What we do at our place every year
- First, we loosen the soil with a fork (not a shovel – so as not to compact it).
- Add sand and compost
- Draw furrows like in Japanese gardens.
- Mulch them immediately after sowing.
- And forget about them for a couple of weeks.
And then … pull out straight, juicy, without a single branching root crops. Is it perfect? No.
But it’s delicious. Natural. And with an “I did it myself” feeling.
Make the bed a little deeper, mix good soil, don’t overfeed, and you’ll be proud of every radish.
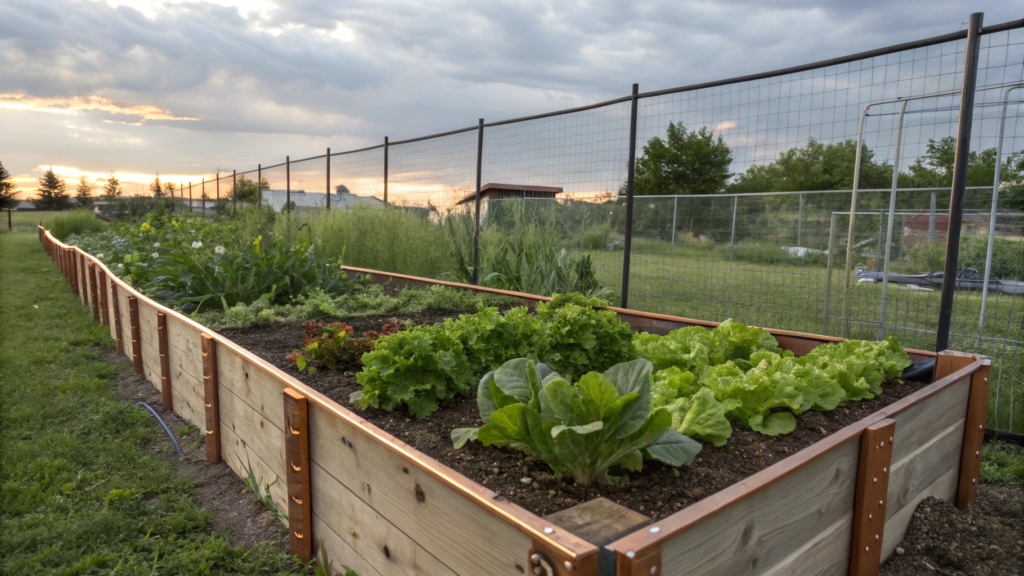
8. How to Protect Your Raised Garden from Pests – The №1 Trick You Need!
One year, Lindy and I grew the perfect lettuce. You know, thick, crunchy, like something out of a magazine. I used to walk around the bed like a proud hen.
And then, uh. one night. And it was gone. Just, uh. gone.
In the morning, all that was left were leaf veins, as if someone had licked the salad clean with a spoon.
The culprit? An army of slugs.
And that’s when we decided it was time to build a defense.
The enemy can’t get through! The key trick is a physical barrier
Yes, yes. It sounds simple, but it’s the most effective and natural defense against pests.
Not sprays,traps, magic. It’s a net.
What works best:
Fine mesh garden netting.
Reliably protects against:
- cabbage flies
- carrot fly
- fleas
- caterpillars
- aphids
- Transmits light and rain
Can be reused every season
How to install the net over the bed
1. Drive in arcs or put old PVC pipes – this will be the frame.
2. Stretch the net over the top, leaving a gap so that the plants do not touch the fabric.
3. Secure the edges – press down with stones, staples or just bend under the ground.
4. Don’t open unnecessarily.
We, by the way, first used an old tulle from my grandmother – it worked! True, a chicken got tangled in it once… but that’s another story.
Alternatives if you don’t have a net:
- Caps made from plastic bottles – perfect for seedlings
- Garden tunnels made of foil and twine
- Pine needle mulch – slugs don’t like it.
- Copper rings – protect from snails
- Beer traps – you know.
But they’re all temporary measures. Only a physical barrier really keeps things under control.
What about beneficial insects?
Oh, yeah. Nature is the best ally. If you want long-term protection:
Plant nasturtiums, marigolds, and velvets nearby – they repel pests
Attract ladybugs and lacewings – they eat aphids like chips.
Support the ecosystem, not just fight the enemy.
From me, tired of slugs. I’ve tried everything. And eventually came back to the simplest thing:
“If you want the cabbage patch to be all yours, cover it up.”
That’s it. No chemicals,stress, nighttime flashlight hunts.
9. DIY Raised Garden Bed for Indoors – Grow Fresh Veggies Year-Round!
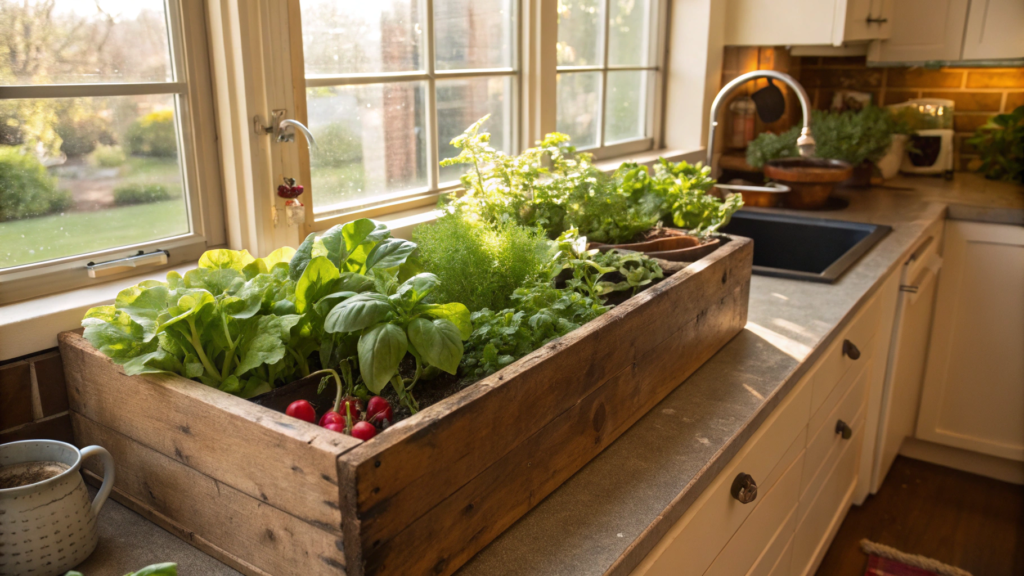
In the winter of 2020, when the whole world seemed to have gone into hibernation, we decided to try growing a small indoor garden bed right in the kitchen. We had an old wooden box, some soil, and a dream of fresh basil.
Well… it started with basil, and then lettuce, radishes, spinach…
And now a mini-garden was growing under the window, like in a greenhouse.
No joke – we actually cut lettuce without leaving home.
What you need for an indoor garden bed
You don’t have to buy a fancy system for $300. Everything can be assembled simply, cheaply, and beautifully.
Basic list:
- Container with sides (depth 15-20 cm)
- Light, breathable soil (with the addition of coconut fiber or perlite)
- Tray or substrate (to prevent water from leaking out)
- Artificial lighting (if there is not enough sun)
- Seeds and a good mood
Container: which one to choose?
You can use:
- Wooden boxes with a lining
- Storage containers (make drainage holes!)
- Fabric grow bags are our favorite option!
- Metal trays from Ikea – style and functionality
Don’t:
- Containers without drainage
- Any container with toxic materials (for example, treated wood or old paint)
Lighting: a critical moment
If the window faces south and there is a lot of sun, you are lucky.
But if not, you can’t do without a lamp.
We use an inexpensive LED lamp with an adjustable stand: Grow Light with Timer (Amazon)
(It has a timer, 3 brightness levels, and keeps our plants perky even in January.)
What can you grow indoors?
Choose fast-growing, shade-tolerant, and easy-to-grow crops.
Here’s what grows well at our house:
- Lettuce mix, arugula, spinach – first harvest in 20-30 days
- Basil, dill, cilantro, parsley
- Onions for feathers and garlic for greens – just stick the cloves into the ground
- Micro carrots (for example, the Parisian Round variety)
- Mini cucumbers in containers – if there is enough light and garter
Hint. For compact varieties, look for the mark “container variety” or “mini” on the packaging.
Watering and care
- Water when the top layer dries out, but do not flood.
- Be sure to use a tray under the bed to avoid flooding.
- Add liquid fertilizer (for example, fish emulsion or a universal composition for greens) every couple of weeks.
Life hacks from experience. Plant thickly and cut from the top – the greens will grow back. Completely change the soil every 2 months if you grow without alternation.
Add a little decoration: use wooden labels, painted pots, garlands.
10. How to Convert an Old Bathtub into a Productive Raised Vegetable Garden!
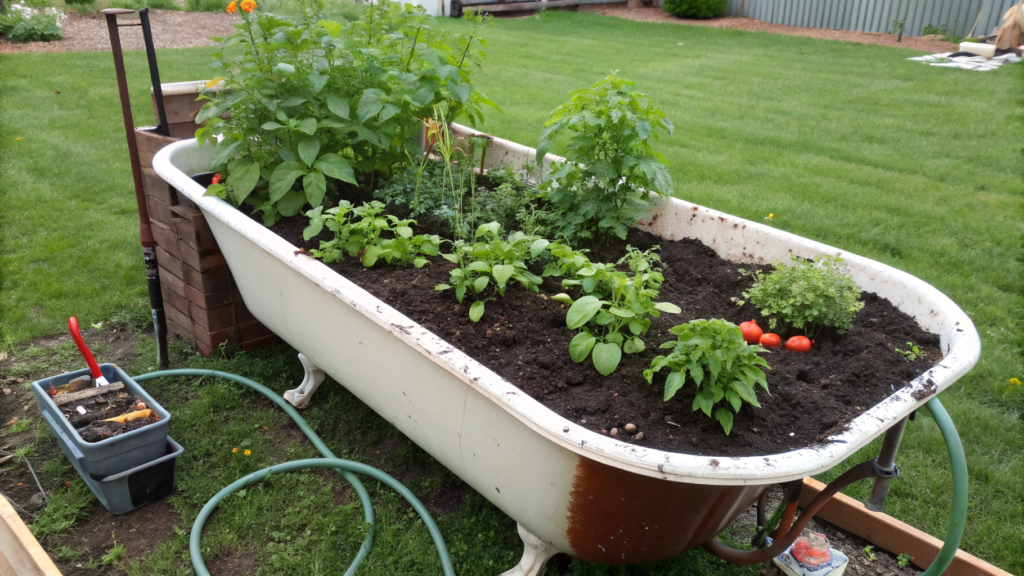
You know that moment when your neighbors tear down your old bathtub and write in the chat: “Whoever needs it, take it, it’s standing by the gate.”
And a week later, we had the most beautiful basil bed you could imagine.
Why does it work?
- Deep. Root vegetables, tomatoes, peppers — it all fits!
- Durable. It won’t fall apart, rot, or bend.
- Mobile. You can put it on concrete or even on the lawn.
- Unique. People will ask: “Seriously? This is a BATH?”
How to Turn a Bathtub into a Garden Bed
1. Clean the bathtu. Wash off dirt, rust, and silicone residue. It’s better to use an eco-friendly product or just baking soda and vinegar.
If the enamel is damaged, that’s okay. There will still be soil inside.
2. Make drainage holes. Important! Without drainage, the roots will start to rot.
If the bathtub is metal:
- Use a metal drill (ask your friends or a workshop)
- Make 3-5 holes on the bottom, about 1 cm each
If the bathtub is acrylic, it’s easier: you can even drill with a hand drill.
No way to drill? Fill the bottom with 15 cm of crushed stone + sand and make a slope towards the drain.
3. Choose a location. Place the tub:
- In a sunny spot (vegetables love the sun, especially tomatoes and peppers)
- Next to water or a hose – it will be easier to care for
- You can even put it on a terrace or balcony, if the weight allows
4. Fill the tub in layers (lasagna-style!). Here is our tried and tested recipe:
Drainage on the bottom: crushed stone, brick, large branches
Then – cardboard or newspapers
Then – a layer of compost, green waste
On top – garden soil + humus
A lot of soil is used – about 120-150 liters, but this is a one-time thing. Then you only renew it.
5. Plant a crop. Here’s what feels especially good in a “bath bed”:
- Tomatoes (indeterminate varieties – right in the center!)
- Carrots, beets, daikon – they like depth
- Peppers, eggplant – just don’t forget to water
- Cabbage, Swiss chard, lettuce
- Basil, mint, dill, parsley along the edges
You can even plant nasturtium or marigolds along the edge – they will scare away pests and hang beautifully.
Want to “pump up” the structure a little?
- Put the bath on bricks or wooden supports – it will be more convenient to work with, and drainage is better
- Treat the outside with garden paint – this will make it a decorative element
- Add arches and non-woven fabric – and you will get a mini-greenhouse
A garden is not only about efficiency. It is about joy. About creativity. About using what you have and turning it into something amazing.
Let’s try it?
There is no right or wrong in gardening. There is what works for you.
If you made a bed out of pallets, you are great, planted herbs in a bathtub, you are a genius, just laid a board, covered it with soil and grew basil, you are already a gardener.
Write, what idea do you want to try first?
I will be very glad to see your results – write in the comments!