
Desert landscaping front yard designs adapt to different climate conditions. Arizona, Nevada, Texas, Utah, Florida, New Mexico — each region has its own character. In some places extreme heat is the main factor, in others it’s winter moisture, and in others tropical downpours.
Lindy and I have worked with dry landscapes for years, and we keep noticing the same mistake: people copy the style but ignore the climate. As a result, the composition looks impressive for the first few months, and then problems show up — rot, overheating, and more.
In this article, we’ve gathered 10 desert front yard ideas. Each option can be adapted to your own yard if you keep the proportions right, prepare the base properly, and choose plants based on their final size.
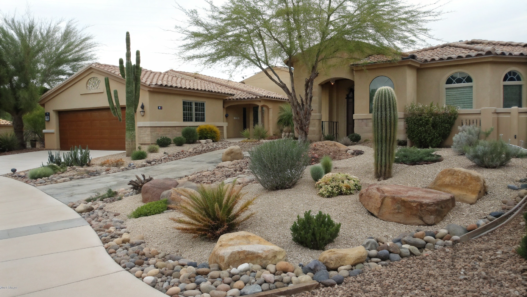
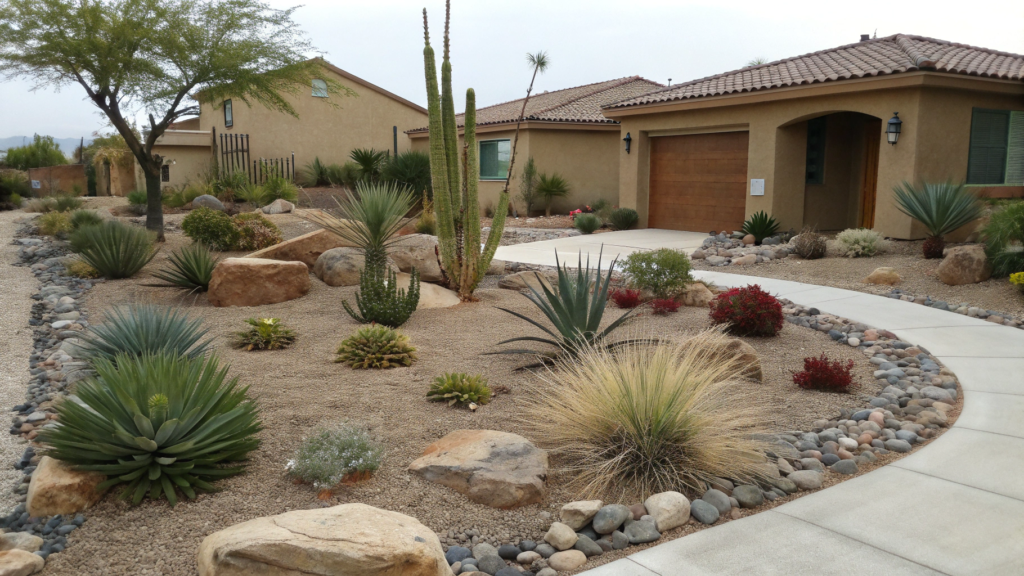
1. Arizona-Inspired Saguaro Front Yard
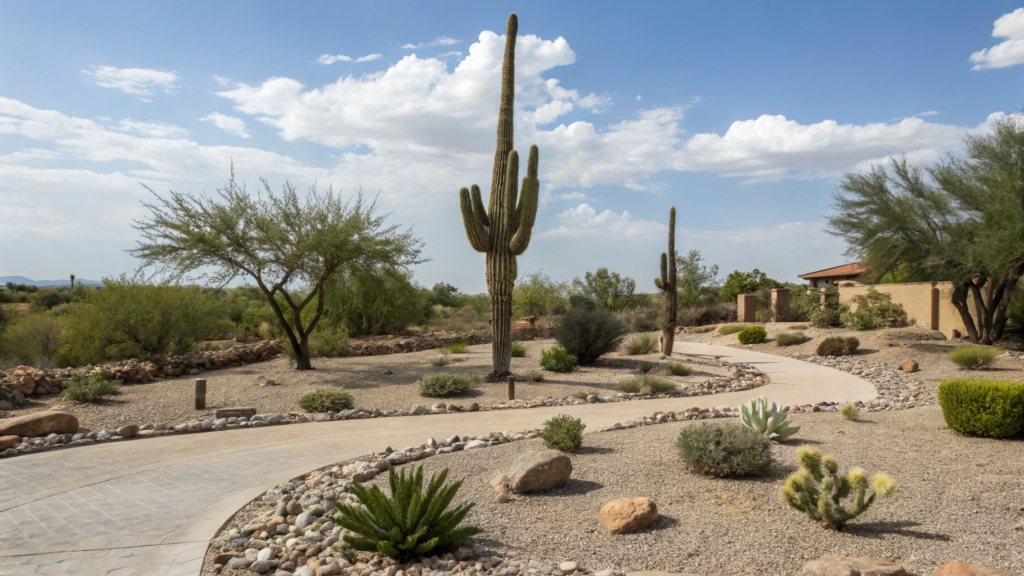
Arizona-Inspired Saguaro Front Yard gives you the chance to recreate the feeling of the real Sonoran Desert right at home. Let’s break down which plants to choose, how to distribute space properly, how much gravel you’ll need, and what dimensions to consider when designing your front yard.
When Lindy and I saw a real saguaro in Arizona many years ago, it didn’t look decorative at all. It looked ancient. Calm. Confident. That’s why you don’t start with the small details — you start with the composition.
What You’ll Need
To create an Arizona-style front yard, you’ll need:
Saguaro cactus (Carnegiea gigantea) — if you live in USDA zones 9–11.
Young specimens are usually 2–5 ft (60–150 cm) tall, and even a “small” plant can weigh 80–150 lb (36–68 kg). It’s important to remember: mature saguaros can grow up to 40 ft (12 m) and live more than 150 years.
If the climate is colder — use tall architectural accents:
- Mexican fence post cactus (Pachycereus marginatus)
- Desert spoon (Dasylirion wheeleri)
- Tall barrel cactus
Drainage base:
- Crushed stone, 3/4 inch (19 mm)
- Landscape gravel layer 3–4 inches (7–10 cm)
- Sand-and-gravel planting mix (minimum 50% mineral content)
Natural stones 12–24 inches (30–60 cm) for accent groupings
Drip irrigation system with a timer
Companion plants:
- Ocotillo (Fouquieria splendens)
- Agave americana
- Red yucca (Hesperaloe parviflora)
- Native desert grasses
How to Do It
1. Define the focal point.
Don’t place the saguaro in the center of the yard. In nature, they don’t grow in perfect lines.
It’s better to choose a spot 5–8 ft (1.5–2.5 m) away from the entry path or the corner of the house. Leave at least 6 ft (1.8 m) of open space around a mature plant — the root system is shallow but wide.
2. Prepare the soil properly
Saguaro cannot tolerate standing water.
- Remove the top layer of sod.
- Add a 4-inch (10 cm) layer of crushed stone.
- Mix native soil with coarse sand at a 1:1 ratio.
- Create a small mound 4–6 inches (10–15 cm) high.
Excess moisture is the main reason saguaros fail in decorative plantings. The roots need to breathe.
3. Add secondary layers
This is where the yard starts to feel alive. Around the saguaro, place:
- 2–3 agaves spaced 3–4 ft (90–120 cm) apart
- 1 ocotillo for vertical contrast
- 2–4 red yucca for softer form
- Patches of decorative gravel
It’s important to follow the rule of scale: plants should not compete with the central element. They should support it.
4. Work with textures
An Arizona yard is about texture, not flower beds. Use:
- Light gravel 1/2 inch (12 mm)
- Dark basalt stone 2–3 inches (5–7 cm)
- Sandy transitions
Alternating stone sizes creates depth. And you can see that even from the street.
5. Minimal watering — but done correctly
For the first 1–2 years, a saguaro needs moderate watering in summer — about once every 2–3 weeks during the hot season. Later, watering can be reduced to rare deep soakings.
Infrequent but deep watering is better than frequent shallow watering.
When we first started working with dry landscapes, we thought “desert” meant “empty.” It turned out to be the opposite. It’s a landscape where every line is visible. Where distances matter. Where space is just as important as plants.
And if everything is done right, your Arizona-Inspired Saguaro Front Yard will look almost like a real piece of the Sonoran Desert.
2. Las Vegas Desert Landscaping with Palm Features
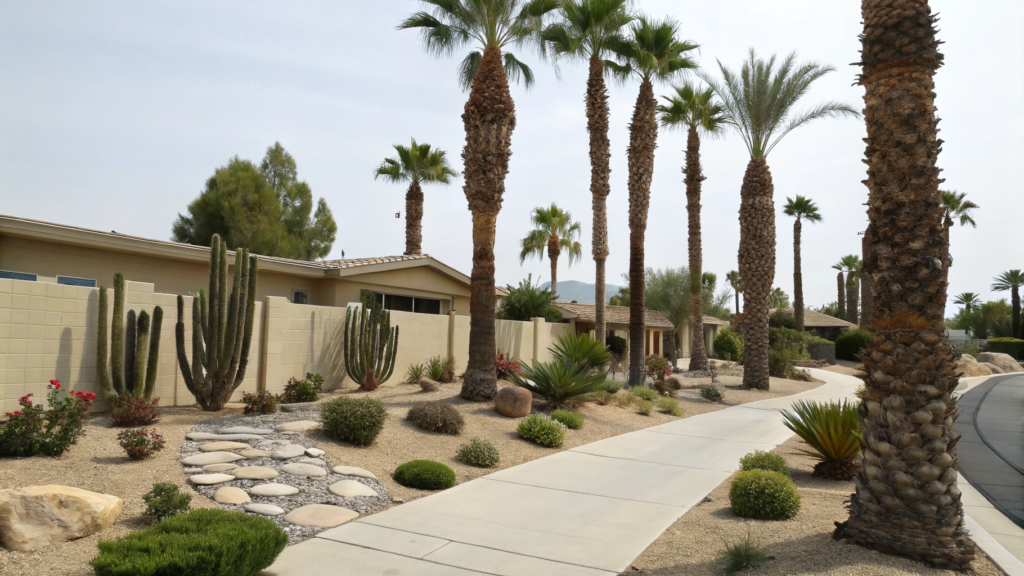
This is a completely different character of a desert front yard. If in Arizona the composition is held together by a monumental saguaro, in Las Vegas the focus shifts to palms, rhythm, and texture contrast. There’s more vertical presence, a bit more movement.
By the way, palms need to be used carefully in a desert landscape. And if everything is done right, the result is a clean, structured, and very “Vegas-style” front yard.
What You’ll Need
First of all — don’t forget the climate. Southern Nevada is in USDA zones 9a–9b, summers are extremely hot, and winter temperatures can drop to 20–25°F (−6 to −4°C).
For this type of project, suitable options include:
- Mexican Fan Palm (Washingtonia robusta)
Mature height — up to 70–100 ft (21–30 m).
Narrow trunk, compact crown. A strong choice for a vertical accent. - Mediterranean Fan Palm (Chamaerops humilis)
More compact — 6–15 ft (1.8–4.5 m).
Works well in smaller front yards. - Date Palm (Phoenix dactylifera) — if you want a more massive silhouette.
Basic materials:
- 3/4 inch (19 mm) crushed stone drainage layer
- Gravel 3–4 inches (7–10 cm)
- Large stones 18–30 inches (45–75 cm) for accent groupings
A drip irrigation system with a separate line for palms. For convenience, you can use a reliable timer like RAINPOINT Sprinkler Timer Outdoor Water Timer for Garden Hose — it handles heat well and allows you to set rare but deep watering.
Second layer plants:
- Agave americana
- Red yucca
- Desert marigold
- Low ornamental grasses (for example, muhly grass)
How to Do It
1. Vertical structure is the foundation
In Las Vegas, front yards are often viewed against an open sky. That’s why the palm works almost like an architectural element — almost like a column.
It’s better to plant 1–3 palms in a group rather than placing one in the center. The spacing between them should be at least 6–8 ft (1.8–2.5 m) for medium varieties.
When we analyzed several projects in Henderson, one thing was clear: a single palm often gets visually lost. A small group, however, creates a strong silhouette.
2. Contrast with stone
A palm moves upward. It needs to be visually grounded.For that, use:
- Dark basalt accents
- Light gravel 1/2 inch (12 mm)
- Large boulders weighing 150–400 lb (68–180 kg)
That weight may sound excessive, but stones of that size create a sense of stability. Lightweight decorative rocks don’t achieve the same effect.
3. Skip the lawn
This is important. According to Southern Nevada Water Authority, replacing traditional lawns with xeriscape significantly reduces water consumption, which is why the region actively encourages moving away from turf.
If you want a soft green area, use decorative gravel patterns or accent plantings of grasses instead of traditional lawn.
4. Palms require intentional watering
Unlike cacti, palms prefer deeper watering. During the first 1–2 years, they typically need watering every 7–10 days in summer, with moisture reaching a depth of 24–36 inches (60–90 cm). After they establish, the schedule can be reduced.
Deep, infrequent watering helps develop a stronger root system that can handle extreme heat.
5. Minimal color — focus on form
In Las Vegas landscapes, bright flowers are less important than clear shapes.
- Vertical palm trunks create height.
- Agave rosettes form dense graphic centers.
- Yucca leaves add direction.
- Low grasses soften the composition and introduce movement in the wind.
Flowers can be present, but they shouldn’t dominate. The main role belongs to structure — the shapes and how they relate to each other.
From Our Experience
We once saw a front yard in a Las Vegas suburb where the owners planted six different palm varieties, added bright annual flowers, and installed artificial turf. Everything was expensive. Everything was neat. And yet the yard felt overloaded.
After simplifying — three palms, gravel, agaves, and a few large stones — the composition became much clearer and more open.
Las Vegas desert landscaping with palm features looks best when nothing is excessive. Palms provide height, gravel creates a clean base, and agaves and yuccas define the form. That’s enough.
If plants have enough space, water doesn’t collect around the roots, and elements don’t compete with each other, the yard stays clean and structured for years. In this style, it’s not about complexity — it’s about thoughtful planning.
3. Texas Desert Front Yard with Native Grass
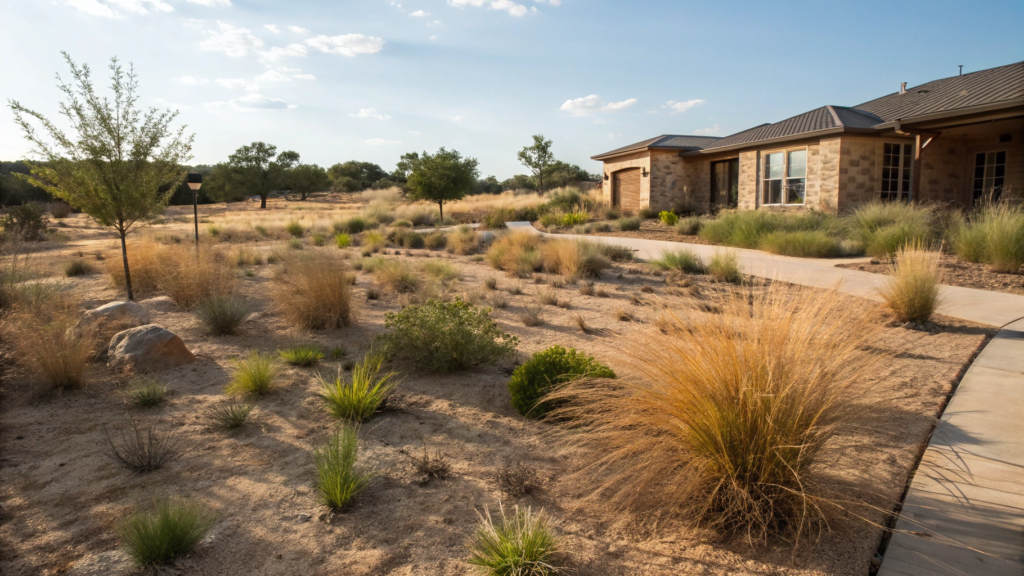
This is a dry, hot, but still living landscape. It’s not just cacti against gravel. It’s also movement of grasses, seasonal color shifts, and resilience without constant maintenance.
Texas sun is intense. Soil can be dense, sometimes calcareous, sometimes sandy. And if you plant decorative European grasses, by mid-summer they often struggle. Native species, on the other hand, look calm and stable even in August.
What You’ll Need
The foundation is native grasses adapted to heat and periodic drought.
Good options include:
- Gulf Muhly (Muhlenbergia capillaris) — 2–3 ft (60–90 cm), soft pink clouds in fall
- Little Bluestem (Schizachyrium scoparium) — 2–4 ft (60–120 cm), shifts from blue to copper tones
- Switchgrass (Panicum virgatum) — 3–6 ft (90–180 cm), works well as a vertical background
- Buffalograss (Bouteloua dactyloides) — low-growing and durable, can replace a lawn
Materials:
- 3/4 inch (19 mm) crushed stone
- Gravel layer 2–3 inches (5–7 cm)
- 2–4 large boulders weighing 100–300 lb (45–135 kg)
- Drip irrigation system
How to Do It
1. Think about how the yard looks from the street
Don’t start with planting. Step out to the road and look at the yard from a distance.
Where will the densest volume be? Where will open space remain? Grasses work better in clusters, not in an even carpet.
For example:
- Along one side of the path — a group of 5 Gulf Muhly
- In the back — 3–4 Switchgrass
- Near the entrance — low Buffalograss
This creates a sense of order. The yard doesn’t feel random.
2. Prepare the soil without overfeeding it
Native grasses don’t need rich soil. Remove the sod. Loosen the top 6–8 inches (15–20 cm).
If the soil is compacted, add sand.
Important! Don’t turn the soil into a “garden mix.” In overly fertile soil, grasses produce too much green mass and can flop over.
If the yard has a slope, create gentle waves in the terrain about 4–6 inches (10–15 cm) high. This adds depth and improves drainage.
3. Plant closer than feels comfortable
Many people worry that plants will outgrow their space. But if you leave too much distance, the yard will look sparse.
For most varieties:
- 18–24 inches (45–60 cm) spacing for Muhly
- 24–30 inches (60–75 cm) for Bluestem and Switchgrass
Within 1–2 seasons, plants will fill in and the composition will feel complete.
4. Use stones as structural anchors
Grasses move. Stones stabilize.
Choose 2–3 large boulders instead of many small ones. A weight of 150–250 lb (68–113 kg) works well for visual balance.
You can sink part of the stone 2–3 inches (5–7 cm) into the soil so it looks settled, not just placed on top.
5. Watering is temporary
During the first season, grasses need regular watering:
- In summer — every 5–7 days
- Moisture depth — about 12 inches (30 cm)
After establishment, many varieties need minimal supplemental watering.
Overwatering should be avoided. Constant moisture makes the root system weak.
6. Don’t rush to cut everything in fall
When grasses dry out, the first impulse is to “clean up.” Trim everything. Make it neat.
But in a Texas desert yard, dry stems are not a mess. They are structure.
Leave them through winter. They:
- protect the root system
- add texture in the colder months
- work beautifully in low winter light
Cut them back in early spring when you see the first signs of new growth. Trim to 6–8 inches (15–20 cm), and they’ll recover quickly.
From Practice
We’ve seen Texas yards where grasses were trimmed into rigid shapes. In the end, they lost their character and started to look like a regular lawn.
A Texas desert front yard with native grass works best when grasses are allowed to behave like grasses. They move in the wind, shift colors during the season, and create living texture.
It’s not about the number of plants. The key is not to over-control them. When you give them space, the yard feels natural and resilient.
4. Utah Red Rock and Hardy Succulent Mix
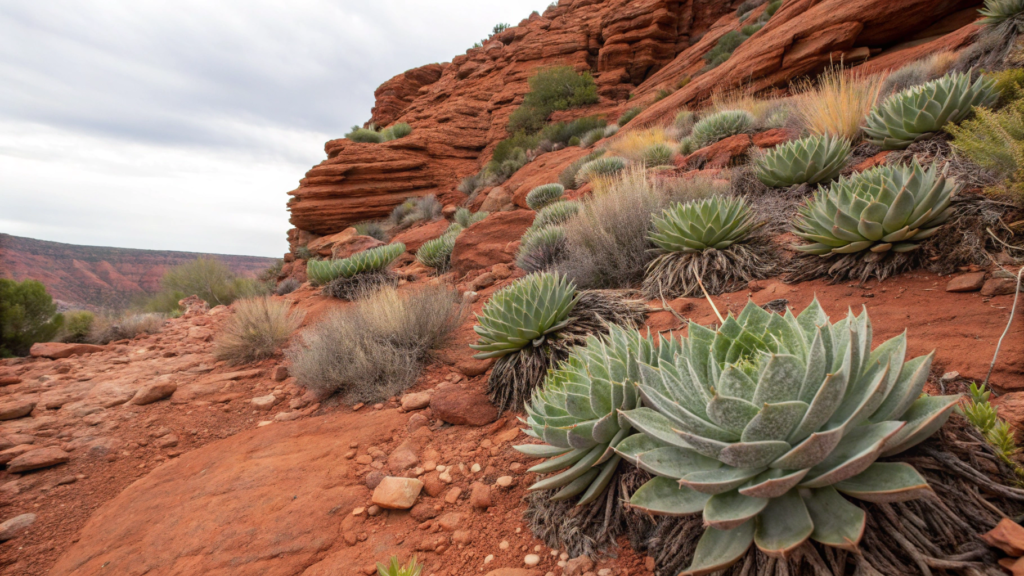
Red stone, strong lines, dense succulent rosettes that handle both heat and frost — that’s what a Utah Red Rock and hardy succulent mix is built on.
When Lindy and I started working on a similar layout for friends in a region with a comparable climate, one thing became clear very quickly: if the soil is not prepared properly, winter will expose every mistake. By spring, half of the planting can simply be gone.
What You’ll Need
Plants must be truly cold-hardy. Good options include:
- Sempervivum (Hens and Chicks) — hardy down to −30°F (−34°C)
- Hardy Sedum
- Cold-hardy Opuntia (always check the specific variety)
- Yucca filamentosa for vertical structure
The base should include:
- 3/4 inch (19 mm) drainage stone
- Red gravel layer 3–4 inches (7–10 cm)
- Large stones 12–30 inches (30–75 cm)
How to Do It
1. Start with the stone
Years ago, I made a mistake while working with red stone. I planted first and started “adjusting” the rocks later. In the end, I had to replant everything.
It’s much better to build the stone composition first.
Lay out the boulders on the surface. Walk around and look at them from different angles. Stones should form natural groupings, not a straight line. Bury each one 2–4 inches (5–10 cm) into the ground. That makes them stable and visually grounded.
If you’re unsure, reduce the number of stones. Three large ones are usually stronger than ten medium ones.
2. Soil must be dry by nature
In Utah, succulents are more likely to die from winter moisture than from cold.
We remove the top 4–6 inches (10–15 cm), add crushed stone if the soil is compacted, and mix the soil with sand and fine gravel. The soil should crumble in your hand, not stick.
Lindy always says: if the soil looks “too good,” it’s too rich for succulents.
3. Plant in groups but leave air
Sempervivum works best in clusters of 5–9 rosettes. Sedum can form low carpet-like islands. Yucca should act as a single accent.
Leave space between groups. The red stone must remain visible. If everything is covered with plants, the style disappears.
Before final planting, place the pots directly on the gravel and step back 10–15 ft (3–4.5 m). From that distance, balance issues become obvious.
4. Think about where snow will settle
If you ignore this, the yard will look different in spring than it did in fall.
Snow collects in specific areas — near walkways, along walls, in low spots. Plant the toughest varieties (Sempervivum, Sedum) there. More sensitive plants should go on slightly raised areas.
Even a small slope helps prevent rot.
5. Gravel is not just a finishing touch
A red gravel layer 3–4 inches (7–10 cm) thick creates cohesion. A thin layer looks weak.
Leave a 1–2 inch (2.5–5 cm) gap around the base of each plant so the crown is not sitting in damp material.
And one more thing — don’t mix too many shades of red. Two at most. Otherwise, the yard starts to look decorative instead of structured.
6. Watering
During the first month after planting — light watering every 7–10 days. After establishment, watering should be minimal.
We constantly remind ourselves: succulents prefer dryness. It’s better to underwater than overwater.
Tip. Before ordering the full amount of red gravel, buy a few bags and spread them in the yard for 1–2 days.
Utah light is harsh, and the stone color can look different outdoors than it does in the store. It’s much easier to test the tone in advance than to replace the entire surface later.
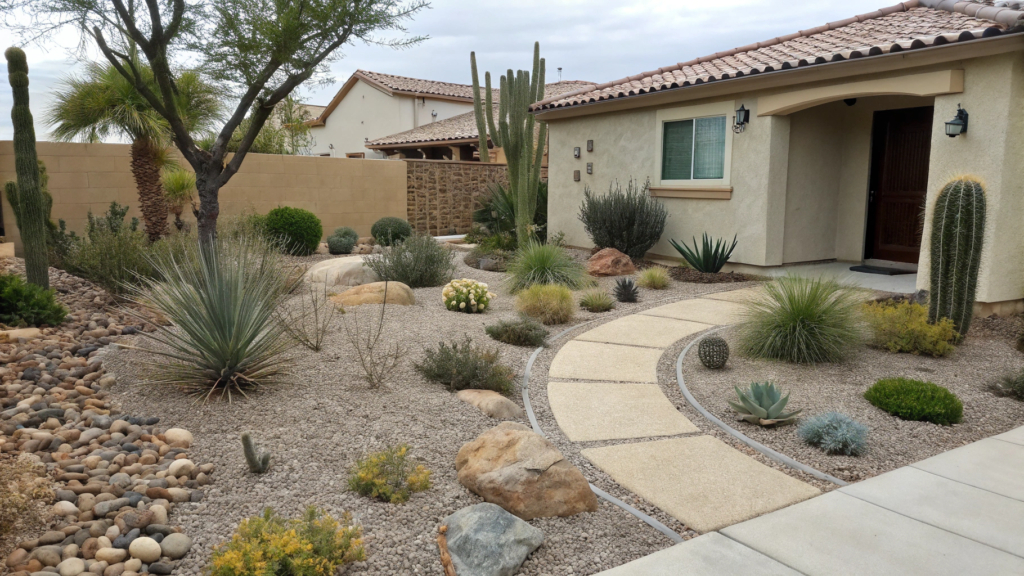
5. Simple Gravel and Agave Combo
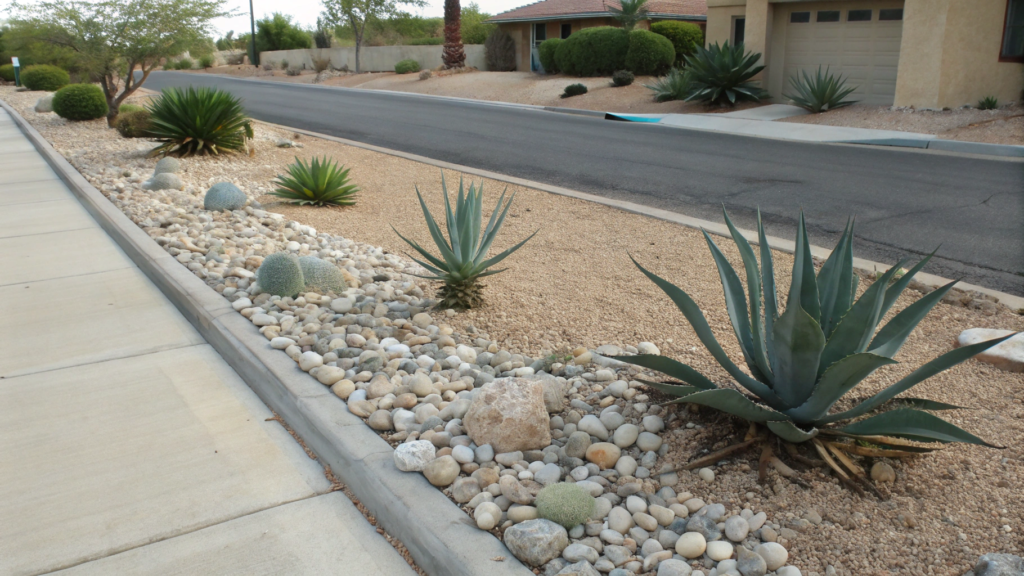
Simple gravel and agave combo works especially well in hot states with minimal rainfall, where lawns quickly turn into a constant problem. This is one of the most reliable options for a front yard in a dry climate. No complex layouts. No dozens of plants. Just stone and a few strong forms.
What You’ll Need
The main element is Agave. Choose the variety based on the size of your yard:
- Agave americana — up to 4–6 ft in diameter (120–180 cm), a bold focal point
- Agave parryi — more compact, about 2–3 ft (60–90 cm)
- Agave victoriae-reginae — a neat rosette, suitable for smaller spaces
Base materials:
- 3/4 inch (19 mm) crushed stone drainage layer
- Gravel layer 3–4 inches (7–10 cm)
- 1–3 large stones 12–24 inches (30–60 cm)
For irrigation control, a simple timer like Orbit 62061Z Single-Outlet Hose Watering Timer works well. It’s mechanical and easy to manage without complicated settings.
How to Do It
1. Define the main focal point
An agave is a sculpture. It shouldn’t disappear in the yard.
If the space is small (for example, 20×25 ft / 6×7.5 m), 1–3 plants are enough. Leave at least 4–6 ft (120–180 cm) between large agaves so mature rosettes don’t overlap.
Before planting, place the container in the chosen spot and step back 10–15 ft (3–4.5 m). If the agave doesn’t stand out immediately, the location needs adjustment.
2. Prepare a dry, breathable base
Agave does not tolerate heavy, wet soil. Remove sod to a depth of 4–6 inches (10–15 cm). If the soil is clay, mix in crushed stone and sand. The soil should feel loose and crumbly.
Create a slight mound 2–4 inches (5–10 cm) high under the plant. It improves drainage and visually highlights the form.
3. Stone should support, not compete
A 3–4 inch (7–10 cm) gravel layer creates a clean background and reduces evaporation.
Avoid very fine gravel — dusty stone looks messy. Choose 1/2–3/4 inch (12–19 mm) material instead.
Place large boulders so they support the agave visually rather than compete with it in scale.
4. Minimal but precise watering
During the first month after planting — moderate watering every 7–10 days. After establishment, agaves require very infrequent irrigation.
The main rule here is simple: it’s better to underwater than overwater. Standing moisture is the primary cause of rot.
Tip. If you’re unsure about the number of plants, remove one. An extra element is always more noticeable than a missing one.
What to Keep in Mind
If the agave is crowded, if the soil is heavy, or if gravel is spread in a thin decorative layer, the composition quickly loses its structure.
Before finishing the project, check three things:
- The agave has enough space for its mature diameter
- Water does not collect after irrigation
- Gravel is at least 3 inches (7–8 cm) deep
If these conditions are met, the yard will remain clean and stable for many seasons.
6. Florida Desert-Style Landscaping with Tropical Succulents
Florida means humidity, heavy rain, and hurricanes. That’s why a desert-style front yard in Florida has to be adapted. This is not dry Nevada. Here, moisture control is the key.
Friends of ours in South Florida once tried to recreate an “Arizona-style” gravel yard. Within one season, half of the plants rotted. The reason was simple — the climate is different. Once you plan for that from the beginning, the result becomes much more stable.
What You’ll Need
In Florida, tropical succulents and drought-tolerant forms that can handle humidity work better than classic desert cacti.
Good options include:
- Agave attenuata — soft leaves, no sharp spines
- Aloe vera and larger Aloe varieties
- Euphorbia tirucalli (Pencil Cactus)
- Beaucarnea recurvata (Ponytail Palm) — a strong vertical accent
- Dwarf palms for balance
Base materials:
- 3/4 inch (19 mm) crushed stone drainage layer
- Gravel 3–4 inches (7–10 cm)
- 2–4 large stones 18–30 inches (45–75 cm)
- Drip irrigation line with the option to shut off during rainy season
How to Do It
1. Start with drainage, not planting
In Florida, water is the main factor.
Remove sod to a depth of 6 inches (15 cm). If the yard sits low, build raised zones 4–6 inches (10–15 cm) high. This is especially important for agaves and aloes — their base should never sit in wet soil.
If the soil is sandy, that’s an advantage. If it’s clay-heavy, mix in crushed stone and coarse sand to help water drain faster.
2. Plan for faster growth
Tropical succulents grow faster in Florida than in dry climates.
Agave attenuata can reach 3–4 ft (90–120 cm) in diameter. Leave at least 3 ft (90 cm) between plants.
Plant Aloe in groups of 3–5 specimens — this makes the composition feel more cohesive.
We always place plants in their containers first and observe them for a couple of days. In a humid climate, growth can exceed expectations.
3. Use stone as a structural base
Gravel visually creates dryness, even when the air is humid.
Apply a 3–4 inch (7–10 cm) layer. A thin layer quickly fills with weeds and looks unfinished.
Choose light or neutral-colored large stones. Very dark rocks in Florida sun can overheat and increase evaporation.
4. Plan for heavy rain
Florida can receive 2–4 inches (5–10 cm) of rain in a single day. That changes everything.
Avoid low areas where water collects. If there’s a slope, guide runoff toward a drainage zone.
Plant succulents on slight elevations whenever possible.
5. Water according to weather, not schedule
During the dry season, watering every 7–10 days may be sufficient. During the rainy season, irrigation should be turned off completely.
A common mistake is leaving automatic watering active during regular rainfall.
Tip. Before planting, test how quickly water drains. Pour 1–2 gallons (4–8 liters) of water into the selected area and observe whether it absorbs within 30–60 minutes. If water remains longer, the area should be raised or drainage improved.
7. New Mexico Courtyard with Adobe Elements
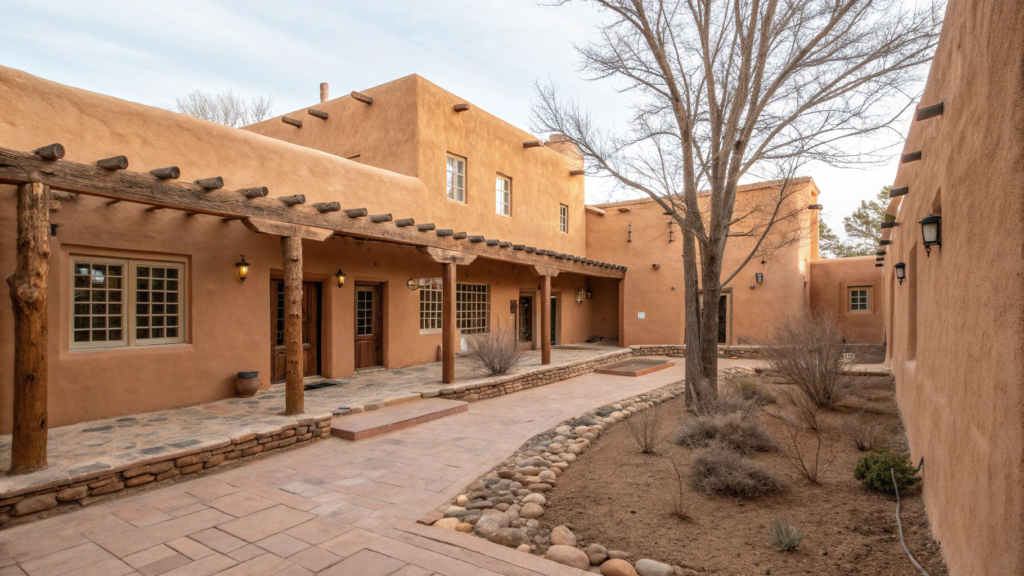
New Mexico courtyard with adobe elements means thick walls, warm clay tones, and an inner yard protected from wind and harsh sun. And at the same time — minimal water, maximum structure.
New Mexico has a dry climate, but temperature swings are noticeable. Hot during the day, cool at night. That’s exactly why traditional adobe architecture works so well: it absorbs heat and helps create a stable microclimate.
What You’ll Need
The foundation of this courtyard is architectural structure. Plants play a secondary role.
- A wall or enclosure with adobe-style finish (natural clay, textured plaster)
- Terracotta or sand-colored tile for paving
- Gravel 3–4 inches (7–10 cm) in planting areas
- 1–3 large ceramic or clay pots
Plants suitable for New Mexico climate:
- Desert Willow (Chilopsis linearis) — if the courtyard is large enough
- Yucca
- Agave parryi
- Cold-hardy Opuntia
- Lavender or drought-tolerant grasses for softness
How to Do It
1. Start with geometry
A courtyard in New Mexico style works because of its form.
Define clear boundaries: a wall, an arch, a low enclosure. Even in a front yard, you can create a sense of enclosure with an L-shaped wall 4–6 ft (120–180 cm) high.
The space should feel intimate. If everything is open, the adobe effect is lost.
2. Keep the surface warm in tone
The surface is a key element.
If you use tile or concrete, choose sand, clay, or terracotta tones. Gray or cool-colored stone weakens the atmosphere.
Gravel should be warm beige or slightly reddish. The layer should be at least 3 inches (7–8 cm). Anything thinner looks temporary.
3. Plants are accents, not filler
This type of courtyard should not feel like a garden center display.
Usually enough:
- 1 strong focal plant (yucca or agave)
- 2–3 softer plantings
- One small tree, if the space allows
Leave open areas between plantings. Empty space supports the composition.
We often check balance in a simple way: if removing one plant makes the courtyard look better, it didn’t need to be there.
4. Shade matters
Sun in New Mexico is intense. Plan where shade will appear.
This can be:
- A wooden pergola
- A beam-covered patio
- A wall niche
Shade not only protects plants, it adds depth to the space. Without it, the courtyard can feel too uniform.
5. Water moderately and precisely
Most plants for this style do not require frequent irrigation. During the first season — every 7–10 days in summer. After establishment — much less.
Enclosed courtyards can hold moisture longer, so check the soil before watering. Overwatering is immediately visible in an adobe-style composition — plants lose their shape.
Tip. Before permanently placing pots or large accents, set them in position while empty and leave them there for 2–3 days. Light shifts during the day in a courtyard: morning shade is different from evening shade. An element that looks balanced at noon may feel overwhelming later.
It’s much easier to move empty pots than to relocate heavy ceramic containers filled with soil and plants.
8. Front Yard Desert Landscaping with Decorative Turf
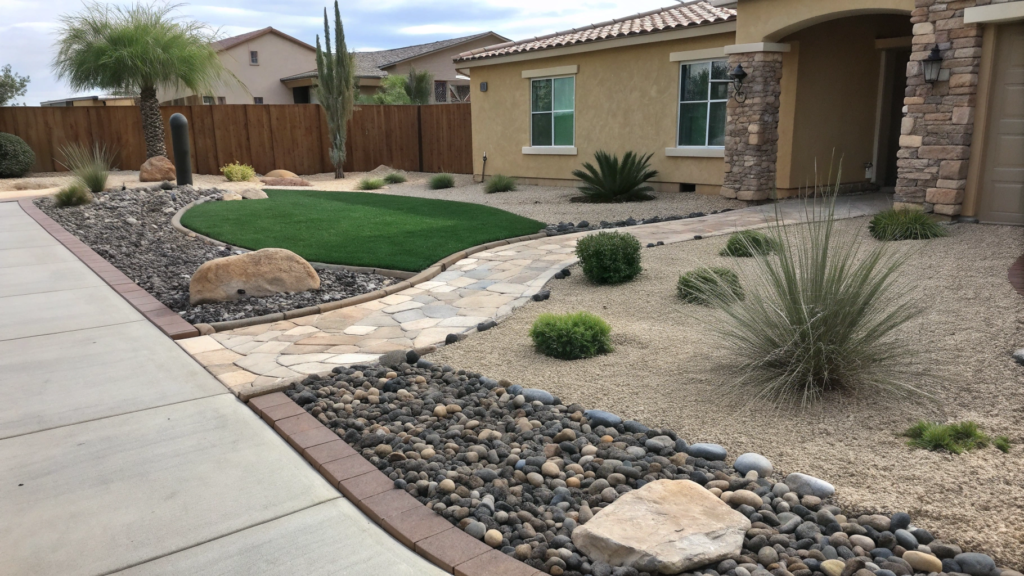
In my practice, I’ve seen many projects where artificial turf covered the entire front yard. In theory, it looked neat. Reality — it felt too uniform and unnatural. But when decorative turf is used as part of a composition between gravel and stone, the result becomes much more interesting.
What You’ll Need
For this approach, you’ll need:
- High-quality artificial turf with a pile height of 1.5–2 inches (38–50 mm)
- Compacted crushed stone base 3–4 inches (7–10 cm)
- Sand leveling layer 1 inch (2.5 cm)
- Gravel 3–4 inches (7–10 cm) for adjacent areas
- 1–3 large stones 18–30 inches (45–75 cm)
It’s important to choose turf with good drainage. A product like Petgrow Artificial Grass 1.5 Inch Synthetic Turf Lawn works well — it has a dense structure and built-in drainage holes.
How to Do It
1. Define the shape of the green zone
Avoid placing a rectangle in the center. Turf works better as a geometric element — a strip along the pathway, an oval, or an L-shaped zone near the entrance.
Keep the size moderate. For example, a 10×12 ft (3×3.5 m) area already creates a green presence without turning the yard into a sports field.
The shape should support the overall composition of stone and plants, not compete with it.
2. The base determines everything
Artificial turf without proper preparation will shift and settle unevenly.
Remove sod to a depth of 4–6 inches (10–15 cm). Install crushed stone and compact it thoroughly. Add a sand layer for leveling.
The base must feel solid. If you walk over it and footprints remain, compaction is not sufficient.
We once saw a yard where this step was skipped. Within a year, the surface developed waves and uneven spots. The entire area had to be rebuilt.
3. Keep the edge between turf and gravel clean
The transition between turf and gravel is an important detail.
Use a hidden plastic or metal edging 2–3 inches (5–7 cm) high. It holds the border in place and prevents materials from mixing.
Without proper edging, the border slowly shifts, especially in hot climates.
4. Add vertical structure
If you leave only turf and gravel, the yard can feel flat.
Add 1–3 accent plants: Agave, Yucca, or a small palm, depending on your region.
Keep at least 2–3 ft (60–90 cm) between the turf and larger plants to maintain clean lines.
5. Consider heat buildup
In hot states, decorative turf can reach 140°F (60°C) or higher under direct sun.
If the area is fully exposed, plan for partial shade — a pergola, a tree, or a wall that provides natural cover during peak heat hours.
Tip. Choose turf with a natural green tone. Bright, artificial shades immediately reveal synthetic material. Before purchasing, request a sample and place it in the yard for a couple of days. In sunlight, color perception changes compared to how it looks in a store.
Before You Call the Project Finished
Front yard desert landscaping with decorative turf looks clean only when three conditions are met: a solid base, clear geometry, and moderate coverage. If the green area is too large or edges are sloppy, the minimalist desert effect disappears.
Keep turf as an accent, not the background — and the composition will remain structured and stable.
9. Minimalist Desert Paths with Natural Stones
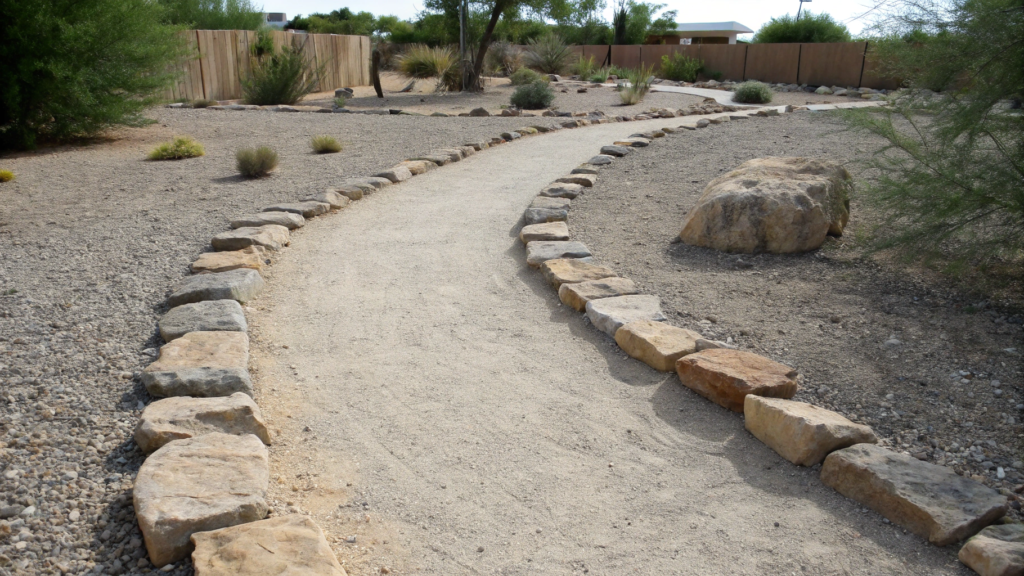
Minimalist desert paths with natural stones — stone, spacing, rhythm. No extra curves just for decoration.
Even a clean gravel yard feels unfinished without a clear pathway. Add a stone path — and the space becomes understandable. There’s direction. There’s order.
What You’ll Need
For this type of path, you’ll need:
- Natural flat flagstone slabs, 1.5–2 inches thick (4–5 cm)
- Crushed stone base 3–4 inches (7–10 cm)
- Sand leveling layer 1 inch (2.5 cm)
- Gravel 2–3 inches (5–7 cm) around the stones
- Rubber mallet and level
If the yard is small, 6–12 medium slabs (18–24 inches / 45–60 cm wide) are enough. Larger pieces feel more stable than many small stepping stones.
How to Do It
1. The walking line must make sense
Before digging, walk the space. From the gate to the door. From parking to the porch.
The path should follow the shortest, most natural route. If people still cut across the gravel, the line is wrong.
A comfortable path width is at least 24–30 inches (60–75 cm). Narrower feels tight. Wider is possible, but minimalism starts to fade.
2. The base is not decorative
Remove soil to a depth of 4–6 inches (10–15 cm). Add crushed stone and compact it. On top, spread sand for leveling.
If this step is skipped, slabs will shift after rain or temperature changes. We’ve seen paths like that after one year — uneven and needing complete rework.
The base must feel solid. Walk on it — if you leave footprints, it’s not compacted enough.
3. Place stones with restraint, not symmetry
Lay out the slabs on the surface before fixing them.
Spacing between slabs should be 2–4 inches (5–10 cm) if you plan to fill with gravel. For a cleaner look, leave 1–2 inches (2.5–5 cm).
Don’t align them perfectly straight. Slight variation looks more natural. But avoid randomness — minimalism does not allow chaos.
4. Fill and stabilize
After setting the slabs, fill gaps with fine gravel or crushed stone.
Keep a 2–3 inch (5–7 cm) layer around the slabs. This adds stability and reduces shifting.
Check every slab with a level. Even a slight tilt is noticeable when walking.
5. Keep the whole yard in scale
If the path is too narrow compared to a wide gravel area, it gets lost. If it’s too wide, it becomes dominant.
In a small front yard (for example, 15×25 ft / 4.5×7.5 m), it’s better to use 6–8 large slabs instead of dozens of small stepping stones.
Minimalism is not about using fewer materials. It’s about precision.
Tip. Before final fixing, walk the path in regular shoes. Take 10–15 steps. If you feel instability or an awkward step anywhere, correct it immediately. A minimalist path should not only look clean — it should feel natural underfoot.
10. Desert Landscaping Front Yard for Compact Spaces
A small space immediately exposes mistakes: oversized plants, overloaded compositions, chaotic gravel. In a compact yard, there’s no room for unnecessary elements.
Lindy and I have worked many times with lots sized 12×20 ft (3.5×6 m), 15×25 ft (4.5×7.5 m). And every time we see the same thing — the smaller the space, the more important proportions become.
What You’ll Need
For a compact desert front yard, choose:
- 1–2 medium structural plants (for example, Agave parryi or a compact Yucca)
- 3–5 low accent plants (Sedum, smaller Aloe, ornamental grasses)
- Gravel layer 3–4 inches (7–10 cm)
- 1–2 flat stones 12–18 inches (30–45 cm)
- If needed — a narrow stone path
In a small yard, large 300 lb (135 kg) boulders already feel too heavy. Medium-sized stones are usually more balanced.
How to Do It
1. Define the visual center first
In a small yard, the eye should immediately know where to look. Without a focal point, the space feels random.
Choose one dominant form. It can be:
- An agave up to 3 ft (90 cm) in diameter
- A compact yucca
- A small palm (if the climate allows)
Place it slightly off-center — about one-third across the width of the yard. That small shift creates movement and makes the space feel deeper.
2. Work with levels, even if the space is tight
Even a 3–4 inch (7–10 cm) height change alters perception.
You can slightly raise the planting area of the central plant or create a subtle gravel wave. This adds depth without complex construction.
A completely flat surface in a small yard often feels too plain.
3. Reduce the number of plant varieties
A common mistake is wanting to plant everything.
In a compact yard, it’s better to use 2–3 plant types and repeat them. Repetition creates order. Variety without structure creates visual noise.
For example: one agave, three identical grasses, a few low succulents. That’s enough.
4. Gravel is not just background
The gravel layer should be at least 3 inches (7–8 cm). A thin layer quickly mixes with soil and looks messy.
Choose one size — 1/2–3/4 inch (12–19 mm). Mixing multiple sizes in a small yard overloads the composition.
Color also matters. Light gravel visually expands space. Dark gravel makes it feel more enclosed.
5. Think about movement
Even in a very small yard, consider how someone walks through it.
Sometimes 4–6 stepping stones, 16–20 inches wide (40–50 cm), are enough to create a sense of route.
The path shouldn’t dominate the yard. It should guide.
6. Plan for the plant’s final size
In a small space, a plant that grows just 1 ft (30 cm) larger can change the entire balance.
Before planting, check the mature diameter. If in 3–4 years the plant will take over half the yard, choose a more compact variety.
We once saw a 14×18 ft (4×5.5 m) front yard where a large Agave americana was planted. Within a few years, it occupied almost the entire center, and the space felt cramped.
Tip.Take a photo of the yard from street level before planting. Then mentally overlay — or sketch — the mature size of the plants onto that image. This helps you understand scale before you start digging.
In a desert landscaping front yard for compact spaces, every element must justify its presence. One strong focal point. Repeated forms. Clear edges. A proper gravel layer. If removing one element makes the composition better, it probably didn’t belong there.
Climate Sets the Rules
We’ve looked at 10 desert landscaping options for front yards — from Arizona to Florida. Each region comes with its own conditions: in some places drainage is critical, in others plant size matters more, and elsewhere winter moisture or tropical rainfall define the strategy.
But across all climates, one principle remains consistent — thoughtful structure and carefully chosen materials.
Which state are you in? What climate shapes your yard decisions? Have you already tried a desert-style front yard, or are you just planning it?Share in the comments which option feels closest to you and why. And if you’ve already completed a project, tell us what worked best — and what you had to adjust after the first season.