
Labor Day Dessert… nobody really demands anything fancy, but everyone secretly hopes to see something sweet, crunchy, fruity, creamy, cold, or just unexpected on the table. But if you, like me, don’t want to turn on the oven in 90-degree heat, let’s agree: desserts should be simple.
But simple doesn’t mean boring. In this roundup, I’ve collected 10 recipes that look amazing but actually come together in just 10–15 minutes. No fuss, no complicated techniques, no perfectionism. And yet—with love, personality, and that special homemade touch that makes people say: “You made this yourself?! Seriously?!”
1. Oreo Icebox Cake (4 Ingredients)

Oreo Icebox Cake is basically a cake without baking. It looks impressive, like you spent half a day with a mixer, but in reality all you need are 4 simple ingredients and 10 minutes of your time. And a little patience to let it chill in the fridge. Although… if you grab a spoon and eat it straight from the pan, no judgment here.
What you’ll need:
- 1 package of Oreo cookies (14.3 oz / about 400 g) — you can use the original or any variety, but the classic always works best
- 3 cups whipped cream (or Cool Whip substitute — 710 ml)
- 1 teaspoon vanilla extract
- ½ cup milk (120 ml) — for dipping cookies
If you want to try making homemade whipped cream, grab a Manual Whipped Cream Dispenser — it doesn’t take much space and gives you truly airy texture.
How to assemble this no-bake wonder:
- Prep everything first. Whip the cream with vanilla until fluffy if you’re using real cream. Cool Whip is already ready. Pour milk into a bowl.
If you want to make whipped cream yourself: take 1 cup of cold heavy cream and whip with a mixer on medium speed for about 3–4 minutes, until soft peaks form. Add 1–2 tablespoons of sugar (to taste) and a teaspoon of vanilla. Done, your homemade whipped cream is ready!
- Layer like a builder. Quickly dip each Oreo in milk (literally 1–2 seconds—don’t let them fall apart!) and line them up in a dish. Spread a layer of cream on top.
- Repeat the fun. Do 3–4 layers like this: cookies → cream → cookies → cream. Crush a couple Oreos and sprinkle them on top as decoration.
- Chill for at least 4 hours. Overnight is even better. The cookies will soak up the cream and transform into soft “cake-like” layers, almost like classic tiramisu.
Why this works for any party:
- First, it looks like a full-on cake. But you know exactly how little time it took.
- Second, you can make it the day before and just pull it out of the fridge when guests arrive.
- Third, everybody loves it: kids, adults, even those who “don’t eat desserts that are too sweet.” Because Oreos with cream are that perfect balance.
Tip. If you want a slightly more “grown-up” version, slip in a drizzle of melted chocolate between the layers or add a splash of coffee liqueur to the milk.
2. Fruit Salsa with Cinnamon Sugar Chips
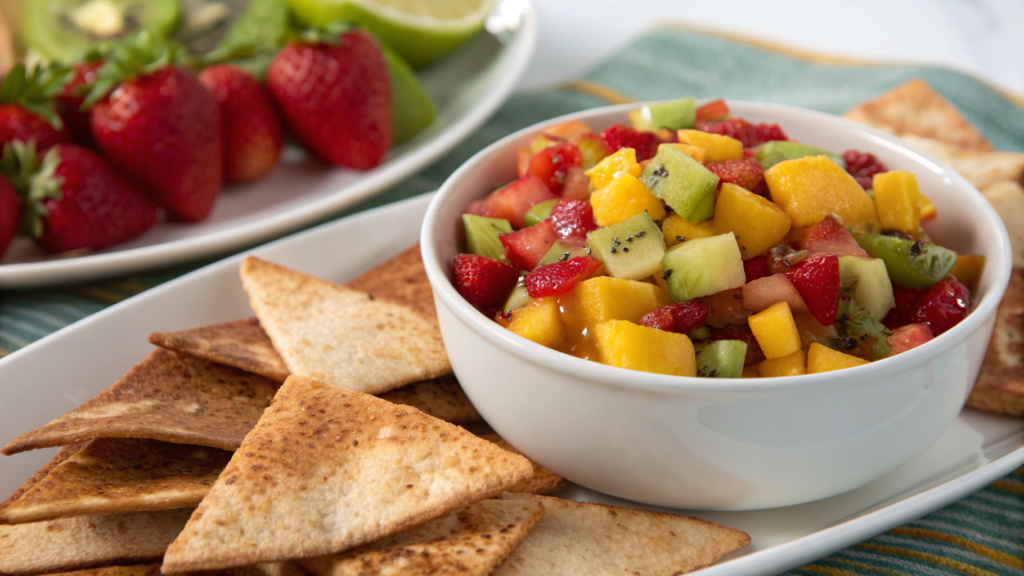
This recipe always shows up on our table for Labor Day dessert. It’s bright, fresh, crunchy, doesn’t need refrigeration or forks, and even people who usually ignore sweets love it. Because here you get Labor Day dessert, a snack, and a picnic element — all at once. It always makes a surprising impression.
Ingredients:
For the fruit salsa:
- 1 cup strawberries, finely chopped (150 g)
- 1 apple, peeled and diced into small cubes
- 1 kiwi, peeled and chopped
- ½ cup blueberries or raspberries (seasonal)
- 1 tbsp orange juice
- 1 tsp cane sugar or maple syrup — to taste
- If you have it on hand — add half a peach or nectarine. This combo works great!
For the cinnamon chips:
- 6–8 tortillas (small size)
- 2–3 tbsp melted butter
- ⅓ cup sugar
- 1 tsp ground cinnamon
How to make it
Make the fruit salsa:
- Chop all the fruit very finely. The smaller — the better the texture. Pay special attention to the apple and kiwi: no rough chunks, please. Almost like making taco-style salsa.
Want to keep the apple from browning? Sprinkle the pieces with lemon juice right after chopping. The flavor won’t change, and the salsa will stay bright longer. - Place everything in a large bowl. Add orange juice and a little sugar or syrup.
- Gently stir and refrigerate for at least 15 minutes (better — a couple hours). Let the fruit mingle, release juices, and the flavor will become richer.
Tip. If the fruit is too soft — add a couple of ice cubes before serving. This refreshes the salsa and brings back structure.
Make the cinnamon chips:
- Preheat oven to 375°F (190°C).
- Cut tortillas into triangles. Usually 6–8 tortillas give about 48 pieces.
- Brush each triangle with butter on both sides. This makes them golden and crisp.
- Coat in the sugar and cinnamon mixture or just sprinkle on top. I love coating — the cinnamon sticks better, and the chips come out crispy on the edges and softer in the middle.
- Arrange on a baking sheet (even better on a silicone baking mat, which is a must-have for baking).
- Bake for 8–10 minutes. Watch closely so they don’t burn — especially if your oven has a mind of its own.
- Cool completely. And here’s the magic — they become even crunchier as they cool down.
Moreover, spoon the salsa into a glass bowl or jars. Next to it, arrange the chips in a fan on a plate. You can decorate with mint leaves or kiwi slices on the side — it looks very cute.
For a picnic, I love serving this fruit salsa with cinnamon chips in large clear plastic cups: salsa on the bottom, chips sticking out like spoons. Super convenient and looks fun.
3. Chocolate Chia Cups with Coconut Cream

In this dessert, it feels like healthy eating, a love for chocolate, and the desire not to stand by the stove for more than 10 minutes all come together. Chocolate Chia Cups are even easier to make than oatmeal for breakfast. Especially if you already have a chilled can of coconut milk in the fridge.
This Labor Day dessert fits everyone. It’s vegan, gluten-free, sugar-free (if you want), and… yes, it’s actually delicious.
What you’ll need:
- ⅓ cup chia seeds (60 g)
- 1¼ cups unsweetened almond milk (or coconut milk — 300 ml)
- 2 tbsp unsweetened cocoa powder
- 2–3 tbsp maple syrup or honey (to taste)
- ½ tsp vanilla extract
For the cream topping:
- 1 can full-fat coconut milk (13.5 oz / 400 ml) — chilled for at least 12 hours
- 1 tbsp maple syrup
- Pinch of vanilla
If coconut cream doesn’t whip well, use only the solid part from the can and drain the liquid. This way, the cream will turn out thick and fluffy.
How to put it all together:
- In a bowl, mix chia seeds with cocoa, syrup, vanilla, and milk. Whisk well so there are no clumps.
- After 5 minutes, stir again — this step is important! The chia will start to thicken and form the base for the pudding.
- Pour into jars or glasses (for example, those mini mason jars). Refrigerate for 3–4 hours, or even better, overnight.
- While the pudding sets, whip the coconut cream: carefully scoop out the solid part from the top of the can, leaving the liquid behind. Whip with syrup and vanilla until fluffy.
- When the pudding is ready, top with coconut cream and garnish with chocolate shavings or fresh berries.
I love serving these cups right in mini jars with a spoon on the side and a thin strawberry slice on top of the cream. If you want to play with texture, sprinkle with cacao nibs or walnut crumbs. And in hot weather — chill the spoons before serving, and the Labor Day dessert will have that café-chic vibe.
4. Yogurt Berry Parfaits in Mason Jars

Yogurt parfaits in jars look like something straight out of a cozy café, take just 10 minutes to assemble, and the taste… it’s better than you’d expect.
This Labor Day dessert is portioned, neat, fresh, healthy — and looks absolutely gorgeous.
It’s a perfect Labor Day recipe: easy to prep ahead, simple to serve, and you can keep them in the fridge until the right moment to shine.
Ingredients:
- 2 cups Greek yogurt (plain or vanilla — your choice) — 480 ml
- 1½ cups fresh berries (raspberries, blueberries, strawberries, blackberries)
- ¾ cup muesli or granola — about 70–80 g
- 2–3 tbsp honey or maple syrup
- A little vanilla extract (optional)
- And of course, mini Mason Jars or any clear cups
How to make it:
- Start with the yogurt base. If you’re using plain yogurt, now’s the time to stir in some honey or syrup and a pinch of vanilla extract. Taste it — the flavor should be balanced, not overly sweet. Ready? Set it aside.
- Next come the berries. Chop the strawberries into small pieces if you’re using them. Blueberries and raspberries can stay whole. It’s important that the berries are dry — otherwise, the layers will slide apart.
- Grab clean jars and start layering your parfait. First — yogurt, about 2 tablespoons. Then — a handful of berries. Top with granola.
- Repeat this process once or twice until you reach the top of the jar. Always finish with yogurt and a pretty layer of berries on top. You can drizzle a bit of honey or add a mint leaf — it will look like it belongs on a display.
- If you’re prepping ahead — just cover with lids and refrigerate.
Important details (and hacks):
- Want the granola to stay crunchy? Add it on top right before serving.
- Making these in advance? Assemble everything except the top layer of granola. Cover with lids and keep in the fridge for up to 24 hours.
- Kid-friendly version. Swap muesli for graham cracker pieces and use flavored yogurt for fun.
At a picnic, these jars disappear instantly. I put them in a large bowl filled with ice to keep them cool. At home, I serve them on a wooden tray with small spoons on the side. Everyone grabs a jar — it’s convenient, tidy, and looks beautiful.
5. Peanut Butter Rice Krispie Squares

Peanut Butter Rice Krispie Squares smell like childhood but sound grown-up thanks to the peanut butter. They come together in just 10 minutes, need no mixer, no oven, and pretty much everyone loves them.
This Labor Day dessert is easy to adapt to your style — add chocolate if you want, or sprinkle a bit of sea salt on top. But even in its basic version, it’s a guaranteed win. Simply perfect for Labor Day dessert ideas.
Ingredients:
- 3 cups Rice Krispies or any puffed rice cereal (75 g)
- ½ cup peanut butter (120 g)
- ½ cup honey or maple syrup (120 ml)
- Optional: ½ cup chocolate chips or shavings
A good peanut butter for this recipe is Organic Creamy Peanut Butter. It’s natural, without additives, and melts perfectly with honey.
How to make it:
- In a small saucepan, combine honey and peanut butter. Heat over medium, stirring constantly. After a couple of minutes, the mixture will become smooth and slightly runny — exactly what you need. Don’t let it boil, or the flavor will change.
- Remove from heat and quickly add the Rice Krispies. Work fast — the cereal should be coated evenly, but not crushed. I usually stir with a silicone spatula, which makes it easier to keep the texture intact.
- Transfer the mixture into a pan (8×8 inches / 20×20 cm), lined with parchment or lightly greased. Smooth it out evenly. If it sticks, lightly wet the spatula or rub with a bit of oil.
- If you want chocolate on top, sprinkle the warm mixture with chocolate chips. They’ll melt slightly and create a gooey, caramel-like topping.
- Chill the pan in the fridge for at least 30 minutes. The Labor Day dessert will firm up, become dense, and you’ll be able to cut it into neat squares.
If serving at home, place the squares on a wooden board, add a few peanuts and a sprinkle of chocolate chips on top. If taking them to a picnic, wrap in parchment and pack into a container. I sometimes tie up 2 squares with kitchen twine — they look almost like little gifts.
These Rice Krispie squares with peanut butter travel well, don’t crumble, and don’t melt, so guests can easily take them along. But honestly, they rarely make it past the table — too good to save for later.
6. S’mores Cones in the Oven

Here’s an idea I first tried on Labor Day a couple of years ago — and now I make it every season. These S’mores Cones are quick to prepare, melt in your mouth, and honestly take just 10 minutes. No sticky fingers from marshmallows, no campfire needed.
The best part — kids go crazy for them, adults get nostalgic, and you don’t have to stand with a stick over the fire.
Ingredients:
- 4–6 waffle cones
- ½ cup mini marshmallows
- ½ cup chocolate chips (or finely chopped chocolate bar)
- ¼ cup graham cracker crumbs
- Optional: peanuts, banana slices, strawberry pieces, or caramel
If you want a more even bake without leaks, place the cones in a muffin tin. Or use stainless steel cone holders, especially if serving at a picnic.
How to make it:
- Mix the filling. In a bowl, combine marshmallows, chocolate chips, and graham cracker crumbs. Feel free to add peanuts, caramel bits, or banana slices. The point is to keep the filling colorful and fun.
- Fill the cones. Carefully pack each waffle cone, layering the mix. Don’t press down too hard — leave some space so the marshmallows can melt instead of getting compressed.
- Wrap in foil. Cover each cone with aluminum foil. I usually close them fully but leave the tip slightly open — makes it easier to unwrap later.
- Bake. Preheat oven to 375°F (190°C) and bake cones for 7–8 minutes. No longer, or the cones will get too brittle. The marshmallows will turn gooey, and the chocolate will melt just right.
- Cool slightly. Once they’re out of the oven, wait about a minute. Unwrap the top and watch how everything inside has beautifully melted together. The smell at this point is pure happiness.
I serve these cones like “campfire meals” — in a basket lined with parchment. Everyone unwraps their own cone, and in that moment, the smiles are the same — just like kids by the fire.
Place a small dish with extra graham crumbs and chocolate shavings on the side for dipping. And honestly — this is the only Labor Day dessert that never makes it to “later.” It’s gone. Always.
7. Mini Key Lime Pie Jars (No Bake)
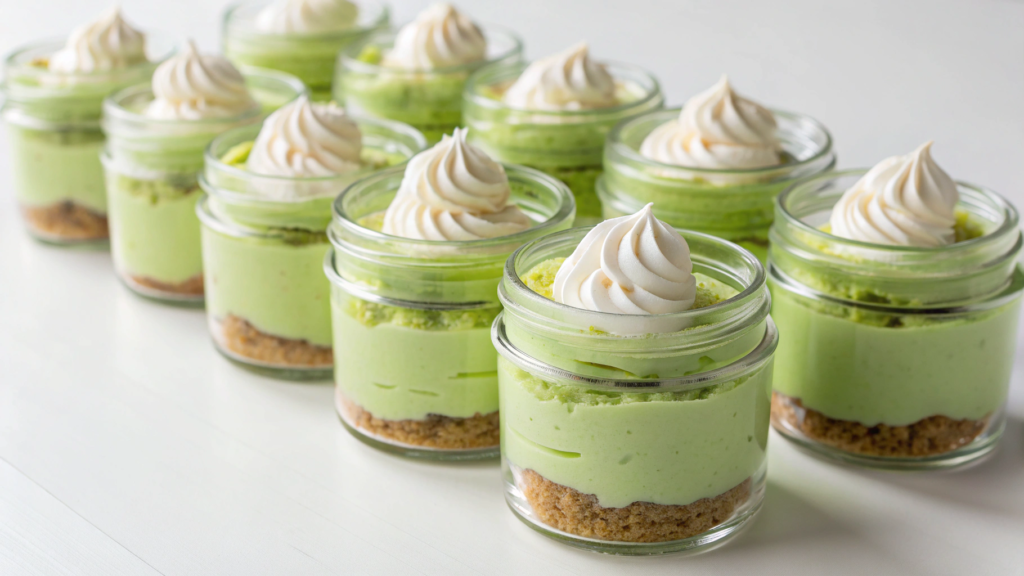
These mini desserts in jars look festive, serve perfectly in portions, and don’t require an oven or a baking pan. All you need is a bit of patience and some good jars.
Ingredients:
- 1 cup graham cracker crumbs (or shortbread cookies) — about 100 g
- 3 tbsp melted butter
- 1 can sweetened condensed milk (14 oz / 396 g)
- ½ cup freshly squeezed lime juice (120 ml) — or lemon juice if lime isn’t available
- ½ cup heavy cream (or whipping cream) — 120 ml
- Zest of 1 lime
- Optional: whipped cream and lime slices for garnish
If you don’t want to deal with juicing by hand, use a manual citrus press. It gets every drop out of the lime and is especially handy when you need a lot.
How to make it:
- Make the crust. In a bowl, mix cookie crumbs with melted butter. You’ll get a crumbly but “held together” mixture. Spread it across the bottoms of jars, pressing down lightly with a spoon. About 1½–2 tablespoons per serving.
- Make the cream. In another bowl, combine condensed milk and fresh lime juice. Whisk — the mixture will thicken on its own, almost like magic. Add the zest for flavor. Separately, whip the cream (by hand or mixer) until soft peaks form, then gently fold it into the lime mixture. The cream will be airy yet stable.
- Assemble the Labor Day dessert. Spoon a couple of tablespoons of lime cream over the crumb base. Smooth it out. Top with whipped cream if you’d like, and decorate with a lime wedge or a sprinkle of zest — it looks festive and elegant.
- Chill for at least 2 hours. Overnight is even better. This lets the flavor develop, the cream stabilize, and the crumbs soak slightly at the bottom to get a more “sandy” texture.
Hack from us:
If you want the crumbs to stay crunchy — add them only before serving! Store the cream separately in jars with lids. This works especially well if you prep desserts ahead and want them to look fresh at serving time.
But if you do want to assemble right away — simply use a double layer of crumbs on the top and bottom to keep structure and texture. And of course, don’t forget the jars — I use mini Mason Jars with screw lids, they’re perfect for both serving and storage.
I place the jars on a wooden board and serve with mini spoons. Add a plate of lime slices on the side, or even mini syrup pipettes if you want to “play restaurant.” And yes, you can easily take them to a picnic: just seal with lids and toss in a cooler bag.
8. Mixed Berry Frozen Yogurt Bark

This isn’t just frozen yogurt. It’s a layered, berry-filled, crunchy yet creamy Labor Day dessert that makes any celebration feel at least 10 degrees cooler.
Ingredients:
- 2 cups Greek yogurt (plain or vanilla) — 480 ml
- 2–3 tbsp honey or maple syrup
- 1 tsp vanilla extract (if using plain yogurt)
- 1 cup mixed fresh or frozen berries (raspberries, blueberries, strawberries, blackberries)
- 2 tbsp chia seeds or shredded coconut (optional)
- A few spoonfuls of nuts, granola, or chocolate chips — to taste
For freezing, a silicone baking pan with edges works perfectly — nothing sticks, it’s easy to remove once frozen, and you don’t have to fuss with parchment paper.
How to make it:
- Prepare the base. In a large bowl, mix yogurt with honey and vanilla. Taste it — it should be slightly sweet, but not overly so. Keep in mind, yogurt tastes less vibrant once frozen, so add a bit more honey if needed.
- Spread on a pan. Line a baking sheet with parchment paper or use a silicone pan. Spread the yogurt mixture into a rectangle about 0.2 inches (0.5 cm) thick. Don’t make it too thin — otherwise, it will crumble when cut.
- Add the toppings. Scatter the berries over the top. If using frozen berries, don’t thaw them! Just press them gently into the yogurt. Sprinkle with extras like nuts, seeds, chocolate chips, or coconut — whatever you like. Just don’t overload, or it’ll be hard to break later.
- Freeze for 3–4 hours. Overnight is best. The yogurt bark should harden completely so it breaks nicely and doesn’t melt too fast in your hands.
- Break into pieces. Once frozen, remove from the pan and place on a cutting board. Cut or break into large chunks by hand. Store in a freezer-safe container, and here’s the key: always separate layers with parchment paper, or they’ll stick into one solid block.
Hack to remember:
If you want the Labor Day dessert to stay firm longer on the table, freeze not just the bark but also the plate or board for serving. It sounds small, but it works every time. For take-along, wrap pieces individually in parchment and store in a zip-lock bag — neat and practical.
Lay the bark pieces on a board, sprinkle with a few berries and mint leaves. Kids love eating it with their hands, adults enjoy it with coffee. Personally, I love sneaking a piece late at night, standing by the freezer.
9. Almond Butter Date Balls (Gluten-Free)

This Labor Day dessert isn’t overly sweet, sticky, or runny. Instead, it’s filling, rich, with a nutty-chocolate aftertaste and a pleasantly dense texture that makes it hard to stop at just one ball.
Ingredients:
- 1 cup pitted dates (about 12)
- ½ cup almond butter (or peanut butter, but the flavor will be different)
- ¼ cup ground almonds or gluten-free oats
- 2 tbsp cocoa powder
- 1 tsp vanilla extract
- Pinch of salt
- Optional: shredded coconut, chia seeds, chocolate chips, or crushed nuts for coating
How to make it:
- Prep the dates. If they’re a bit dry, soak them in hot water for 10 minutes, then pat dry. This gives you a smooth paste instead of chunky bits. Make sure all pits are removed.
- In a food processor (or powerful blender), blend dates with almond butter, cocoa, vanilla, and salt. The mixture should be sticky but not runny. If it’s too dry — add a splash of water. If it’s too soft — add some oats or almond flour.
- Add texture. Stir in the ground almonds (or oats). At this point, you can also mix in chia seeds, chocolate chips, or anything you’d like hidden inside.
- Roll into balls. Take about 1 tablespoon of mixture and roll between your palms — you’ll get around 12–15 balls. You can coat them in coconut, cocoa powder, or nut crumbs — not only tasty but pretty too.
- Chill for at least 30 minutes. During this time, the balls will firm up, and the flavor will become richer, like a true Labor Day dessert.
Extra tip:
If you want perfectly even and same-size balls, use a spring-release ice cream scoop. Seriously, it makes life easier. And to keep your hands from sticking, lightly wet them with water before rolling.
I like storing these balls in a glass jar with a lid and keeping them on an open shelf — they look nice and feel like part of the kitchen decor. They’re also great to take along: wrap 2–3 in parchment and toss them in your bag for a healthy snack on the go.
With coffee, tea, or just water — they work in every scenario. And this is one of those gluten-free desserts that actually satisfies.
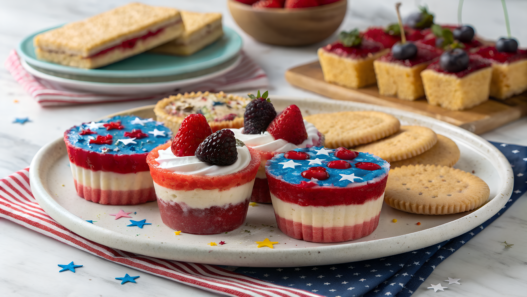
10. Red, White & Blue Sprinkle Dipped Strawberries
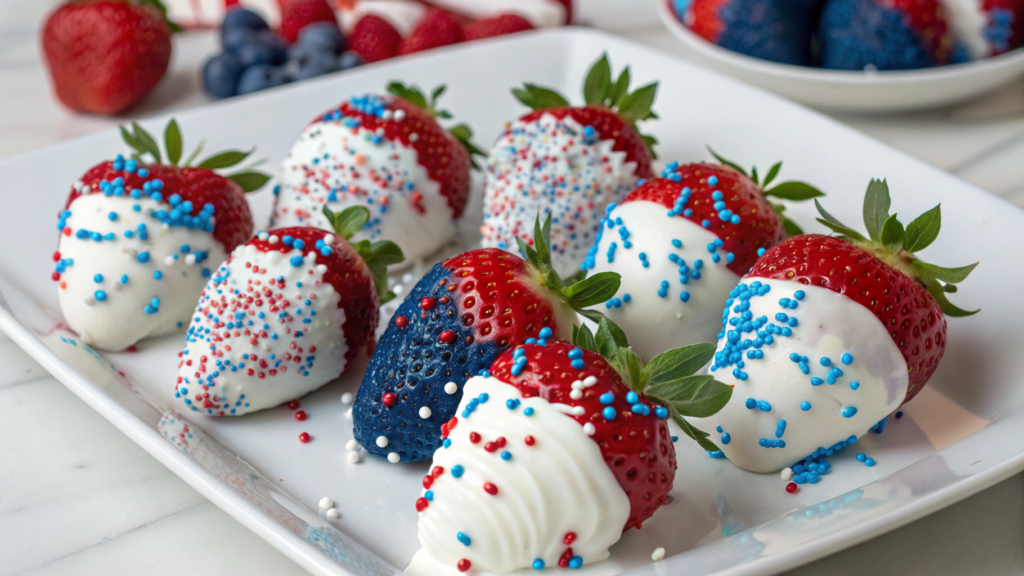
Red, White & Blue Dipped Strawberries are fresh strawberries dipped in white chocolate and covered in festive sprinkles. It’s simple, yet looks like something straight out of a bakery display.
This Labor Day dessert is made by kids, teens, adults — anyone who wants to create something fun without turning on the oven. And once you try it, you’ll want to repeat it on Labor Day, the Fourth of July, Thanksgiving, or even on a random weekend.
Ingredients:
- 1 pound fresh strawberries with stems (about 450 g)
- 1 cup white chocolate (or white chocolate chips — about 170 g)
- 1 tbsp coconut oil (optional, for smoother coating)
- Red and blue sprinkles (sugar pearls, rods, stars — any kind, as long as they’re bright and crunchy)
How to make it:
- Prep the strawberries. Wash and dry them thoroughly. This step is key: if the berries are wet, the coating won’t stick. Keep the stems — they make dipping easier.
- Melt the white chocolate. Use either a double boiler or microwave in short 20–30 second bursts, stirring in between. Add coconut oil if you want a more fluid texture — it makes dipping easier.
- Get the sprinkles ready. Pour sprinkles into a shallow bowl. You can even set up red on one side and blue on the other to dip just part of each berry.
- Dip the strawberries. Hold by the stem and dip each berry about ⅔ into the melted chocolate. Let the excess drip off slightly, then dip the lower part into the sprinkles.
- Set and chill. Place the dipped strawberries on a baking sheet lined with parchment paper. Refrigerate for 15–20 minutes until the chocolate sets.
Take a wooden board, set it on a tray with ice, and arrange the berries upside down, stems facing down — that way the colorful tips show first. Add little flags, mint leaves, or serve with champagne (or lemonade — that works too!).
These strawberries are best eaten the same day. But if anything remains (rarely!), store them in the fridge in a sealed container, with parchment between layers to prevent sticking.
All the recipes are here. Time to choose!
Now you’ve got a full set of ideas that save the day when you want Labor Day dessert without the hassle of baking. Just a handful of ingredients, a few minutes of assembly — and you’ve got a whole sweet lineup ready for the holiday.
Which one will you try first in your kitchen? How did it turn out? Maybe you have your own trick or secret ingredient that makes it even better?
Leave a comment — I always read them and love hearing how these recipes come to life in your homes.
Thanks for spending this time with me and my favorite desserts!