
During the cold season, a home especially needs texture, depth, and soft light. When there’s a short day outside and dry frosty air, the space inside can easily become faceless and monochrome.
In this roundup, we gathered 10 winter floral arrangements that don’t require complicated materials or big expenses. At the same time, each idea creates its own character in the space. In some cases it’s the vertical line that works, in others it’s color, in others it’s texture.
Lindy and I wanted to show how, using proportions, proper height, and a mix of materials, you can change the feeling of a room. No overload. No extra decor. Just what truly helps you feel warmth at home in winter.
1. Frosted Pine and White Rose Living Room Display
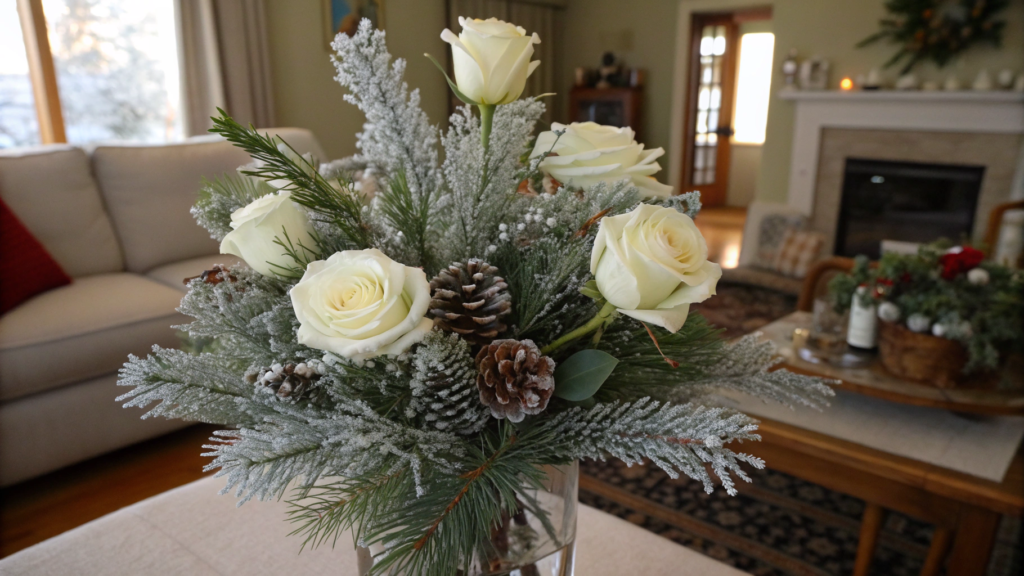
In this winter bouquet, pine gives shape and the scent of a winter forest, while white roses add soft light. In the living room, this kind of arrangement instantly makes the air feel “lived-in.”
For example, I made this bouquet in mid-January, when the Christmas tree was already taken down, the string lights were packed away, and the house suddenly felt a little empty. And this bouquet literally brought life back into the space.
What You’ll Need
For a medium-sized arrangement (for a coffee table 30–40 inches / 75–100 cm):
- 5–7 fresh pine branches, 18–24 inches (45–60 cm) long
- 6–9 white roses with stems 16–20 inches (40–50 cm) long
- A glass vase 10–12 inches (25–30 cm) tall, about 6 inches (15 cm) in diameter
- Floral foam or heavy stones
- A small amount of artificial “snow” spray, optional
For a stable base, it’s convenient to use OASIS Floral Foam Blocks — they’re easy to cut to fit the vase and hold the shape of the arrangement even if the branches are heavy.
How to Create Frosted Pine and White Rose Living Room Display
- Prepare the base
Soak the floral foam for 10–15 minutes and let it fully absorb water. If you’re using stones, place them at the bottom and pour cold water to a height of about 3–4 inches (7–10 cm). - Build the pine framework
Place the longest branches first. Let the arrangement extend beyond the edges of the vase by about 4–6 inches (10–15 cm) in width. Make the lower layer denser and the top lighter. At this stage, the bouquet should already look full. - Prepare the roses properly
Cut the stems at an angle and remove the lower leaves. Leave the height so the buds sit slightly above the pine, but don’t stick out too sharply. Usually, that’s about 14–16 inches (35–40 cm) from the edge of the vase. - Arrange the flowers asymmetrically
Place three roses closer to the center, and distribute the rest more freely. One can be slightly lower, another slightly farther out. This adds a natural look. - Add a light “frost” effect
If you’re using spray, apply it from a distance of 12–18 inches (30–45 cm) only to the tips of the pine branches. The effect should stay subtle. - Choose the right spot
Place the arrangement where there is warm side lighting in the evening. The white petals begin to glow softly — and the living room changes.
In winter, interiors often lack color depth and natural texture. Pine adds rich greenery and structure, while white roses create a feeling of light and cleanliness. The contrast between matte pine and smooth petals creates visual balance. And let’s not forget the scent of pine, which makes the space feel more “home-like.” Even without candles or extra decor.
Tip
If you want the arrangement to look fresh longer, add 1 teaspoon of sugar and a couple of drops of bleach to 1 quart of water (0.95 L). Change the water every 2 days. And one more thing: if the pine starts to dry slightly, just trim the tips of the branches and lightly mist them with water. They visually come back to life.
Sometimes these simple details make all the difference. And the living room doesn’t look like a “winter decoration” — it becomes a truly lived-in space.
2. Evergreen Mason Jar Kitchen Arrangement
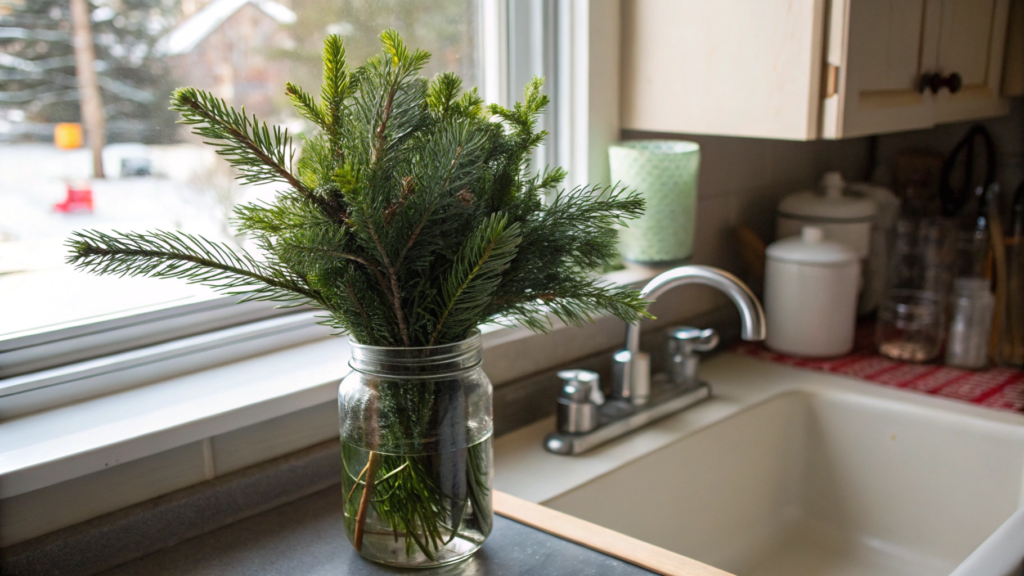
Evergreen Mason Jar Kitchen Arrangement — compact, neat, and fits perfectly into a kitchen where every surface counts.
In winter, the kitchen especially lacks living greenery. We spend a lot of time at the stove, cooking, baking, making tea — and a small pine accent suddenly makes the whole space feel more cohesive.
My grandma often placed such a jar on the windowsill near the sink. I loved watching how the winter sunlight passed through the glass and highlighted the needles. A simple thing. But beautiful.
What You’ll Need
For one standard-size arrangement:
- 1 glass mason jar 16–32 oz (470–950 ml)
- 4–6 fresh pine branches, 10–14 inches (25–35 cm) long
- 2–3 thin sprigs of juniper or thuja
- 1–2 small white roses or ranunculus (optional)
- Twine or thin linen ribbon
If you don’t have a suitable jar, you can use Mason Jars 16 oz — they’re stable, transparent, and perfect for kitchen arrangements.
How to Create Evergreen Mason Jar Kitchen Arrangement
- Prepare the jar
Pour cold water to about 3–4 inches (7–10 cm). If the jar is tall (32 oz), you can fill it up to 5 inches (12 cm). It’s important that the lower part of the branches stays in water. - Create a dense green base
Start with 2–3 longer pine branches. They will set the height. Add the rest in a circle, slightly tilting them outward. The arrangement should be wider than the jar opening by about 2–3 inches (5–7 cm). - Add accent branches
Juniper or thuja add texture and variation in shades. Place them slightly higher than the main pine, but not dominating. - If using a flower — place it last
A small white rose or ranunculus adds light. Leave the stem 8–10 inches (20–25 cm) long so the bud slightly rises above the greenery. - Finish the neck of the jar
Wrap the jar with twine in 2–3 turns. The knot can stay on the side — it adds a light asymmetry.
Why Especially in the Kitchen
There is always movement, heat, steam, and smells in the kitchen. Large arrangements can get in the way. But a compact glass jar with greenery stays stable and doesn’t take much space.
By the way, studies in environmental psychology show that the presence of natural elements in interiors positively affects spatial perception and reduces tension.
Glass lets light pass through and makes the arrangement visually lighter.
Tip
To help the arrangement last longer, change the water completely every 2 days, trim the stems by about 0.5 inch (1–1.5 cm), and keep the jar at least 12 inches (30 cm) away from the stove or radiator — a fresh cut and avoiding dry hot air noticeably slow down the drying of the pine.
Sometimes the kitchen doesn’t need heavy decor. A small jar with living greenery is enough — and it already looks different.
3. Snowy Hydrangea Entryway Bowl
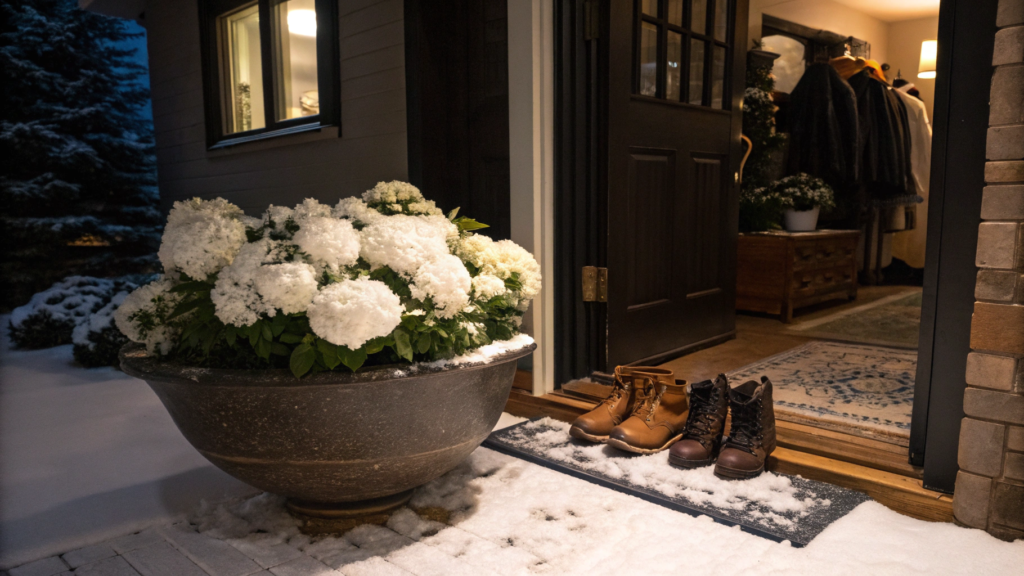
The entryway in winter often looks dark — you know, shoes, coats, rugs. And here, a large bowl with white hydrangeas works like a visual light source. Even if there isn’t much actual light.
What You’ll Need
For a standard entry console 36–48 inches (90–120 cm) wide:
- 3–5 large white hydrangeas (bloom diameter 6–8 inches / 15–20 cm)
- A low ceramic or glass bowl 10–14 inches (25–35 cm) in diameter
- Floral foam or metal mesh
- 2–3 sprigs of silver eucalyptus or thin pine
- A small amount of artificial “snow” spray (optional)
How to Create Snowy Hydrangea Entryway Bowl
- Prepare the base properly
Soak the floral foam for 15 minutes. If using metal mesh, form it into a dense ball and secure it inside the bowl. Pour in a small amount of water so the lower part of the foam stays moist. - Trim the hydrangeas to a compact length
Leave stems 4–6 inches (10–15 cm) long. An entry area requires a low arrangement — it shouldn’t block the view or get in the way. - Form a dense center
Insert the first hydrangea in the center. Then add the others around it, slightly tilting them outward so the blooms overlap. The bowl should look full, without gaps. - Add texture along the edges
Insert eucalyptus or pine closer to the edge of the bowl, slightly below the level of the hydrangeas. They create depth and highlight the whiteness of the petals. - Create a delicate “snow” effect
Spray from a distance of 12–18 inches (30–45 cm), only on the upper part of the petals. The effect should be barely noticeable. - Place the arrangement correctly
Position the bowl so there is soft light from above. If there is a wall lamp or ceiling spotlight, angle it slightly so the light glides across the petal texture.
White hydrangeas create a sense of light even in a small space. Large blooms help with this by forming one cohesive volume without visual clutter.
The low shape of the arrangement makes it stable and safe in a high-traffic area. And silver branches add light contrast and emphasize the winter look.
Tip
Before placing the hydrangeas in the arrangement, fully submerge the blooms in cold water for 20–30 minutes. Hydrangeas actively absorb moisture through their petals, and this “bath” helps them stay firm longer, especially in dry winter air.
4. Mini Winter Wonderland Mantel Vase
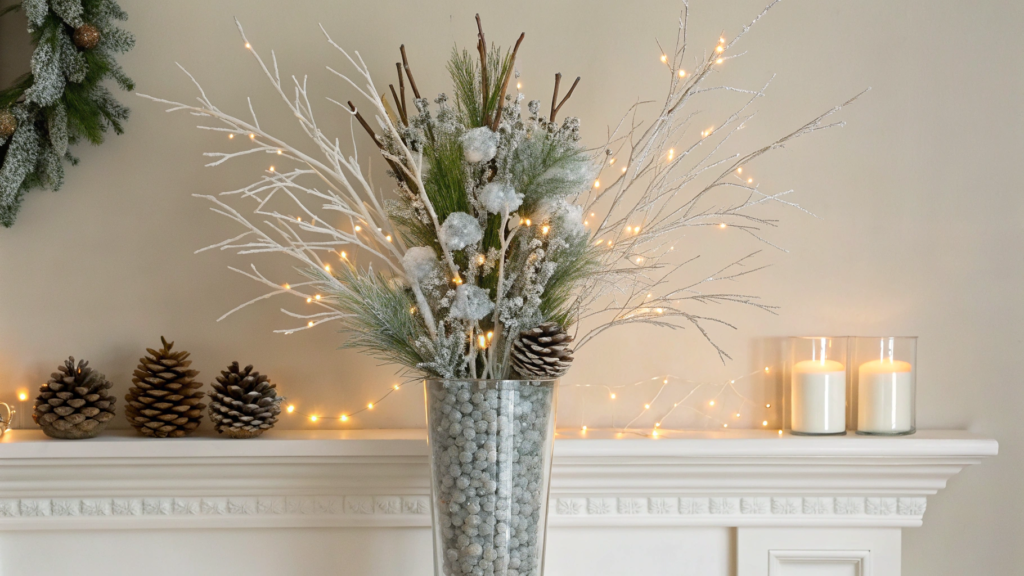
No one will argue that a vertical arrangement doesn’t take up much space and adds height and movement.
That’s exactly what Mini Winter Wonderland Mantel Vase does — a tall, light composition that draws the eye upward.
What You’ll Need
For a standard mantel 48–60 inches (120–150 cm) wide:
- A narrow glass or ceramic vase 12–16 inches (30–40 cm) tall
- 3–5 pine branches 16–22 inches (40–55 cm) long
- 2–3 sprigs of white baby’s breath or dried flowers
- 1–2 thin branches with white or silver berries
- A small amount of water
- Optional — a thin white candle nearby (for compositional balance)
For stability, I would recommend using clear glass fillers like CYS EXCEL Glass Gems Vase Fillers — they add weight and help keep the branches upright.
How to Create Mini Winter Wonderland Mantel Vase
- Prepare the vase and add stability
If the vase is lightweight, pour glass gems into the bottom in a 1–2 inch (2.5–5 cm) layer. Add water to about 3–4 inches (7–10 cm). This ensures stability and hydration for the branches. - Create the central vertical line
Choose the straightest and tallest pine branch and place it first. It sets the direction of the whole arrangement. Add the remaining pine branches at a slight angle so the shape stays slim but not rigid. - Add light accents in height
Insert baby’s breath or dried flowers slightly above the main pine layer. They should extend 1–2 inches (2–5 cm), creating a subtle “snow” effect. - Place the berry branches closer to the middle
Not at the top and not at the very edge. Let them sit roughly at the mid-height of the arrangement. This creates visual balance. - Step back and look from the side
A mantel is often viewed at an angle. Check how the arrangement looks not only from the front but also from a diagonal perspective. If needed, slightly rotate the branches.
Why This Shape Works Especially Well for a Mantel
The fireplace area usually already has a strong horizontal line — the shelf itself, a mirror frame, or a TV. A vertical composition creates directional contrast, making the space feel more dynamic.
A narrow vase doesn’t take up much room and allows you to place other objects nearby. And the light from the fireplace or wall sconces beautifully highlights the texture of the pine and baby’s breath.
Tip
If the fireplace is used regularly, keep the vase at least 18 inches (45 cm) away from open flames or strong heat sources. Hot dry air quickly dries out the needles and makes them brittle.
A mantel doesn’t need complicated decor. It needs the right vertical line, a bit of greenery, and a sense of winter air. And this small vase helps the space feel complete.
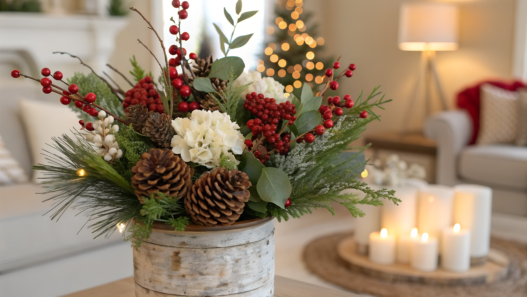
5. Crimson Berry and Cotton Stem Arrangement
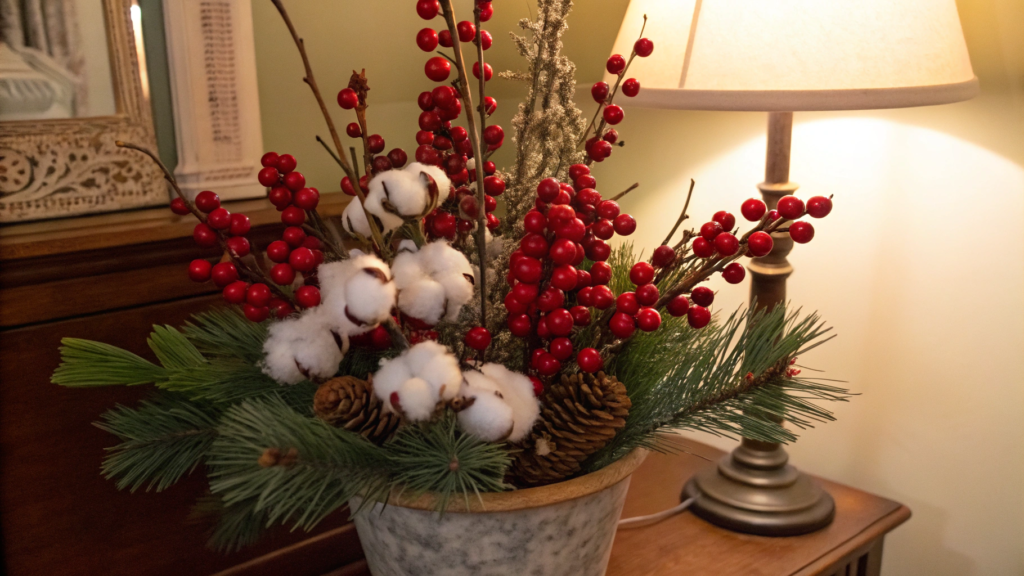
I like this option for its contrast. Cotton looks soft, almost airy. Red berries are dense and насыщенные. And the green base pulls everything together.
A cold day in the middle of winter. Warm lamp light in the room, and red berries showing through against the pine. It feels like a living accent in the middle of winter monochrome.
Nothing extra or complicated. Just color and texture.
What You’ll Need
For a medium arrangement on a table or console 36–48 inches (90–120 cm) wide:
- 4–6 branches with red berries, 18–24 inches (45–60 cm) long
- 3–5 cotton stems, 16–20 inches (40–50 cm) long
- 3–4 branches of pine or eucalyptus for the base
- A ceramic or metal vase 10–14 inches (25–35 cm) tall
- Floral foam or heavy stones
How to Create Crimson Berry and Cotton Stem Arrangement
- Start with the green base
Insert 3–4 pine or eucalyptus branches around the edges of the vase. They should extend slightly beyond the rim by about 3–4 inches (7–10 cm), forming the foundation. - Add red berries as a structural element
Place the berry branches so they create diagonals. Do not set them strictly vertical. Let one branch lean slightly to the right, another to the left. Height can vary within 2–3 inches (5–7 cm) between branches. - Insert cotton stems last
The cotton should sit slightly above the berries or at the same level. Leave a length of 14–16 inches (35–40 cm) from the edge of the vase. The white puffs create a soft contrast and visually balance the intensity of the red. - Check the balance from all sides
If the arrangement is on a table, it will be seen from different angles. Walk around it and make sure there are no empty spots. - Adjust the density
If it feels like there is too much red, add one more pine branch. If the arrangement looks heavy, slightly spread the branches to create more air.
Why This Is a Winter Arrangement
In winter, interiors often become more neutral. And a rich red accent creates a focal point. Cotton adds tactile softness, while pine adds depth of color. Together they create a strong composition that fits naturally into a winter interior.
Tip.
If you’re using real berry branches, remove leaves below the water line and change the water every 2–3 days to prevent cloudiness and keep the arrangement looking neat.
This is the kind of arrangement where one bold accent can change the entire space.
6. Rustic Candleholder with Fresh Eucalyptus
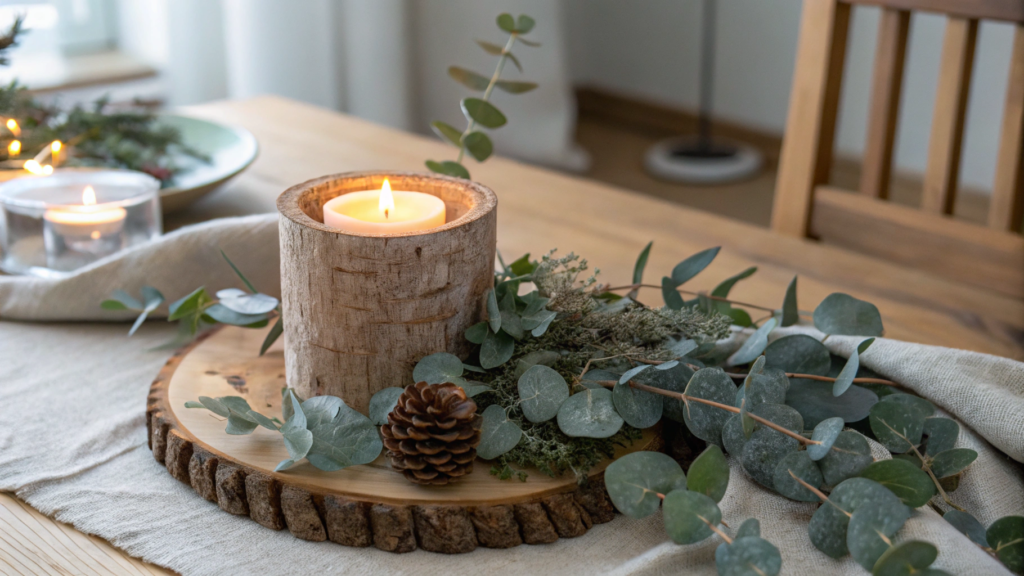
In winter, interiors often lack localized warm light. Not general ceiling lighting, but one source that creates a soft glow around itself. A candle solves this simply and effectively.
Fresh eucalyptus adds a calm green-silver tone that pairs easily with wood, linen, and light walls. As the leaves dry slightly, they become lighter and denser in texture, while the arrangement keeps its neat look.
I love arrangements like this for their simplicity. There are no flowers, no bright accents. But there is depth.
What You’ll Need
For one medium-sized arrangement:
- 1 wooden candleholder 6–10 inches (15–25 cm) tall
- 1 candle 2–3 inches (5–7.5 cm) in diameter, 4–6 inches (10–15 cm) tall
- 3–5 fresh eucalyptus stems 12–18 inches (30–45 cm) long
- A small piece of natural twine
- A metal or ceramic base (if the candleholder is narrow)
How to Create Rustic Candleholder with Fresh Eucalyptus
- Prepare the base
Make sure the candleholder stands stable and doesn’t wobble. If the base is narrow, place it on a metal or ceramic tray 10–12 inches (25–30 cm) in diameter. This adds safety and visual weight. Before starting, wipe off dust — in warm candlelight, small details become more noticeable. - Prepare the eucalyptus properly
Before building the arrangement, refresh the stem cuts by trimming about 0.5 inch (1–1.5 cm) at an angle and remove lower leaves that might touch the base. If the stems are too long, shorten them to 12–14 inches (30–35 cm) so they don’t look uncontrolled. - Create the first layer of greenery
Take 2–3 stems and gently place them around the base of the candleholder so the leaves face in different directions. Don’t wrap too tightly — leave a little air between branches. The arrangement should look natural, not like a dense wreath. - Add a second layer for volume and depth
Insert 1–2 more stems slightly lower or to the side, creating light asymmetry. Leave the extending parts about 4–6 inches (10–15 cm) from the center. If the leaves fully cover the candleholder, gently spread them with your fingers — the wood should stay visible. - Secure the arrangement with twine
Wrap it 2–3 times around the base. Tie the knot on the side or back so it doesn’t draw attention. Don’t pull too tight — the stems shouldn’t deform. - Check the distance from the flame and proportions
Leaves should stay at least 2 inches (5 cm) away from the edge of the candle. If the candle is tall (6 inches / 15 cm), make sure upper leaves aren’t in the flame zone. Step back 4–5 feet (1.2–1.5 m) — that’s how the arrangement will be perceived in the room. - Light the candle and evaluate the glow
When the candle burns, eucalyptus reflects the warm light and casts soft shadows. If the shadows feel too dense, slightly rotate the branches — even a small shift changes the overall look.
Why This Arrangement Works in Winter
A candle creates localized warm lighting that visually balances a cold winter day. Eucalyptus adds soft greenery with a silver tone, and together with wood it forms a calm, natural palette.
This arrangement is compact and doesn’t overload the surface. It looks great on a dining table, a coffee table, or next to a fireplace.
Important. Use only stable candles of the proper diameter. Keep greenery at least 2 inches (5 cm) away from the flame and never leave a burning candle unattended. If maximum safety is needed, choose a quality LED candle with warm light — the visual effect will be almost the same.
Tip
If the eucalyptus starts drying out, lightly mist the leaves with water in the morning and keep the arrangement away from direct hot airflow. This helps the greenery maintain a fresh appearance longer.
7. Icy Blue Orchid Console Piece
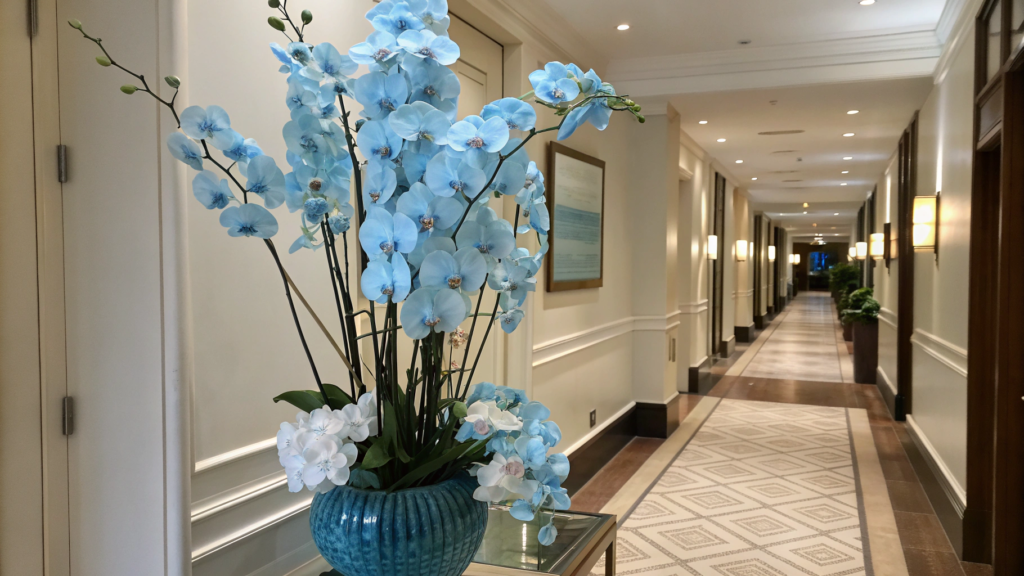
I love orchids for their architecture. They have a clean stem line, neat flowers, and a minimalist character. And Icy Blue Orchid Console Piece is an arrangement for a narrow console or hallway where you need a vertical accent and a sense of cleanliness.
What You’ll Need
For a standard console 36–48 inches (90–120 cm) wide:
- 1–2 Phalaenopsis orchids 20–28 inches (50–70 cm) tall
- A ceramic planter 6–8 inches (15–20 cm) in diameter
- Decorative pebbles or glass gems
- A small branch of silver pine or eucalyptus
- A tray 12–16 inches (30–40 cm) wide for the compositional base
By the way, you can use Nearly Natural Phalaenopsis Orchid Arrangement — quality artificial orchids look very natural and require no care.
How to Create Icy Blue Orchid Console Piece
- Prepare the base and stabilize the plant
If the orchid is in a plastic pot, place it inside the ceramic planter and fill the space with decorative pebbles. This adds weight and stability. A console is a high-traffic area, and the arrangement should stand securely. - Choose the right height
The total height of the arrangement (including the planter) should be within 24–32 inches (60–80 cm). If ceilings are low, do not exceed 28 inches (70 cm) so you don’t overload the vertical line. - Add a light green accent at the base
Place 1–2 short pine or eucalyptus branches at the base of the pot. They create a layer and highlight the cool tone of the petals. - Use a tray for balance
Place the planter on a tray 12–16 inches (30–40 cm) wide. This brings the elements together into one composition and visually grounds the height. - Adjust the direction of the flower spikes
Orchids often lean slightly. Turn the pot so the curve of the stem faces toward the center of the room, not toward the wall. - Check the lighting
Orchids look beautiful in soft side light. Avoid direct sunlight in winter, especially if the window faces south — cooler light will highlight the tone of the petals better.
Why Orchids Work in Winter
In winter, there are often fewer live plants in the house and less natural light. An orchid solves both problems: it blooms for a long time and stays neat without constant replacement, unlike cut flowers.
Its vertical shape helps add height to interiors where there are usually many horizontal surfaces — tables, shelves, sofas. And light or cool tones of the petals look good against a neutral winter palette — white walls, gray textiles, and light wood.
In addition, orchids do not require frequent watering in winter, which makes them a practical option for the season when indoor air is dry because of heating.
Tip
If the orchid is live, water it using the soaking method once every 7–10 days by placing the pot in water for 10–15 minutes, then letting the excess water drain completely. In winter, overwatering is the most common mistake.
8. Simple White Tulip and Pine Centerpiece
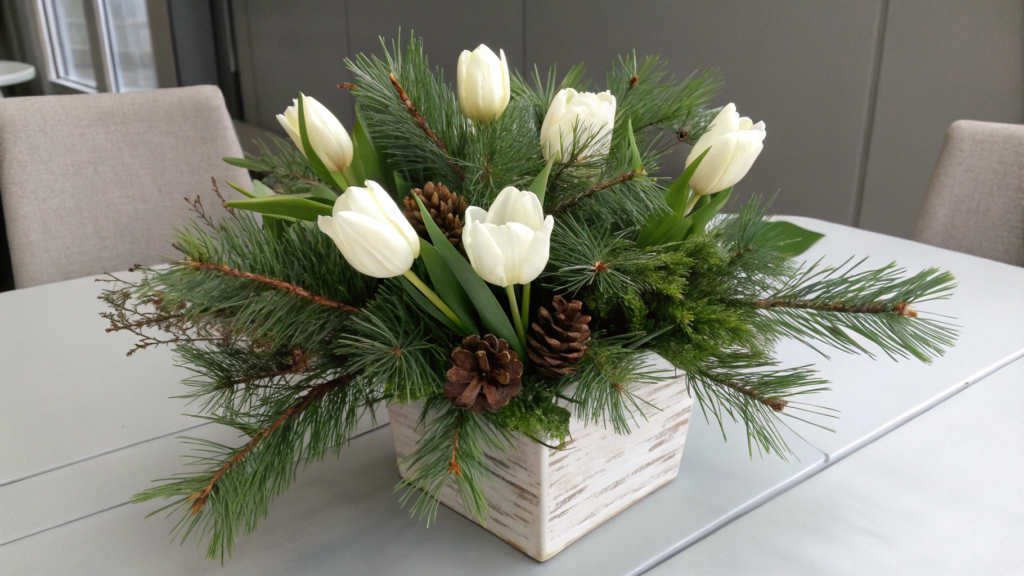
Simple White Tulip and Pine Centerpiece — just white tulips and pine, together creating a neat, light accent on the table.
Tulips in winter always feel a little unexpected. When it’s cold and gray outside, their smooth petals look almost delicate. And pine next to them adds structure and depth. The result is a balance between softness and density.
I like that this arrangement doesn’t require many materials. And at the same time, it looks thoughtful.
What You’ll Need
For a table 48–60 inches (120–150 cm) long:
- 10–15 white tulips with stems 12–16 inches (30–40 cm) long
- 4–6 fresh pine branches 14–18 inches (35–45 cm) long
- A low elongated vase 12–16 inches (30–40 cm) long
- Floral foam or ceramic balls
- Cold water
How to Create Simple White Tulip and Pine Centerpiece
- Prepare the vase and base
If using foam — soak it in advance and place it inside the vase so it fills the shape without gaps. If using ceramic balls — pour them in a 1–2 inch (2.5–5 cm) layer, then add water to a height of 3–4 inches (7–10 cm). - Create the green base
Lay the pine branches along the entire length of the vase. Let them slightly extend beyond the edges by 2–3 inches (5–7 cm). This creates a horizontal line and defines the shape. - Trim the tulips to the right height
Leave stems 8–10 inches (20–25 cm) from the edge of the vase. The center of the arrangement should stay low so it doesn’t block the view across the table. - Insert tulips at a slight angle
A light tilt adds movement. Distribute the flowers along the full length, leaving small spaces between them so the arrangement looks airy. - Add water after final placement
Make sure the water level reaches 2–3 inches (5–7 cm) up the stems. Tulips actively drink water, especially in the first few days. - Check the arrangement from a seated level
Sit at the table and look at it at eye level. If one tulip rises too high, trim it slightly.
Why This Looks Especially Good in Winter
In winter, interiors usually have fewer fresh flowers, and the palette becomes more neutral. White tulips add light, especially on cloudy days when natural light is limited.
Pine compensates for the lack of greenery outside and adds dense color that doesn’t look bright or overpowering. Together they create a clean, calm arrangement that doesn’t compete with winter decor.
The low horizontal shape works well for a dining table: it doesn’t block the view and stays functional even during dinner or gatherings.
Tip
Tulips continue to grow even after being cut. To keep the arrangement in shape, refresh the cut by 0.5 inch (1–1.5 cm) every 2–3 days and adjust the stem height if they stretch higher than the others.
9. Silver Fern and Delicate Baby’s Breath Combo
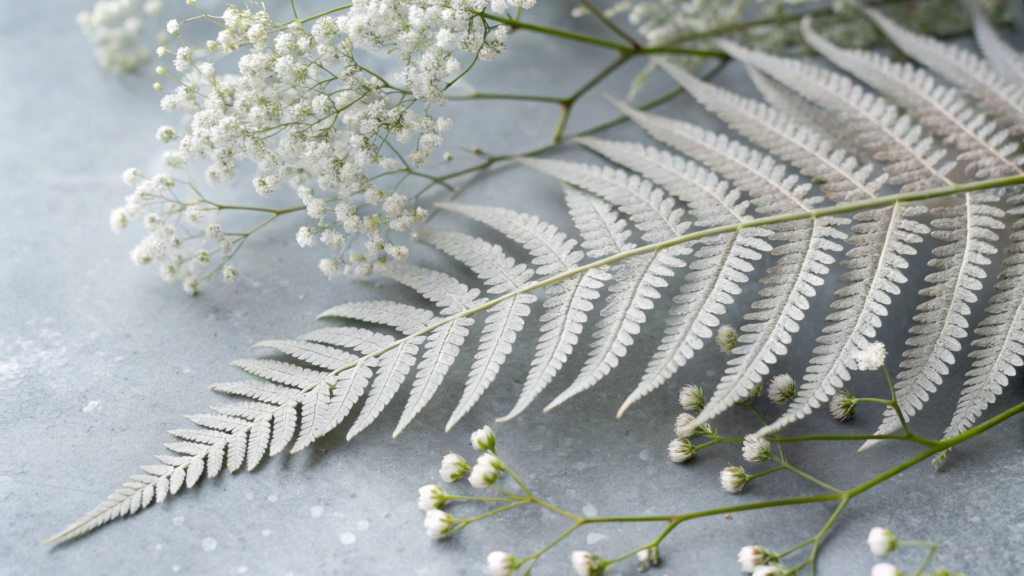
Silver Fern and Delicate Baby’s Breath Combo — just silver fern and airy baby’s breath creating a soft frost-like effect.
Fern gives structure, almost graphic lines. Baby’s breath adds airiness. Together they look subtle, neat, and very modern.
What You’ll Need
For an arrangement on a console or nightstand:
- 4–6 silver fern stems 16–22 inches (40–55 cm) long
- 2–3 baby’s breath stems 14–18 inches (35–45 cm) long
- A narrow vase 10–14 inches (25–35 cm) tall
- Floral foam or glass gems
- A small amount of water
If fresh fern isn’t available, you can use a decorative version. It holds its shape well and looks neat.
How to Create Silver Fern and Delicate Baby’s Breath Combo
- Prepare a stable base
If the vase is narrow and tall (10–14 inches / 25–35 cm), make sure to weigh it down. Add glass gems in a 1–2 inch (2.5–5 cm) layer, then pour water to 3–4 inches (7–10 cm). If using floral foam, trim it exactly to the vase diameter so it doesn’t shift. Fern has a wide crown, and without stability the arrangement may lean. - Build the fern framework
Start with the tallest stem (20–22 inches / 50–55 cm) — it sets the vertical line. Place the other stems at different heights, creating a stepped structure with a 2–3 inch (5–7 cm) difference. Do not place them parallel. Turn the leaves so they open in different directions — this makes the arrangement look fuller instead of flat. - Add baby’s breath to distribute density
Before placing, gently divide larger baby’s breath stems into 2–3 smaller parts. Insert them slightly deeper, so the blooms seem to come out of the fern. The top clusters may extend 1–2 inches (2–5 cm), but not more than 3 inches (7 cm) above the main line. This keeps the shape slim. - Adjust light and volume balance
Step back 4–5 feet (1.2–1.5 m) and look at the arrangement at eye level. If one side feels heavier, slightly rotate the vase or add a small piece of baby’s breath to the opposite side. The composition should feel balanced, not symmetrical. - Fix the final shape
Make sure fern leaves are not pressed against the wall. Leave at least 2 inches (5 cm) of space behind the vase so the greenery looks dimensional. If needed, gently spread the leaves with your fingers — the silver surface catches side light beautifully.
In winter, silver fern fits well into light and cool-toned interiors without standing out too much. Baby’s breath adds lightness and makes the arrangement less strict. It visually softens the greenery and helps create a neat, light accent without bright colors.
Tip
If the baby’s breath is fresh, change the water every 2 days and remove fallen tiny blooms so the arrangement stays neat and keeps its shape.
10. Minimal Modern Succulent in Frosted Glass
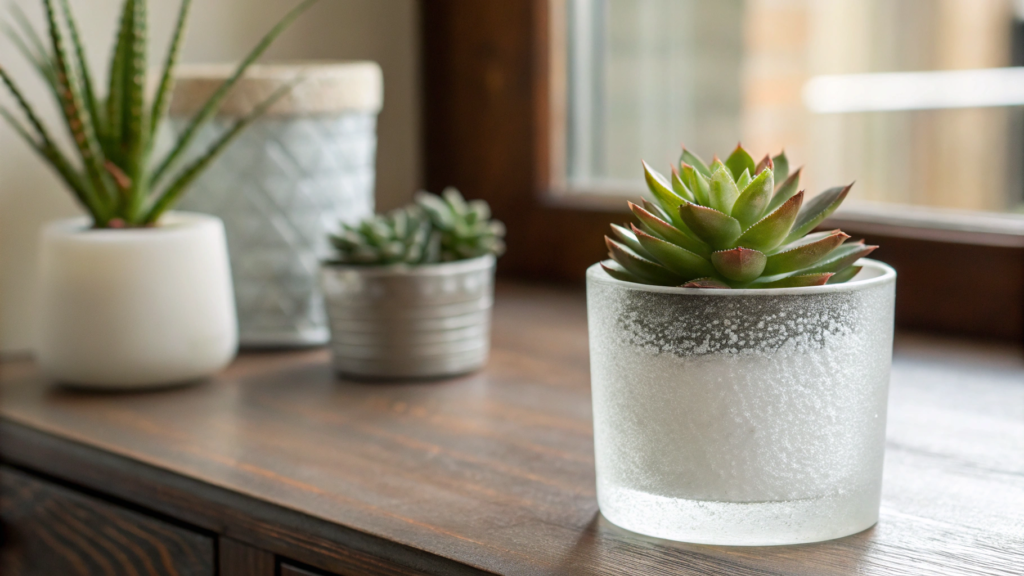
Minimal Modern Succulent in Frosted Glass — no cut flowers. No pine. Just one neat succulent in frosted glass.
I like this format for narrow surfaces — a coffee table, nightstand, or desk. Nothing extra. Just form, texture, and light.
What You’ll Need
For one arrangement:
- 1 succulent 3–5 inches (7–12 cm) in diameter
- A frosted glass cup or planter 4–6 inches (10–15 cm) in diameter
- A drainage layer (expanded clay or small pebbles)
- Potting mix for succulents
- Decorative white gravel
How to Create Minimal Modern Succulent in Frosted Glass
- Prepare the drainage layer
Add expanded clay or pebbles in a 1 inch (2.5 cm) layer at the bottom of the glass. Frosted glass containers often have no drainage holes, so drainage is especially important — succulent roots do not tolerate standing moisture. - Add the potting mix
Fill the glass about two-thirds full with soil for succulents. Lightly press it down with your fingers, but not too tightly — air should circulate around the roots. - Place the plant in the center
Set the succulent so the top of the root ball sits about 0.5 inch (1–1.5 cm) below the rim of the glass. This creates a clean line and prevents soil from spilling out. - Fill the space and level the surface
Add soil around the sides, gently pressing it in place. Then top with a 0.5–1 inch (1–2.5 cm) layer of white decorative gravel. It covers the soil and enhances the minimalist look. - Choose the right location
Place the arrangement where there is bright indirect light. Succulents love light, but in winter avoid cold drafts near the window. - Adjust the proportions
The total height of the arrangement should stay within 4–7 inches (10–18 cm). If the plant feels too tall, choose a wider glass to maintain balance.
A succulent stays green year-round. It doesn’t depend on the season, doesn’t require frequent replacement, and doesn’t lose its shape in a week. The compact size makes this arrangement versatile. It fits modern interiors with clean lines and a calm palette.
Warm Accent This Winter
In winter arrangements, it’s important to understand the size of the surface, consider the source of heat and light, and choose materials that keep their shape longer than a week. When the form is thoughtful, even a simple pine branch or one flower looks neat and appropriate.Try one option from the list and see how the space changes.
Then write in the comments — which arrangement worked best for you and where you placed it. It’s interesting to see which solutions turn out to be the most practical in your home.