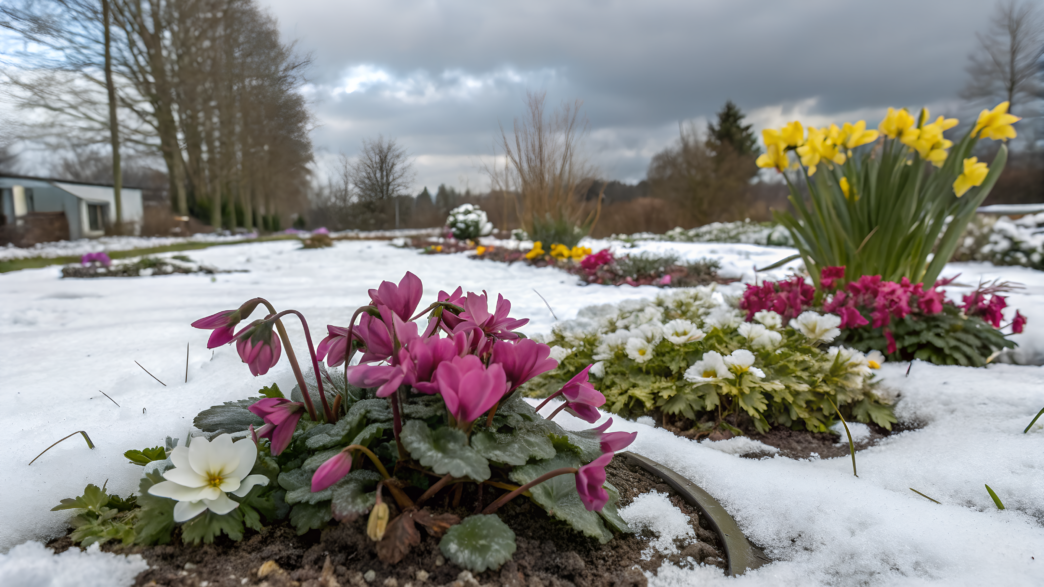
Even at temperatures around 35–40°F (1–4°C), there are plants in a winter garden that keep blooming, hold structure, or maintain expressive foliage. In this article, I tried to gather 10 winter flowers for the garden and containers that can handle cold, short-term frosts, and unstable weather.
There are no random picks here. Only plants that truly establish themselves in flower beds, window boxes, and raised beds — from hellebores and snowdrops to heather and chrysanthemums. And each one requires specific planting conditions, temperature ranges, and practical details that affect the result.
If you follow these guidelines — your winter garden will reward you.
1. Vibrant Pansies That Survive Frost
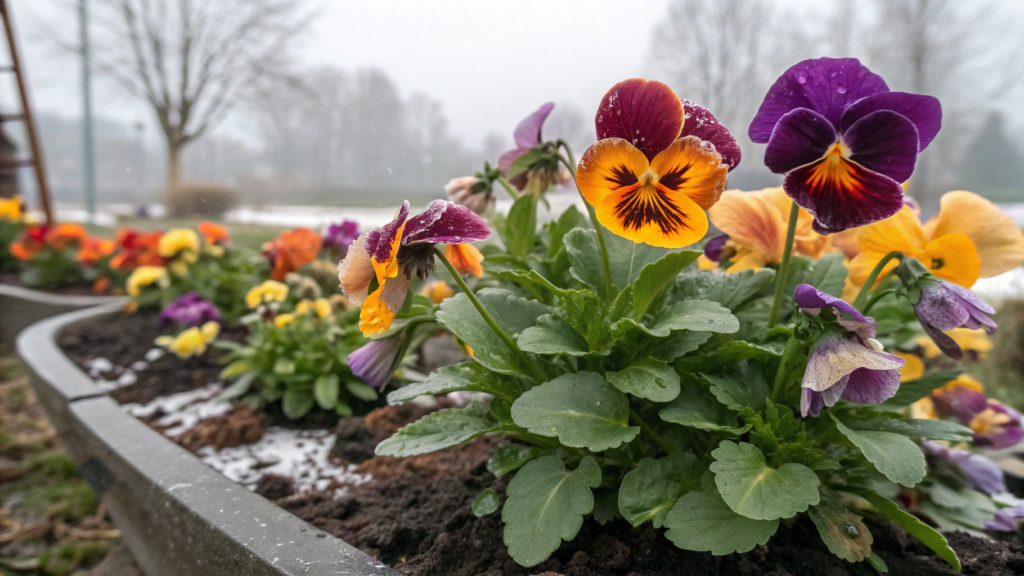
Hardy pansies are one of the most reliable options for a winter flower bed and container plantings.
Varieties from the Viola × wittrockiana group tolerate temperatures down to 10–15°F (-12…-9°C), especially if the root system is protected from excess moisture.
Extension programs from University of Minnesota and Texas A&M AgriLife directly note that pansies remain decorative during winter and are suitable for growing in USDA zones 7–9, and with container protection can successfully overwinter in colder regions.
The main survival factor is not so much frost as proper soil drainage.
Where to Plant Hardy Pansies
Optimal planting parameters:
- Bed depth: minimum 8–10 inches (20–25 cm)
- Container: from 1 gallon (3.8 L) per plant
- Pot diameter: at least 12 inches (30 cm)
- Spacing between plants: 6 inches (15 cm)
- Mulch layer: 1–2 inches (2.5–5 cm)
What You Need
- Hardy pansy seedlings
- Container with drainage holes
- Structural, well-draining container soil, such as FoxFarm Ocean Forest on Amazon
- Slow-release fertilizer 5-10-5
- Mulch (bark, straw, or pine needles)
How to Make Sure Pansies Survive the Winter
- Plant early — at least 4–6 weeks before consistent frost.
This gives roots time to strengthen and develop a full root system. The soil should still be warm — around 50–60°F (10–15°C). If planted too late, the plant will not have time to adapt, and even moderate frost can weaken it. - Ensure perfect drainage.
A container should have at least 3–4 drainage holes about 0.5 inch (1.2 cm) in diameter. In garden beds, you can add a 1-inch (2.5 cm) gravel layer beneath the root zone. Standing water in winter is far more dangerous than frost itself. Waterlogged soil at 28–30°F (-2…-1°C) damages roots faster than dry soil at 20°F (-6°C). - Mulch after the first frosts.
Add a 1–2 inch (2.5–5 cm) layer of mulch around the base of the plant, but do not cover the center of the crown. Mulch stabilizes soil temperature and reduces sharp fluctuations between daytime sun and nighttime cold. This is especially important in regions with alternating thaws and freezes. - Use row cover in extreme cold.
If the forecast predicts temperatures below 5°F (-15°C), cover plants with frost fabric rated 0.9–1.2 oz/yd². The cover should rest loosely without pressing on the leaves. During the day, if temperatures rise above 32°F (0°C), lift the material slightly to prevent condensation and crown rot.
Tip. If you want winter pansies to bloom longer, regularly remove spent blooms even during winter. This stimulates new flower production. Yes, even at 35°F (1–2°C), the plant still responds to pruning.
And one more thing — avoid nitrogen fertilizers in late fall. Excessively active growth makes tissues more sensitive to sharp temperature swings.
2. Growing Cyclamens in Colorful Pots
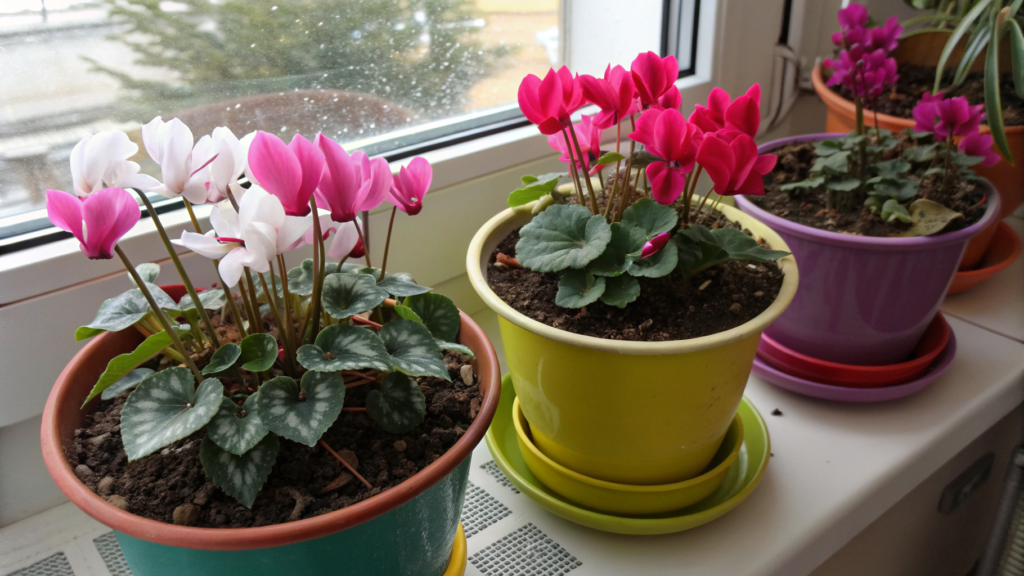
Cyclamen persicum is not for an open flower bed in zone 5. It’s for pots. For controlled conditions. And that’s exactly why there’s less disappointment with it.
Cyclamens start actively blooming at 40–55°F (4–13°C). In warmer weather, they quickly go into stress. That’s why winter and early spring are their natural season for container growing.
According to University of Florida IFAS Extension, Cyclamen persicum prefers cool air, indirect light, and consistently moist — but not wet — soil. The main mistake is overwatering.
Why Containers Matter
In the ground, cyclamens often suffer from temperature swings and moisture fluctuations. In a pot, you control:
- soil volume
- drainage
- plant mobility
- protection from frost below 32°F (0°C)
And yes, pot color matters. Bright ceramic containers enhance the flower tones — white, raspberry, deep burgundy. In winter, that contrast is especially noticeable.
What You Need
- A live Cyclamen persicum plant in a pot
- A container with drainage holes (1–2 gallons / 3.8–7.5 L, minimum 8–10 inches / 20–25 cm in diameter)
- Light, well-aerated soil mix
- Expanded clay or gravel for drainage
How to Keep Cyclamen Alive in a Container During Winter
- Use a light substrate with good aeration.
The soil should be loose, with 20–30% perlite or sand added. Dense soil traps excess moisture, and the cyclamen tuber is sensitive to rot. - Plant so the top of the tuber sits slightly above soil level.
Burying it increases the risk of rot. The upper part of the tuber should remain visible by about 0.5 inch (1–1.5 cm). - Water from below, not from above.
Pour water into the saucer and let the soil absorb it for 15–20 minutes. Then drain the excess. Water entering the center of the rosette often causes crown rot. - Protect from hard frost.
If temperatures drop below 32°F (0°C), move the container to a cool indoor space or cover it with insulating material. Cyclamen tolerates light frost but does not handle prolonged freezing.
Tip. To extend blooming, remove spent flower stems completely — gently twist them off at the base instead of cutting. This reduces the risk of rot and encourages new buds.
And one more thing — don’t place cyclamen near heaters. At temperatures above 65°F (18°C), it quickly finishes its bloom cycle.
3. Hardy Primroses for Shaded Corners
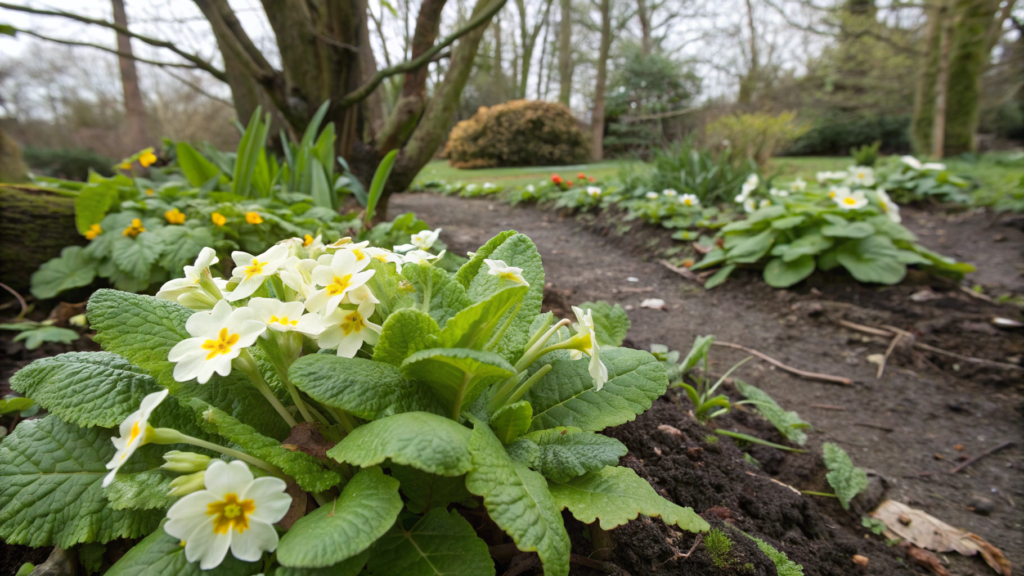
You will most likely have a spot in your garden where it is always damp in winter, cool, and almost no sun — that is the territory for hardy primroses. In exactly these places, primroses feel best.
We are talking about Primula vulgaris and Primula acaulis varieties. They tolerate temperatures down to 5–10°F (-15…-12°C) provided the soil remains stable and without ice crust.
Extension programs from PennState and University of Vermont note that primroses belong to cold-hardy early spring perennials capable of blooming in cool early spring weather. And yes, they do not like drying out. But they do not need swamp conditions either.
Ideal Conditions for Winter Primrose
- Partial or filtered shade
- Soil with at least 30% organic matter content
- Planting depth — crown level with the soil surface
- Spacing between plants — 8 inches (20 cm)
For shaded corners along a house foundation, it is advisable to dig planting holes about 10 inches (25 cm) wide and 8 inches (20 cm) deep. This allows you to add compost and improve the structure of heavy soil.
What You Need
- Hardy primroses (Primula vulgaris or P. acaulis)
- Compost or leaf mold
- Loose, well-draining soil
- Mulch (thin layer, up to 1 inch / 2.5 cm)
If planting in a container, choose a pot of at least 2 gallons (7.5 L) — primrose roots are dense and prefer stable moisture.
How to Make Sure Primroses Grow Successfully in Shade During Winter
- Prepare the soil in advance.
Dig the area to a depth of 8–10 inches (20–25 cm) and incorporate at least 2–3 inches (5–7 cm) of compost. Primroses prefer slightly acidic soil with a pH of 6.0–6.5. Heavy clay holds water too long in winter — this increases the risk of root rot. - Plant close, but not too close.
A spacing of 8 inches (20 cm) allows the plants to close in by spring and create a dense color patch. If planted too tightly, air circulation decreases; if too widely spaced, the composition looks empty. - Control moisture levels.
The soil should remain moderately moist, but not wet. If the site is in an area of active snowmelt, raise the bed by 2–3 inches (5–7 cm) so water does not accumulate around the crown. - Prune damaged leaves.
After severe frost, individual leaves may lose turgor. It is better to remove them carefully to avoid creating fungal infection points. Use clean tools and do not cut too low.
Tip. If you want to strengthen the effect in a shaded corner, plant primroses in groups of 5–7 plants of the same color. A single plant looks modest. A group creates a dense color patch even in a gray winter garden.
Do not fertilize in December–January. Primroses activate with the natural increase of daylight. Early stimulation of growth will only weaken the plant.
4. Snowdrops That Bloom Through Snow
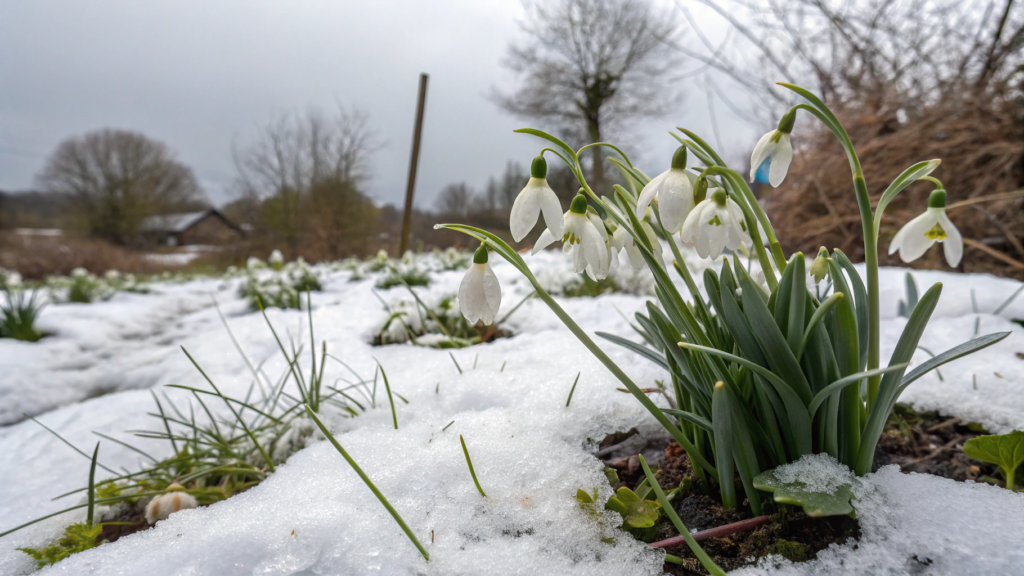
The classic European snowdrop (Galanthus nivalis) withstands морозы down to -20°F (-28°C) if the bulbs are planted correctly and not sitting in wet soil. This is not a delicate houseplant. It is a small, stubborn plant that appears when there are still 3–6 inches (7–15 cm) of snow around. And that is its strength.
According to the Royal Horticultural Society and University of Illinois Extension, snowdrops are among the most cold-hardy bulb perennials and begin growth and flowering very early — at cool soil temperatures and with minimal warming.
Where to Plant Snowdrops
Snowdrops do not like open, windy areas. They grow best:
- Under deciduous trees
- Along pathways
- On slopes with natural drainage
- In groups of 10–25 bulbs
Planting depth — 3 inches (7–8 cm).
Spacing between bulbs — 3 inches (7–8 cm). If the soil is heavy, add 20–30% sand or fine gravel to the planting hole.
What You Need
- Galanthus nivalis bulbs. When purchasing, pay attention to bulb size — ideally 10/12 cm in circumference. A large bulb almost guarantees flowering in the first season.
- Compost (layer 1 inch / 2.5 cm)
- Loose, well-drained soil
- Planting tool
How to Make Sure Snowdrops Bloom Reliably Every Year
- Plant in fall while the soil is still warm.
The optimal time is when soil temperature is around 50–55°F (10–13°C). This allows the bulb to begin rooting before freezing. Planting in cold soil reduces the survival rate. - Avoid areas with standing meltwater.
Snowdrops tolerate frost, but they do not tolerate constant moisture. If the site is flat, raise the bed by 2–3 inches (5–7 cm) or create a slight slope for drainage. - Do not cut foliage immediately after flowering.
After the flower fades, leaves should remain for at least 4–6 weeks. During this period, the bulb stores nutrients for the next year. Early removal weakens the plant. - Divide clumps every 3–4 years.
When plantings become crowded, flowering becomes less intense. In summer, during dormancy, carefully dig up the cluster of bulbs and divide them. Replanting at a depth of 3 inches (7–8 cm) stimulates renewal.
Snowdrops in Winter Garden Design
Snowdrops rarely look striking alone. But in mass, they create a dense white patch that remains visible even through light snow cover.
Good combinations: snowdrops + dark mulch, snowdrops + winter ivy, snowdrops + dwarf conifers.
If planted under a deciduous tree, they receive enough light in early spring before the canopy leafs out. This is the natural cycle they are adapted to.
Technique for Natural Propagation
Two to three years after planting, you will notice clumps beginning to thicken. Snowdrops reproduce through “offsets” — daughter bulbs.
To speed up the process:
- Do not disturb the soil after flowering
- Do not dig over the area
- Add a thin layer of compost once a year
Over time, a dense carpet forms. And in early spring, the garden begins to look not empty, but awakened.
Tip. If you want snowdrops to look natural, do not plant them in a strict line. Scatter the bulbs on the ground and plant them where they fall. This method creates a sense of “self-seeding,” and in spring the composition looks alive, not planned down to the millimeter.
5. Winter Heathers for Year-Round Texture
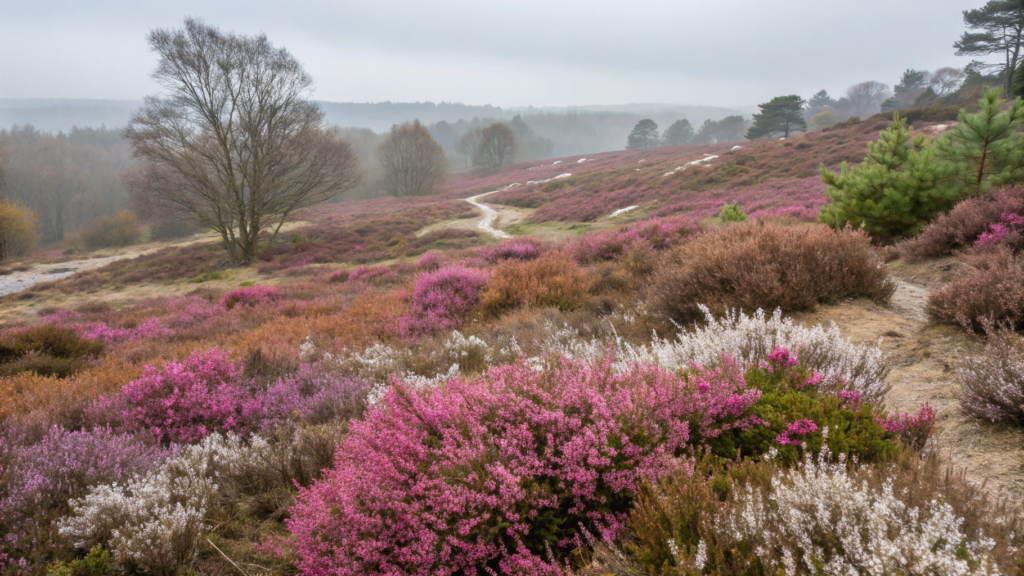
Winter Heather (Erica carnea) is the background. The base. The layer that keeps the garden looking alive even when most plants are dormant in winter.
A dense, low shrub 6–12 inches (15–30 cm) tall creates a textured carpet that remains decorative down to about -20°F (-28°C).
Erica carnea is considered one of the most cold-hardy winter-blooming shrubs. The Royal Horticultural Society and Oregon State Extension confirm its hardiness for approximately USDA zones 5–8 (sometimes 4–8 depending on the cultivar).
And when everything around is gray — heather is already pink, lilac, or white.
Why Winter Heather Matters in a Composition
- It keeps green mass year-round
- It blooms from January to March
- It creates dense ground coverage
- It suppresses weed growth
One shrub looks neat. But 5–7 shrubs create continuous texture.
Winter Heather is best placed on slopes, in rock gardens, along pathways, in front of conifers, or in the foreground of a winter bed.
Spacing between shrubs — 12–18 inches (30–45 cm). Planting hole depth — 10–12 inches (25–30 cm)
Hole diameter — at least twice as wide as the root ball
What You Need
- Live Erica carnea plants in containers (4 inch or 1 gallon pots)
- Acidic soil (pH 5.0–6.5)
- Peat or pine needles for acidifying
- Compost (layer 1–2 inches / 2.5–5 cm at planting)
- Drainage material (gravel or coarse sand)
How to Keep Winter Heather Dense and Blooming Every Season
- Prepare soil with the correct acidity.
Before planting, test the pH. If it is above 6.5, incorporate 2–3 inches (5–7 cm) of acidic peat and mix it into the existing soil to a depth of 10–12 inches (25–30 cm). Without correcting acidity, heather gradually loses color intensity and slows growth. - Ensure drainage without drying out the site.
Add 1–2 inches (2.5–5 cm) of gravel at the bottom of the planting hole. The soil should remain moderately moist, not waterlogged. In winter, excess water can cause crown rot. - Plant in groups, not as single shrubs.
Ideally — 3, 5, or 7 plants in one zone. A spacing of 12–18 inches (30–45 cm) allows shrubs to close in within 2–3 seasons and create a dense carpet. Wider spacing leaves the structure fragmented. - Prune lightly after flowering.
Immediately after flowering ends (usually March–April), shorten the shoots by 1–2 inches (2.5–5 cm). This encourages denser growth and prevents the center of the shrub from becoming bare. Do not cut into old wood — heather does not regenerate well from it.
Winter Heather works especially well with dwarf conifers, junipers, boxwood, ornamental grasses, and snowdrops.
The contrast between dark evergreen foliage and pink bloom strengthens the visual effect. And the dense canopy of heather covers the soil, keeping the bed neat even without snow.
Tip. If your winters are windy, plant heather in areas protected from northern winds. Cold, dry wind causes more damage than frost itself. In exposed areas, you can temporarily install mesh wind protection about 18–24 inches (45–60 cm) high.
6. Mixing Hellebores with Early Tulips

The combination of hellebores (Hellebores) and early tulips works not because of brightness, but because of smart overlap in bloom time and height.
According to the Royal Horticultural Society and Cornell Cooperative Extension, Helleborus orientalis and hybrids of Helleborus x hybridus are winter-blooming perennials capable of keeping decorative foliage year-round. Botanical tulips such as Tulipa kaufmanniana and Tulipa greigii are known for earlier flowering compared to most classic tulip varieties.
Why Hellebores and Early Tulips Work Together
Hellebores create a dense dark-green background. Their foliage remains decorative even in winter, and flowering begins very early — already at 35–40°F (1–4°C). The bed does not look empty.
Then early tulips enter. They are lower, but brighter. Their smooth, defined blooms rise between hellebore clumps and create a light accent.
This is not competition — it is balance:
- hellebore — mass and depth
- tulip — color and vertical lift
And most importantly, bloom time overlaps, so the garden does not lose visual continuity between seasons.
What You Need
- Live Helleborus plants (preferably 1 gallon pots)
- Early botanical tulip bulbs (10/12 cm bulbs)
- Compost
- Drainage material
- Slow-release fertilizer 5-10-5
How to Plant Hellebores and Early Tulips Correctly
- Prepare the planting area to a depth of at least 12 inches (30 cm).
Hellebores have a strong root system. Dig the area thoroughly and incorporate 2–3 inches (5–7 cm) of compost, mixing it well with the existing soil. The soil should retain moisture but never be wet. - Plant hellebores first.
Space plants 18 inches (45 cm) apart. The crown should sit level with the soil surface. Planting too deep can cause crown rot, and planting too high can lead to drying out. - Place tulip bulbs between hellebores.
Plant them at a depth of 6 inches (15 cm). Space bulbs 4 inches (10 cm) apart. Position tulips slightly toward the front of the composition so their blooms are visible above the hellebore foliage. - Mulch with a thin layer of 1–2 inches (2.5–5 cm).
This stabilizes soil temperature and reduces fluctuations during winter thaws. - Do not cut hellebore foliage too early.
Old leaves can be removed carefully at the end of winter when new flower stems begin to appear. But do not rush to clear the plant completely. After early tulips finish blooming, the dense hellebore foliage preserves the volume of the bed and prevents empty gaps. Removing it too early breaks the structure of the composition.
Small Design Technique
If you want to increase depth in the composition:
- Choose dark-toned hellebores (burgundy, plum)
- Add light or cream early tulips
- Repeat the tulip color in another part of the bed
Color repetition makes the composition cohesive rather than random.
This type of planting works best in partial shade under deciduous trees, on the east side of the house, in front of hedges, or along pathways.The soil should be loose, with at least 25–30% organic matter.
7. Cold Weather Violas for Window Boxes

Violas (Viola cornuta and hybrids) are more compact and hardier “relatives” of pansies. And for winter window boxes, they work even better.
Violas are classified as cold-hardy annuals and tolerate temperatures below freezing, especially when the root zone is protected. According to University of Minnesota Extension, they are considered more cold-tolerant than many other ornamental forms.
And this matters: they are not as sensitive to wind as cyclamens. For windows, that makes a real difference.
Why Violas Work for Window Boxes
A window box is always a stress zone:
- wind
- rapid temperature swings
- limited soil volume
- drying out
Violas are compact (6–8 inches / 15–20 cm), root quickly, and form a dense carpet. They do not stretch or lose shape in cool weather.
Their blooming continues at 35–45°F (1–7°C), and in a mild winter — almost without interruption.
What You Need
- Live Viola cornuta plants (plug plants or 4 inch pots)
- Window box at least 6–8 inches (15–20 cm) deep
- Light, well-draining soil
- Perlite or fine gravel
- Slow-release fertilizer with low nitrogen
How to Keep Violas in Window Boxes from Freezing
- Choose a box deep enough.
Minimum depth — 6 inches (15 cm), ideally 8 inches (20 cm). A thin soil layer freezes faster. The larger the soil volume, the more stable the root temperature. - Add a 1 inch (2.5 cm) drainage layer.
Place expanded clay or fine gravel at the bottom. This reduces the risk of standing water, which in winter is more dangerous than frost. - Plant closer than in summer.
Space plants 4 inches (10 cm) apart. Growth slows in cold weather, so dense planting creates a finished look immediately. - Mulch the surface with a thin layer.
Apply 0.5–1 inch (1–2.5 cm) of bark or pine needles to stabilize soil temperature. - Protect the box from direct wind.
If the window faces north or west, and temperatures drop below 15°F (-9°C), temporarily wrap the box with insulating material or bubble wrap.
Tip. Remove spent blooms regularly — even in winter. This stimulates new bud formation. And avoid excess nitrogen: too much soft growth becomes weaker in cold conditions.
How to Make the Composition Expressive
With violas in window boxes, it is easy to overdo it. It is better to choose one dominant color and one supporting shade. For example, deep purple paired with soft yellow or cream. The contrast should be visible, but not loud.
Another technique is color repetition. If one box uses a dark blue tone, repeat it in another container or near the front door. This keeps the composition unified rather than scattered.
In winter, structure matters more than abundance. A dense planting of one or two shades looks cleaner and stronger than a multicolored mix.
8. Bright Calendulas for Instant Cheer
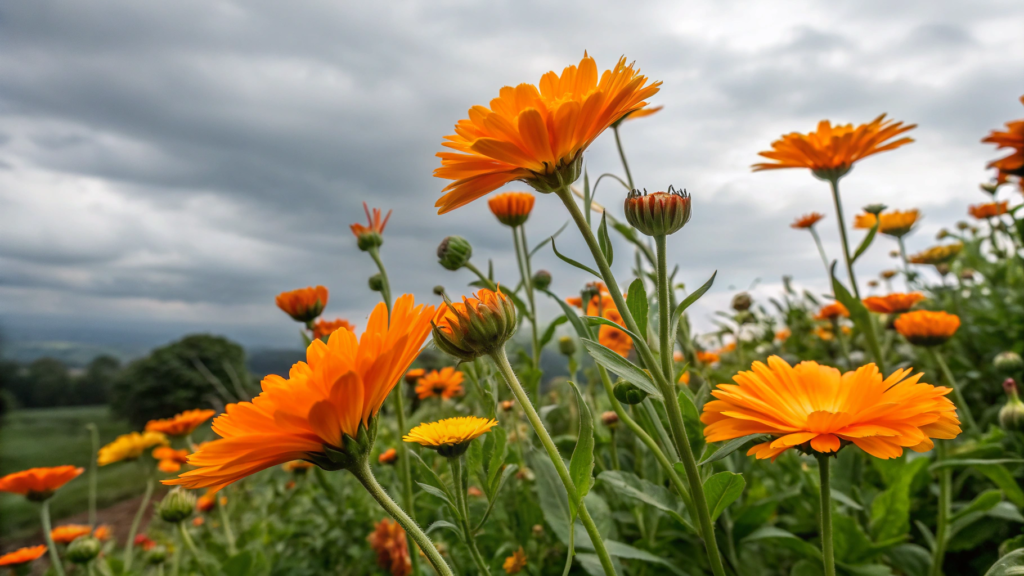
Calendula (Calendula officinalis) is not afraid of cool weather and continues blooming at 35–45°F (1–7°C). It tolerates light frosts down to 28°F (-2°C) without serious damage.
According to Oregon State University Extension, calendula is classified as a cold-hardy annual capable of tolerating light frost and maintaining decorative value in cool conditions.
And most importantly — its color is not “winter.” It is warm. Orange, apricot, sunny yellow. Against a gray sky, it looks striking.
Where to Use Calendula in Winter
- In raised beds
- In containers 1–2 gallons (3.8–7.5 L)
- Along pathways
- In sunny spots near a south-facing wall
Calendula prefers full sun, at least 6 hours per day. In shade, flowering becomes weaker.
Spacing between plants — 8–10 inches (20–25 cm). Plant height — 12–18 inches (30–45 cm)
What You Need
- Calendula officinalis seeds or established seedlings
- Light, well-draining soil
- Compost
- Container with drainage (if not planting in ground)
How to Keep Calendula Blooming Longer in Cool Weather
- Sow or plant at the right time.
Calendula establishes best when soil temperature is around 50–60°F (10–15°C). Sow seeds at a depth of 0.5 inch (1–1.5 cm) and gently firm the soil. If sowing in fall, do so 4–6 weeks before consistent frost so plants root properly and enter winter established. - Monitor watering — especially in containers.
Soil should be moderately moist, not wet. In cold weather, evaporation slows and overwatering becomes common. Check soil with your finger at 1 inch (2.5 cm) depth: if it feels moist, delay watering. Constant dampness at 35–40°F (1–4°C) weakens plant resilience. - Fertilize moderately and correctly.
Use fertilizer with a formula such as 5-10-5 or 4-8-6 every 3–4 weeks. Excess nitrogen (the first number) stimulates leaf growth but reduces bud formation. In cool weather, the plant does not need aggressive growth — it needs stable flowering. - Remove spent flowers regularly.
Cut flower stems back to the first leaf node. If dry seed heads remain, the plant shifts energy into seed production and reduces new buds. Even at 40°F (4°C), calendula responds to pruning and continues forming flower buds. - Protect when temperatures drop below 25°F (-4°C).
Calendula tolerates light frost, but severe cold damages flower tissue. In open ground, use frost fabric rated 0.9–1.2 oz/yd². In containers, move plants closer to a south-facing wall — walls release stored heat at night.
Tip. Calendula pairs well with dark mulch and conifers. Its bright color stands out against deep green foliage. And yes, the flowers are edible. They can be added to salads or dried for tea. It is not only decorative, but also useful.
9. Dusty Millers That Outlast the Chill
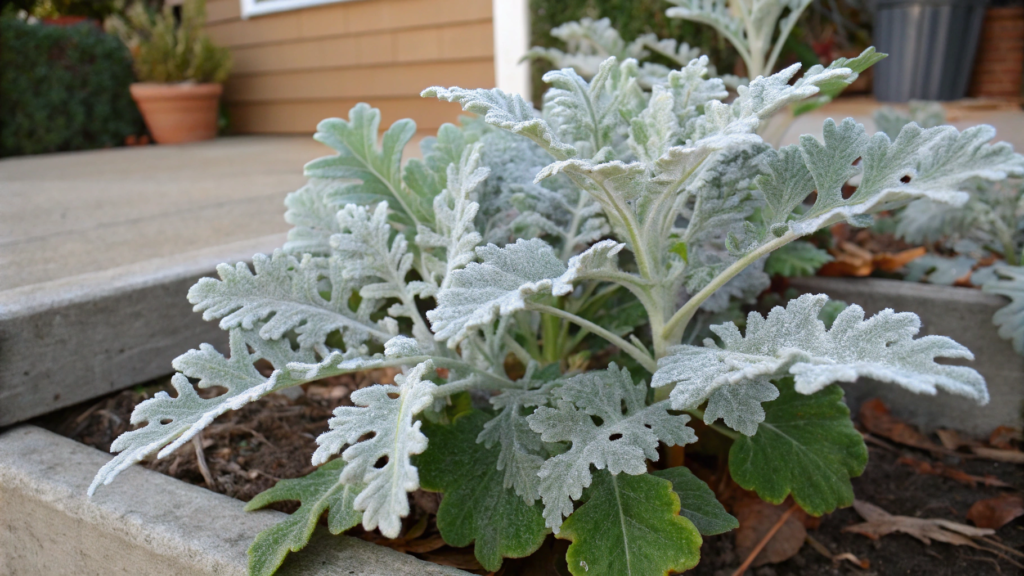
This plant is valued not for flowers, but for its foliage: silvery, velvety, deeply cut. And it’s exactly this foliage that stays decorative even when temperatures drop to 20–25°F (-6…-4°C).
According to University of California Cooperative Extension, Dusty Miller is considered a relatively cold-hardy ornamental foliage plant. In USDA zones 8–10, it is grown as a perennial, and in colder regions — as a hardy annual.
And what matters: its silver tone enhances any bright plants nearby — violas, calendula, pansies.
Dusty Miller in winter works well in 1–2 gallon (3.8–7.5 L) containers, in window boxes as a background, along pathways, and in combination with bright winter flowers.
Plant height — 8–15 inches (20–38 cm). Plant width — up to 12 inches (30 cm).
What You Need
- Live Dusty Miller plants (4 inch or 1 gallon pots)
- Light, well-draining soil
- Container with drainage holes
- Moderate fertilizer with low nitrogen
How to Help Dusty Miller Keep Its Shape and Withstand the Cold
- Prepare the right soil before planting.
Dusty Miller does not tolerate heavy, compacted soil. Add 20–30% perlite or coarse sand to the planting mix. If growing in a 1–2 gallon (3.8–7.5 L) container, make sure there are at least 3–4 drainage holes at the bottom. In winter, standing water at 30–35°F (-1…+2°C) causes rot faster than frost damages the leaves. - Reduce watering in cool weather.
At temperatures below 45°F (7°C), growth slows significantly. Water only when the top 1–2 inches (2.5–5 cm) of soil are completely dry. Constant moisture in cold conditions weakens the root system and makes foliage soft. - Avoid nitrogen feeding in late fall.
Nitrogen stimulates active growth, and soft young tissue tolerates frost poorly. The last feeding should be done no later than 6 weeks before the first frost. During winter, stop fertilizing completely. - Protect from ice crust and wet snow.
Dusty Miller leaves tolerate dry cold down to 20–25°F (-6…-4°C), but ice crust can cause damage. If freezing is expected after rain, gently cover the plant with lightweight frost fabric or shake off ice so stems don’t snap. - Maintain a compact shape with light pinching.
If the plant stretched in fall, gently pinch back the tips by 0.5–1 inch (1–2.5 cm). This helps preserve a dense structure and prevents stems from collapsing under snow.
Tip. The silver foliage of Dusty Miller deepens the composition. If you plant dark purple violas or bright calendula next to it, the silvery shade “highlights” their color, making it appear richer.
10. Chrysanthemums for Late-Season Color
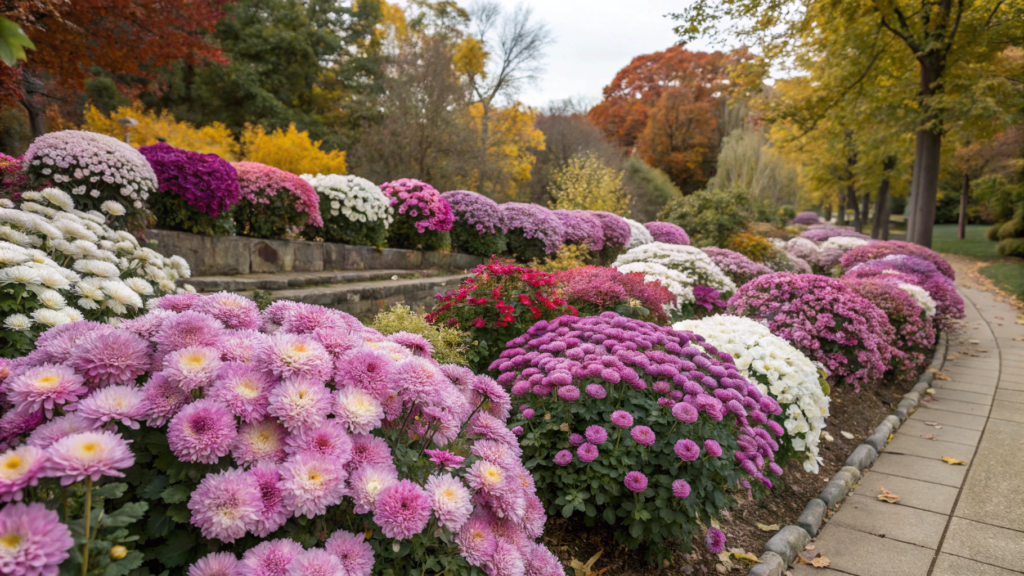
Chrysanthemums (Chrysanthemum × morifolium) are highly valued for late fall and early winter color. They bridge the gap between the end of summer annuals and the real cold.
Most garden chrysanthemums tolerate light frosts. According to PennState Extension, hardy garden varieties successfully overwinter in USDA zones 5–9 with good drainage. At the same time, container-grown florist forms are not always suitable for perennial growing.
What You Need
- Live hardy garden mums, not greenhouse florist forms
- Well-drained, fertile soil
- Compost (2–3 inches / 5–7 cm when preparing the site)
- Mulch for winter protection
How to Help Chrysanthemums Survive the Cold and Return Next Year
- Plant early and at the correct depth.
Garden mums should be planted at least 6–8 weeks before the first hard frost. When planting, gently loosen the root ball and place it so the top sits at soil level — not higher, not deeper. After planting, water thoroughly so soil fills all air pockets. - Prepare drainage in advance, not “just in case.”
In heavy clay soil, add 20–30% coarse sand or fine gravel and 2–3 inches (5–7 cm) of compost. Chrysanthemums tolerate frost down to 25°F (-4°C), but constant winter moisture destroys them faster than cold. If the area is low, form a raised bed 4–6 inches (10–15 cm) high. - Do not cut the plant down completely in fall.
After the first frost, flowers will darken — that’s normal. Cut stems back to 6–8 inches (15–20 cm), not to the ground. These stems help trap snow and create natural protection for the root zone. Cutting everything down exposes the center of the plant to freezing. - Mulch only after light soil freezing.
If you mulch too early, soil stays warm and wet — roots may rot. When the top layer lightly freezes (around 28–32°F / -2…0°C), add 2–3 inches (5–7 cm) of mulch: bark, straw, or pine needles. Mulch protects against temperature swings, not against cold itself. - Protect container plants separately.
In a 2–3 gallon (7.5–11 L) pot, roots freeze faster. It’s best to bury the container in the ground or wrap it with insulating material. If possible, move the plant to a cool space at 35–45°F (1–7°C) — this is the safest overwintering option.
Chrysanthemums are not complicated. They are lost more often from improper fall preparation than from frost. If you provide drainage, don’t rush pruning, and mulch correctly — the plant will return calmly in spring.
Tip. If growing chrysanthemums in a container, for winter it’s better to bury the pot in the ground or move it to a cool, not warm space (35–45°F / 1–7°C). In containers, roots freeze faster than in soil.
Chrysanthemums provide dense, saturated color when the garden needs it most. And if you choose hardy garden varieties, they won’t remain a one-season decoration.
Your Experience Matters
If you choose plants correctly, beds and containers don’t look empty between seasons. Color shifts into texture, texture into new bloom. One plant supports another.
In the end, the garden stays alive — not because of excess, but because of thoughtful structure.
If you’ve already tried growing winter flowers, share in the comments: what performed best during the cold season? Were there plants that pleasantly surprised you — or ones that didn’t survive their first winter?Please include your climate zone — it will help other readers navigate their choices.