Even though winter isn’t the best time for the garden, the porch still shouldn’t look empty or neglected. Lindy and I have tried dozens of winter planter setups — not all of them successful, by the way. And we learned that in winter, shape, stability, and materials work far better than the amount of decor.
These 10 winter planter ideas actually survive cold, wind, and snow without needing constant care or attention. Only the options we use ourselves — at the entryway, under windows, and on an open porch.
I break down each idea step by step: what to use, how to put it together, and why this exact combination holds up all winter. If you want your home to feel lived-in even in January — keep reading.
1. Frost-Proof Evergreen and Berry Box

Every winter, Lindy and I argue a little about the porch. She’s always for “liveliness,” even in the frost. I’m for stability and simplicity. In the end, Frost-Proof Evergreen and Berry Box became that exact compromise — both visually and practically.
What you’ll need for the arrangement
- Frost-proof planter box
Fiberstone and dense outdoor plastic have worked best for us. An ideal porch size is 30–36 inches long and 12–14 inches wide
(≈ 75–90 × 30–35 cm) - Evergreen branches (the structure of the arrangement)
We most often use:
- dwarf spruce
- white pine tips
- juniper
- boxwood
- dwarf spruce
- Berry branches for color
Winterberry holly is ideal, but if it’s not available, high-quality faux branches work too. The key is a matte finish, without that “plastic shine.” - Drainage
Fine gravel or crushed stone — a 2–3 inch layer (≈ 5–7 cm) - Dense outdoor soil
Not all-purpose. It’s too loose and freezes too fast. - Small decorative elements (optional)
Pinecones, thin birch twigs, spruce tips.
How to assemble it step by step
- Prepare the container. If your planter box doesn’t have drainage holes, make them — even in winter.
Standing water in freezing temperatures leads to damaged roots. - Add the drainage layer. The gravel should fully cover the bottom. Roots shouldn’t sit in ice for weeks.
- Add the soil. Fill the planter to about ⅔ of its height.
Don’t compact it too tightly — winter soil gets heavy on its own. - Start with the evergreens. Place the tallest branches closer to the center or the back of the box.
They create the shape and hold the entire arrangement together. - Add the berry branches. Insert them at an angle, slightly crossing. Too much symmetry looks artificial.
As Lindy always says: “Let it look like it grew there on its own.” - Light stabilization. If the branches move, gently secure them inside the soil with jute twine.
You won’t see it from the outside, but in 30–40 mph winds (≈ 50–65 km/h), everything stays in place. - Final check. Step back a couple of feet and look.
If something feels unnecessary — remove it. In winter, fewer details read better.
Tip
When temperatures stay below -10°F (≈ -23°C), we often use cut evergreen branches instead of live plants with roots. It’s simply more reliable.
This arrangement is a solid starting point and valuable because it lasts the entire winter, not just the first couple of weeks. Evergreens keep their shape, berry branches add color even on gray days, and the box itself doesn’t need watering or constant fixing. It’s a strong option if you want the porch to look cared for without ongoing effort.
2. Rustic Birch Log and Pine Planter
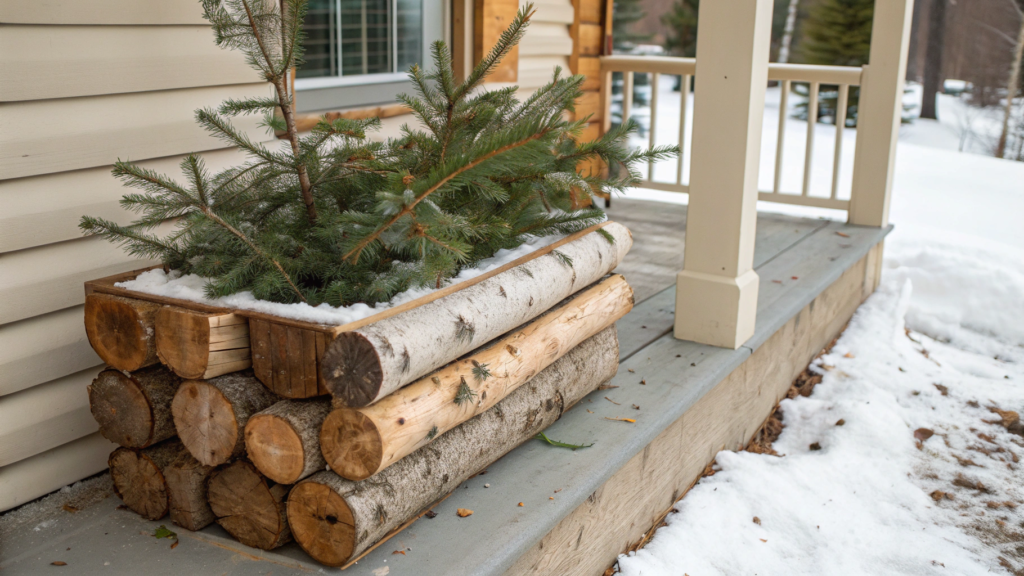
This arrangement has exactly what Lindy and I love in winter: not polished beauty, but something that looks like you just came back from a walk, brought in a few branches, and the porch instantly felt alive.
Once in Idaho, we were clearing an old birch near the fence (it had started leaning dangerously), and we ended up with a pile of log sections. Throwing them away didn’t feel right. We stacked them under the shed… and a week later, some of them were already on the porch as this Rustic Birch Log and Pine Planter. It looked so “right” that we ended up repeating it every winter after that.
What you’ll need for the arrangement
- Birch log sections or cut logs
Diameter: 3–6 inches (≈ 7–15 cm). Length: 10–18 inches works best (≈ 25–45 cm)
Ideally, they should already be air-dried. - Deep planter box / container
Minimum depth — 10–12 inches (≈ 25–30 cm) - Pine branches (main volume)
White pine or Scotch pine — soft, full, and easy to shape. - Accent evergreen branches (optional, but usually worth it)
Cedar or juniper — for structure along the edges. - Drainage and soil
Gravel and dense outdoor soil (not “all-purpose indoor mix”). - Stabilizers
Stones, pieces of bark, thin wooden wedges (even scrap cutoffs work).
How to assemble it step by step
- Prepare the container. Check the drainage holes — in winter this matters even more, because standing water quickly turns into an ice plug. If there are no holes, drill a few in the bottom, otherwise the whole setup will suffer from moisture and freezing. Simple wooden boxes work especially well for this look, like the La Jolie Muse Rustic Wooden Outdoor Planter Box (Amazon).
- Add the drainage layer. Pour in 2–3 inches of gravel (≈ 5–7 cm) and level it out. This layer isn’t optional — it helps water drain and reduces the risk of the soil turning into a solid block of ice. If the planter is large and heavy, going closer to 3 inches adds extra peace of mind.
- Fill with soil about halfway. Don’t fill the container to the top right away. Birch logs take up space, and you need room to place and secure them. Lightly press the soil down with your hand, but don’t compact it hard — air in the soil actually helps stability in winter.
- Place the birch logs (this is the structure). Start with 3–5 logs, positioning them closer to the center or slightly toward the back of the container. Vary the heights so it looks like a natural stack rather than a fence. Push each log slightly into the soil so it doesn’t wobble — this step is critical, otherwise everything will start shifting in the wind.
- Secure the birch and hide the mechanics. Add more soil around the logs and press it in with your hands until they feel solid. If one still moves, wedge a small stone or piece of bark at the base inside the soil. Then lightly cover the surface so it doesn’t look like a construction site — everything should feel clean and intentional.
- Add pine branches for volume. Insert the pine branches between the logs at an angle, directing them outward and slightly upward. Start near the center to establish the main shape, then fill in the edges so the arrangement looks wide and full. Avoid symmetry — small variations in angle make the whole thing feel natural right away.
- Final balance and stability check. Step back and look at it from a short distance. The birch should stay visually dominant, with the pine framing it and adding softness. If something sticks out too sharply, just move one branch — that’s faster and cleaner than adding more elements. Gently shake one branch with your fingers at the end: if nothing shifts or falls out, the arrangement will handle wind and snow just fine.
Tip
If the birch is freshly cut, it can darken and crack faster. Air-dried wood works better — we usually leave ours under a covered area for 6–8 weeks before using it.
This arrangement works well because it doesn’t demand attention. Birch holds its shape, pine needles don’t drop for weeks, and the planter handles snow, wind, and temperature swings without trouble.
And every time you step out onto the porch, there’s that quiet feeling that the space isn’t forgotten — it looks put-together and lived-in.
3. Copper Pot with Mini Conifers

Copper Pot with Mini Conifers — in this arrangement, copper darkens in winter, shifts into a deeper tone, contrasts beautifully with snow, and makes even a small setup feel grounded and mature.
What you’ll need for the arrangement
- Copper outdoor planter
Diameter 14–18 inches, depth at least 14 inches (≈ 35–45 cm) Must have drainage holes or allow you to drill them. - Miniature conifer plants
These work especially well:
- dwarf Alberta spruce
- dwarf mugo pine
- compact juniper
Plant height — 12–24 inches (≈ 30–60 cm)
- dwarf Alberta spruce
- Drainage
Gravel or expanded clay — a 2–3 inch layer (≈ 5–7 cm) - Dense outdoor soil
- Optional finishing elements
Pinecones, small cedar or pine branches for the surface.
How to assemble it step by step
- Prepare the planter. Copper pots are heavy, and that’s a good thing. Place it in its final spot right away and make sure it sits level. If there are no drainage holes, drill them before planting. Copper doesn’t handle standing water well, and in winter that matters even more.
- Add the drainage layer. Pour in 2–3 inches of gravel and level it out. In copper planters, this also helps buffer temperature swings, keeping roots out of cold, trapped water.
- Fill with soil to about ⅔ of the volume. Leave space to set the plant and top up later. Lightly press the soil with your hand, but don’t compact it — winter soil will firm up on its own.
- Set the mini conifer. Place the plant right in the center. In this setup, symmetry works. Mini conifers look best when they feel stable and upright, without tilt or imbalance.
- Backfill and secure. Add soil around the root ball, pressing gently with your palms. Tug the plant slightly upward — if it doesn’t move, it’s set correctly. This matters because winter soil can shift over time.
- Add a finishing layer. Scatter a few pinecones or short pine branches on top. They cover exposed soil, add texture, and make the planter look finished instead of like a pot of dirt.
- Final check. Step back a couple of feet. The copper should stay visible, and the conifer should read clearly against it. If it feels like too much, remove something. In this idea, less works better than more.
A quick note on copper
Copper naturally develops patina over time — and that’s a good thing. We don’t polish ours on purpose. A slightly darkened surface feels less decorative and more appropriate for winter conditions.
This arrangement is compact and stable. One conifer, minimal upkeep, and a copper planter that adds a sense of structure and warmth even in the cold season.
It’s a solid choice for small porches or entryways, where you want one confident accent without extra details.
4. Herbal Window Planter with Winter Fragrance
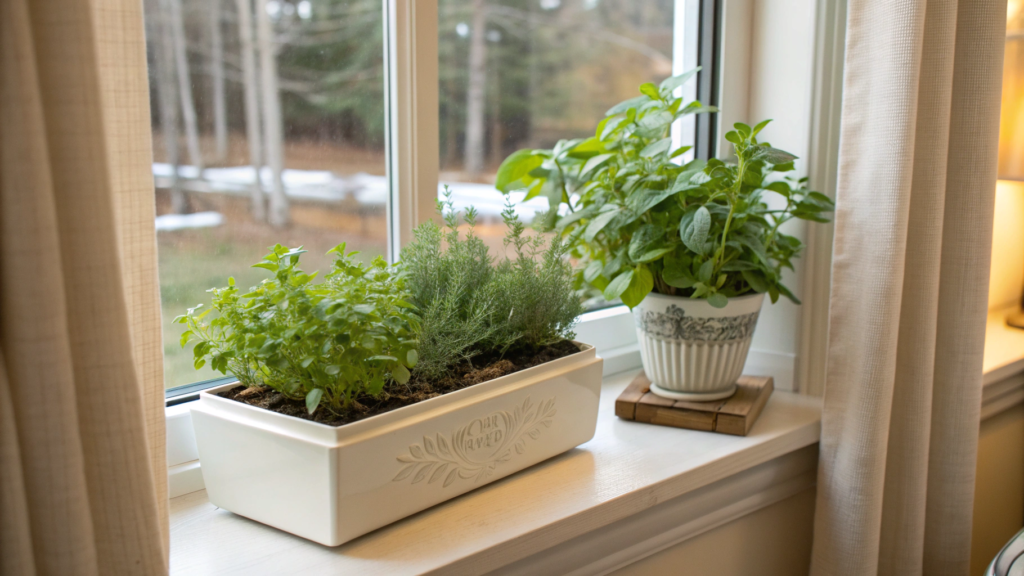
This idea didn’t come from looks — it came from scent. In winter, windows stay closed, the air feels still, and at some point you notice the house is missing living aromas. That’s how Herbal Window Planter with Winter Fragrance came to be — a compact box right under the window. And in my opinion, it’s one of the most underrated winter arrangements. For no good reason.
What you’ll need for the arrangement
- Window planter box
The length depends on the window, but a comfortable minimum is 24–30 inches
Depth — 8–10 inches (≈ 60–75 × 20–25 cm). Must have drainage holes. - Cold-hardy aromatic herbs
The best performers have been rosemary (upright variety), sage, thyme, and winter savory. - Drainage
Gravel or expanded clay — 1.5–2 inches (≈ 4–5 cm) - Dense outdoor soil
Not greenhouse soil and not “herb potting mix.” - Optional additions
A few pine branches or thin birch twigs for structure.
How to assemble it step by step
- Place the planter box in position. It’s important to set the box exactly where it will stay all winter. Wind tends to move around windows, and if the planter sits unevenly, the soil will slowly shift. Make sure the box is secured and doesn’t wobble.
- Add the drainage layer. Pour in 1.5–2 inches of gravel and level it out. For herbs, this matters a lot: they don’t tolerate standing water, and in winter excess moisture is the main reason roots freeze out.
- Fill with soil to about ⅔ of the volume. Lightly press the soil with your palm, but don’t compact it. Herbs need air in the root zone, even in winter. Dense soil freezes faster.
- Place the herbs, starting with the tallest. Set rosemary closer to the center or the back of the box. It defines height and shape. Arrange sage and thyme along the edges — they naturally spill outward and soften the composition.
- Adjust spacing. Don’t plant too tightly. Leave 2–3 inches (≈ 5–7 cm) between plants. In winter, this allows airflow and reduces the risk of rot during thaws.
- Backfill and gently secure. Add soil around the roots and press lightly with your fingers, without force. Gently pull each plant upward — if it doesn’t move, it’s set correctly. This matters because winter soil can settle over time.
- Add a top layer and structure. Lay a few pine branches or thin twigs on top. They don’t just decorate — they protect the soil from sharp temperature swings and add visual volume.
Scent
In cold weather, rosemary and sage release fragrance, especially on sunny days. And when you open a nearby window or door, you notice it immediately. Not overpowering. Just alive.
In everyday use, it’s simply practical: open the window, snip some rosemary or thyme — and suddenly winter no longer feels disconnected from the kitchen and the garden.
5. Cedar and Magnolia Porch Urn

Cedar and Magnolia Porch Urn works best right by the door — where people constantly pass through, open and close it, and where shape and stability really matter.
Magnolia isn’t here for flowers. Its large leaves hold volume and stay readable even on gray days, while cedar creates a dense backdrop. As a result, the urn looks put-together and clean all winter, even when everything around it feels wet, dull, and windy.
What you’ll need for the arrangement
- Classic porch urn
Ideally heavy and stable. Height 18–24 inches (≈ 45–60 cm), diameter 14–18 inches (≈ 35–45 cm) - Cedar branches
These create volume and background. Fresh, dense, without dried-out tips. - Magnolia branches
3–7 branches, depending on urn size. The larger the leaves, the fewer details you need. - Drainage
Gravel — a 2–3 inch layer (≈ 5–7 cm) - Dense soil or a sand-soil mix
- Stabilizers
Stones or pieces of wood for internal support.
How to assemble it step by step
- Place the urn in its final position. These arrangements don’t like being moved around. Set the urn where it will stay and make sure it isn’t sitting in a draft or wobbling. At an entryway, this matters even more — doors create air movement, and light setups lose stability fast.
- Add the drainage layer. Pour in 2–3 inches of gravel and level it out. In urns, drainage serves two purposes: it moves water away and adds weight to the bottom, making the arrangement more stable.
- Fill with soil to about halfway. Don’t go higher. Cedar and magnolia need space for anchoring, not just to be “stuck in.” Lightly press the soil so it isn’t loose, but don’t turn it into a solid block.
- Build the base with cedar. Place cedar branches first, arranging them in a circle with a slight outward angle. They create a bowl-like shape and a backdrop. Make sure the tips aren’t all at the same height — small differences keep the look calm and balanced.
- Add magnolia as the focal point. Insert magnolia branches closer to the center, either straight up or with a very slight tilt. The leaves should read clearly from a distance. If there are too many, the arrangement starts to feel heavy — fewer large leaves work better.
- Secure the interior. Add more soil and place a few stones at the base of the branches. This step matters: magnolia is dense and creates wind resistance. Press gently with your palm — the branches shouldn’t move.
- Step back and adjust the rhythm. Look at the urn from the front and the side. If the magnolia feels overpowering, remove one branch. If the cedar gets lost, add one along the edge. It’s better to adjust placement than to add more elements.
This arrangement works well because it’s stable. No constant fixes, no ongoing effort after installation. Magnolia holds its form even in freezing temperatures and keeps its look for weeks, while cedar stays green and doesn’t shed if the branches are fresh. Together, they create a setup you don’t need to touch again until spring.
6. Lantern-Filled Cedar Box Planter
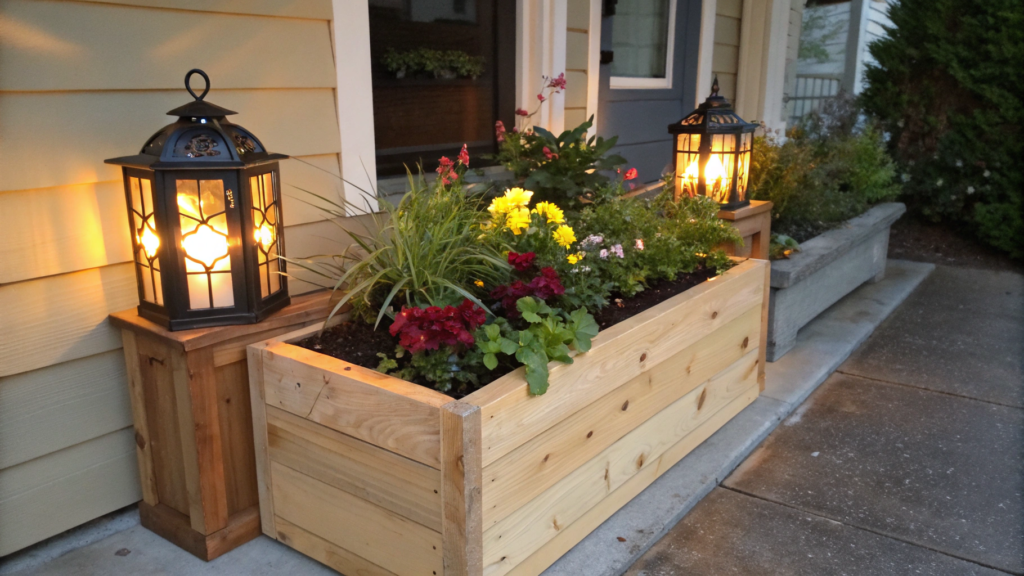
Lantern-Filled Cedar Box Planter is an arrangement that works both during the day and after dark. It’s one of the most practical options for an entryway if you actually use your porch, not just look at it through the window.
What you’ll need for the arrangement
- Cedar planter box
Preferably rectangular and stable. Size: 30–36 inches long, 12–16 inches wide
(≈ 75–90 × 30–40 cm) - Cedar branches
These form the base and background for the lanterns. Dense, fresh, without dry tips. - Outdoor lanterns
1–3 pieces, depending on the length of the box. Lantern height 8–14 inches (≈ 20–35 cm). Glass panels with a metal frame work best. - LED candles or solar lights
Only safe options. Open flame isn’t needed here. Simple metal lanterns with clear glass work best, without patterns.
For example, Stonebriar Decorative Metal Lantern (Amazon) — heavy, stable, and free of unnecessary decoration. - Drainage and soil
Gravel and dense outdoor soil. - Stabilizers
Stones or weights to keep the lanterns steady.
How to assemble it step by step
- Place the planter box in position. Do this right away. Once lanterns are inside, moving the box becomes inconvenient. Make sure the surface is level — unevenness is especially noticeable when solid objects are involved, not just branches.
- Add the drainage layer. Pour in 2–3 inches of gravel (≈ 5–7 cm) and level it out. Cedar doesn’t like constant moisture, and lanterns add weight, so the base needs to be stable.
- Fill with soil to about halfway. Don’t go higher. This planter needs depth to secure both the branches and the lanterns. Lightly press the soil so it isn’t loose.
- Place the lanterns first. This is the key step. Set the lanterns into the box before adding any branches.
Space them evenly, but not perfectly measured.
Add a stone or weight under each base and press it slightly into the soil — the lanterns should feel solid and not tip over in the wind. - Add cedar branches around the lanterns. Insert branches along the perimeter and between the lanterns, angling them outward and slightly upward. They should frame the light, not block it. If a branch covers the glass, remove it right away — it will be annoying in the evening.
- Backfill and secure everything together. Add a bit more soil to lock in the branches and lantern bases. Gently press with your palms, checking that nothing shifts or wobbles.
- Check the arrangement after dark. Turn the lanterns on in the evening. This is one of the few setups where the final check shouldn’t be done in daylight. The light should be visible but not harsh. If it feels too bright, remove one lantern rather than trying to “mute” the light with branches.
This arrangement solves two problems at once: during the day, the planter looks clean and structured, and in the evening, the porch gets soft, calm light without wires or string lights.
And there’s something very practical about coming home in winter and seeing the light before you even open the door. Simple, comfortable, and easy to live with.
7. White Pine and Juniper Outdoor Arrangement

White Pine and Juniper Outdoor Arrangement works best in places where there’s already stone, steps, or a walkway, and adding anything else would only overload the space.
Together they look clean all winter. Nothing distracts, nothing asks for attention — the arrangement simply keeps order around the house.
What you’ll need for the arrangement
- Outdoor planter or low urn
Shape — round or slightly elongated. Depth 12–16 inches (≈ 30–40 cm) - White pine branches
Soft, long, with gentle movement. - Juniper branches
Dense, more rigid, with a cool tone. This is the visual anchor. - Drainage
Gravel — 2–3 inches (≈ 5–7 cm) - Dense outdoor soil
- Small stones
For internal stabilization if the container is wide.
How to assemble it step by step
- Place the container in position. Make sure the planter sits level — any tilt will be noticeable here because there are no decorative elements to pull the eye away.
- Add the drainage layer. Pour in 2–3 inches of gravel and level it out. This helps water drain and adds weight at the bottom — especially useful if the container sits in an open area.
- Fill with soil to about halfway. Take your time. The soil should be dense but not compacted. In this arrangement, the branches act as the structure, and they need something solid to hold onto.
- Build the base with white pine. Start with the pine. Insert the branches at an angle, directing them outward and slightly to the sides. They should spread and create a soft silhouette. Avoid making them all the same length — variation in height keeps the arrangement alive, even without decoration.
- Add juniper for structure.Place juniper closer to the center or along the edges, depending on the container’s shape. These branches should be more vertical. They define a clear outline and keep the arrangement from looking loose or undefined.
- Adjust balance and density. Look from the side and from the front. If pine feels too dominant, add another juniper branch. If the composition feels too stiff, remove one dense branch and give the pine more space. The balance between soft and structured is what matters here.
- Secure and clean the surface. Add more soil and press the branch bases gently with your palm. If the container is wide, place a couple of stones inside for stability. The surface should look clean — no broken pieces sticking out, no “construction” marks.
This arrangement works because it’s as neutral as possible. It doesn’t demand attention, doesn’t compete with its surroundings, and quietly survives the entire winter. White pine holds its shape even after heavy snow, while juniper barely changes and stays the visual framework.
That’s why it works so well at entrances and along walkways: the eye can rest, and the space stays tidy and composed, even when everything around it looks worn out.
8. Eucalyptus and Pinecone Porch Crate
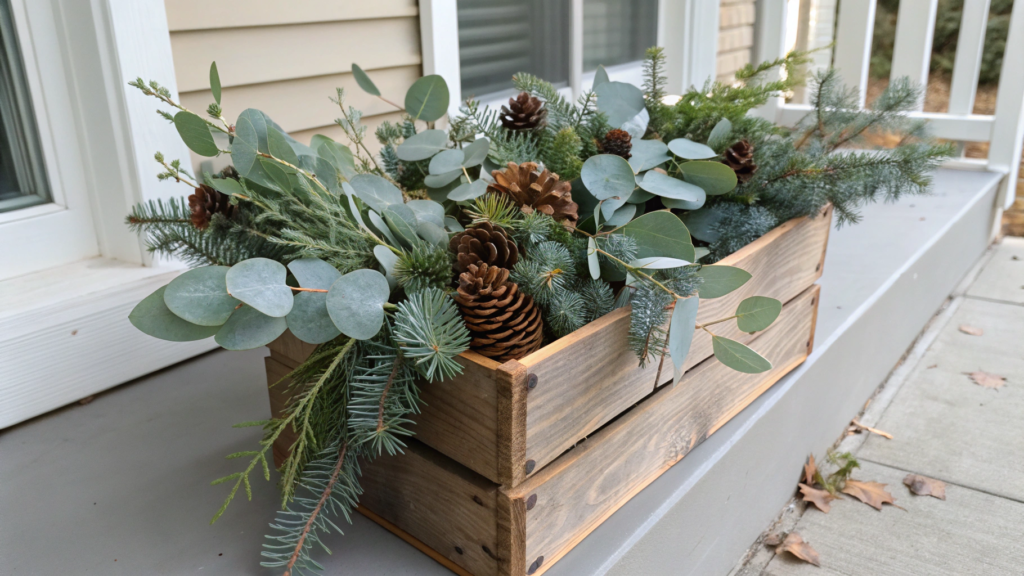
Eucalyptus and Pinecone Porch Crate turned out to be the option that adds freshness without breaking the winter feel. It all comes down to balance: cool green tones, dry texture, and absolutely no shine.
What you’ll need for the arrangement
- Wooden crate or low box
Preferably with an open texture, without varnish. Size: 18–24 inches long, 10–12 inches wide (≈ 45–60 × 25–30 cm) - Eucalyptus branches
Seeded eucalyptus or silver dollar — matte, with a cool tone. Branch length — 18–24 inches (≈ 45–60 cm) - Pinecones
Medium to large size. Real ones, not decorative — they look calmer and more natural. - Inner liner or heavy-duty plastic bag
To protect the wood from moisture. - Soil or weight
Depending on whether you’re using live or cut branches.
How to assemble it step by step
- Prepare the crate and moisture protection. If the box is wooden, make sure to add a liner or thick plastic inside. In winter, moisture is the main enemy of wood. Internal protection helps the crate last for several seasons.
- Add weight or soil. If you’re using cut eucalyptus, a layer of gravel or sand at the bottom is enough.
If you plan to set the branches in soil, fill the crate about halfway. The base needs to be heavy — otherwise the eucalyptus will act like a sail. - Place the eucalyptus first. Insert the branches at an angle, not straight up. Let them gently spread outward. Avoid creating a tight bundle — eucalyptus looks best when there’s air between the branches.
- Adjust height and direction. Shorten some branches and leave others taller. This removes the “bouquet” look and makes the arrangement feel more like part of the landscape.
- Add pinecones as anchors. Place the pinecones at the base of the eucalyptus, partially pressing them into the soil or sand. They add weight, visual balance, and a clear seasonal feel. Without them, eucalyptus can look too light.
- Check stability. Gently move the crate or one branch. If anything shifts, add more weight inside. This arrangement should stay put even in gusty wind.
- Final adjustment. Step back and look from the side. If the eucalyptus feels too forward or intrusive, remove one branch. In this case, restraint works better than excess.
This arrangement is visually light but physically stable. There’s nothing to trim, swap, or adjust every week.
Cut eucalyptus holds up well in cold weather and dries slowly without losing its shape. The color becomes slightly more muted — and that’s actually a benefit. The main thing is to avoid placing the crate under direct rain if the wood isn’t protected.
9. Driftwood Basket Winter Display

Driftwood Basket Winter Display looks a little wild. Slightly uneven. And that’s exactly why it works so well in winter.
What you’ll need for the arrangement
- Woven outdoor basket
Preferably dense, with firm walls.
Diameter 16–20 inches, depth 12–16 inches (≈ 40–50 × 30–40 cm) - Driftwood
3–6 pieces of different lengths and shapes. Unfinished, with natural texture. - Evergreen branches
Pine, cedar, or juniper — for background and volume. - Inner liner
A heavy-duty bag or plastic insert to protect the basket. - Weight
Stones, sand, or gravel. - Optional
Dried grasses, seed pods, or a few pinecones.
How to assemble it step by step
- Prepare the basket and moisture protection.Woven baskets look great, but they don’t handle moisture well. Place the liner inside so it covers the bottom and sides. This alone can extend the basket’s life by at least a couple of seasons. For setups like this, we use simple outdoor baskets like MyGift Seagrass Wicker Storage Basket (Amazon) — tight weave, good shape, and enough room inside for proper weighting.
- Add weight. Pour a layer of stones or sand into the bottom. 3–4 inches (≈ 7–10 cm) is a solid reference point. Driftwood is light, and without weight the basket can easily shift in strong wind.
- Place the driftwood first. Start with the largest pieces. Set them at different angles, avoiding symmetry. Driftwood should look like it ended up there on its own. If one piece feels too dominant, it’s better to remove it right away.
- Secure the base. Add a bit more weight or soil around the wood and press lightly. Driftwood shouldn’t wobble, but it also shouldn’t look buried or forced in place.
- Add evergreen branches. Insert branches between the driftwood, directing them outward and to the sides. They soften the shape and visually tie everything together. Don’t fill every gap — air and pauses matter here.
- Adjust height and rhythm. Shorten some branches and leave others longer. Driftwood should remain the main visual element, not get lost in greenery.
- Final adjustment. Look at the arrangement from the side. If it feels too vertical, add a horizontal piece of driftwood or remove one tall branch. Balance matters more than fullness.
Driftwood handles frost and moisture well because it’s already been through harsh conditions. That’s why it feels so natural in winter and doesn’t fall apart after a couple of weeks. The key is not to seal it with varnish or treatments — a natural surface looks calmer and ages better over time.
10. Snowy Fern and Silver Twig Planter
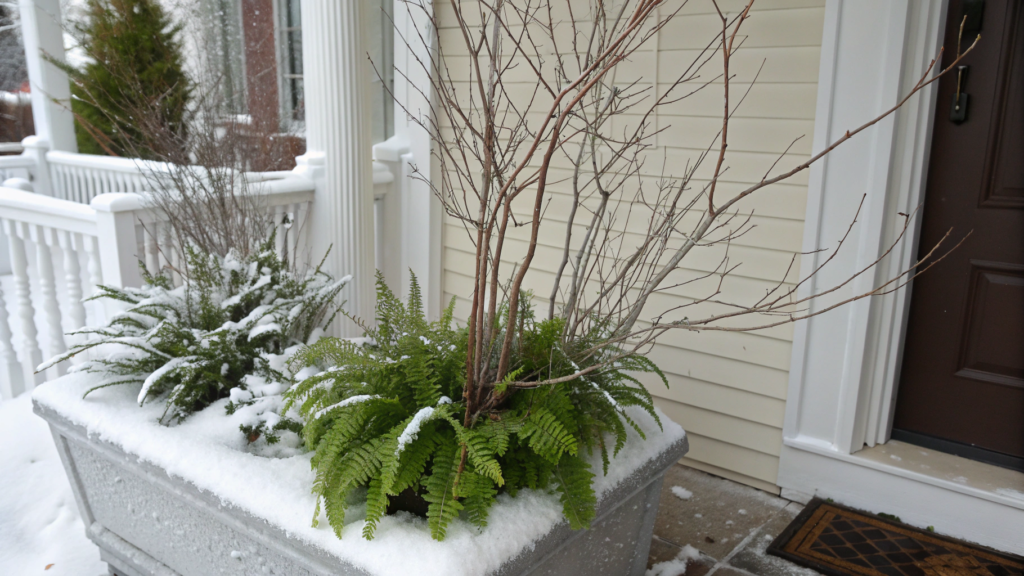
I usually associate ferns with shade, damp summers, forest floors. Using them in winter? But Snowy Fern and Silver Twig Planter turned out not as a green patch, but as graphic structure. Calm, cool, very winter-like.
This option isn’t for a bright porch. It works best in places where quiet and structure matter.
What you’ll need for the arrangement
- Outdoor planter with a simple shape
Preferably without decoration, so it doesn’t compete with texture. Diameter 16–20 inches, depth 12–16 inches (≈ 40–50 × 30–40 cm) - Artificial or cut winter fern
Better with a matte surface, no shine. Height — 12–18 inches (≈ 30–45 cm) - Silver twigs
Willow, birch, or manzanita with a cool tone. 5–9 branches, depending on planter size. - Drainage
Gravel — 2–3 inches (≈ 5–7 cm) - Dense outdoor soil or weight
- Optional
A small amount of fine artificial snow — only if you want a light frost effect.
How to assemble it step by step
- Place the planter in its final position. This arrangement is meant to be seen up close, so choose a spot where it won’t block movement or get visually lost. Check stability — there are many vertical lines here, and any tilt will be obvious.
- Add the drainage layer. Pour in 2–3 inches of gravel and level it out. Even with artificial elements, weight at the bottom matters — it keeps everything in place during wind and snowfall.
- Fill with soil about halfway. Lightly press the soil so it isn’t loose. Silver twigs need firm anchoring, otherwise they’ll move with the slightest airflow.
- Place the fern first. The fern acts as the lower layer. Set it closer to the center or slightly off-center to create a soft base. The fronds shouldn’t point straight up — let them fall naturally, like they’re resting under snow.
- Add the silver twigs. Insert the branches vertically or with a very slight tilt. Vary the height — some higher, some mid-level. This adds depth and keeps the arrangement from looking flat.
- Adjust density. If it feels like there are too many branches, remove one. Silver twigs work best with space between them. This is one of those cases where pauses matter more than filling everything in.
- Final fixation and surface cleanup. Add a bit more soil and press the base firmly with your palms. The surface should look clean — no visible plastic, bark scraps, or random debris. If you’re using a snow effect, keep it minimal, just on the tips of the fern and branches.
Fern brings softness and horizontal lines, while silver branches add vertical structure and cool light. Together, they create an arrangement that doesn’t get tiring over the season. It looks especially good on overcast days and in side lighting.
This is a setup you don’t need to adjust, refresh, or add to. It simply stands there and does its job — adding structure where winter usually breaks things down.
When winter isn’t a pause
Winter arrangements are a way to keep order around the house when the garden is resting and the space outside can easily start looking abandoned. A good winter planter doesn’t demand attention, doesn’t fall apart after the first snow, and doesn’t make you constantly fix things.
These arrangements keep the entry calm and collected: you leave in the morning, come back in the evening — and everything stays in place.
I’m curious how you handle this at your place. Which setups made it through winter without problems?
And which ones had to be taken apart by January?Leave a comment — I read them all and often rely on real reader experience when planning new pieces.