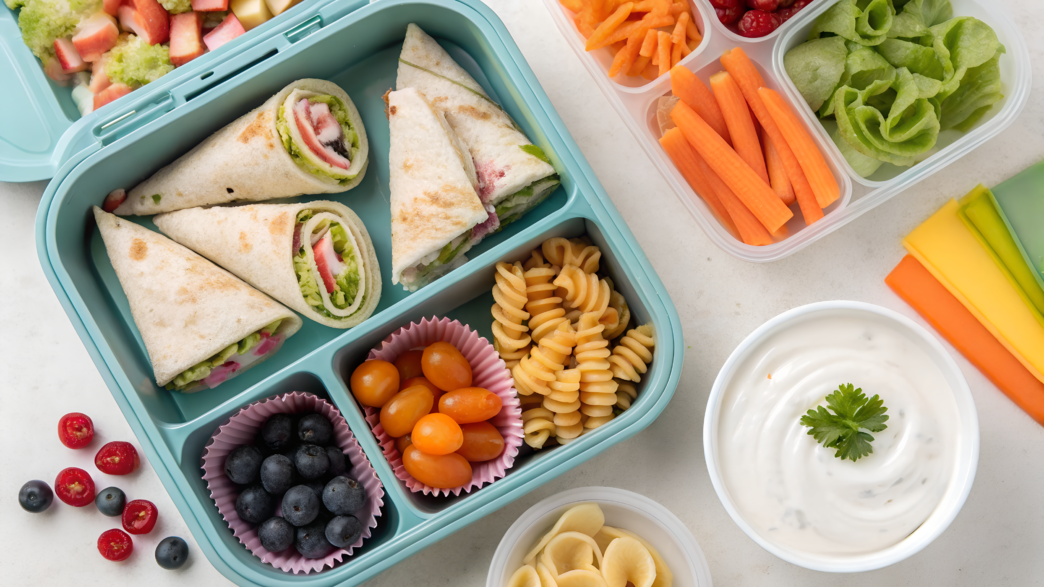
A school lunch is not just food. It’s also care, an attempt to send warmth when your child is away.
And everyone who has ever packed a lunchbox in the morning knows: putting in “something” is easy. Putting in something they’ll actually eat — that’s a whole different story.
Especially if you have a first grader, a picky eater, or just a little one tired of changes who doesn’t always want to eat “by the rules.”
I’ve gathered 15 school lunch ideas that work for us and for our friends. Each of them has been tested by time (and by the backpack), uses familiar but reimagined ingredients, and can be easily adapted for different tastes and diets.
And all of this — in real lunchboxes, between grabbing the gym clothes and tying shoelaces.
1. Mini Quesadilla Bento
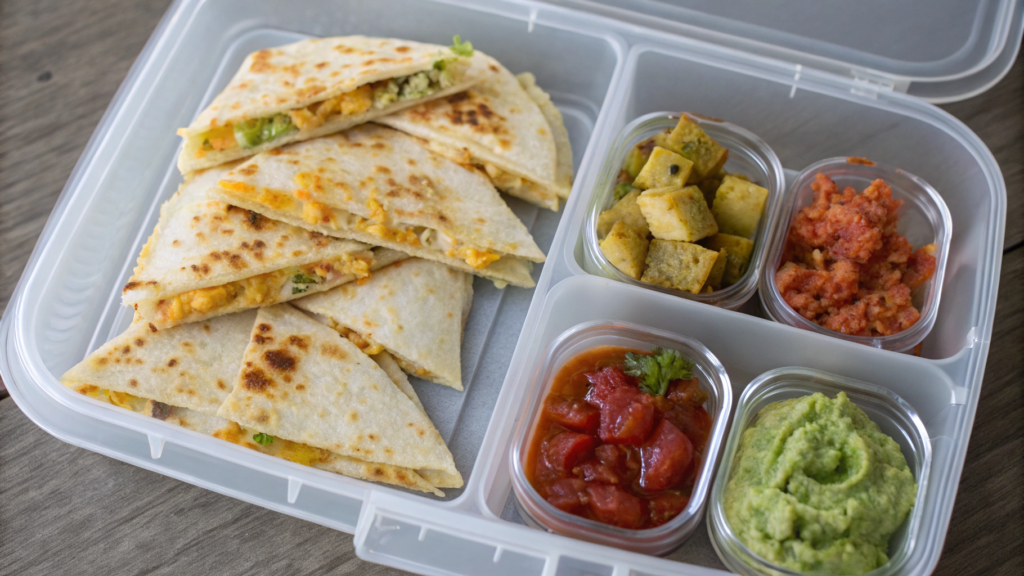
Mini quesadillas are the kind of meal where you think you’re making “nothing special,” but in reality, you get a school lunch that disappears from the box almost instantly.
A regular quesadilla is too big, falls apart, and is awkward to eat with small hands. But if you do it differently — mini, portioned, neat — it turns out just right.
What’s in a Mini Quesadilla Bento:
- Mini quesadillas with cheese and chicken
- Guacamole or sour cream for dipping
- Sliced bell pepper
- A few grapes or apple slices
And all of it neatly packed into a sectioned lunchbox, like the Bentgo Kids Lunch Box — yes, the very one we love for its order and simplicity.
How to Make Mini Quesadillas
Ingredients:
- 4 small tortillas (6-inch / ≈15 cm)
- ½ cup shredded cheddar cheese (2 oz / ≈60 g)
- ½ cup finely chopped cooked chicken (2 oz / ≈60 g)
- A little oil (vegetable or butter) — for frying
Instructions:
- Lay the tortillas on your work surface. On one half of each, spread the cheese and chicken — I always try to distribute evenly, so there’s no “empty here, mess there.”
- Fold in half and press lightly. This is important: it keeps the filling from falling out when you flip them in the pan.
- Heat a skillet over medium, add a little oil. Fry quesadillas on both sides until golden — about 2 minutes per side.
- Let them cool! This is key — never put hot quesadillas straight into a lunchbox. I usually cut them into 2 or 3 triangles once they’ve cooled a bit.
What to Add to the Bento School lunch:
- Sliced bell pepper — red, yellow, green — always bright, crunchy, and even the pickiest eater usually tries at least one piece.
- Guacamole — if your kid loves “creamy stuff,” or just swap for sour cream.
- Fruit — I often add seedless grapes, apple slices (spritzed with lemon juice so they don’t brown), or even a couple of mandarin wedges.
2. Turkey & Cheese Roll-Ups
These Turkey & Cheese Roll-Ups take just 3 minutes to make, look neat, and — most importantly — get eaten down to the very last bite. A total win.
Bento Box Components:
- Turkey & Cheese Roll-Ups
- Snap peas or baby carrots
- Crackers with hummus or cheese dip
- Half a banana or a couple of strawberries
How to Make Turkey & Cheese Roll-Ups
Ingredients:
- 2 tortillas or lavash wraps (10-inch / ≈25 cm)
- 4 slices deli turkey breast
- 2 slices cheddar or mozzarella cheese
- About 2 tbsp cream cheese
- Romaine lettuce or spinach leaves — optional
Instructions:
- Lay the tortilla flat on a surface. Spread a thin layer of cream cheese. This not only adds flavor but also “glues” everything in place so it won’t fall apart.
- Place 2 slices of turkey and 1 slice of cheese on top. If you’re adding lettuce — now’s the time.
- Roll it up gently. Don’t squeeze too tightly or the cheese might tear.
- Slice into 4–5 pieces. They look like mini sushi — perfect for little hands.
Why This Recipe Works:
- Doesn’t fall apart
- No reheating needed
- Easy to eat with hands
- Works even for kids who “don’t like sandwiches but love sushi-style food”
What to Pack on the Side School lunch:
- Snap peas or baby carrots — they add crunch and color.
- Hummus in a small container (Mini Condiment Containers) — kids love to dip!
- Fruit — half a banana (sliced and sprinkled with lemon juice so it won’t brown) or a couple of large strawberries.
Pro Tip. If you want to add a “surprise,” make one of the roll-ups with a different filling — like ham and cream cheese. Tell your child it’s the “joker roll”.
And yes, you can make 4–6 of these ahead of time and store them in an airtight container in the fridge. They keep perfectly for up to 2 days — which makes mornings a lot easier.
3. Rainbow Pasta Salad

When I first made this salad, I didn’t think kids would go for it. There’s broccoli, peppers! There’s — the scary word — a pasta vinaigrette.
But it disappeared. Because in reality, it’s just pasta with rainbow veggies and cheese. And kids have a weakness for food that looks like a celebration.
Lunchbox Components:
- Rainbow Pasta Salad (in a mini container)
- Mini meatballs or pieces of chicken nuggets
- Mandarins or berries
- Crackers or a small cookie
We use EasyLunchboxes Snack Box Containers — they’re the perfect size for pasta, and nothing leaks, even with dressing.
How to Make Rainbow Pasta Salad
Ingredients:
- 1 cup cooked pasta (spirals or bowties — 4 oz / ≈115 g)
- ¼ cup finely chopped red bell pepper
- ¼ cup finely chopped broccoli (briefly blanched)
- ¼ cup canned corn
- ¼ cup grated carrot or yellow bell pepper
- ¼ cup shredded cheese (cheddar or mozzarella works best)
- 1–2 tbsp dressing: olive oil + a little lemon juice + salt
Instructions:
- Cook pasta until al dente, rinse with cold water, and let it cool completely.
- Chop the veggies — the finer, the better.
- Mix everything in a bowl, add the dressing and cheese. Toss gently.
- Pack into mini containers. If making for school — make sure to close the lid tightly.
Tips from Us:
- You can swap the dressing for Greek yogurt + a little mustard + honey — it turns out creamier and milder.
- Don’t add tomatoes if it’s going into a lunchbox — they release too much liquid.
- It’s handy to make a double batch and keep it in the fridge — this salad lasts 2 days, and goes with everything: nuggets, meatballs, chicken pieces, even eggs.
- If you want to make the salad more “interactive,” pack the cheese separately and let your child sprinkle it on top.
This salad looks cheerful, is eaten with a spoon, doesn’t stick to the teeth — and even veggie-haters end up eating broccoli, thinking it’s just green pasta.
4. Hummus & Veggie Dippers
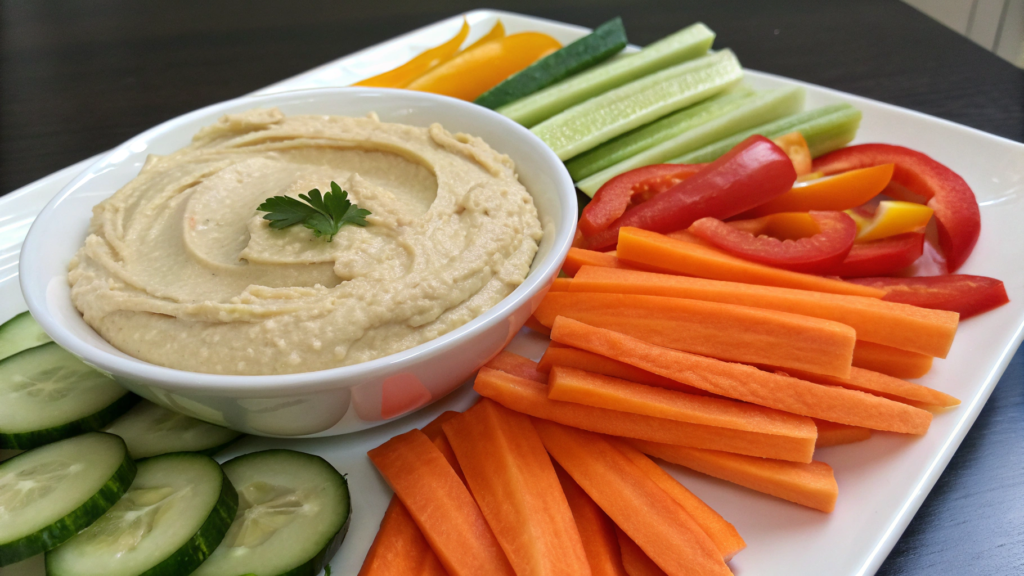
Hummus may smell like garlic, but if you serve it right — with cute sliced sticks and crunchy sides — it becomes a game. And kids love to dip.
Bento Box Components:
- Mini container of hummus
- Carrot, cucumber, celery sticks, and snap peas
- Pita chips or mini crackers
- Fruit: grapes, mandarin slices, or pear slices
We pack hummus in Sistema Mini Dip Containers — small, leakproof, and they fit perfectly even in the side compartment of a Bentgo box.
How to Pack This School Lunch
Hummus: you can use store-bought or make it at home. We like the basic version — chickpeas, lemon juice, olive oil, and a touch of tahini.
Veggies:
- Carrots — cut into thin sticks
- Cucumbers — best peeled
- Snap peas — split in half
- Celery — optional (or swap for broccoli)
Crunchy sides: pita chips, crackers, or breadsticks.
Fruit: make sure it’s not too watery. Mandarins are great, pears too if you sprinkle them with lemon juice.
Packing Tips:
- Arrange veggies upright in one compartment — looks like a “bouquet.”
- Pack hummus in a small container, separate from everything else.
- Keep fruit away from anything crunchy (otherwise crackers get soggy).
- Add a sticker or mini flag on a toothpick — yes, it matters, especially for younger kids.
If hummus doesn’t catch on right away, try serving it a few times at home as “nugget sauce” or “secret cream.” You’ll see — it works.
5. Apple Sandwiches
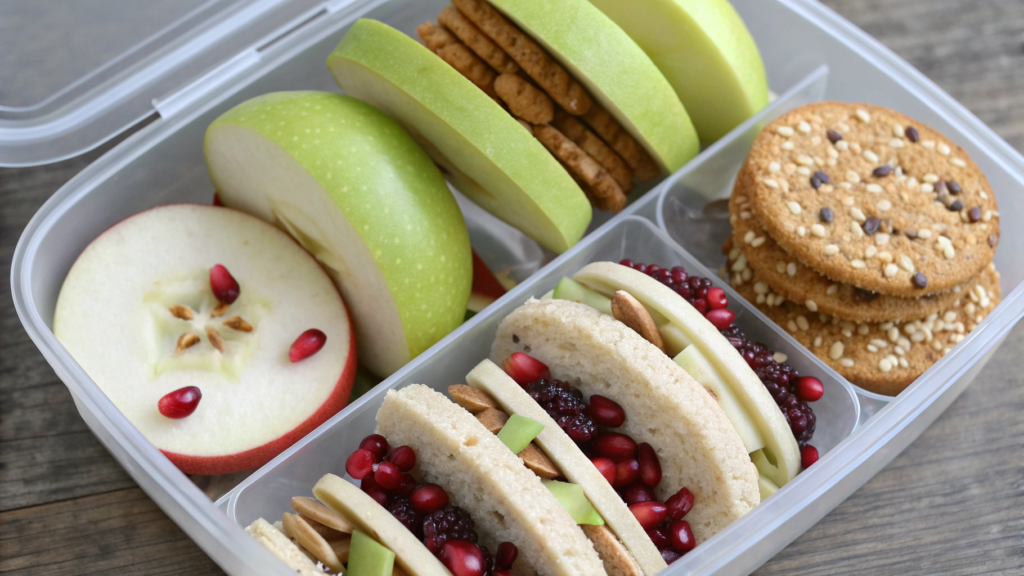
This recipe not only looks fun (like a “sandwich, but made of apple”), it’s also nutritious, crunchy, and 100% bread-free — which is rare among school snacks.
Bento Box Components:
- Apple Sandwiches — with filling of choice
- A mix of nuts and raisins / pomegranate seeds
- Plain cracker or breadstick
- Yogurt tube or string cheese
For slicing apples, the OXO Good Grips Apple Corer works perfectly.
How to Make Apple Sandwiches
Ingredients:
- 1 large sweet apple (Fuji or Honeycrisp are best)
- 2–3 tbsp peanut butter or SunButter (if nut-free)
- 1 tbsp granola or cereal (optional)
- A little honey (optional)
- Alternatives: almond butter, cream cheese, banana, raisins, cranberries
Instructions:
- Wash and dry the apple. We don’t peel it — the skin adds crunch. Just make sure it’s cleaned well.
- Remove the core. Do this carefully so the apple doesn’t fall apart. If you don’t have a corer, you can first slice into rings, then carefully cut out the center of each with a knife.
- Slice into rings, about ⅓ inch thick (≈1 cm). Usually you get 4–5 rings from one apple.
- Spread the filling on one ring. Our favorite mix: peanut butter + a pinch of granola + a drop of honey.
- Cover with another ring. You get a real apple “sandwich”! And it holds together perfectly — nothing leaks or falls apart.
Filling Variations:
| Base | Add-ins |
| Peanut butter | Raisins, cereal, shredded coconut |
| SunButte | Banana, honey |
| Almond butter | Pomegranate, dried cranberries |
| Cream cheese | Blueberries, strawberry pieces |
One of our top picks is cream cheese + a little jam when we want a “dessert-style” version.
How to Pack the School Lunch:
- In one compartment — the apple sandwiches (2–3 pieces).
- In another — pomegranate seeds or dried fruit with nuts.
- Add something “neutral”: crackers, a breadstick, or string cheese — these balance out the apple’s sweetness.
- Include a fork — even if they eat by hand, it’s nice to give the option.
Tricks:
- To keep apples from browning, spritz with lemon juice or dip quickly in a water-salt solution (½ tsp salt per cup water — quick dip and dry).
- You can prep ahead and wrap in plastic wrap if you want to pack them tightly into a box.
- This snack works for kids on a gluten-free diet if you use gluten-free fillings.
6. Pizza Muffins
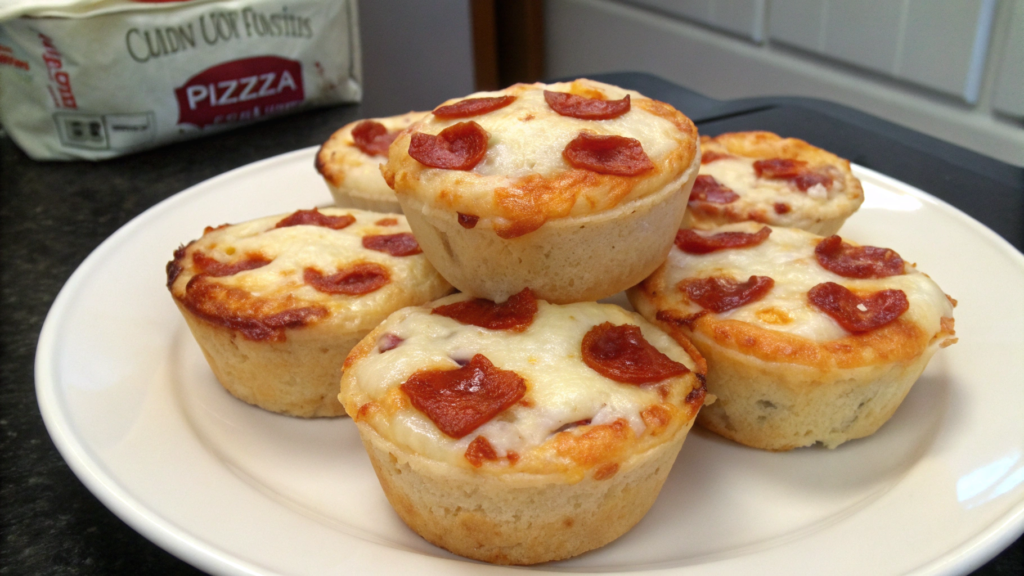
Who doesn’t love pizza — especially when it fits in your hand and doesn’t fall apart? That’s why pizza muffins are a total lifesaver. They taste just like pizza. They look neat. They’re easy to eat at school with hands. And even after 4 hours in a backpack — still tasty, still presentable. I’m not exaggerating!
Bento Box Components:
- 2–3 pizza muffins
- Cucumber slices or snap peas
- Fruit puree or applesauce pouch
- A quarter of a homemade brownie or a mini bar
We bake ours in the Wilton Non-Stick Mini Muffin Pan — 24 muffins at once, nothing sticks, and it’s perfect for freezing extras for later.
How to Make Pizza Muffins
Ingredients (for 12 mini muffins):
- ¾ cup all-purpose flour (≈90 g)
- ¾ tsp baking powder
- ½ tsp dried oregano
- Pinch of salt
- ¾ cup milk (6 oz / ≈180 ml)
- 1 large egg
- 1 cup shredded mozzarella cheese (4 oz / ≈115 g)
- ⅓ cup finely chopped pepperoni (or cooked chicken, ham)
- ¼ cup pizza sauce (or ketchup + spices)
- 1–2 tbsp grated Parmesan (optional)
Instructions:
- Preheat the oven to 375°F (190°C). Grease the muffin pan or line with paper cups.
- Mix dry ingredients in a bowl: flour, baking powder, oregano, and salt.
- In another bowl, whisk milk and egg. Add cheese, meat, and sauce — stir to combine.
- Combine wet and dry ingredients. Mix until smooth, but don’t overdo it.
- Spoon into muffin cups, filling each about ¾ full. Sprinkle with Parmesan if desired.
- Bake 20–22 minutes, until tops are golden and slightly crisp.
- Cool completely before packing into a lunchbox. I usually make them the night before — in the morning, just pull from the fridge.
Filling Variations:
- Ham + pineapple (mini Hawaiian pizza)
- Olives + bell pepper (vegetarian version)
- Cooked turkey + broccoli (for a “healthy” day)
- Just cheese + basil (if you’re in a picky-eating phase)
School Lunch Packing Tips:
- Add a cheese stick or a few cucumber slices — muffins like having some “green friends” alongside.
- If you’re worried your child won’t be full — pack 3 muffins. They’re small, but filling.
- You can use lunchbox heat packs if you want to keep them warmer a little longer.
If you have leftovers — no problem. Warm them up in the morning and serve with cream cheese. It turns into a mini “pizza toast”-style breakfast, only better.
7. Yogurt Parfait Jars
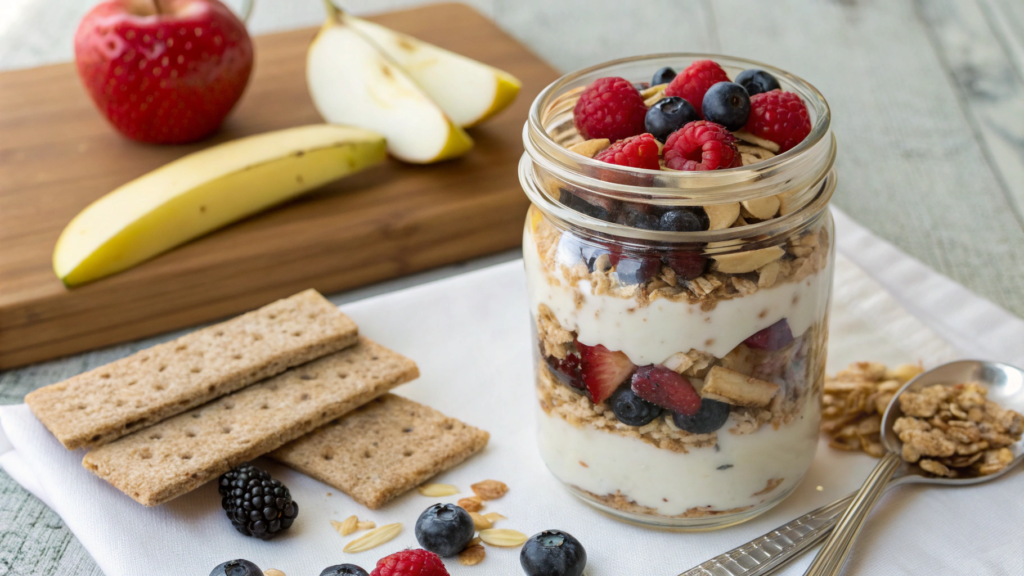
This school lunch feels like a little café dessert, only in a jar. And yes, it may look fancy, but in reality — it’s one of the easiest school lunches.
It turns out pretty, tasty, and most importantly — it looks like you really put in the effort.
Bento Box Components:
- Yogurt parfait in a jar (the base)
- Greek yogurt + berries + granola + honey
- Crackers or a mini bar
- Apple sticks or banana pieces
We use Mason Jars — they’re the perfect child-sized portion, with a wide mouth and a leakproof lid.
How to Assemble Yogurt Parfait School lunch
Ingredients (for 1 jar):
- ½ cup Greek yogurt (plain or vanilla) — ≈120 ml
- ¼ cup berries (blueberries, strawberries, raspberries)
- 2 tbsp granola (or swap for oats with honey)
- 1 tsp honey or maple syrup
- 1 tbsp chia seeds (optional)
Instructions:
- Layer yogurt first. I use either plain or vanilla Greek yogurt — thick, won’t leak, and filling.
- Add berries for the second layer. Fresh is best, but thawed works if you drain the juice so it doesn’t flood everything.
- Top with granola. I add it right before closing the jar to keep the crunch. Or pack it separately in a mini container and let kids add it themselves — they love doing that.
- Finish with honey and a sprinkle of chia seeds. If you want, add a few banana slices or mini chocolate chips. That way it definitely won’t come back home!
How to Pack in a Lunchbox:
- Place the jar in one compartment (they usually fit perfectly into a standard Bentgo).
- Add a spoon — we use Reusable Kids Spoons Set — lightweight, durable, and color-matched to the lunchbox.
- Include a neutral snack — a cracker, bagel, or half an apple.
- For balance, pack something salty — pretzels, a mini cheese stick, or a couple of crackers.
Layer Variations:
| Yogurt | Fruit | Extras |
| Vanilla | Raspberry + kiwi | Grated chocolate |
| Plain | Banana + blueberries | Nuts or pumpkin seeds |
| Strawberry | Apple + cinnamon | Oats with syrup |
If you don’t want a sweet option — make a “veggie parfait”: Greek yogurt + shredded carrot + nuts + a little raisin and honey.
Tricks:
- Keep granola on top or in a separate container — so it stays crunchy.
- Layer “wet” fruit between two layers of yogurt to keep them from soaking the granola.
- Prep the jar the night before — everything except the granola. In the morning, just screw on the lid and drop it into the lunchbox.
This school lunch gives steady energy without being heavy. It’s got protein, fiber, and just enough joy in every layer.
8. Dino Nugget Sliders
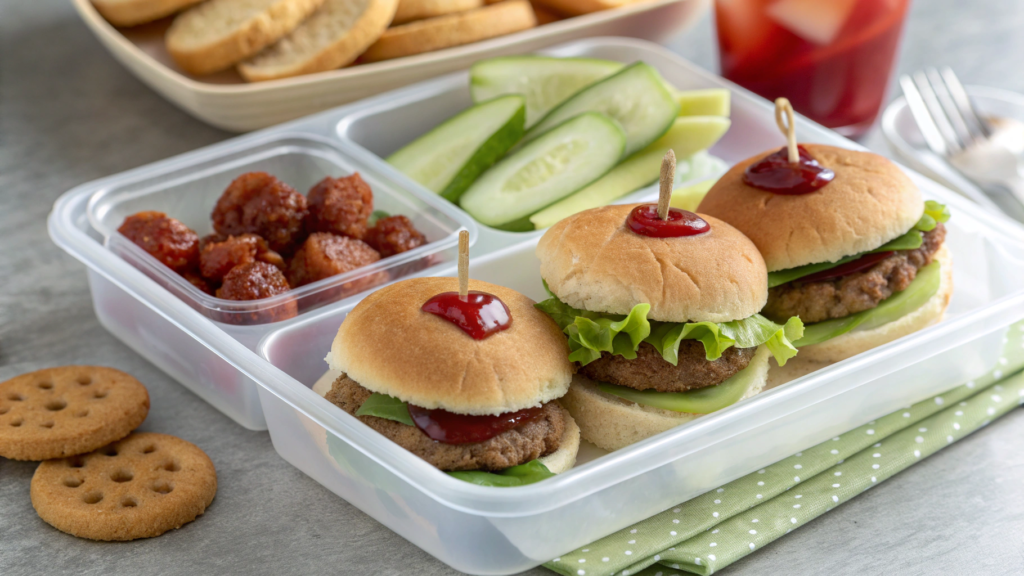
When you’re a parent trying to cook “real food” but living in the reality of school mornings, activities, and rushed routines — you know the value of recipes like this.
Dino Nugget Sliders aren’t just mini burgers. They’re a compromise that works: they look cute, eat quickly, and appeal even to the pickiest kids.
Bento Box Components:
- 2–3 mini sliders with dino nuggets
- Veggies: cucumber slices or snap peas
- Dried fruit or a mini apple
- Mini cookie or breadsticks
How to Make Dino Nugget Sliders School lunch
Ingredients:
- 4–6 dinosaur-shaped nuggets (any kind works, as long as they’re small)
- 4–6 mini buns (sweet or plain)
- 2–3 tbsp ketchup or sauce of choice
- Lettuce leaves or cucumber slices (optional)
- Thin slices of cheese (optional)
Instructions:
- Preheat the oven to the temperature on the nugget package. Usually 400°F (≈200°C). Bake until golden and crispy — about 12–15 minutes.
- Slice the mini buns lengthwise, but not all the way through, so they don’t fall apart. This helps hold the filling inside.
- (Optional) Toast the inside of the buns on a dry skillet. Adds texture and keeps the sliders more stable.
- On the bottom bun, spread a little sauce, then add the nugget, then cheese or lettuce, and cover with the top bun.
- Cool to room temperature before packing into a lunchbox. Warm sliders in a sealed box will make soggy buns and condensation.
How to Pack the School Lunch:
- Place two or three sliders in one lunchbox compartment.
- In another — veggie sides like cucumber slices or snap peas.
- Add fruit: mini apple, pear, mandarin — anything that won’t leak juice.
- Include one small sweet: a cracker, piece of dark chocolate, or homemade cookie.
Tips:
- If you want to keep the sliders crisp, use paper dividers inside the lunchbox.
- Skip the sauce inside if sliders will sit for more than 3 hours — instead, pack a dipping container. We use Sistema Mini Dip Containers.
- To make ahead, assemble the sliders in the evening, wrap in wax paper, and store in a container in the fridge. In the morning, just transfer to the lunchbox.
These sliders are the perfect solution when you don’t want to make a “serious” meal but also don’t want to give in to packaged snacks. And if you let your child assemble them at the table — it turns into a “build-your-own burger” moment, which almost always works.
9. Sweet Potato Tots
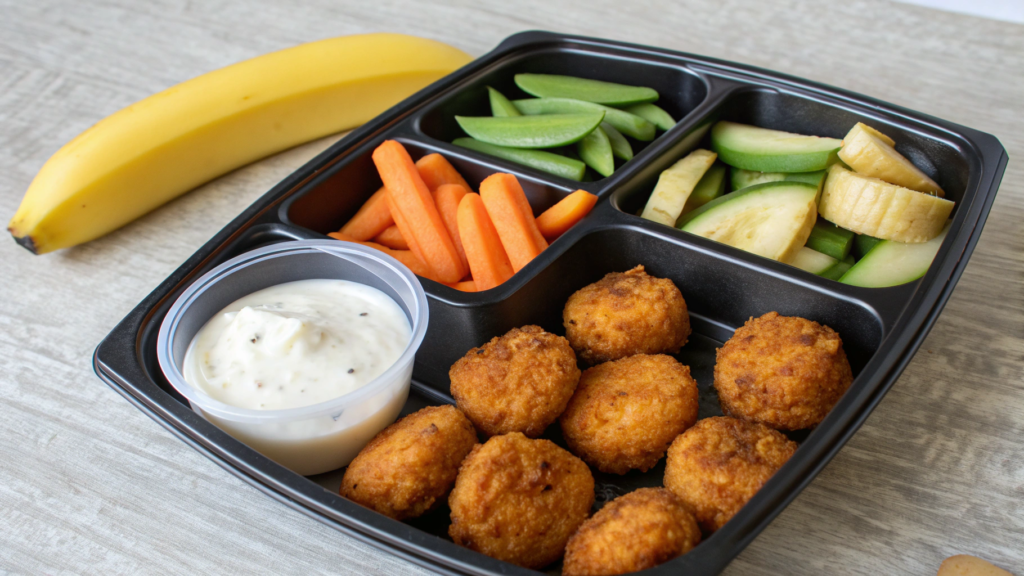
Sweet potato tots are soft inside with a golden crust outside. They work as a side, a snack, or the main part of a school lunch.
Easy to eat by hand, warm, flavorful, and filling — but without being “too heavy.”
Bento Box Components:
- 4–6 sweet potato tots
- Greek yogurt or cheese dip (in a mini container)
- Crunchy veggies — snap peas, carrot sticks, cucumber slices
- Half a banana or apple slices
For storage and packing, we use Rubbermaid LunchBlox Containers, which handle both hot and cold foods and make portioning easy.
How to Make Sweet Potato Tots
Ingredients (makes 12–14 pieces):
- 1 large sweet potato, ≈1 cup mashed (about 250 g)
- ¼ cup breadcrumbs (≈30 g)
- 2 tbsp grated Parmesan
- ¼ tsp garlic powder
- Salt and pepper — to taste
- 1 tsp olive oil — for baking or frying
Instructions:
- Peel and boil the sweet potato until soft, about 10–12 minutes after boiling. Drain and mash.
- Add breadcrumbs, cheese, and spices. Mix well. The mixture should be shapeable — not too wet, not too dry.
- Form small tots — shaped like short sticks or mini patties. If they stick to your hands, dampen fingers with a little water.
- Place on a baking sheet lined with parchment paper. Drizzle lightly with oil.
- Bake at 400°F (200°C) for about 20 minutes, flipping halfway. They should be golden and slightly crisp.
Variations:
- Add grated carrot or zucchini if you want extra veggies.
- Swap breadcrumbs for ground oats if you prefer.
- For a vegan version — just skip the cheese and add a little more breadcrumbs.
How to Pack the School Lunch:
- In one compartment — 4–6 tots, cooled to room temperature.
- In a mini container — dipping sauce: Greek yogurt with lemon, or soft cream cheese.
- Separately — veggies that are easy to dip.
- Something sweet — apple, pear, or a mandarin slice.
If you want the tots to stay warm longer, use a small thermos insert. We’ve tested the OmieBox Bento Box with Thermos Insert — it keeps food warm until lunchtime.
Sweet potato tots are the kind of thing you can batch cook on the weekend and freeze. Then it’s grab, reheat, pack. No tough decisions at 7:30 a.m.
10. Sunbutter Banana Wraps
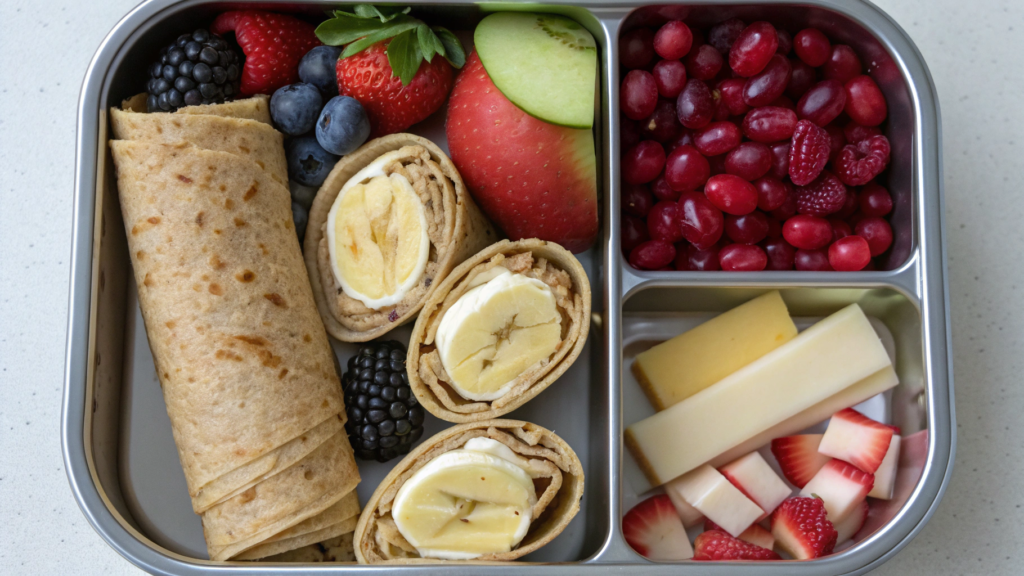
Sunbutter Banana Wraps are one of the fastest recipes in our collection, but at the same time, they’re nutritious, balanced, and filling.
I often pack them on days when I don’t want to turn on the stove. And it’s the perfect option if your school is nut-free: Sunbutter (sunflower seed spread) is a safe alternative, and it tastes just as good as peanut butter.
Bento Box Components:
- 1–2 halves of a Sunbutter Banana Wrap
- Mix of berries or apple slices
- Yogurt bar or cheese stick
- Mini dried fruit or pomegranate seeds
We use Mission Carb Balance Soft Taco Tortillas — they’re soft, hold their shape well, and are the right size for little hands.
How to Make Sunbutter Banana Wraps
Ingredients (for 1 large wrap):
- 1 soft tortilla (8 inch / ≈20 cm)
- 1 medium banana
- 1–2 tbsp Sunbutter
- Optional: a little honey, cinnamon, or shredded coconut
Instructions:
- Lay out the tortilla on a flat surface. It should be soft and at room temperature. If stiff, microwave for 10 seconds.
- Spread Sunbutter evenly. Leave about ½ inch (1 cm) border around the edges so it doesn’t squeeze out.
- Place the banana whole along one edge. If it’s too long, trim the ends so it fits neatly.
- Roll up tightly, keeping the banana centered so slices look even.
- Cut into 2 or 4 pieces. You can also slice into sushi-style rolls if you want a fun presentation.
Variations:
- Sprinkle the banana with cinnamon or shredded coconut before rolling.
- Add a thin layer of berry jam — raspberry or strawberry works great.
- If nuts are allowed, swap Sunbutter for almond or peanut butter.
How to Pack the School Lunch:
- In one compartment — 2–4 wrap pieces.
- In another — fruit: berries, grapes, mandarin slices, or apple wedges.
- For protein — add a yogurt bar or cheese stick.
- Finish with something crunchy: dried fruit, seeds, or a little granola.
To keep wraps from unrolling, wrap each piece in wax paper or secure with small picks. This is especially handy for field trips or travel.
Sunbutter Banana Wraps are one of those recipes that work just as well for younger kids and teens. No stove needed. Grab a banana, spread, roll, slice — and school lunch is ready.
11. Cheesy Broccoli Bites
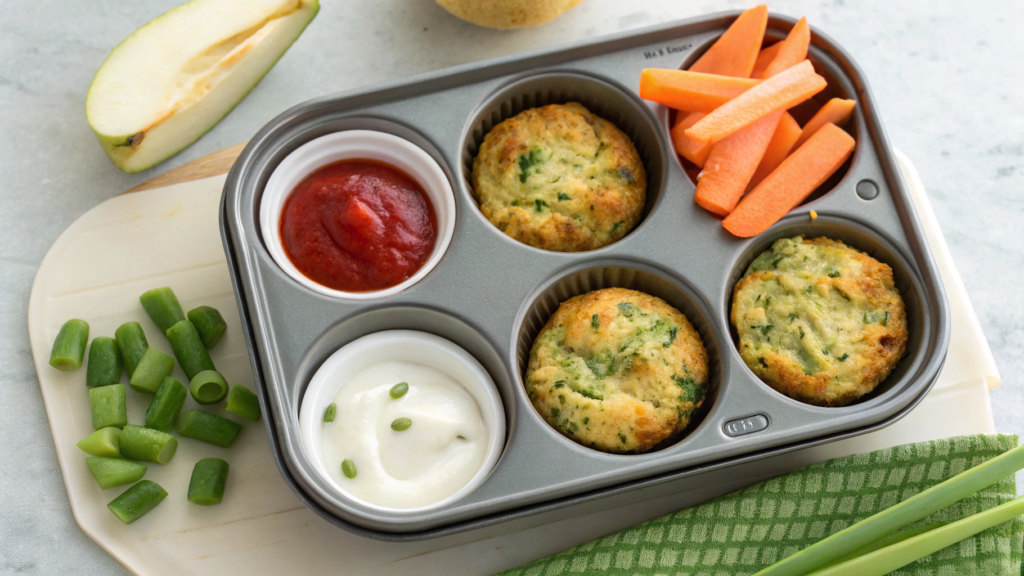
Cheesy Broccoli Bites are warm, flavorful, and filling mini snacks. They don’t fall apart, they’re easy to eat by hand, and somehow they sneak past the kid “green food radar.”
Bento Box Components:
- 3–4 Cheesy Broccoli Bites
- Dipping sauce (Greek yogurt, ketchup, or mild ranch)
- Veggie mix — snap peas, carrot sticks, cucumber slices
- Half a pear or apple slices
We bake them in the Wilton Mini Muffin Pan — the cups are the right depth, and nothing sticks even without paper liners.
How to Make Cheesy Broccoli Bites
Ingredients (makes 12 mini bites):
- 1 cup finely chopped cooked broccoli (≈150 g)
- ½ cup shredded cheddar cheese (≈60 g)
- ¼ cup breadcrumbs (≈30 g)
- 1 large egg
- 1 tbsp flour
- ¼ tsp salt, black pepper to taste
- Optional: a little garlic powder or oregano
Instructions:
- Boil broccoli until tender, then chop finely. The smaller, the better for binding with the other ingredients.
- Mix everything in a bowl: broccoli, cheese, breadcrumbs, egg, flour, and spices. The mixture should be moist enough to hold shape for rolling balls.
- Form into balls or press with a spoon into mini muffin cups. We usually use a small ice cream scoop — it keeps them even in size.
- Bake at 375°F (190°C) for 20–22 minutes, until the edges turn golden. Let them cool slightly — they firm up as they cool.
Variations:
- Swap some broccoli for cauliflower — especially if your child is on a “green boycott.”
- Use mozzarella instead of cheddar — for a softer, stretchier texture.
- Add a small piece of cooked turkey or ham inside — makes them more filling.
How to Pack the School Lunch:
- Place 3–4 bites in one compartment.
- In a mini container — dipping sauce: yogurt, mild hummus, or even ketchup (if your child loves dipping).
- Add fresh veggies: carrot, snap peas, cucumber.
- Include something sweet and fresh — apple, pear, or grapes.
Cheesy Broccoli Bites are a great way to get kids to eat veggies in a form that doesn’t scare them. And adults like them, too. If any are left over, reheat in the oven and serve with salad or soup for dinner.
12. Chicken & Waffle Skewers
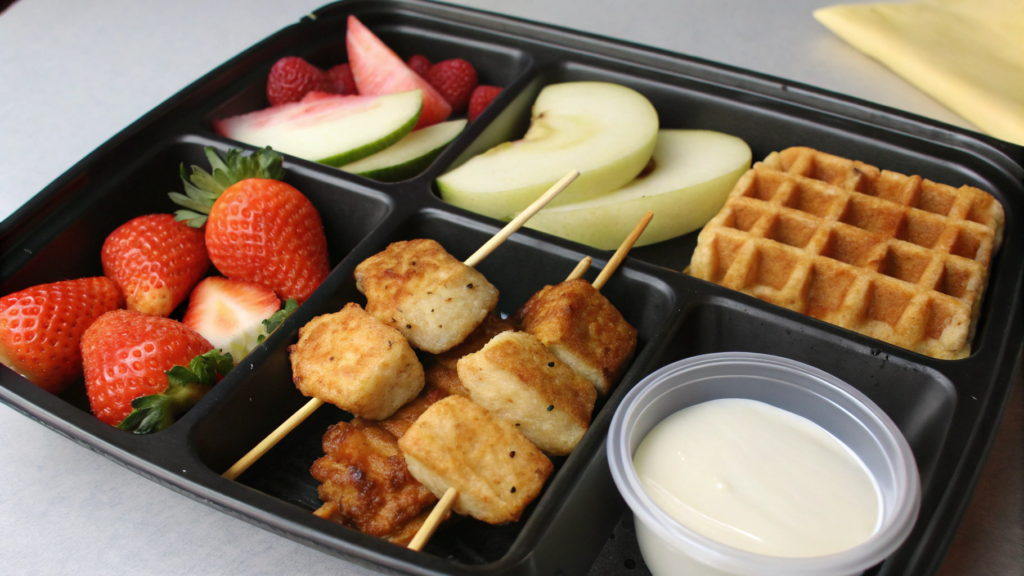
Chicken & Waffle Skewers are convenient, familiar in flavor, and couldn’t be easier to make.
Especially if you have leftover nuggets and a couple of frozen waffles from breakfast.
Bento Box Components:
- 2–3 skewers with chicken and waffles
- Small container with syrup or honey
- Fruit: strawberries, apple, pear
- Yogurt tube or mini cheese stick
How to Make Chicken & Waffle Skewers
Ingredients (for 2 servings):
- 6–8 chicken nuggets (homemade or frozen)
- 2–3 mini waffles or 1 large waffle, cut into squares
- 1–2 tbsp maple syrup or honey
- Mini skewers or toothpicks
Instructions:
- Cook or reheat the nuggets. If using frozen, bake according to the package until crispy. Let them cool slightly to warm.
- Warm the waffles. Use mini waffles, or cut one large into squares. Make sure they aren’t too soft — or they’ll fall apart.
- Assemble: waffle — chicken piece — waffle. Depending on skewer size, make 2–3 layers. If everything slides, pierce through the edge of both the waffle and chicken to hold it together.
- Serve with a mini container of syrup or honey.
Variations:
- Swap waffles for mini pancakes.
- For a savory twist — add a drop of Dijon mustard or cheese sauce.
- Use grilled chicken instead of nuggets if you’re cooking a family batch.
How to Pack the School Lunch:
- In one compartment — 2–3 skewers, laid diagonally or separated into parts.
- In another — container with syrup or honey.
- Add fruit: choose something with crunch to balance textures — apple or pear.
- Bonus: yogurt, soft cheese, or a couple of mini crackers.
If you’re concerned about child safety, replace wooden skewers with short plastic picks or simply pack the ingredients separately — the child can assemble them at school lunch.
Chicken & Waffle Skewers feel like a weekend breakfast at a café, but in a lunchbox they become a fun, balanced option. Protein, carbs, a touch of sweetness — all in a format that kids actually want to eat.
13. Mini Pancake Stacks
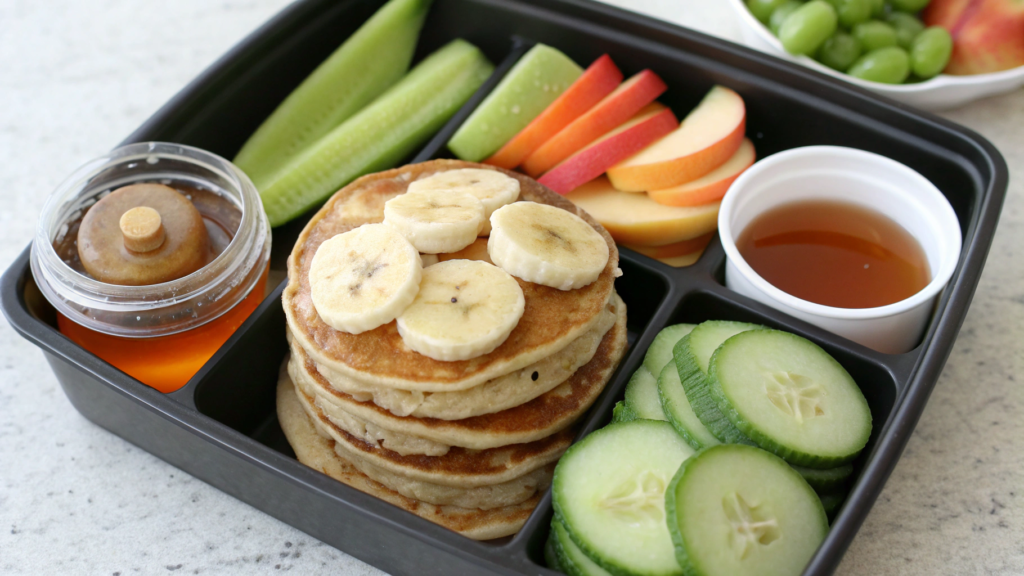
Mini Pancake Stacks are convenient, filling, and visually “festive.” Most importantly — they give you flexibility: you can make a sweet version, or a more neutral one. And even if you’re not into cooking, assembling these is absolutely doable for anyone.
Bento Box Components:
- 2–3 mini stacks of pancakes and bananas
- Small container with honey, syrup, or nut butter
- Crunchy veggies — cucumber, snap peas
- Fruit tube or apple slices
How to Make Mini Pancake Stacks
Ingredients (for 3 skewers):
- 6–9 mini pancakes (≈2 inches diameter / ≈5 cm)
- 1 ripe banana
- Optional: berries, peanut butter, honey, nuts
- Short skewers or toothpicks
Instructions:
- Prepare mini pancakes. Use store-bought mix or frozen ones — just make sure they’re small. You can prep ahead and keep them in the freezer. Reheat before assembling — about 10 seconds in the microwave.
- Slice the banana into rounds about ½ inch thick (≈1.2 cm). These will be the “filling” between pancakes.
- Assemble stacks: pancake — banana — pancake — (add another layer if you want). Secure with a skewer or toothpick.
- Pack a mini container with a dip: honey, maple syrup, or nut butter.
Variations:
- Swap banana for berries (blueberries, strawberries) or a pear slice.
- Add peanut butter between layers — then you don’t need a separate dip.
- For a more “dessert-like” version — add a little chocolate spread or a sprinkle of cinnamon.
How to Pack the School Lunch:
- Place 2–3 skewers diagonally or on their side — make sure they’re not warm.
- Add a small container with dipping sauce (kept separate).
- In another compartment — something crunchy for contrast: cucumbers, carrot sticks.
- Fruits — apple, pear, seasonal berries.
- For extra protein — add a cheese stick or some Greek yogurt.
If skewers are inconvenient, you can stack 2–3 pancakes “burger style,” just layered and wrapped in wax paper. Then kids eat them like mini sandwiches.
Mini Pancake Stacks are the easiest way to turn breakfast into school lunch — especially when you want something quick, but also cute and put-together without extra effort.
14. Fruit & Cheese Kabobs
There are recipes kids like because they’re tasty. And there are those they like because they’re fun to hold and build themselves. Fruit & Cheese Kabobs are exactly that kind of option. They give freedom: kids decide where to start. It’s a snack, a school lunch, and a mini-game all in one container.
Bento Box Components:
- 2–3 skewers with fruit and cheese
- A few crackers or breadsticks
- Yogurt or fruit puree
- Veggies: snap peas or carrots
We use safe plastic skewers like Mini Party Picks 4-inch — no sharp ends.
How to Make Fruit & Cheese Kabobs
Ingredients (for 3 skewers):
- 3–4 types of fruit (grapes, strawberries, melon, apple, pear, banana)
- 2–3 types of cheese (cheddar, mozzarella, gouda, Babybel)
- Mini skewers or toothpicks
Instructions:
- Cut cheese into ½-inch cubes (≈1.2 cm). Dense cheeses hold best — softer ones might slide off.
- Prepare fruit: cut into pieces or leave whole if small. Grapes and blueberries work perfectly. Apples and pears should be sprinkled with lemon juice to prevent browning.
- Thread onto skewers, alternating: fruit — cheese — fruit — cheese. You can keep them consistent or make each kabob unique.
- Chill before packing, especially if using soft cheese — otherwise it may “sweat” in the container.
Variations:
- Instead of skewers, use a mini container with cut-up pieces so the child assembles their own.
- Add turkey or ham cubes for a more filling version.
- For a summer twist — melon and feta. Proven: kids eat it if it’s “on a stick.”
How to Pack the School Lunch:
- In one compartment — 2–3 kabobs with fruit and cheese.
- In another — crackers or breadsticks.
- Separately — yogurt or fruit puree.
- Add fresh veggies like carrots, snap peas, or cucumber.
- To boost nutrition — include a cheese stick or boiled egg. Perfect match for balance and structure.
Fruit & Cheese Kabobs require minimal prep but bring maximum excitement for kids. And yes — adults love them too. I often make a double batch: one for the lunchbox, one for myself at the laptop.
15. Veggie Mac & Cheese Cups
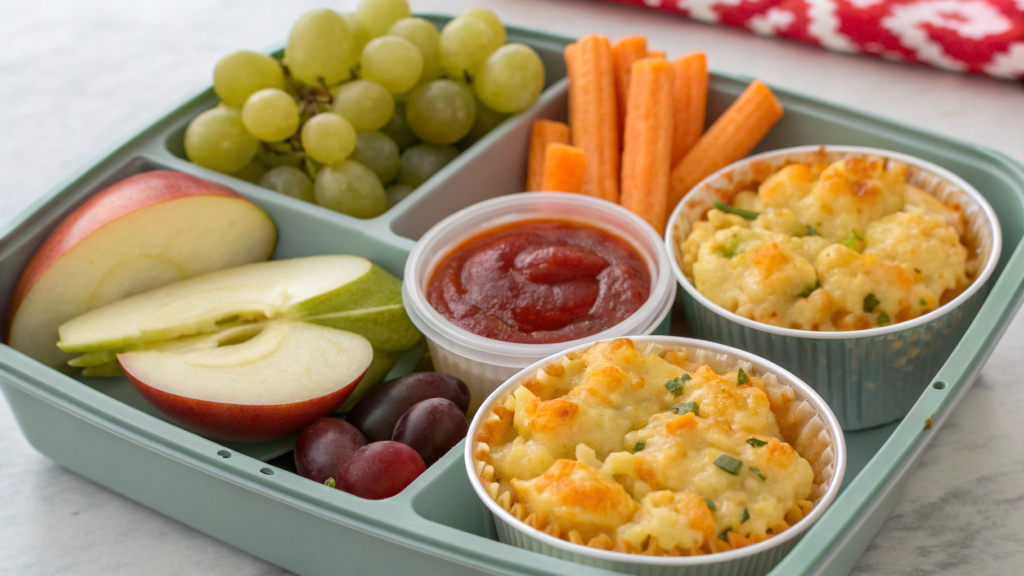
Veggie Mac & Cheese Cups are just mac and cheese — but baked into muffin form. They’re easy to eat with hands, hold their shape well, and most importantly — you can hide veggies inside, and no one will notice.
Bento Box Components:
- 2–3 mac & cheese veggie cups
- Ketchup or creamy dip in a mini container
- Fruit: apple, pear, grapes
- Breadstick or cheese stick
We bake them in Wilton Silicone Baking Cups — nothing sticks, easy to remove, and reusable.
How to Make Veggie Mac & Cheese Cups
Ingredients (for 6 cups):
- 1 cup cooked elbow pasta — ≈120 g
- ⅓ cup cooked broccoli, finely chopped
- ¼ cup grated carrot
- ½ cup shredded cheddar cheese — ≈60 g
- 1 egg
- 2 tbsp milk
- 2 tbsp breadcrumbs
- ¼ tsp salt
Instructions:
- Cook pasta until al dente. Drain and let cool.
- Prepare veggies. Broccoli and carrot can be lightly steamed or just use leftovers from dinner. Chop very finely.
- Mix everything together: pasta, veggies, cheese, egg, milk, salt, and breadcrumbs. The mixture should be moist but hold together.
- Spoon into baking cups, pressing down lightly. Sprinkle extra cheese on top if you like.
- Bake at 375°F (190°C) for 18–20 minutes, until golden on top. Cool before packing.
Variations:
- Swap broccoli for peas, cauliflower, or zucchini.
- Replace cheddar with mozzarella or a cheese mix for a softer, meltier texture.
- For a gluten-free version — use GF pasta and breadcrumbs.
How to Pack the School Lunch:
- In one compartment — 2–3 mac & cheese cups.
- In a mini container — dip: cream cheese, ketchup, or yogurt sauce.
- Add fruit: apple slices, pear, or grapes.
- For extra balance — breadstick, cheese stick, or a small bar.
- If you worry about softness, pack them in a section without wet items nearby. They keep well in the fridge for up to 2 days.
Share Your Finds
This isn’t a final list — it’s a base to start from. Once you see that school lunch can be tasty, practical, and actually eaten, the whole process doesn’t feel so overwhelming.
These 15 lunch ideas can be endlessly varied: swap fillings, adapt for allergies, mix flavors. They’re simply real, working combinations you can use right away. No decorations, just care.
If you try something from here — leave a comment and tell us how it worked.
Which ideas disappeared from the lunchbox first, which ones didn’t stick, what you added of your own.
And if you have a favorite lunch idea — share it. I want this collection to grow and live together with us.