
I resisted the idea of “clean eating” for a long time. It felt like everything around was turning into yet another trend, and you just want to eat normally. But the more time we spent tending our garden, our beds, our soil, the clearer one thing became: when your food is simple and made with your own hands, it’s really good for your body.
There are foods that make you feel lighter afterward. There are recipes that don’t require an hour of cooking or complicated prep. And these ten fall exactly into that category. We made them in Idaho, made them in the PNW, made them on days when everything went smoothly and on days when nothing did.
If you’ve been wanting to start eating better without going overboard, here’s your gentle beginning. Not a diet. Not rules. Just food that’s nice to cook and nice to eat.
1. Avocado Toast with Cherry Tomatoes
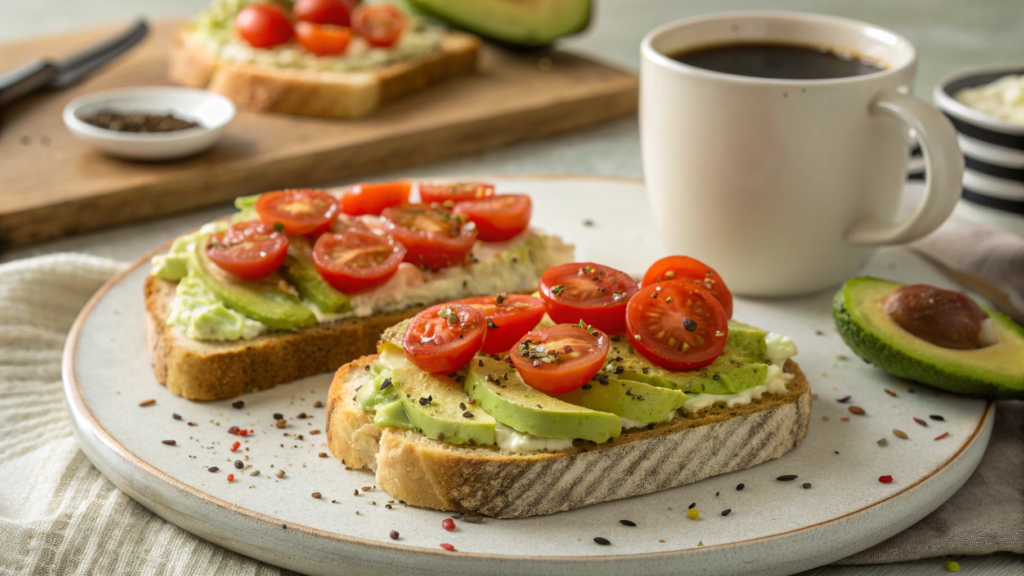
When the day is just beginning, that soft avocado, fresh cherry tomatoes and slightly warm bread help your body wake up calmly. And yes, even when the garden is in total chaos — this is the breakfast I choose.
In our first year in Idaho, we ate it almost every day — cherry tomatoes were inexpensive then, and we baked good bread ourselves in a small electric oven. Sometimes simplicity supports you more than any complex recipe.
There’s a big Harvard study where people’s habits were tracked for several years. Turns out, those who ate more whole-grain bread had healthier hearts and lived longer. A small detail — but a noticeable difference.
Ingredients
(for 2 servings)
- 2 slices whole-grain bread
- 1 ripe avocado
- 1 cup cherry tomatoes (about 150 g), halved
- 1–2 tsp olive oil
- Salt and black pepper — to taste
- A pinch of chili flakes — optional
- A bit of fresh lemon juice
If you need a good tool for neatly cutting and removing an avocado, the OXO Good Grips 3-in-1 Avocado Slicer is the best one.
How to Make It
- Toast the bread.
If you use a toaster — great, but the flavor is brighter in a pan. No need for oil; the bread will crisp up on its own. Leave it on a rack for a minute so it doesn’t get soggy underneath. - Prep the avocado.
Slice it lengthwise, gently remove the pit. Scoop out the flesh and mash it with a fork in a small bowl. Leave a few larger chunks — the flavor comes through better this way. - Season the base.
A pinch of salt, a few drops of lemon juice, and just one or two drops of olive oil. Salt opens the flavor, lemon keeps the color, oil adds softness. - Assemble the toast.
Spread the avocado onto the warm bread. No need to make it perfect — a little looseness makes it look more alive. - Add the tomatoes.
Place the cherry tomatoes on top without pressing them. Add freshly ground pepper. If you like heat — sprinkle chili flakes, but just a pinch so it doesn’t overpower the avocado.
A little tip to finish
If you want the toast to be filling but not heavy, add a bit of pumpkin seeds on top. They bring a light nutty flavor, add a pleasant crunch, and make the toast feel more satisfying — we often do this before a long day in the garden.
2. One-Pot Quinoa and Veggie Bowl
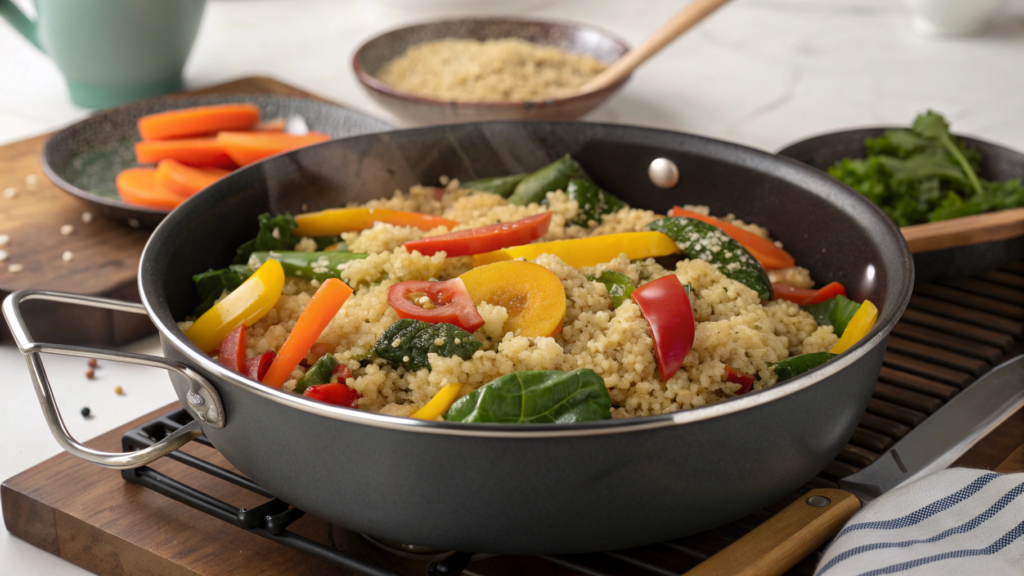
When you want to truly feed yourself well, that’s exactly when this One-Pot Quinoa and Veggie Bowl shows up on the stove.
Quinoa seemed like a “too trendy grain” to me, and then suddenly it turned out that it cooks faster than rice, requires almost no attention, and keeps your energy steady the whole day. And after this bowl, I stopped looking for a substitute.
Scientists at Harvard noticed that people who add more whole grains to their diet feel more energetic and have a more stable blood sugar level. Quinoa is exactly in that category — it works gently but confidently.
Ingredients
(for 2–3 servings)
- 1 cup (180–190 g) quinoa
- 2 cups (480 ml) vegetable broth or water
- 1 cup (about 100 g) broccoli florets
- 1 cup (about 120 g) carrots, chopped
- 1 zucchini, diced
- 1 tbsp olive oil
- 1 tsp salt or to taste
- 1/4 tsp black pepper
- 1–2 tsp lemon juice
How to Make It
- Rinse the quinoa.
Rinse it under cold water for 20–30 seconds until it starts to “squeak” between your fingers. This removes the natural layer of saponins that gives bitterness. Don’t skip this step — the difference is huge. - Sauté the veggies.
Turn on medium heat, warm the olive oil in a deep pan or saucepan. Add the carrots and zucchini. Cook for 3–4 minutes, just until they start to soften slightly. Broccoli goes in later so it doesn’t turn into mush. - Combine everything in one pot.
Add the rinsed quinoa straight to the veggies and gently mix so it gets coated in oil. This makes the flavor richer. - Add liquid and simmer.
Pour in the broth (or water), add salt and pepper. Bring to a boil, reduce the heat to low and cover. Cook for 12–15 minutes. The quinoa should expand, and the liquid should absorb fully. - Add the broccoli.
Five minutes before it’s done, open the lid and place the broccoli on top. It will steam gently and keep its bright green color. We always do it this way — the flavor stays cleaner. - Final touch.
Remove from heat, add a bit of lemon juice. It brightens the flavor and makes the bowl lighter, almost fresh. Let it sit under the lid for 2 minutes.
A little tip to finish
If you want to boost the nutrition without extra effort, add a spoonful of plain Greek yogurt on top. It creates a soft contrast with the warm quinoa and veggies — especially in colder months, when you want something a bit richer but still not heavy.
3. Baked Salmon with Garlic and Spinach
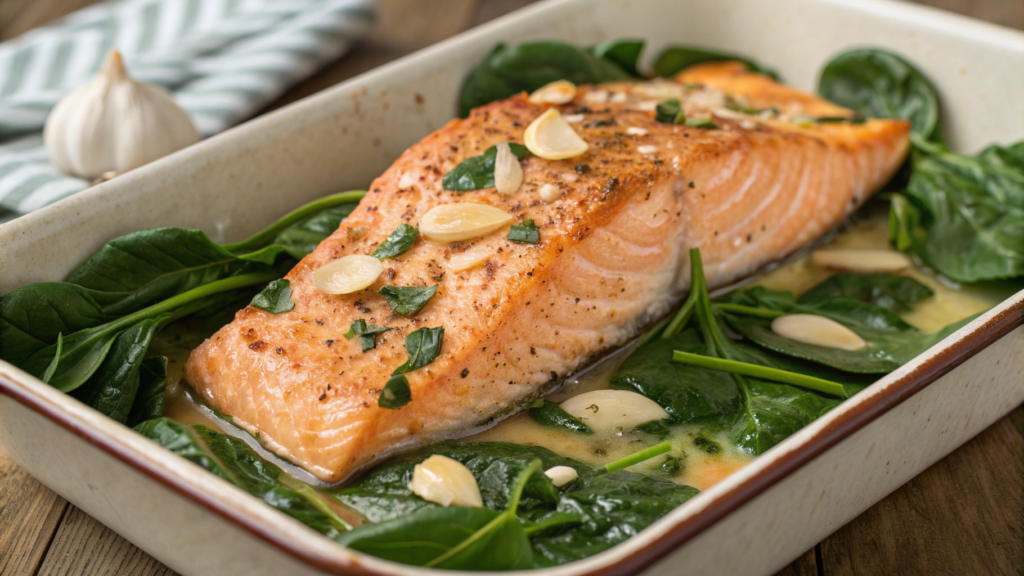
Baked salmon always saves the day when you need to eat properly but have almost no energy left. We’d pull out a small baking dish, heat the oven, and throw in the salmon with garlic — and in 12–15 minutes dinner was ready. Recipes like this are what keep us afloat during long seasons of garden work.
The American Heart Association has been saying the same thing for years: fish like salmon, rich in omega-3, truly helps the heart work better if you eat it at least a couple of times a week.
Ingredients
(for 2 servings)
- 2 salmon fillets, 5–6 ounces each (140–170 g)
- 2 tbsp olive oil
- 2 tsp lemon juice
- 3 cloves garlic, minced
- 4 cups (about 120 g) fresh spinach
- 1/2 tsp salt
- 1/4 tsp black pepper
- 1/4 tsp paprika (optional)
How to Make It
- Preheat the oven.
Heat it to 400°F (200°C). This is the standard temperature for baking fish: high enough to keep the salmon juicy while letting the garlic caramelize slightly. - Mix the aromatic base.
In a small bowl combine the olive oil, lemon juice, minced garlic, salt, pepper, and paprika.
The garlic should be chopped, not pressed — this way it won’t burn. - Prep the dish and spinach.
Spread the spinach evenly across the bottom of the baking dish. It will wilt down by half — don’t worry, that’s exactly how leafy greens behave when baked.
Place the salmon on top, skin-side down. - Pour the marinade.
Generously coat the fish with the mixture, making sure to get the sides too.
Some will drip onto the spinach — that’s good, it absorbs all the flavor. - Bake.
Put the dish in the center of the oven and cook for 12–15 minutes.
The salmon should turn opaque but stay slightly moist inside. If unsure, pierce the thickest part with a knife: the flakes should separate easily. - Let it rest.
Take the dish out and let the fish sit for 2 minutes. This stabilizes the juices — a classic technique for any fish cooked with heat.
A little tip to finish
If you want to make the dish even richer in flavor, add 1 teaspoon of cold-pressed olive oil on top after baking.
Not before — but after. This keeps the aroma fresh instead of burnt and makes the salmon’s flavor brighter. We do this almost always, especially in winter when we crave a slightly deeper aroma.
4. Chickpea and Veggie Curry
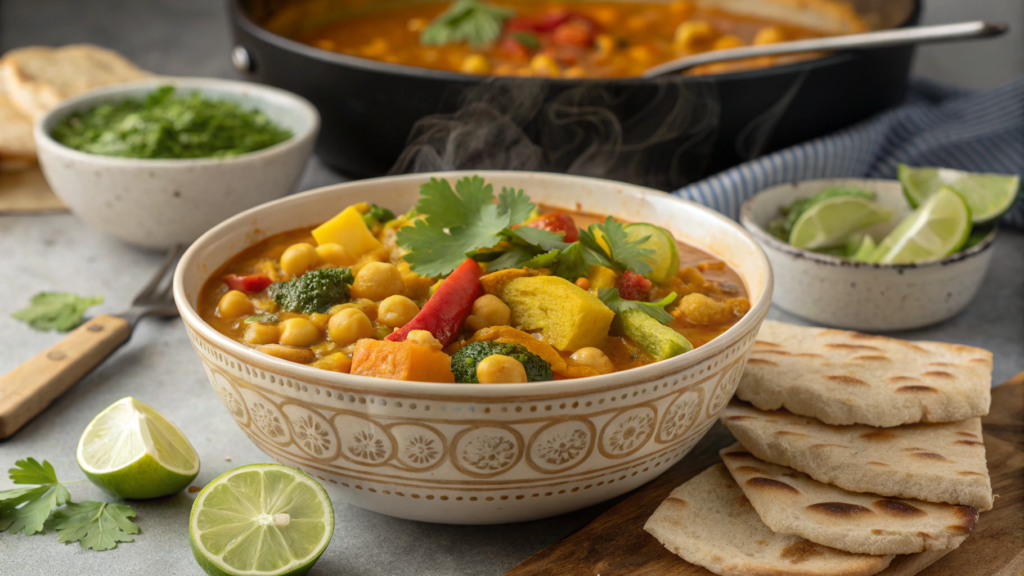
When we started cooking curry at home, I thought it would be another complicated recipe with a million spices. And then I made my first simple vegetable curry. And since then, Chickpea and Veggie Curry has become a dish that often delights us with its rich flavor.
You can swap the vegetables, adjust the heat level, and chickpeas always hold their shape and provide protein.
There’s a solid study where they tested the effect of chickpeas, beans, and lentils on satiety. It turned out that after legumes, people don’t feel hungry for longer. So our curry isn’t just delicious — it keeps you full for a long time.
Ingredients
(for 3–4 servings)
- 1 tbsp vegetable oil
- 1 medium onion, diced
- 2 cloves garlic, minced
- 1 tbsp fresh grated ginger
- 1 tbsp curry paste (red or yellow)
- 1 cup (about 120 g) carrots, sliced into half-moons
- 1 cup (about 150 g) cauliflower florets
- 1 can chickpeas, 15 oz (425 g), rinsed and dried
- 1 can coconut milk, 13.5 oz (400 ml)
- 1 cup (240 ml) vegetable broth or water
- 1 tsp salt
- 1/4 tsp black pepper
- 1 tbsp lemon juice
- 2 tbsp fresh herbs — cilantro or parsley
If you don’t have a good garlic press at home (and it really speeds up recipes like this), here’s one of the most durable options Alpha Grillers Garlic Press / Crusher – Heavy Duty, Easy Clean Stainless Steel.
How to Make It
- Heat the oil.
In a large skillet or saucepan, warm the vegetable oil over medium heat. It should become slightly fluid and glossy — that’s the perfect moment to add the onion. - Sauté the onion, garlic, and ginger.
Cook the onion for 3–4 minutes until soft but not browned.
Then add the garlic and ginger and cook for 1 more minute — the ginger releases its aroma as soon as it starts “breathing” in the steam. - Stir in the curry paste.
Add the curry paste directly to the pan and stir with a spatula for 30–40 seconds. This is important: the paste needs to release its aroma in the oil — that’s how it’s done in traditional Indian and Thai cooking. - Add the vegetables.
Carrots and cauliflower go in first because they need more time to soften. Cook for 2 minutes, just until they’re coated in the sauce. - Combine everything.
Add the chickpeas, pour in the coconut milk and broth. Mix well so the curry paste spreads evenly. - Simmer.
Bring it to a gentle boil, then reduce the heat to low, cover, and cook for 12–15 minutes. The sauce should thicken slightly, and the vegetables should become soft but not fall apart. - Final balance.
Add the lemon juice — 1 tablespoon is the right amount and doesn’t make it too acidic for this volume of coconut milk — and the fresh herbs. Stir and let the curry rest under the lid for 2 minutes.
A little tip to finish
If you want a deeper flavor, add 1/2 teaspoon of ground cumin together with the curry paste in step 3. It enhances the nutty notes of the chickpeas — we do this almost every time we want the dish to be a bit more expressive without extra heat.
5. Sweet Potato and Black Bean Tacos

Sweet Potato and Black Bean Tacos became our “default” dinner — a dish that doesn’t require inspiration, only the right ingredients and a warm skillet.
There’s a study showing that combining vegetables and legumes in your diet — like sweet potatoes and beans — is associated with a longer and healthier life.
Ingredients
(for 6 small tacos)
- 2 medium sweet potatoes (about 500 g), diced
- 1 tbsp olive oil
- 1 tsp salt
- 1/2 tsp paprika
- 1/2 tsp ground cumin
- 1 can black beans, 15 oz (425 g), rinsed and dried
- 1/4 cup (60 ml) water
- 1 tbsp lemon or lime juice
- 6 small corn or flour tortillas
- 1/2 cup (60–70 g) thinly sliced red cabbage
- 1/4 cup (60 g) yogurt or sour-cream-based sauce
How to Make It
- Preheat the oven.
Set it to 425°F (220°C) — the ideal temperature for sweet potatoes to brown instead of turning mushy. - Prep the sweet potatoes.
Mix the diced sweet potatoes with olive oil, salt, paprika, and cumin. Use your hands — spices spread more evenly this way.
Spread in a single layer on a baking sheet. - Bake.
Cook for 20–25 minutes, flipping once halfway through. The cubes should be slightly caramelized on the edges and soft inside. - Prep the beans.
While the sweet potatoes bake, heat a small skillet over medium heat. Add the beans, water, and a pinch of salt. Cook for 3–4 minutes, just until the beans warm through and soften a bit. Add the lemon/lime juice at the end. - Warm the tortillas.
This is important: cold tortillas tear. Warm them on a dry skillet for 10–15 seconds per side, or wrap in foil and heat in the oven for a couple of minutes. - Assemble the tacos.
Add some sweet potatoes to each tortilla, then the beans, then the sliced cabbage.
Finish with a spoonful of yogurt sauce — it adds freshness and balances the sweetness of the sweet potatoes.
A little tip to finish
If you want more depth of flavor without adding heat, mix 1 teaspoon of honey into the hot sweet potatoes as soon as you take them out of the oven. It melts instantly and enhances the natural sweetness, making the tacos more balanced. We discovered this trick by accident — and now we use it almost every time.
6. Overnight Oats with Berries
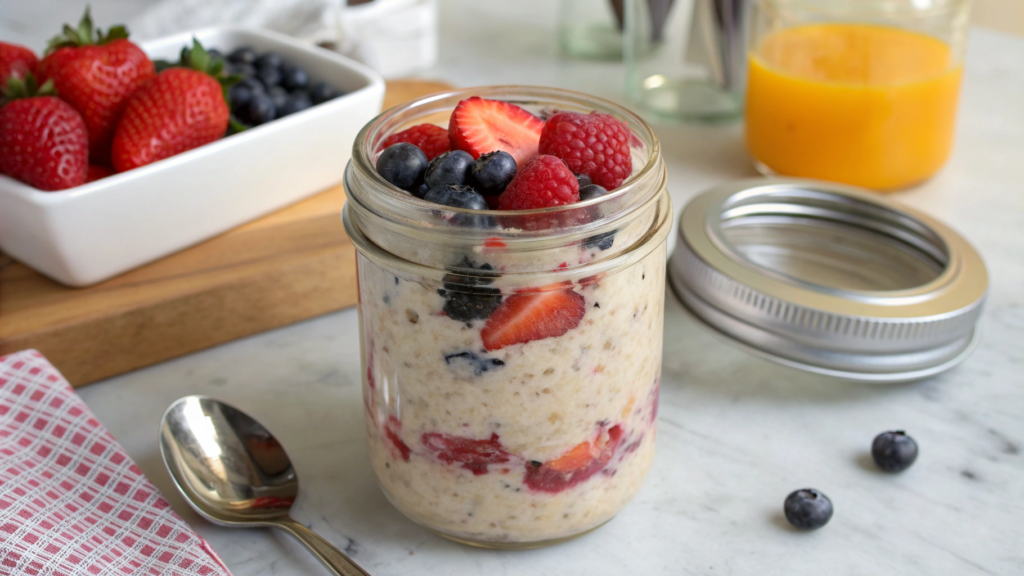
I spent a long time trying to find a breakfast I could make in the evening, because our mornings back then were like a small hurricane: animals, the garden, mail, endless tasks. And one day I mixed oats with yogurt and berries, put it in the fridge — and in the morning I opened the jar. That was it. I did it!
Researchers have been studying oats for years — and there’s clear evidence that the beta-glucan in oats helps reduce levels of “bad” cholesterol. So this isn’t just a tasty breakfast; it’s also gentle support for the heart.
Ingredients
(for 1 large portion or 2 smaller ones)
- 1/2 cup (40 g) old-fashioned oats
- 1/2 cup (120 ml) milk or plant-based drink
- 1/3 cup (80 ml) yogurt
- 1 tbsp honey or maple syrup
- 1/2 cup (70–80 g) fresh or frozen berries
- 1 tbsp chia seeds
- 1/4 tsp vanilla extract
- 1 tbsp chopped nuts (optional)
How to Make It
- Mix the base.
In a jar or container combine the oats, milk, and yogurt. Mix until no dry flakes remain. This step affects the texture — if you mix poorly, there will be clumps in the morning. - Add sweetness and vanilla.
Stir in the honey (or syrup) and the vanilla extract. They soak into the mixture overnight and make the flavor more even.
Vanilla always tastes brighter in cold recipes — a small detail, but you notice the difference. - Stir in the chia seeds.
Chia absorbs part of the liquid and makes the mixture creamier. The main thing is to mix well so no “pockets” of seeds remain. - Add the berries.
Fresh ones — gently, so they don’t get crushed. Frozen ones — just add them as they are; they release juice overnight and tint the oats a beautiful color. - Leave overnight.
Close the container and refrigerate for at least 6 hours. Ideally — 8–10.
During this time the oats absorb the liquid and become soft without cooking. - Top before serving.
In the morning add nuts or a few more fresh berries. It’s optional, but it adds a nice contrast of textures.
A little tip to finish
If you want the texture to turn out perfectly creamy, add 1 extra tablespoon of yogurt on top at night without mixing. Overnight it will pull in excess liquid and create an incredibly delicate top layer — we discovered this when we forgot to stir once.
7. Zucchini Noodles with Pesto
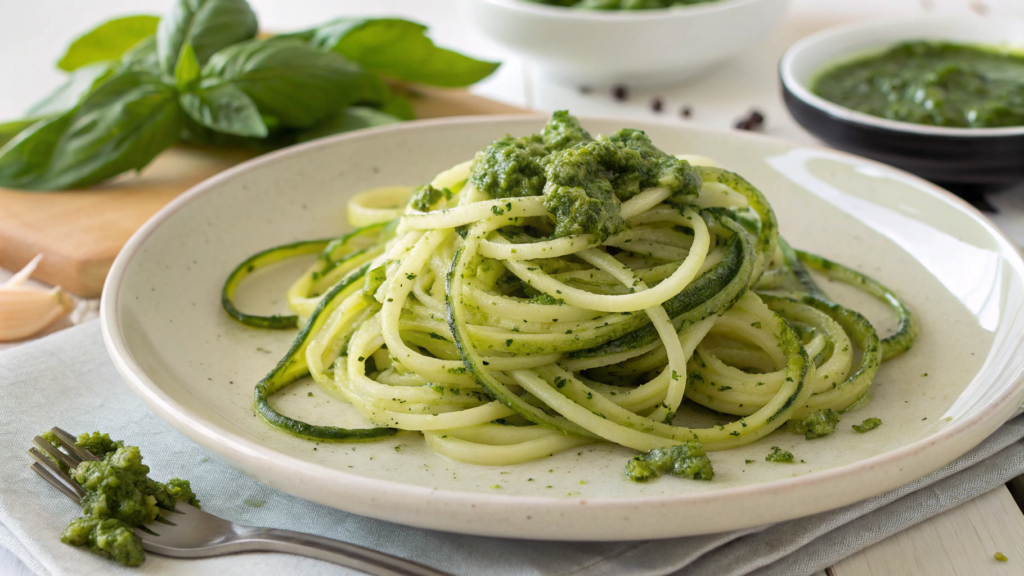
Zucchini Noodles with Pesto is a dish that comes together in minutes, doesn’t weigh you down, and works surprisingly well even on hot days when you barely want to eat. Especially when you have a big zucchini harvest — you pick two small ones in the morning, and by evening three more appear on the vine.
For many years, researchers observed thousands of people and noticed something important: those who ate more vegetables — about five servings a day — felt healthier and faced serious diagnoses less often. Interestingly, vegetables had a stronger effect than fruits.
Ingredients
(for 2 servings)
- 2 medium zucchinis (about 200 g each)
- 1 tbsp olive oil
- 1/4 tsp salt
- 1/4 tsp black pepper
- 1/2 cup (120 ml) pesto (homemade or high-quality store-bought)
- 1 tbsp lemon juice
- 2 tbsp grated Parmesan
How to Make It
- Prep the zucchini.
Turn them into “noodles” using a spiralizer. If you’re confident with a knife, you can slice them thinly instead — but the spiral shape is much more delicate.
Important: after slicing, gently blot the zoodles with a paper towel. This removes excess moisture and helps the sauce cling better. - Light warming.
Heat a skillet over medium heat, add the olive oil.
Add the zucchini and cook for 1.5–2 minutes, no longer. The noodles should become flexible but not soft — otherwise they turn into a watery side dish. Here, time control decides everything. - Add salt, pepper, and lemon.
Lemon juice is added at this stage, not at the end — it helps the zucchini keep their bright flavor and slightly reduces their natural wateriness. - Mix with pesto.
Remove the skillet from the heat and only then fold in the pesto. Basil darkens with heat, and olive oil loses its aroma — that’s why the sauce is added after removing from the stove.
Mix gently using tongs. - Serve.
Divide onto plates and sprinkle with grated Parmesan. You can add a couple more drops of olive oil on top — it always works.
A little tip to finish
If you want the dish to be more filling but still light, add 1/2 cup of cherry tomatoes, halved, directly to the warm zoodles before mixing with the pesto. The tomatoes will warm slightly while keeping their fresh flavor — we do this almost every time during the season.
8. Greek Yogurt Parfait with Granola
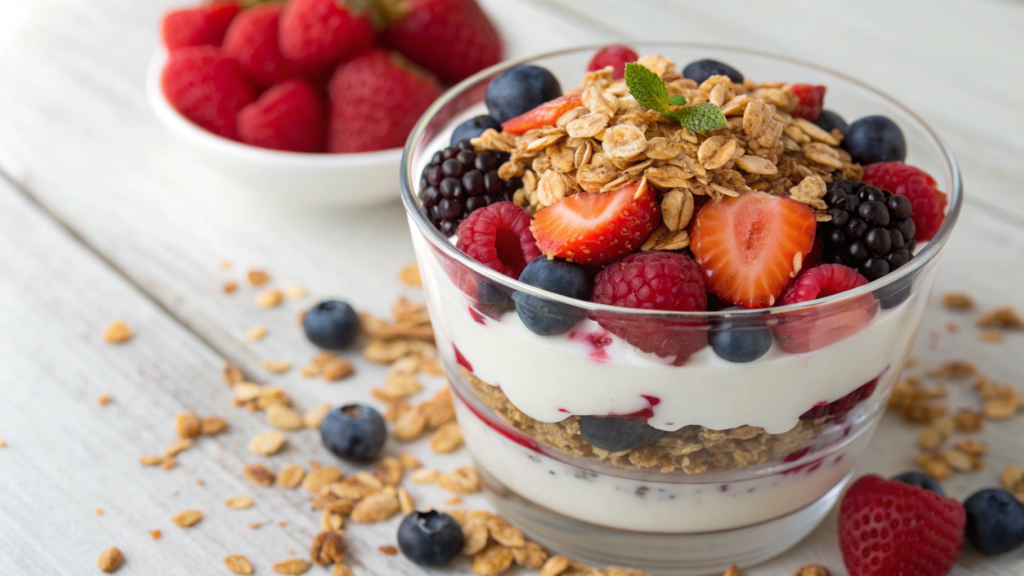
Parfait is one of the few breakfasts that turn out beautiful without any effort. Especially when the granola is crunchy and the yogurt is cold and thick.
Several studies found something interesting: people who regularly eat yogurt tend to have a “healthier” microbiota and face fewer metabolic issues. So this parfait is not just tasty — it’s genuinely supportive.
Ingredients
(for 1 large portion or 2 smaller ones)
- 1 cup (240 g) thick Greek yogurt
- 1/2 cup (70–80 g) granola
- 1/2 cup (70–80 g) berries (fresh or thawed)
- 1 tbsp honey or maple syrup
- 1 tbsp chopped nuts (optional)
How to Make It
- Prep the container.
A clear glass or jar works best — not for beauty, but because the layers help you control how much granola you add. If you add too much, the yogurt just disappears. - First layer — yogurt.
Add 3–4 tablespoons to the bottom. It should be thick, not runny.
If your yogurt is thinner, let it drain through a small sieve — the texture becomes much nicer. - Second layer — berries.
Spread them gently without pressing.
If using frozen berries, thaw them slightly so they don’t tint the entire glass one color. - Third layer — granola.
Sprinkle an even layer. Don’t press it down — granola needs to stay crispy.
This layer is all about texture contrast, which is why tamping it down ruins the effect. - Repeat the layers.
Again yogurt → berries → granola. Two rounds are usually enough. - Final touch.
Drizzle honey or syrup on top. You can add nuts — they enhance the sense of fullness and add a lovely aroma.
A little tip to finish
If you want the yogurt to be even thicker and richer, place it in a fine sieve for 15–20 minutes before assembling. It’s a mini version of the “labneh” process — the yogurt becomes denser, and the whole dessert feels more “structured.” We do this especially in summer when we crave a thicker texture.
9. Lentil Soup with Carrots and Celery

Lentil soup doesn’t require complicated ingredients, but it has small nuances — and those are exactly what make the flavor deep and the texture smooth.
Researchers have tested the effects of legumes on weight and appetite. They found that lentils and chickpeas help people stay full longer, and in some cases even slightly reduce weight without diets or effort.
Ingredients
(for 4 servings)
- 1 tbsp olive oil
- 1 medium onion, diced
- 2 medium carrots, sliced into half-moons
- 2 celery stalks, chopped
- 3 cloves garlic, minced
- 1 cup (200 g) red lentils
- 6 cups (1.4 L) vegetable broth or water
- 1 tsp salt
- 1/2 tsp black pepper
- 1/2 tsp paprika
- 1 tbsp lemon juice
- 2 tbsp chopped fresh parsley
How to Make It
- Heat the oil.
In a pot over medium heat, warm the olive oil until it becomes slightly glossy — that’s when it’s ready for the vegetables. - Sauté the onion, carrots, and celery.
Cook for 5–6 minutes, stirring occasionally. The vegetables should soften but not brown.
This step forms the “flavor base” of the soup — the classic mirepoix in traditional cooking. - Add the garlic.
Cook for 1 more minute, just until the aroma becomes stronger.
If the garlic starts to darken, it will turn bitter — so control matters here. - Rinse the lentils.
Red lentils are always rinsed before cooking to remove extra starch and any dust. Rinse until the water runs clear — usually 10–15 seconds. - Add the lentils and spices.
Stir in the lentils, salt, pepper, and paprika. Let the lentils warm for 20–30 seconds — it deepens the flavor and helps them cook more evenly. - Pour in the broth.
Bring the soup to a boil, then lower the heat and simmer for 20–25 minutes.
Red lentils cook quickly and partially break down — this is what gives the soup its thick and creamy texture without any cream. - Final balance.
Turn off the heat, add the lemon juice and chopped parsley.
Lemon brightens the flavor and lifts the aroma of the vegetables — a classic technique for legume-based soups.
A little tip to finish
If you want the soup to be slightly thicker and more “homey,” remove half a ladle of liquid into a separate bowl, then blend the remaining soup with an immersion blender for 2–3 seconds only. Return the liquid back.
This is an old restaurant trick, and it works flawlessly.
10. Grilled Chicken with Steamed Broccoli
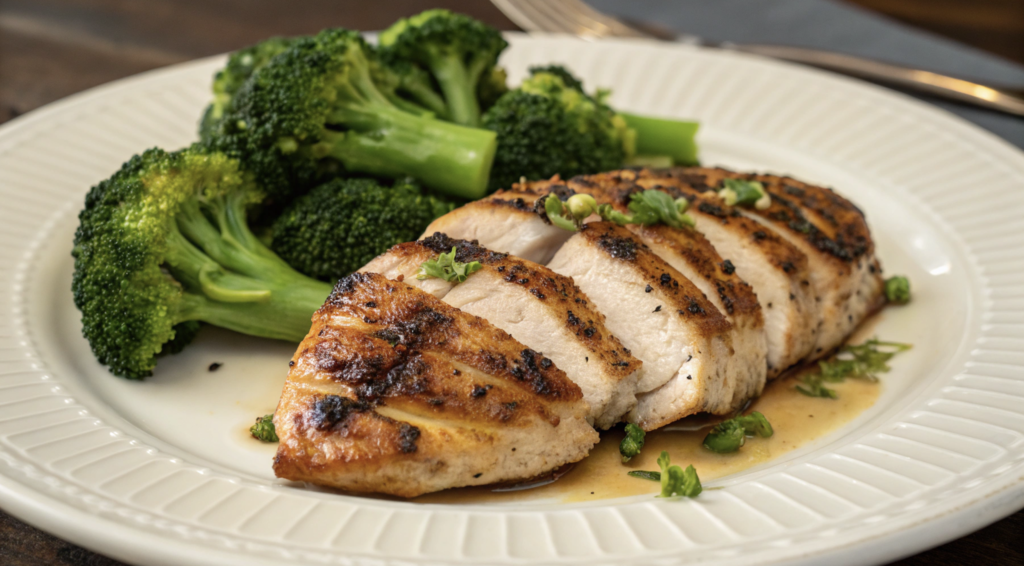
I’m always surprised how such simple ingredients can turn into a plate that’s both delicious and gives a feeling of lightness — especially in the evening when it’s late and you don’t want anything heavy.
There are several large observational studies showing that eating broccoli at least a couple of times a week helps the heart work more steadily and reduces health risks. A small habit — a big contribution.
Ingredients
(for 2 servings)
- 2 chicken breasts, 6–7 oz each (170–200 g)
- 1 tbsp olive oil
- 1 tsp salt
- 1/2 tsp black pepper
- 1/2 tsp paprika
- 1 tsp lemon juice
- 3 cups (about 250 g) broccoli florets
- 1/4 cup (60 ml) water for steaming
How to Make It
- Prep the chicken.
Pat the breasts dry with a paper towel — a dry surface gives a more even, golden sear.
Brush with oil, sprinkle with salt, pepper, and paprika.
Add the lemon juice and let sit for 10 minutes — that’s enough to make the meat slightly more tender. - Heat the grill or grill pan.
The temperature should be high — around 400–425°F (200–220°C).
If the surface isn’t hot enough, the chicken will steam instead of sear. - Cook the chicken.
Grill the breasts for 6–7 minutes per side, without moving them unnecessarily. This creates clean grill marks and helps retain the juices.
Chicken is ready at an internal temperature of 165°F (74°C) — the safe standard. - Prep the broccoli.
While the chicken cooks, place a saucepan on the stove with 1/4 cup of water, add a steaming basket, and place the broccoli inside.
Cover with a lid. - Steam the broccoli.
Cook for 4–5 minutes. The broccoli should be tender at the edges but crisp inside.
If you cook it longer, it turns gray and watery — defeating the whole purpose of steaming. - Rest the chicken.
Remove it from the heat and let it rest for 2–3 minutes. This lets the juices redistribute, keeping the breast tender.
A little tip to finish
If you want the flavor to feel more “complete,” drizzle 1 teaspoon of olive oil over the broccoli and add a pinch of salt after cooking. The broccoli tastes brighter instantly, and the texture stays airy. We do this almost always when cooking without sauces.
Your choice
Lindy and I always joke that if you open our notebook of recipes, you’ll see lots of scribbles, crossed-out lines, notes in the margins… but these 10 recipes always stay. They’ve survived moves, different kitchens, different seasons. They even survived the weeks when neither of us wanted to cook at all.
Clean eating isn’t a goal. It’s a side effect that appears when you choose simple ingredients and cook them with attention — not out of guilt or trends. And if even one recipe from this collection settles into your home for a long time, that means we’re already on the same wavelength.
I’m genuinely curious which dishes you’ll love most. And which ones you’ll cook again. Write in the comments — I always read them and love seeing how these simple recipes live in other people’s kitchens.