10 Companion Planting Layout Ideas For Raised Beds That Feel Effortless are practical ways to arrange crops in raised beds, taking into account root depth, plant spacing, airflow, and insect movement. When everything is distributed properly, the bed doesn’t get overloaded and doesn’t require constant intervention.
We tried some of these layouts ourselves, and saw others while traveling and visiting farms where people work not for pretty photos, but for real results. Each one follows a simple logic that leads to solid outcomes.
In this well-planned structure, every plant has its place. And this clearly helps anyone who has raised beds.
1. Raised Bed Layout for Cucumbers and Dill Border
This is a method where plants actually help each other. Let’s break down how to build this bed step by step.
Years ago, Lindy and I planted cucumbers “wherever they fit.” They did fit. And then they sprawled into the paths, tangled, got sick, and looked slightly offended by life. Dill grew somewhere on its own. No system. No real result.
Why cucumbers and dill?
Cucumbers (Cucumis sativus) are active, fast-growing plants with a shallow root system (about 12–18 inches / 30–45 cm). They need support, airflow, and consistent feeding.
Dill (Anethum graveolens) is light and airy, with roots reaching 18–24 inches (45–60 cm) deep. It grows lower and barely competes with cucumbers for the upper nutrient layer.
The interesting part is the ecology. When dill flowers, it attracts small predatory insects. They feed on aphids and thrips — and cucumbers often suffer from those pests. It’s not guaranteed protection, but it adds natural support to the planting.
So dill isn’t “for looks.” It’s a working tool.
Bed size
The ideal raised bed for this layout is 4 ft wide × 8 ft long (1.2 × 2.4 m), with a height of 12–18 inches (30–45 cm) and about 32 cubic ft (0.9 m³) of soil.
That size lets you reach the center without stepping on the soil — and loose soil is critical for cucumbers.
Planting layout
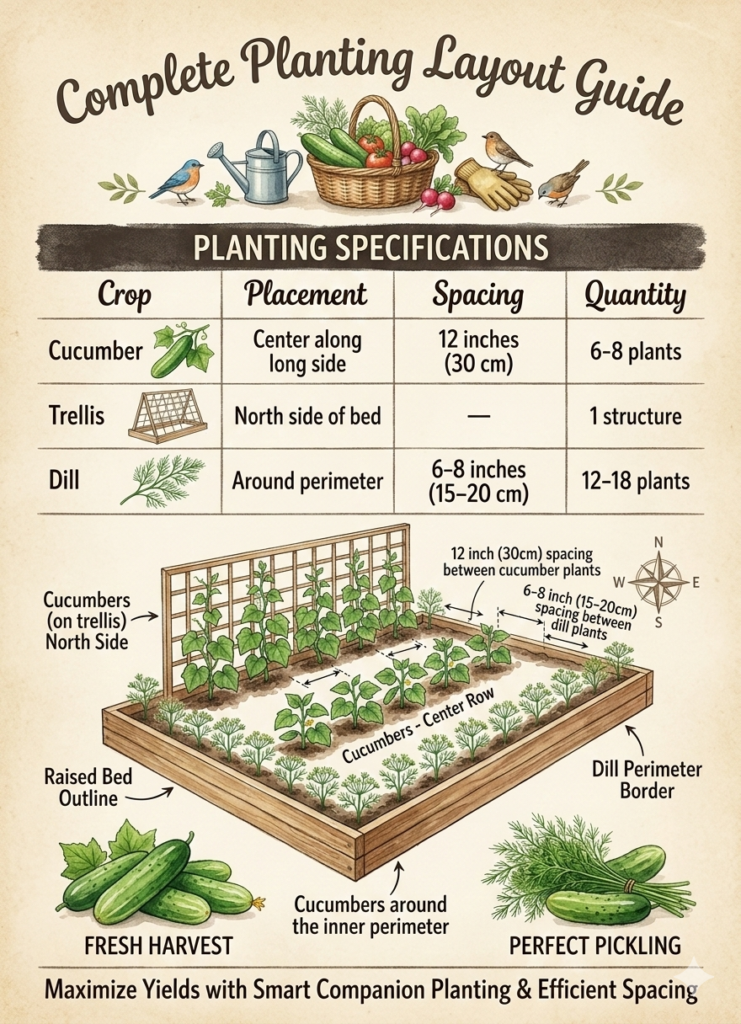
| Crop | Placement | Spacing | Quantity |
|---|---|---|---|
| Cucumbers (on trellis) | Center along long side | 12 inches (30 cm) between plants | 6–8 plants |
| Trellis | North side of bed | — | 1 structure |
| Dill | Around perimeter | 6–8 inches (15–20 cm) | 12–18 plants |
Why place the trellis on the north side?
So it doesn’t shade the dill. Light spreads evenly, and cucumber leaves get proper airflow.
We use a 6 ft (1.8 m) metal mesh trellis. A similar model many people use for raised beds is the Gardener’s Supply Company Cucumber Trellis. It holds up to 30–40 lbs (14–18 kg). Tested. Cucumbers get heavy, especially if you miss harvest day.
How this layout works in practice
1. Vertical growth instead of chaos
When cucumbers grow on the ground, the leaves sit in moisture. That increases the risk of powdery mildew.
Growing vertically improves ventilation and lowers fungal risk. We noticed it in the second season. The difference was obvious. Leaves stayed dry even after watering.
2. Dill as a living frame
Dill along the edge creates:
- a soft wind buffer
- attraction for beneficial insects
- a natural boundary
It also looks tidy. Not sterile. Alive. Sometimes dill grows up to 3 ft (90 cm). Yes, it can lightly shade the edge. But cucumbers in the center still get full sun.
3. Density and feeding
Cucumbers are heavy feeders.
On a 4×8 ft bed, we add:
- 20–25 lbs (9–11 kg) of compost before planting
- 1–2 inches (2.5–5 cm) of mulch once soil warms
We use straw or shredded leaves. Mulch keeps moisture steady. On average, cucumbers need about 1–1.5 inches of water per week (2.5–4 cm). More in hot weather.
Balance matters. Dill doesn’t like soggy soil. That’s why drip irrigation works best. It avoids extra moisture on the leaves.
Step-by-step placement logic
- Install the trellis first.
Secure it 8–10 inches (20–25 cm) deep. Cucumbers grow fast, and adding support later means disturbing the roots. - Plant cucumbers 12 inches (30 cm) apart.
On an 8 ft (2.4 m) bed, that gives you 6–8 plants. That’s plenty for a steady harvest. - Sow dill around the perimeter in a 6–8 inch (15–20 cm) strip.
Don’t do single scattered spots — make a light band. After it sprouts, thin it so you keep 6–8 inches between plants. - Mulch the center of the bed.
A 1–2 inch (2.5–5 cm) layer helps hold moisture for cucumbers. Mulch the dill edge later, once it’s stronger. - Guide the vines upward for the first 2–3 weeks.
Help them grab the trellis. After that, they’ll climb on their own.
This layout becomes manageable. It doesn’t demand constant control. In small details like this, it feels like the bed runs on its own… and you’re just guiding it slightly. You harvest cucumbers. Sometimes trim a little dill on the edge. And the bed keeps working.
Tip. Don’t cut all the dill at once. Leave at least one third of the plants to flower. Flowering umbels attract beneficial insects more than young greens. If you remove all the dill too early, the effect drops.
2. Potato Bed Layout With Beans as Living Trellis
Potatoes and beans? Together? Sounds strange? But this system really makes life easier.
Let’s look at how to place potatoes in a raised bed, where to plant beans, how much spacing to leave, how much soil is needed for hilling, and why beans can work as a living trellis, not just a random neighbor in the bed.
Why potatoes and beans actually work together
Potatoes (Solanum tuberosum) form tubers at a depth of 4–12 inches (10–30 cm).
Beans (Phaseolus vulgaris), especially climbing varieties, send roots deeper — up to 24 inches (60 cm) and more.
That means less direct competition.
Beans are a legume crop. On their roots live special bacteria that help “capture” nitrogen from the air and hold it in the soil.
In large fields, this creates a noticeable effect. In a small raised bed, the volume is obviously smaller. But even there, the soil becomes more alive, looser, more active. And nearby plants feel more stable.
Bed size and base layout
The optimal size is 4 ft × 8 ft (1.2 × 2.4 m), height 12–18 inches (30–45 cm).
Potatoes love depth. If the bed is lower than 10 inches, proper hilling becomes difficult.
Placement layout
| Crop | Location | Spacing | Quantity |
| Potatoes | 2 rows in the center | 12 inches (30 cm) | 10–12 tubers |
| Beans (climbing) | Along the north side | 8 inches (20 cm) | 8–10 plants |
| Support (if needed) | Behind the beans | 5–6 ft (1.5–1.8 m) height | 1 structure |
Plant potatoes at a depth of 4 inches (10 cm), then gradually add soil. Place beans closer to the edge — they grow upward and don’t shade the tubers.
How this works in practice
1. Living vertical instead of an empty edge
Instead of installing a heavy metal trellis, you can use a dense net or even simple wooden stakes. The beans create a green wall on their own.
2. Soil stays cooler
Potatoes don’t like overheating. When beans climb along the edge, they slightly shade the bed. Not completely. But enough to keep the soil from overheating in July.
We noticed this during a particularly hot summer. The harvest was more even. Fewer small tubers.
3. Nutrient balance
Potatoes are heavy feeders.
On a 4×8 ft bed, we add:
- 25–30 lbs (11–14 kg) of compost before planting
- an additional 1–2 lbs (0.5–1 kg) of organic fertilizer with phosphorus
Beans don’t require many feedings. That makes it convenient. They don’t pull nutrients aggressively if the soil is already healthy.
Step-by-step placement logic
- Prepare the bed at least 12 inches (30 cm) deep.
Potatoes form tubers within the soil layer, so a loose and deep base is critical. Before planting, incorporate 25–30 lbs of compost into a 4×8 ft bed. - Place potatoes in two rows down the center.
Leave 12 inches (30 cm) between tubers and about 18 inches (45 cm) between rows. This allows space for hilling and proper airflow. - Plant beans along the north edge.
An interval of 8 inches (20 cm) between plants is enough to form a dense green wall without overwhelming the edge. - Install a light vertical support 5–6 ft (1.5–1.8 m) tall.
It’s better to secure it immediately so you don’t disturb bean roots later. The potatoes remain below and are not fully shaded. - Hill the potatoes gradually.
When the tops reach 6–8 inches (15–20 cm), add soil. Repeat 1–2 more times during the season — this increases the tuber formation zone.
Tip. Do not hill potatoes with dry, loose dust. Add slightly moist soil. Dry soil collapses and doesn’t form a stable layer for additional stolons where tubers develop.
What to consider before planting
In short — the layout works, but there are details.
- Do not use early potatoes with very late climbing beans if your summer is short. Their growth timing may not match.
- Do not overfeed with nitrogen. Excess nitrogen gives more foliage and fewer tubers.
- Watch spacing. If planted too densely, beans will shade potatoes more than necessary.
- Do not plant beans too close to the tubers. Roots don’t aggressively conflict, but space still matters.
This layout works best in 4×8 ft or 3×6 ft beds. In smaller spaces, it’s better to keep one row of potatoes and one edge for beans. If the soil is heavy, add sand or compost beforehand. In dense soil, potatoes form deformed tubers.
And one more thing: if you are growing determinate bush beans, not climbing ones, the layout changes. Beans then act as an edge filler, not a vertical layer. That’s a different structure.
Why this layout works calmly
It doesn’t require complicated calculations. Potatoes grow at their own pace. Beans grow at theirs.
The space is used vertically and in depth without complicated structures. Potatoes work below, beans work above, and the bed doesn’t stay empty at any level. If the soil is loose and spacing is respected, the system doesn’t require constant control — just timely hilling and guiding the beans upward.
3. Strawberry Bed Layout With Chive Edges
Strawberry Bed Layout With Chive Edges — in this layout, strawberries produce a steady harvest, and chives along the edges act as natural support. Here you’re working with plant density, airflow, pest pressure, and cleaner berries.
We once planted strawberries as a simple “carpet.” It looked cute. A month later — solid foliage, dampness underneath, and grayish berries we didn’t even want to pick.
Why strawberries and chives work well together
Strawberries (Fragaria × ananassa) have a shallow root system — about 6–8 inches (15–20 cm) deep.
Chives (Allium schoenoprasum) grow deeper and form compact clumps.
Onions and other Allium plants release sulfur compounds. Research shows that planting onions and garlic near berry crops can reduce aphid pressure and some fungal issues.
It’s not 100% protection. But the overall environment becomes noticeably calmer.
Bed size and planting density
The optimal size is 4 ft × 8 ft (1.2 × 2.4 m), height 10–12 inches (25–30 cm).
Strawberries don’t need extreme depth, but good drainage is critical. In standing water, berries suffer quickly.
Layout table
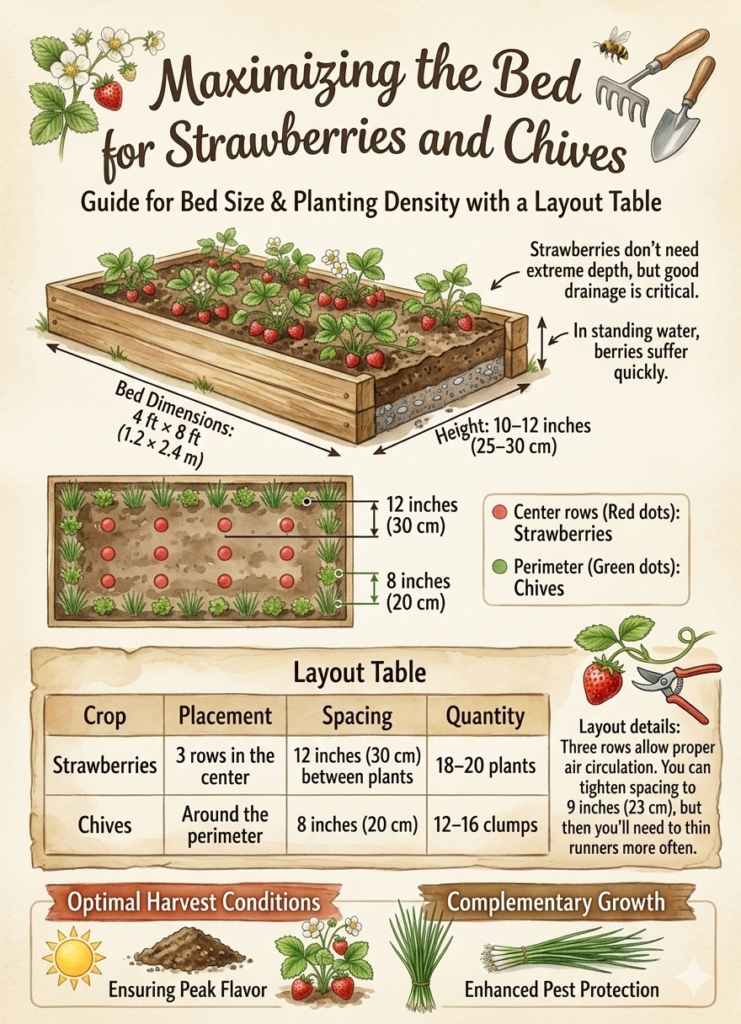
| Crop | Placement | Spacing | Quantity |
| Strawberries | 3 rows in the center | 12 inches (30 cm) between plants | 18–20 plants |
| Chives | Around the perimeter | 8 inches (20 cm) | 12–16 clumps |
Three rows allow proper air circulation. You can tighten spacing to 9 inches (23 cm), but then you’ll need to thin runners more often.
How this works in practice
1. The edges stop being vulnerable
Strawberries planted along the edge often suffer first — drying out, getting damaged, being stepped on.
When chives are planted around the perimeter, the edge becomes dense and stable.
It works as both a physical buffer and an aromatic layer.
2. Berries stay cleaner
We always mulch strawberries with 1–2 inches (2.5–5 cm) of straw. This reduces berry contact with soil and lowers the risk of gray mold.
Natural straw mulch works especially well. It’s light and doesn’t compact the surface.
3. Moisture levels stabilize
Strawberries need about 1 inch of water per week (2.5 cm). When the bed is reinforced along the edge with chives, wind dries the surface less aggressively.
We noticed this during a windy season — fewer soil cracks, fewer dried-out berries.
Step-by-step placement logic
- Prepare loose soil with strong drainage.
Add 15–20 lbs (7–9 kg) of compost to a 4×8 ft bed and make sure water doesn’t pool after irrigation. - Plant strawberries in three center rows.
Keep 12 inches (30 cm) between plants. This allows them to spread without overheating or trapping moisture. - Plant chives around the entire perimeter.
Space them 8 inches (20 cm) apart. This creates a tight green frame without overwhelming the strawberries. - Mulch the center with straw.
A 1–2 inch layer reduces evaporation and protects berries from direct soil contact. - Remove excess runners during the season.
This maintains the structure of the bed and prevents overcrowding.
Tip. Don’t leave chives undivided for more than 3 years. Older clumps become too dense and start competing for moisture. Divide them in spring to keep the bed edge tidy and productive.
From our experience
If the soil is heavy and clay-based, add sand or compost beforehand — strawberries don’t tolerate stagnant water. And don’t overfeed with nitrogen, or you’ll get more leaves and fewer berries.
Chives, on the other hand, need almost no feeding and quietly grow along the edge without interfering with the main crop.
In the end, you get a bed where the center focuses on harvest, and the edges maintain stability. It’s far more productive than a dense carpet without structure.
4. Tomato Bed Layout With Basil Pockets
Tomato Bed Layout With Basil Pockets — this layout we saw in Oregon, on a small farm near Eugene. In it, tomatoes get air and space, and basil is placed not in rows, but in “pockets” between them. Not as a dense line, but as real pockets. The bed looked lighter. And the harvest was even.
Later, we tried this layout ourselves. And it really works.
Why tomatoes and basil work together
Tomatoes (Solanum lycopersicum) have a strong root system that can go down 24–36 inches (60–90 cm) in loose soil.
Basil (Ocimum basilicum) works in the upper layer — about 8–12 inches (20–30 cm).
These are different feeding levels.
Basil doesn’t just smell good to us. It releases aromatic compounds that can confuse some insects. This is not protection in a “plant it and forget it” way. But the background around tomatoes becomes less attractive to certain pests. It’s an extra layer of support, not armor.
Bed size and placement
The optimal size is 4 ft × 8 ft (1.2 × 2.4 m), with a height of at least 12 inches (30 cm).
Tomatoes don’t like crowding. And this is where most people make a mistake — planting too close.
Layout table
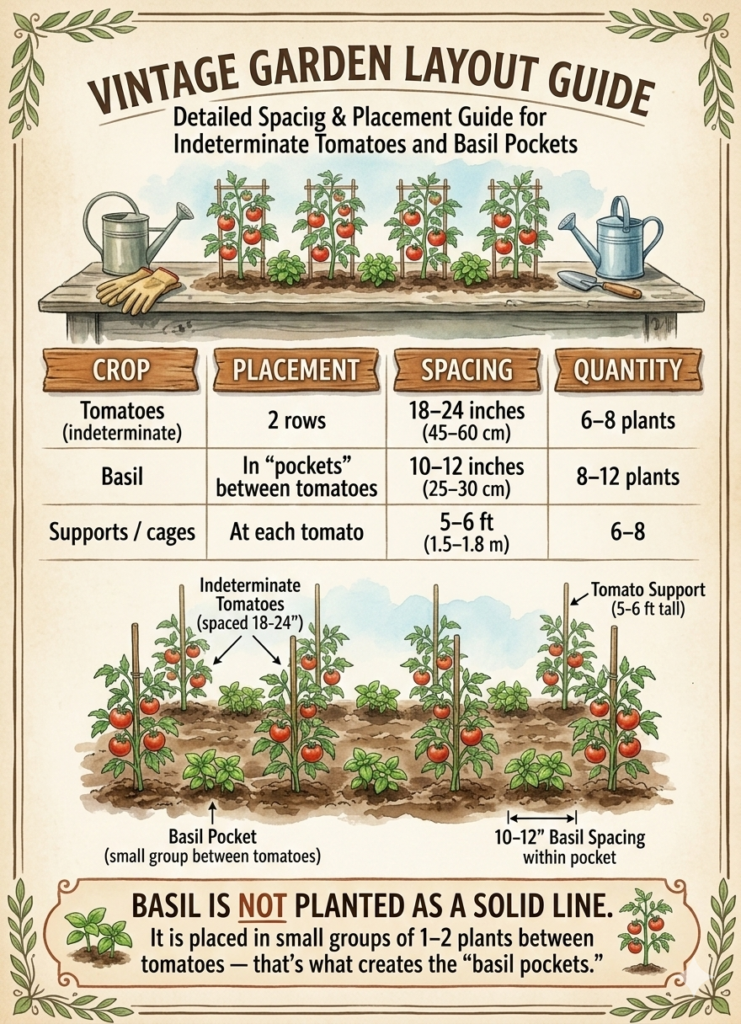
| Crop | Placement | Spacing | Quantity |
| Tomatoes (indeterminate) | 2 rows | 18–24 inches (45–60 cm) | 6–8 plants |
| Basil | In “pockets” between tomatoes | 10–12 inches (25–30 cm) | 8–12 plants |
| Supports / cages | At each tomato | 5–6 ft (1.5–1.8 m) | 6–8 |
Basil is not planted as a solid line. It is placed in small groups of 1–2 plants between tomatoes — that’s what creates the “basil pockets.”
How it looks through the season
At the beginning of the season, tomatoes are still compact. Basil fills the empty spaces.By mid-summer, tomatoes grow upward, and basil stays in the lower layer, covering the soil.
This gives:
- Better ventilation — plants don’t press tightly against each other.
- Less soil overheating — basil creates a living cover.
- More even moisture levels.
Tomatoes need regular and deep watering — on average about 1–1.5 inches per week (2.5–4 cm) if there’s no rain. When the soil is covered with living foliage or mulch, moisture evaporates more slowly, and watering works more efficiently.
Soil preparation
For a 4×8 ft bed, you usually need:
- 30–40 lbs (14–18 kg) of compost
- 2–3 lbs (1–1.5 kg) of organic fertilizer with phosphorus and potassium
Tomatoes are nutrient-demanding. Basil does not need separate feeding.
Step-by-step placement logic
- Prepare the bed with a deep, loose layer.
Loosen the soil to at least 12–14 inches (30–35 cm) so tomato roots can move downward freely. Add compost across the whole bed in advance — not just under each plant. The soil should be light and well-drained, without a dense layer underneath. - Plant tomatoes in two rows with proper spacing.
Leave 18–24 inches (45–60 cm) between plants. Crowded tomatoes ventilate poorly and trap moisture in the foliage, especially in July. When planting, you can bury the stem 2–3 inches (5–7 cm) deeper to encourage additional root formation. - Place basil in groups between tomatoes.
Plant 1–2 basil plants in each gap, leaving about 10–12 inches (25–30 cm) between them. Do not turn the space into a solid carpet — the “pockets” should remain small islands. Basil fills the lower level without blocking airflow. - Install supports or cages at planting time.
Push them into the soil 8–10 inches (20–25 cm) deep. Doing this later is risky — roots can be damaged. Tomatoes gain mass quickly, and support must be stable from the start. - Mulch open soil areas.
A layer of 1–2 inches (2.5–5 cm) of straw or shredded leaves reduces evaporation and stabilizes soil temperature. Basil will cover part of the surface, but open zones should not stay bare.
Tip. Do not plant basil right against the tomato stem. Leave at least 4–5 inches (10–12 cm) of open space around the base. This reduces moisture around the stem and lowers the risk of fungal issues.
In this layout, tomatoes get space and airflow, and basil works as living filler between them. The bed is not overcrowded, the soil is covered, and ventilation remains strong. If spacing is respected, the system stays manageable and doesn’t require constant mid-summer corrections.
5. Carrot and Onion Checkerboard Layout
Carrot and Onion Checkerboard Layout — this is a layout where carrots and onions are planted in a staggered grid, not in straight rows. Not “a strip of carrots — a strip of onions,” but an even alternation across the whole bed. In practice, this kind of planting creates fewer pest issues and less competition.
We tried this on part of our bed. It turned out to be much more stable than classic rows.
Why carrots and onions work together
Carrots (Daucus carota) form their root at a depth of 8–12 inches (20–30 cm).
Bulb onions (Allium cepa) have a more compact root system — about 6–10 inches (15–25 cm).
They use a similar soil layer, but don’t interfere with each other if spacing is correct.
The main advantage is smell. Onions release sharp sulfur compounds. It’s harder for the carrot fly to navigate when something strong-smelling grows nearby. This is not full protection. But in mixed planting, damage is usually lower than in a pure carrot bed.
Bed size and density
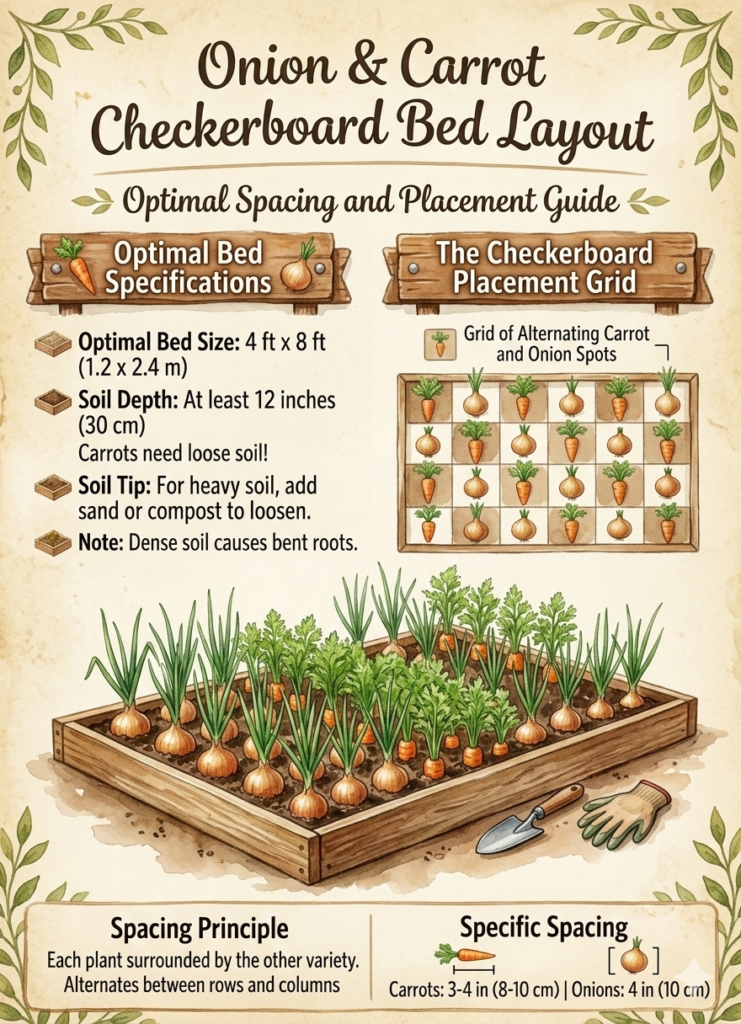
Optimally — 4 ft × 8 ft (1.2 × 2.4 m), with a depth of at least 12 inches (30 cm) — carrots don’t like compacted soil.
If the soil is heavy, loosen it in advance and add sand or compost. Bent roots are almost always the result of a dense lower layer.
Placement layout (checkerboard)
| Crop | Spacing | Principle |
| Carrot | 3–4 inches (8–10 cm) | Alternates with onion |
| Onion | 4 inches (10 cm) | Planted between carrot spots |
Instead of rows, you form a grid. From above, each carrot plant is surrounded by onions, and vice versa. That’s the checkerboard layout.
How it works through the season
In spring, onions start faster. Carrots develop more slowly. Early in the season, the bed looks sparse.
By mid-summer, plants fill the space but don’t create a dense carpet. This planting pattern gives:
- Better scent distribution — onion aroma spreads across the whole bed.
- More even soil use.
- Fewer empty zones for weeds.
Carrots need steady moisture — about 1 inch of water per week (2.5 cm) if there’s no rain. In a checkerboard layout, water distributes more evenly than in tight straight rows. Soil gets soaked deeper and dries out less between plants.
Soil preparation
Before planting in a 4×8 ft bed, add:
- 15–20 lbs (7–9 kg) of compost
- some sand if needed to lighten the structure
Carrots are especially sensitive to dense soil. Stones and clumps should be removed in advance.
Step-by-step placement logic
- Prepare the soil deeply and thoroughly.
Carrots don’t tolerate a compact layer. Loosen soil to at least 12 inches (30 cm), remove stones and large clumps. If soil is heavy, add 1–2 buckets of sand and 15–20 lbs of compost to a 4×8 ft bed. The surface should be fine and loose — this directly affects root shape. - Mark the bed with a 4×4 inch (10×10 cm) grid.
You don’t need a ruler, but you need a visual guide. The checkerboard principle only works with even spacing. If distances vary too much, the structure loses its meaning. - Sow carrots in every other grid cell.
Sowing depth — about ½ inch (1 cm). After sowing, lightly press the surface so seeds make good contact with soil. Water gently, without washing seeds away. - Plant onion sets in the empty spots.
Place bulbs so the tip is almost level with the soil surface. Don’t bury too deeply — it slows growth. About 4 inches (10 cm) between onions allows full bulb formation. - Thin carrots after true leaves appear.
When seedlings reach 2–3 inches (5–7 cm) tall, carefully remove extras, leaving 3–4 inches (8–10 cm) between plants. This is the most unpleasant but most important stage. Without thinning, roots stay thin and misshapen. - Maintain even moisture.
Carrots need around 1 inch of water per week (2.5 cm). Drying out early leads to coarse, fibrous roots. It’s better to water less often but deeply.
Tip. If your carrots germinate unevenly, mix the seeds with dry fine sand in about a 1:5 ratio before sowing. This helps distribute them evenly across the grid and reduces the need for heavy thinning.
And one more thing — don’t leave thinned carrot tops on the bed. Their smell can attract carrot flies. Remove them right away or add them to compost.
Small details like this don’t change the layout — but they make it truly work.
The checkerboard planting pattern spreads both crops evenly across the bed. Carrots and onions don’t form separate zones — they function as one system. If the soil is loose and spacing is respected, the bed stays ventilated, and roots develop more evenly and reliably.
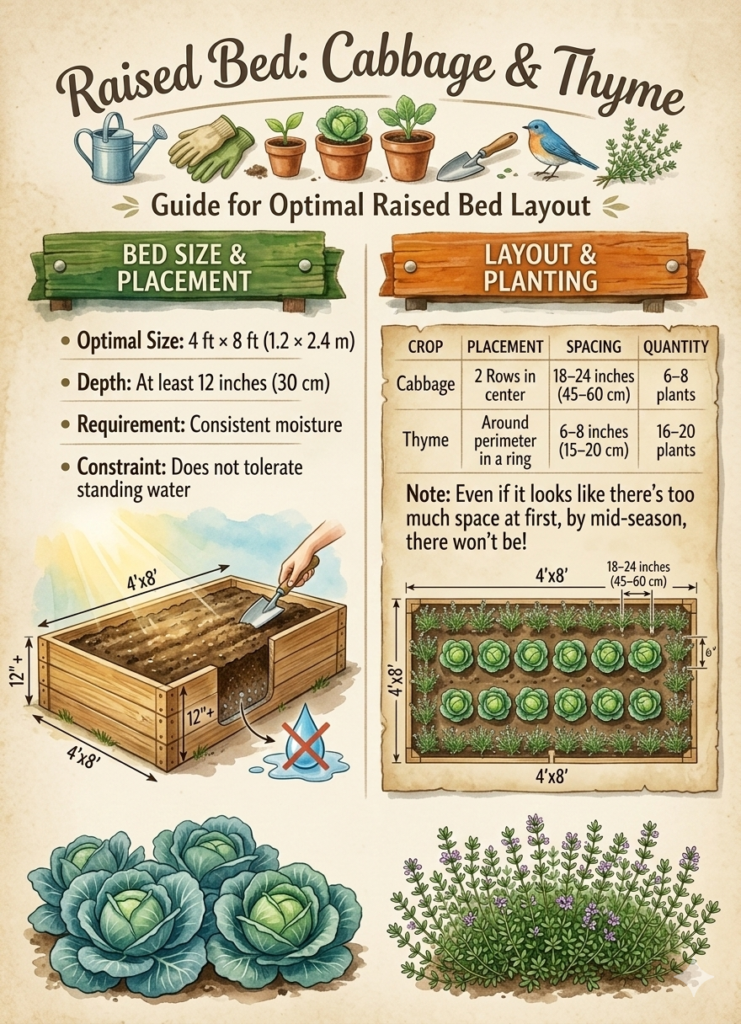
6. Cabbage Bed Layout With Thyme Ring
Cabbage Bed Layout With Thyme Ring — this is a layout where cabbage is planted with proper spacing in the center, and a dense ring of thyme forms along the edge. All of this supports air circulation, pest pressure control, and structural stability.
Why cabbage and thyme work together
Cabbage (Brassica oleracea) forms a large leaf rosette and a root system reaching about 12–18 inches (30–45 cm) deep. It needs space and strong ventilation.
Thyme (Thymus vulgaris) has a compact, shallow root system — around 6–8 inches (15–20 cm). It doesn’t compete for depth and grows as a dense, low cover.
The strong scent of thyme can confuse insects. When aromatic plants surround cabbage, pests have a harder time quickly locating it by smell. This is not full protection, but the overall environment becomes less attractive for some cabbage pests.
Bed size and placement
Optimal size — 4 ft × 8 ft (1.2 × 2.4 m), height at least 12 inches (30 cm).
Cabbage does not tolerate standing water, but it requires consistent moisture.
Layout table
| Crop | Placement | Spacing | Quantity |
| Cabbage | 2 rows in the center | 18–24 inches (45–60 cm) | 6–8 plants |
| Thyme | Around the perimeter in a ring | 6–8 inches (15–20 cm) | 16–20 plants |
Cabbage should not be crowded. Even if it looks like there’s too much space at first — by mid-season, there won’t be.
How the layout works through the season
In spring, thyme stays low. Cabbage actively builds leaves.
By mid-summer, heads begin forming — and at this stage, ventilation becomes critical.
Wide spacing provides:
- Better airflow between plants.
- Less moisture buildup in the center of the rosette.
- More even light on lower leaves.
Cabbage needs regular deep watering — on average about 1–1.5 inches per week (2.5–4 cm) if there’s no rain. But when planted too densely, moisture stays longer between leaves, and the risk of rot increases.
Thyme along the edge helps hold the shape of the bed. It covers soil, firms up the perimeter, and slows weed invasion. It’s not a hard barrier, but the edge becomes cleaner and more stable.
Soil preparation
For a 4×8 ft bed, you’ll need:
- 30 lbs (14 kg) of compost
- 2 lbs (1 kg) of organic fertilizer rich in phosphorus and potassium
Cabbage is nutrient-demanding. Thyme prefers moderately fertile, well-drained soil. Soil that’s too rich makes thyme loose and stretched.
Step-by-step placement logic
- Loosen the soil and add compost evenly.
Loosen to at least 12 inches (30 cm) deep. Make sure there is no dense layer that traps water underneath. - Mark two rows in the center for cabbage.
Leave 18–24 inches (45–60 cm) between plants and about the same between rows. This ensures strong air circulation. - Plant cabbage seedlings with slight stem burial.
Bury the stem about 1 inch (2–3 cm) deeper. This improves stability and encourages additional root growth. - Plant thyme around the entire perimeter in a tight line.
Spacing of 6–8 inches (15–20 cm) creates a continuous aromatic ring without gaps. - Mulch the center of the bed.
A layer of 1–2 inches (2.5–5 cm) helps retain moisture, but do not cover the base of the rosette — it needs airflow.
Tip. If you notice the first cabbage white butterfly caterpillars, inspect the underside of leaves immediately. Thyme reduces the chance of heavy infestation, but manual inspection remains the most effective early control.
In this layout, cabbage grows in the center and forms heads calmly. Along the edge runs a low aromatic thyme ring that holds the structure of the bed. If spacing is respected and plants aren’t crowded, air flows freely, cabbage develops evenly, and the bed remains manageable throughout the season.
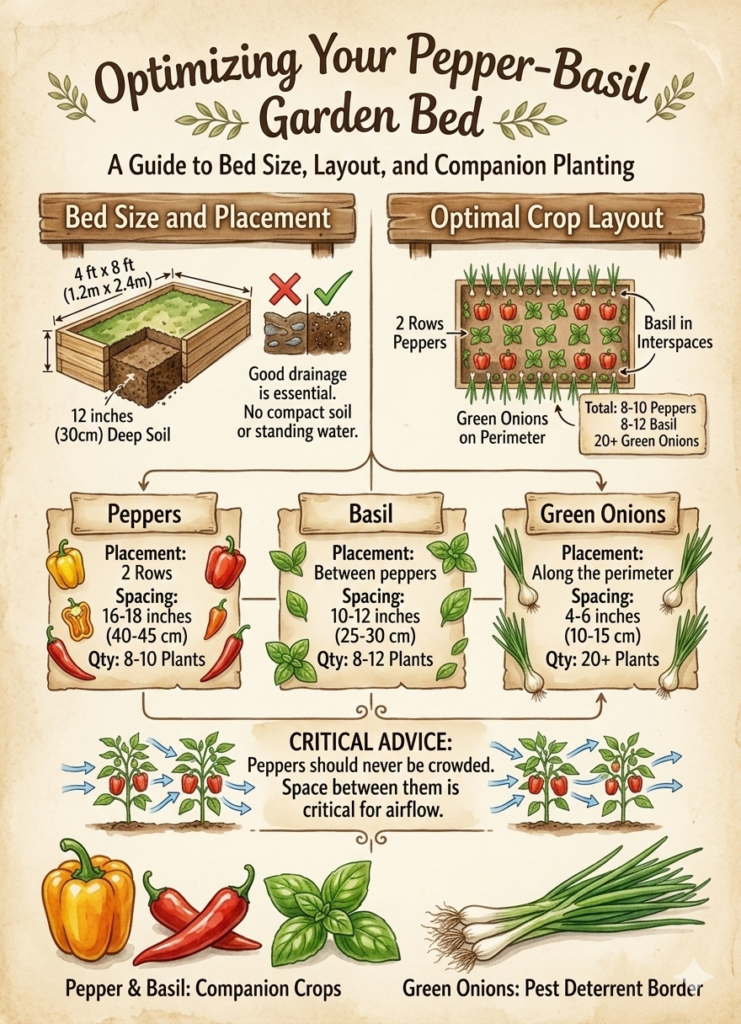
7. Pepper Bed Layout With Basil and Green Onions
In this layout, peppers get warmth and airflow, basil fills the lower layer, and green onions run along the edge as a light protective line. Not a decorative border — a functional structure.
Why peppers, basil, and green onions work together
Peppers (Capsicum annuum) develop roots about 12–24 inches (30–60 cm) deep in loose soil. They love heat and do poorly in soggy conditions.
Basil (Ocimum basilicum) works in the upper layer — about 8–12 inches (20–30 cm). It doesn’t compete deeply but helps cover the soil surface.
Green onions (Allium fistulosum) have compact roots and take up very little space.
Each plant occupies a slightly different layer, so they don’t crowd each other when spaced correctly.
Bed size and placement
Optimal bed size — 4 ft × 8 ft (1.2 × 2.4 m), at least 12 inches (30 cm) deep. Peppers don’t like compact soil or standing water. Good drainage is essential.
Layout table
| Crop | Placement | Spacing | Quantity |
| Peppers | 2 rows | 16–18 inches (40–45 cm) | 8–10 plants |
| Basil | Between peppers | 10–12 inches (25–30 cm) | 8–12 plants |
| Green onions | Along the perimeter | 4–6 inches (10–15 cm) | 20+ plants |
Peppers should never be crowded. Space between them is critical for airflow.
How the layout works through the season
In spring, peppers grow slowly while soil is still cool. Basil fills in later, once temperatures stay above 60°F (15°C).
By mid-summer, peppers form dense bushes. Basil covers the soil, reducing evaporation. Green onions create a clean edge and prevent weeds from taking over the perimeter.
Peppers need steady watering — about 1–1.5 inches per week (2.5–4 cm) if there’s no rain. When soil is shaded by basil or green onion leaves, it dries out more slowly. Moisture stays more stable, and roots avoid stress from sudden swings.
Soil preparation
For a 4×8 ft bed, add:
- 25–30 lbs (11–14 kg) of compost
- 1–2 lbs (0.5–1 kg) of organic fertilizer high in phosphorus and potassium
Too much nitrogen is not ideal — peppers will grow lots of leaves but fewer fruits.
Step-by-step placement logic
- Prepare loose, well-drained soil at least 12 inches (30 cm) deep.
Make sure water does not collect in the root zone. Peppers are especially sensitive to excess moisture. - Plant peppers in two rows, spaced 16–18 inches (40–45 cm) apart.
This gives bushes room to grow without leaves touching. You can bury the stem slightly — about 1 inch (2–3 cm) — to improve stability. - Place basil between peppers in small “islands.”
One plant per gap, leaving 10–12 inches (25–30 cm) between basil plants. Keep space around the pepper stem for airflow — basil should not press against it. - Plant green onions along the perimeter.
Spacing of 4–6 inches (10–15 cm) creates a dense edge. Onions don’t shade peppers but help keep the border clean. - Mulch exposed soil with a 1–2 inch (2.5–5 cm) layer.
This stabilizes temperature and reduces moisture loss, especially in hot weeks.
Tip. If your summers are hot and dry, pinch basil regularly. Compact plants create a dense lower layer without shading peppers. Overgrown basil can stretch upward and reduce airflow.
In this layout, peppers get space and warmth. Basil protects the soil surface. Green onions stabilize the edge. If spacing is respected and drainage is good, the bed stays manageable and productive all season.
8. Three Sisters Layout for Small Raised Beds
Three Sisters Layout for Small Raised Beds is a compact version of a traditional planting method used by Indigenous peoples of North America.
Corn provides height. Beans climb the stalks. Squash covers the soil.
But in a small raised bed, everything has to be arranged carefully — otherwise it turns into chaos.
We first saw a compact version on a demonstration plot in Arizona. The bed was only 4×6 ft, but each plant had a clear role. No overcrowding. No fighting for light.
Why the “Three Sisters” system works
Corn (Zea mays) develops roots up to 24–36 inches (60–90 cm) deep in loose soil and serves as a natural support.
Pole beans (Phaseolus vulgaris) climb the corn and help fix nitrogen in the soil.
Squash or zucchini (Cucurbita spp.) have shallow roots and long vines that spread across the surface, shading the soil.
Each plant works on a different level — above and below ground.
Bed size and placement
For a compact version, ideally 4 ft × 6 ft (1.2 × 1.8 m), at least 12–18 inches (30–45 cm) deep.
Smaller than that increases the risk of overcrowding.
Layout table
| Crop | Placement | Spacing | Quantity |
| Corn | Central block | 12 inches (30 cm) | 6–8 plants |
| Pole beans | At base of corn | 1–2 per stalk | 6–12 plants |
| Squash/Zucchini | Edge of bed | 1–2 plants | 1–2 |
Corn should be planted in a block, not a single row. This is important for pollination.
How it develops through the season
Corn grows first. Beans are added when corn reaches about 6 inches (15 cm) tall. This prevents young corn from being overwhelmed.
Squash grows more actively later and covers the soil surface by mid-summer.
This setup gives:
- Vertical use of space
- Reduced evaporation thanks to squash leaves
- Dense planting without shading out the corn
Corn needs steady watering — about 1–1.5 inches per week (2.5–4 cm) if there’s no rain. Moisture is especially important during ear formation. Dry soil at that stage can reduce yield.
Soil preparation
This system is nutrient-hungry. For a 4×6 ft bed, you’ll need:
- 30–40 lbs (14–18 kg) of compost
- 2–3 lbs (1–1.5 kg) of organic fertilizer
Corn is a heavy feeder. Without rich soil, the system won’t perform well.
Step-by-step placement logic
- Prepare the soil deeply and plan the direction of growth.
Loosen soil to at least 12–18 inches (30–45 cm). Dense lower layers make corn unstable. Decide in advance where squash vines will grow — outside the bed or along one side. In a small space, this matters. - Plant corn in a compact block, not a line.
Space plants 12 inches (30 cm) apart to form a tight square of 6–8 stalks. This improves wind pollination. In a small raised bed, a single row performs worse. - Wait until corn reaches 6–8 inches (15–20 cm), then add beans.
If planted at the same time, beans may outgrow and weigh down young corn. Plant 1–2 bean seeds near each stalk, but leave 2–3 inches (5–7 cm) from the base. - Plant squash at the edge and guide vines outward.
Plant 1, at most 2 if the variety is compact. Keep at least 18 inches (45 cm) from the center. Once vines appear, gently guide them outside the bed to prevent shading and airflow issues. - Maintain steady water and nutrients during active growth.
Corn needs about 1–1.5 inches of water per week (2.5–4 cm) during ear formation. Water deeply so moisture reaches corn roots, not just the surface where squash roots sit. - Keep the center open.
If squash vines start invading the middle, redirect or pinch them back. In a small bed, airflow matters more than maximum leaf spread.
Tip. Avoid ultra-sweet hybrid corn in a small system. They require more nutrients and water. Choose sturdy, moderate-height varieties — they’re more stable in compact beds.
In a small raised bed, this system needs a bit more attention early in the season. But if you balance height, root depth, and vine direction correctly, the plants begin working as one structure — not three competing crops.
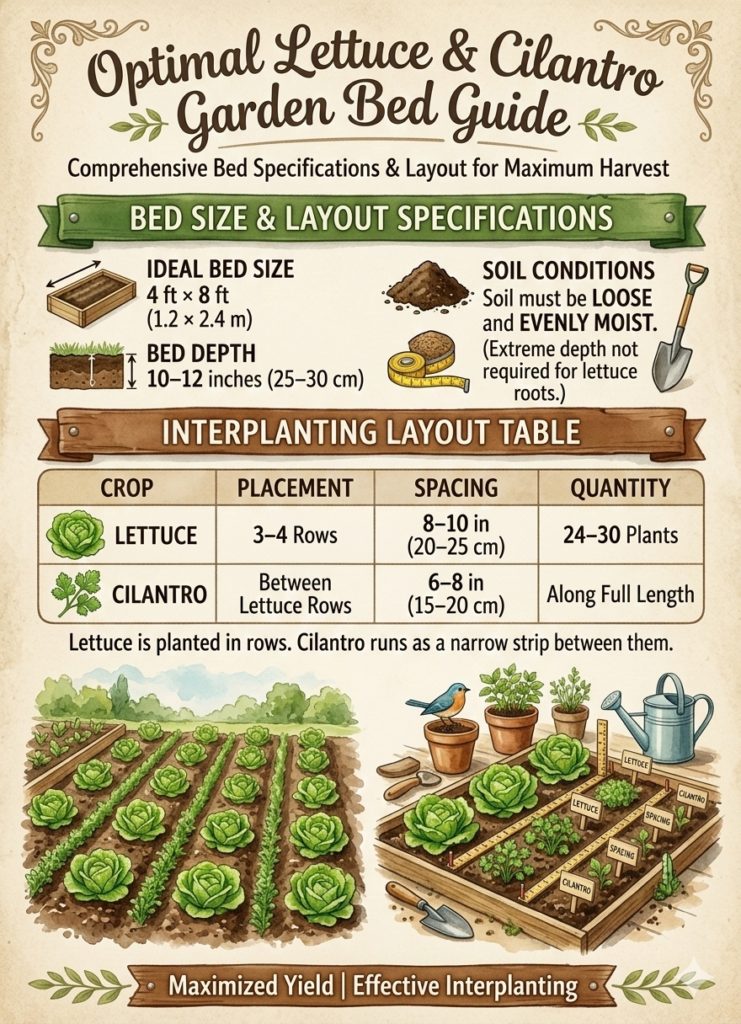
9. Salad Bed Layout With Lettuce and Cilantro Rows
Here, lettuce creates the base, and cilantro adds aroma while filling the gaps. Everything grows compactly, without chaos, and doesn’t turn into a dense, airless carpet.
Why lettuce and cilantro work well together
Lettuce (Lactuca sativa) has shallow roots — about 6–8 inches (15–20 cm). It quickly covers the soil surface and doesn’t grow deep.
Cilantro (Coriandrum sativum) develops a stronger taproot — up to 10–12 inches (25–30 cm). It grows slightly deeper and doesn’t interfere with lettuce at the surface.
Cilantro also releases aromatic compounds. Studies suggest that fragrant herbs in mixed plantings may reduce the activity of some small pests. It’s not protection, but it adds stability to the system.
Bed size and layout
Ideal size — 4 ft × 8 ft (1.2 × 2.4 m), depth 10–12 inches (25–30 cm).
A lettuce bed doesn’t need extreme depth, but the soil should be loose and evenly moist.
Layout table
| Crop | Placement | Spacing | Quantity |
| Lettuce | 3–4 rows | 8–10 inches (20–25 cm) | 24–30 plants |
| Cilantro | Between lettuce rows | 6–8 inches (15–20 cm) | Along full length |
Lettuce is planted in rows. Cilantro runs as a narrow strip between them.
How it works through the season
Lettuce starts fast. You can begin selective harvesting in 3–4 weeks.
Cilantro grows a bit slower at first, but by the time lettuce matures, it fills the spaces between rows.
This gives:
- Even soil coverage and less drying
- Fewer open areas for weeds
- Gradual harvesting instead of one big harvest
Lettuce needs regular watering — about 1 inch per week (2.5 cm) if there’s no rain. In hot weather, it needs more because leaves lose water quickly. When the soil is shaded by foliage, it dries more slowly and moisture stays stable.
Soil preparation
For a 4×8 ft bed, you’ll need:
- 15–20 lbs (7–9 kg) of compost
- A light organic fertilizer without excess nitrogen
Too much nitrogen makes lettuce loose and more likely to bolt quickly.
Step-by-step placement logic
- Loosen and level the soil surface.
The top layer should be fine and even — lettuce doesn’t like hard crust. Water the soil well before planting. - Plant lettuce in rows spaced 8–10 inches (20–25 cm) apart.
Don’t crowd it. Even if it looks too open, leaves will close gaps in about three weeks. - Sow cilantro in narrow strips between rows.
Plant seeds about ½ inch (1 cm) deep. After sprouting, thin plants to 6–8 inches (15–20 cm) apart. - Water regularly and evenly.
Soil should stay moist but not soggy. Sharp dry periods make lettuce bitter. - Harvest lettuce selectively.
Cut outer leaves and leave the center intact. This extends harvest time and creates more space for cilantro.
Tip. If summer turns warm and lettuce starts to bolt, shade the bed with light netting at about 30–40% coverage. This can extend harvest by one to two weeks and keep leaves tender.
In this layout, lettuce creates the main volume, and cilantro fills the gaps while adding fragrance. Space is used evenly, soil stays covered, and harvest can be gradual. For spring or fall growing cycles, this bed remains simple and easy to manage.
10. Herb Companion Strip Layout for Pollinator Pull
This is a narrow but carefully planned strip of flowering herbs planted next to a vegetable bed.
The goal of the Herb Companion Strip Layout for Pollinator Pull is simple: create a steady flow of pollinators and beneficial insects toward your main crop. It’s not decorative — it’s a working tool.
Which herbs work best
Choose plants with long flowering periods and strong aroma:
- Dill
- Cilantro
- Basil
- Thyme
- Oregano
Umbel plants like dill and cilantro are especially attractive to small predatory insects. These herbs increase the presence of beneficial insects in vegetable systems.
Strip size and basic setup
Optimal dimensions:
- Width: 1–1.5 ft (30–45 cm)
- Length: 6–8 ft (1.8–2.4 m) along the bed
- Soil depth: at least 10–12 inches (25–30 cm)
Placement table
| Plant | Spacing | Role in Strip |
| Dill | 10–12 inches (25–30 cm) | Attracts predatory insects |
| Cilantro | 8–10 inches (20–25 cm) | Early flowering |
| Basil | 10–12 inches (25–30 cm) | Summer nectar source |
| Thyme | 6–8 inches (15–20 cm) | Low, stable edge |
| Oregano | 8 inches (20 cm) | Long flowering period |
The key is to alternate plants, not group them in blocks.
Step-by-step placement logic
- Choose the sunny side of your vegetable bed.
The strip needs at least 6–8 hours of direct sun. In shade, herbs grow leaves but flower poorly — and flowering is the whole point. - Mark a strip 1–1.5 ft (30–45 cm) wide along the bed.
Don’t make it narrower than 1 ft — plants will crowd. Don’t make it wider than 1.5 ft — it may compete with your main crop for water. - Plant herbs in an alternating pattern.
For example: dill — basil — cilantro — thyme — then repeat. Larger plants spaced 10–12 inches (25–30 cm) apart. Low growers can be spaced 6–8 inches (15–20 cm). This creates a continuous wave of blooms along the strip. - Water evenly for the first 3–4 weeks.
Young plants must establish roots. After that, thyme and oregano tolerate drier soil, but dill and basil still need steady moisture. - Allow part of the strip to flower fully.
Don’t harvest everything for leaves. If you remove all flower stems, the strip loses its main function. At least 40–50% of plants should be in bloom at any given time. - Maintain moderate density.
If thyme or oregano spreads too aggressively, trim the edges slightly. The strip should stay airy, not turn into a thick mat.
Tip. Keep the strip within 3 ft (1 m) of your main crop. Pollinators and beneficial insects tend to work locally. If the herb strip is too far away, insects may stay there instead of moving to your vegetables.
A herb strip strengthens your main bed without taking much space. If it gets enough sun and flowers gradually through the season, insects stay nearby consistently. That means better pollination and fewer problems — without extra structures or complicated systems.
What works for you?
Each of these layouts is a foundation you can adapt to your climate, bed size, and seasonal rhythm. Sometimes protection from heat matters most; airflow; pollinator support. Which layout have you tried — or plan to test this season?
If you have your own working variation, share it. Real observations are always more valuable than theory.