Lindy and I have noticed this many times, both in our own space and in other people’s yards: you can pour endless effort into garden beds, pathways, and outdoor seating areas, but until there’s a comfortable place to sit, the space still feels unfinished. Like it isn’t really being used yet. We’ve seen all kinds of benches. Simple ones and more complex builds. Successful ones and not-so-great ones. And it’s not about the budget or the “design.” It’s about logic, proportions, and understanding what the bench is actually for. In this article, we’ve put together 10 bench ideas that show up again and again in real life — in backyards, gardens, small patios, and similar spaces. Different approaches, different purposes — and none of them look “cheap” when they’re built thoughtfully.
1. Simple Cinder Block and Wood Bench
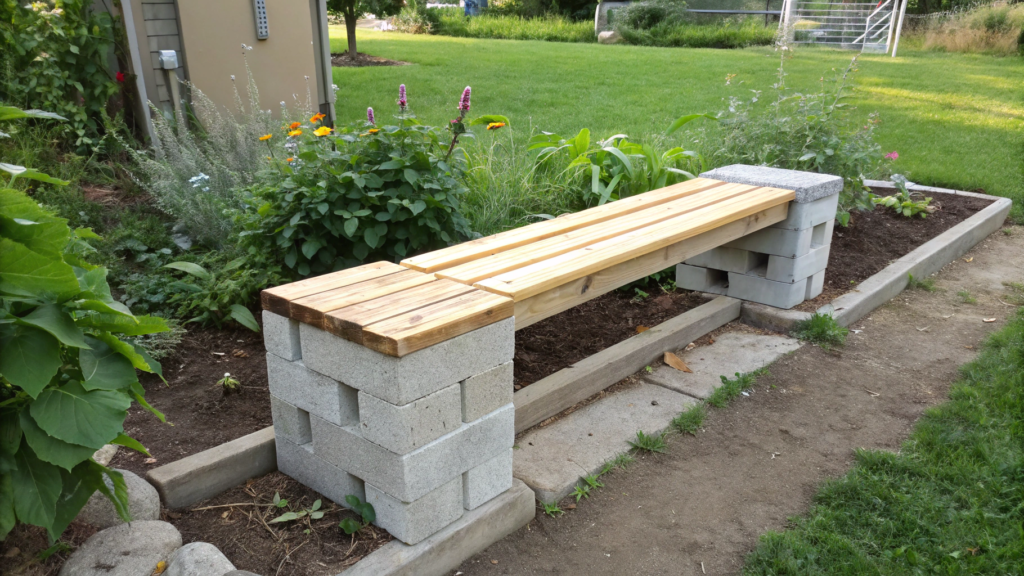
Sometimes the garden beds are growing, the paths are in place, the zones are clearly defined — and there’s still nowhere to sit.
We ran into this both on our first micro-homestead in Idaho and later on, at our newer place. In those moments, a bench made from cinder blocks and wooden boards turned out to be the most logical solution. Fast. Reliable. And visually better than expected.
Why this option works so well
- Cinder blocks add weight and stability
- 2×10 boards create a comfortable seat depth
- No fasteners means no wobbling or twisting over time
This kind of bench doesn’t look “temporary,” even if you build it in one evening.
And honestly — it ages beautifully. Scuffs, sun fading, small chips don’t ruin it. They actually add character.
What you need for this bench
A very short list. No specialty materials.
Materials:
- 2–3 standard cinder blocks (16×8×8 inches)
- 2 pieces of 2×10 lumber, 6 feet long (about 183 cm)
- Outdoor wood oil or sealer
How we usually build this bench
Prepare the boards.
Light sanding along the edges and surface. The goal is to remove splinters and sharp corners, not to achieve a furniture-grade finish.
Treat the wood.
Apply outdoor oil or sealer. In the long run, this step makes a big difference in how the bench looks one or two seasons later.
Place the cinder blocks.
Set the blocks upright, with the openings facing sideways.
Generally, two blocks are sufficient for a 6-foot bench. However, if you want greater rigidity, adding a third block in the center is a smart upgrade.
Set the boards in place.
The boards slide directly into the block openings.
The seat height naturally ends up around 18–19 inches, which works well for longer sitting.
Check stability.
Sit down, shift your weight, give it a small test wobble.
The structure holds through weight alone — no movement, no squeaking.
We’ve placed benches like this along house walls, near fire pit areas, next to greenhouses or garden beds, and even in temporary setups for gatherings.
If the bench will be used often, it makes sense to add cushions like the Greendale Home Fashions Outdoor Bench Cushion — they stay in place, don’t flatten out, and handle sun and rain well.
This bench isn’t overly refined, but it’s comfortable, heavy, and reliable. The kind of thing people use every day without ever thinking about how it came to be.
2. 2×4 Rustic Garden Bench
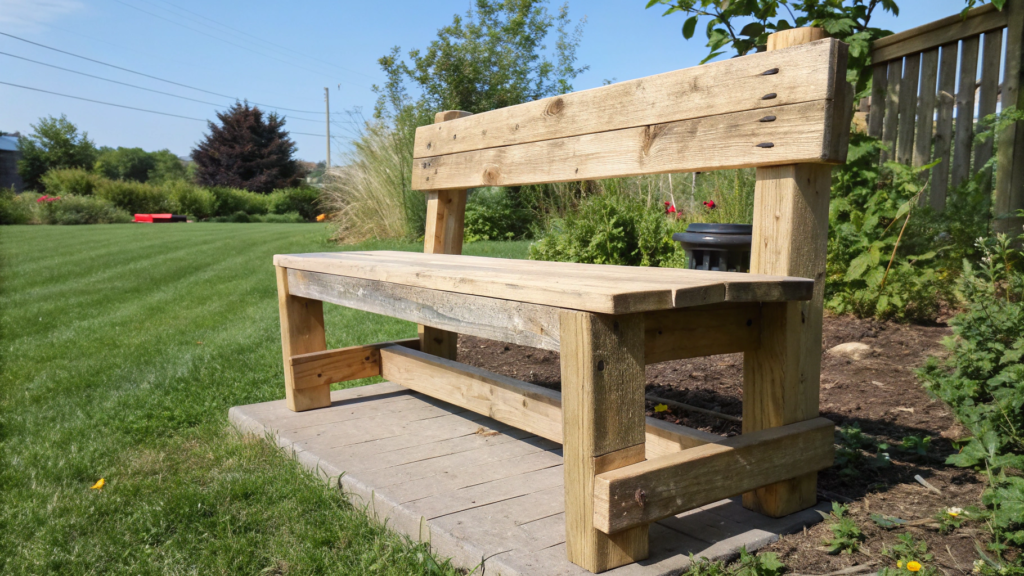
A bench made from 2×4 lumber is that exact option when you need something reliable, straightforward, and without extra details. Not a decorative object. Not a temporary solution. But a piece that naturally becomes part of the yard and simply does its job.
It doesn’t try to draw attention to itself, yet it always ends up being useful at the right moment.
Why 2×4 — and this isn’t accidental
A 2×4 board (actual size 1.5×3.5 inches) is one of the most stable and widely available materials in the U.S.
Therefore, it performs especially well as outdoor garden furniture.
- Availability — you can find it in any hardware store
- Strength — easily supports adult weight without additional reinforcement
- Predictability — minimal warping when assembled correctly
- Easy replacement — if one board gets damaged years later, it’s simple to swap it out
Moreover, it’s important that a 2×4 bench never feels flimsy; in fact, even in its simplest form, it still feels solid and grounded. Even in its simplest form, it feels solid and grounded.
What you need for the bench
Materials:
- 6–8 pieces of 2×4 lumber, 8 feet long (about 244 cm)
- 3-inch exterior screws
- Outdoor wood glue (optional, but helpful)
- Oil or sealer for outdoor wood
Tools:
- Miter saw or circular saw
- Drill/driver
- Measuring tape
- Speed square
Base dimensions that work
We usually stick to these proportions:
- Bench length: 5–6 feet (about 152–183 cm)
- Seat height: 17–18 inches (about 43–46 cm)
- Seat depth: 11–12 inches (about 28–30 cm)
These dimensions work well for quick breaks and for longer, comfortable sitting.
How we build this bench
- Cut the pieces. We prepare the seat components, legs, and cross supports separately.
To begin with, it helps to label each piece right away; as a result, you’ll save valuable time during assembly. - Assemble the seat frame. We form a rectangle using 2×4 boards.
Screws are responsible for most of the assembly; nevertheless, a thin layer of exterior glue can be applied for added stability. - Attach the legs. The legs are mounted to the inside of the frame.
This makes the structure more stable and keeps the look clean. - Install cross supports. Lower and side braces significantly extend the life of the bench.
This is especially important if the bench will sit on uneven ground. - Install the seat boards. We leave a small gap — ¼ inch (about 6 mm) — to allow for water drainage and wood movement.
- Sand and finish. Sharp edges are removed, and a protective finish is applied.
Even a single coat noticeably improves both appearance and durability.
This bench works especially well along garden beds and greenhouses, near the entrance to a garden or workshop, next to a fire pit, or as extra seating for guests.
It doesn’t require cushions, but it can easily be paired with textiles if desired.
And importantly, it never feels out of place in any of these spots.
This is working garden furniture, built from familiar materials, with clear logic and a predictable, dependable result.
3. Pallet Bench with Storage Space
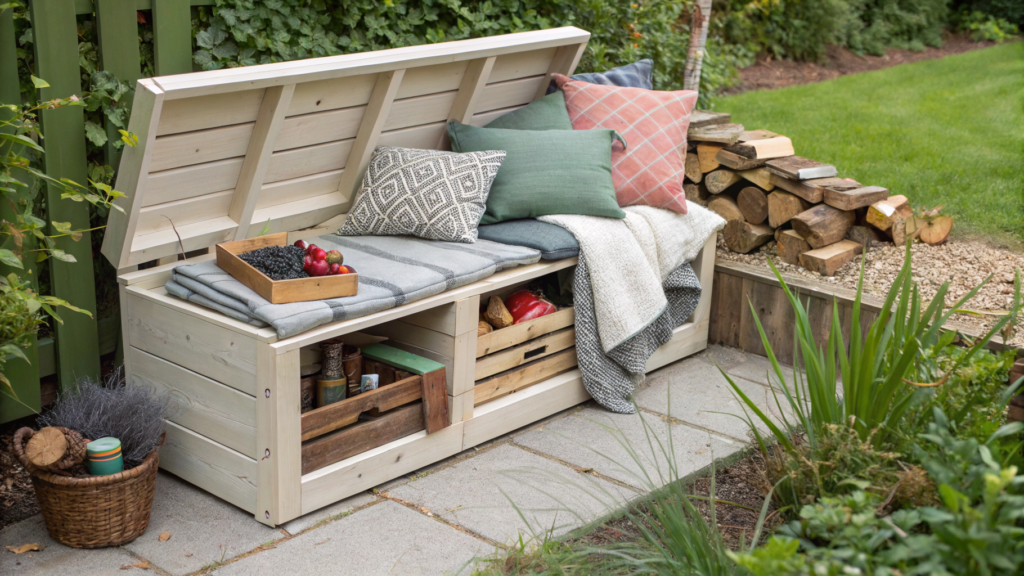
Blankets, garden gloves, cushions, small tools, kids’ toys, firewood for the fire pit — all of it is always somewhere nearby. And when there’s no well-thought-out storage, things spread out very quickly.
A pallet bench with built-in storage solves this problem without extra structures. It looks like a regular garden bench, but inside it works like a storage box.
Why pallets are a smart choice here
Pallets are often underestimated. And that’s a mistake.
- Thick wood — usually ¾–1 inch (about 19–25 mm)
- Designed for heavy loads — originally rated to hold hundreds of pounds
- Easy to source — often free or very inexpensive
- Simple to repair — any board can be replaced without effort
With proper assembly, this kind of bench can support 300–400 pounds (about 135–180 kg) without feeling flimsy.
What you need for a storage bench
Materials:
- 2–3 quality pallets (no rot, no cracks)
- Hinges for the lid
- Exterior screws, 2½–3 inches
- Outdoor oil or wood sealer
If the bench will be used frequently, it’s worth adding gas struts or lid supports so the lid doesn’t slam shut.
For hinges, reliable options like National Hardware Heavy Duty Gate Hinges work well — they handle the weight of the lid and don’t loosen over time.
How we usually build this bench
- Select and prepare the pallets. First, we check the markings. We only use pallets stamped HT (heat treated) — no chemical treatment. We inspect the wood for cracks and rot. Even one weak board can cause problems later.
Before disassembly, we lightly mist the pallets with water — the boards split less this way. - Carefully take the pallets apart. We work slowly, using a pry bar and hammer.
The goal is to preserve long, solid boards for the seat and lid.
Nails are pulled or countersunk right away — this saves time later. - Build the storage box. We assemble a rigid rectangle: bottom, two side walls, and the back. The typical height ends up around 18–20 inches (about 46–51 cm), which is comfortable for seating.
All joints are screwed together, with exterior glue added to the seams if needed. - Reinforce the structure from the inside. Extra blocks or doubled boards go into the corners.
The bottom gets at least one cross brace — especially important if the bench will store heavy items or firewood. - Build the seat-lid. We use the straightest boards available. They’re laid out with a ¼-inch gap (about 6 mm) to allow water to drain. Before fastening, we check that the surface is flat and doesn’t flex.
- Attach the lid with hinges. Hinges are spaced evenly along the length. We test the movement several times — the lid should open smoothly, without twisting or binding.
If the lid is heavy, we add a lid support or gas strut. - Sand and protect the wood. Sharp edges and corners are removed, especially along the front edge of the seat.
A protective finish is applied, with extra attention to the end grain — it absorbs moisture the fastest.
What works well to store inside
This bench handles:
- outdoor cushions
- blankets and throws
- garden gloves and small tools
- firewood for the fire pit
- toys and seasonal items
And most importantly — everything stays out of sight, but always within reach.
This bench works especially well on a deck, near a fire pit, along a house wall, or next to a seating area.
It’s functional, heavy, and genuinely useful. And those are the pieces that tend to stay in a yard the longest.
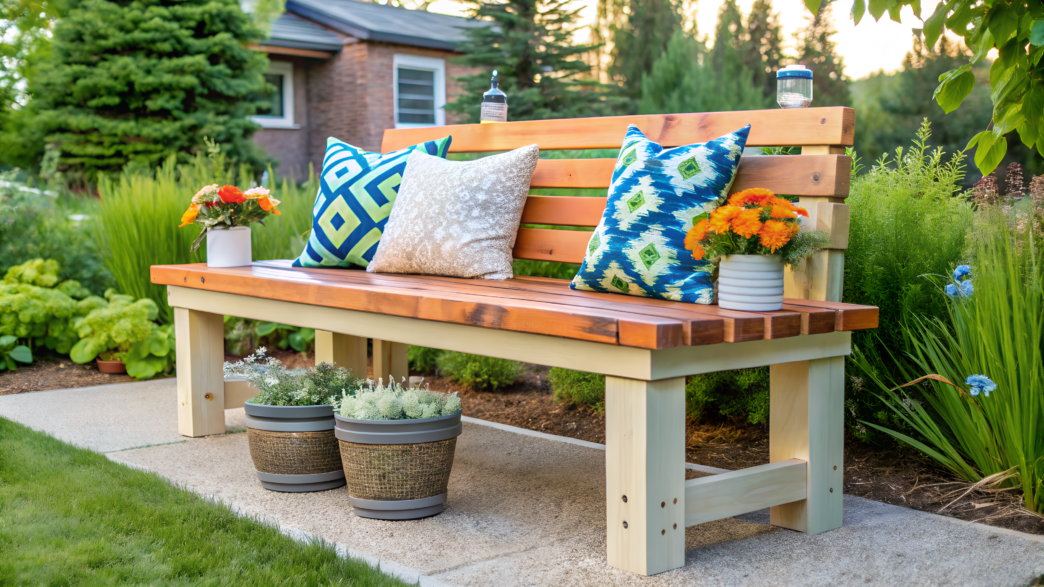
4. Backrest Bench for Maximum Comfort
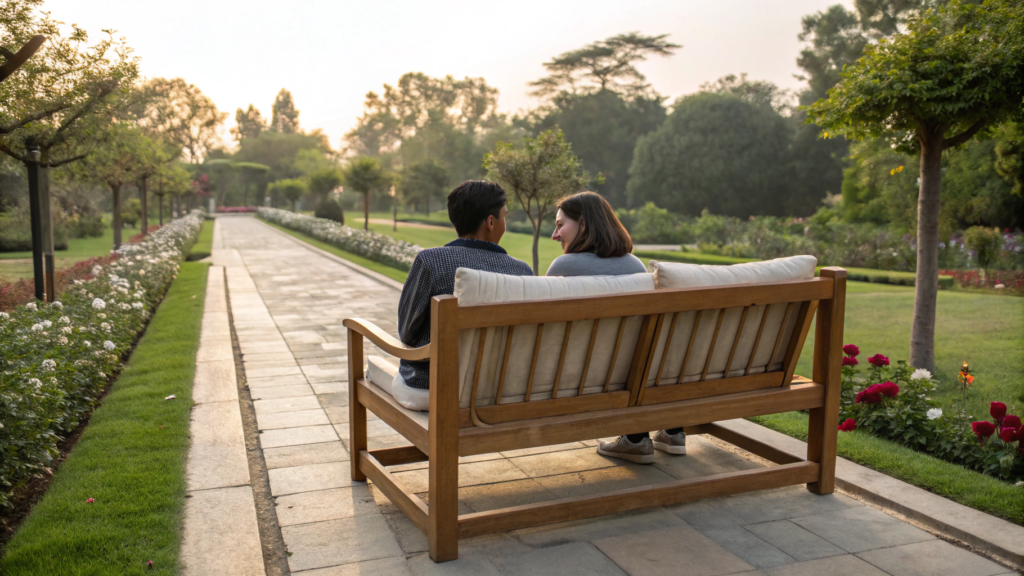
Benches without a backrest don’t last long with Lindy and me. They’re fine for short pauses: taking off gloves, setting down a basket, resting for five minutes. But as soon as a bench is needed for conversation, tea, evening light, and quiet, a backrest becomes essential.
In moments like that, the body doesn’t want to just “sit down.” It wants to settle in properly.
Why a backrest matters
First of all, it’s worth thinking about load on the body.
- Lower back support reduces fatigue
- A backrest angle allows you to sit longer without tension
A bench like this starts working as a real relaxation-zone element. People don’t sit on it “in passing,” but deliberately.
What needs to be considered ahead of time
A bench with a backrest has several key points that can’t be ignored.
- Backrest angle. The optimal range is 10–15 degrees. Less than that and the backrest is almost useless. More than that and it becomes uncomfortable to stand up.
- Backrest height. 14–18 inches (about 36–46 cm) from the seat is a comfortable range for most adults.
- Connection rigidity. The backrest is always under backward load.
This is not the place to save on joints or cross supports.
What you need for a backrest bench
Materials:
- 2×4 or 2×6 boards for the frame
- 1×6 or 2×4 boards for the seat and backrest
- 3-inch exterior screws
- Outdoor oil or sealer
Tools:
- saw
- drill/driver
- square
- measuring tape
How we usually build this bench
- Start with the seat base. First, we assemble a rectangular frame for the seat using 2×4 boards. If the bench is longer than 5 feet (about 152 cm), we add at least one center cross support — without it, the seat will start to flex over time.
At this stage, it’s important to check the diagonals: the frame must be square, or everything that follows will drift. - Attach the legs and lower stretchers. The legs are mounted inside the frame, not outside — this keeps the look cleaner and helps the bench handle side loads.
We size the legs so the final seat height ends up around 17–18 inches (about 43–46 cm).
Lower stretchers are added between the legs — they’re critical, especially if the bench sits on soil rather than a deck. - Build the seat. Boards are installed lengthwise, leaving a ¼-inch gap (about 6 mm).
This is necessary to protect against water and swelling.
Before final fastening, Lindy and I always sit down and check the depth — 12–14 inches (about 30–36 cm) works best for a bench with a backrest. - Install the backrest posts.This is a key stage. The posts are never attached only to the seat. They must be secured to both the legs and the frame, otherwise the backrest will start pulling away over time.
We use 2×4 boards, sometimes doubling them if the bench is long. - Set and attach the backrest. The angle is set within the 10–15 degree range.
Less than that is uncomfortable. More than that makes standing up harder.
Here we don’t rely on numbers alone: we temporarily position it, sit down together, adjust, and try again.
Only after that do we fasten it permanently. - Add a top rail and reinforcements. A top board across the backrest adds rigidity and makes the shoulder area more comfortable.
If the bench will stand in an open area, we add diagonal braces — they significantly extend its lifespan. - Sand and protect the wood. We remove sharp edges in all body-contact areas: the front edge of the seat, the top of the backrest, and the corners of the posts.
After that, we apply a protective finish. The end grain is treated especially carefully — it’s the first to absorb moisture.
This kind of bench works especially well near a fire pit, on a deck, along a house wall, or in a quiet corner of the garden.
It’s a bench that invites you to stay, to read, to talk, to watch the sunset.
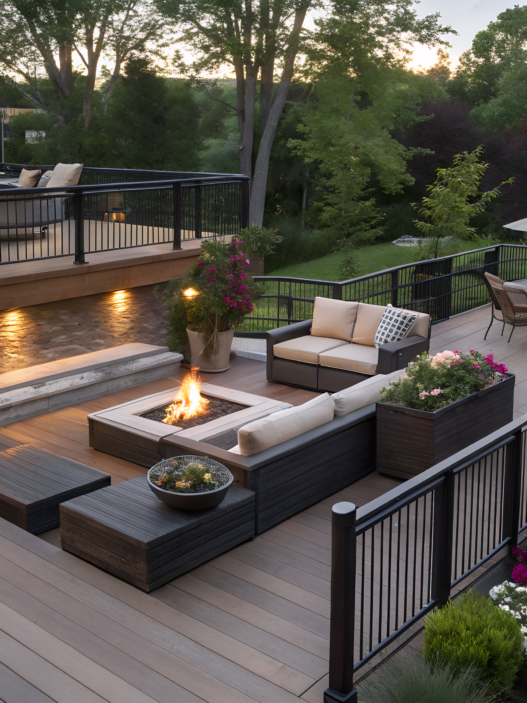
5. DIY Outdoor Bench for Fire Pit Seating
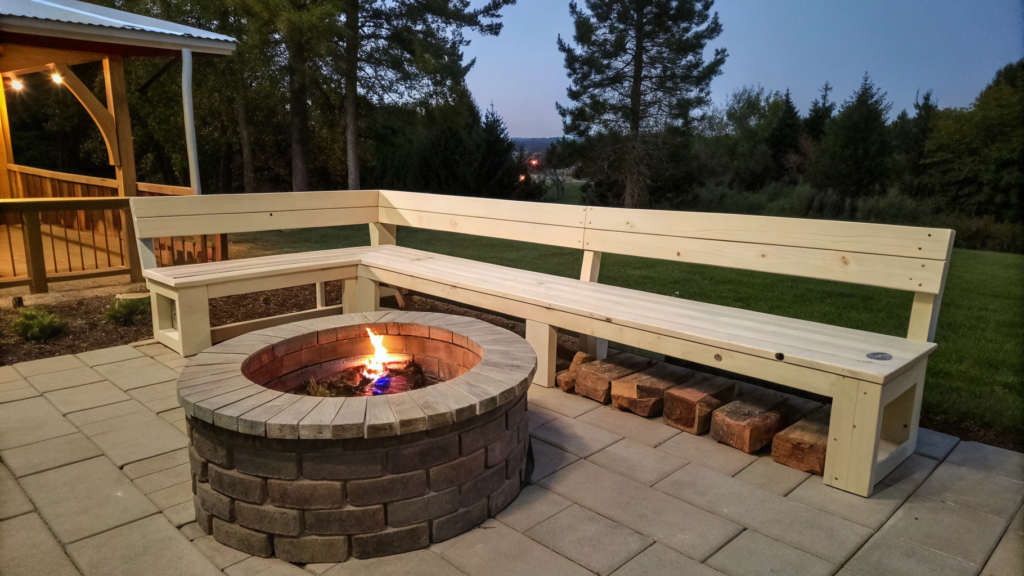
Not every bench works well in a fire pit area. Some are too low. Some are awkward to turn toward the heat. Others start wobbling when people stand up and sit down one after another.
That’s why a bench for a fire pit setup needs the right geometry, stability, and a sense of safety — not just a place “to sit down.”
What sets a good fire pit bench apart
There are a few principles we’ve learned to stick to pretty strictly.
- Upright seating. Without a strong recline. Around a fire, people usually sit upright, turn their bodies, and lean toward the warmth.
- Increased stability. People stand up, step away, come back. The bench shouldn’t react to that movement.
- Optimal height. Too low — your feet get cold.
Too high — it’s hard to warm up.
The best range is 17–18 inches (about 43–46 cm). - No unnecessary details. Armrests and complex shapes only get in the way here.
What you need for this bench
Materials:
- 2×4 boards for the frame
- 2×6 or 2×4 boards for the seat
- 3-inch exterior screws
- Outdoor oil or heat-resistant wood treatment
If the bench will sit close to the fire, we always choose dense wood and avoid high-gloss finishes.
How we usually build a fire pit bench
- Determine the length for the specific space. We always start with the space, not the boards.
For fire pits, a length of 5–6 feet (about 152–183 cm) works best.
The bench should seat two or three people without wrapping the entire circle. - Build a rigid seat frame.We use 2×4 boards to form a rectangle. If the length is over 5 feet, we always add a center cross brace.
This is critical — people often sit down abruptly around a fire. - Attach the legs with reinforcement. Legs are mounted inside the frame. The height is set so the final seat height lands at 17–18 inches.
Lower stretchers are added between the legs to handle side loads. - Build the seat. Boards are installed with a ¼-inch gap (about 6 mm).
This matters — dew and temperature swings are common near a fire pit. - Test the seating in place. We always move the bench to the fire pit before final finishing. We sit down, turn, try different positions.
Sometimes shifting the bench 6–8 inches completely changes how it feels. - Sand and protect the wood. The front edge of the seat is especially important.
Feet go there. Movement happens there. Comfort matters there. After sanding, we apply one or two coats of protective finish.
This type of bench works best around round or square fire pits, in a semicircle when space is limited, or as stationary seating that doesn’t need to be moved.
On this bench, people usually:
- stay longer than they planned
- set their mug on the ground and lose track of time
- sit shoulder to shoulder, quietly watching the fire
This is a point of attraction. And when it’s built right, it starts doing its job on its own — without reminders and without extra words.
6. Wedding-Ready Outdoor Bench Setup
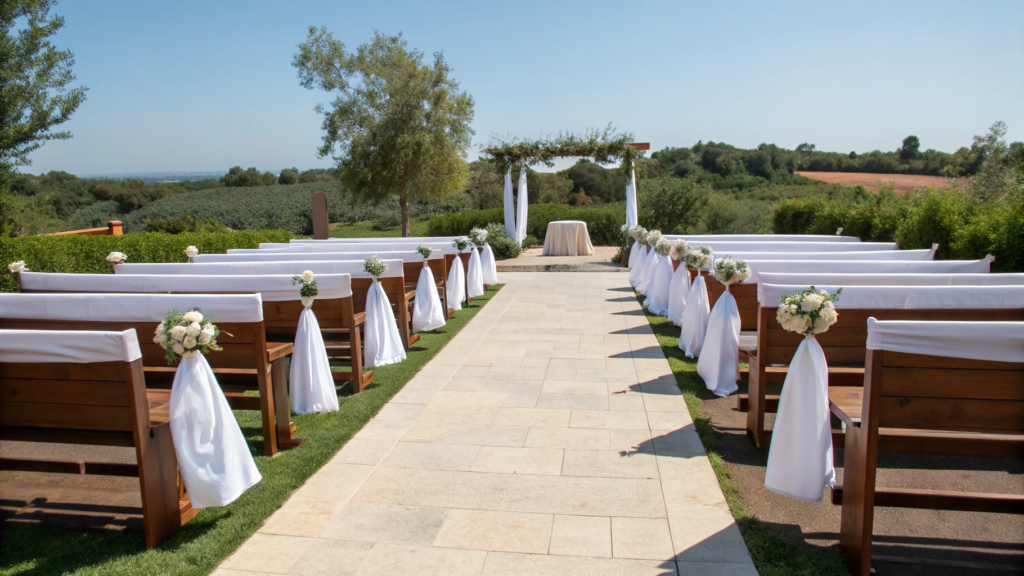
Wedding and event benches are a different story altogether.
Lindy and I understood this when we started helping friends host ceremonies right on their land. Same benches. Same boards. But the expectations change completely: how it looks from the outside, symmetry, clean lines, and the feeling that everything is in its place.
How an “event” bench differs from an everyday one
There are a few principles that immediately change how the space is perceived.
- Visual lightness. Even a solid structure should look neat. No extra crossbars in plain sight.
- Unified style. All benches must be identical. Not “similar.” Any inconsistency shows up instantly in photos.
- Comfort without over-relaxation. People don’t sit for long, but the seating still needs to be comfortable. Too low or too deep is a bad idea.
- Stability. No one should hesitate before sitting down. That sense of confidence matters on a gut level.
What we use for this kind of setup
Materials:
- 2×4 boards for the frame
- 1×6 or 2×6 boards for the seats
- 3-inch exterior screws
- Oil or stain in a neutral tone
For events, we almost always choose calm, neutral colors: natural wood, light walnut, soft gray-brown tones. They don’t clash with people’s clothing and photograph well.
For added comfort, we sometimes use removable cushions — simple and neutral ones, like the Greendale Home Fashions Indoor/Outdoor Bench Cushion, with no patterns and no extra bulk.
How we usually build these benches
- Plan the layout in advance. We place markers on the ground, check spacing between rows, and test walkways. Leaving 36–40 inches (about 91–102 cm) between rows works best.
- Build identical modules. All benches are built using the same template. Most often, that’s a 6-foot length (about 183 cm). Matching lengths immediately create visual order.
- Assemble a rigid but clean frame. A 2×4 frame with a minimal number of visible elements. Reinforcements are hidden inside so the lines stay simple.
- Form the seat. Boards are installed with a ¼-inch gap (about 6 mm). Seat depth is 11–12 inches (about 28–30 cm).
That’s comfortable, without making the bench feel “sofa-like.” - Finish work — extra carefully. This is where we spend more time. All edges are softened, all surfaces are clean. Stain or oil is applied evenly, with no blotches.
- Test the full setup. We place all the benches, then step back. We look at row alignment, symmetry, and empty spaces.
Sometimes shifting things by 2–3 inches completely changes the feeling.
These benches work best for outdoor ceremonies, family celebrations, and dinners under a canopy. They’re also very practical for photo sessions and events without rental furniture.
After the event, the benches move easily into the garden, by the fire pit, or onto the deck — and keep being used.
7. Budget-Friendly Minimalist Bench
A minimalist bench usually comes without decorative twists, without extra boards, and without the feeling that you’re “building a project.” It doesn’t argue with the space. It simply appears — and stays.
Savings here are not only about money, but also about time.
- Less material — less cutting and less waste
- Simple geometry — fewer mistakes
- No complex joints — higher reliability
- Light weight — the bench can be moved without effort
And yes, a bench like this often looks more expensive than it actually is, especially if the wood is finished carefully.
What you need for a minimalist bench
Materials:
- 4–5 pieces of 2×4 lumber, 8 feet long (about 244 cm)
- 3-inch exterior screws
- Oil or a simple outdoor wood sealer
Tools:
- saw
- drill/driver
- measuring tape
- square
For finishing, we often use simple clear oils without complex tones. For example, Thompson’s WaterSeal Clear Wood Protector works well — no shine and no “plastic” effect.
Dimensions that don’t let you down
We almost always use these proportions:
- Length — 4–5 feet (about 122–152 cm)
- Seat height —17–18 inches (about 43–46 cm)
- Depth — 10–11 inches (about 25–28 cm)
This is enough for the bench to be comfortable without looking bulky.
How we usually build this bench
- Assemble the seat frame. Two long boards and two cross pieces.
We check the diagonals — the frame must be square, or the bench will twist under load. - Attach the legs. The legs are mounted inside the frame. This looks cleaner and is structurally more reliable.
The height is calculated right away, taking the seat thickness into account. - Add a lower stretcher. Even a single stretcher between the legs greatly increases stability. This is especially important if the bench sits on soil rather than decking.
- Install the seat boards. We use 2–3 boards, laying them with a ¼-inch gap (about 6 mm). Water needs to drain, and the wood needs room to expand.
- Finish the surfaces. We soften the front edge of the seat and the corners.
It’s a small detail, but it’s exactly what makes the bench comfortable for everyday use.
This bench works best in narrow patios, along walls, near the garden entrance, or next to a workshop or greenhouse. It pairs easily with other elements, feels reliable, and behaves predictably.
These are the pieces that most often become essential — and end up lasting the longest.
8. Compact Bench for Small Patios
Small patios are a category of their own. This is exactly where standard benches stop working. They’re either too deep, visually too heavy, or they block movement. A compact patio bench needs a different design logic.
You can’t work “by eye” here. There are clear parameters that decide everything:
- Reduced seat depth. Not 12–14 inches, but 9–10 inches (about 23–25 cm).
This is enough for sitting, without the bench eating up the space. - Clean front line. No protruding legs or decorative elements. The cleaner the front, the more open the space feels.
- Shorter length. Ideally 36–48 inches (about 91–122 cm). Two people sit comfortably, a third already feels like too much — and that’s fine.
- Light visual weight. Thinner elements, open space under the bench, minimal boards.
Where benches like this are especially needed
- narrow urban patios
- balconies and semi-balconies
- walkways along the house wall
- small inner courtyards
These are the benches that make a space livable.
What you need for a compact bench
Materials:
- 4–6 pieces of 2×4 lumber, 8 feet long (about 244 cm)
- 2½–3-inch exterior screws
- Outdoor oil or wood sealer
Here, board quality matters more than usual. Any warping shows immediately because the structure is simple and open.
How we usually build a compact bench
- Start with precise measurements of the space. Not “roughly,” but with a tape measure. We measure not only the wall length, but also the walkway.
The bench must not block movement — leave at least 30–32 inches (about 76–81 cm) of clear space in front of it. - Assemble a narrow seat frame. We use 2×4 boards, but rotate them with the narrow edge facing up. This reduces seat depth and makes the bench feel lighter visually.
We check the diagonals — even small misalignment is very noticeable here. - Build short legs. The height is calculated so the final seat height is 17 inches (about 43 cm). Legs are mounted strictly inside the frame.
From the outside, the bench should read as a clean rectangle. - Add minimal reinforcement. One rear stretcher or a lower brace is enough.
Extra reinforcement only makes the bench look heavier. - Install the seat boards. We use 2 boards, sometimes 3, depending on width.
The gap between boards is ⅛–¼ inch (about 3–6 mm). Going too wide here looks sloppy. - Round over the edges. The front edge of the seat is always slightly rounded.
In tight spaces, people bump into benches with their legs more often. - Finish work. One coat of oil often looks better than two. The bench should blend into the space, not stand out.
You can increase functionality without increasing size by adding a thin cushion, placing the bench directly against a wall, or using it as a spot for shoes or bags.
This is a precisely calculated solution, where every inch does real work.
9. Multi-Purpose Bench with Hidden Storage
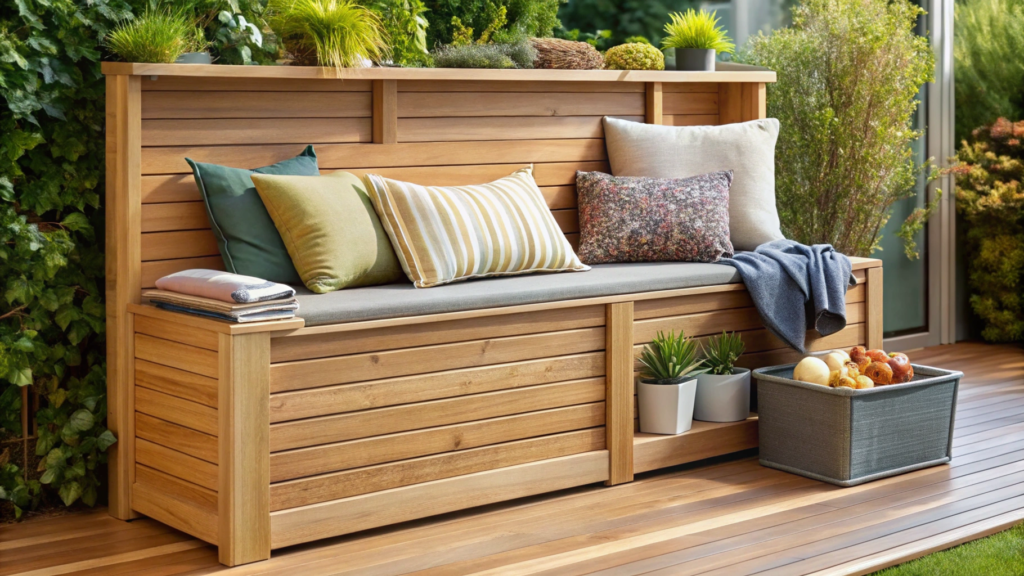
The more active life gets on the property, the faster things accumulate. Not clutter — useful, everyday items. Cushions. Blankets. Garden gloves. Kids’ toys. Firewood. And when there’s no thoughtful place for them, the space starts to look messy.
A multi-purpose bench with hidden storage looks like a clean, ordinary bench from the outside, while inside it offers a working volume that gets used every single day.
Why hidden storage works better than open storage
Open shelves only look good in photos. Real life is different.
- Enclosed space protects from rain and dust
- Items stay out of sight — visual order remains
- The bench stays a bench, not a box
- The function isn’t obvious, but it constantly saves the day
And yes — these are exactly the kinds of solutions that tend to stay with us the longest.
What’s important to think through before building
There are several key points without which the bench quickly becomes disappointing.
- The lid must open easily. A heavy lid without stops is a bad idea.
- The interior space must be useful. Minimum storage depth is 14–16 inches (about 36–41 cm).
- The seat must not flex. Even when empty inside, the seating should feel solid.
What you need for a bench with hidden storage
Materials:
- 2×4 boards for the frame
- 1×6 or 2×6 boards for the walls and seat
- 2½–3-inch exterior screws
- Hinges for the lid
- Gas struts or lid stays
- Outdoor oil or wood sealer
For the lid, we almost always use reliable gas struts. With them, the lid doesn’t fall and doesn’t startle anyone — especially when kids are nearby.
Working dimensions that have proven themselves
We most often use this configuration:
- Length — 4–6 feet (about 122–183 cm)
- Seat height — 18–19 inches (about 46–48 cm)
- Seat depth — 12–14 inches (about 30–36 cm)
- Interior storage depth — 14–16 inches (about 36–41 cm)
These proportions allow comfortable seating while using the interior space without the feeling of a “narrow box.”
How we usually build this bench
- Build a rigid box. We start with the bottom and side walls. 2×4 boards are used as an internal frame, then sheathed with thinner boards.
The corners are reinforced with blocks — this is where most of the load transfers. - Reinforce the bottom. Even if the bench sits on decking, we add at least one cross support under the base. This is especially important if heavy items will be stored inside.
- Build the seat-lid. We use the straightest boards available. A ¼-inch gap (about 6 mm) is left between boards for water drainage.
The seat needs to be rigid on its own, not only because of the frame. - Install hinges and gas struts. Hinges are spaced evenly along the length. Gas struts are selected based on the lid’s weight.
We test several times: the lid should stop in the open position and close without slamming. - Test the seating. Lindy and I always sit on the bench before final finishing.
We check whether the seat flexes and whether the lid is easy to open while seated nearby. - Sand and protect the wood. Special attention goes to the front edge of the seat and the top edge of the lid. These areas contact the body most often.
What’s convenient to store inside
This type of bench works well for:
- outdoor cushions
- blankets
- garden gloves and small tools
- toys
- spare candles and fire pit accessories
And most importantly — nothing is left in plain sight.
This bench shows its strengths best on a deck, near a fire pit, along a house wall, or in small patios.
It replaces several pieces at once while keeping the space visually light. It’s a calm, well-thought-out solution that makes the property more comfortable without unnecessary gestures.
10. Bench Built Entirely from Recycled Pallets
After building material deliveries, pallets are something almost everyone ends up with. They sit around, get in the way, and wait for “better times.” Throwing them out feels wrong. Taking them apart without a clear plan usually ends with them just being moved from one place to another.
Lindy and I first saw the idea for this kind of bench on a neighbor’s property. The pallets weren’t hidden or disguised — they were used as-is, carefully and with intention.
A bench made entirely from pallets isn’t the fastest route. It involves more effort, more sorting, and more hands-on work.
But it immediately shows what reclaimed material is really capable of when you treat it thoughtfully.
Different rules apply here than with mixed builds
- Zero lumber purchases. Everything — the frame, the seat, and the reinforcements — comes from pallets.
- Varying board thickness and density. This has to be accounted for right away, or the bench will end up uneven.
- Higher standards for material selection. One bad board can compromise the entire build.
The result feels especially valuable. You can literally see something unnecessary turning into something useful.
Only use:
- pallets marked HT (heat treated)
- dry wood with no smell
- boards without rot or deep cracks
We never use:
- pallets with no markings
- chemically treated pallets
- wood with oil stains or a strange odor
We usually plan on 2–3 pallets per bench, depending on length and the rigidity we want.
What you need for a pallet bench
Materials:
- 2–3 reclaimed pallets
- 2½–3-inch exterior screws
- Outdoor oil or wood sealer
Tools:
- pry bar
- hammer
- drill/driver
- saw
- sander or sandpaper
Dimensions that actually work with pallets
Pallets come with their own limitations, and that’s normal.
Most often, we land on these dimensions:
- Bench length: 48–60 inches (about 122–152 cm)
- Seat height: 17–18 inches (about 43–46 cm)
- Seat depth: 11–12 inches (about 28–30 cm)
Here, the build adapts to the boards — not the other way around. That’s important to accept from the start.
How we usually build this bench
- Fully disassemble the pallets. Not partially. Completely. We use a pry bar and patience. The goal is to save as many intact boards as possible.
All nails are either pulled or driven flush. - Sort the wood. Boards for the seat go in one pile. Thicker elements for the frame go in another. This makes the rest of the build much easier.
- Build the frame from the strongest pieces. We use pallet blocks and thicker boards.. A rectangular seat frame and legs are assembled.
If the bench is longer than 48 inches (about 122 cm), a center cross brace is mandatory. - Reinforce the structure underneath. Lower stretchers between the legs are required.
Pallet wood is inconsistent, and without reinforcement, the bench loses rigidity quickly. - Build the seat. We use the straightest boards available. Boards are laid with a ¼-inch gap (about 6 mm).
Before final fastening, we check that the surface doesn’t wave or flex. - Sand thoroughly. Pallet wood almost always starts rough. Special attention goes to the front edge of the seat and the corners.
Comfort matters most here. - Apply protective finish. One or two coats, depending on wood density. End grain is treated separately and generously.
This bench feels most at home near the garden beds, by the compost area, next to the fire pit, or in the working part of the property. It doesn’t need a perfect setting.
It fits naturally into a living space where things are used, not displayed.
A Favorite Bench
If you made it this far, the topic clearly matters to you. And chances are, you already have an image in mind of the bench that fits your space best.
There’s no need to copy everything exactly. These projects aren’t templates — they’re reference points.
Sizes can be adjusted. Materials can be swapped. The structure can be simplified or reinforced. What matters most is that the bench works for your life, not just looks good in photos.Lindy and I always love seeing the solutions people come up with.
If you’ve already built a bench or are just planning one, leave a comment about where it will live and what you’ll use it for. Sometimes one short comment helps someone else see a solution they hadn’t considered.