Summer isn’t just about picnics and watermelon — it’s about those hot evenings when nobody wants to be stuck in the kitchen for hours. Guests drop by unannounced, kids grow hungry fast, the porch fills with smoke, someone runs barefoot in the yard, and the only thing missing is a simple summer meal to bring everyone together.
And all of that calls for food that’s simple and satisfying. Something the kids will eat without complaints and the adults will come back for seconds. We’ve put together 10 summer meal recipes that actually work for every kind of crowd—from a noisy playdate to a quiet dinner for two with a chilled glass of wine.
Here, you’ll find some unexpected combinations and quick fixes for those nights when the fridge is nearly empty. Every recipe is tested and approved by real summer, real sun, and real life on a small patch of land where every summer meal feels a little like a celebration.
1. Frozen Pizza Nacho Bake
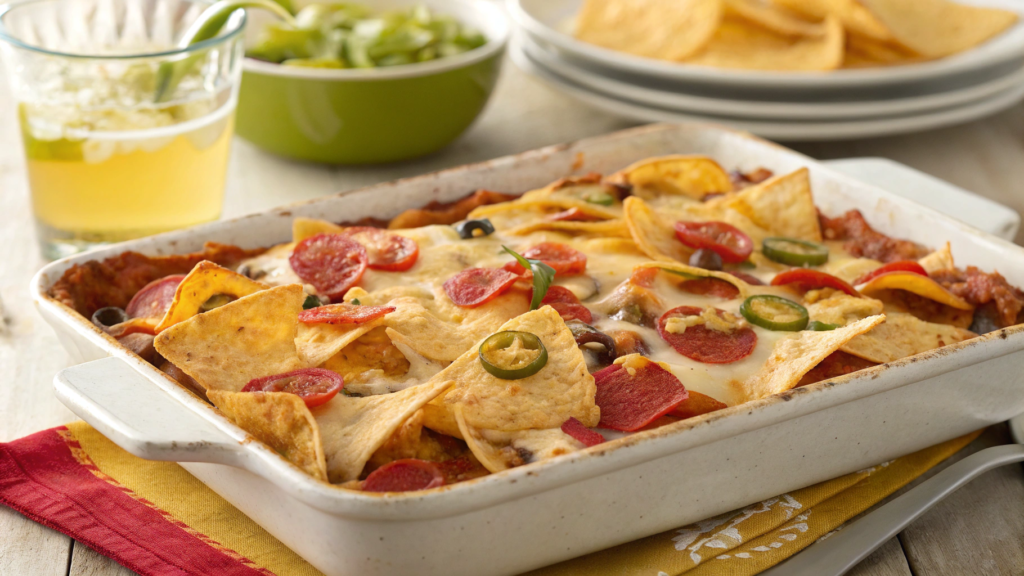
Sometimes in summer, we just don’t have the energy for anything. Really—after a full day in the garden, someone again left the hose running, and you’re basically melting from the heat. And then neighbors drop by, the kids are hungry, and everyone looks like they could eat a horse… if it weren’t so hot.
That’s when this hybrid came to life: pizza plus nachos.
Ingredients:
- 2 frozen pizzas (choose simple ones—cheese or pepperoni work great)
- 1.5 cups shredded cheddar (150 g)
- 1/2 cup canned corn (100 g)
- 1/2 cup black beans (or red beans, if that’s what you’ve got)
- 1 large fresh tomato, diced
- 1/4 cup pickled jalapeños (to taste)
- 2–3 handfuls of sturdy tortilla chips (they shouldn’t get soggy!)
- Sour cream, guacamole, and fresh cilantro for serving
- Optional: red onion, green onion, olives
How to Make It:
- Preheat the oven to 400°F (200°C). That’s important—we want everything to bake through, but not turn into a soggy mess.
- Grab a rimmed baking sheet. This will keep the whole “pizza-nacho construction” under control, especially when the cheese starts melting wherever it wants.
- Place the frozen pizzas side by side. If they’re round, you can overlap them a little or fold the edges in slightly. The goal is to create a solid base.
- Bake for 10 minutes. You want the pizzas to be semi-cooked but still soft—they need to hold the toppings but not become brittle.
- Take them out and start building. Layer on the beans, corn, tomatoes, and jalapeños. All this brings moisture and texture. Then scatter the chips on top—messy, but evenly.
- Sprinkle the shredded cheddar all over. Then put it all back in the oven for another 6–8 minutes. Keep an eye on the cheese—it should melt and brown just a bit around the edges.
- Let it rest for a minute. This is crucial! The chips crisp up, and the whole thing becomes more stable. Much easier to slice… and doesn’t burn your mouth.
I like to serve this miracle right on a wooden board (we’ve got a favorite oak one we found at a flea market). I add little bowls of sour cream, guacamole, fresh herbs. Sometimes I sprinkle a little lime juice over each slice.
If you’re making it for grown-ups, offer a side of spicy salsa—it pulls the whole thing together beautifully.
Tips from our kitchen:
- If you want the pizza to hold its shape better, freeze it for just 10 minutes before baking.
- Use thicker tortilla chips, or they’ll get soggy too fast. We love Late July Organic Sea Salt Thin & Crispy Tortilla Chips — they’re perfect for texture.
2. Ramen-Crusted Chicken Tenders with Peach Ketchup

I’m not kidding — this recipe came out of desperation.
It was the end of the month, the fridge was nearly empty, and all we had left in the cupboard was a single pack of instant ramen and a couple of chicken breasts. And a few peaches that were basically saying: “Use us. Now.”
As usual, dinner came together from whatever was on hand. But the result? Crunch, flavor, and even the kids asked for seconds.
Ingredients
For the chicken:
- 1 lb chicken breasts or tenders (about 450 g), cut into strips
- 2 eggs
- 2 packs instant ramen (use plain ones, without seasoning packets)
- 1/2 cup all-purpose flour (60 g)
- 1/2 tsp garlic powder
- Salt and black pepper
- Oil for frying (vegetable or avocado)
For the peach ketchup:
- 2 ripe peaches, peeled and chopped
- 1/2 cup ketchup (125 ml)
- 1 tbsp apple cider vinegar
- 1 tsp honey or maple syrup
- A pinch of cayenne pepper (optional)
How to Make It
- Prepare the ramen coating. Take the instant noodles and crush them by hand or with a rolling pin — but don’t turn them into dust! You want large flakes so the crust has that signature crispy crunch.
A zip-top bag and a heavy jar work great for this step. - Set up your breading station. In one bowl: mix flour, garlic powder, salt, and pepper.
In a second bowl: beat the eggs.
In a third bowl: place the crushed ramen. - Bread the chicken. Dip each chicken strip first in the flour, then in the eggs, and finally press firmly into the ramen flakes.
Make sure the ramen sticks well to form a solid, crunchy crust. - Fry the chicken. Heat about 1/2 inch of oil in a heavy skillet. I use the Lodge Cast Iron Skillet, 10.25-Inch — it keeps the temperature nice and even.
Fry in batches, about 3–4 minutes per side, until golden brown and cooked through.
Remove to a plate lined with paper towels.
Make the peach ketchup:
In a small saucepan, combine ketchup, chopped peaches, vinegar, honey, and cayenne.
Bring to a boil, then reduce heat and simmer for 10 minutes, until the peaches are soft.
Blend the mixture into a smooth, thick sauce — it should be slightly sweet with a hint of spice, perfect for dipping.
Serve the crispy chicken strips on a wooden board or a flat serving plate. Add a small bowl of warm peach ketchup on the side.
Sometimes we serve it with fresh peach slices to intensify the flavor.
Top with chopped green onion or microgreens for an eye-catching finish.
Tips:
- Don’t let the oil get too hot — ramen burns quickly if the temperature is too high.
- Want even cooking? Lightly pound the chicken between two sheets of parchment paper to make it uniform in thickness.
- This recipe is kid-friendly — they love crushing the noodles and helping with the breading process.
3. Grilled PB&J Tacos with Bacon
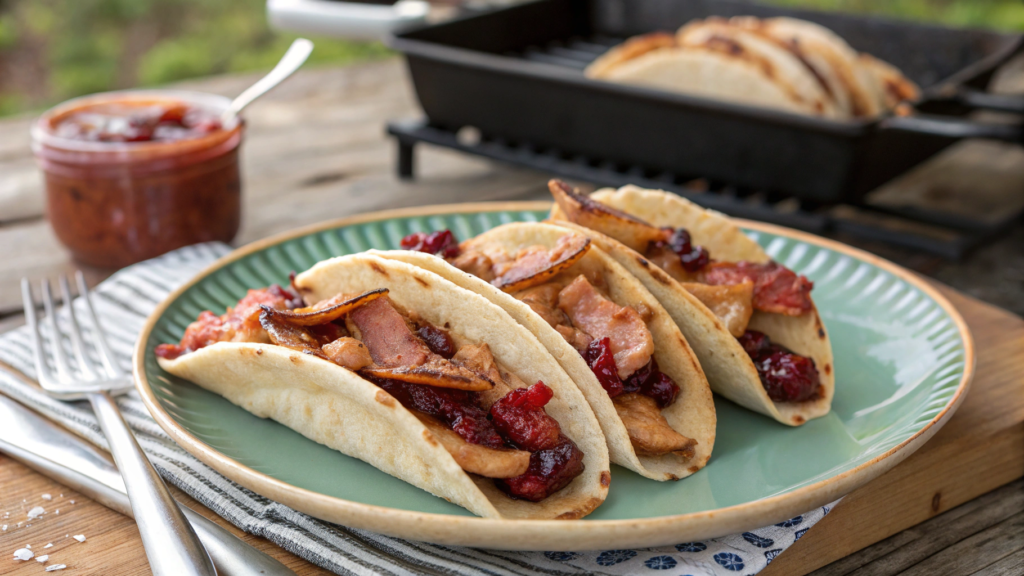
At some point last summer, we realized our grill wasn’t just for dinners. It was for breakfast, for afternoon snacks, and for “something quick while the kids play with the chickens.”
And that’s how we ended up making these grilled tacos: with peanut butter, jam, and bacon. Sounds weird? It is. Does it work? Absolutely.
By the way, this is one of the few recipes everyone eats — even the ones who “don’t like peanut butter.” Tested and true.
Ingredients (for 4 servings):
- 4 small tortillas (soft wheat or corn work best)
- 1/2 cup peanut butter (2 tablespoons per tortilla)
- 1/2 cup strawberry or raspberry jam (blueberry works too — they all do)
- 8 slices of bacon
- Oil for grilling (vegetable or butter)
How to Make It:
- Start with the bacon. Fry it in a skillet or on the grill — whichever works best for you. Just make sure it’s crispy but not burned.
We use the Presto Electric Skillet 16-Inch with Glass Cover, because it holds the temperature perfectly and fits all the bacon at once. - While the bacon cooks, heat up the grill or grill pan. If you’re doing this over an open flame, lightly oil the grates so the tortillas don’t stick.
- Spread peanut butter on one side of each tortilla, and jam on the other. Lay two slices of bacon between them — like the “filling” for a taco.
- Fold the tortillas in half — like mini quesadillas. Then place them on the grill.
- Grill for just 1.5 to 2 minutes per side. Keep an eye on them — tortillas brown fast. When you see golden grill marks and the jam just starting to melt — that’s the perfect time to pull them off.
Serve on a large wooden board, stacked so they stay warm. You can add a bowl of Greek yogurt or some fresh berries — and suddenly this weird-looking sandwich becomes a full-on summer snack.
Sometimes we pack these tacos in a cooler bag for walks — they still taste great even cold.
And if you want something truly different — one time we drizzled chili honey on top.
It was unexpectedly amazing.
Tips:
- Don’t overheat the peanut butter — it can start to ooze out.
- If your tortillas are a bit dry, sprinkle them with water before grilling.
- Also, jam that’s too runny might leak while heating — a thicker one works better.
4. Mac ‘n Cheese-Stuffed Bell Peppers
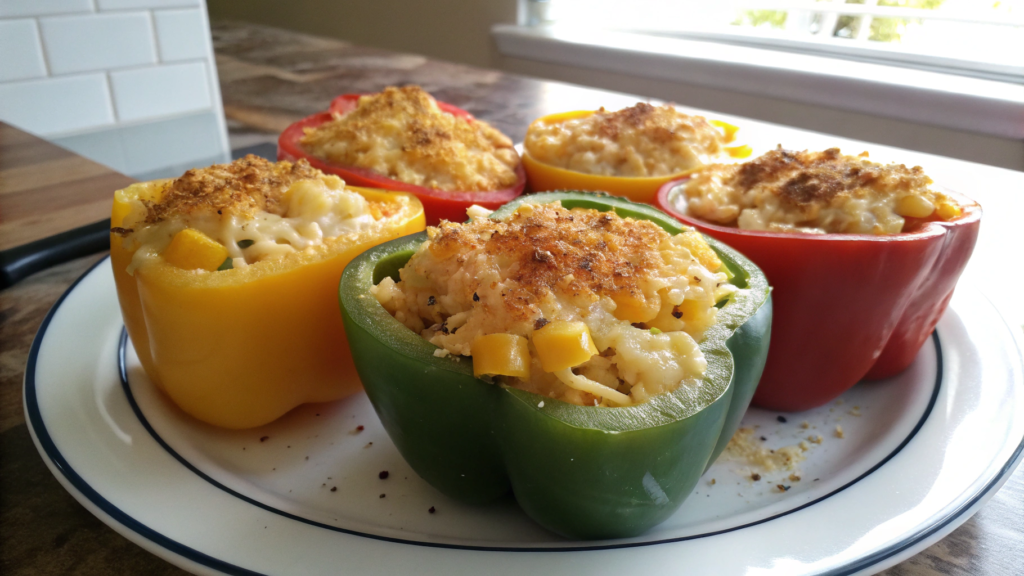
Mac and cheese hidden inside a vegetable? Who would’ve thought that trick would work so well. One summer lunch with friends, when the garden was overflowing with bell peppers, someone half-jokingly said, “What if we just put mac ‘n cheese in them?”
Well… why not, we thought. So we did.
Now it’s our go-to weekend dish during summer — when we want something filling, simple, and just healthy enough to not feel guilty.
Ingredients (for 4 servings):
- 4 large bell peppers (yellow, red, or orange)
- 2 cups elbow macaroni (about 200 g, gluten-free works too)
- 1 ½ cups shredded cheddar cheese (150–180 g)
- 1 tbsp butter
- 2 tbsp milk (plant-based is fine)
- 1/2 tsp paprika
- Salt and pepper to taste
- Breadcrumbs for topping (optional)
How to Make It:
- Start with the peppers. Cut off the tops and remove seeds and membranes.
At our house, the kids usually handle this part — they love it!
Place the peppers upright in a baking dish so they stay stable. - Meanwhile, cook the macaroni until al dente. Drain and return to the pot. Add butter, shredded cheddar, milk, paprika, salt, and pepper.
Mix it all until the cheese melts.
If you want it creamier — add another spoon of butter or a splash of cream. Totally up to you. - Fill the peppers with the mac ‘n cheese. Top with breadcrumbs if you like a crunchy finish.
Then into the oven! - Bake at 375°F (190°C) for 25–30 minutes. The peppers should soften without collapsing, and the filling should be hot all the way through.
- If you don’t have a proper baking dish — we use the Cuisinart Chef’s Classic Enameled Cast Iron 7-Quart Casserole — it holds heat well and looks great on the table if you serve straight from it.
Best served hot, right out of the oven, topped with a little fresh herb.
Sometimes we set out small bowls with ketchup, hot sauce, or even sour cream — let everyone pick what they like.
If you’re making these in advance, they reheat well in the oven or even on the grill under foil.
Tips:
- You can pre-bake the peppers for 10 minutes if you want them extra soft.
- Mac ‘n cheese holds its shape better if it cools slightly — makes it easier to stuff.
- Try adding diced ham, sautéed mushrooms, or broccoli — and suddenly it’s a whole new version.
5. Crunchy Cornflake Chicken Fingers
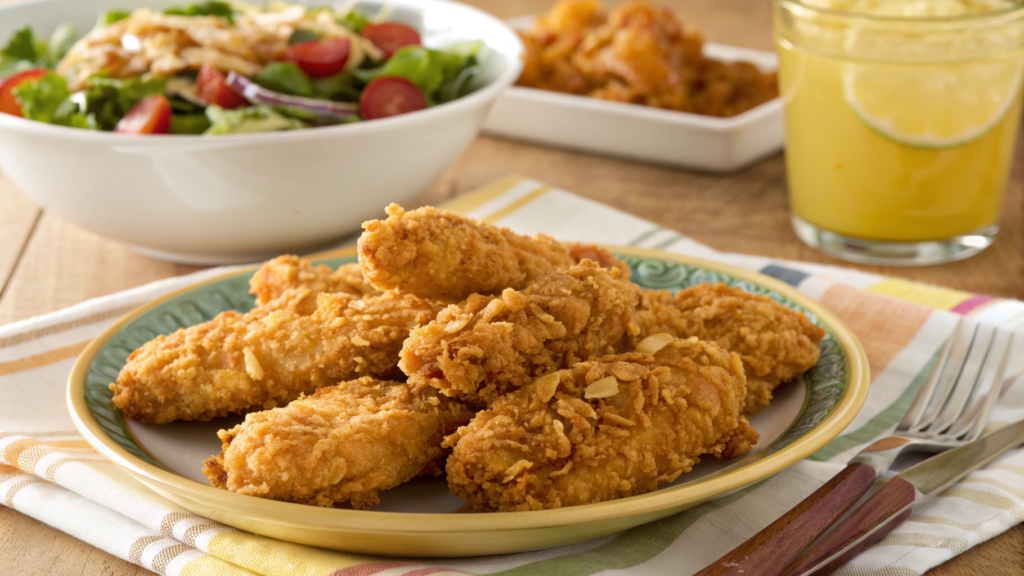
When the house smells like cornflakes and baked chicken tenders — that’s a sure sign summer is in full swing, and the dish on the table is disappearing faster than you can say “just one more.”
These crispy chicken fingers with a cornflake crust are the perfect choice for a picnic, a dinner on the porch, or that kind of day when you just want a summer meal that’s simple, hearty, and loved by absolutely everyone.
What You’ll Need:
- 1.5 lb chicken breast (≈ 700 g)
- 2 cups plain cornflakes (≈ 50 g)
- 2 large eggs
- 1/4 cup milk (≈ 60 ml)
- 1/2 tsp garlic powder
- 1/2 tsp paprika
- Salt and freshly ground black pepper, to taste
- A bit of vegetable oil for the baking sheet or nonstick spray
How to Make It:
- Prep the coating. Place the cornflakes into a sturdy plastic bag (or a blender) and crush them lightly — not into flour, but into coarse crumbs. Pour into a bowl and stir in the spices.
- Make the egg mixture. In a separate bowl, beat the eggs with the milk and add a pinch of salt.
- Slice the chicken. Cut the chicken breast into long strips — just the right size to grab with your fingers like real chicken fingers!
- Dip and bake. Dip each strip into the egg mixture, then coat generously with the cornflake crumbs.
Place the coated strips on a parchment-lined baking sheet greased with a bit of oil. Leave a little space between them so they bake evenly. - Bake. Put in the oven preheated to 400°F (≈ 200°C) and bake for 18–22 minutes, until they’re golden and crispy. You can flip them halfway through for extra crunch on both sides.
Tips from Our Kitchen:
- If you’re grilling — cook the fingers on a greased grate. They’ll pick up a nice smoky flavor.
- Leftovers store great in the fridge and make the perfect lunch — just wrap them in a tortilla with salad and a yogurt-based sauce.
- Want a spicy twist? Add a pinch of cayenne to the coating. Our friends love the “grown-up” version!
This dish is just another example of how simple ingredients and a little summer meal energy can bring everyone to the table — from picky kids to serious food lovers.
6. BBQ Spaghetti Sliders
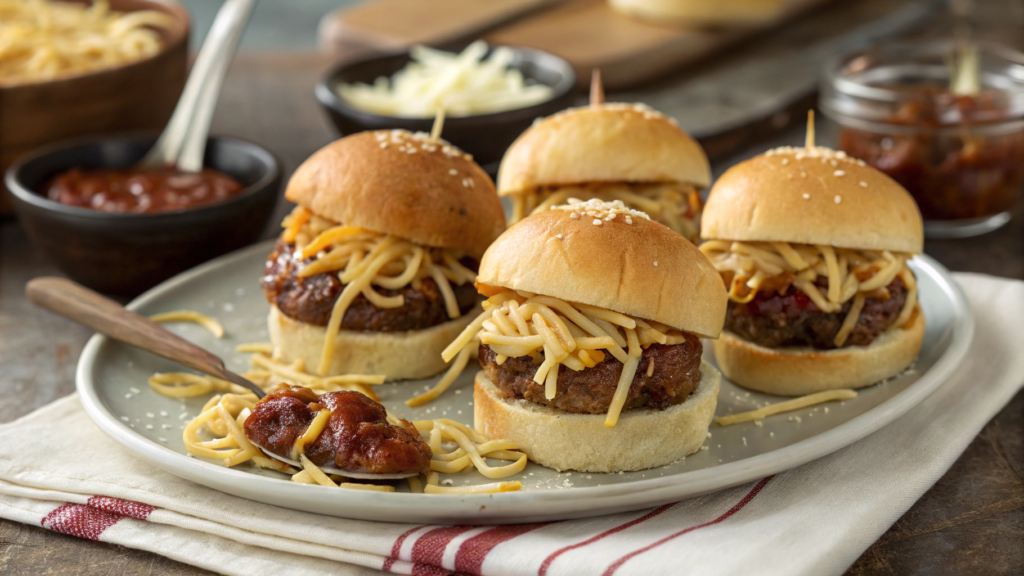
BBQ Spaghetti Sliders — mini burgers with pasta inside. Sounds crazy, but works like Swiss clockwork.
What You’ll Need:
- 12 slider buns (slightly sweet ones like King’s Hawaiian Rolls work best)
- 6 oz spaghetti (≈ 170 g, about half a standard pack)
- 1/2 lb ground beef (≈ 225 g)
- 1/2 cup barbecue sauce (≈ 120 ml)
- 1 cup shredded mozzarella (≈ 100 g)
- 1/2 cup shredded cheddar (≈ 50 g)
- 1 tbsp butter
- Salt and pepper — to taste
How to Make It:
- Boil the pasta. Cook the spaghetti according to package instructions until al dente.
Drain and set aside. - Cook the meat. In a skillet, brown the ground beef until fully cooked.
Add salt, pepper, and barbecue sauce. Remove from heat. - Combine everything. In a large bowl, toss the spaghetti, meat, and both cheeses together.
While it’s still warm, the cheese will start melting and the whole mix turns into a sticky, flavorful mass. Total fire. - Assemble the sliders. Slice the buns horizontally (not all the way through!) — like a book.
Spread a thick layer of filling. Top with the other half of the buns.
Brush the tops lightly with melted butter. - Bake. Put the whole tray into the oven at 350°F (≈ 175°C) for 10–12 minutes,
until the buns are slightly crispy and the cheese is even more melted inside.
How to Serve:
- Use a large wooden board or baking tray. Serve the hot sliders right on it — they already look like Pinterest food content.
- Small wooden skewers help guests grab a slider without burning fingers.
- Serve with a small bowl of barbecue sauce on the side (or even garlic yogurt — yes, it’s unusual, but seriously good).
- Add corn chips or pickles on the side — the texture contrast is divine.
- For a picnic — wrap each slider in wax paper and take them along.
They keep well even in warm weather, as long as you don’t overload the cheese.
7. Cheeseburger Quesadilla Pockets

Some summer meals feel like they were made for summer. No fancy techniques, they cook fast — and disappear even faster.
These cheeseburger quesadilla pockets are exactly that. No joke — this dish became a hit.
Ingredients:
- 1 lb ground beef (≈ 450 g)
- 1/4 cup ketchup (≈ 60 ml)
- 1 tbsp Dijon mustard
- 1/2 small onion, finely chopped
- 1/2 cup pickles, diced
- 1 cup shredded cheddar cheese (≈ 100 g)
- 1 cup shredded mozzarella
- 4 large tortillas
- A little oil for frying
How to Make It:
- Cook the beef. Use a skillet — hot and quick. When the meat is almost done, add the onion, ketchup, mustard, and a pinch of salt and pepper.
Stir and cook for another minute. Add the pickles, stir, and remove from heat. - Build the pockets. Cut each tortilla in half. Place some of the beef and cheese on one side, fold it over to form a half-moon pocket.
- Fry them. On a dry skillet or with a little oil — cook 2–3 minutes per side, until golden and crispy.
The cheese inside should be fully melted!
Serving Ideas & Tips:
- With sauce. Serve with anything — from homemade burger sauce to sour cream with paprika.
We usually go with Greek yogurt, dill and a touch of mustard. - Kid-friendly. Use street taco–size tortillas to make mini versions — easier to hold and eat.
- On the grill. Yes, you can cook them over a grate — just wrap in foil and grill for 2–3 minutes per side.
These quesadillas are our go-to 15-minute trick when guests show up and we need something hot and tasty, fast.
8. Sweet Potato & Sausage Pizza Boats

We started making these “boats” when the garden gave us way too much sweet potato and there were a couple leftover sausages from breakfast.
Now it’s my wife’s favorite summer meal — especially with a few basil leaves on top and a glass of homemade kombucha.
Ingredients (for 4 boats):
- 2 large sweet potatoes
- 1/2 lb Italian sausage (≈ 225 g) — spicy sausage works too
- 1/2 cup marinara or pizza sauce (≈ 120 ml)
- 3/4 cup shredded mozzarella (≈ 75 g)
- 1/4 cup shredded parmesan
- Salt and pepper — to taste
- Olive oil
- Fresh basil — optional
A great sugar-free pizza sauce to try is Rao’s Homemade Pizza Sauce. It’s thick, flavorful, and totally clean.
How to Make It:
- Bake the sweet potatoes. Preheat your oven to 400°F (200°C). Wash the sweet potatoes well (you’ll leave the skin on), poke a few holes with a fork, and place them on a baking sheet.
Bake for 45–60 minutes, until soft when pressed.
Tip. You can cut them in half lengthwise and bake cut-side down to speed up the process — the texture will be a bit drier but still good. - Prep the filling. While the sweet potatoes bake, brown the sausage in a skillet.
If using links — remove the casing and break the meat into small chunks as it cooks.
Cook for 7–8 minutes over medium heat.
At the end, stir in the pizza sauce and let everything simmer on low to combine into a thick, flavorful mix. - Make the boats. Slice the baked sweet potatoes lengthwise — not all the way through — and gently open them up to form a pocket.
Scoop out a little of the flesh to make space for the filling.
Don’t throw it out! If there’s a lot, mix it into the filling. It’s full of goodness. - Fill the boats. Start with a spoonful of sausage mixture, then top with mozzarella and finish with parmesan. Drizzle lightly with olive oil.
Place back in the oven for 10–12 minutes, until the cheese melts and everything gets a bit golden.
Serving & Notes:
- Definitely add fresh basil on top — it makes the whole dish pop. You can also sprinkle chili flakes.
- They look great on a wooden board, especially served with a fresh greens mix (arugula + spinach) and a lemony vinaigrette.
- If you’re cooking outdoors — wrap each boat in foil and heat over coals.
It works like a charm!
Sweet potato here isn’t just a crust substitute. It makes the whole dish brighter — in taste, texture, and nutritional value.
Especially if you, like us, try to avoid cranking up the oven or working with yeast dough in summer.
9. Dog & Pineapple Rice Bowl
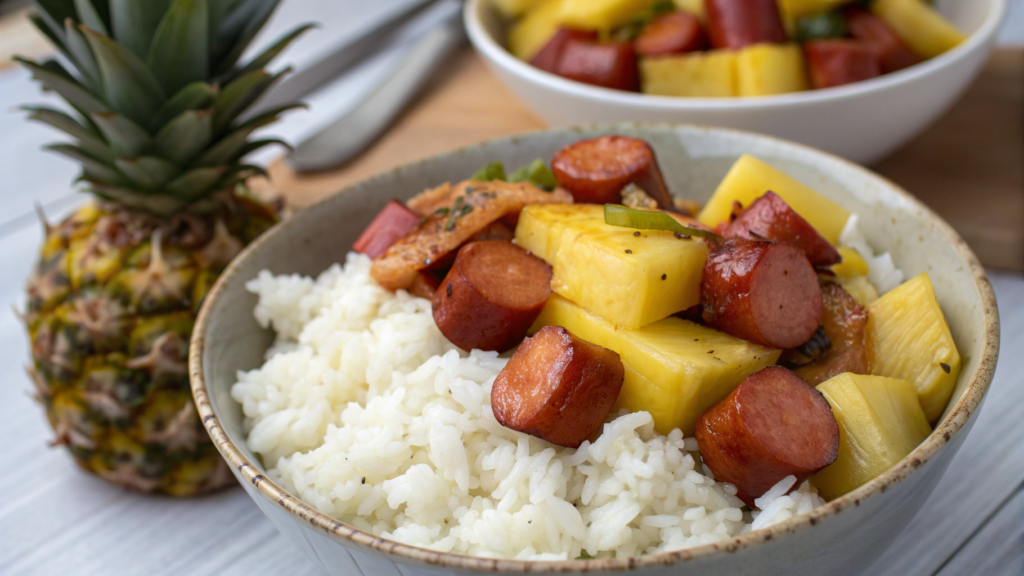
When you grow your own food, you learn to see ingredients differently. Take hot dogs, for example — they’re not just “food truck snacks.”
Especially in summer, when you’ve got leftover rice, juicy pineapple, and just a bit of inspiration.
This rice bowl with hot dogs and pineapple is sweet, salty, smoky, and textured — everything you want in one deep dish.
Ingredients (for 2 servings):
- 1 cup cooked rice (≈ 200 g) — jasmine or basmati works best
- 2 hot dogs, sliced into rounds
- 1/2 cup pineapple, diced (fresh or canned)
- 1/4 cup red bell pepper, chopped
- 1/4 small red onion, thinly sliced
- 1 tbsp soy sauce
- 1 tsp sesame oil
- Salt and pepper — to taste
- Green onion and sesame seeds for topping
How to Make It:
- Brown the hot dogs. In a dry skillet or with a little oil, sauté the sliced hot dogs until golden and crispy on both sides.
That crisp makes all the difference! - Add the veggies and pineapple. In the same skillet, toss in the bell pepper, onion, and pineapple.
Sauté for 2–3 minutes until they soften slightly and start smelling like grilled pineapple — one of the best summer aromas, no doubt. - Build the bowl. Spoon the warm rice into a deep bowl. Top with the skillet mixture.
Drizzle with soy sauce and a little sesame oil. Finish with sliced green onion and a sprinkle of sesame seeds.
If you want to make it festive — serve it in a pineapple boat! Just carve out the center of a pineapple and use it as a bowl.
You can also add a fried egg or some avocado on top — it’ll make the bowl heartier and brighter.
For a meatless version — swap the hot dogs for smoked tofu or crispy sautéed shiitake mushrooms.
10. Watermelon Feta Grilled Cheese
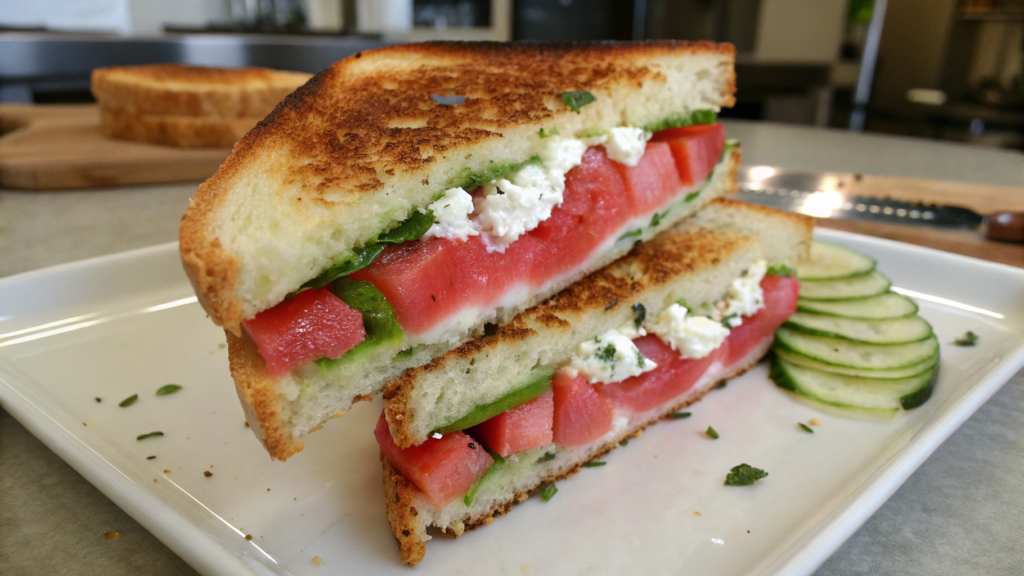
Yes, you read that right: watermelon, feta, and cheese on the grill. When I first heard about this combo, honestly… I scoffed.
Watermelon — in a sandwich?
But then we decided to give it a shot — and now it’s one of our favorite summer dishes.
Ingredients (for 2 servings):
- 4 slices of good rustic bread (slightly stale works best)
- 2 thick slices seedless watermelon (about 1/2 inch / 1.5 cm thick)
- 1/3 cup crumbled feta (≈ 60 g)
- 1/2 cup shredded mozzarella (≈ 50 g)
- 1 tbsp butter
- A bit of honey (optional)
- Fresh thyme or basil — for aroma
- Ground black pepper
How to Make It:
- Prep the watermelon. Remove the rind and cut two solid, even slices. Pat them dry with a paper towel to get rid of excess moisture.
The drier the watermelon, the better it will grill — and won’t soak the bread. - Grill the watermelon (optional, but worth it). Just a quick 30 seconds on a grill pan or regular skillet. It caramelizes the surface and boosts the flavor.
Don’t grill too long — it should stay juicy inside. - Build the sandwich. Layer onto the bread: mozzarella, watermelon slice, feta, a drizzle of honey (if you like sweet-and-savory), fresh herbs, a bit more mozzarella, and top with another slice of bread.
- Grill it. Cook on a skillet with butter, over medium heat — 2–3 minutes per side.
The bread should turn golden and the cheese should stretch.
Use a press or lid to push down the sandwich — it’ll crisp up beautifully.
Serve cut diagonally (yes, that’s a must), topped with a couple basil leaves — it’s not just pretty, it’s refreshing. Perfect with a glass of cold tea or ginger soda.
For guests, cut each sandwich into quarters — they make great appetizers for a summer party.
Don’t forget the napkins — some juice will spill, and that’s just part of the charm.
What does summer taste like to you?
So — feeling that summer inspiration yet? I hope at least one of these recipes makes it to your kitchen — or your grill, or your porch, or maybe packed in your lunchbox for an evening walk.
Because summer meal food doesn’t need to be complicated. It should be alive, crispy, full of grilled bread aroma, melted cheese, and sticky fingers from watermelon.If you’ve ever tried something similar — tell us in the comments! If you cook one of these recipes — share the results, we really want to see how it turned out for you.
And maybe you’ve got your own “weird but brilliant” summer dish? Tell us! I believe the best recipes come from kitchen conversations and quiet evening experiments.