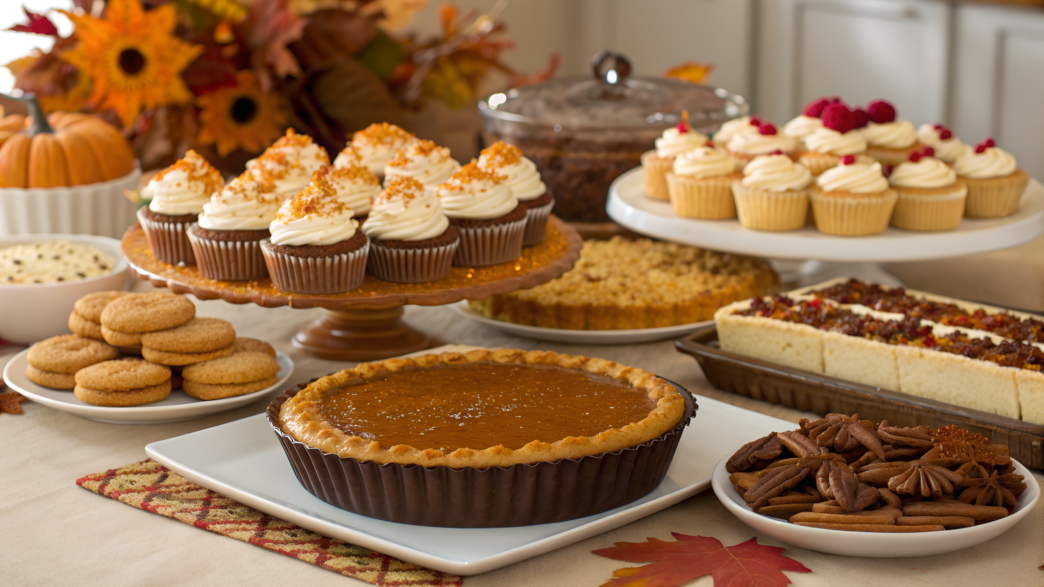
Desserts don’t just end the dinner — they’re the final touch after everything that’s happened at the table. Thanksgiving desserts are that sweet anticipation, that moment when everyone’s full but still reaches for “just a little piece.”
This year, I decided to focus on simplicity and variety. These 10 recipes don’t require hours of dough work or fancy decorations — but they’re full of flavor and warmth. It’s exactly what I’d serve to my family and friends. Each dessert is made to bring a little extra coziness to the celebration.
1. No-Bake Pumpkin Pie Cups
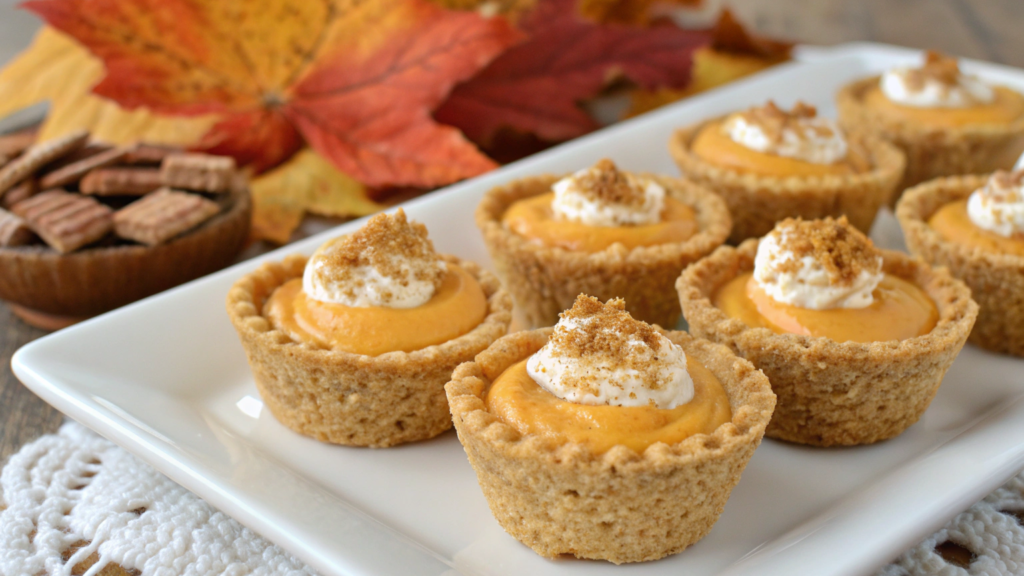
Thanksgiving is filled with aromas — turkey, potatoes, and everything else sizzling and bubbling on the stove. That’s when I make No-Bake Pumpkin Pie Cups — a dessert that saves me when there’s neither energy nor oven space left.
What you’ll need:
- 1 ½ cups crushed graham crackers (or any shortbread cookies) — about 150 g
- ¼ cup melted butter (60 ml)
- 8 oz cream cheese (about 225 g), room temperature
- ½ cup cane sugar (100 g)
- 1 cup pumpkin puree (240 g)
- 1 teaspoon cinnamon
- ½ teaspoon nutmeg
- ¼ teaspoon ground cloves
- 8 oz whipped cream or whipped topping (225 g)
- Plus: a pinch of salt and a bit of vanilla for aroma
How to make it:
- Make the crust. In a small bowl, mix crushed crackers with melted butter. Spread the mixture over the bottom of small jars or glasses (Ball Regular Mouth Mason Jars, 8 oz, set of 12).
- Make the filling. In a large bowl, beat the cream cheese and sugar until smooth. Add pumpkin puree, spices, and a pinch of salt. Gently fold in the whipped cream so the texture stays light and airy.
- Assemble the dessert. Spoon the pumpkin cream over the crust layer. You can make one or two layers — up to you. Top with a bit more whipped cream and a sprinkle of cinnamon.
- Chill. Refrigerate for at least an hour so the texture sets and the flavor deepens.
The result is a creamy, spiced dessert with a soft pumpkin flavor. The spices unfold slowly and warmly, and the texture feels like a mix between a cheesecake and a mousse.
If you want a little crunch, sprinkle some caramelized nuts or crushed ginger snaps on top — I often do this to balance the sweetness.
And here’s what I love most: unlike a regular pie, these cups can be served straight from the fridge without worrying if someone’s running late. They’re perfect for a crowd — and for when you’ve got no time to spare.
2. Mini Chocolate Pecan Tarts
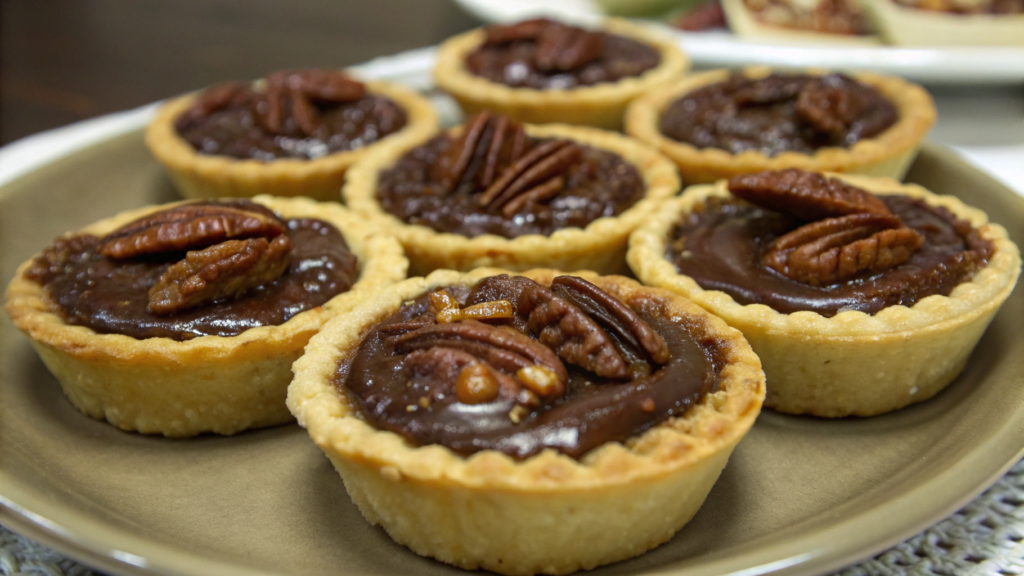
Mini Chocolate Pecan Tarts — small, crispy, filled with a rich chocolate-pecan filling, and incredibly delicious!
I first made them just out of curiosity — I wanted to see if the classic pecan pie would work in a mini version. And it did! Less crust, more nutty filling, and that light crunch of chocolate… mmm.
What you’ll need:
- 1 package pie crusts (about 14 oz / 400 g)
- ¾ cup chopped pecans (about 100 g)
- ½ cup dark chocolate, melted (90 g)
- ⅓ cup cane sugar (65 g)
- ⅓ cup corn syrup (80 ml)
- 2 eggs
- 2 tablespoons melted butter (30 g)
- 1 teaspoon vanilla extract
- A pinch of salt
How to make it:
- Prepare the crust. Preheat the oven to 350°F (175°C). Roll out the dough on a lightly floured surface — not too thin, about ⅛ inch (3 mm). Cut out circles to fit mini muffin tins. If the dough tears a bit, just press it back together with your fingers. The key is to have an even layer covering the bottom and sides.
- Make the filling. In a large bowl, whisk the eggs until light and slightly foamy. Add sugar and syrup — the mixture should look shiny and smooth. Stir in melted butter, vanilla, and a pinch of salt. Then add the chopped pecans and slightly cooled chocolate. It’s important that the chocolate isn’t hot, or it’ll scramble the eggs — wait a few minutes after melting. The texture should resemble thick caramel.
- Assemble the tarts. Fill each tart shell about three-quarters full — the filling will rise a bit while baking. If you like the nuts showing on top, keep a few pecans aside and place them over each tart by hand. It gives them a cozy, homemade look.
- Bake. Place the tin on the middle rack and bake for 20–25 minutes. When the crust turns golden and the center slightly jiggles, they’re done. Don’t overbake — you want the caramel filling to stay soft.
- Cool and decorate. Let the tarts cool in the tin for about 10 minutes, then gently loosen them with a thin knife. You can drizzle them with melted chocolate or sprinkle a bit of flaky sea salt for contrast.
These little tarts are perfect for making ahead. Once completely cooled, store them in an airtight container for up to three days — the flavor only gets richer.
As they cool, the chocolate firms up, the nuts become fragrant, and the caramel turns perfectly chewy. For an elegant touch, place each tart in a paper cup and top with a small dollop of whipped cream. Perfect with a cup of coffee after dinner.
3. Gluten-Free Apple Crisp

Gluten-Free Apple Crisp is the smell of baked apples, warm cinnamon, and butter. The aroma spreads through the house and instantly makes everything feel warmer and cozier — both inside and out.
I love this recipe because it doesn’t need flour, eggs, or any “chef-level” baking skills. Everything is simple and homemade, but the result is outstanding — crispy topping, juicy apples, and a hint of lemon freshness. And yes, it’s completely gluten-free!
What you’ll need:
For the filling:
- 6 large apples (preferably Granny Smith or Honeycrisp), peeled and sliced
- 2 tablespoons lemon juice (30 ml)
- ¼ cup cane sugar (50 g)
- 1 teaspoon cinnamon
- ½ teaspoon ground ginger
- 1 tablespoon cornstarch (or potato starch if you want it 100% grain-free)
For the crumble:
- 1 cup gluten-free rolled oats (90 g, Bob’s Red Mill Gluten Free Rolled Oats)
- ½ cup almond flour (60 g)
- ⅓ cup brown sugar (70 g)
- ½ teaspoon salt
- ½ teaspoon cinnamon
- ¼ cup melted butter (60 ml)
- 1 teaspoon vanilla extract
How to make it:
- Prepare the apples. Preheat the oven to 350°F (175°C). In a large bowl, mix apple slices with lemon juice, sugar, spices, and starch. Toss with your hands — it helps coat the apples more evenly. Spread the mixture into a baking dish (about 8×8 inches / 20×20 cm).
- Make the crumble. In a separate bowl, combine oats, almond flour, sugar, salt, and cinnamon. Pour in the melted butter and vanilla, mixing until you get a crumbly texture.
For extra crunch, you can add a handful of chopped pecans or walnuts. - Assemble the dessert. Evenly sprinkle the crumble mixture over the apples. Don’t press it down — leaving air pockets helps create that perfect crumbly layer that cracks nicely under the spoon.
- Bake. Bake for about 35–40 minutes, until the top is golden and the apples underneath start to caramelize. If the top browns too quickly, cover it loosely with foil.
- Serve. Let the dessert cool for at least 10 minutes. Then serve it warm with a scoop of vanilla ice cream or a spoonful of whipped cream.
When the spoon breaks through the top and you hear that gentle crunch — you know it’s a success. Warm apples under the crispy layer are just perfect.
This Gluten-Free Apple Crisp is healthier than the classic version and just as delicious. Sometimes I add a splash of oat milk to the filling — it makes the apples creamier and the aroma even deeper.
4. Cranberry Cheesecake Bars
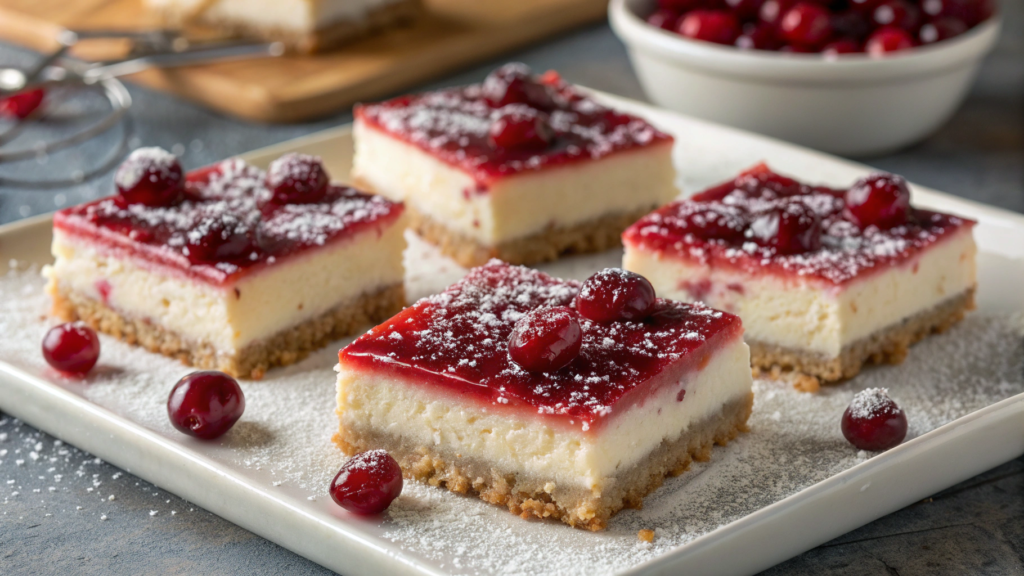
Cranberry Cheesecake Bars combine everything we love — the gentle tartness of cranberries, the velvety smoothness of cream cheese, and a sandy crust that gives the perfect crunch.
It all started when I mixed leftover homemade cranberry sauce with a creamy cheesecake filling — and the result was so good that now I make the sauce on purpose just for these bars.
What you’ll need:
For the crust:
- 1 ½ cups crushed graham crackers (150 g)
- ¼ cup melted butter (60 ml)
- 2 tablespoons sugar (25 g)
The filling:
- 16 oz cream cheese (about 450 g), room temperature
- ½ cup sugar (100 g)
- 2 eggs
- 1 teaspoon vanilla extract
- ¼ cup sour cream (60 ml)
The cranberry layer:
- 1 ½ cups fresh or frozen cranberries (150 g)
- ½ cup sugar (100 g)
- ¼ cup water (60 ml)
- 1 teaspoon lemon juice
How to make it:
- Make the crust. Preheat the oven to 350°F (175°C). In a bowl, mix graham cracker crumbs, butter, and sugar until the texture feels like wet sand. Press the mixture into an 8×8-inch (20×20 cm) baking pan and flatten it with a spoon. Bake for 8–10 minutes until set.
I use the USA Pan 8-Inch Square Baking Pan — it has a nonstick surface, and the corners come out perfectly smooth. - Prepare the cranberry sauce. While the crust cools, combine cranberries, sugar, water, and lemon juice in a small saucepan. Cook over medium heat for about 10 minutes, until the berries burst and the mixture thickens into a sauce. Let it cool to room temperature.
- Make the cheesecake filling. In a large bowl, beat the cream cheese and sugar until smooth. Add the eggs one at a time, then mix in the vanilla and sour cream. The texture should be creamy but not runny.
- Assemble the bars. Pour half of the cheesecake filling over the crust. Spoon the cranberry sauce on top, swirling it slightly into the filling to create a marbled effect. Then pour the remaining filling over and smooth the surface.
- Bake. Bake for 35–40 minutes, until the center is set (a little jiggle is fine). Let it cool completely, then refrigerate for at least 3 hours.
It’s best to cut them into squares about 2×2 inches and serve them on a wooden board or white ceramic platter. I like arranging them in neat rows — the white-and-pink cranberry swirls look stunning on their own, no extra decoration needed.
You can top each square with a sprinkle of crushed nuts or a few fresh cranberries. Serve alongside a cup of strong coffee or hot apple cider — absolutely perfect.
5. Kids’ Turkey Cupcakes
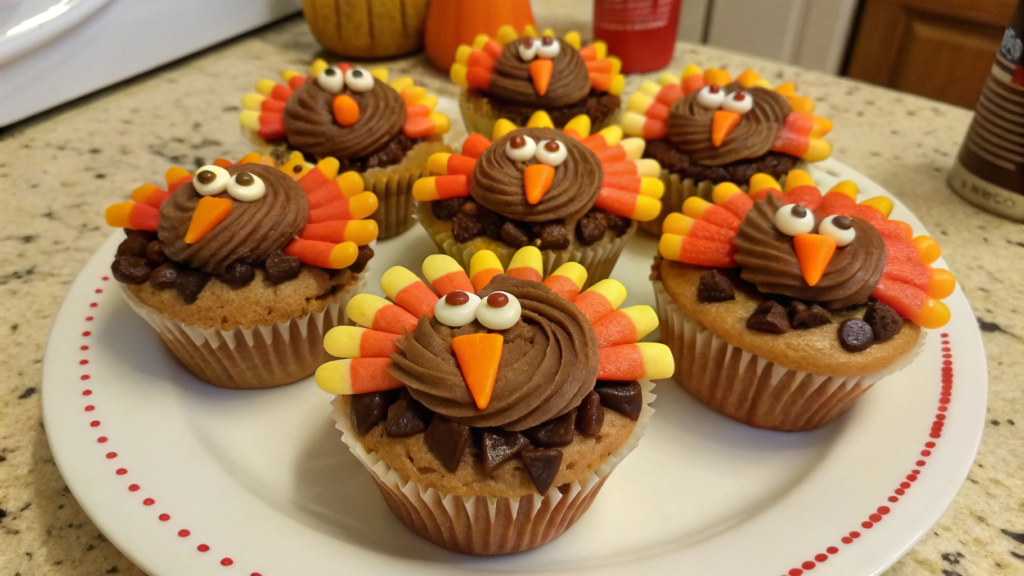
These Kids’ Turkey Cupcakes look like mini turkeys — with candy “feathers” and chocolate chip “eyes.” Fun, simple, and delicious.
Whenever we host Thanksgiving dinner, these cupcakes save the day: kids stay busy, the kitchen stays calm, and the house fills with laughter and the smell of vanilla.
What you’ll need:
For the cupcakes:
- 1 box chocolate or vanilla cake mix (about 15 oz / 425 g)
- 3 eggs
- ½ cup vegetable oil (120 ml)
- 1 cup water (240 ml)
(Of course, you can make the batter from scratch — but during the holidays, I choose the easy way and don’t feel bad about it!)
For the decoration:
- 1 cup chocolate frosting (store-bought or homemade)
- 24 round chocolate cookies (like Oreo Thins)
- Multicolored candy corn for “feathers”
- Candy eyes or mini chocolate chips
- Yellow and red icing gel for the beak and “wattle”
How to make it:
- Bake the cupcakes. Preheat the oven to 350°F (175°C). In a bowl, whisk together the cake mix, eggs, oil, and water until smooth. Pour into cupcake liners, filling them about ¾ full. Bake for 18–20 minutes, until a toothpick comes out clean. Let cool completely.
- Prepare the decorations. While the cupcakes cool, lay out all the decorating pieces — candy corn, cookies, eyes. It’s easiest to do this on a tray so the kids can build their own “turkeys” right at the table.
- Decorate. Spread chocolate frosting over each cupcake — it doesn’t have to be perfect, a little homemade texture gives them character. Stick 4–5 candy corn pieces into the back for feathers. Place half an Oreo in the center as the “body.”
Add the eyes, a tiny yellow beak made with icing gel, and a red “wattle” on the side — just add a drop of gel and stretch it gently with a toothpick. - Let them set. Put the decorated cupcakes in the fridge for 15–20 minutes so the frosting firms up and the decorations stay in place — even if someone decides to organize a “turkey parade” across the table.
How to serve:
The most fun way is to arrange the cupcakes on a round wooden board or tray, like a little flock of turkeys gathering for dinner. You can even add name tags — it makes for an adorable edible place setting!
If serving to kids, place a bowl of leftover candy corn nearby and let them “redecorate” the cupcakes however they like. Trust me, their imagination won’t disappoint.
And when the evening ends and a couple of “survivor turkeys” remain on the counter — that’s your cue to make some tea and enjoy one quietly, all to yourself.
6. Salted Caramel Pretzel Bites
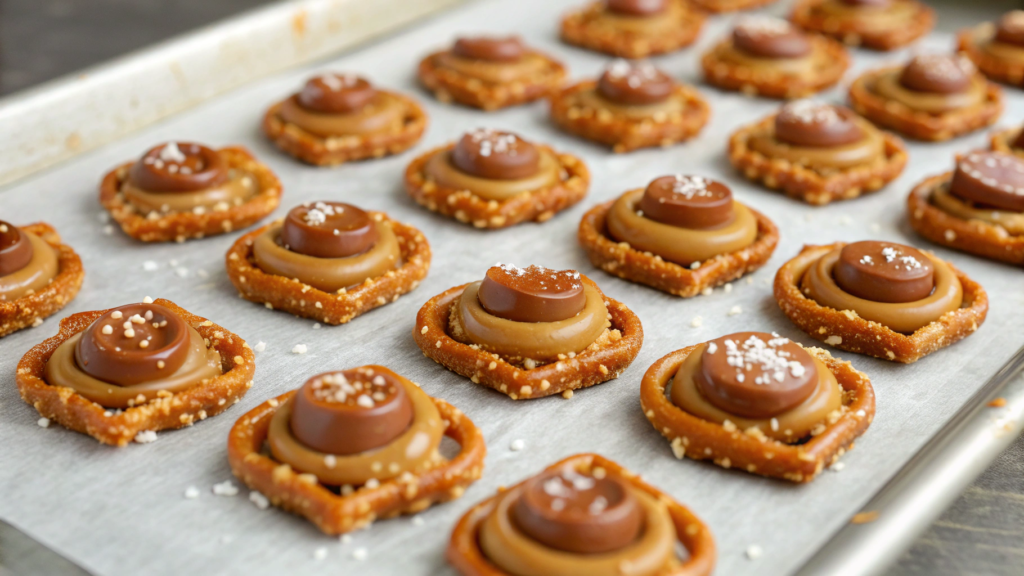
Salted Caramel Pretzel Bites don’t require a mixer, a baking pan, or even a spoon. Just a baking sheet, an oven, and a little patience. The result is mini pretzels — small, salty-sweet, crispy, with a soft caramel center and a warm chocolate note.
What you’ll need:
- 40 mini pretzels (like Snyder’s Snaps — perfectly square)
- 40 Rolo chocolates or chocolate-covered caramels
- A handful of whole nuts (pecans or almonds — your choice)
- A pinch of flaky sea salt (for balance)
- Some melted dark chocolate (optional, for decoration)
How to make it:
- Prepare the base. Preheat the oven to 250°F (120°C). Line a baking sheet with parchment paper and arrange half of the pretzels in neat rows — about 5×8. Place one Rolo (or caramel) on top of each pretzel.
- Bake. Put the tray in the oven for 3–4 minutes, until the candies soften but don’t melt completely. Watch closely — caramel melts fast!
- Assemble. Remove the tray and immediately top each candy with another pretzel, pressing gently so the caramel flattens. You can also add half a nut on top — it gives a homemade truffle look.
- Salt and cool. While the caramel is still warm, sprinkle a pinch of sea salt flakes (Maldon works perfectly). Let them cool completely — or chill in the fridge for 15 minutes to speed things up.
- Decorate (optional). For a more festive touch, drizzle some melted dark chocolate over the top. It looks beautiful.
Serve these pretzel bites in a large bowl or on a wooden board, mixed with nuts and chocolate chips.
You can also pack them into a glass jar with a lid and tie a ribbon around it — a perfect Thanksgiving gift for guests.
And if you plan to “just make a few,” go ahead and double the batch right away — they disappear faster than you think.
7. Pumpkin Mousse in Mason Jars
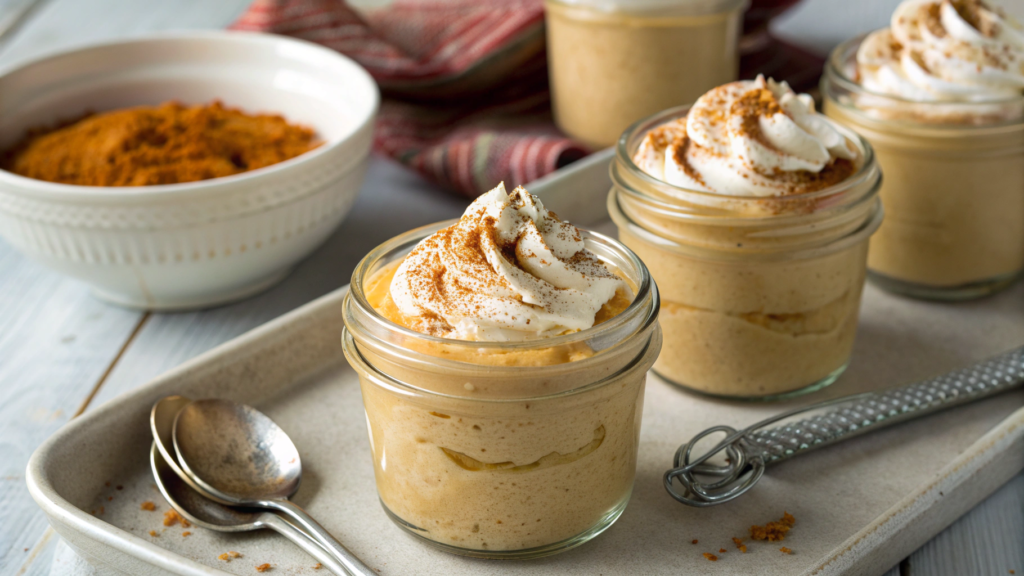
Pumpkin Mousse in Mason Jars turns out soft, airy, and spiced — with that perfect pumpkin pie flavor, but without the crust or baking. It looks beautiful, especially when served in jars — ideal for small gatherings, family dinners, or even picnics.
I love making this mousse ahead of time: whip it up in the evening, pour it into jars, and by morning it’s ready to welcome the guests.
What you’ll need:
- 1 cup pumpkin puree (240 g)
- ¾ cup heavy cream (180 ml)
- 8 oz cream cheese (225 g), softened
- ½ cup brown sugar (100 g)
- 1 teaspoon cinnamon
- ¼ teaspoon ground ginger
- A pinch of nutmeg
- 1 teaspoon vanilla extract
- Whipped cream and a sprinkle of cinnamon for topping
How to make it:
- Make the base. In a large bowl, beat the cream cheese and sugar until light and creamy. Add the pumpkin puree, spices, and vanilla. Mix until smooth — the texture should be silky and fragrant, without any lumps.
- Add the cream. In a separate bowl, whip the cream until soft peaks form (don’t overbeat — it should stay light and airy). Gently fold it into the pumpkin mixture using a spatula, not a mixer — that’s the secret to keeping the mousse soft and delicate.
- Pour into jars. Use 8 oz mason jars or small glasses. Fill them almost to the top, cover with lids, and refrigerate for at least 2 hours (overnight is even better).
- Decorate before serving. Just before serving, top each jar with a spoonful of whipped cream, dust lightly with cinnamon, or grate a bit of dark chocolate on top. For extra texture, you can sprinkle crushed graham crackers or nuts.
How to serve:
The most charming way is to place the jars on a wooden tray, surrounded by cinnamon sticks and a few pumpkin leaves — it looks like a mini “taste of autumn.”
For dinner, serve each jar on a small plate with a spoon on the side — it feels both homey and restaurant-level elegant.
The mousse is light yet rich in flavor — sweetness perfectly balanced with warm spices, and the cream cheese adds depth that most desserts lack.
8. Apple Cider Donut Holes
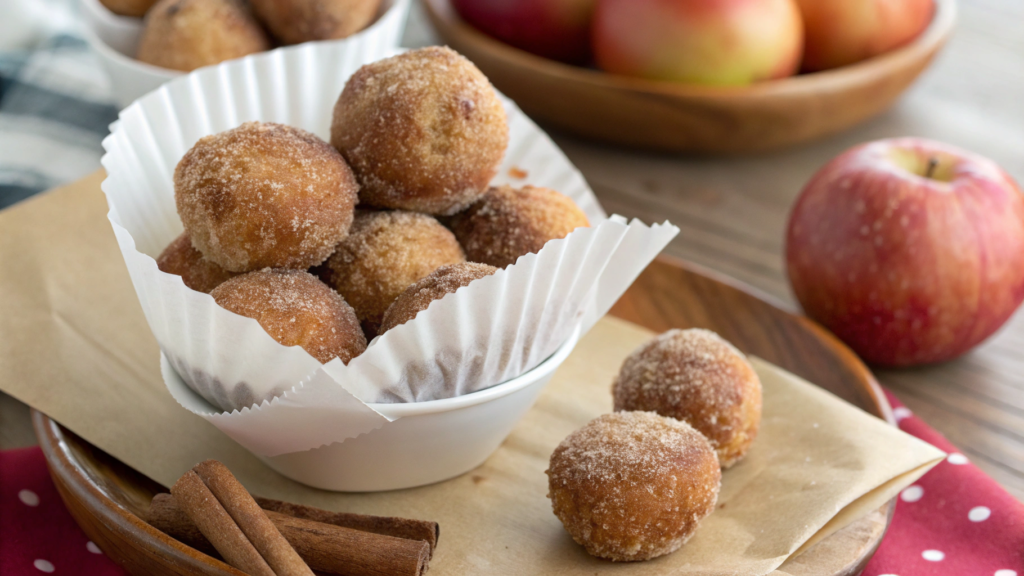
Apple Cider Donut Holes are mini donuts that melt in your mouth, leaving a gentle apple-cinnamon aftertaste. They’re easy to grab by hand, serve in paper cones, or pile up in a bowl for a festive table display.
What you’ll need:
For the dough:
- 1 ¼ cups all-purpose flour (150 g)
- 1 teaspoon baking powder
- ½ teaspoon baking soda
- ½ teaspoon salt
- 1 teaspoon cinnamon
- ¼ teaspoon nutmeg
- ¼ cup cane sugar (50 g)
- ¼ cup brown sugar (50 g)
- 1 large egg
- ½ cup reduced apple cider (120 ml)
- ¼ cup buttermilk (60 ml)
- 2 tablespoons melted butter (30 g)
- 1 teaspoon vanilla extract
For the coating:
- ½ cup sugar (100 g)
- 1 teaspoon cinnamon
- 3 tablespoons melted butter (40 g)
How to make it:
- Reduce the apple cider. Pour 1 cup of cider into a small saucepan and simmer over medium heat until it reduces by half — this will concentrate the flavor. Let it cool.
- Mix the dry ingredients. In a bowl, combine flour, baking powder, baking soda, salt, cinnamon, and nutmeg. Whisk well so the spices distribute evenly.
- Add the wet ingredients. In another bowl, whisk together the egg and both sugars until light and foamy. Add the reduced cider, buttermilk, melted butter, and vanilla. Combine with the dry ingredients gently — don’t overmix. The batter should be soft and slightly sticky.
- Bake or fry.
- For baking: use a mini donut or mini muffin pan and bake at 350°F (175°C) for 10–12 minutes, until the donuts rise and turn lightly golden.
- For frying: drop small spoonfuls of dough into hot oil at 350°F (175°C) and fry for 1–2 minutes on each side until golden brown.
- For baking: use a mini donut or mini muffin pan and bake at 350°F (175°C) for 10–12 minutes, until the donuts rise and turn lightly golden.
If baking, the Wilton Mini Donut Pan works perfectly — the donuts come out evenly shaped and don’t stick.
- Make the sugar coating. Mix sugar and cinnamon in a bowl. While the donuts are still warm, roll them first in melted butter, then in the cinnamon sugar mix.
Serve Apple Cider Donut Holes in paper cones or a bowl lined with parchment paper. For a cozy “fairground” vibe, place a pitcher of hot apple cider nearby and let guests help themselves while the donuts are still warm.
Sometimes I thread them onto wooden skewers, alternating with apple slices — it looks fun and festive, especially on a kids’ table.
9. Chocolate Dipped Cranberries
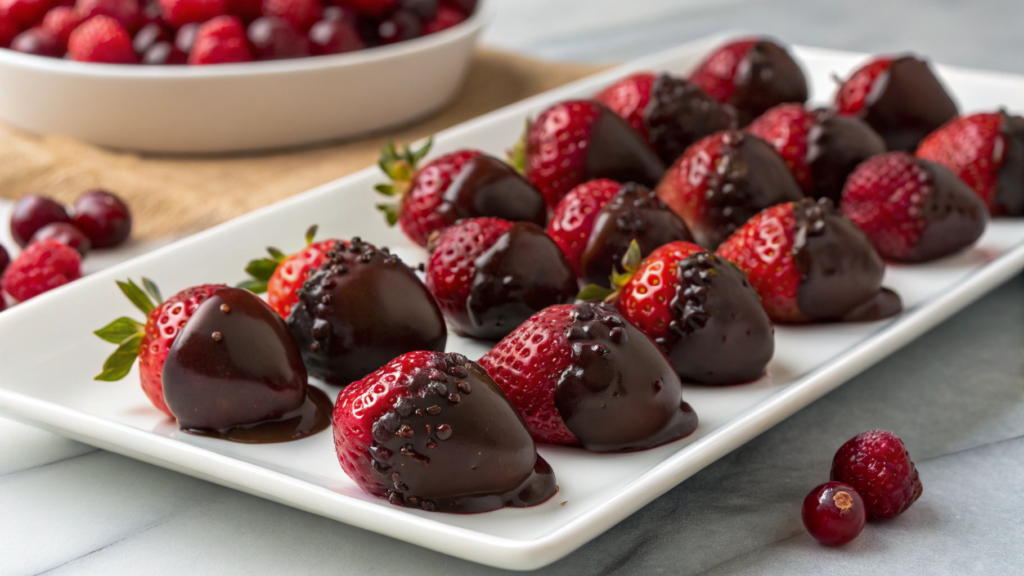
Chocolate Dipped Cranberries are perfect when you want to add something light, refreshing, yet elegant.
Cranberries coated in chocolate strike that perfect balance between tart and sweet, fresh and warm. The crisp chocolate shell hides a burst of berry flavor — a little unexpected, but totally memorable. And yes, they’re incredibly easy to make.
What you’ll need:
- 2 cups fresh cranberries (200 g)
- 8 oz dark or milk chocolate (225 g)
- 1 tablespoon coconut oil (for shine and smooth texture)
- Optional: white chocolate for drizzling or powdered sugar for dusting
How to make it:
- Prepare the berries. Rinse the cranberries and dry them thoroughly — this step is crucial for the chocolate to stick properly. If the berries are wet, the coating won’t adhere.
- Melt the chocolate. Using a double boiler, melt the chocolate with coconut oil, stirring constantly. The oil adds gloss and helps the chocolate harden with a smooth finish.
- Dip the cranberries. Add a handful of cranberries to the melted chocolate and stir gently until each one is evenly coated. Place them on a parchment-lined baking sheet, keeping the berries from touching each other.
- Decorate (optional). Before the chocolate sets, drizzle with white chocolate for a marble effect or sprinkle lightly with powdered sugar for a “frosted” look.
- Chill. Refrigerate for 20–30 minutes, until the chocolate hardens.
The most beautiful way to serve them is in small glass bowls or clear dessert cups — the contrast of red berries against dark chocolate looks festive and elegant.
You can also arrange them in mini candy cups and place them on the table as edible decor.
If preparing in advance, store them in an airtight container in the fridge for up to three days — they’ll keep their shine and freshness perfectly.
10. Sweet Potato Pie Bars

Sweet Potato Pie Bars are soft, aromatic, and slightly caramelized — like a classic pie, but without the hassle of rolling out dough. They cut neatly into squares, look charming, and taste like something from a top-notch bakery.
After experimenting with leftover roasted sweet potatoes, I ended up with something everyone now calls “fall brownies without chocolate.” And honestly, I agree.
What you’ll need:
The crust:
- 1 ½ cups crushed graham crackers (150 g)
- ¼ cup melted butter (60 ml)
- 2 tablespoons sugar (25 g)
The filling:
- 2 cups mashed sweet potatoes (about 450 g)
- ¾ cup cane sugar (150 g)
- ½ cup heavy cream (120 ml)
- 2 large eggs
- 2 tablespoons melted butter (30 g)
- 1 teaspoon vanilla extract
- 1 teaspoon cinnamon
- ¼ teaspoon nutmeg
- A pinch of salt
The topping:
- A handful of chopped pecans
- 1 tablespoon brown sugar
- 1 tablespoon butter (for light caramelization)
How to make it:
- Make the crust. Preheat the oven to 350°F (175°C). Mix the cracker crumbs, sugar, and melted butter until the texture feels like wet sand. Press firmly into the bottom of an 8×8-inch (20×20 cm) baking pan lined with parchment paper. Bake for 8–10 minutes to set the base.
- Prepare the filling. In a bowl, combine mashed sweet potatoes, sugar, eggs, cream, melted butter, vanilla, and spices. Whisk until smooth. The mixture should be silky, slightly thick, and smell like vanilla latte with spice.
- Bake. Pour the filling over the crust and smooth it out with a spatula. Sprinkle with pecans mixed with brown sugar and butter. Bake for 35–40 minutes, until the center is set but still slightly soft.
- Cool. Let it cool completely in the pan, then refrigerate for at least 2 hours. This step is key — chilling helps the bars firm up and makes them easier to slice cleanly.
Cut into 2×2-inch squares and serve on a wooden board — the amber color and nutty topping look stunning. Add a dollop of whipped cream or drizzle a bit of maple syrup on top for extra shine and flavor depth.
If you’re hosting a big dinner, place the platter next to coffee or cider — these bars pair beautifully with both.
The Magic of Holiday Desserts
Holiday desserts aren’t just food — they’re a reason to linger at the table a little longer. That’s the moment when conversations soften, laughter gets louder, and someone inevitably says, “You have to send me this recipe!”
That’s exactly why I love these simple, homemade sweets. They’re not about showy complexity — they’re about flavor, scent, and warmth that stays in your memory.
Maybe one of these recipes will become your new family tradition — the one everyone will remember years from now.Which of these desserts will you try first? Or maybe you already have a favorite that makes your holiday complete?
Share it in the comments — I read every single one.