
A small plot is not a death sentence. It’s a challenge.
And if you’ve ever looked at your tiny backyard and thought, “Well, maybe the cats can just walk here…” – know this: in this small space you can grow food that will actually feed you.
We started with one and a half beds and an old olive tub. And now we manage to collect full-fledged harvests on a plot that you can walk around in three minutes. All thanks to the very tricks that I will tell you about in this article.
Here are 10 of the most effective, simple and inexpensive ways to get the most out of a miniature garden. We came up with some ourselves, spied some from urban farmers, and some came after a couple of failures…
I will try to tell you how to grow a big result even on a small plot.
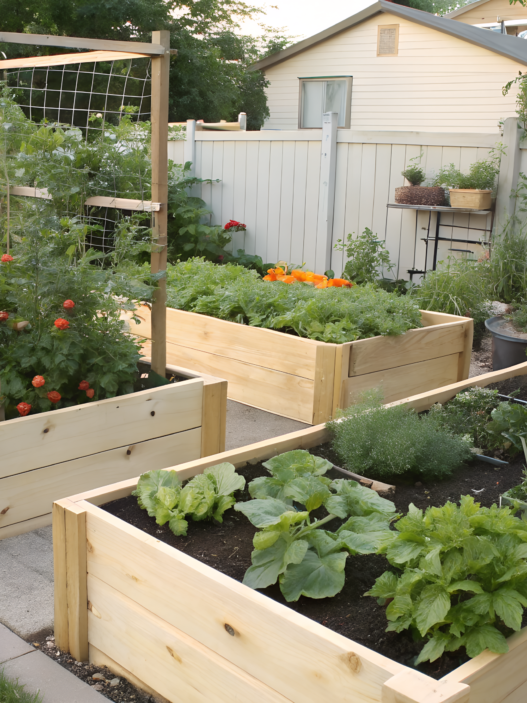
1. How to Build a No-Dig Raised Bed for Vegetables – Cheap & Easy!

Creating a raised bed without digging is not only simple and economical, but also improves its structure and microbiome. This method is especially suitable for small plots, maximizing the use of space.
Raised beds also allow for better drainage of excess water, preventing moisture stagnation.
Materials that will be needed:
- Cardboard or newspapers. To suppress weeds and create a barrier between the old soil and the new layer of compost.
- Compost or over-ripened manure. Provides nutrients for plants.
- Straw or hay. For mulching and moisture retention.
- Wooden boards, bricks or stones. To create the sides of the bed (optional)
Step-by-step instructions for creating a raised bed without digging:
- Site Selection. Determine a site with good lighting, receiving at least 6-8 hours of sunlight per day.
- Site Preparation. Mow the grass in the chosen location, leaving the clippings in place for additional fertilizer.
- Laying cardboard or newspapers. Cover the entire area of the future bed with layers of cardboard or newspapers, overlapping the edges by 15-20 cm to prevent weeds from germinating. Moisten this layer with water.
- Adding compost. Apply a 10-15 cm layer of compost or digested manure on top of the cardboard. This will provide a nutritious environment for the plants.
- Mulching. Cover the compost with a 5-10 cm layer of straw or hay. This will help retain moisture and prevent weed growth.
- Creating borders (optional). If you want the bed to have clear boundaries, install wooden boards, bricks or stones around the perimeter.
- Planting the plants. Make small holes in the mulch layer, add some compost, and plant seeds or seedlings.
When Lindy and I first decided to try the method of raised beds without digging, to be honest, we were a little skeptical. But the results have exceeded all expectations. Our tomatoes and zucchini grew incredibly healthy, and the number of weeds was significantly reduced. Now this method is one of the most preferred on the plot!
For the convenience of creating raised beds without digging, you can use ready-made frames such as the Keter Splendor Raised Garden Bed. They are easy to assemble, durable and have a built-in self-watering system, which makes caring for plants much easier.
2. Turn Pallets into a Productive Vertical Vegetable Garden in One Afternoon!

A vertical garden project from a wooden pallet can be completed in just one day using a minimal set of tools and often free materials. And it looks not like a temporary craft, but like a real edible wall.
We decided to make a vertical garden bed from a pallet in 2021, when we no longer knew where to stick another pot of salad. We ran out of space, but we wanted more and more greenery to tear by hand, wash and immediately on a sandwich!
A neighbor gave us a couple of old pallets, and that same day we assembled a vertical garden bed. By evening, basil, spinach and some strawberries were already growing on the wall behind the chicken coop. And it looked amazing.
What you will need
- 1 wooden pallet (only with the HT marking – it means it is heat-treated, without chemicals)
- Geotextile or thick fabric (even old burlap will do)
- Stapler and staples
- Soil mix (homemade or ready-made will do – more on that below)
- Seedlings or seeds
- Screws, ties or wire (for fastening)
- Optional: paint or stain
If you want a ready-made solution, then here is a great option: COZU Vertical Garden Planter – it already has shelves and drainage, ideal for a balcony or patio.
Step-by-step instructions for creating a vertical garden from a pallet:
1. Choose a pallet.
Look for a pallet with the HT marking – this means that it is safe for growing food. Without marking – don’t risk it. There is no place for chemicals in a food garden. The best places to look for them are DIY markets, garden centers, and grocery stores. They are often given away for free.
2. Secure the fabric to the back and bottom.
Place the tray face down. Stretch the fabric along the back, sides, and bottom to create “pockets” for the soil. Staple the fabric in place, using a lot of staples. This will keep the soil in.
3. Fill the tray with soil.
Place the tray face up. Carefully pour the mixture into each “slot” between the boards. Tamp it down lightly so that the soil does not settle after watering.
Here is our basic soil recipe: 1 part compost, 1 part coco coir or peat, 1 part perlite or coarse sand.
4. Plant seedlings or seeds.
The best crops for vertical trays: lettuce and spinach, herbs (basil, thyme, dill), strawberries, nasturtium and calendula (both beautiful and edible), violas and alyssum – for bees and coziness.
I do not recommend planting root vegetables – carrots and radishes will be too crowded.
5. Raise and secure the tray.
Raise the tray to a vertical position and securely fasten it to the wall, fence or wooden support. We use construction screws, metal corners or plastic ties.
Important! Make sure the structure is stable. The wind can shake it!
Mistakes we made (and you can avoid repeating). When we made the first vertical bed, we rushed a little – we put it vertically right after filling it with soil. After a couple of days, everything slid down, and our salad looked like the Leaning Tower of Pisa.
Bottom line. After filling the fields, put the tray in, let the soil settle, wait a day — and only then lift it up.
| Plant Type | Best Picks |
| Leafy Greens | Lettuce, spinach, kale |
| Herbs | Basil, parsley, thyme |
| Edible Flowers | Nasturtium, calendula |
| Small Fruits | Strawberries |
| Pollinator Plants | Alyssum, violas |
A study in Renewable Agriculture and Food Systems found that vertical gardens increase yield per square meter, reduce insect damage, and reduce water consumption — all due to better ventilation and lighting. They also support urban biodiversity, which is especially important for pollinators.
3. Build a Self-Watering DIY Vegetable Garden – Save Time & Effort!

If you have ever had a vegetable garden in your life, then you definitely know this feeling: the day was hot, you did not have time to water, and the next evening … the leaves hung like rags. The soil cracked. The tomatoes look at you reproachfully. And you are like: oh … again!
Well, you get it..
In the end, we went the smart way: we built a self-watering bed. And not just for the sake of an experiment, but to really make our lives easier. And this was one of the smartest decisions in recent years.
Why self-watering isn’t just “cool” – it’s a must (especially if you’ve got a busy life)
- Watering is uniform and stable – the roots do not dry out and do not “drown”.
- You water once a week, not every evening.
- The harvest is richer, especially for tomatoes, peppers and salads.
- The risk of fungi and rot is reduced – because the leaves remain dry.
- And in general: less running around, more pleasure from the garden.
What you will need
- Raised bed frame (wood, metal or ready-made plastic)
- Dense construction film or pond film (to create a reservoir)
- Perforated drainage pipe
- PVC pipe for filling with water (diameter 5-6 cm, length – to the top of the bed)
- Geotextile (landscape fabric)
- Planting mixture (recipe below)
- Required: drainage hole to protect against overflow
- Optional: overflow hole, water level indicator
How to assemble a self-watering bed – step by step:
1. Line the bottom of the bed with film.
This will be the water tank. The film should go onto the sides by about 10 cm. It is important that it is airtight and without holes.
- Be sure to make a drainage hole – drill a small hole 2-3 cm above the level of the pipes. This is an overflow, it will save you from over-moistening if you accidentally pour too much water.
2. Lay out the perforated pipe.
This is the future “reservoir”. I lay it in a snake along the bottom – this way there will be more moisture, and it will rise evenly upwards.
3. Install a pipe for filling with water.
One end goes into the tank, the other sticks up above the soil level. You will add water through it. You can insert a plastic tube with a float into the pipe – and you will always see how much moisture is in the tank.
4. Cover everything with geotextile.
It is like a filter: it will not allow the soil to fall into the pipes, but will allow moisture to pass upwards. Be sure to overlap the fabric so that there are no gaps.
5. Fill the bed with soil.
I use my favorite mixture:
- 1 part compost
- 1 part coconut substrate or peat
- 1 part perlite or coarse sand
If you want a ready-made mixture, try FoxFarm Ocean Forest – it is nutritious, loose and holds moisture well.
6. Plant the plants and water from above.
The first time, always water from above – this starts the capillary effect, and the moisture begins to “pull” up from the reservoir. After this, you can only water through a pipe.
In my experience, self-watering is especially liked by – tomatoes, leafy greens, basil, parsley and dill, peppers and eggplants, cucumbers and bush beans.
But radishes, carrots and beets are not the best choice. They need more control over moisture so that the root vegetables do not crack.
The system works due to capillary rise of water. That is, water “pulls” up from the bottom layer, passes through the fabric and moistens the soil from below.
A study in ScienceDirect showed that self-watering beds save up to 50% of water and reduce evaporation from the soil surface.
And also – fewer fungal diseases, because the leaves do not get wet every evening.
Tips. Make a hole for overflow – about 2 cm from the bottom, so that the water does not spill over higher and check the water level once a week. Do not plant too deep – leave 5 cm to the edge of the bed so that water does not spill out when watering.
4. The Best Soil Mix for DIY Raised Vegetable Beds – Grow Bigger Crops!

When it comes to gardening, especially on a small plot, soil is everything. Seriously. Not the structure, not the weather, not expensive seeds. It’s all about what you plant in.
The first time we took some “garden soil” from bags, covered it and waited for a miracle. As a result: tomatoes slowed down, basil didn’t smell, and spinach immediately went into bolting. It was a shame.
The next year we approached this issue with all seriousness. And the harvest was… wow. We didn’t just have salad every day – we shared it with neighbors, froze it, and it never ended. All thanks to the right, living, breathing mixture.
Why can’t you just take soil from the garden?
Because regular garden soil often has:
- too much clay or sand, which means it’s either a swamp or a desert;
- poor drainage – the roots suffocate;
- no organic matter – the plants literally have nothing to eat;
- low levels of beneficial microorganisms.
Raised beds require a special approach.
A good soil mixture should be loose and light so that the roots can breathe. It should retain moisture, be rich in organic matter so that the plants get nutrition not only from fertilizers. And it should be alive, with microflora and worms (if you’re lucky!)
Our tried and tested recipe for soil for raised beds:
Mix in equal parts (by eye, in buckets or a wheelbarrow – whatever is convenient):
- 1 part compost. This is the basis of nutrition. Mature homemade compost or store-bought compost will do (look for dark, crumbly, with an earthy smell).
- If the compost is not perfect, you can add a little rotted manure or vermicompost to strengthen it.
- 1 part coconut substrate or peat. It is needed to retain moisture and lightness. Coconut is more convenient – it is neutral in pH and renewable, but peat will also work, especially if you already have some in stock.
- 1 part perlite or coarse river sand. This is a component for drainage and air. It helps the soil “breathe” and not cake. If there is no perlite, take sifted sand.
- Additionally. For each square meter of the bed, add a handful of vermicompost. This is not a base, but as a biological additive – it launches life into
Important! Do not compact the mixture too much. It should be fluffy, like fresh bread.
Renew the top layer every season. We just add 5 cm of fresh compost on top. Add mulch. This will protect the microflora, and the moisture will not evaporate. Straw or hay works best.
So if you want your garden to feed you for real, and not just for show? Start with the soil. Make it a full-fledged living environment. And then even one box on the balcony will give you greens that you can’t buy in any store.
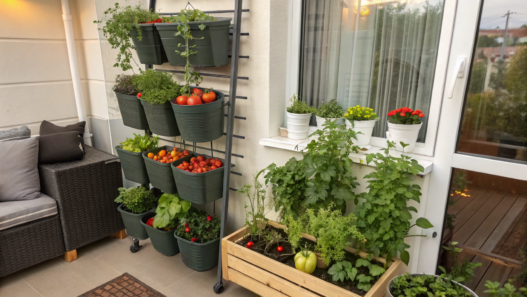
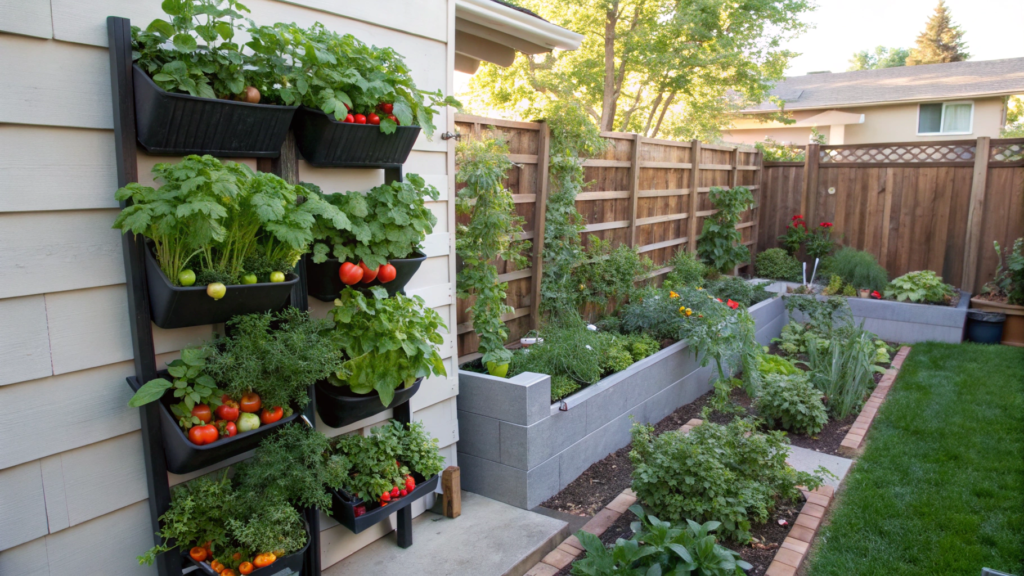
5. How to Maximize Your Harvest in a Small Garden – Vertical Growing Secrets!
If you have a tiny yard, a flower bed near the porch or just a couple of boxes on the balcony, this is not a death sentence for the harvest. On the contrary. Small spaces often give the best results if you approach them wisely.
And the main secret is vertical growing. This is when you do not ask for more space, but simply use what you already have, but in a new way.
Why vertical growing?
Saves space, leaving room for walkways and other crops
Improves lighting – plants shade each other less
Reduces the risk of fungus – leaves are drier, air circulation is better
Makes it easier to care for – no need to crawl on your knees among the tops
Increases yield by 2-3 times in the same area.
Method No 1. Make a vertical trellis with a well-thought-out planting system
The easiest thing is to tie up something that already grows upward. Cucumbers, beans, tomatoes, peas, they can all grow upward.
And if you also plant something low-growing at the base of the trellis, then you get a double harvest on the same strip of the garden bed.
We do this every year:
- Install a simple trellis along the garden bed. Reinforcement, mesh, ropes between two stakes will do.
Or a ready-made garden arch trellis on Amazon – it looks beautiful and is durable!
- Plant cucumbers or beans at the base of the trellis – they will curl upwards
- And between them, at the very ground, plant basil, lettuce, radishes or Swiss chard
- You get a “two-story bed” – light, moisture and nutrition are shared, but do not compete
We call this “vertical neighborhood” – it works both in boxes and in regular beds.
Method No 2. Use multi-tiered containers and hanging planters
If there is very little space – for example, only a balcony or porch – vertical structures based on containers will save the day.
We once made a vertical “garden” from three old plastic boxes and wood scraps. The result: greenery from July to October. Minimum space, maximum greenery.
Options:
- Multi-tiered cascade pots
Like Mr. Stacky 5-Tier Vertical Planter — it takes up less than 1 square meter, but holds up to 20 plants!
- Hanging planters on a wall or fence
- Vertical racks with shelves (you can even use an old rack)
The best crop for such containers: lettuces, spinach, parsley, mint, strawberries, basil, arugula, chard. And by the way, all this is a meter from the kitchen!
A study by the International Journal of Agricultural Technology shows that vertical beds increase yields by 30-60% per square meter compared to traditional methods.
And vertical growing also improves access to pollinators, which increases fruit set in tomatoes and strawberries.
6. Cheap & Easy DIY Compost Bin – Make Your Own Plant Food!

If you’re not composting yet, you’re missing out. And I’m not talking about saving the planet (although that’s true too!), I’m talking about the fact that you’re literally throwing away fertilizer. Every day. From your kitchen.
For us, it all started with a couple of carrot peels. Then we added eggshells, grass clippings, coffee grounds… and suddenly it turned out that our plants were growing twice as well. And we stopped buying store-bought fertilizer altogether.
And, lo and behold, you don’t need to buy expensive compost bins. Below, I’ll show you two options – both cheap, both tested, both working.
Method No 1. Composter from a plastic trash can
This was our first composter. We bought a regular trash can with a lid – and turned it into a mini-recycling station. It still works!
What you will need:
- A plastic trash can with a tight-fitting lid (60-100 l capacity)
- A drill
- Bricks or wooden blocks (to raise the can off the ground)
How to make it:
- Drill holes on the sides, bottom and lid – this will provide ventilation and drainage of excess moisture.
- Place the can on the bricks – so that air can pass through from below.
- Start loading waste: kitchen (peelings, eggshells, tea, coffee), garden (grass, leaves).
- Close the lid and periodically stir the contents (you can simply turn the can on its side and roll it around the area – it works!).
In 2-3 months – ready compost, rich, with the smell of forest soil. The can is full, and there is much less garbage in the house.
Method No 2. Stationary composter made from wooden pallets
If you have a little more space and want something brutal and solid, pallets are just what you need.
We built such a composter in an hour, from three pallets and an old door. It has been working for 3 years already – nothing crumbles, and fits into the style of the site.
What you will need:
- 3-4 wooden pallets
- Screws, self-tapping screws or wire
- Gloves and 20 minutes of time
How to make:
- Install three pallets in the letter “U” – these will be the walls. You can screw them to each other or tie them with wire.
- The fourth pallet – if desired – will be a door or a front panel.
- Place the structure directly on the ground so that worms and bacteria can “come visit”.
- Load in layers: green waste (grass, food scraps) + brown (leaves, paper, sawdust). Cover the top with burlap or a piece of film to retain moisture.
Compost “smells bad” is the most common myth, and it sounds logical… until you try it yourself. Because if the compost has a bad smell, it means there’s something wrong with it. And if everything is according to the rules, the smell will be earthy, like after rain in the forest. No joke.
When the smell appears and what to do:
- Too many wet residues (fruits, vegetables, grass) → add dry materials: leaves, cardboard, straw, sawdust, paper.
- No ventilation → Compost must “breathe”. Therefore, holes in the tank or cracks in the pallets are not a minus, but a plus. They prevent everything from turning into a rotten mess.
- Compost is damp, like a swamp → mix and dry
A study published in the Waste Management Journal showed that homemade compost enriches the soil with organic matter and beneficial microorganisms and can increase crop yields by 25-40%.
My favorite moment is when you open the bin lid and there is warm, crumbly, dark coffee-colored soil. A few months ago, it was cores and leaves.
Now it’s food for plants, and you made it with your own hands. Literally, from garbage to gold.
DIY Trellis Hacks for Vegetables – Stop Wasting Space in Your Garden!

Every year we promised ourselves that we would plant everything neatly, compactly, and not spread the tomatoes all over the bed.” And every year by midsummer everything looked like a green dump: the tomatoes lay on the basil, the cucumbers crawled into the flower bed, and the beans went into the raspberry bushes.
Sound familiar?.. Then it’s definitely time for you to try trellises and vertical supports. And not only for tomatoes, even pumpkins can be sent up. Below are two simple, cheap and really working methods that we use every season.
Method No 1. A trellis made of reinforcement and mesh – for everything that creeps and climbs
Cucumbers, beans, peas, zucchini and even pumpkin – all these guys love to climb.
And if you give them a strong support for this, they will not only stop spreading the entire plot, but will also give more harvest, because they will receive more light and air.
How we do it we:
- Take two pieces of reinforcement or metal pins and drive them into the edges of the bed
- Between them, stretch a net or thick twine in several layers
- Tie up the plants as they grow or just let them cling themselves
Plus. You can plant low-growing crops along the base – lettuce, chard, radish. And get a double harvest on one strip!
Method No 2. A vertical trellis made of branches – cheap, beautiful, environmentally friendly
When you want something natural that doesn’t stand out from the general “garden vibe“, we make trellises from ordinary branches collected after pruning trees.
Here’s how:
- Choose 4-6 strong, straight branches about a meter long
- Put two of them vertically into the ground – these will be the posts
- Between them, across, tie short branches at different heights – you get a ladder-shaped lattice, which is convenient for beans, peas or flowers to climb.
- Tie everything with twine or wire
These lattices not only work, but also turn the bed into an art object.
It looks especially beautiful when several crops climb at once, for example, peas and flowering nasturtium.
Last season, we tied a Butternut pumpkin to an arch made of reinforcement.
Yes, yes – a pumpkin. Everyone said that it would fall, break off, not hold up…
But it grew, hung, and looked like and looked great. One fruit weighed almost 3 kg and hung on the trellis until the harvest.
Now we have a rule: if we can tie it up, we will!
A study published in Agricultural Water Management showed that growing on trellises can reduce moisture evaporation from the soil by 30–40%, and also increase the yield of cucumbers and beans by up to 50% due to better access to light.
Little space – lots of imagination!
So you’ve reached the end. But, frankly, there is no “end” here. Because a vegetable garden is a story that is rewritten every season.
You can try, make mistakes, redo it, and once again enjoy the greenery that has sprouted in the box where boots used to stand.
You can add one life hack every year, and in a couple of years you will no longer believe that you once thought: “I have too little space for a vegetable garden.”
And if you are already using any of these ideas – write in the comments!
I love to hear how others have everything arranged, what worked and what did not go according to plan. We, small-land gardeners, must stick together!