Learning how to start a home compost can feel overwhelming, but it doesn’t have to be! Follow these steps to set up your compost pile and start producing high quality, nutrient-dense compost in no time!
Composting is an amazing process where millions of tiny microorganism accelerate the decay of organic material to produce a nutrient-rich humus product that can be used to build healthy, living soils! Compost is often referred to as ‘black gold” because it can be so valuable for the garden!
The most beautiful thing about compost is that it’s entirely made from waste products and can be done by every gardener and home owner!
Many people become overwhelmed by the perceived complexity of composting. But, in the end, it’s just decaying matter! Which, luckily for us gardeners, decay is a normal process that happens naturally! So you can help nature by accelerating the decay through regulated hot composting systems… or you can just take advantage of what nature is already doing through cold compost systems!

Benefits of Composting
- Reduces household and yard waste, along with the fuel that would be used to haul it to a municipal landfill
- Can be used to provide a natural mulch to help suppress weeds and maintain soil moisture
- Improves the tilth of soil and improves soils that are too heavy in sand or clay
- Increases the water-retention capabilities of soil
- Can help prevent erosion, run-off and topsoil loss due to wind and water
- Provides nutrients for microorganisms. Feeding the soil microorganisms is the key to healthy living soils that in turn provide the necessary nutrients for plant life.
- Reduces the need for chemical fertilizers

How to Start Composting – Step by Step:
Step 1: Decide on your composting style!
The first step to creating your own healthy home compost system is to decide on your composting style! It’s important to match your compost system to your life. For instance, if you live on a large piece of land with a huge garden and livestock, your compost system will look dramatically different from someone who lives in a townhouse with a small backyard and small kitchen garden.
How much compost do you need?
Begin by thinking about your garden. How much compost do you need to make for your garden? If you are actively building and expanding your garden beds, or if you have a very large garden, you will need quite a bit of compost that is produced on a regular basis.

How much waste material do you have for composting?
Next, consider your property. Do you have a lot of waste that is produced from your property? For example, do you have big trees that drop tons of leaves in the Fall? Or do you have livestock that produce a lot of waste? If not, are there neighbors that can share their organic material or other resources that you can take advantage of?
Finally, think about your home and lifestyle. How much waste do you produce on a regular basis that can be composted? Are there life changes that you can make in order to create more environmentally-friendly waste that can be easily composted?
Decide on your style:
Once you have considered these factors, you can decide on what style of composting you want to do (hot or cold) and how much compost you want to produce based on how many inputs you have available and how much finished compost you need for your garden.
Step 2: Choose a bin or compost system:
Once you have decided how you want to compost (hot or cold) and how much compost you want to produce, you can decide on the best compost bin system for you! Some great options are a basic pile, a 3-bin system, a tumbler or a continuous composter.
3 Bin Composter
3-bin systems are a very common system that is easy to set up. These systems utilize 3 bins that sit directly next to each other. As the compost is aged, it is moved from one bin to the next as it is progressively decomposed.
The bins are usually 3-sided and sometimes have a door or front panel that opens. Some systems are designed with a “roof” to provide shade and/or protection from wildlife/rodents depending on the area. The bins are generally sized to accommodate a 4’x4’x4′ pile. They are most often made from a combination of wood and wire.

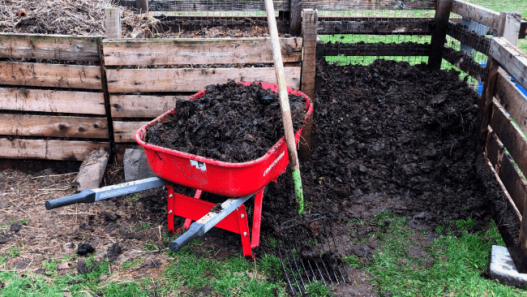
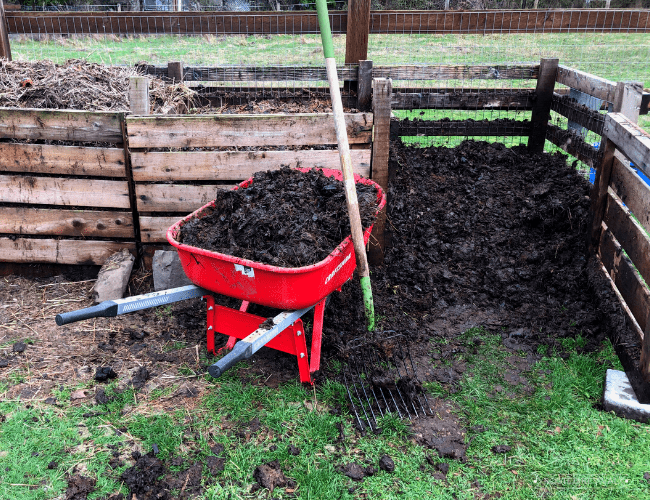
Piles
The easiest compost system is just a pile! Yes, you can actually just make piles of your compost without using any formal bin or container. When using a pile system without a container, it’s most ideal to have space for multiple piles in a consecutive row or line. If piles are arranged in a line, it can make turning your compost easier because you can just rake the compost into the new spot without having to lift it out of a bin like you would with a 3-bin system. If you are placing the piles in an area where there are lots of weeds or grass, you may want to put down a weed barrier such as cardboard before building your pile (especially if cold composting).

Tumblers
Compost tumblers are a fully-sealed round container which holds the compost materials and allow for easy turning. Most are suspended on legs, however some are designed to be rolled on the ground. Because the container is sealed, it helps heat the materials and maintain proper moisture levels. They can turn out finished compost in just a few weeks if the conditions are correct. Tumblers can be homemade or pre-manufactured.

Continuous Composters:
Continuous composters and gravity fed composters work on the same principle. Waste scraps are deposited in the top of the bin in the correct ratio, along with any necessary moisture. Over time, the scraps will break down and travel down the bin as you add new materials to the top. At the bottom of bin there is a door or drawer where you can remove finished compost. Some of these bin styles have sliding doors to keep the different layers of decomposing compost separate.

Step 3: Decide where to place your compost
Keep it convenient:
Whichever system you decide on, it’s important to choose good placement for your compost area. Keep it in a convenient place where you can easily visit it on a daily basis. I recommend placing it an equal distance from the kitchen, the garden, and the barn (if you have one) so that you can easily access it from all those spaces. Make sure that you can easily maneuver a cart or wheelbarrow in and out of the space where the compost will be.
Consider aesthetics:
Consider the aesthetics of where you place your compost system. While compost really shouldn’t smell when done properly, you still may want to put it in a place that isn’t directly adjacent to a frequented outdoor space. Or, you may want to surround it with some pretty plantings to help disguise it! You can even grow plants like comfrey and borage which can be pruned frequently and added to the pile!

Water access:
Finally, choose a location for your compost system that has easy access to water. You many need to add moisture to your pile on a regular basis, so placing it within close proximity to a hose or rain barrel is a great idea!
Step 3: Add Organic Matter
Once you have built or installed your compost system, it’s time to start composting! Use a proper mixture of high carbon materials and high nitrogen materials to get the best compost possible! Here’s what you can add to your pile:
As a general rule of thumb, start by adding 1 part green material to 3 parts brown materials.
“Greens” = High Nitrogen Materials
- Fresh grass clippings
- Kitchen vegetable scraps
- Fresh, healthy garden clippings
- Animal manures (not from domestic cats or dogs)
- Used coffee grounds
- Egg shells
- Green mulches such as clover
- Fresh tree trimmings
- Feathers from chickens/domestic birds
- Hair clippings from humans and pets
- Weeds that have not set seed and do not spread by root

“Browns” = High Carbon Materials
- Dried grass clippings
- Dried leaves
- Shredded newspaper or paper
- Shredded cardboard
- Hay or straw (make sure it isn’t sprayed)
- Used animal bedding
- Wood chips, shavings or sawdust
- Bread, chips, crackers, rice, pasta
- Dryer lint from natural materials
- Dust, dirt and pet hair from vacuum

What Not to Compost:
- Items made out of non-natural or synthetic materials
- Cardboard or paper that has a shiny or wax coating
- Plastics that are compostable at municipal facilities only (most home composts don’t get hot enough to break these down)
- Pet waste from dogs and cats
- Meats, oils and dairy items (not ideal for beginner composters but can be composted in a consistently hot and well-regulated pile)
- Garden waste from diseased or pest-ridden plants

Use lasagna layers to add materials
An easy way to do this is through the “lasagna” layer method. Using this method, you simply alternate layers of materials: add a brown layer followed by a green layer. Your brown layer should be about three times bigger than your green layer to achieve a good ratio of browns to greens.
Begin by putting down a thick layer of bulky brown material, such as small sticks and twigs, straw (non-sprayed) or dried leaves. This will help increase the airflow at the base of the pile. Next, add a layer of green materials. Then, follow that with another layer of brown material. Keep alternating as ou add layers until your pile is about 3ftx3ftx3ft.
Or, if you don’t have enough materials to make layers, you can simply mix together both the green and brown materials (still paying close attention to the ratio) and then add them to the pile.
Step 4: Add Moisture
Moisture is an important part of the composting magic formula! Your pile should always be moist, but not drenched! When you pick up your compost material, it should feel like the moisture level of a damp sponge that has been wrung out. If you squeeze the materials, it should feel moist but you shouldn’t be able to squeeze out a lot of water.

Take some time to get accustomed to how fast your pile dries out and how often you have to water it. This will probably change during different times of the year.
If your pile is too dry, water it with a hose, sprinkler or bucket. Rainwater is a great addition to the pile if you have any that has been caught and saved through a catchment system.You may need to turn the pile in order to evenly dampen all the layers and ensure there are no dry patches.
If your pile is too wet, try adding some more brown/dry material and stirring it in. You can also turn the pile to help it dry out and increase airflow.
Step 5: Maintain your Compost Pile
Continue adding organic matter to your compost pile in alternating layers. Moisten the layers as needed to maintain the correct level of moisture

Once the bin is full, or once the pile reaches 3-4 feet high by wide, it’s time to turn it. Stop adding new material at this point and instead add them to a new pile or collect them to add once your first pile is finished.
After the first turn, you should see your compost begin to really heat up as the materials decompose. After a short while, the pile will start cool. Generally, you will want to turn the pile every 4-10 days to maintain a good level of heat. The ideal range for a compost pile is between 120-150oF. You can purchase a probe thermometer if you want to check the temperature more regularly.

Maintenance Tips:
- When you turn your pile, you may want to dampen it if it has dried out in spots.
- You may see a whitish film on your materials. While it may look like mold, this is actually the mycelium fungi that helps break down the materials.
Step 6: Harvest your Compost!
Continue to turn your compost pile until it reaches a level of completion that you are happy with (it will continue to break down, but you can use it sooner). Generally, you will want your finished compost to have a crumbly texture and a dark color. It should smell earthy. You will also want to make sure that it isn’t hot anymore, especially if using it in the garden around plants.
Home compost often contains larger pieces of materials than store-bought compost which is comprised almost entirely of manure. If your compost is finished, but you want a finer material, you can make a compost sifter. You can sift out the smaller materials to use now and put the larger components back into an active pile to continue composting in order to break them down further.
Every batch of compost may take a different amount of time to reach completion depending on the materials that are added to it. Compost may also mature faster or slower depending on the time of year and the temperature. Watch your compost closely and become familiar with how long it generally takes. Feel free to experiment by adding different materials and adjusting the pile as needed to speed or slow the process. Experimentation helps you get familiar with the process and improve it to meet your needs!

Composting Tips:
- Keep a small pail, bucket or container in the kitchen to collect food scraps as you accumulate them. Once the pail is full, you can add them to the pile.
- Break or cut items into small pieces before adding them to the pile. The smaller pieces will break down much faster because they have a larger surface area to be worked by the microorganisms and fungi.
- Always top your green layer with a layer of brown material to reduce the risk of pests such as gnats
- You can inoculate your pile by adding a shovel of fresh living soil to the mix.
- Once your pile is finished, leave a bit of the finished compost behind to give the next batch a jump-start!
- You may want to cover your pile to deter animals and to keep the moisture regulated, especially if you live in a very wet area.
- The ideal size for a compost pile is between 3-4 feet high and wide.

Compost Troubleshooting:
The compost smells
Compost should have an earthy smell, similar to a forest floor. If your pile smells sour or like ammonia, it is probably too high in nitrogen or is too wet. Add dry brown matter to the pile and turn it to fully incorporate the materials.
The pile doesn’t get hot
If your pile isn’t heating, it is probably too high in carbon (“brown”) materials or is too dry. Start by adding some green material (such as fresh grass clippings or garden waste/weeds) and wetting the pile. Turn the pile to make sure it is moist throughout.
Gnats are all over the compost pile
It’s not uncommon for gnats to take up residence in a compost pile and use it as a breeding ground! To deter them, start by making sure your compost isn’t too wet. Let the pile dry slightly to deter them. Turn the pile and make sure any food scraps are completely covered over. You may also need to increase your carbon matter or decrease your nitrogen matter. If your pile was covered, uncover it. If it wasn’t covered, try covering it. The gnat problem should resolve within a week or so after taking these steps.
Rodents are burrowing into the pile
You may need to line the soil layer under your pile with a hardware cloth to deter burrowing rodents. Piles that stay hot will also help deter rodents and other pests that cannot sustain the heat.
Pin this post so you don’t forget it!


I have a lot of chicken/duck/goat manure that quickly fills up my 3 bin system. Do have any tips for composting large amounts of animals manure?