In fall, food needs to be predictable, so you can load the ingredients, go about your day, and get a solid result without burning, drying things out, or constant checking. In this article, I’ve gathered dishes that truly behave well in a slow cooker, don’t fall apart, and easily last for several days in the fridge.
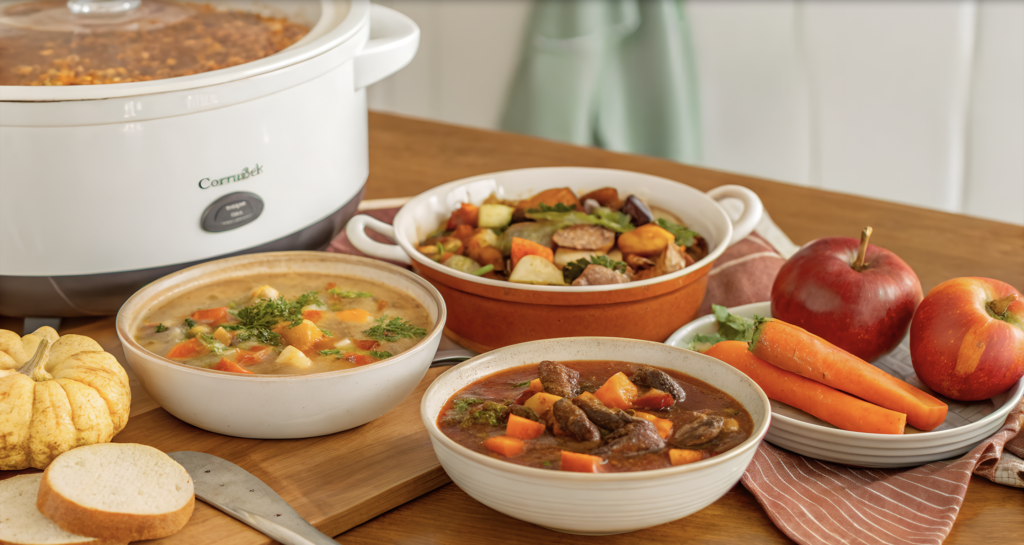
You’ll find meat and vegetable options here, hearty soups, bowl-style meals, and recipes that work well for weekly meal prep. I walk through each option step by step, explain why the ingredients work the way they do, and where it’s better not to simplify things so you don’t ruin the texture or flavor.
All the recipes are tested in a real kitchen, not on paper, and designed to take as little active cooking time as possible.
1. Quinoa and Black Bean Chili
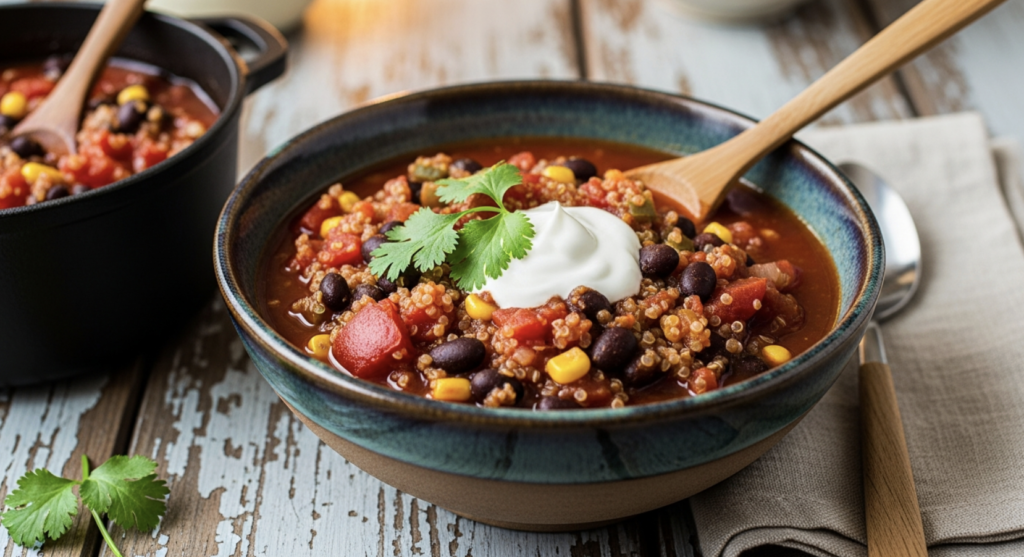
Quinoa and Black Bean Chili is not a “replacement for something,” but a standalone dish that works both as dinner and as a make-ahead meal for a couple of days.
Everything is cooked in a slow cooker, without complicated steps or constant supervision.
Ingredients (serves 6)
Base:
- 1 cup dry quinoa (≈ 170 g)
- 2 cans (15 oz) black beans, rinsed and drained (≈ 850 g)
- 1 large yellow onion, finely chopped
- 3 cloves garlic, finely chopped
- 1 red bell pepper, diced
Liquid and tomatoes:
- 1 can (28 oz) diced tomatoes (≈ 800 g)
- 2 cups vegetable broth (≈ 480 ml)
Spices:
- 2 tbsp chili powder
- 1 tsp ground cumin
- 1 tsp smoked paprika
- 1/2 tsp dried oregano
- 1 tsp salt
- 1/2 tsp black pepper
Additional:
- 1 tbsp olive oil
- juice of half a lime (optional)
How I make it
- Onion and garlic. I heat olive oil in a pan, add the onion, and cook it over medium heat until soft, about 5 minutes. It needs to turn translucent without browning. I add the garlic at the very end and warm it for no more than 30 seconds so it doesn’t turn bitter.
- Adding everything to the slow cooker. I transfer the onion and garlic to the crockpot, then immediately add the rinsed quinoa, beans, bell pepper, tomatoes, and vegetable broth. I mix well so the quinoa doesn’t settle into a dense layer at the bottom.
- Spices. All the spices go in at once. It’s important not to overdo the salt here — the beans and tomatoes already bring their own intensity, so it’s better to adjust seasoning at the end.
- Cooking. I cook it for 6–7 hours on LOW or 3–4 hours on HIGH. During this time, the quinoa fully cooks, absorbs the liquid, and becomes part of the overall structure instead of sitting separately.
- Finish. At the end, I taste, adjust the salt, and, if I want a slightly brighter flavor, add lime juice. Then I let the chili rest in the turned-off slow cooker for 10–15 minutes so the texture evens out.
I serve this chili in a deep bowl, sometimes adding a spoon of Greek yogurt or chopped cilantro on top. If I’m cooking for family, I place a bowl of grated cheese and lime wedges on the table so everyone can build their own version.
The next day, the chili becomes thicker and holds its shape even better, which makes it convenient both as a standalone dish and as a filling for flatbreads or served over rice.
2. Slow Cooker Lemon Herb Chicken
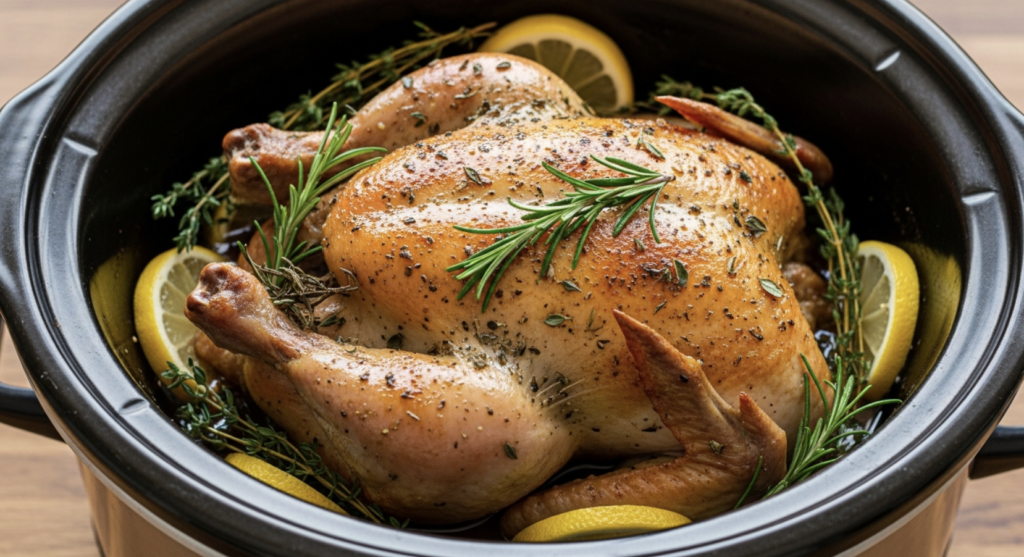
Slow Cooker Lemon Herb Chicken is a basic recipe where the chicken turns out juicy, with a clear lemon and herb flavor, without overloaded spices and without the sweetness that sometimes ruins dishes like this.
This is exactly the case where a slow cooker really does half the work for you.
Ingredients (serves 4–6)
Base:
- 2.5 lbs boneless, skinless chicken thighs or breasts (≈ 1.1 kg)
Marinade:
- 1/3 cup freshly squeezed lemon juice (≈ 80 ml)
- 1/4 cup olive oil (≈ 60 ml)
- 4 cloves garlic, finely chopped
- 1 tbsp dried oregano
- 1 tbsp dried thyme
- 1 tsp dried rosemary
- 1 tsp salt
- 1/2 tsp black pepper
Additional:
- 1 lemon, sliced into rounds
- fresh herbs for serving (optional)
How I make it
- Preparing the chicken. I pat the chicken dry with a paper towel and place it straight into the slow cooker bowl. There’s no need to sear it first — the fat and juices will create the right texture on their own.
- Marinade. In a bowl, I mix the lemon juice, olive oil, garlic, and all the herbs. I stir well so the herbs don’t clump together. I pour the marinade over the chicken and gently turn the pieces with my hands so everything is evenly coated.
- Lemon. I lay the lemon slices on top. I don’t mix them in. They work as an aromatic layer, not as the main source of acidity.
- Cooking. I cook it for 4–5 hours on LOW or 2.5–3 hours on HIGH. If you’re using chicken breast, LOW works better and helps keep it juicy.
- Finish. At the end, I carefully turn the chicken and let it rest for 10 minutes with the slow cooker turned off. During this time, the sauce settles and doesn’t look watery.
Tip. If you see that there’s more sauce than you need, don’t pour it out. I often remove the chicken and simmer the sauce in a small saucepan for 5–7 minutes. It turns into a concentrated sauce that works well for serving or as a base for vegetables.
I serve Slow Cooker Lemon Herb Chicken with roasted potatoes, rice, or a simple vegetable mix. I always use the sauce — either spooned over the chicken or mixed into the side dish. If I have fresh herbs, I add them directly on the plate, not during cooking.
This dish keeps well in the fridge for 3–4 days and reheats without losing its structure.
3. Cauliflower and Chickpea Curry
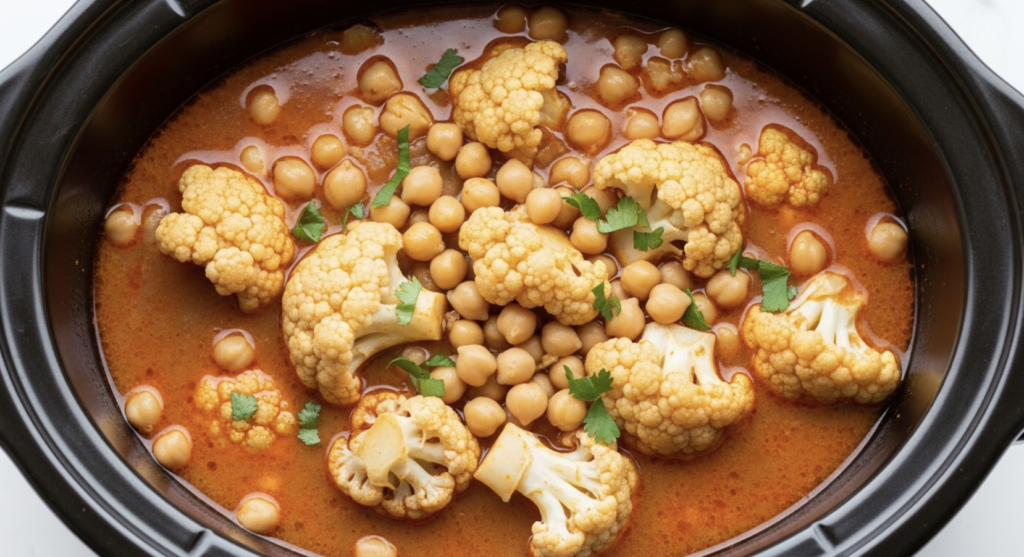
In this recipe, cauliflower provides structure, chickpeas are responsible for density, and the spices bring everything together into a clear, balanced dish that handles long cooking well and doesn’t turn into mush.
I originally adapted this recipe specifically for a slow cooker, because on the stovetop it requires attention, while here everything happens calmly and predictably.
Ingredients (serves 6)
Base:
- 1 large head cauliflower, cut into florets (≈ 1.3–1.5 kg)
- 2 cans (15 oz) chickpeas, rinsed and drained (≈ 850 g)
- 1 large yellow onion, finely chopped
- 4 cloves garlic, finely chopped
- 1 tbsp freshly grated ginger
Liquid and sauce:
- 1 can (14 oz) full-fat coconut milk (≈ 400 ml)
- 1 can (14 oz) diced tomatoes (≈ 400 g)
Spices:
- 2 tbsp curry powder
- 1 tsp ground cumin
- 1 tsp ground coriander
- 1/2 tsp turmeric
- 1 tsp salt
- 1/2 tsp black pepper
Additional:
- 1 tbsp olive oil
- fresh cilantro for serving (optional)
How I make it
- Vegetable prep. I break the cauliflower into medium florets — pieces that are too small will fall apart, while very large ones won’t absorb the sauce properly. I chop the onion finely so it dissolves into the finished dish and doesn’t stand out in separate chunks.
- Aromatic base. I heat olive oil in a pan, add the onion, and cook it until soft. Then I add the garlic and ginger and warm them for about one minute. This step matters: the spices later open up more evenly and don’t taste raw.
- Adding to the slow cooker. I transfer the onion mixture to the crockpot, then add the cauliflower, chickpeas, tomatoes, and coconut milk. I mix gently so the sauce spreads evenly without breaking the florets.
- Spices. I add all the spices at once and gently mix again. It’s better not to overdo the salt here — chickpeas already bring depth, and you can always adjust seasoning at the end.
- Cooking. I cook it for 5–6 hours on LOW or 3–4 hours on HIGH. The cauliflower becomes tender but keeps its shape, and the sauce thickens on its own.
- Finish. About 10–15 minutes before the end, I taste and adjust the salt. If the sauce feels too thick, I add a couple of tablespoons of hot water or broth and gently mix.
If you often cook dishes with coconut milk, pay attention to heat stability. In slow cookers with sharp temperature swings, the sauce can separate. For recipes like this, I use a simple model without extra modes, like the Crock-Pot 7-Quart Manual Slow Cooker, because it holds a steady temperature and doesn’t overheat sauces.
I serve Cauliflower and Chickpea Curry with long-grain rice or quinoa. If I have fresh cilantro, I add it directly to the plate. The next day, this dish becomes thicker, which makes it convenient both as a main meal and as part of a bowl.
4. Turkey Meatballs in Marinara
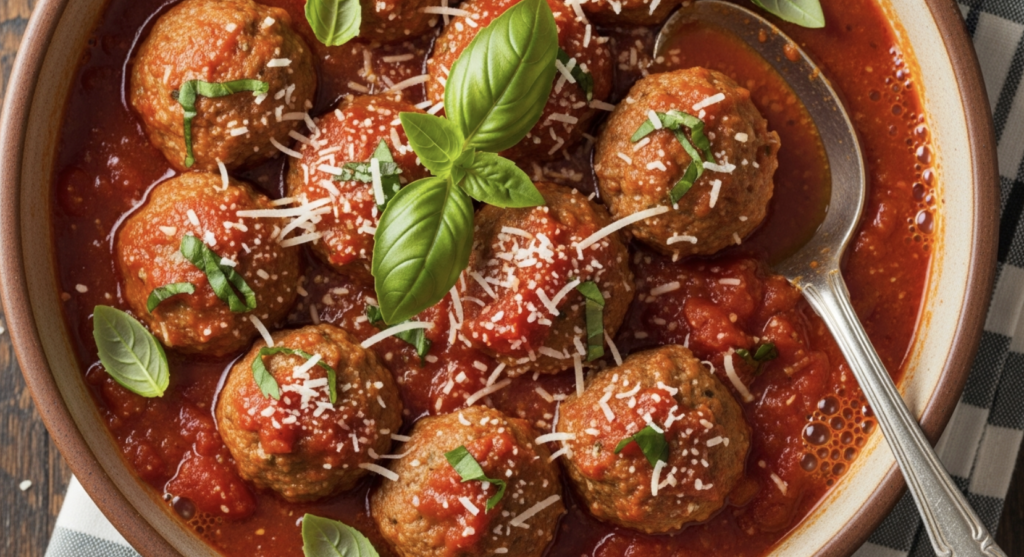
I use this version both for dinner and as a make-ahead option for several days. It handles both scenarios well. Turkey stays juicy, the meatballs keep their shape, and the sauce doesn’t require constant attention.
Ingredients (serves 5–6)
Base:
- 2 lbs ground turkey (≈ 900 g)
- 1/2 cup breadcrumbs (≈ 30 g)
- 1 large egg
- 1/4 cup grated Parmesan (≈ 25 g)
- 3 cloves garlic, finely chopped
- 1 tsp salt
- 1/2 tsp black pepper
Sauce:
- 1 jar (24 oz) marinara sauce (≈ 680 g)
- 1 can (14 oz) crushed tomatoes (≈ 400 g)
- 1 tsp dried basil
- 1 tsp dried oregano
Additional:
- 1 tbsp olive oil
- fresh basil for serving (optional)
How I make it
- Mixing the meat. In a large bowl, I combine the ground turkey, breadcrumbs, egg, Parmesan, garlic, salt, and pepper. I mix everything quickly by hand, without overworking it — if you knead too long, the meatballs turn dense.
- Shaping. I form balls about the size of a walnut. I try to keep them the same size so they cook evenly and don’t fall apart.
- Quick sear. I heat olive oil in a pan and quickly brown the meatballs on all sides until lightly colored. This isn’t for full cooking, but to lock in shape and flavor.
- Sauce. In the slow cooker bowl, I mix the marinara sauce, crushed tomatoes, basil, and oregano. The sauce should be thin enough to cover the meatballs at least halfway.
- Slow cooker. I gently place the meatballs into the sauce, slightly pressing them down with a spoon. I cook for 4–5 hours on LOW or 2.5–3 hours on HIGH. During this time, the turkey cooks through and the sauce thickens.
- Finish. At the end, I taste the sauce and add salt if needed. Then I let the dish rest for 10 minutes with the slow cooker turned off — the meatballs hold their shape better when serving.
Tip. When working with ground turkey, temperature control matters more than it seems. Turkey dries out not because of the slow cooker, but because it’s overcooked “just to be safe.” I solved this by using a digital meat thermometer — I check one meatball near the end of cooking and turn everything off as soon as it reaches a safe internal temperature.
This helps a lot when cooking a large batch and you don’t want to guess.
I serve Turkey Meatballs in Marinara with pasta, polenta, or simply with vegetables. I use the sauce generously — it holds well on the side dish. Leftovers keep in the fridge for up to four days and reheat well without losing texture.
5. Beef and Barley Soup

Beef and Barley Soup — in this recipe, the beef doesn’t shred into fibers, the barley keeps its shape, and the broth turns out thick and stable. No complicated decisions here — everything is straightforward and clear.
Ingredients (serves 6–8)
Base:
- 2 lbs beef chuck, cut into large cubes (≈ 900 g)
- 3/4 cup pearl barley, rinsed (≈ 150 g)
- 1 large yellow onion, finely chopped
- 3 carrots, sliced into rounds (≈ 300 g)
- 3 celery stalks, chopped
- 3 cloves garlic, finely chopped
Liquid:
- 8 cups beef broth (≈ 1.9 L)
Spices:
- 1 tsp salt
- 1/2 tsp black pepper
- 1 tsp dried thyme
- 1 bay leaf
Additional:
- 1 tbsp olive oil
- fresh parsley for serving (optional)
How I make it
- Preparing the meat. I cut the beef into large pieces — anything smaller than 3–4 cm doesn’t work here and will dry out. I pat the meat dry with a paper towel so it doesn’t release excess moisture during searing.
- Quick sear. I heat olive oil in a pan and sear the beef in batches until lightly colored on all sides. I’m not aiming for a crust — the goal is to set the surface and lock in flavor.
- Vegetable base. In the same pan, I quickly soften the onion, then add the garlic and cook for about 30 seconds more. This removes any raw edge and makes the broth more even.
- Adding to the slow cooker. I transfer the beef, onion, and garlic to the crockpot. Then I add the carrots, celery, and rinsed barley. I spread everything out evenly so the barley doesn’t settle into a dense layer at the bottom.
- Liquid and spices. I pour in the beef broth and add salt, pepper, thyme, and the bay leaf. I stir once — that’s enough.
- Cooking. I cook for 7–8 hours on LOW or 4–5 hours on HIGH. During this time, the beef becomes tender without falling apart, and the barley fully cooks and slightly thickens the soup.
- Finish. At the end, I remove the bay leaf, taste, and adjust the salt. I let the soup rest for 15 minutes — the structure becomes more stable, especially if I plan to store it.
Tip. If you’re making soup with pearl barley, don’t soak it ahead of time for the slow cooker. In a slow cooker, it cooks evenly and releases some starch into the broth, which thickens the soup naturally without flour or other thickeners. Soaking works against the structure here — the barley will finish before the meat and start to break down.
I serve Beef and Barley Soup simply, in a deep bowl, sometimes adding a bit of fresh parsley right before serving. This soup keeps well in the fridge for 3–4 days, and the next day it becomes even thicker. It works well both for reheating and for freezing in portions.
6. Sweet Potato and Kale Stew

Sweet Potato and Kale Stew brings everything together into one cohesive, structured stew that holds up well for several days and doesn’t lose flavor when reheated.
Ingredients (serves 6)
Base:
- 2 lbs sweet potatoes, peeled and cut into cubes (≈ 900 g)
- 1 bunch kale, tough stems removed, leaves roughly chopped (≈ 150–200 g)
- 1 large yellow onion, finely chopped
- 3 cloves garlic, finely chopped
- 1 tbsp freshly grated ginger
Liquid:
- 4 cups vegetable broth (≈ 960 ml)
- 1 can (14 oz) diced tomatoes (≈ 400 g)
Spices:
- 1 tsp ground cumin
- 1 tsp smoked paprika
- 1/2 tsp ground coriander
- 1 tsp salt
- 1/2 tsp black pepper
Additional:
- 1 tbsp olive oil
- juice of 1/2 lemon (optional)
How I make it
- Sweet potato prep. I cut the sweet potatoes into cubes about 2–2.5 cm in size. I don’t go smaller — they’ll lose their shape. Larger pieces aren’t ideal either, because they cook unevenly.
- Aromatic base. I heat olive oil in a pan, add the onion, and cook it until soft. Then I add the garlic and ginger and warm them for about a minute. This step removes sharpness and makes the overall flavor more balanced.
- Adding to the slow cooker. I transfer the onion, garlic, and ginger to the crockpot. I add the sweet potatoes, tomatoes, and vegetable broth. I mix gently so the sweet potato pieces don’t break apart.
- Spices. I add the spices and stir once. At this stage, the mixture looks fairly thin — that’s normal. The sweet potatoes will thicken the stew as it cooks.
- Cooking. I cook for 5–6 hours on LOW or 3–4 hours on HIGH. The sweet potatoes become tender while keeping their shape, and the broth thickens.
- Kale and finish. About 30 minutes before the end, I add the kale and gently fold it into the stew. At the very end, I taste, adjust the salt, and add lemon juice if needed.
Tip. Always add kale at the end, not together with the sweet potatoes. If you add it too early, it releases color and becomes overly soft. Late addition keeps the leaf structure intact and makes the stew look cleaner.
I serve Sweet Potato and Kale Stew in a deep bowl. Sometimes I add a spoon of thick yogurt or a bit of fresh herbs directly on the plate. This dish keeps well in the fridge for up to four days and works well for portioned freezing.
7. Slow Cooker Honey Garlic Chicken
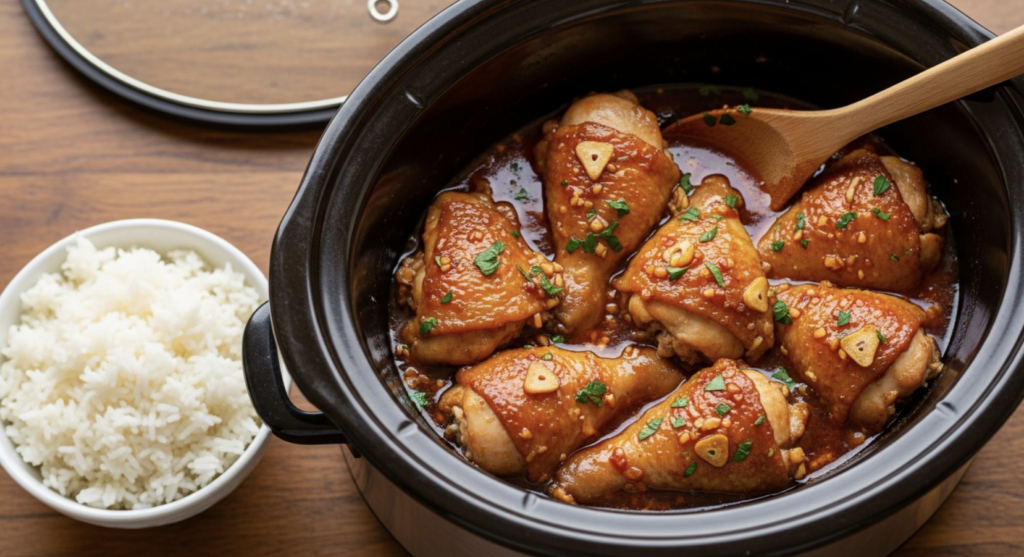
Slow Cooker Honey Garlic Chicken comes together in a very balanced way. Here, honey works as a gentle binding element, while garlic and soy sauce keep the flavor contained and clear. The chicken stays juicy, and the sauce turns thick but controlled, without that “glaze for the sake of glaze” feeling.
Ingredients (serves 4–6)
Base:
- 2.5 lbs boneless, skinless chicken thighs (≈ 1.1 kg)
Sauce:
- 1/3 cup honey (≈ 80 ml)
- 1/3 cup soy sauce or tamari (≈ 80 ml)
- 4 cloves garlic, finely chopped
- 1 tbsp rice vinegar
- 1 tsp freshly grated ginger
- 1/2 tsp black pepper
Thickening (if needed):
- 1 tbsp cornstarch
- 2 tbsp cold water
Additional:
- 1 tbsp neutral oil
- green onions for serving (optional)
How I make it
- Preparing the chicken. I pat the chicken dry and place it in the slow cooker bowl in a single layer. If the pieces are too large, I cut them in half — this helps them heat evenly and keeps them from “floating” in the sauce.
- Sauce. In a bowl, I mix the honey, soy sauce, garlic, vinegar, ginger, and black pepper. I stir until smooth, making sure the honey fully dissolves and doesn’t settle at the bottom.
- Combining. I pour the sauce over the chicken and gently turn the pieces so each one is coated. It’s important not to add salt here — the soy sauce already sets the right level.
- Cooking. I cook for 4–5 hours on LOW or 2.5–3 hours on HIGH. The chicken becomes tender without falling apart, and the sauce gradually darkens and thickens.
- Texture check. If the sauce feels too thin, I remove the chicken, add the cornstarch mixed with cold water to the sauce, stir, and cook for another 10–15 minutes on HIGH. After that, I return the chicken to the pot.
- Finish. I let the dish rest for 10 minutes with the slow cooker turned off — the sauce settles and clings better to the chicken.
Tip. For recipes like this, it’s important not to increase the amount of honey, even if it feels like there isn’t much sauce. In a slow cooker, sweet components intensify as they cook, and one extra spoon can easily throw off the balance. If you need more volume, it’s better to add a bit of broth rather than more sweetness.
I serve Slow Cooker Honey Garlic Chicken with rice, quinoa, or a simple vegetable mix. I use all of the sauce — it spreads well through the side dish. This meal keeps well in the fridge for up to four days and reheats without issues.
8. Vegetable Minestrone Soup
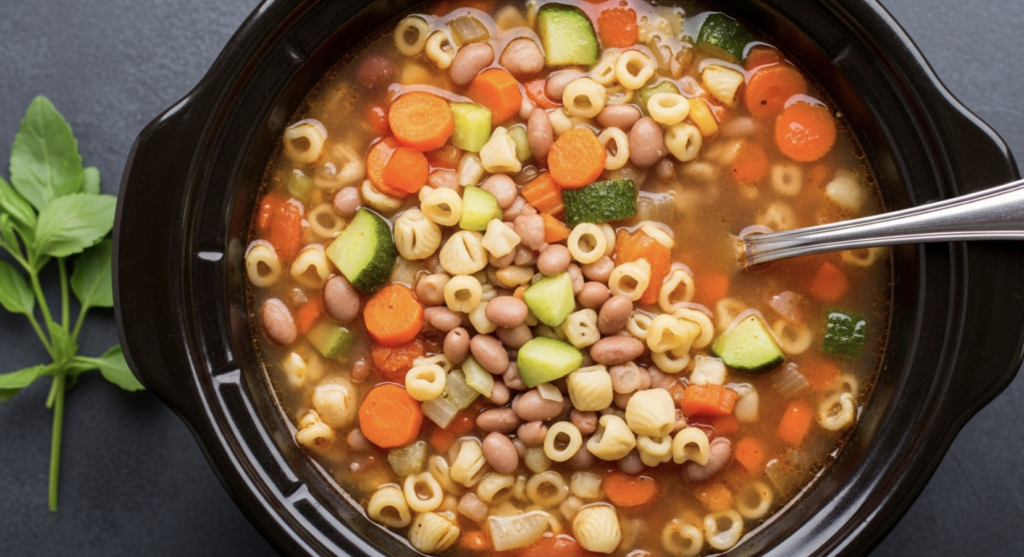
Vegetable Minestrone Soup is a soup I cook often. There is no single “main” ingredient here — everything works together: vegetables, beans, pasta, and broth. The soup doesn’t separate into layers and doesn’t turn watery.
Minestrone is a great fit for a slow cooker: vegetables cook evenly, the broth comes together without boiling, and the pasta doesn’t turn mushy — as long as you add it at the right time.
Ingredients (serves 6–8)
Base:
- 1 large yellow onion, finely chopped
- 3 carrots, diced (≈ 300 g)
- 3 celery stalks, chopped
- 2 cups green beans, chopped (≈ 250 g)
- 2 zucchini, diced (≈ 300 g)
- 3 cloves garlic, finely chopped
Beans and tomatoes:
- 1 can (15 oz) cannellini beans, rinsed (≈ 425 g)
- 1 can (14 oz) diced tomatoes (≈ 400 g)
Liquid:
- 6 cups vegetable broth (≈ 1.4 L)
Pasta and greens:
- 1 cup small pasta (ditalini or elbow) (≈ 90 g)
- 2 cups chopped kale or spinach (≈ 60–80 g)
Spices:
- 1 tsp dried basil
- 1 tsp dried oregano
- 1/2 tsp thyme
- 1 tsp salt
- 1/2 tsp black pepper
Additional:
- 1 tbsp olive oil
- grated Parmesan for serving (optional)
How I make it
- Vegetable base. I heat olive oil in a pan and cook the onion until soft. I add the garlic and keep it on the heat for about 30 seconds. This removes the raw edge and makes the broth more even.
- Adding the vegetables. I transfer the onion and garlic to the crockpot. I add the carrots, celery, green beans, and zucchini. I spread everything out evenly — it’s important that dense vegetables don’t sit in one tight layer.
- Liquid and tomatoes. I add the beans, tomatoes, and vegetable broth. I stir once. At this stage, the soup looks quite thin — that’s normal.
- Spices. I add all the spices and salt. I don’t increase the amounts — the flavor will develop over several hours.
- Cooking. I cook for 6–7 hours on LOW or 3–4 hours on HIGH. The vegetables become tender while keeping their shape.
- Pasta and greens. About 30 minutes before the end, I add the pasta and greens. I stir gently. The pasta cooks directly in the soup and doesn’t overcook.
- Finish. I taste, adjust the salt, and let the soup rest for 10–15 minutes before serving — the structure becomes more stable.
Tip. If you’re making minestrone for several days, don’t add all the pasta at once. I often add only half and save the rest for reheating. This keeps the soup from getting too thick and helps it hold a good consistency through the last serving.
I serve Vegetable Minestrone Soup with grated Parmesan added directly to the bowl. Sometimes I add a small drizzle of olive oil on top — not for flavor, but for texture. This soup keeps well in the fridge for up to four days and works well for portioned freezing without the pasta.
9. Stuffed Bell Peppers with Ground Beef
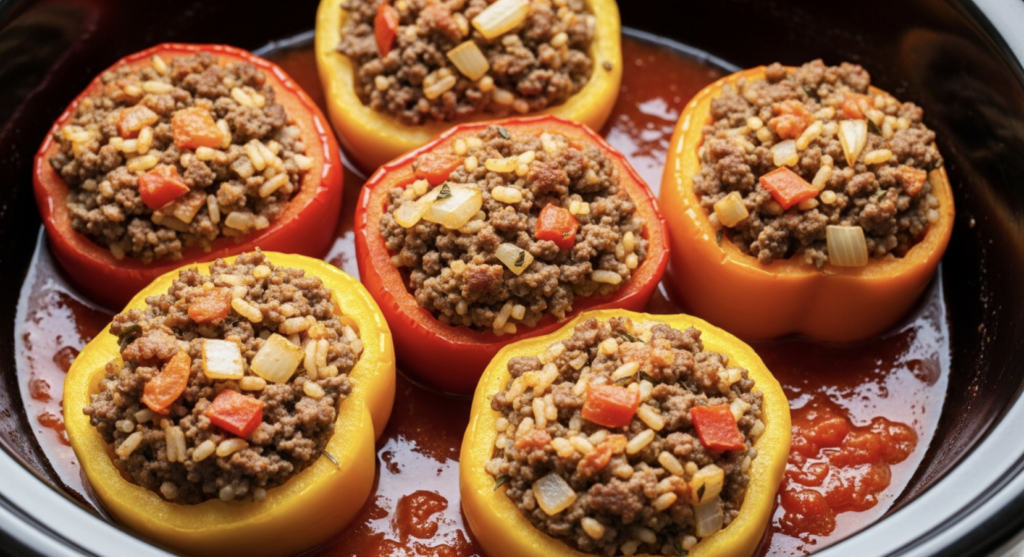
In Stuffed Bell Peppers with Ground Beef, the peppers hold their shape, the filling turns out dense, the rice cooks evenly, and the juices stay inside instead of leaking into the sauce.
In a slow cooker, nothing burns, the peppers don’t collapse, and the beef stays juicy even with long cooking.
Ingredients (serves 5–6)
Base:
- 5–6 large bell peppers, tops cut off, seeds removed
- 1.5 lbs ground beef (≈ 680 g)
- 1 cup cooked rice (≈ 180 g)
- 1 large yellow onion, finely chopped
- 3 cloves garlic, finely chopped
Sauce:
- 1 can (14 oz) diced tomatoes (≈ 400 g)
- 1 cup tomato sauce (≈ 240 ml)
Spices:
- 1 tsp salt
- 1/2 tsp black pepper
- 1 tsp paprika
- 1 tsp dried oregano
Additional:
- 1 tbsp olive oil
- grated cheese for serving (optional)
How I make it
- Preparing the peppers. I cut off the tops and carefully remove the seeds and membranes. I don’t blanch the peppers — in the slow cooker they cook through on their own and keep their shape.
- Filling. I heat olive oil in a pan, add the onion, and cook it until soft. I add the garlic and warm it for about 30 seconds. Then I add the ground beef and cook it just until the color changes, breaking it up as it cooks. It doesn’t need to be fully cooked at this stage.
- Assembling the filling. I take the beef off the heat and add the cooked rice, salt, pepper, paprika, and oregano. I mix until combined — the mixture should be dense, but not dry.
- Stuffing the peppers. I fill the peppers with the mixture without packing it too tightly. I leave a bit of space so the filling can expand as it cooks.
- Sauce and setup. In the slow cooker bowl, I mix the diced tomatoes and tomato sauce. I place the peppers upright, gently setting them into the sauce. The sauce should cover the bottom, but not fully submerge the peppers.
- Cooking. I cook for 5–6 hours on LOW or 3–4 hours on HIGH. The peppers become tender while keeping their shape, and the filling cooks through completely.
- Finish. About 10 minutes before the end, I check one pepper for doneness and adjust the salt in the sauce if needed.
Tip. If your peppers are different sizes, place the larger ones along the edges and the smaller ones closer to the center of the bowl. The temperature is higher around the edges, so this helps everything cook evenly without underdone centers.
I serve Stuffed Bell Peppers with Ground Beef whole, sometimes adding grated cheese directly on the plate. I always use the sauce — it helps bind the filling together. This dish keeps well in the fridge for up to four days and reheats without losing structure.
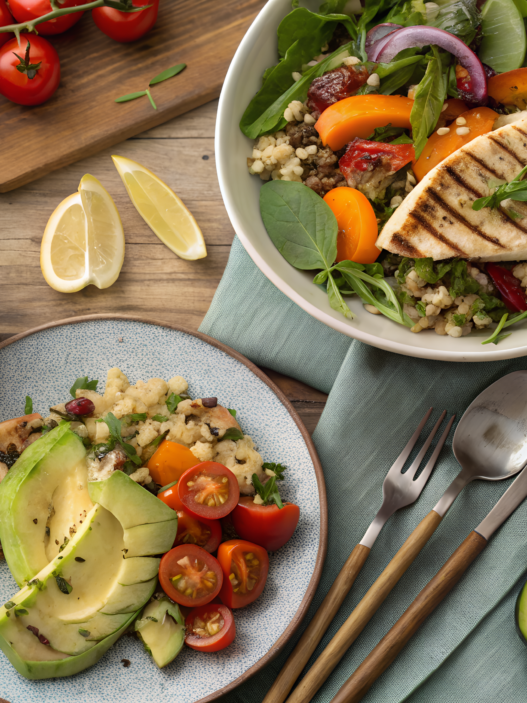
10. Crockpot Greek Chicken Bowls

In Crockpot Greek Chicken Bowls, the chicken cooks in a lemon-and-herb base, stays juicy, doesn’t fall apart, and all the bowl components are easy to combine at serving time. No complicated steps — everything is straightforward and clear.
Ingredients (serves 4–6)
Base:
- 2.5 lbs boneless, skinless chicken thighs or breasts (≈ 1.1 kg)
Marinade:
- 1/3 cup freshly squeezed lemon juice (≈ 80 ml)
- 1/4 cup olive oil (≈ 60 ml)
- 4 cloves garlic, finely chopped
- 1 tbsp dried oregano
- 1 tsp dried thyme
- 1 tsp salt
- 1/2 tsp black pepper
For the bowls:
- cooked rice or quinoa, for serving
- cherry tomatoes, halved
- cucumber, sliced
- kalamata olives, sliced
- red onion, thinly sliced
- feta cheese, crumbled
Additional:
- fresh parsley or dill (optional)
How I make it
- Preparing the chicken. I pat the chicken dry and place it in the slow cooker bowl in a single layer. If the pieces are too large, I cut them in half — this helps them cook more evenly and removes the need for extra checking.
- Marinade. In a bowl, I mix the lemon juice, olive oil, garlic, oregano, thyme, salt, and pepper. I stir until smooth and immediately pour it over the chicken. I turn the pieces by hand so the marinade coats everything evenly.
- Cooking. I cook for 4–5 hours on LOW or 2.5–3 hours on HIGH. The chicken cooks through, stays intact, and can be easily pulled apart with a fork if needed.
- Check and rest. At the end, I taste the juices in the bowl and adjust the salt if necessary. I let the chicken rest for 10 minutes with the slow cooker turned off — during this time, the juices redistribute and the meat becomes easier to slice.
- Preparing the base. While the chicken rests, I cook the rice or quinoa and prep the vegetables for the bowls. It’s important not to chop everything too finely — a bowl is built in layers, not mixed like a salad.
Tip. Don’t slice the chicken immediately after cooking. If you let it rest for at least 10 minutes, the pieces will hold their shape and won’t lose juices when slicing or pulling. This is especially important if you’re using the chicken for bowls rather than serving it whole.
I assemble Crockpot Greek Chicken Bowls in layers: rice or quinoa first, then chicken, vegetables, olives, and feta. I add the herbs at the very end. If there’s juice left from the chicken, I use it as a sauce and drizzle a small amount over the top.
A Practical Kitchen Helper
If you cook with a slow cooker regularly, these recipes can be easily mixed and matched, letting you build your own menus without repetition or unnecessary experiments.
I chose these dishes on purpose so they don’t compete with each other in flavor and don’t rely on hard-to-find ingredients.
If you’ve already cooked one of these recipes or are planning to try one, write about it in the comments. I’d really like to know what worked well for you and what you would adapt for your own kitchen.