
I think everyone has already built up fatigue from the same repetitive dinners, from the endless “what should I cook,” from recipes that take too much time or end up feeling empty and not filling.
These 10 dinners are the result of normal home cooking. Nothing performative. Nothing “for the photo.” No half-day prep, no exotic ingredients, and no attempt to impress. They fill you up, store well, reheat well, and don’t require a special mood to even start cooking.
In short, this is a collection of dinners that work when the day is already over and your energy is almost gone.
1. Spicy Cauliflower Steak with Chimichurri
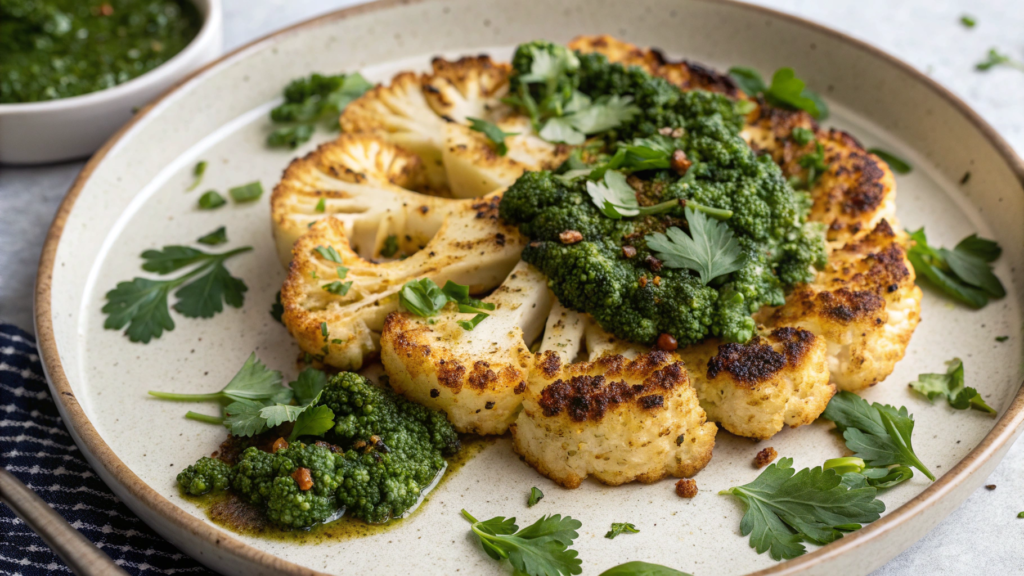
Spicy Cauliflower Steak with Chimichurri breaks the familiar pattern where “cauliflower is just a side dish.” Here, it’s dense, roasted, and full of character. A spicy crust, that oven smokiness, and on top — a herby, bold chimichurri that makes you want to dip bread straight into the plate.
Yes. Even without meat.
Why this works
When roasted, cauliflower behaves almost like a steak: it holds its shape, caramelizes beautifully, and absorbs spices well.
And chimichurri does the rest. Acidity, freshness, the richness of olive oil. A balance you feel immediately.
Ingredients
For the cauliflower steaks:
- 1 large head of cauliflower (≈ 900–1000 g)
- 3 tbsp olive oil (≈ 45 ml)
- 1 tsp smoked paprika
- ½ tsp cayenne pepper (or less if you don’t like it spicy)
- 1 tsp garlic powder
- ½ tsp ground cumin
- salt and freshly ground black pepper — to taste
For the chimichurri sauce:
- 1 cup fresh parsley, finely chopped (≈ 30–35 g)
- 2 tbsp fresh oregano or 1 tbsp dried
- 2 cloves garlic, finely chopped
- ⅓ cup extra virgin olive oil (≈ 80 ml)
- 2 tbsp red wine vinegar (≈ 30 ml)
- chili flakes — to taste
- salt — to taste
How to cook
- Prepare the cauliflower. Preheat the oven to 425°F (≈ 220°C). Trim the leaves off the cauliflower, but keep the core — it holds the steaks together. Slice lengthwise into slabs about ¾–1 inch thick (2–2.5 cm). The edges may crumble — don’t throw them away, they roast beautifully alongside.
- Spices are the character. In a small bowl, mix the olive oil, paprika, cayenne, garlic powder, cumin, salt, and pepper.
Generously coat each steak on both sides. With your hands. Yes, it really helps you feel where something is missing.
- Roast. Place on a parchment-lined baking sheet. Roast for 20 minutes, carefully flip, and return to the oven for another 15–20 minutes.
The goal is a golden crust and a tender center.
Chimichurri — the sauce that changes everything
While the cauliflower is in the oven, mix the parsley, oregano, garlic, vinegar, and olive oil. Season with salt. Taste.If you want — add more acidity. Or more oil. Chimichurri likes freedom.
I usually make it in a small mortar or just chop everything finely with a knife — the texture stays lively, not a “purée.”
How to serve
Place the hot cauliflower steak on a plate. On top — a spoon (or two) of chimichurri.
On the side — something simple, like roasted chickpeas or warm farro. Or just a piece of good bread. Sometimes that’s more than enough.
This dish doesn’t try to be a “meat replacement.” It’s just good. And filling.
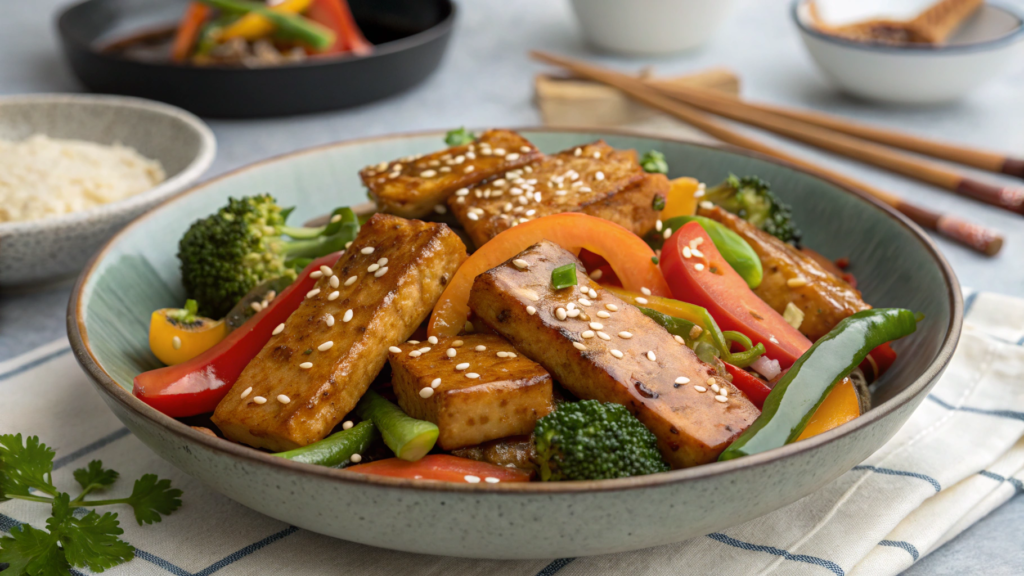
2. Sesame Crusted Salmon Bowl with Citrus Slaw
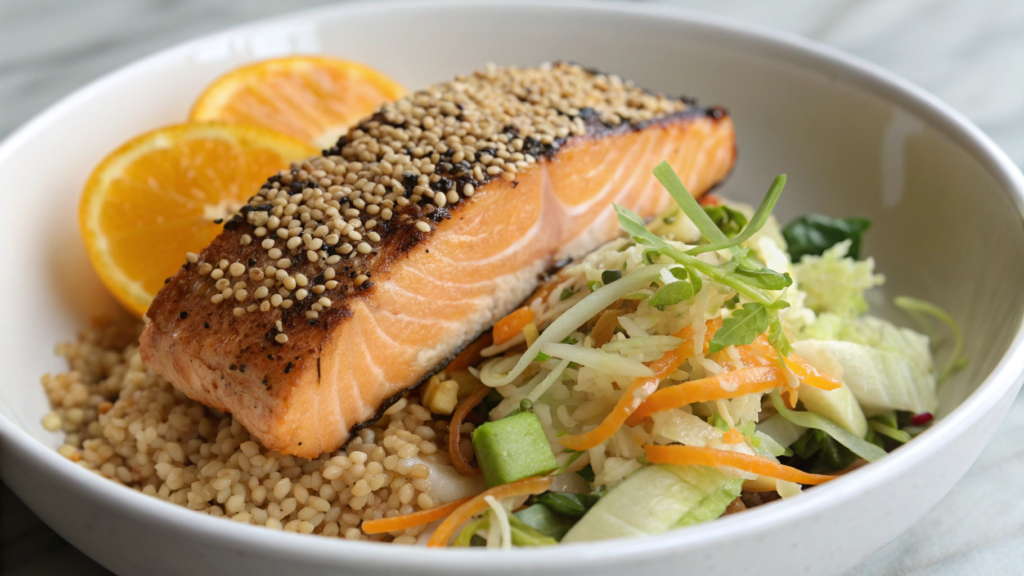
Sesame Crusted Salmon Bowl with Citrus Slaw is warm salmon with a sesame crust, fresh citrus slaw, and a soft grain base. Everything is in its place, nothing extra.
And yes, this is exactly the kind of dinner after which you don’t feel like grabbing “something else to snack on.”
Ingredients
The salmon:
- 4 salmon fillets, 4–5 oz each (≈ 120–140 g)
- 2 tbsp soy sauce or tamari (≈ 30 ml)
- 1 tbsp honey or maple syrup (≈ 15 ml)
- 1 tbsp rice vinegar (≈ 15 ml)
- 2 tbsp sesame seeds (Organic White Sesame Seeds from Frontier Co-op on Amazon — clean, nutty aroma, no bitter aftertaste)
- 1 tbsp neutral oil for frying
For the citrus slaw:
- 2 cups thinly shredded red cabbage (≈ 140–160 g)
- 1 medium carrot, grated
- zest of 1 orange
- 2 tbsp fresh orange juice (≈ 30 ml)
- 1 tbsp rice vinegar
- 1 tbsp olive oil
- salt — to taste
The base:
- 1 cup cooked rice, quinoa, or farro (≈ 180–200 g cooked)
- green onion, avocado — optional
How to cook
- Mix soy sauce, honey, and rice vinegar in a small bowl. Gently brush the salmon fillets on all sides. There’s no need to marinate for long — a couple of minutes is enough for the flavor to start working without fully taking over the fish.
- Sprinkle sesame seeds over the top side of the fillets and gently press them in with your fingers, so the seeds hold well.
- Heat a pan over medium heat, add the oil, and place the salmon sesame-side down. Let it sear for 2–3 minutes without moving it so the crust sets. Carefully flip and cook for another 2–3 minutes, keeping the fish juicy inside.
- While the salmon cooks, mix cabbage, carrot, and orange zest. Add orange juice, rice vinegar, olive oil, and salt. Toss gently with your hands until the cabbage softens slightly but stays crunchy.
- Assemble the bowl in layers: start with the warm grain base, place the sesame-crusted salmon on top, add the citrus slaw on the side, and finish with avocado slices and green onion if using.
I like to assemble this bowl in layers, slowly. First, the warm grain base goes into the bowl — it immediately creates a sense of comfort and fullness. On top, I carefully place the sesame-crusted salmon so the crust stays crispy.
Next to it goes the citrus slaw, cold and fresh, to contrast with the warm fish.
At the very end, I add thin slices of avocado and a bit of green onion. Sometimes I drizzle a couple of extra drops of soy sauce directly onto the rice — and that’s more than enough.
3. Stuffed Zucchini Boats with Quinoa and Feta
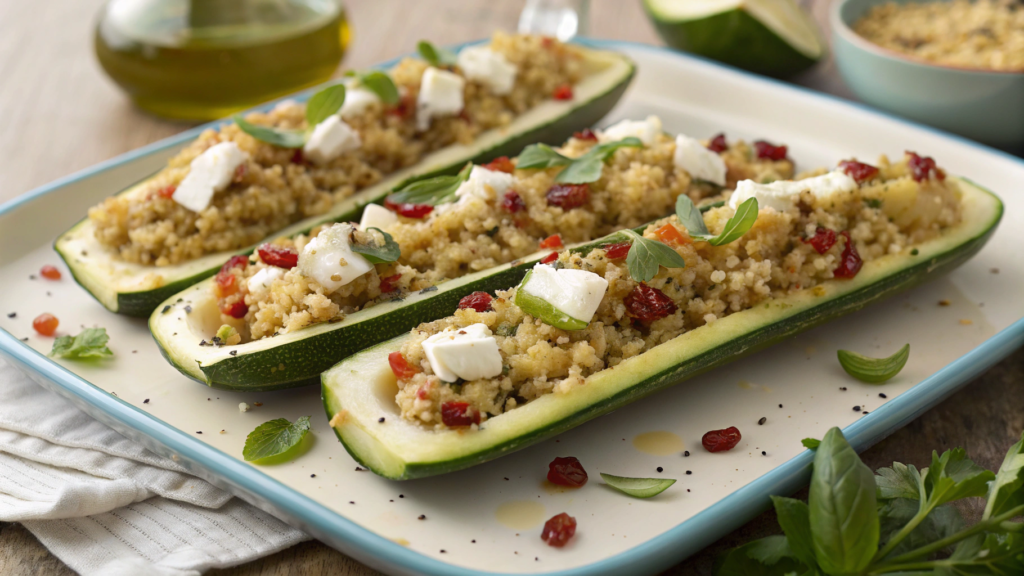
Stuffed Zucchini Boats with Quinoa and Feta are light, but filling, and simple in terms of ingredients.
The zucchini here simply hold the filling, add juiciness, and make the dinner feel noticeably lighter. And that feeling is very pleasant.
Ingredients
The zucchini:
- 4 medium zucchini
- 1 tbsp olive oil
- salt and freshly ground black pepper — to taste
For the filling:
- 1 cup cooked quinoa (≈ 185 g cooked)
- ½ cup crumbled feta (≈ 70–80 g)
- ½ cup cherry tomatoes, halved (≈ 90 g)
- ¼ cup finely chopped red onion (≈ 30 g)
- 2 tbsp olive oil
- 1 clove garlic, finely chopped
- 1 tsp dried oregano or thyme
- zest of ½ lemon
- salt and pepper — to taste
How to cook
- Preheat the oven to 400°F (205°C). Slice the zucchini in half lengthwise and carefully scoop out the centers with a spoon, leaving walls about ½ inch thick (≈ 1–1.5 cm). Don’t discard the flesh — it will be used later. Lightly brush the boats with olive oil and season with salt and pepper.
- Place the zucchini cut-side up on a baking sheet and bake for 10–12 minutes. This step helps them keep their shape and prevents them from turning watery after filling.
- Finely chop the reserved zucchini flesh. Heat olive oil in a pan, add garlic and onion, and cook until soft. Stir in the chopped zucchini flesh and cook for a couple more minutes until excess moisture evaporates.
- Remove the pan from heat. Add quinoa, feta, tomatoes, lemon zest, and oregano. Gently mix, taste, and adjust with salt and pepper if needed. The filling should not feel heavy.
- Fill the zucchini boats with the mixture without packing it too tightly. Return them to the oven for 12–15 minutes, until the tops lightly brown and the aroma fills the kitchen.
I like serving these boats straight from the baking sheet, while they’re hot and fragrant. You can add a bit more crumbled feta on top and a few drops of olive oil.
They’re good on their own, but it’s especially nice to place a simple green salad or a plate of crusty bread next to them to scoop up everything left on the plate.
No sauces are needed — the flavor is already complete.
These zucchini boats are great because they’re easy to change. Today — feta. Tomorrow — goat cheese.
But the feeling of a light, well-thought-out dinner stays every time.
4. Thai-Inspired Sweet Potato Curry

Thai-Inspired Sweet Potato Curry turns out soft, rich, slightly sweet, and very calming. Not sharp or aggressive, but deep in flavor.
Sweet potato gives the dish body and fullness, while the spices bring everything together into one clear story.
Ingredients
For the curry:
- 2 medium sweet potatoes, peeled and cubed (≈ 1 lb / 450 g)
- 1 tbsp coconut oil or neutral vegetable oil
- 1 small yellow onion, finely chopped
- 2 cloves garlic, finely chopped
- 1 tbsp fresh grated ginger
- 2 tbsp red Thai curry paste (adjust to taste)
- 1 can coconut milk (13.5 oz / ≈ 400 ml)
- 1 cup vegetable broth (≈ 240 ml)
- 1 tbsp soy sauce or tamari
- 1 tsp brown sugar or maple syrup
- juice of ½ lime
- salt — to taste
Serving:
- fresh cilantro
- cooked jasmine rice or basmati
Thai curry paste varies a lot in quality. I usually use Thai Kitchen Red Curry Paste from Amazon — it has a clean flavor, without bitterness or aggressive saltiness.
How to cook
- Heat coconut oil in a deep pan or saucepan over medium heat. Add the onion and cook for 4–5 minutes until soft and slightly translucent. Don’t rush this step — the onion creates the sweet base of the whole dish.
- Add garlic and ginger and cook for about 30 seconds, until fragrant. Immediately add the curry paste, stir, and let it open up in the oil without burning.
- Add the sweet potatoes, coconut milk, and vegetable broth. Stir gently so the paste distributes evenly. Bring to a light simmer, then reduce the heat to medium.
- Cover and simmer for 15–20 minutes, until the sweet potatoes are tender but not falling apart. Stir occasionally — the curry likes attention, but not constant interference.
- Add soy sauce, sugar, and lime juice. Taste and adjust — sometimes it needs a bit more acidity, sometimes a pinch of salt. That’s normal.
I like serving this curry in deep bowls, generously, without trying to make it look “neat.”
On the bottom goes warm jasmine rice, on top — the curry with chunks of sweet potato and creamy sauce.
At the very end — a handful of fresh cilantro and, if the mood allows, a couple more drops of lime juice.
This curry is great the next day too. It gets thicker. Deeper. Sometimes even better than right after cooking.
5. Grilled Portobello Tacos with Avocado Cream

Grilled Portobello Tacos with Avocado Cream are not a “vegetarian version” and not an attempt to replace meat.
This is simply very good food.
Ingredients
The mushrooms:
- 4 large portobello caps
- 3 tbsp olive oil
- 2 tbsp balsamic vinegar
- 1 tbsp soy sauce or tamari
- 2 cloves garlic, finely chopped
- 1 tsp smoked paprika
- ½ tsp ground cumin
- freshly ground black pepper — to taste
For the avocado cream:
- 1 ripe avocado
- 2 tbsp lime juice (≈ 30 ml)
- 2 tbsp Greek yogurt or plant-based yogurt
- 1 small clove garlic
- salt — to taste
- water — as needed, for texture
The tacos:
- 8 small corn or wheat tortillas
- thinly sliced red cabbage or lettuce
- fresh cilantro
- lime wedges
How to cook
- Gently brush any dirt off the mushrooms with a dry paper towel and remove the stems. Keep the caps whole so they stay juicy during cooking.
- In a bowl, mix olive oil, balsamic vinegar, soy sauce, garlic, paprika, cumin, and black pepper. Add the mushrooms and turn them a few times so the marinade coats them completely. Let sit for at least 15 minutes.
- Heat a grill or grill pan over medium heat. Cook the portobello caps for 4–5 minutes per side, until soft and lightly charred. They will shrink — that’s normal.
- Let the mushrooms rest for a couple of minutes, then slice them into strips. They should be juicy inside, not dry.
- In a blender or using an immersion blender, combine avocado, lime juice, yogurt, garlic, and salt. Add a little water if needed — the cream should be smooth and easy to spread.
I like assembling these tacos right at the table, letting everyone make their own version.
A warm tortilla, a layer of avocado cream, smoky portobello mushrooms, then some crunchy cabbage and fresh cilantro.
At the very end — a squeeze of lime. That’s it. Hands get messy, but that’s exactly how they’re meant to be eaten.
These tacos are great because they don’t need complicated sides. They’re already complete.
And almost everyone likes them — without exception.
6. One-Pan Lemon Herb Chicken with Roasted Vegetables
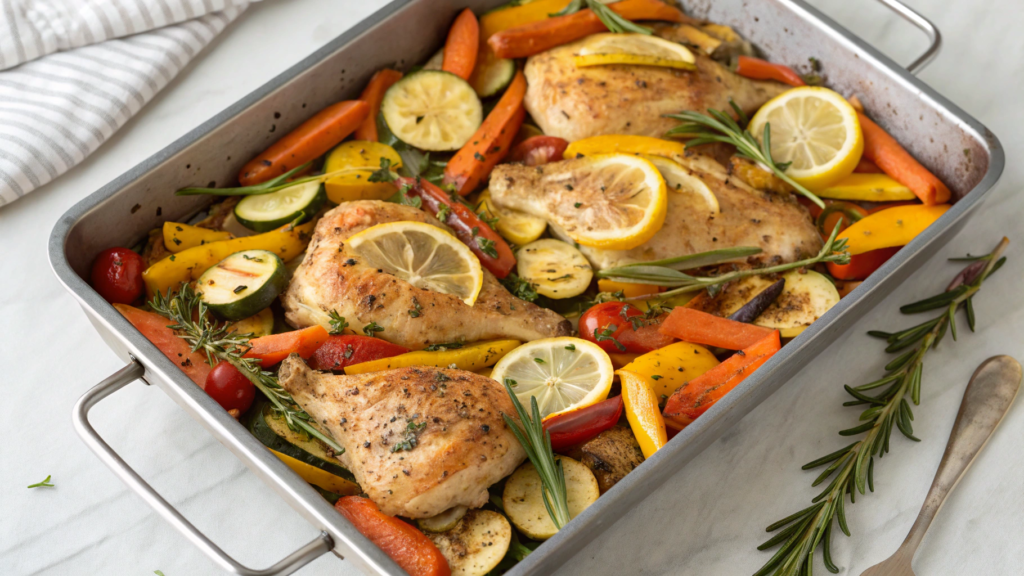
One-Pan Lemon Herb Chicken with Roasted Vegetables is what I cook when I want real, filling food. One pan. Bright lemon. Herbs. Chicken that turns out juicy. And vegetables that are actually tasty, not just “for balance.”
Ingredients
For the chicken:
- 4 bone-in, skin-on chicken thighs (≈ 1½ lb / 680 g)
- 3 tbsp olive oil (≈ 45 ml)
- zest of 1 lemon
- juice of ½ lemon
- 2 cloves garlic, finely chopped
- 1 tsp dried thyme
- 1 tsp dried rosemary
- ½ tsp paprika
- salt and freshly ground black pepper — to taste
For the vegetables:
- 2 cups potatoes, cut into large pieces (≈ 300–320 g)
- 1 cup carrots, cut into chunks (≈ 130–150 g)
- 1 red onion, cut into wedges
- 1 tbsp olive oil
- salt and pepper — to taste
How to cook
- Preheat the oven to 425°F (220°C). I always use a heavy aluminum sheet pan — I’ve been using the Nordic Ware Natural Aluminum Half Sheet Pan for years, it holds heat well and helps the vegetables roast instead of steaming in their own juices. Line the pan with parchment or lightly grease it.
- In a bowl, mix olive oil, lemon zest, lemon juice, garlic, thyme, rosemary, paprika, salt, and pepper. Add the chicken and coat each piece well, especially under the skin — that’s where the flavor settles best.
- Place the potatoes, carrots, and red onion directly on the sheet pan. Drizzle with olive oil, season with salt and pepper, and toss with your hands. This step looks simple, but it determines whether the vegetables are actually flavorful or just edible.
- Arrange the chicken on top of the vegetables, skin-side up. Don’t pack the pieces too tightly — hot air needs space. The chicken juices will drip down, and the vegetables will absorb them along the way.
- Roast for 35–40 minutes, until the chicken is golden and the vegetables are tender inside with browned edges. If the skin starts browning too fast, cover loosely with foil and slightly reduce the temperature.
I usually place the sheet pan right in the center of the table. The chicken stays juicy, the vegetables are soaked with lemon and herbs, and that sauce collects at the bottom — the kind everyone reaches for with bread.
Before serving, I add a bit more fresh lemon juice and, if I have it, a few sprigs of fresh thyme.
A simple green salad on the side works perfectly — nothing else is needed.
7. Pumpkin Gnocchi with Sage Brown Butter Sauce
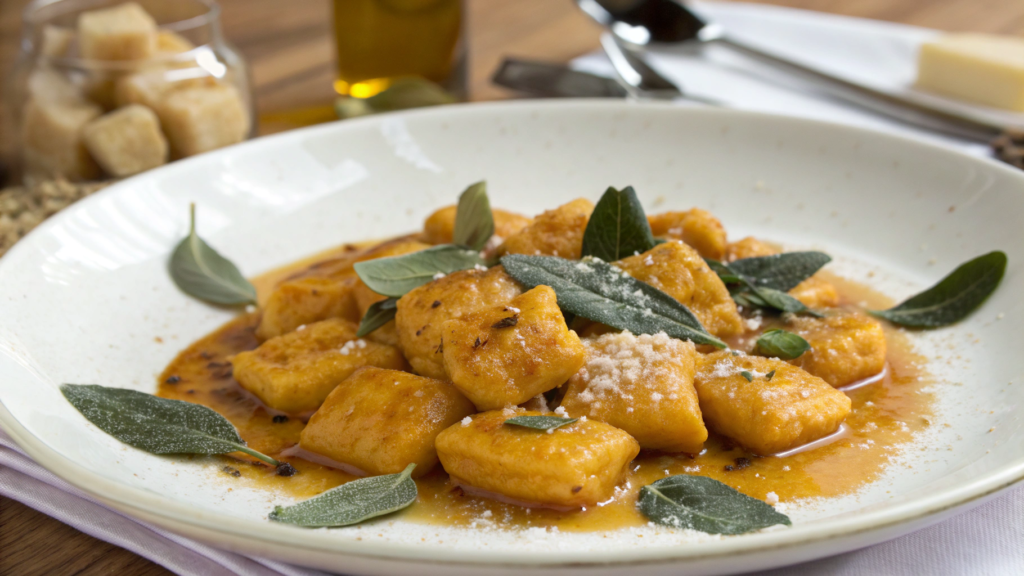
In Pumpkin Gnocchi with Sage Brown Butter Sauce, pumpkin brings a gentle sweetness, the gnocchi add density and comfort, and the brown butter with sage ties everything together into a very grown-up, calm flavor.
Ingredients
For the pumpkin gnocchi:
- 1 cup pumpkin purée (≈ 240 g)
(important: pure pumpkin only, no sugar or spices — I usually use Farmer’s Market Organic Pumpkin because it’s thick and not watery, so the dough doesn’t need extra flour) - 1 cup ricotta (≈ 225 g)
- 1 large egg
- 1 tsp salt
- ¼ tsp ground nutmeg
- 1½–2 cups flour (≈ 180–240 g), as needed
The sauce:
- 6 tbsp butter (≈ 85 g)
- 8–10 fresh sage leaves
- salt — to taste
- freshly ground black pepper
- grated Parmesan, for serving
How to cook
- In a large bowl, mix pumpkin purée, ricotta, egg, salt, and nutmeg until soft and smooth. Gradually add flour, not all at once. Stop as soon as the dough stops sticking but stays tender — overmixing makes the gnocchi heavy.
- Divide the dough into several parts. Roll each into a rope about ¾ inch thick (≈ 2 cm) and cut into small pieces. You can leave them as is or lightly press with a fork for texture.
- Bring a large pot of salted water to a boil. Cook the gnocchi in batches. They’re done as soon as they float — usually 2–3 minutes. Remove with a slotted spoon and transfer to a plate. Don’t leave them in the water.
- In a wide pan, melt the butter over medium heat. Add the sage leaves and cook until the butter smells nutty and starts to turn lightly brown, about 3–4 minutes. Watch closely — the line is thin here.
- Add the gnocchi to the pan and gently toss so each piece is coated in the sauce. Season with salt and black pepper. That’s it.
I serve these gnocchi immediately, while the butter is still hot and evenly coats every piece.
On top — grated Parmesan and a bit of black pepper. Nothing else is needed.
Sometimes I place a simple green salad or quickly sautéed green beans on the side — it keeps the dinner balanced but not heavy.
And if there are leftovers, the gnocchi keep well in the fridge and reheat beautifully in a pan with a drop of butter the next day.
8. Farro Salad with Roasted Grapes and Arugula
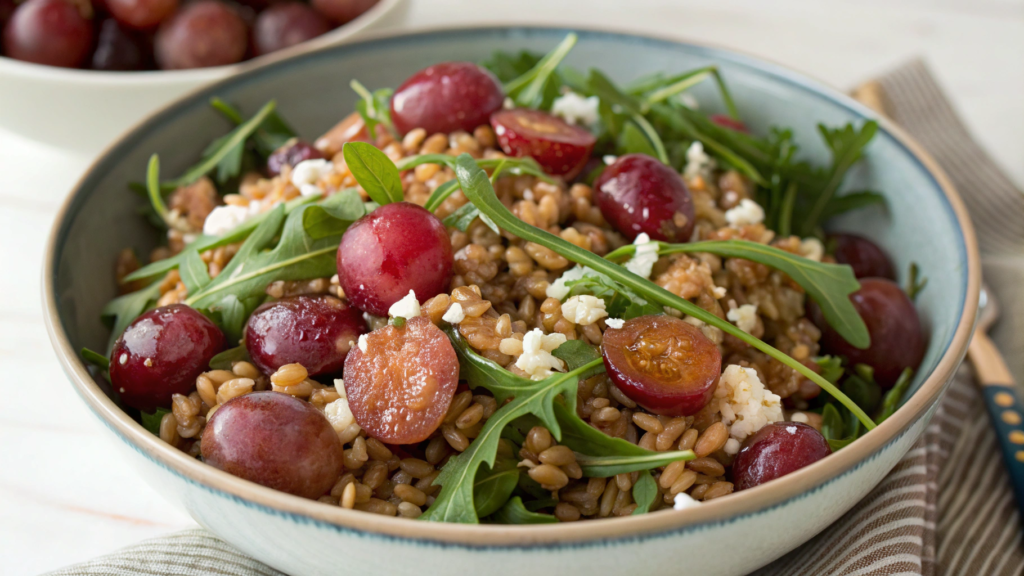
Farro Salad with Roasted Grapes and Arugula works perfectly as a dinner on its own — and even better as “next-day food,” when you just want to open a container and eat something truly good.
Ingredients
For the salad:
- 1 cup dry farro (≈ 190 g)
(I usually use Bob’s Red Mill Farro) - 2 cups grapes, preferably red or black, seedless (≈ 300–320 g)
- 3 cups fresh arugula (≈ 60–70 g)
- ¼ cup thinly sliced red onion (≈ 30 g)
- ¼ cup crumbled feta or soft goat cheese (≈ 35–40 g)
For roasting the grapes:
- 1 tbsp olive oil
- a pinch of salt
- freshly ground black pepper
The dressing:
- 3 tbsp extra virgin olive oil (≈ 45 ml)
- 1½ tbsp red wine vinegar or balsamic (≈ 22 ml)
- 1 tsp honey
- salt — to taste
How to cook
- Rinse the farro under cold water. Cook it in salted water (about 3 cups water per 1 cup farro) until tender with a slight bite, usually 25–30 minutes. Drain and let it cool slightly — it should be warm, not hot.
- Preheat the oven to 400°F (205°C). Place the grapes on a baking sheet, drizzle with olive oil, add salt and black pepper, and toss gently. Roast for 15–20 minutes, until the grapes begin to burst and caramelize.
- In a small jar or bowl, mix olive oil, vinegar, honey, and salt until smooth. The dressing should be soft, with a light acidity.
- In a large bowl, combine the warm farro, roasted grapes, and red onion. Add the dressing and gently mix. Only then fold in the arugula.
- Just before serving, add the feta or goat cheese. Don’t overmix — let the pieces stay visible.
I like this salad slightly warm, when the farro still holds heat and the grapes stay juicy.
It works beautifully as a standalone dinner, especially with a piece of bread or a handful of nuts on top.
If serving as a side, it pairs well with roasted chicken, fish, or even a simple omelet.
9. Ginger Soy Glazed Tempeh Stir Fry
Ginger Soy Glazed Tempeh Stir Fry cooks fast, the kitchen fills with the aroma of ginger and soy, and dinner comes together very quickly.
Tempeh here holds its shape, absorbs the sauce, and gives that satisfying fullness that makes you stop looking for “something else.”
Ingredients
The tempeh:
- 8 oz tempeh (≈ 225 g), cut into cubes or strips
(it’s important to use firm, fresh tempeh without bitterness so there’s no need to pre-soak it) - 1 tbsp neutral oil for frying
The sauce:
- 3 tbsp soy sauce or tamari (≈ 45 ml)
- 1½ tbsp maple syrup or honey (≈ 22 ml)
- 1 tbsp rice vinegar (≈ 15 ml)
- 1 tbsp freshly grated ginger
- 1 clove garlic, finely chopped
- 1 tsp sesame oil
The stir fry:
- 1 red bell pepper, sliced
- 1 cup broccoli florets (≈ 90–100 g)
- 1 cup snow peas or green beans
- 2 green onions, sliced
- 1 tsp sesame seeds — optional
How to cook
- Heat a large skillet or wok over medium heat and add the oil. Add the tempeh in a single layer and let it sear undisturbed for 3–4 minutes, until the edges turn golden. Flip and brown on all sides — this step is what gives the texture.
- While the tempeh cooks, mix soy sauce, maple syrup, rice vinegar, ginger, garlic, and sesame oil. The sauce should be balanced, slightly salty, sweet, and gently sharp.
- Push the tempeh to the sides of the pan and add the vegetables. Cook for 3–4 minutes, stirring often, so they stay bright and slightly crisp rather than soft.
- Pour the sauce directly into the pan. It will quickly start to bubble and glaze the tempeh and vegetables. Stir and cook for another 1–2 minutes, until everything looks glossy and fragrant.
- Add the green onions and sprinkle with sesame seeds if using. Remove from heat immediately — this dish doesn’t like overcooking.
I serve this stir fry right away, while the sauce is still hot and coats every piece.
It works perfectly over jasmine rice, brown rice, or even rice noodles.
If you want something lighter, just spoon it into a bowl on its own and add a bit of fresh herbs.
10. Miso Mushroom Ramen with Baby Spinach
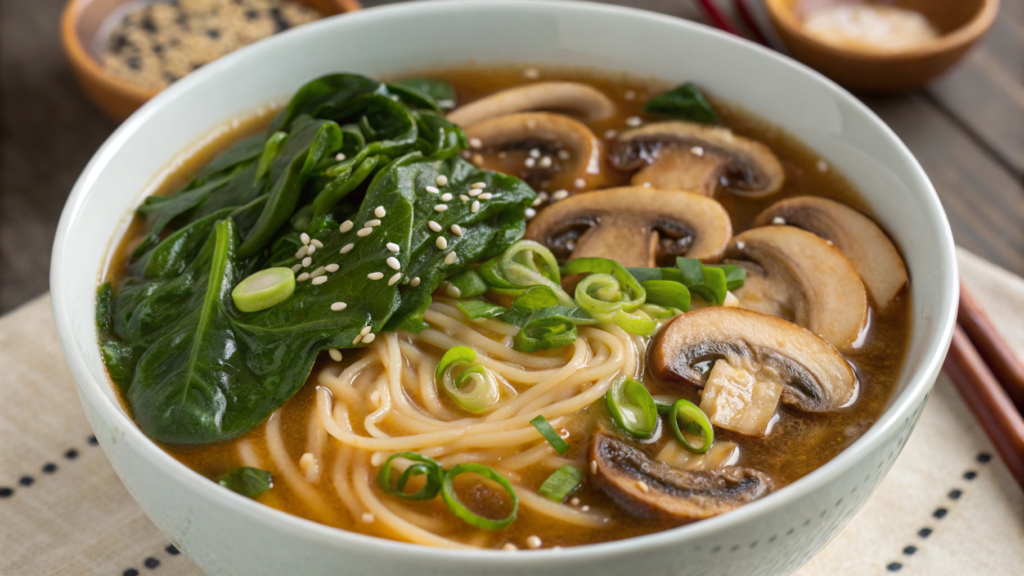
Miso Mushroom Ramen with Baby Spinach turns out rich, umami-dense, and at the same time very composed. Mushrooms give it body, miso adds depth, and spinach brings freshness and lightness.
Ingredients
For the broth and ramen:
- 4 cups vegetable broth (≈ 960 ml)
- 2 tbsp white or yellow miso paste
(check the ingredients: no unnecessary additives — I usually use Hikari Organic White Miso, it’s mild and doesn’t overpower the mushrooms) - 1 tbsp soy sauce or tamari (≈ 15 ml)
- 1 tsp sesame oil
- 1 tbsp freshly grated ginger
- 2 cloves garlic, finely chopped
- 6–8 oz mushrooms (≈ 170–225 g): shiitake, cremini, or a mix
- 3 oz ramen noodles (≈ 85 g)
- 2 cups baby spinach (≈ 60 g)
For serving (optional):
- green onion
- sesame seeds
- chili oil or chili flakes
- halved boiled egg
How to cook
- Slice the mushrooms. If using shiitake, remove the tough stems — they work well in broth but can be chewy in ramen. Don’t slice too thin, so the mushrooms don’t disappear in the soup.
- Heat sesame oil in a pot over medium heat. Add garlic and ginger and warm for 30–40 seconds until fragrant. Don’t let them brown — bitterness isn’t welcome here.
- Add the mushrooms and cook for 4–5 minutes, until they reduce in volume and start releasing their juices. This is where the mushroom character of the broth is built.
- Pour in the vegetable broth and soy sauce. Bring to a gentle simmer, then lower the heat. In a small bowl, dissolve the miso paste with a ladle of hot broth until smooth, then carefully stir it into the pot. Do not boil after adding miso — it prefers gentle heat.
- Add the ramen noodles directly to the broth and cook according to the package instructions, usually 2–3 minutes. At the very end, stir in the spinach — 30 seconds is enough for it to wilt and soften.
I ladle this ramen into deep bowls, making sure each one gets plenty of mushrooms and noodles.
On top go green onions, a bit of sesame, and, if I want heat, a drop of chili oil.
Sometimes I add half a boiled egg — not required, but nice when you want something more filling.
Best eaten right away, while the broth is hot and the miso aroma still lingers above the bowl.
Healthy dinner
These recipes don’t compete with each other. You don’t need to cook them all at once or memorize them as a list. You can come back to them anytime.
Usually one works. Then maybe another.
If you write in the comments which dinner felt closest to you and why, it’s useful not just for me. Very often, answers like that help reveal what everyday food is really missing — fullness, speed, flavor, or simplicity.