Over the years, I’ve come to realize that privacy isn’t about tall solid fences, but about how you learn to work with plants and vertical space. “Green walls” can be anything — from simple trellises you put together in half an hour to heavy metal frames that can support vines weighing dozens of pounds.
Lindy and I have tried just about everything. Clematis, ivy, honeysuckle, container supports… and we keep proving to ourselves that privacy can be created on almost any plot, even if the space is small and the budget is modest.
In this article, I’ve gathered 10 ideas that we tested with our own hands on two very different properties — a small one in Idaho and our current two-acre place in the PNW. The key is knowing which structures work best, which vines fill space faster, and where exactly they show their full potential.
1. Clematis and Ivy Privacy Wall
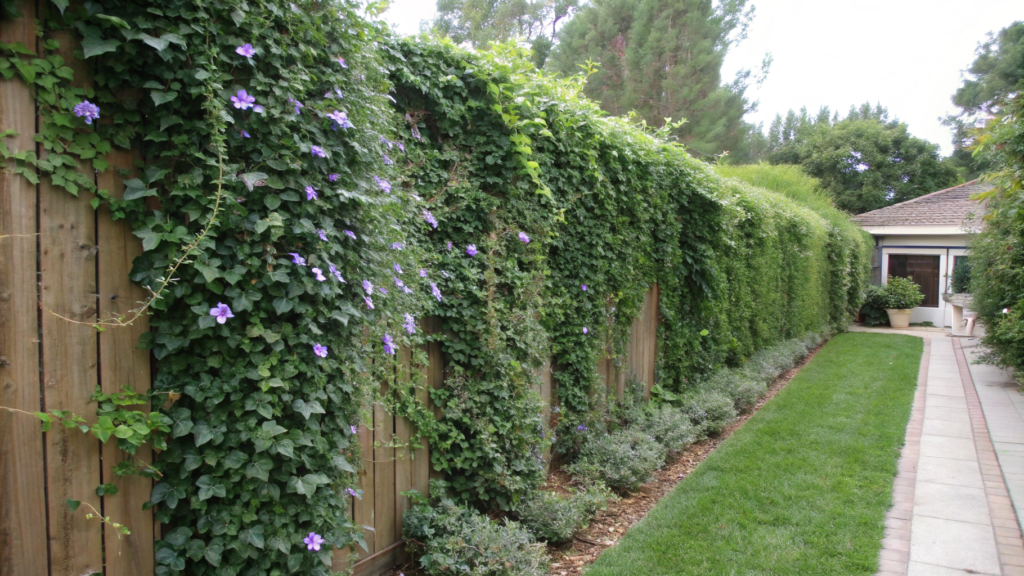
A living wall made from clematis and ivy really works. Clematis reaches upward, while ivy handles the heavy lifting: closing gaps, filling space, and thickening the “curtain.” Together, they create a dense, living frame that quickly turns into natural backyard protection.
Why clematis and ivy
This combination is almost fail-proof. They grow at different speeds, have different leaf structures, and very different “personalities” — which is exactly why they complement each other so well.
- Clematis gives large flowers, color accents, seasonality, and depth.
- Ivy fills empty spots, stabilizes the structure, and stays green even in winter.
And yes, at our old Idaho house we planted clematis with no support at all. We didn’t know any better back then… nothing. Don’t repeat our mistakes.
Build this kind of wall
- Choose a spot with good light.
Clematis needs at least half a day of sun, otherwise it grows without much enthusiasm. Ivy handles filtered light just fine, which makes this pair well balanced in light requirements. - Install a strong 6–8 ft support.
Metal is the most reliable option. Not because it’s trendy, but because ivy turns into a bodybuilder after a couple of years — about 20–30 lbs (9–14 kg) per section. Our first wooden screen didn’t survive its first fall. Since then, we only use steel or aluminum. - Prepare the soil in advance and be generous.
Clematis does not grow in heavy soil. It needs air at the roots, good drainage, and compost — roughly one bucket per planting hole, 18 inches deep (45 cm). Ivy survives almost anywhere, but with good soil it covers space much faster. We also add mulch to keep clematis roots cool in hot weather. - Plant with the correct spacing.
Clematis — every 3–4 ft (90–120 cm).
Ivy — every 5–6 ft (150–180 cm).
This spacing comes from trial and error. Too close and clematis competes. Too dense and ivy takes over everything. - Support growth carefully during the first two seasons.
Regular summer watering, organic feeding in early spring, and gentle guiding ties help clematis stay active. If left alone, it may spend an entire season growing roots only. - Guide shoots by hand while they’re young.
About once a week, walk along the support and secure new growth with soft ties. It takes minutes but makes the wall dense, layered, and controlled. Ivy may wander — just redirect it back. - Monitor thickness once plants mature.
By the second or third season, the wall reaches 10–14 inches (25–35 cm) thick, which creates real privacy. Even weak fences disappear behind the green mass, and ivy keeps the wall effective through winter.
After 2–3 seasons, you end up with a living wall around 10–14 inches (25–35 cm) thick.
It blocks visibility almost completely, especially once the ivy matures.
And what I love most — even in winter, the wall stays green thanks to the ivy. Not perfectly dense, of course, but still very effective.
What you can improve
If you want even more coverage, try mixing specific varieties:
- Clematis ‘Jackmanii’ — large purple blooms, long flowering period.
- Clematis ‘Sweet Autumn’ — fragrant and fast, like it runs on caffeine.
- English Ivy ‘Baltica’ — proven and hardy.
Sometimes I add a third partner — ornamental hops. Just be ready for it to try to take over the entire yard. On small plots, it’s better to stick with the duo.
2. Fast-Growing Jasmine Trellis Design
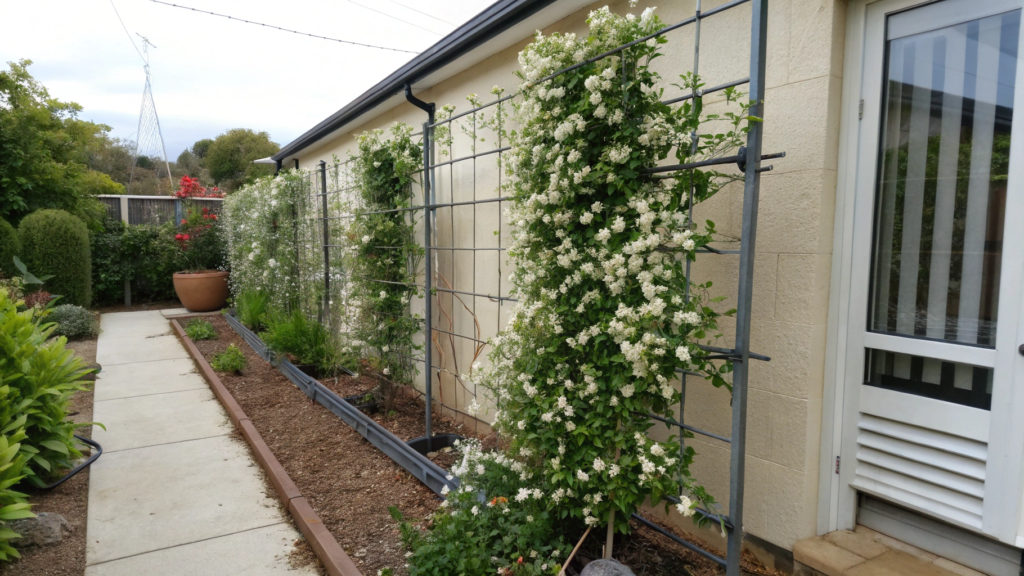
If you need a vertical accent fast, jasmine is the best candidate. It loves sun, warmth, and a well-built support. On trellises 6–7 ft tall (180–210 cm), it really comes into its own, and its evening scent makes the space feel more pleasant, even if the yard is small.
Jasmine grows very actively. If it likes the spot, it can easily put on 3–5 ft (90–150 cm) of growth per season. That’s why it’s important to define the structure upfront: cables, metal trellises, bamboo — anything works as long as it’s stable.
The soil should be light and well-draining. We usually add compost and a bit of sand so the roots don’t sit in moisture. During the first few months, jasmine responds gratefully to regular watering, and after that it mostly takes care of itself.
How to set up a trellis for fast growth
- Choose a support at least 6 ft tall.
Jasmine grows aggressively, so low trellises get filled too quickly. Steel frames or tensioned cables are the most convenient options. - Plant spacing: 2–3 ft (60–90 cm).
This distance is enough to close off a fence quickly. Wider spacing creates “windows” that take a long time to fill in. - Secure the first shoots.
Young jasmine is soft and flexible and often chooses the wrong direction. A couple of ties set the pattern, and after that the plant finds its own way. - Maintain even moisture, without overdoing it.
Jasmine likes consistent watering. Overwatering leads to lots of leaves and fewer flowers, so staying somewhere in the middle works best. - Prune lightly but regularly.
Small adjustments keep the trellis tidy and prevent side shoots from spreading too far.
Jasmine is an ideal choice for areas you want to screen quickly: along a fence near a terrace, by the entryway, next to windows, or on a patio. It creates a soft, dense wall that changes how the space feels in just one season.
On balconies, jasmine in a container with a light metal trellis works just as well — the key is sun. In small yards, it’s perfect for lifting greenery upward and freeing up ground space for beds or compact flower areas.
3. Honeysuckle Fence for Fragrant Evenings
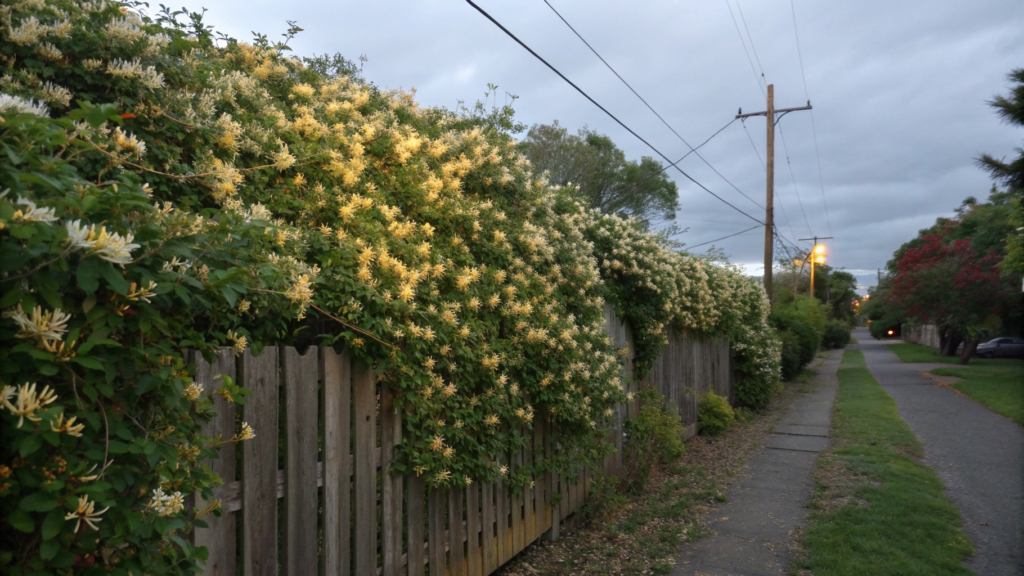
Honeysuckle provides density, privacy, and that light evening scent that everyone loves. It grows quickly, covering a fence in one or two seasons, and requires minimal maintenance.
If you want privacy with fragrance and a fast visual effect, honeysuckle is one of the most reliable options, especially for standard 6-ft fences (about 180 cm).
What to know before planting
- Growth speed. 1–3 ft per year (30–90 cm). Some varieties grow even faster.
- Green wall thickness. After two seasons, about 12–18 inches (30–45 cm).
- Best placement. Full sun or light partial shade — in shade, the plant produces fewer flowers.
- Watering. Moderate; excess water leads to leafy growth instead of flowering.
- Support is required. Honeysuckle likes to cling, but doesn’t always understand direction.
Lindy and I treat it as a “workhorse” for fast projects: when you need to close off a fence quickly, honeysuckle gets the job done.
How to build a honeysuckle fence
- Prepare the support before planting.
Honeysuckle clings, but without guiding mesh or slats it spreads sideways and loses shape. The most practical option is a 6–8 ft (1.8–2.4 m) trellis made of metal wire, such as a Garden Wire Lattice Trellis Panel (Amazon).
It easily supports the weight of mature honeysuckle without sagging. - Choose a variety based on your goal.
If maximum density is the priority:
— Lonicera japonica ‘Hall’s’ — fast, dense, and low-maintenance.
If you want more flowers:
— Lonicera periclymenum ‘Serotina’ — produces fragrant tubular flowers and is resilient.
We more often choose the second option — honeysuckle builds density on its own, but fragrance depends on the variety. - Prepare the soil: loose, well-drained, with compost.
Dig a hole 18–20 inches deep (45–50 cm). Add a 2–3 inch layer of gravel or coarse sand at the bottom, then fill with soil mixed with 1–2 buckets of compost.
Honeysuckle prefers light, breathable soil — it starts growing faster this way. - Plant every 3–5 ft (90–150 cm).
For wide fences, 5 ft spacing works well. If you want faster and denser coverage, reduce spacing to 3 ft. On our property, we used a 3–4 ft spacing, and the wall closed in two seasons. - Guide shoots regularly.
Honeysuckle grows actively but can wander and grab onto anything — from a neighbor’s fence to a bird feeder.
Once a week, walk along and secure shoots in the right direction with soft ties.
This is the easiest way to get a dense green screen without gaps. - Maintain consistent watering for the first two years.
Once established, honeysuckle tolerates drought, but early on it needs steady moisture, especially in summer.
Water once a week, 1–2 gallons per plant (4–8 liters) — this works perfectly. - Pruning should be minimal but regular.
Honeysuckle doesn’t like aggressive pruning. Simply pinch the tips to encourage side growth — this makes the wall denser.
Remove dry or overly long shoots without hesitation.
Idea for an “evening zone”
The most interesting effect appears closer to dusk. The warm floral scent intensifies around 6–9 pm, especially after a sunny day. In Idaho, we noticed this almost immediately: you step into the backyard to put tools away and catch light honey notes in the air. This calm detail strongly affects how the space feels.
And most importantly, this isn’t a “one-month” effect. Many honeysuckle varieties bloom from May to September, and some repeat another wave closer to fall.
4. Eco-Friendly Bamboo Slat Trellis
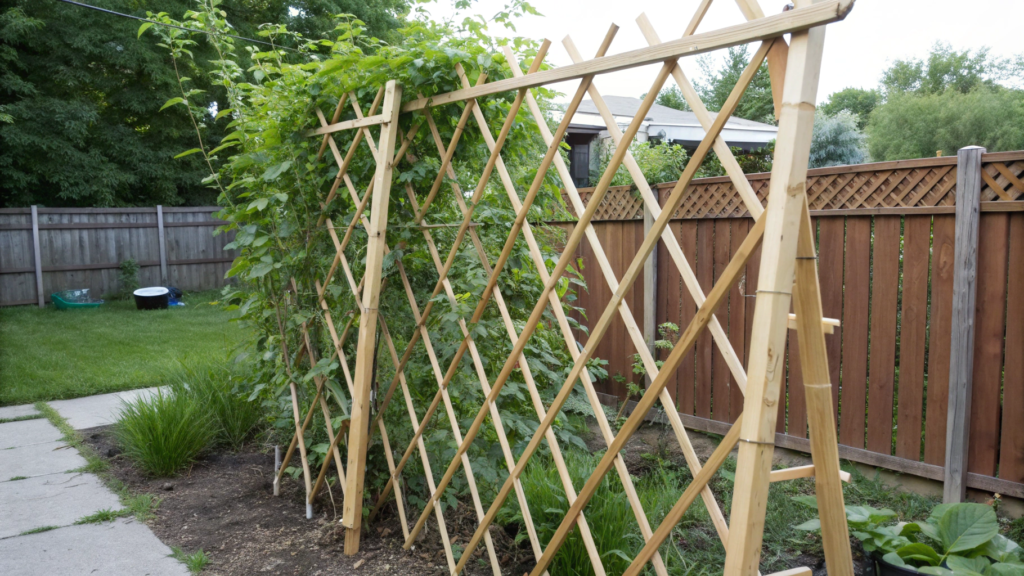
Bamboo is an excellent material for anyone who wants a reliable support for climbing plants while choosing more eco-friendly solutions. It’s lightweight, strong, affordable, and works well for fences, container plantings, and small yards where you need something neat and not too heavy.
What a bamboo trellis is good for
- For clematis, honeysuckle, sweet peas, passionflower, and any plant that needs vertical growth.
- For areas where you don’t want to use metal or a heavy wooden frame.
- For projects that need to stay lightweight — for example, when the trellis is attached to a thin fence or pergola.
And the best part: bamboo is easy to cut to size — pruning shears handle it easily, even with finger-thick stems.
Materials that work best
We’ve tried several options, and the most reliable setup turned out to be a combination of:
- Bamboo poles, 0.5–1 inch thick (1.2–2.5 cm)
- Flat bamboo slats (great for horizontal crossbars)
- Natural jute twine or plastic garden wire
- Anchor stakes to secure the bottom
All of this can be assembled without special tools — just pruning shears and a knife.
We used ready-made Bamboo Garden Fence Panels (Pack of 20) for a side section of the garden, and they’ve held up unchanged for a year and a half.
How to assemble a bamboo trellis
- Define the area and height of the structure.
A height of 6 ft (180 cm) is enough for most climbing plants. If you need to screen a larger area, you can build an 8 ft (240 cm) section, but pay close attention to strength — the taller the structure, the more important it is to reinforce attachment points. - Mark the vertical posts.
Place bamboo poles every 1.5–2 ft (45–60 cm).Closer spacing creates a denser look, but it’s not necessary unless the plant is heavy. - Secure the posts at the base.
Drive each post 6–8 inches (15–20 cm) into the ground. In soft soil, we sometimes reinforce the base with metal stakes to prevent wind movement. - Add horizontal slats.
Cut flat bamboo slats to the width of the structure and attach them every 12–18 inches (30–45 cm).
This spacing works well for most vines — they have enough to grab onto, and the trellis stays visually clean. - Tie everything together with jute twine or garden wire.
We prefer jute — it holds firmly and doesn’t look out of place over time. Plastic wire also works, but it tends to fade in the sun. - Test the load before planting.
Gently pull on the top crossbar. If the structure shifts, add a horizontal brace in the center or shorten the section.
A common beginner mistake is making the trellis too wide. The optimal width is 3–6 ft (90–180 cm) per section.
This type of trellis works great for creating a living divider along a fence. It also functions well as a backdrop for flower beds — especially if you plant clematis or sweet peas nearby. And for container plantings, bamboo is a real lifesaver, since the structure is very light and doesn’t overload the pot.
We once installed a bamboo trellis directly in a cucumber bed because the metal one was used on another project. The result was just as good — the vines climbed easily, and the harvest stayed clean and dry.
5. Modern Steel Frame with Greenery Curtain
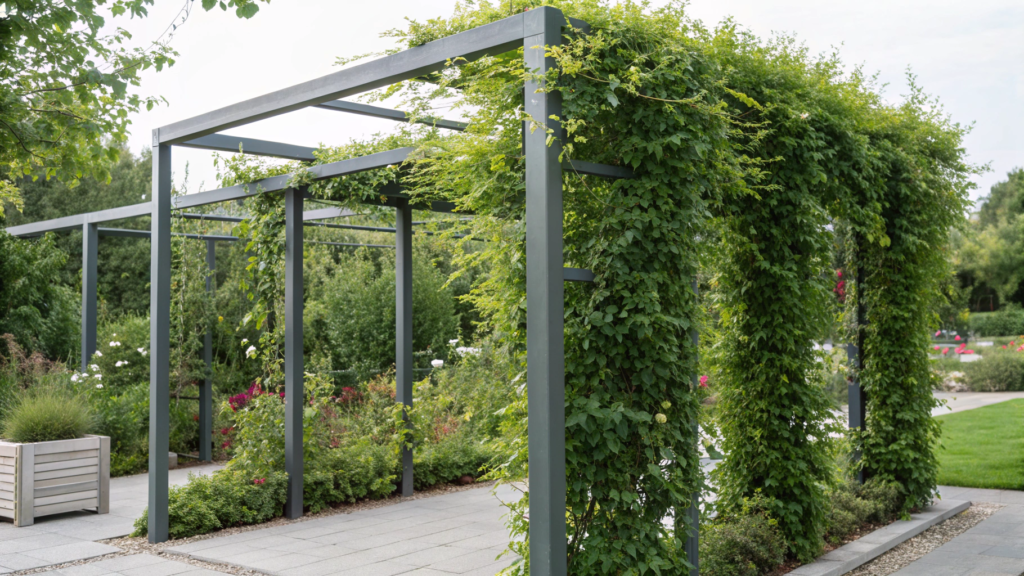
Metal is one of the most stable options for anyone who wants a strong structure that can handle the weight of mature vines. It doesn’t warp from moisture and handles winter without issues.
A steel frame works well with almost any climbing plant, but it’s especially effective with those that create a dense “flow” of greenery: jasmine, Virginia creeper, hops, early-blooming clematis. We used jasmine on it, and it covered the frame almost completely in a single season.
What to know before installation
- Height — 7–8 ft (2.1–2.4 m) is ideal for a full green wall.
- Section width — 3–6 ft (90–180 cm).
- Load — mature vines can add 30–50 lbs (13–22 kg) per section.
- Finish — powder coating or galvanizing significantly extends lifespan.
A steel frame is convenient because it can be installed as a freestanding structure or attached to an existing fence.
Reliable materials
Rectangular steel profiles 1–1.5 inches thick (2.5–3.8 cm) perform best. They keep their shape even when plants decide it’s time to really spread out.
For vertical lines, we use steel cables — they allow you to create a clean grid that’s easy to attach shoots to.
How to install a metal frame
- Mark the installation line.
Place two stakes and stretch a string to see how the frame will sit relative to a fence or path. Sometimes shifting it a couple of inches makes a big difference for light access and avoiding utilities. - Prepare post holes.
A depth of 12–16 inches (30–40 cm) is usually enough to prevent wind movement. In loose soil, adding a bit of gravel at the bottom helps stabilize the posts. - Set vertical posts and level them.
Steel shows any unevenness immediately, so lightly backfill first, check with a level, and only then compact the soil fully. - Add horizontal elements or tension cables.
The optimal spacing is 12–18 inches (30–45 cm). This gives vines enough structure to cover the frame evenly. Stainless steel cables are useful because they can be tightened after a year, once plants gain weight. - Check structural stability.
A light shake by hand will reveal weak points. If the structure moves, reinforce the posts or shorten the section — it usually takes just a few minutes. - Plant vines every 3–4 ft (90–120 cm).
This spacing allows for even growth without overcrowding. Add a bit of compost before planting to help plants establish faster. - Guide the first shoots.
Young vines don’t yet know where to go, so soft ties during the first couple of months are a small investment in a dense green curtain.
A steel frame is well suited for creating a modern private zone — around a terrace or along a property line. It gives a clear visual rhythm and keeps greenery neatly contained.
We’ve also used it as a “green divider” between a seating area and the garden. The frame stays clean and minimal, while the plants form a dense green curtain that separates space without feeling bulky.
6. DIY Cedar Trellis Panels for Small Yards
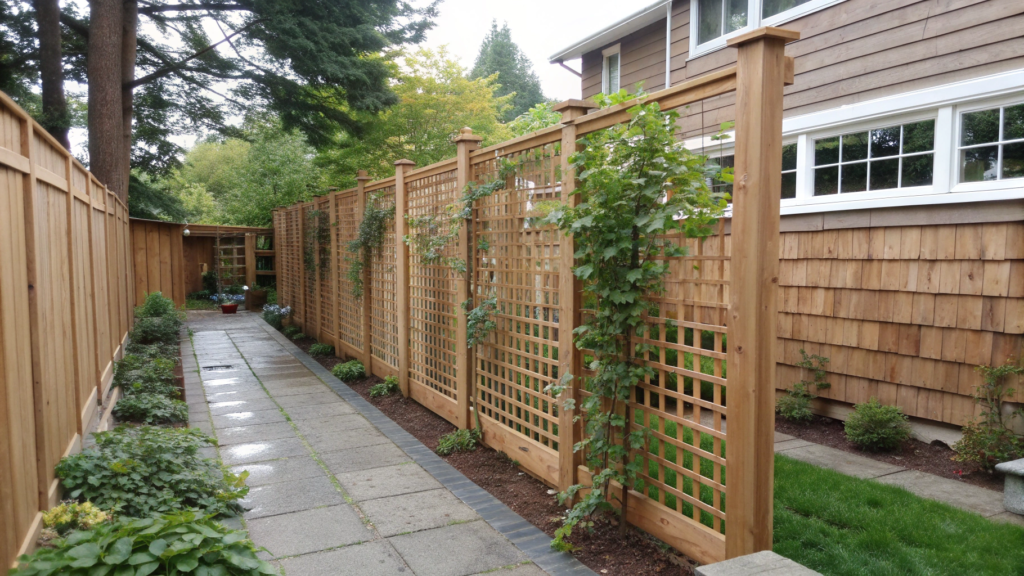
Cedar trellis panels are light, durable, neat, and still strong enough to support clematis, hops, or young honeysuckle.
Cedar is one of the most convenient materials for small spaces. It doesn’t warp after rain, doesn’t rot as quickly as pine, and looks natural even when the panel sits very close to a path or the house.
The panel doesn’t weigh the space down, and even a narrow passage between the house and plantings feels more open.
And the smell… cedar after rain is a bonus all on its own.
Materials that definitely work
For one panel, you usually need:
- Cedar slats 1×2 inches (2.5×5 cm) — main vertical elements
- Boards 1×3 inches (2.5×7.5 cm) — top and bottom frame
- Galvanized or stainless screws
- Garden wire or soft clips for attaching plants
If you don’t want to struggle with finding straight wood, ready-made slats are available in sets.
How to build a cedar panel — steps
- Decide on the panel height and width.
For a small yard, sizes of 5–6 ft tall (150–180 cm) and 2–3 ft wide (60–90 cm) work best. The panel stays light and mobile — you can move it if you decide to change something in the yard. - Assemble the frame from 1×3 boards.
We usually make a rectangle and reinforce the corners so the panel doesn’t wobble. It takes about five minutes but adds great rigidity. - Add the vertical slats.
Spacing should be 6–8 inches (15–20 cm). This is an ideal interval for most vines: plants don’t “fall through” the gaps and cover the surface faster. - Secure the slats with screws or a construction stapler.
Screws last longer, but a stapler is faster. On small panels, both options work well. - Check the panel for stability and weight.
Cedar is light, and that’s a huge advantage: you can lift the panel with one hand and reposition or rotate it at any time. In small yards, this flexibility often saves the day. - Install the panel against a wall, fence, or into the ground.
If mounting to a wall, leave a 1–2 inch gap (2.5–5 cm) so air can circulate freely.
If placing it in the ground, use small metal stakes or wooden stakes to secure the bottom. - Plant and guide the first growth.
Clematis, honeysuckle, sweet peas, momordica — all of them climb cedar beautifully. It’s best to secure the first shoots with soft wire to establish a vertical direction.
How to use this panel in a small yard
A cedar trellis creates a vertical focal point where there’s no room for wide plantings. It easily turns a narrow corner into a green accent, and along a fence it works as a neat green divider.
We once used three of these panels in a row along a small yard, and in just one season we got a dense green corridor that visually made the space feel wider.
7. Low-Cost Lattice Screen With Vines
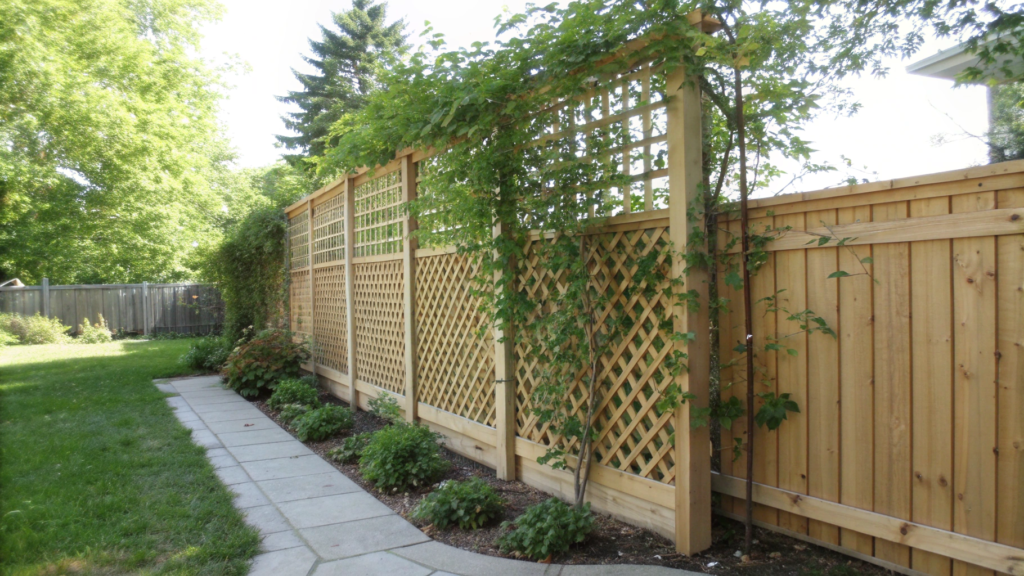
If you want to screen off a corner of the yard or soften the look of a fence but the budget is limited, a lattice screen is one of the most practical low-cost solutions. Lightweight plastic or wooden lattice panels are inexpensive, can be installed in about an hour, and provide an even surface that climbing plants easily latch onto.
Materials worth considering
- PVC lattice — lightweight, rot-resistant, well suited for zoning terraces and patios.
- Wood lattice (pine or spruce) — cheaper, but requires protective treatment.
- Ready-made folding panels — convenient when you need to block off an area quickly without complex installation.
We most often choose PVC — it doesn’t warp and handles the weight of vines without issues.
How to install a budget screen
- Choose support posts.
For a low-cost project, even standard 2×2 inch (5×5 cm) wooden posts work well. Place posts every 3–4 ft (90–120 cm) so the lattice doesn’t sag. - Attach the lattice to the posts.
Use screws with wide washers — this prevents plastic panels from cracking in the wind. For wooden panels, regular screws are sufficient. - Leave a small gap from the ground.
2–3 inches (5–7 cm) is enough to keep the bottom edge from absorbing moisture. The panel will last longer, even if it’s made of wood. - Plant vines and set the growth direction.
Fast-growing climbers work best for budget screens:
— Virginia creeper,
— honeysuckle,
— sweet peas,
— morning glory.
They quickly fill the lattice and create a dense green backdrop. - Secure the first shoots to the lattice.
Small clips or soft wire help form an even green layer. After the second month, plants usually find support on their own.
A budget lattice screen works great for hiding awkward areas such as utility side passages, trash bins, or garage walls. It also performs well along patios — adding privacy without looking heavy.
In small yards, this type of screen helps draw the space upward, and along fences it adds a soft green line instead of a solid wall.
We used this option along the back wall of the house to hide an air conditioning unit. After one season, the lattice was completely covered with morning glory, and the structure started to look like a permanent landscape feature rather than a temporary fix.
8. Evergreen Climbing Hydrangea Cover
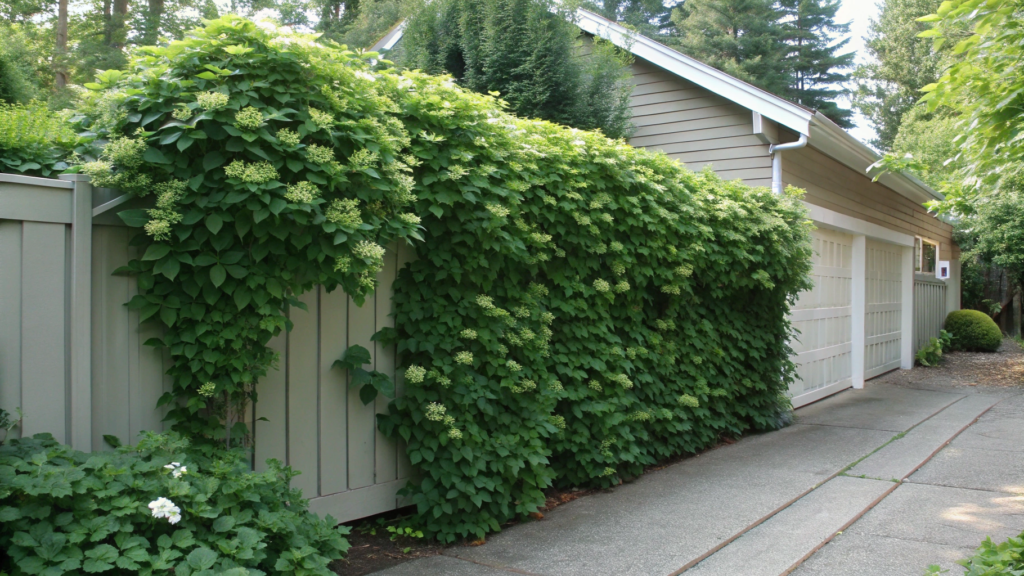
At first glance, climbing hydrangea grows more slowly than ivy or Virginia creeper, but in return it creates the most neat, dense, and well-kept green screen, one that looks respectable even in winter. For fences, garage walls, or shady areas of the yard, it’s a real find.
What makes this hydrangea a valuable choice
- Evergreen quality. The screen works year-round.
- Texture. Leaves are dense and deep green, without a messy look.
- Hardiness. Grows calmly in partial shade.
- Coverage thickness. After 2–3 seasons, about 10–14 inches (25–35 cm).
It’s often placed next to wooden structures — cedar panels, pergolas, block walls — because it looks tidy even if it doesn’t fully cover the surface.
How to prepare for planting
Climbing hydrangea prefers moist but well-drained soil. Dig a hole 18 inches (45 cm) deep and add about one bucket of compost. On heavy clay soils, it’s better to add sand or fine gravel so the roots don’t sit in water.
It clings well to rough surfaces, but on smooth walls it still needs a trellis or cables.
How to install support and plant
- Install a vertical support 6–7 ft tall (180–210 cm).
Wooden slats or metal cables work well. Spacing between lines should be 16–20 inches (40–50 cm), which is enough for even shoot distribution. - Plant every 3–4 ft (90–120 cm).
In small yards, the spacing can be reduced to 2.5 ft. - Maintain moisture during the first two seasons.
This is one of the key points: if the soil dries out, growth slows down. A light layer of mulch on top is a good solution. - Secure young shoots at the early stages.
After rooting, hydrangea starts clinging on its own with aerial roots, but at the beginning it needs guidance. - Trim long shoots periodically.
Climbing hydrangea likes to “go exploring” sideways. If you want a dense screen right on the wall, gently redirect the shoots back.
This hydrangea is especially effective where you need to visually soften a vertical surface — a tall wall, cold concrete, or a dark wooden fence. It creates a sense of depth and makes the space feel calmer and more refined.
Our friends used it on the back wall of their garage, which was always in shade. After two years, the surface turned into a beautiful green backdrop that holds year-round, and even in winter the garden doesn’t look “bare.”
9. Container Trellis for Patios and Balconies

A container trellis is an ideal way to bring a garden-like feeling to places where your planting space is basically one bucket of soil.
Why trellises in containers work so well
- They work in small spaces where installing a permanent support isn’t possible.
- They help create privacy on a balcony without heavy screens.
- They’re convenient because you can move them for the season or turn them toward the sun.
- They’re suitable for plants that don’t need deep root systems.
We most often grow clematis from the viticella group, sweet peas, decorative climbing beans, and mini hops in these containers.
Suitable materials
Lightweight structures are the best friends of containers:
- Bamboo trellises
- Metal mini trellises (4–6 ft)
- Foldable PVC frames
- A high-quality lightweight support like Mini Steel Garden Trellis, 5 ft — it weighs very little but holds plants securely.
How to set up a container trellis
- Choose a container with a volume of at least 10 gallons (38 L).
Smaller pots dry out quickly, and vines need stable moisture. A width of 16–18 inches (40–45 cm) is optimal. - Install the trellis before filling the container.
This matters: once the soil is packed, inserting a support is difficult. We place it on the bottom and cover it with the first layer of soil to fix the angle. - Use a light, breathable soil mix.
A blend of all-purpose soil and compost in a 3:1 ratio works well. Heavy soils aren’t suitable — container plants need aeration. - Plant at the base of the trellis.
Position the plant slightly closer to the back wall of the container so the front stays open — this improves air circulation. - Maintain moisture and add mulch.
On patios and balconies, soil dries out faster due to wind and sun. A 1–2 inch (2.5–5 cm) mulch layer helps stabilize moisture. - Guide the first shoots right away.
Containers move more in the wind, so vertical guidance needs to be set from the very first days.
On balconies, these setups create a green divider without overloading the space. They work well near railings, next to a small table, or in a corner where you want to visually lift the space upward.
On patios, this is one of the most convenient ways to add privacy — place a container with a trellis between seating areas, and you get a soft, living separation.
10. Reclaimed Wood Trellis Fence Project
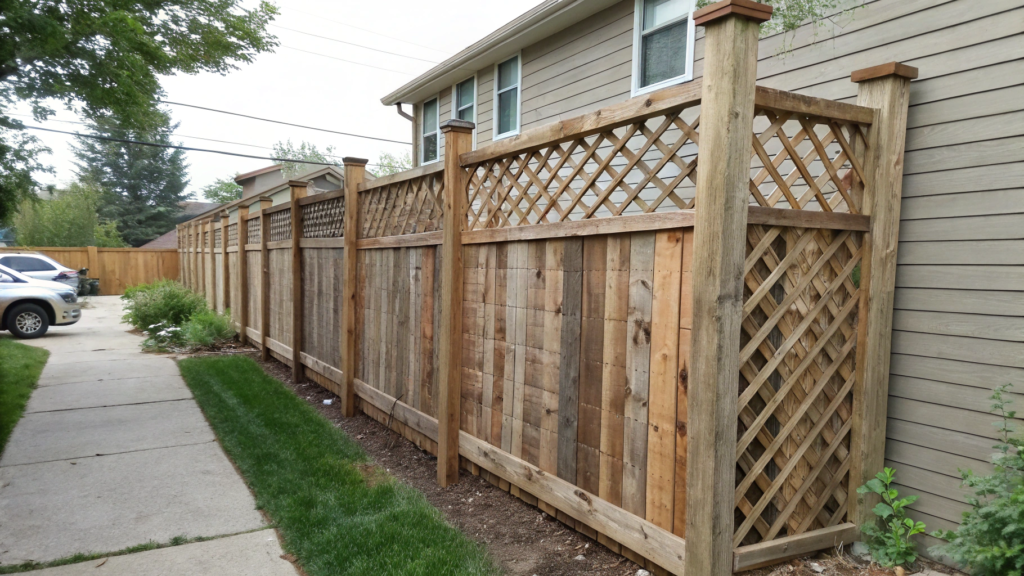
A trellis made from reclaimed wood is especially good for yards where you want to add character and texture without buying new materials. Old wood often looks more interesting than new: natural tones, sun-faded grain, subtle surface relief — all of this makes the structure feel visually “alive.”
Why reclaimed wood is convenient
- It has already been tested by moisture and sun.
- Light roughness helps plants cling more easily.
- The panel feels more “warm” visually.
- The cost is usually minimal — often it’s completely free material.
Suitable materials
- Boards 1 inch thick (2.5 cm) — taken from pallets, fences, or old shelving
- Slats 1×2 inches (2.5×5 cm) for vertical elements
- Wood screws
- Exterior protective oil
How to build this type of panel — steps
- Sort boards by thickness and condition.
We usually lay all the material out on the ground and pick pieces of roughly equal thickness. Different wood tones are fine — they actually add beauty. - Assemble the frame from the straightest boards.
A height of 6 ft (180 cm) and a width of 3–4 ft (90–120 cm) work well for a single panel.
The frame is the foundation of the entire structure — it provides rigidity. - Add internal slats.
Spacing of 6–10 inches (15–25 cm) works well for most climbing plants.
Reclaimed wood has its own character — slats may vary in texture, creating a very natural, handmade pattern. - Secure the structure with screws.
It’s best to use galvanized screws to avoid rust stains. With older wood, pre-drilling small pilot holes often helps prevent splitting. - Oil the panel or leave it untreated.
We treated some panels and left others unfinished. Untreated wood eventually develops a beautiful gray patina — it depends on the effect you want. - Install the panel along a fence or wall.
In small yards, it’s convenient to place the panel on metal anchors or wooden stakes — this makes it easy to move.
For permanent mounting, leave a 1–2 inch gap (2.5–5 cm) from the wall for ventilation. - Plant vines and guide the first shoots.
Old wood works especially well with ivy, Virginia creeper, honeysuckle, and climbing roses. The rough surface helps them grab on faster.
This type of structure is great for screening utility zones, softening the look of old walls, working as a decorative panel near a patio, and adding style along a fence.
On an older property, we used reclaimed supports near a small utility shed — and within one season they became one of the most loved visual elements of the yard. A simple structure, but very expressive.
Protected Space
Each of these projects is very different in style, materials, and approach, but they all lead to the same result: vertical greenery truly transforms a yard. It adds structure, makes the space feel more protected, and in summer brings shade, fragrance, and a living backdrop that’s pleasant to look at every day.
And importantly, all of these ideas work not only in large yards. Small courtyards, balconies, narrow side passages along a house — that’s where trellis systems reveal their full potential.If you’ve already tried some of these solutions or want to create your own version, share it in the comments. Which materials did you like most? And is there a project you would add to this list?