On our homestead during planting season, when your hands smell like soil and your thoughts are somewhere between seedlings and watering, there’s often just no energy left to cook anything complicated.
It’s exactly in those moments that simple, healthy dinners save the day — dinners that don’t require much work in the kitchen. Dinners that come together fast, aren’t overloaded with oils, aren’t heavy, have a normal ingredient list, taste great — the kind you actually want to cook more than once.
Lindy and I ended up pulling together our favorite dishes. In this article, there are ten such dinners.
And I’ll share not only how to cook them, but also why each step works. All from practice, from our kitchen, from our life.
1. Sheet Pan Lemon Herb Chicken and Veggies
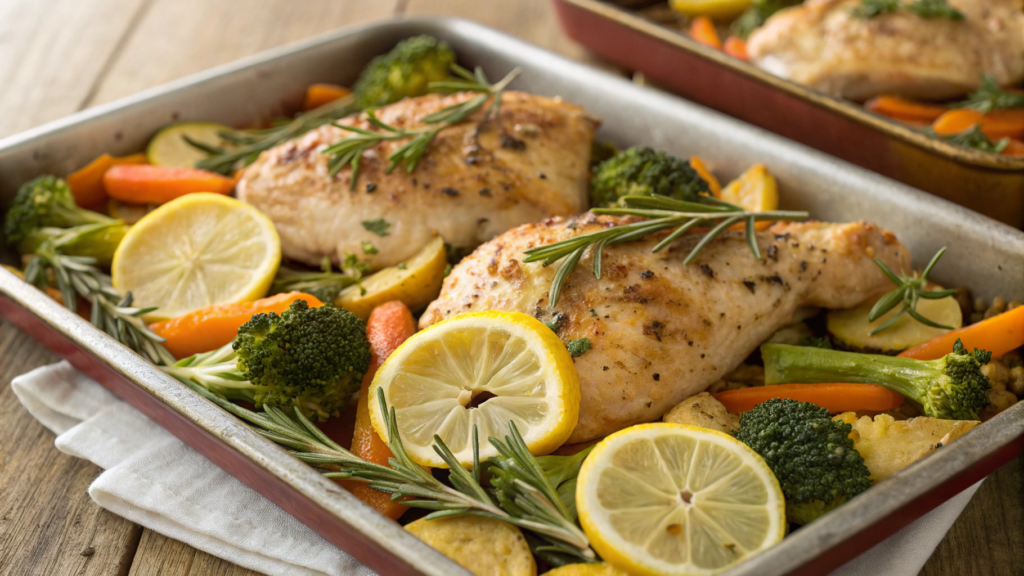
Yes, this is lemon chicken with veggies on one sheet pan — a light, warm, juicy meal that never lets you down. Dinner appears almost “between tasks,” yet still turns out so good that you wonder: why didn’t we make this more often before? And all without pots and endless cleanup — a real weeknight gift.
Ingredients
For the chicken:
- 1.5 lb boneless skinless chicken thighs (about 680 g)
- Juice of 1 large lemon
- 2 tbsp olive oil (30 ml)
- 3 garlic cloves, minced
- 1 tsp salt
- 1/2 tsp black pepper
- 1 tsp dried oregano
- 1 tsp dried thyme
- 1 tsp paprika
- A pinch of chili flakes
For the veggies:
- 2 cups broccoli (150–200 g)
- 1 sweet potato, cubed
- 1 carrot
- 1 red bell pepper
- 1–2 tbsp olive oil
- 1/2 tsp salt
- 1/2 tsp dried herbs
If you want a really good crispy edge on the veggies — don’t overcrowd the sheet pan.
How to Cook — simple, step by step
- Mix the marinade. Squeeze the lemon juice straight into a bowl — no need to be careful, just as it is. Add the olive oil, garlic, paprika, oregano, thyme, salt, and pepper. Mix with a fork until you get that bright-smelling emulsion. If the oil floats on top, don’t worry — that’s exactly how it should be.
- Coat the chicken in the marinade. Add the thighs to the bowl and use your hands (yes, your hands) to rub the marinade into every piece. It should cover them completely, even in the folds. If you have time, leave it for 20–30 minutes. If not, keep going — the lemon still makes the flavor deep and bold.
- Prep the veggies. Cut the sweet potato into cubes about 1×1 inch (2–2.5 cm). Slice the carrot into half-moons, and the bell pepper into long strips. Put everything into a bowl, add oil, salt, dried herbs, and mix. If the veggies look “dry,” add another teaspoon of oil — they should look slightly glossy, not oily.
- Spread everything on the sheet pan. Place the chicken closer to the center — it will release juices, but you don’t want them flooding the veggies. Scatter the veggies around with small gaps between pieces. Visually it should look like they have “air” to brown.
If you have a good metal sheet pan — use it without parchment, the crust will be better. - Bake at 425°F (220°C) for about 25–30 minutes. This is the temperature where the chicken stays juicy and the veggies get caramelized. At the 20-minute mark, quickly open the oven and check the sweet potato with a fork: if it’s soft, turn on broil.
3 minutes of broil gives that golden top, but keep an eye on it — the chicken browns fast. - Let the dish rest. When you take the sheet pan out, let it sit on the table for about 5 minutes. The juices inside the chicken will redistribute, and every piece will be tender. I used to skip this step, and now I do it almost automatically.
Small details that make the flavor brighter
Sometimes I add big wedges of red onion — it turns soft and sweet, and it picks up the lemon and garlic beautifully.
Lindy likes adding fresh thyme on top of the finished chicken — the aroma becomes fresh, almost like you cooked everything outside near the garden.
2. Brown Rice Stir-Fry with Tofu
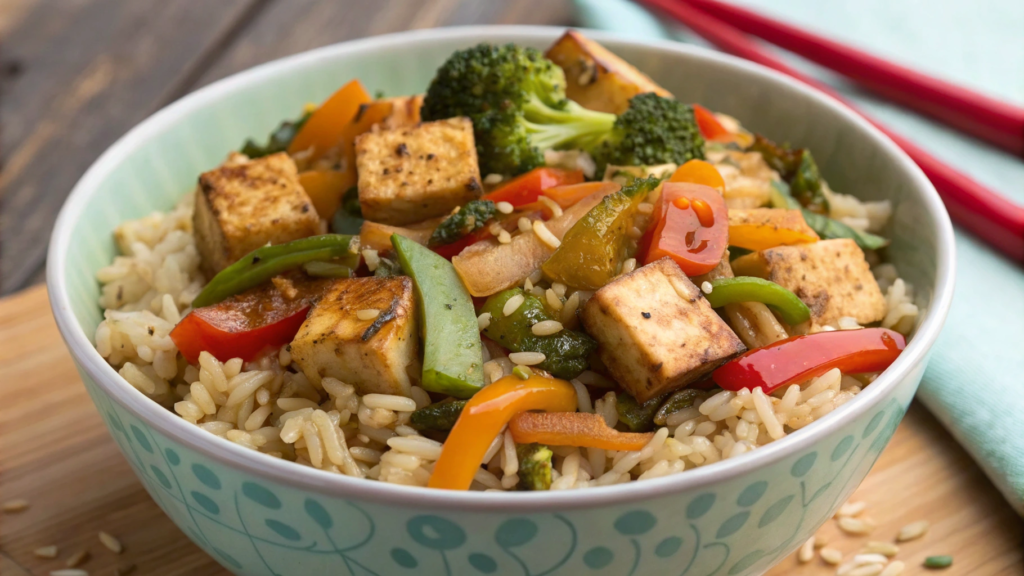
Stir-fry with brown rice and tofu is that meal that always saves you when you’re short on time but still want real, normal food — something homemade, not “grab whatever.”
And honestly — this is one of those recipes that requires almost no effort but gives you the feeling that you actually ate like a human.
Ingredients
For the base:
- 1 cup brown rice (raw) — about 200 g
- 1.75–2 cups water (420–480 ml)
The stir-fry:
- 14 oz firm tofu (400 g), cubed
- 1 tbsp cornstarch
- 1 tbsp avocado or vegetable oil
- 1 red bell pepper, sliced
- 1 large carrot, thinly sliced
- 1 big handful of broccoli
- 3 green onions, chopped
- 2–3 garlic cloves, minced
- 1–2 tsp fresh grated ginger (to taste)
The sauce:
- 3 tbsp soy sauce
- 1 tbsp honey or maple syrup
- 1 tbsp rice vinegar
- 1 tsp sesame oil
- 1 tsp sriracha (or less if you don’t like heat)
We often use one simple skillet that survives any thermal abuse — Lodge Cast Iron Skillet. It’s truly indestructible.
How to Cook — step by step, but human
- Cook the brown rice. Nothing complicated: rinse the rice, put it into a pot, add water, cover with a lid, and cook on low heat for 35–40 minutes. Brown rice takes time to open up, but the result is dense and nutty.
If you want to speed things up — soak it for an hour beforehand. - Prep the tofu. Let it “dry out”: place it on a paper towel and lightly press on top. Then coat the cubes in cornstarch.
Cornstarch is the small secret to a crispy crust without any deep frying. - Sear the tofu. On a well-heated skillet (yes, cast iron shines here), sear the cubes for 6–8 minutes until golden. Don’t move them too often — they like to sit still and brown in peace.
- Add the fresh veggies. Pepper, carrot, broccoli — all at once.
Cook for 4–5 minutes. They should soften but keep a slight crunch. In our garden the broccoli grows almost all summer, and fresh broccoli behaves differently in the skillet — it “rings,” if that makes sense. - Aromatics — into the skillet. Garlic, ginger, the white part of the green onions.
The smell hits right away… garlic plus ginger is an amazing aromatic combo. - Stir in the sauce. In a separate bowl, quickly mix soy sauce, honey, vinegar, sesame oil, and sriracha.
Pour it into the skillet and mix immediately so the sauce coats everything evenly. It thickens in about a minute. - Combine everything with the rice. Add the cooked brown rice, stir, and keep it all together for another minute so the flavors blend.
- Serve with the green part of the onions. It adds a fresh, bright finish. Sometimes I sprinkle sesame seeds — looks beautiful and boosts the flavor.
Small details that make the dish better
You can swap tofu for tempeh — the texture is firmer, the flavor deeper. Carrot is best sliced thin, almost like shavings. That way it doesn’t feel rough or chewy.
If you want more protein — add a second portion of tofu and keep the veggie amount the same.
3. Turkey and Zucchini Meatballs
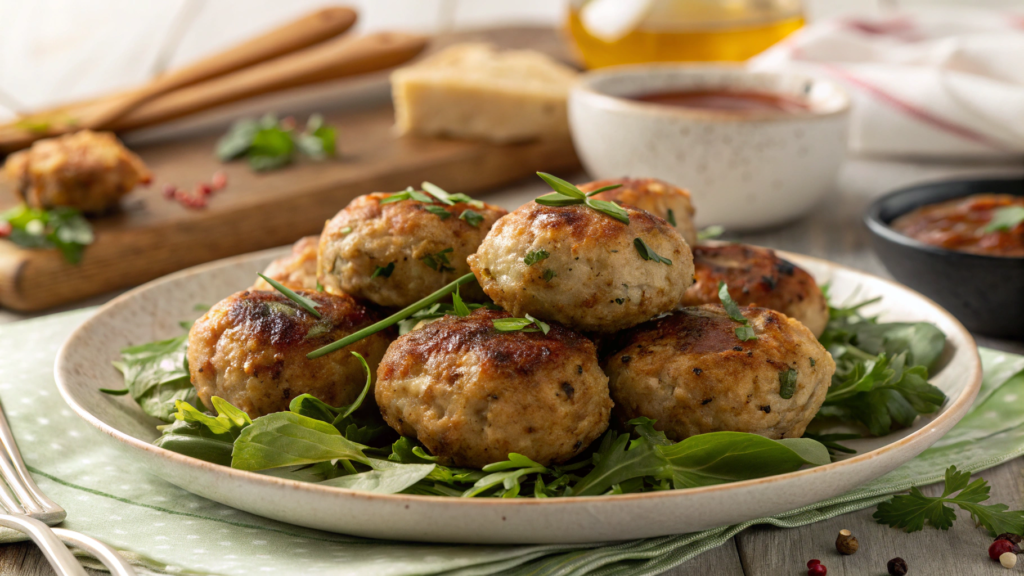
If I’m honest, turkey meatballs weren’t on my list of favorite dinners for a long time. But now this is one of those dinners I make when I want something light, high-protein, and not greasy, but still not dry (turkey loves to dry out, and we battled with that for a long time).
Zucchini is the rescue. It gives juiciness, structure, and makes the meatballs soft, almost like you added cream — but without the cream.
Ingredients
For the meatballs:
- 1 lb ground turkey (454 g)
- 1 medium zucchini, grated on a coarse grater (squeeze out excess moisture)
- 1 egg
- 1/3 cup breadcrumbs (35–40 g)
- 2 garlic cloves, minced
- 1/2 tsp salt
- 1/2 tsp black pepper
- 1 tsp Italian herbs
- 1 tbsp olive oil (for greasing the sheet pan)
For serving:
- Marinara sauce (homemade or store-bought)
- A bit of fresh basil
- A couple spoonfuls of grated parmesan (optional)
If you want to bake meatballs perfectly (so they don’t stick and hold their shape), it’s easiest to use a sturdy sheet pan like Nordic Ware Aluminum Half Sheet. It handles 450°F with no problem.
How to Cook — step by step, with details
- Prep the zucchini. Grate it on a coarse grater, place it in a towel, and squeeze lightly. Not to the last drop!
We once squeezed too hard — the meatballs turned out dense, almost like patties.
The zucchini should stay slightly moist — it’s responsible for that soft, juicy texture. - Combine the mixture. In a large bowl, mix the turkey, zucchini, egg, breadcrumbs, garlic, salt, pepper, and herbs.
Use your hands — you need to feel the texture. The mixture should be soft, pliable, moist, but not runny. - Form the balls. About the size of ping-pong balls. If it sticks — lightly wet your hands with cold water.
- Arrange on the sheet pan. Grease the sheet pan with a little oil and place the meatballs with small gaps between them.
Space is important — otherwise they’ll steam instead of baking. - Bake at 400°F (200°C) for 18–22 minutes. We usually set the timer for 18 minutes and cut one meatball with a knife: if the juice is clear — they’re done.
This timing keeps them tender instead of dry. - Serve with warm marinara. Sometimes I warm the sauce right in a skillet and transfer the meatballs into it.
Lindy likes adding basil on top — it makes the flavor fresher and brighter.
Small notes from practice
Sometimes I add a bit of grated onion to the mixture, literally a tablespoon — the meatballs become softer and more tender.
And if you want a brighter flavor, Dijon mustard works well, just a tiny amount, about a teaspoon.
Sometimes I make a double batch specifically for freezing — these meatballs freeze beautifully, and later, when you need dinner fast, you just pull them out, warm them in marinara, and dinner is ready in minutes.
4. Cauliflower Fried Rice
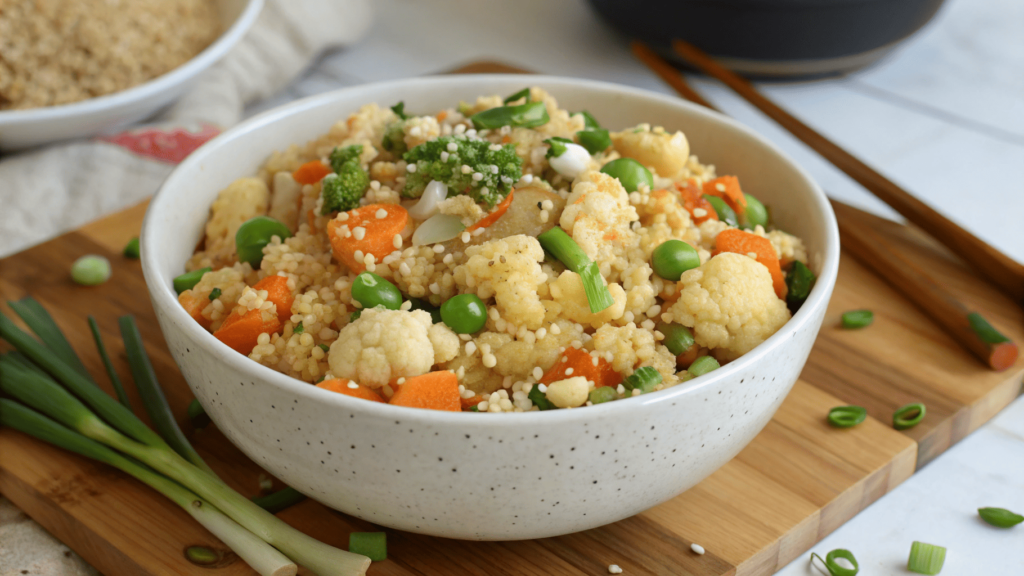
Honestly: cauliflower instead of rice? One year we had a huge cauliflower harvest (it grows like crazy for us in the PNW), and Lindy said: “Let’s just try it. What do we lose?”
A light, warm, flavorful cauliflower fried rice became one of the most convenient weeknight dinners. It cooks faster than the classic version and often has an even nicer texture — tender, with crisp little veggie pieces.
For us, this turned into one of those quick healthy dinners that always works.
Ingredients
For the base:
- 1 medium head of cauliflower, grated or pulsed into crumbs
- 2 tbsp avocado or vegetable oil
- 1 small onion, finely chopped
- 2–3 garlic cloves, minced
- 1 cup frozen green peas (about 150 g)
- 1 cup carrots, diced into small cubes
- 2 eggs
- 3 green onions, chopped
For the sauce:
- 2–3 tbsp soy sauce
- 1 tbsp honey or syrup
- 1 tsp sesame oil
- 1/2–1 tsp sriracha (to taste)
How to Cook — simple steps, but with nuance
- Prep the cauliflower. Cut it into large pieces and pulse in a blender. You want coarse crumbs — big enough to look like rice but not turning into purée.
If you overdo it, everything becomes wet and mushy. - Sauté the onion and carrots. Heat a skillet, add oil, toss in the onion and carrots. They should soften but keep a bit of texture.
I love this moment — when the kitchen starts smelling like sautéing veggies and the air becomes warm. - Add garlic and peas. Garlic goes in for 30 seconds (it browns fast), and the peas just need to heat through.
Sometimes I add a little fresh ginger — about half a teaspoon for a warm, bright aroma. - Push the veggies aside and scramble the eggs. Crack two eggs right into the skillet and scramble until soft.
Then mix them back in with the veggies. This small trick makes the texture richer and more cohesive. - Add the cauliflower. Here it’s important not to stir nonstop. Let it “catch” on the skillet — about 3–4 minutes.
It should soften but not turn into a paste. - Pour in the sauce. Mix soy sauce, honey, sesame oil, and a bit of sriracha in a bowl.
Pour into the skillet, toss quickly, and cook for another minute. On high heat, the flavor becomes deeper and more savory. - Add the green onions. They add freshness and tie everything together.
Lindy always says that without green onions it’s “just fried cauliflower, not dinner.”
Small notes from practice
Sometimes I add diced turkey or shrimp if we want more protein — both versions work great.
Cauliflower loves strong heat, so it really shines on a skillet that holds temperature well — that’s the secret to that real wok-style flavor.
And one more thing: if the cauliflower had moisture, you can “dry” it briefly in the skillet without oil — literally a minute — and only then add the veggies and sauce. The texture ends up light and crumbly, almost like regular rice.
5. Baked Cod with Fresh Herbs

Baked cod with herbs is the kind of dish that doesn’t require mood or inspiration.
And it always turns out normal. Actually, more than that — it turns out so soft, so clean in flavor, that every time I’m surprised how four ingredients can turn into something so… homey.
Lindy and I entered a whole “fish period” here in the PNW. Fish is more accessible, and I realized how much cod loves herbs, lemon, and high heat. This simple formula always works.
Ingredients
The fish:
- 1.5 lb cod (680 g), portioned
- 2 tbsp olive oil (30 ml)
- Juice of 1/2 lemon
- 2–3 garlic cloves, minced
- 1 tsp salt
- 1/2 tsp pepper
The herbs:
- 1/4 cup fresh parsley, finely chopped
- 1/4 cup dill (if you like it)
- 2 tbsp fresh thyme leaves
- 1 tbsp soft butter (optional)
For aroma:
- 1 lemon, sliced into rounds
- A couple of thyme sprigs
To make sure the cod cooks evenly and doesn’t “steam” but actually bakes, it’s best to use a heavy dish or pan like a Lodge Cast Iron Skillet. The fish holds its shape and stays firm, not falling apart.
How to Cook — simple steps with nuance
- Prep the fish. Lay the cod on a paper towel and pat it lightly — excess moisture makes the fish taste boiled instead of baked.
This tiny action really changes the texture and final result. - Mix a quick marinade. Olive oil, lemon juice, garlic, salt, and pepper — everything in a small bowl.
I usually taste a drop first — the balance of oil and acidity should feel right. - Coat the fish with the mixture. Just drizzle it over and rub it in with your fingers. Nothing should drip — better to use less than too much.
- Add the herbs. Mix the parsley, dill, and thyme with a teaspoon of oil or soft butter.
Then spread this mix over the top of the fish.
The herbs release an incredible fresh roasted aroma in the oven. - Arrange the lemon slices. A few under the fish, a few on top.
The lemon underneath creates gentle steam, and the top slices caramelize slightly. - Bake at 425°F (220°C) for 10–14 minutes. It depends on the thickness of the piece.
The fish should flake easily with a fork but still be moist.
I usually check at the 10-minute mark by pressing lightly on the side with a fork. - Let the fish rest. Just a couple of minutes. The flavor becomes smoother and the juices settle.
Small notes from practice
Sometimes I add a few drops of white wine on top before baking — the flavor becomes deeper, especially with fresh thyme. Lindy prefers the version with dill, and I go for extra parsley because it makes the flavor brighter without adding heaviness.
If you get a thicker piece of cod, you can finish it under the broiler for a couple of minutes — the top turns golden and the dish looks like you spent way longer on it than you actually did.
And this recipe pairs perfectly with a simple salad or even leftover rice — it’s so universal it adapts to whatever ingredients you have.
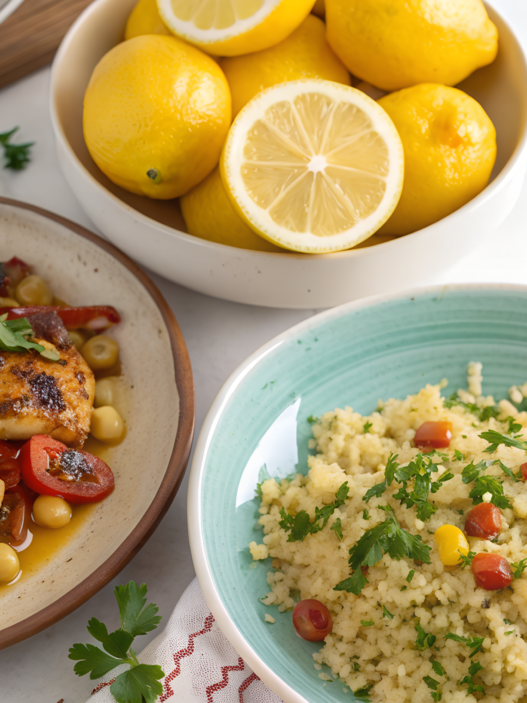
6. Stuffed Bell Peppers with Quinoa
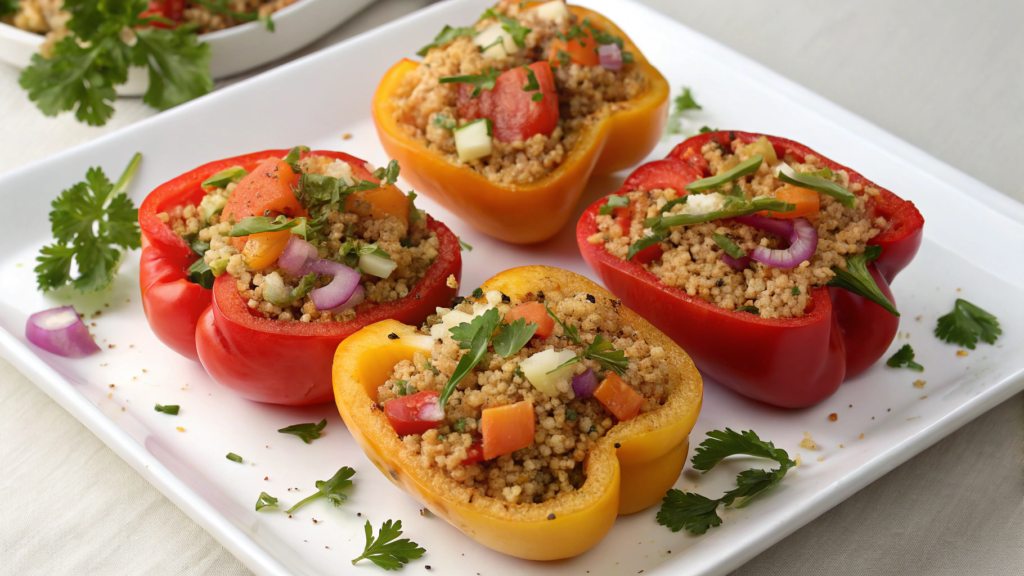
When we started growing peppers actively on our property (both in Idaho and later in the PNW), I realized one simple thing: they’re easier to cook on weekdays than on holidays.
They do half the work for you — they look beautiful, they hold the filling perfectly, and all you need is to mix the filling and put them in the oven.
This version is the lightest, the most “green,” with no meat, yet still filling thanks to quinoa. Quinoa absorbs all the flavor from the veggies, tomato sauce, and spices… and turns into this soft “pilaf-like” mixture inside the pepper. It’s one of those simple plant-based dinners that feels comforting without effort.
Ingredients
For the peppers:
- 4 large bell peppers, any colors
- 1 tbsp olive oil
- A pinch of salt
For the filling:
- 1 cup quinoa (raw) — about 170 g
- 2 cups vegetable broth (or water) — 480 ml
- 1 small onion, finely chopped
- 2–3 garlic cloves, minced
- 1 cup black beans, rinsed (canned is fine)
- 1 cup corn (frozen or fresh)
- 1.5 cups tomato sauce or crushed tomatoes
- 1 tsp paprika
- 1/2 tsp cumin
- 1/2 tsp salt
- 1/4 tsp pepper
- A bit of fresh parsley or cilantro for serving
To help the peppers keep their shape, it’s easiest to bake them in a sturdy dish or cast-iron pan like a Lodge Cast Iron Skillet, which distributes heat beautifully.
How to Cook
- Prep the quinoa. Rinsing is essential — it takes 10 seconds but changes the flavor a lot.
Then add broth, bring to a boil, lower the heat, and cook covered for 15 minutes.
The quinoa should be fluffy with no extra liquid for a perfect filling texture. - Prep the peppers. Slice off the tops and remove the seeds carefully. Brush the insides with a bit of oil and sprinkle with a pinch of salt.
I love peppers — they’re so neat, like they were designed for stuffing. - Sauté the veggies for the filling. In a skillet, lightly sauté the onion, then the garlic.
Add corn, beans, and spices. Paprika gives that warm, “homemade” flavor. - Add the quinoa and tomato sauce. Mix everything together in one skillet.
The filling should be thick, moist, but not watery — otherwise it’ll just run out of the peppers. - Stuff the peppers. Pack them gently but firmly.
You can lightly “press down” the filling, and add a small spoon of sauce on top. - Bake at 375°F (190°C) for 35–45 minutes. The peppers should soften but not fall apart.
Sometimes I cover them with foil for the first 20 minutes so they cook evenly.
This is the step that gives them that tender, roasted flavor. - Add fresh herbs on top. Right out of the oven — the aroma becomes brighter.
Small notes from practice
Sometimes I add a little grated cheese to the filling — just a couple of spoonfuls, not for cheesiness, but for structure.
Lindy likes the more “summer” version with extra corn. And sometimes I toss in a bit of crumbled feta, which gives a slightly fresh, slightly creamy taste without heaviness.
Stuffed peppers reheat beautifully the next day — the flavor gets deeper because the quinoa absorbs the sauce even more. And if your garden produced smaller peppers, you can make mini versions — little “snack boats,” super cute and very easy.
7. Spaghetti Squash with Marinara Sauce
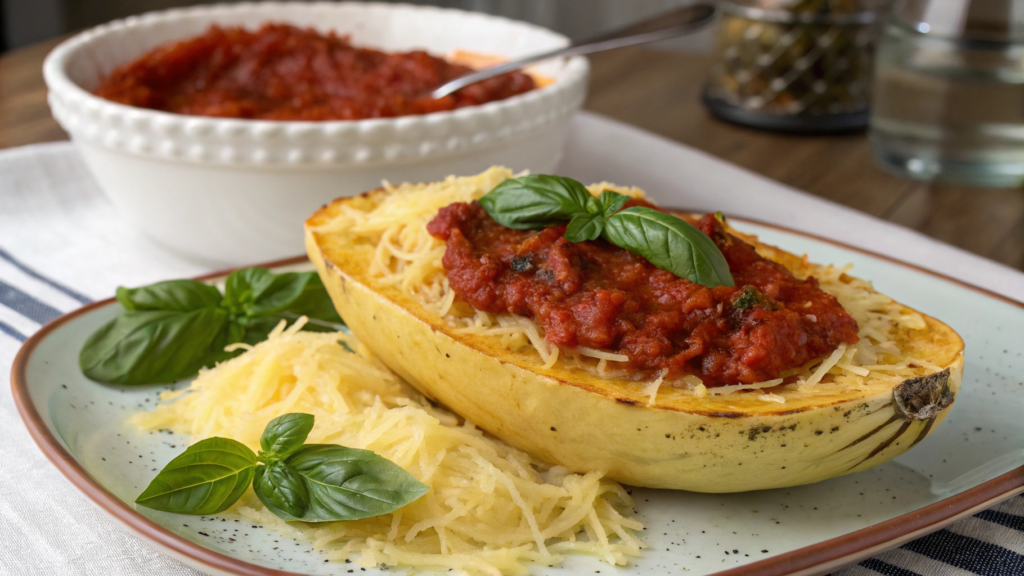
Spaghetti squash is that long yellow beauty that looks like a pumpkin but behaves like pasta.
And for some time now, it’s been one of those dinners that always saves the day — when you need something light, warm, flour-free, low-oil, but still really delicious.
All you need is squash, an oven, and a good marinara sauce.
Ingredients
The squash:
- 1 large spaghetti squash
- 1–2 tbsp olive oil
- 1/2 tsp salt
- 1/4 tsp pepper
The sauce:
- 1.5–2 cups marinara (homemade or store-bought)
- 2–3 garlic cloves (if you want a deeper sauce flavor)
- A bit of fresh basil
- A couple spoonfuls of grated parmesan (optional)
For serving:
- Extra basil
- A drizzle of olive oil on top
If the squash is large and heavy, it’s easiest to bake it in a sturdy dish or heavy pan like a Lodge Cast Iron Skillet — it holds the weight and heat without any trouble.
How to Cook — step by step, but human
- Cut the spaghetti squash lengthwise. This is the “scariest” part. If the knife gets stuck, use gentle rocking motions.
Scoop out the seeds with a spoon — they come out easily, don’t torture yourself. - Oil and season. Brush the cut sides with oil, add a bit of salt and pepper.
I like adding a pinch of dried oregano — it gives a beautiful warm aroma. - Bake at 400°F (200°C) for 35–45 minutes. Timing depends on size.
The flesh should pull apart easily with a fork — creating those long “spaghetti” strands. - Prepare the sauce. While the squash is baking, warm the marinara in a skillet.
If you want a deeper flavor — add garlic, sauté it for a minute, then pour in the sauce.
In the PNW we always have lots of basil, and I often throw a couple of leaves into the sauce while heating. - Assemble everything. Pull the squash flesh out with a fork — drag it like you would through hair, and you get perfect strands.
Don’t mash it, keep the structure. - Mix with the sauce or serve with sauce on top. I usually mix — the flavor becomes more even.
Lindy likes serving the sauce on top, like real spaghetti. - Add fresh basil, parmesan, and a drizzle of oil. That small drizzle on top makes the dish feel more “complete.”
Small notes from practice
Sometimes I bake the squash ahead of time — in the morning or on weekends — and in the evening I just warm the “spaghetti” in a skillet with the sauce. Then dinner is literally 5 minutes.
If you want a brighter flavor, add red pepper flakes — they make the dish spicier but don’t burn.
Lindy likes the version where we add a bit of sautéed mushrooms to the sauce — it turns out heartier, richer, and the flavor becomes deeper.
This squash is honestly surprising: it behaves like pasta but feels light, and there’s no heaviness afterward like there is with regular pasta in the evening.
And yes — if you grow a very large spaghetti squash, you can store it in the cellar for two or three weeks without any problem.
8. Thai Peanut Chicken Lettuce Wraps
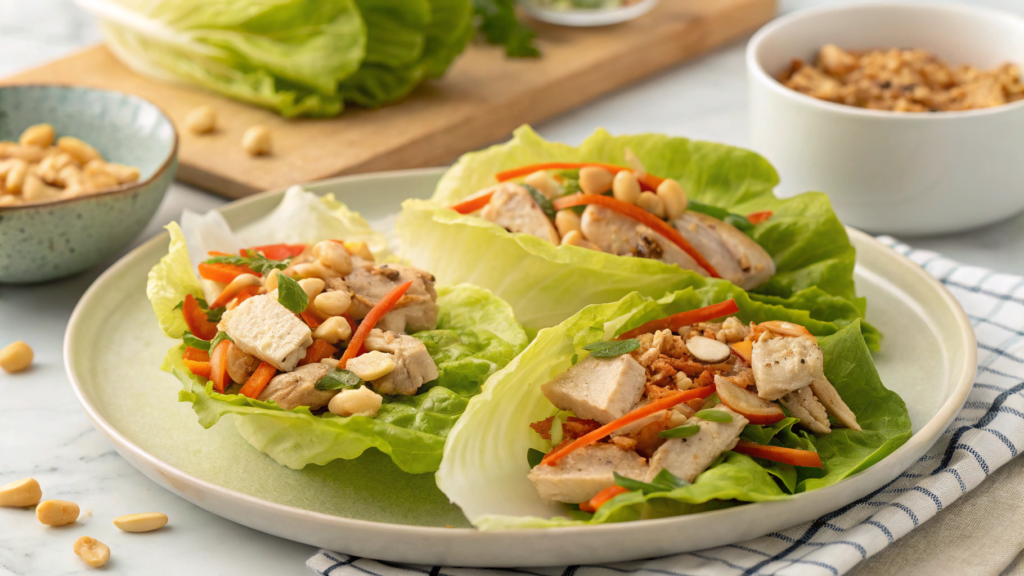
This is one of those meals that comes together in 15 minutes but looks beautiful.
And it always turns out a little bright, a little crunchy, fresh — exactly how dinner should feel after a day of work in the garden.
These Thai lettuce wraps save us all summer long when it’s so hot that turning on the oven feels criminal. But honestly, we make them in winter too.
Ingredients
The filling:
- 1 lb ground chicken or finely chopped chicken breast (454 g)
- 1 tbsp avocado or vegetable oil
- 1 bell pepper, finely chopped
- 1 medium carrot, grated
- 3 green onions, chopped
- 2–3 garlic cloves, minced
- 1 tsp fresh grated ginger
The sauce (the peanut sauce):
- 1/4 cup peanut butter (60 ml)
- 2 tbsp soy sauce
- 1 tbsp honey or syrup
- 1 tbsp rice vinegar
- 1 tsp sesame oil
- 1–2 tsp sriracha (to taste)
- 2–3 tbsp hot water for consistency
For serving:
- Romaine or iceberg lettuce leaves
- Extra green onions
- Lime for serving
To help the meat brown quickly without releasing extra moisture, it’s best to use a heavy hot skillet like a Lodge Cast Iron Skillet — it holds heat steadily and gives the chicken a nice golden color instead of gray.
How to Cook — simple steps with nuance
- Make the sauce first. In a bowl, mix peanut butter, soy sauce, honey, vinegar, sesame oil, and sriracha.
Add hot water little by little until the sauce becomes soft and slightly pourable.
It should be creamy but not thick like paste — that’s key for a balanced peanut flavor. - Brown the chicken. Heat the skillet, add oil, and add the chicken. Break it up with a spatula so it doesn’t clump.
When a light crust appears — that’s the moment when the flavor forms. - Add the veggies. Bell pepper, carrot, the white part of the green onions — all at once.
Cook 3–4 minutes so the veggies soften but stay crisp.
Then add garlic and ginger — they cook fast, just 30–40 seconds. - Stir in the peanut sauce. Pour in almost all the sauce (save a little for serving).
Mix so every bit of chicken gets coated in that creamy, spicy, sweet-salty mixture.
If it feels thick — add a spoon of water. This keeps the filling juicy and bright. - Prep the lettuce leaves. Wash and dry them. Romaine or iceberg works best — sturdy and crisp.
Warm filling + cold crunchy leaves is a combination that always works. - Assemble. Add a spoon of warm chicken into a leaf, top with green onions, a drizzle of leftover sauce, and a little lime.
That’s it. No complications.
Small notes from practice
Sometimes I add a bit of sautéed mushrooms to the filling for a denser texture.
Lindy loves the version with extra lime — it brightens everything and sharpens the flavor.
If you want a crunchier filling, keep some of the carrot raw and add it right before serving.
And one more thing: when I make a double batch, I store the filling separately from the lettuce leaves. That way the leaves stay crisp, and dinner becomes automatic — just assemble a couple of wraps and enjoy.
9. Black Bean and Corn Chili
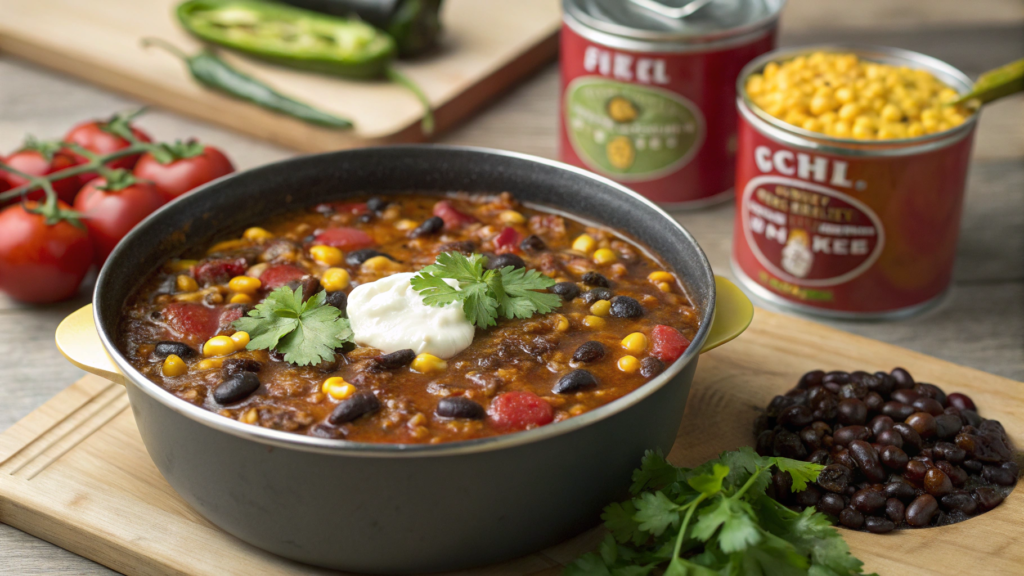
A couple of cans, corn, peppers, tomatoes. Nothing inspiring. I just threw everything into one pot — and honestly didn’t expect anything special.
But this Black Bean and Corn Chili became one of those dishes you start making often. Thick, warm, flavorful, but not heavy… It cooks quickly, and the next day it’s even better.
Ingredients
Main:
- 1 tbsp avocado or vegetable oil
- 1 medium onion, finely chopped
- 2–3 garlic cloves, minced
- 1 red bell pepper, diced
- 1 cup corn (frozen or fresh)
- 2 cups black beans, rinsed (or 1 can, 15 oz)
- 1 can (14.5 oz / ~400 g) crushed tomatoes
- 1.5 cups vegetable broth (360 ml)
Spices:
- 1 tbsp chili powder
- 1 tsp cumin
- 1 tsp paprika
- 1/2 tsp salt
- 1/2 tsp oregano
- A pinch of cayenne — optional
For serving:
- Avocado slices
- Lime
- Green onions
- A bit of Greek yogurt or sour cream (optional)
How to Cook — detailed, but not overwhelming
- Heat the pot and start with the onion. Add the oil and the chopped onion.
Sauté 3–4 minutes until soft and translucent — this builds the base of the flavor.
If the onion browns slightly on the edges, even better — the aroma becomes deeper and richer. - Add garlic and bell pepper. Garlic for just 30–40 seconds — it releases flavor quickly.
Then add the pepper and cook 2–3 more minutes.
It should soften a bit but not fall apart — texture matters in chili. - Stir in the corn. If it’s frozen, just add it as is. It sometimes makes tiny popping sounds when frying — totally normal.
- Add the spices. Chili powder, cumin, paprika, oregano, salt — all at once.
Stir for a couple of minutes so the spices can “open up” in the hot oil.
This step turns chili into chili — not into “tomato soup with beans.” - Add the beans, tomatoes, and broth. Beans should be rinsed to remove extra liquid and salt. Tomatoes go in with their juice.
Add the broth and stir.
The consistency should be medium-thick — not watery, but not a paste. - Bring to a gentle simmer. Lower the heat and cover. Simmer 20–25 minutes. Chili thickens slowly, and the flavor comes together as one.
- Taste and adjust. Sometimes it needs a bit more salt. Sometimes a splash of broth if it became too thick.
And if you want it spicier — a pinch of cayenne. - Serve hot. A spoon of yogurt, green onions, lime — and the chili becomes a complete dinner.
Small notes from practice
Sometimes I add a bit of sweet potato diced into small cubes — it makes the chili slightly “creamy” in flavor but still light.
Lindy loves the version with extra cumin — she says it makes the flavor “warmer.”
If you want the dish heartier, add a couple spoonfuls of tomato paste — it deepens the flavor and makes the chili feel like those cozy winter stews.
And yes, if there’s some left for tomorrow — lucky you: chili gets thicker, softer, and even tastier the next day.
10. Shrimp and Asparagus Skillet
Shrimp and asparagus in a skillet — so quick that we often make it without even planning dinner ahead.
And here’s what surprises me every time: it’s one of the simplest dinners, yet it feels like a full dish from a nice café. Juicy shrimp, bright green asparagus, lemon, garlic — everything fast, clean, and very homey.
Ingredients
Main:
- 1 lb shrimp, peeled and deveined, no tails (454 g)
- 1 bunch asparagus, cut into 1–2 inch pieces
- 2 tbsp avocado or olive oil
- 3 garlic cloves, minced
- Juice of 1/2 lemon
- 1/2 tsp salt
- 1/3 tsp pepper
- A pinch of chili flakes (optional)
Optional:
- 1 tbsp butter — for a creamy finish
- A couple slices of lemon
- Fresh dill or parsley for serving
How to Cook — simple steps with the right details
- Heat the skillet until very hot. This matters — shrimp cook fast, and if the skillet is weak, they’ll turn watery.
The goal is for the oil to lightly sizzle when the first piece of asparagus hits it — that’s the start of proper searing. - Sauté the asparagus. Add it first. Cook 3–4 minutes, stirring. It should become brighter in color, soft on the edges, and crisp in the center.
Sometimes I add a pinch of salt here — it helps bring out the flavor. - Add the garlic. Just for 30–40 seconds. It releases aroma fast, and the house fills with that warm smell that always triggers appetite.
- Add the shrimp. Spread them in an even layer so they touch the surface.
Shrimp need to brown on one side before flipping — otherwise they become rubbery.
Usually it takes about 2 minutes per side. - Season. Salt, pepper, chili flakes if you’re using them.
- Add lemon juice and butter. Lemon brightens everything, and butter makes the flavor feel more complete.
When the butter melts, mix everything into one layer — the aroma at this moment becomes unbelievably good. - Let the dish “sit” for a minute. Take the skillet off the heat but leave the shrimp inside — they soak in the flavors of asparagus, garlic, and butter.
This is the moment many people skip, but it makes the dish feel finished. - Serve right away. Sprinkle with herbs and add a couple lemon slices on top.
Sometimes we eat it as is. Sometimes with rice or crusty bread.
Small notes from practice
Sometimes I add a few cherry tomatoes sliced in half — they brown lightly and give sweetness that supports the asparagus.
Lindy loves the version with extra garlic — she says the shrimp taste “brighter.”
If you want a more textured, crunchier version, you can leave part of the asparagus raw and mix it in right before serving.
And when I make a double batch, I store the shrimp separately from the veggies — they reheat better that way.
If you’re cooking large shrimp, they need less salt — they’re naturally a bit salty.
Favorite quick dinner
Behind each of these recipes is a little piece of life. Somewhere I’m standing by the stove after a long day on the property.
Somewhere Lindy and I are laughing because a carrot flew off the skillet onto the floor,I’m waiting for the veggies to brown and looking out the window to see if the chickens came home.
Yes, homemade food doesn’t have to be complicated to be delicious. It can be light, simple, very quick — and still real.
If you try something from this collection — let me know in the comments on Rooted Revival what you made, what you liked, and what you’d change. I’m genuinely curious which recipes will “stick” for other people the way they stuck for us.
And if you have your own quick healthy dinners — share them. On our little homestead, we’re always happy for new ideas, especially the ones that help feed ourselves on days when time is short.