For many people, spring floral arrangements often feel complicated, like you absolutely need a florist. And on top of that, a bunch of expensive flowers and a perfect interior. In reality, it’s much simpler. 10 Spring Floral Arrangements That Look Designer Made in Minutes is about clear techniques, the right proportions, and a little attention to detail.
I really want to share different formats with you — from tulips with citrus in a glass bowl to hydrangeas by the front door. All of these options can be put together quickly. And almost all of them — without special skills.
The main thing is not being afraid to start and experiment. But you also need to understand scale, avoid overloading the arrangement, and not be afraid of empty space. No need for complications. Sometimes placing three stems correctly is enough.
1. Tulip and Citrus Bowl Centerpiece
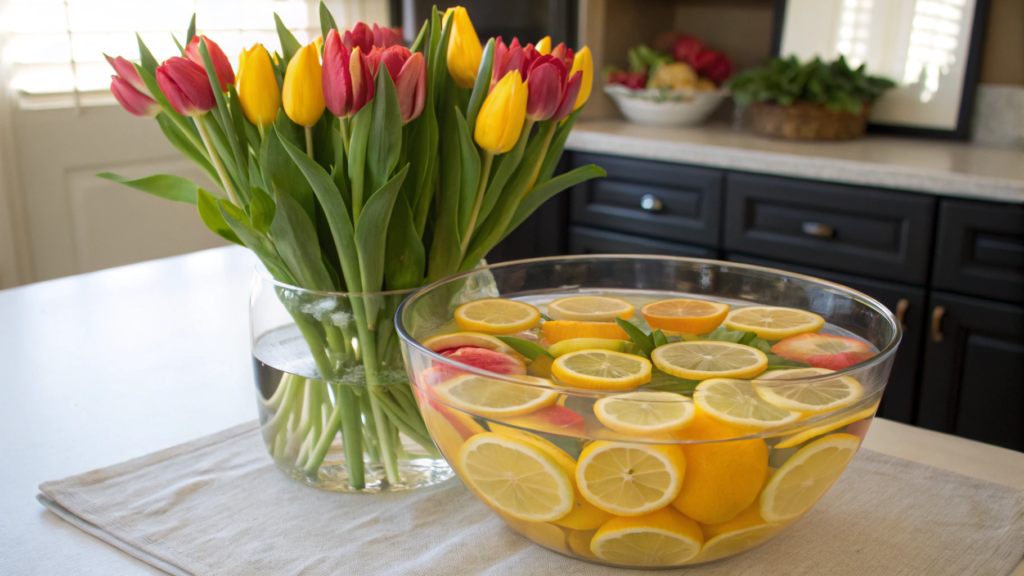
Tulip and Citrus Bowl Centerpiece comes together in 15–20 minutes right in your kitchen.
It’s a mix of fresh tulips, a clear glass bowl, and bright citrus slices in water. Once I made this arrangement from whatever I had on hand. Tulips from the market. Lemons from the fridge. And a large glass bowl. No prep at all. And it turned out so good, even I didn’t expect it.
What You’ll Need
- Clear glass bowl 10–12 inches (25–30 cm) in diameter
- 2–3 lemons
- 2–3 oranges
- 10–15 tulips
- Cold water
How to Make It
- Slice the citrus into rounds about 0.5 inch (1–1.5 cm) thick. Too thin and they’ll slide down. Too thick and they’ll look heavy. If the oranges are very juicy, gently pat them dry so the water stays clear longer.
- Arrange the slices along the inside of the glass bowl. Start from the bottom and slightly tilt the bowl to place them in a soft fan shape. Alternate lemon and orange for a lively look, or use only lemons for a more minimal feel.
- Slowly pour cold water up to about 2/3 of the bowl’s height. Pour along the side, not into the center. The water should secure the citrus in place. If a slice floats up, adjust it with a long spoon.
- Trim the tulips at an angle about 1 inch (2–3 cm) using sharp pruners. Remove any leaves below the water line to help the flowers stay fresh longer.
- Create a loose spiral bunch. Hold 5–7 tulips in your hand, angle each stem slightly in the same direction, and form a soft spiral. Place them into the bowl together, then add the remaining stems, keeping the center fuller and the edges lighter.
- Adjust the overall height. The finished arrangement should be around 12–14 inches (30–35 cm) tall. It shouldn’t block faces at the table. If it’s too tall, trim the stems slightly and reset the bouquet.
Tip
If you want your Tulip and Citrus Bowl Centerpiece to stay neat longer, add about 1 teaspoon of white vinegar or a flower food solution to the water. It slows down bacteria growth.
Also, tulips keep growing even after being cut — sometimes 1–2 inches (2–5 cm) in a few days. If you’re preparing the arrangement in advance, trim them slightly shorter. By the next day, they’ll be at the perfect height.
Where to Place This Arrangement
The dining table is a classic choice. The arrangement is low and doesn’t interfere with conversation.
- A kitchen island from 24 inches (60 cm) wide adds color without overwhelming the space.
- A console near the entrance works especially well if there’s a mirror nearby. The reflection of the citrus enhances the effect.
- A coffee table is fine too, as long as it’s stable and not in a walkway.
Don’t place it on a narrow sunny windowsill — direct sunlight speeds up wilting. And keep it away from radiators as well.
A Bit of Practicality Instead of Just Romance
Yes, the arrangement looks fresh. But it’s practical too.
- Citrus slices visually fill the volume, so you can use fewer flowers.
- The clear bowl creates a light, polished look.
- The arrangement lasts 3–5 days if you change the water every 1–2 days.
And if the tulips start leaning slightly — that’s normal. They move toward the light. There’s something natural about that. This kind of arrangement doesn’t require florist skills. You can do it yourself. And it feels good when beauty comes together without extra stress.
2. Hydrangea and Moss Table Runner Clusters
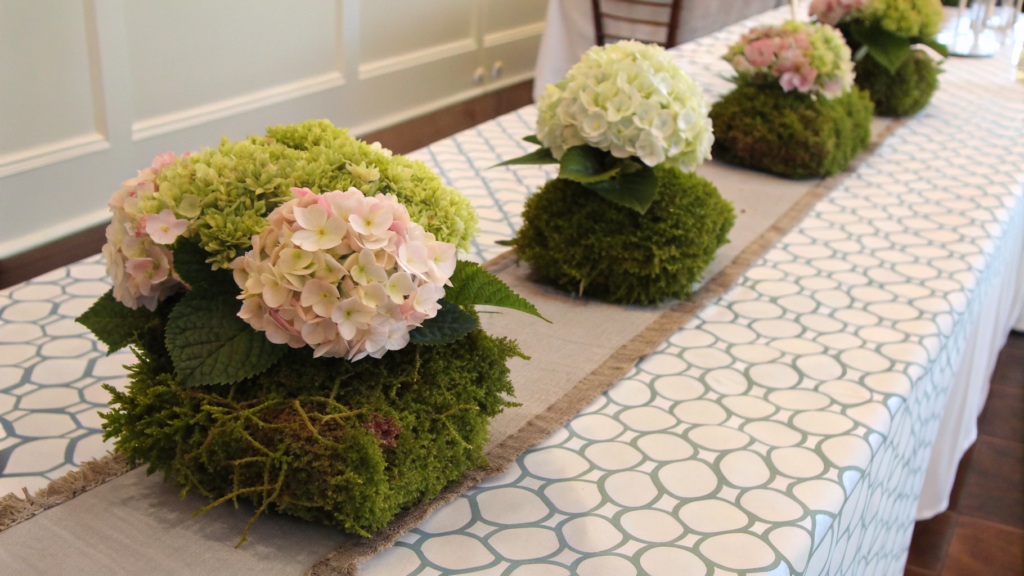
Hydrangea and Moss Table Runner Clusters is not a single vase arrangement, but several small clusters of hydrangeas and moss placed along the table like a living runner.
And the secret isn’t complexity. It’s in the repetition of shapes and rhythm.
What You’ll Need
- 3–5 large hydrangea heads
- 3–5 low glass vases 4–6 inches (10–15 cm) tall
- A bag of preserved or decorative moss
- Small pruners
- Water
- Optional — a few sprigs of eucalyptus
If you don’t have suitable low vases, Royal Imports Set of 4 Clear Glass Cylinder Vases 5” works well. The height of 5 inches (12–13 cm) is ideal for a low floral runner that doesn’t block the view across the table.
How to Make It
- Prepare the hydrangeas.
Cut the stem at an angle about 1 inch (2–3 cm). Remove extra leaves — hydrangeas drink a lot of water, and excess greenery speeds up wilting. If the flowers look slightly tired, submerge the entire bloom in water for 30–60 minutes — they often come back to life. - Fill the vases about 2/3 with water.
Hydrangeas need deep hydration. They are known for evaporating water quickly through their large blooms. - Place one hydrangea in each vase.
Don’t try to create a dense bouquet. One large bloom per vase creates a modern, clean look. If the head is too large, you can gently divide it into two parts. - Arrange the vases along the center of the table.
For a table 60–72 inches (150–183 cm) long, 3–4 clusters are enough. Leave about 10–15 inches (25–38 cm) between them. Don’t line them up perfectly — slight asymmetry looks more natural. - Add moss between the vases.
Lay the moss in loose “islands,” not a solid carpet. It should create a sense of living texture, not look artificial. You can lift it slightly to add dimension. - Optional — add 2–3 eucalyptus stems.
They soften the arrangement and introduce gentle movement.
Tip
Hydrangeas love deep water and cooler temperatures. Change the water daily, especially in warm rooms. If petal edges begin to dry slightly, refresh the cut and dip the stem end in very hot water (almost boiling) for about 30 seconds, then immediately into cold water. This helps restore water absorption.
And don’t place hydrangeas in direct sunlight. Their large blooms lose moisture faster than flowers like tulips.
Where to Use Hydrangea and Moss Table Runner Clusters
- A long dining table from 60 inches (150 cm)
- A dinner table for 6–10 guests
- A rustic wooden table with visible texture
- A wedding table or festive brunch setting
This arrangement looks especially beautiful on natural wood, linen tablecloths, or light surfaces.
Repeating large hydrangea blooms creates a sense of intentional design — and the table immediately looks more polished.
Moss adds depth and texture without extra cost, while low vases keep the composition airy and light. Everything is built on a simple pattern — vase, hydrangea, moss — without complicated techniques. And in the evening, when candles are lit, the arrangement looks especially stylish.
3. Tall Vase Cherry Blossom Branch Statement
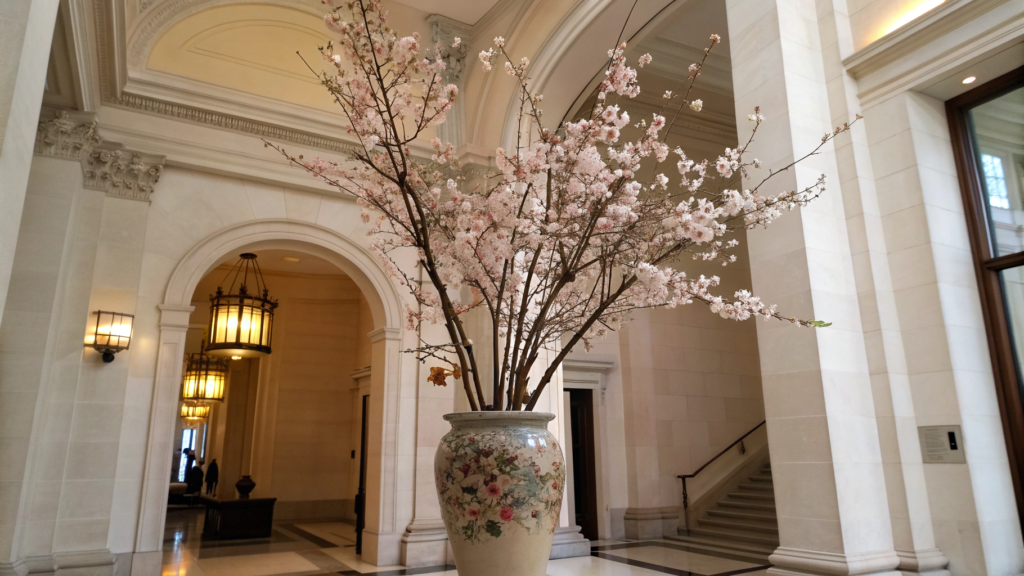
In this Tall Vase Cherry Blossom Branch Statement, a tall vase and several branches of blooming cherry (or decorative sakura) create vertical height and a light cloud above.
I used this arrangement in an entryway with 9-foot ceilings (2.7 m). The space instantly felt lifted. Here, the branch becomes part of the architecture.
Proportions matter. If the vase is too low, the composition looks random. If there are too many branches, you lose air.
What You’ll Need
- A tall glass or ceramic vase 18–24 inches (45–60 cm)
- 3–5 cherry blossom branches 30–48 inches (75–120 cm) long
- Water
- Pruners
- Optional — decorative stones or pebbles for stability
How to Make It
- Check the proportion of “vase height + branch height.”
The total height should be about 1.5–2 times taller than the vase. For example, if the vase is 24 inches (60 cm), the branches can be 36–48 inches (90–120 cm). This creates proper visual balance. - Trim the branches at an angle 1–2 inches (2–5 cm).
Use sharp pruners. If the branch is thick, slightly split the base about 0.5 inch (1 cm) to improve water absorption. - Remove lower side shoots.
Anything below the water line should be removed. This keeps the water clear and gives the silhouette a cleaner look. - Fill the vase 1/2–2/3 full with water.
Branches are heavier than regular flowers, so don’t overfill. Otherwise, water may spill when you place them inside. - Place the first branch at a slight angle.
Don’t set it straight up. A gentle tilt creates movement. The first branch defines the direction of the whole arrangement. - Add the remaining branches in a soft fan shape.
Position them at different depths — one closer to the front, another slightly deeper. Leave space between branches. The bloom should look like a cloud, not a dense bush. - Check stability.
If the vase is lightweight, add decorative pebbles at the bottom. Branches create a higher center of gravity, so the arrangement must be stable, especially in high-traffic areas. - Step back 6–8 feet (2–2.5 m) and observe the silhouette.
From that distance, you’ll see if the composition leans too much to one side. If needed, slightly rotate the vase or adjust the branches.
Tip
If you’re using freshly cut branches in early spring, you can encourage buds to open. After trimming, place the branches in warm water for a few hours, then move them to room temperature. Blooming speeds up.
Also, change the water every 2–3 days. Tall vases look clean only when the water stays clear.
Where to Place Tall Vase Cherry Blossom Branch Statement
This kind of tall arrangement works best where there’s vertical space. It needs air above and a bit of distance around it so the branches don’t press against ceilings or walls.
- An entryway with ceilings from 8 feet (2.4 m)
- A living room corner near a chair or sofa
- A space near the staircase
- A minimalist interior that needs a vertical accent
Pay attention to airflow. Don’t place it directly under air conditioning or next to heating — branches dry out faster and blooming may last less time.
In this arrangement, height creates an architectural accent, and fewer elements give more volume. Light passes through the branches without making the space feel heavy. One tall composition can replace several smaller vases. And the room feels put together. Calm. With the focus lifted upward.
4. Basket Arrangement with Market Bunches and Herbs
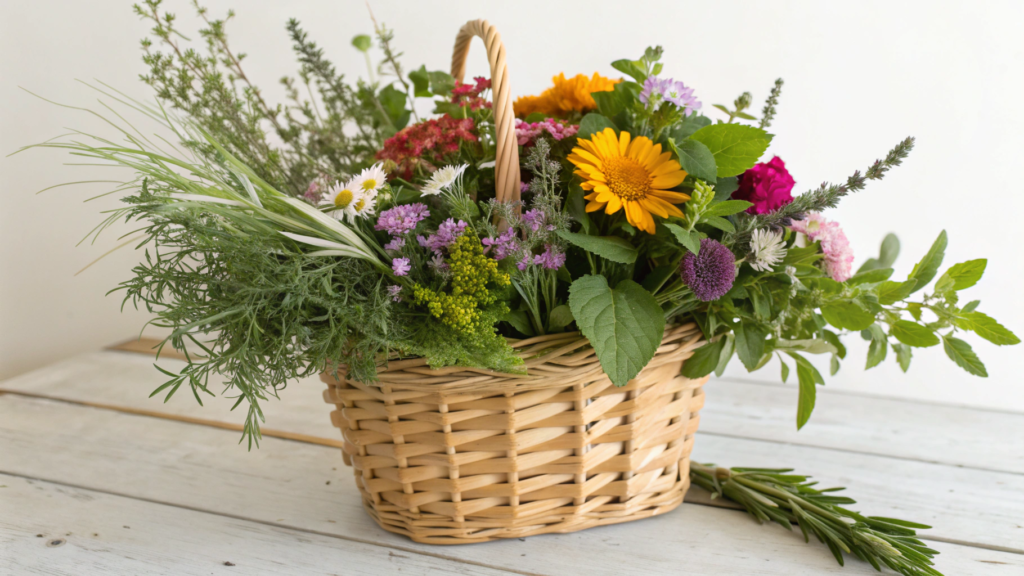
Basket Arrangement with Market Bunches and Herbs doesn’t look fussy, and it’s a great way to create a budget-friendly floral arrangement that doesn’t feel budget at all.
What You’ll Need
- A woven basket 12–16 inches (30–40 cm) wide
- A plastic container or low bowl that fits inside
- 2–3 market flower bunches (tulips, ranunculus, carnations, alstroemeria)
- 1–2 bunches of fresh herbs (rosemary, mint, thyme, basil)
- Floral foam or water
- Pruners
A basket like Household Essentials Large Water Hyacinth Wicker Basket works well. Around 15 inches (38 cm) wide is a good scale for the center of a dining table or kitchen island.
How to Make It
- Prepare the inner container.
Never pour water directly into the basket. Insert a plastic bowl that fits well. If using floral foam, soak it fully in water for 10–15 minutes without pushing it down — let it absorb moisture on its own. - Decide on the shape.
For a basket 14–16 inches (35–40 cm) wide, a slightly elongated shape works best — wider horizontally, lower in height. The final arrangement should be about 10–12 inches (25–30 cm) tall so it doesn’t block the view across the table. - Start with greenery.
Insert rosemary or thyme around the edges, creating a soft outline. Let the greenery extend 1–2 inches (2–5 cm) beyond the basket edge. This makes the arrangement feel alive. - Add the main flowers.
Separate the market bunches into individual stems. Don’t place them as they were tied. Arrange flowers in groups of 3–5 stems of the same kind. This creates visible blocks of color. - Work in layers.
Larger flowers go closer to the center. Smaller blooms stay toward the edges. Don’t aim for perfect symmetry. Slight variation in height looks more natural. - Check it at eye level.
Step back 6–8 feet (2–2.5 m). If one side feels heavier, add greenery or a single bloom to balance the visual weight. - Hide technical elements.
If foam or the container is visible, cover it with moss or extra greenery.
Herbs are not just filler. They add natural fragrance. If you use rosemary or mint, the table will smell fresh. But don’t overdo it — 3–5 sprigs are enough for a 14–16 inch (35–40 cm) basket.
Also, herbs wilt faster. If the arrangement sits for more than 2–3 days, you can replace the herbs without rebuilding everything.
Tip
When buying supermarket flowers, choose buds that aren’t fully open yet. They’ll last 2–3 days longer. And always refresh the cuts every 48 hours, trimming 0.5–1 inch (1–2 cm) off the stems.
Where to Place Basket Arrangement with Market Bunches and Herbs
This arrangement feels relaxed and natural, so it doesn’t need a formal interior. It works best where people actually spend time — eating, talking, having coffee.
- A kitchen island from 24 inches (60 cm) wide
- A dining table for 4–8 people
- An entryway console
- A buffet or serving table during dinner
On natural wood, the basket looks especially warm and organic. On glossy surfaces, it adds texture and balances the smooth finish.
Market bouquets look more alive and natural than salon arrangements. The basket adds warmth and texture, and the herbs create volume without extra cost.
In the end, the composition feels like part of everyday life, not decor “for an occasion.” And that slight imperfection is exactly what makes the table truly beautiful.
5. Silk Peony Arrangement for Allergy Friendly Homes
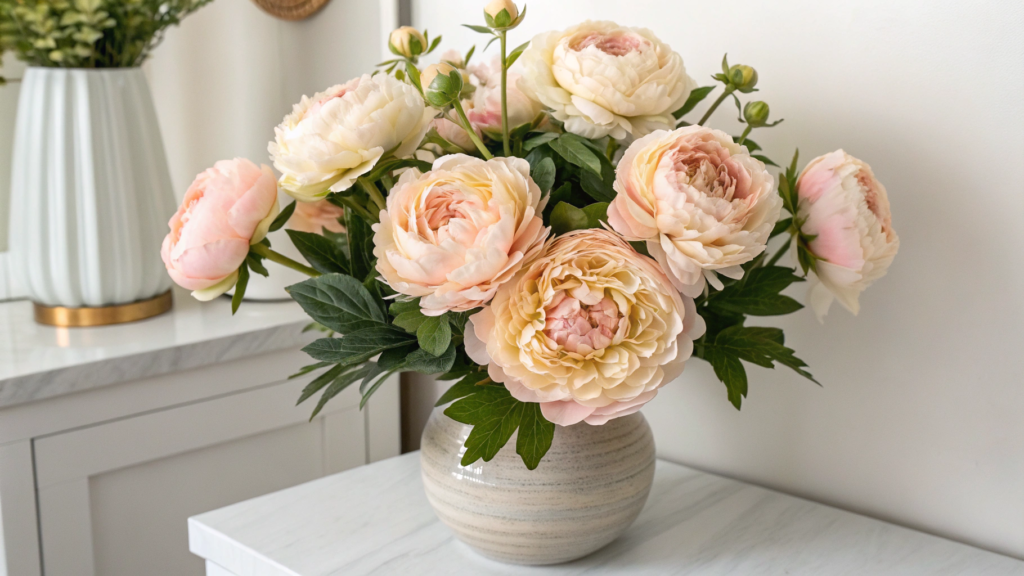
If there are allergy sufferers at home, sensitivity to pollen, or you simply don’t want to change water every two days — Silk Peony Arrangement for Allergy Friendly Homes is a perfect solution.
Modern realistic silk peonies are made with so much detail that from 2–3 feet (60–90 cm) away, they’re almost impossible to tell from fresh flowers. They have dense petals and a natural color gradient, which makes the arrangement look more believable.
What You’ll Need
- 8–12 silk peony stems
- A vase 8–12 inches (20–30 cm) tall
- Optional — floral tape or clear tape for support
- Wire cutters
How to Make It
- Fluff each stem.
Never place artificial flowers straight “out of the box.” Gently separate the petals, lift the layers, and slightly bend the stems. This adds a more natural feel. - Adjust the length.
The final height should be about 1.5 times taller than the vase. For example, if the vase is 10 inches (25 cm) tall, the flowers should reach about 15 inches (38 cm). If stems are too long, trim them carefully with wire cutters. - Create the base shape.
Take 3–4 peonies and form a central cluster. Then add the remaining stems in a soft spiral, turning the arrangement slightly in your hands. Even with artificial flowers, movement matters. - Work with different heights.
Don’t keep all blooms at the same level. Let 2–3 buds sit 1–2 inches (2–5 cm) higher. This creates depth. - Turn the blooms in different directions.
One slightly to the left, another forward, one angled down. If they all face the same way, the arrangement looks flat. - Check the silhouette from 6–8 feet (2–2.5 m).
Step back and see if it looks too round. If needed, gently spread the outer stems.
A Small Detail
To make the Silk Peony Arrangement look even more natural, add 2–3 stems of greenery like artificial eucalyptus or olive branches. A bouquet made only of peonies can feel too “wedding-like.” A touch of greenery softens the overall look.
Tip
Artificial flowers need care too. Every 2–3 weeks, gently wipe the petals with a soft dry cloth or use a cool hair dryer setting to remove dust.
If the arrangement stands in sunlight, choose models with UV protection. Otherwise, after 6–12 months, the color may start to fade slightly.
Where to Place Silk Peony Arrangement for Allergy Friendly Homes
- Bedroom — safe for people sensitive to scents
- Home office — no fragrance, no maintenance
- Shelf or dresser in the living room
- Bathroom — where fresh flowers usually wilt quickly
It looks especially good in interiors with a neutral palette: white, cream, light gray.
Silk Peony Arrangement for Allergy Friendly Homes stays neat all year round. There’s no need to search for fresh blooms or worry that buds will droop in a few days. Shape and volume stay the same for months.
It’s especially practical for homes with allergies or scent sensitivity — no pollen, no fragrance, no moisture. The arrangement is safe for bedrooms, nurseries, or workspaces.
6. Church Pew End Florals with Ribbon and Greenery
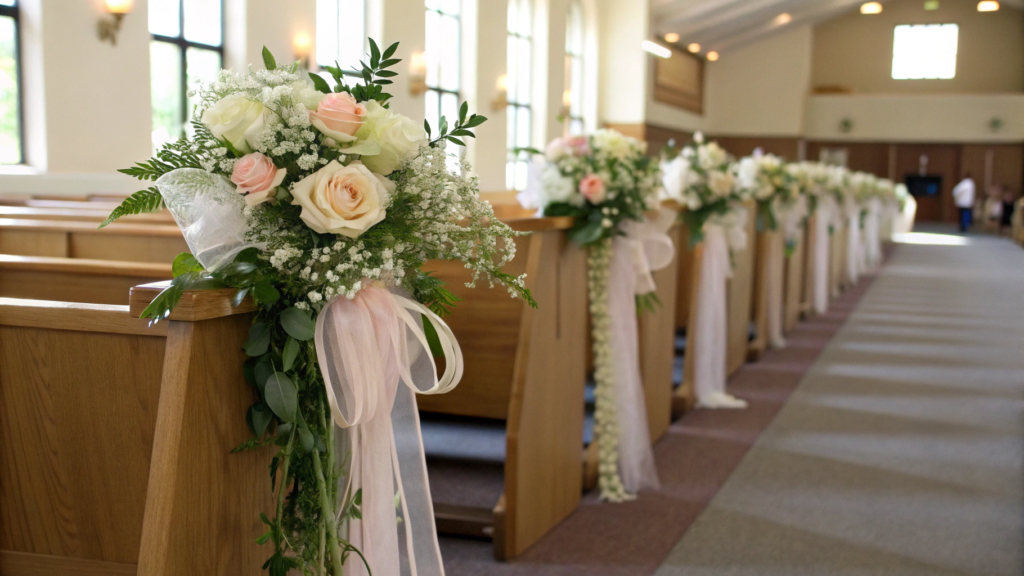
You probably know Church Pew End Florals with Ribbon and Greenery — those small arrangements attached to the end of a church pew or lining a wedding aisle. I made them once for an intimate ceremony with 40 guests, and the most important thing I learned is this: they have to stay light. If the arrangement is too heavy, it starts pulling down and looks messy.
What You’ll Need
- 1–3 large flowers (peony, rose, hydrangea)
- 3–5 greenery stems (eucalyptus, ruscus, fern)
- Ribbon 1.5–2 inches (4–5 cm) wide and 36–60 inches (90–150 cm) long
- Floral wire or zip ties
- Pruners
How to Make It
- Create the greenery base.
Take 3–5 stems and fan them out. The green base should be about 12–16 inches (30–40 cm) long. Remove lower leaves so the attachment area looks clean. - Add the focal flower.
Place one large bloom closer to the top of the greenery, slightly off-center. This feels more natural. If using 2–3 flowers, group them together instead of spreading them out. - Secure everything with wire.
Wrap the stem base tightly with floral wire or green tape. The wrapped section should be about 3–4 inches (8–10 cm) long so the arrangement holds its shape. - Attach the ribbon.
Wrap the ribbon around the base and tie a soft knot or bow. Let the ends hang freely 18–24 inches (45–60 cm). They should move gently with airflow. - Check the weight.
The arrangement shouldn’t weigh more than 1–2 pounds (0.5–1 kg). If it feels heavy, remove excess greenery or one bloom. - Attach to the pew or chair.
Use soft wire or removable ties. Never use glue or nails. The piece should come off easily without damaging the surface.
If the ceremony is outdoors, think about wind. Very long ribbons can twist. In that case, choose 18 inches (45 cm) instead of 60 inches (150 cm). Also, the flowers should last 2–4 hours without water. In hot weather, go for sturdier options like roses, carnations, or artificial peonies.
Tip
Assemble one test piece the day before the event. It helps you understand the right balance of size and ribbon length. Sometimes photos suggest you need more greenery, but in real space, you don’t.
Where to Use Church Pew End Florals with Ribbon and Greenery
These arrangements create a feeling of soft ceremony. They’re not the main decor — they’re a guiding accent that leads the eye along the space.
- Church pews or wedding ceremony chairs
- An outdoor aisle
- The edges of a long dinner table
- Stair railings for a formal event
It’s important to consider the size of the venue. In a small space, 4–6 arrangements are enough. In a long aisle, repeat them at equal intervals to maintain rhythm and visual consistency.
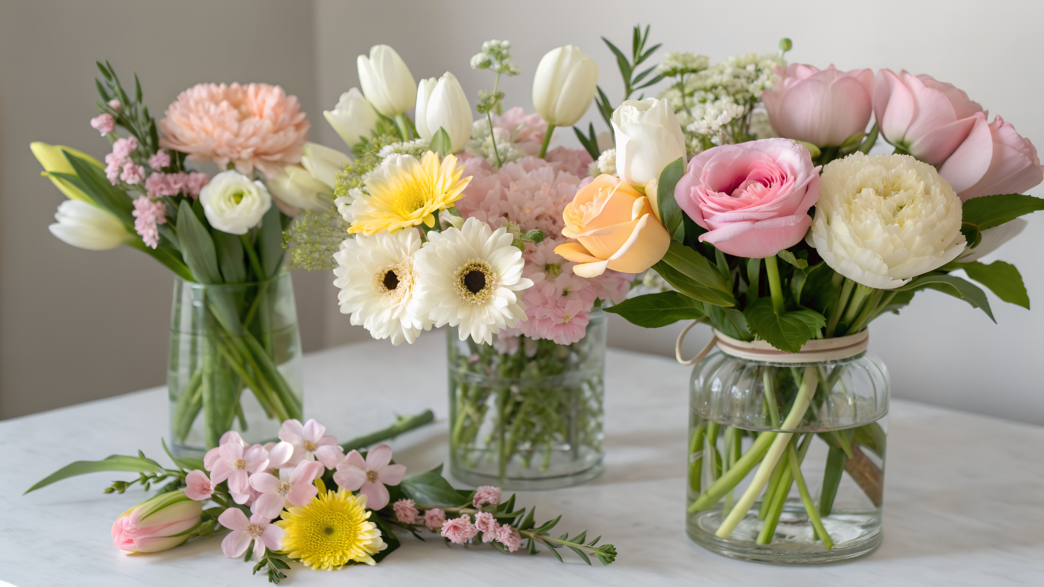
7. Wedding Bud Vase Mix and Match Set
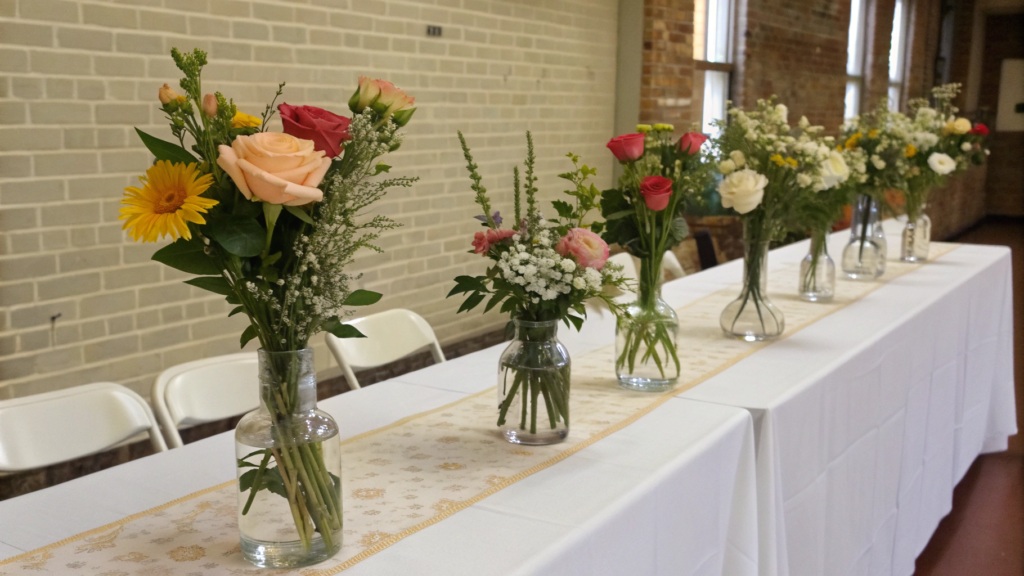
Wedding Bud Vase Mix and Match Set is a collection of small vases with different flowers, placed along a table or across a ceremony space.
I once saw this setup at a dinner for 30 guests. No oversized centerpieces. Just 12 small vases, each with its own mood. And it was the mix of repetition and variation that created the right effect.
What You’ll Need
Scale matters here. Too few vases and it feels random. Too many and it looks crowded.
- 8–15 small vases 4–6 inches (10–15 cm) tall
- 3–5 flower types (ranunculus, mini roses, tulips, carnations, delphinium)
- 1–2 greenery types (eucalyptus, ruscus)
- Water
- Pruners
A good option is ComSaf Set of 12 Clear Glass Bud Vases. At around 5 inches (12 cm) tall, they’re the ideal size for a low wedding setup that doesn’t block guests’ faces.
How to Make It
Lay out the vases first. Before starting, place them on the table in a rough arrangement. This helps you see spacing and balance.
- Fill each vase 2/3 with water.
Small vases get cloudy faster, so add fresh water close to the event time. - Prep and sort the flowers by type.
Don’t mix everything right away. Keep flowers grouped on the table to control color distribution. - Place 1–3 stems per vase max.
A 5-inch (12 cm) vase should never feel overloaded. One focal bloom plus a sprig of greenery often looks better than a tight mini bouquet. - Alternate flower types and heights.
One vase might hold only ranunculus. Another could have mini roses and greenery. Avoid repeating the exact same combination in a row, but keep the overall palette consistent. - Repeat color every 2–3 vases.
If you’re using peach roses, bring them back a couple of vases later down the table. This creates rhythm. - Check the spacing.
On a 72-inch (183 cm) table, 6–8 vases work well with about 6–10 inches (15–25 cm) between them. Don’t place them too close together. - Look from above.
Bud vase setups often look better from a top view than eye level. Make sure color is evenly distributed.
Tip
If the event lasts more than 4 hours, choose sturdy flowers like carnations, mini roses, or alstroemeria. They handle heat and limited air conditioning better.
Also, always buy 10–15% more stems than you think you need. Small vases use up flowers faster than large arrangements.
Where to Use Wedding Bud Vase Mix and Match Set
This setup works especially well where guests sit close together and clear sightlines matter.
- Long wedding tables
- Banquet tables for 6–10 guests
- Cocktail areas
- Intimate ceremony settings
It creates a feeling of thoughtful design without heavy decoration. Guests see the flowers, but the table never feels overcrowded.
8. Simple Mason Jar Florals with Grocery Store Stems
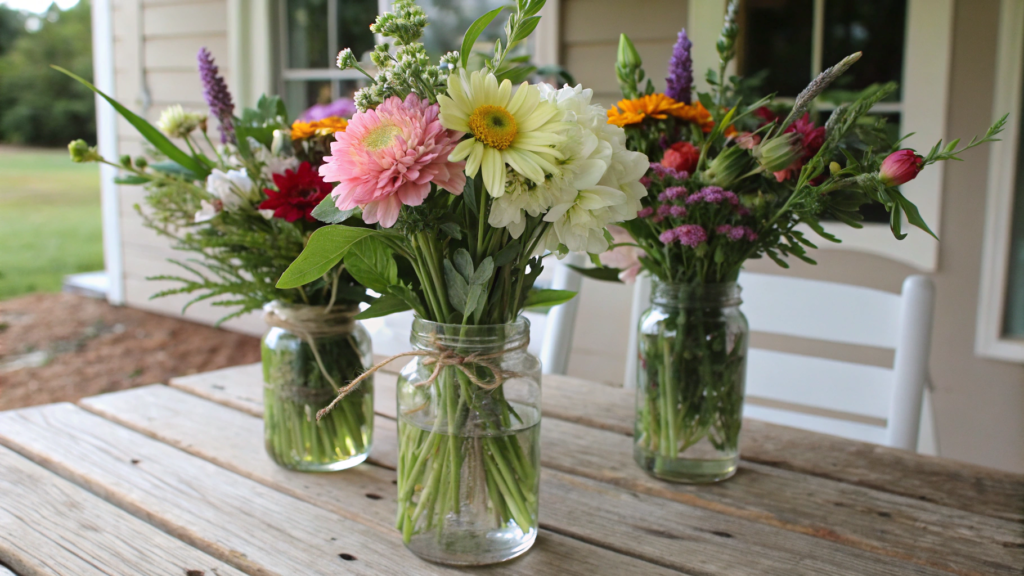
Sometimes the mood is simple — walk into a regular supermarket, grab a couple of bouquets, and put together Simple Mason Jar Florals with Grocery Store Stems.
It looks effortless, but tidy. A bit farmhouse. And still perfectly appropriate for dinner, a veranda, or even a small wedding table.
What You’ll Need
Keep in mind: a mason jar is a small vase. You’ll need fewer flowers than you think.
- 4–8 16 oz Mason jars (about 470 ml)
- 2–3 supermarket bouquets (tulips, carnations, alstroemeria, daisies)
- A bit of greenery (eucalyptus or greens from the bouquet)
- Water
- Pruners
How to Make It
Place the jars on the table first. Arrange them before adding flowers. This helps you see spacing and rhythm.
- Fill each jar about 2/3 with water.
Don’t fill to the top — once stems go in, water rises. Mason jars are narrow, so overflow happens quickly. - Take the bouquets apart completely.
Never place them as they were tied. Separate every stem. Remove lower leaves — anything below the water line should go. - Trim each stem 0.5–1 inch (1–2 cm) at an angle.
This improves water absorption. Even fresh flowers last 1–2 days longer with a fresh cut. - Use 3–5 stems per jar max.
A mason jar looks best when flowers sit loosely. One focal bloom plus 1–2 secondary stems and a bit of greenery is enough. - Vary the height.
Final arrangement height should be about 8–12 inches (20–30 cm). Don’t make every jar identical. One might have 4 stems, another 3. - Alternate colors along the table.
If you’re using yellow daisies and pink carnations, don’t repeat the same combo every time. Let colors reappear every 1–2 jars. - Step back 6–8 feet (2–2.5 m).
Mason jar florals work as a group. Make sure color feels evenly distributed across the table.
You can wrap the neck of the jar with linen twine or thin ribbon. But keep it minimal. The beauty of mason jars is in their simplicity. And choose flowers with sturdy stems — very soft ones may collapse in the narrow opening.
Tip
Supermarket flowers often sit in water with preservatives. After purchase, refresh the cut and replace the water with clean water immediately. And don’t place jars in direct sunlight. A mason jar heats up faster than thick glass vases.
Where to Use Simple Mason Jar Florals with Grocery Store Stems
These arrangements create a relaxed atmosphere. They don’t need a perfect interior.
- Summer dinner on the patio
- Kitchen table
- Rustic-style wedding table
- Picnic or barbecue
They add color and life without stealing attention. And sometimes, that simplicity is what makes the space feel warm and lived-in.
9. Dutch Style Tulip Spiral Bouquet in a Pitcher
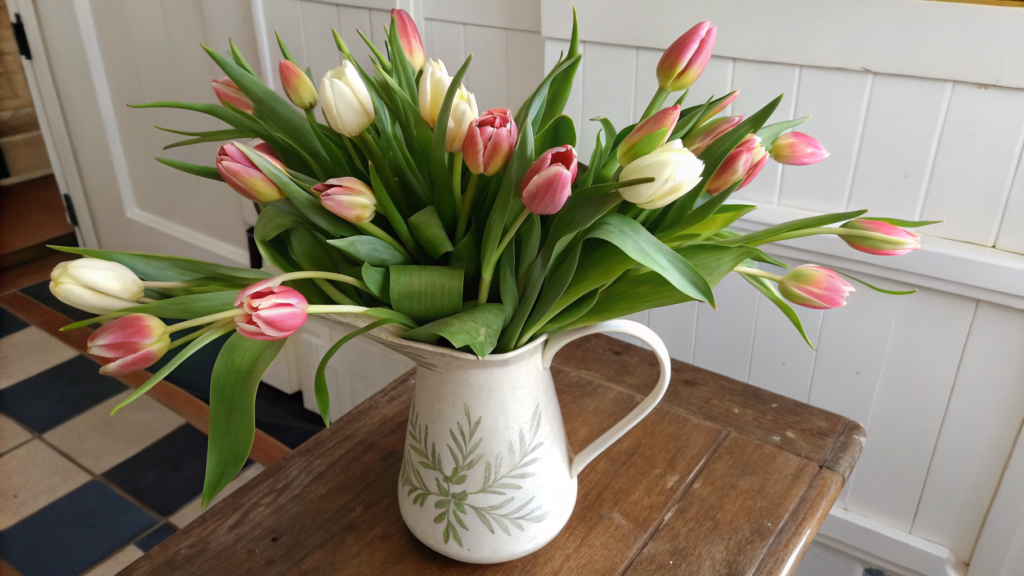
Dutch Style Tulip Spiral Bouquet in a Pitcher gives the feeling of a carefully gathered bouquet.
The Dutch spiral technique means the stems are placed at an angle and cross at one central point. The bouquet holds its shape, looks full, and still feels airy.
The method is simple. But when you do it correctly — the difference is obvious.
What You’ll Need
Before starting, choose the right pitcher. It should be stable and heavy enough.
- 15–25 tulips in one or two shades
- A pitcher 8–10 inches (20–25 cm) tall
- Water
- Pruners
How to Make It
Remove lower leaves before assembling. No leaves should touch the water.
- Hold the first tulip vertically.
This becomes the central axis of the bouquet. - Place the second tulip at about a 45-degree angle.
The stem should cross the first at one point. Hold them together in your hand. - Keep adding tulips at the same angle.
All stems should face in the same direction. This creates the spiral. - Rotate the bouquet in your hand as you work.
This helps maintain even shape and prevents leaning. - Trim the stems to the same length once finished.
The final height should be about 1.5 times taller than the pitcher. For example, with a 9-inch (23 cm) pitcher, the bouquet should be around 14 inches (35 cm) tall. - Place the bouquet in water filled to 2/3 height.
If tulips feel too loose, gently tighten the spiral before placing them. - Adjust the angle.
Tulips naturally bend toward light. Turn the pitcher so the curve looks intentional.
Tulips continue growing after cutting — sometimes 1–2 inches (2–5 cm) over a few days. That means the arrangement will open up and shift slightly. If you want a tighter look, choose buds that aren’t fully open yet.
Tip
Don’t combine daffodils with tulips in the same pitcher without preparation. Daffodils release sap that can shorten the life of other flowers. If you want to mix them, let daffodils sit separately in water for 24 hours, then change the water before combining.
And change the water every 1–2 days. Tulips prefer clean water and cooler temperatures.
Where to Use Dutch Style Tulip Spiral Bouquet in a Pitcher
This bouquet creates a soft vertical accent and works well where you need noticeable but not overpowering volume.
- A kitchen island from 24 inches (60 cm) wide
- A dining table for 4–8 people
- A buffet or console in the dining room
- A dresser in a neutral-toned living room
When you look at the gentle curve of tulips, you realize — a simple technique can make ordinary flowers feel much more expressive.
10. Hydrangea and Eucalyptus Front Entry Arrangement
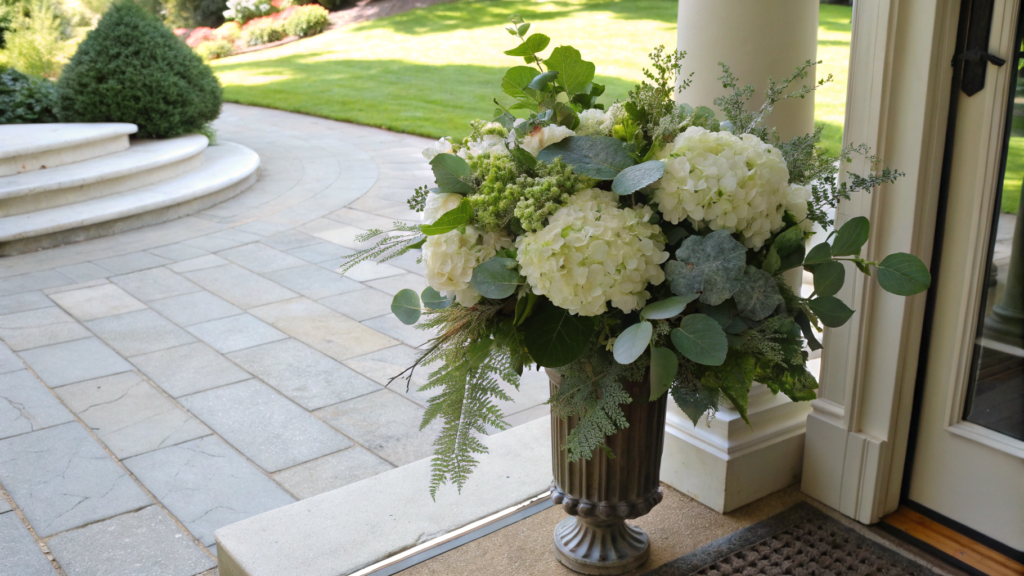
If you place Hydrangea and Eucalyptus Front Entry Arrangement near the door, the space immediately feels more polished and intentional.
Hydrangea gives volume. Eucalyptus adds movement and softness. Together they create a composition that’s noticeable from the doorway but doesn’t feel excessive.
What You’ll Need
An entry area usually calls for a slightly larger arrangement than a dining table.
- 3–5 large hydrangeas
- 5–8 eucalyptus stems
- A tall vase or planter 14–20 inches (35–50 cm) high
- Water
- Pruners
How to Make It
Place the vase in its final spot before arranging. This helps you judge the scale of the space correctly.
- Fill the vase 2/3 with water.
Hydrangeas need deep hydration. In a tall vase, make sure stems are well submerged. - Trim hydrangeas 1–2 inches (2–5 cm) at an angle.
If the stem is thick, slightly split the base about 0.5 inch (1 cm) to improve water absorption. - Remove all leaves below the water line.
Entry areas are often warmer, especially in summer. Leaves in water spoil faster and make it cloudy. - Set the hydrangeas first.
Arrange them in a triangle — one slightly higher, two a bit lower. The final height should be about 1.5 times taller than the vase. - Add eucalyptus between the blooms.
Don’t insert it straight up. Let the stems extend 2–4 inches (5–10 cm) beyond the main volume. This creates a soft silhouette. - Turn the vase and check the view from the door.
An entry arrangement should look good from outside when the door opens. - Step back 6–10 feet (2–3 m).
Make sure the composition doesn’t lean to one side. Adjust the hydrangeas slightly if needed.
Hydrangeas are sensitive to temperature shifts. If the arrangement stands near a door that opens frequently in winter, cold air can shorten their lifespan. In that case, choose sturdier varieties or even high-quality artificial hydrangeas.
Tip
If hydrangeas begin to droop slightly, fully submerge the bloom in cool water for 30–60 minutes. They often recover if dehydration is the issue.
And change the water every 1–2 days. A tall clear vase should always look clean.
Where to Place Hydrangea and Eucalyptus Front Entry Arrangement
This arrangement works where you need a vertical accent and a sense of completion.
- By the front door inside the house
- On a console in the entryway
- Near the staircase
- In a living room corner by the entrance
It creates a calm, welcoming accent that greets guests first.
Handmade Arrangements Feel Different
Spring arrangements don’t have to be perfect. They should feel alive. A little variation in height. A bit of space between stems. A touch of movement.
Start with something simple — mason jars with market flowers or tulips in a pitcher. Then experiment. Change the scale. Play with height and texture.If you try one of these arrangements at home, share in the comments which one you chose and where you placed it. It’s always interesting to see which format feels the most practical and expressive in your own space.