
Corn and tomatoes can grow well in the same space. But only if you plan their layout in advance. Corn quickly gains height and forms a dense wall of leaves. If it ends up on the southern side or too close to tomatoes, the light starts getting blocked. And tomatoes are very sensitive to lack of sun — it immediately affects flowering and fruit size.
We didn’t learn this in theory. One season the plants looked healthy, but the yield was smaller than usual. The reason turned out to be simple — shade in the middle of the day. Since then, we always watch where the sun falls in July, not just in spring when the plants are still small.
The most important thing here is row orientation and airflow. If the light is distributed properly, the crops don’t interfere with each other. If not — competition begins.
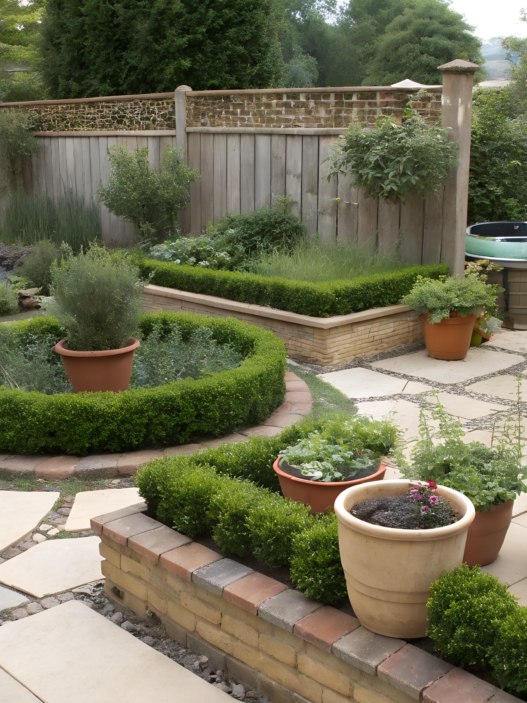
1. Basil Borders for Larger Tomato Trusses

We already knew that basil and tomatoes “get along,” but I wanted to test whether planting density actually affects the result. And it turns out — yes. It does.
Why a border and not just a couple of plants?
Most gardeners plant 1–2 basil plants next to a tomato. That’s good. But that’s not a system. A border is:
- A continuous line of basil along the entire bed
- Strip width 12–18 inches (30–45 cm)
- Planted in 2 staggered rows
- Spacing between plants 8–10 inches (20–25 cm)
This creates a dense aromatic barrier. And that’s where it gets interesting.
What happens in practice
When basil grows as a dense ribbon along tomatoes, it’s not the “energy of the bed” that changes — it’s very specific things.
Fewer pests
There are studies showing that aromatic plants can influence insect behavior through their scent. Basil has been studied in relation to thrips and whiteflies. It’s not full protection, but it can be an additional factor that reduces pest pressure.
In our experience, a bed with a dense basil border behaves more steadily than one without it.
Improved soil-level microclimate
A thick border lightly shades the soil. The ground dries out less, and tomato roots don’t overheat on hot days. Root overheating directly affects truss size and fruit set stability.
More stable flowering and fruit set
When basil blooms nearby, there are more pollinating insects in the bed. It’s not magic. It’s ecosystem logic. More activity — better pollination.
And all of this together leads to more even, heavier trusses. Not giant. Not miraculous. But steady.
How we do it at home
- Prepare the soil ahead of time.
Tomatoes and basil both like loose, well-drained, organic-rich soil. We aim for pH 6.0–6.8 and mix in at least 2–3 inches of compost (5–8 cm) before planting. If the soil is heavy, we add more compost and a bit of coarse sand. If it’s sandy, we increase the compost. No standing water. - Keep proper spacing for tomatoes.
We leave 24–30 inches (60–75 cm) between plants and at least 36 inches (90 cm) between rows. Air needs to move freely. That helps reduce fungal issues. - Plant basil as a dense ribbon.
We make a strip 12–18 inches (30–45 cm) wide, plant two staggered rows, and keep 8–10 inches (20–25 cm) between basil plants. We always leave at least 6 inches (15 cm) from the tomato stem. - Wait for warm soil before planting basil.
The soil temperature should be at least 60°F (16°C). In cold soil, basil just stalls. - Use careful watering.
Drip irrigation works best. Basil leaves don’t like constant moisture from above. The soil should stay evenly moist, not soaked. - Pinch regularly to thicken growth.
We trim the tops often to keep the border compact. I use Fiskars Steel Bypass Pruning Shears because they cut clean and don’t crush stems. The denser the leaves, the stronger the aroma. - Prevent early flowering.
As soon as basil starts forming flower buds, we pinch them off. We want leafy growth, not seeds.
Important details
- Don’t plant basil too close to the tomato stem — at least 6 inches (15 cm).
- Drip irrigation is better. Basil leaves don’t like constant moisture from above.
- Choose varieties like Genovese or Sweet Basil — they produce stronger leaf mass.
And one more thing. Don’t expect results in a week. The border starts working when the leaf canopy closes. Usually that’s 3–4 weeks after planting.
One year we grew Brandywine tomatoes that formed heavy trusses of 5–6 fruits weighing 12–16 oz (340–450 g). That season, the basil stood like a solid wall. A coincidence? Maybe. But we repeat this every year.
2. Garlic Rings to Slow Aphids and Whiteflies

Garlic around tomatoes is a working planting scheme — if you do it correctly.
When Lindy and I first tried planting garlic not in a separate bed, but as a ring around each tomato plant, it was purely practical. Aphids were already starting to show up. Whiteflies too. And we don’t use chemicals.
That’s when garlic stopped being just a vegetable. It became a protective element of the system.
What happens in practice
Garlic contains sulfur compounds, including allicin. Studies show that garlic extracts can reduce aphid populations and other small sucking pests on vegetable crops (published in Crop Protection and Journal of Economic Entomology).
This does not mean that garlic planted nearby will completely solve the problem. But its scent can make plants less attractive to pests.
It’s important to understand: garlic does not “kill everything.” It reduces plant attractiveness.
And that difference is noticeable. When a garlic ring forms around a tomato, the scent environment changes. For humans — barely noticeable. For small sucking insects — a completely different signal.
Another advantage: garlic does not compete with tomatoes for light. Its root system is compact and goes deeper, without aggressively taking the topsoil layer the way lettuce or shallow greens might.
How we make garlic rings
- Define the ring diameter.
We form the ring 6–8 inches (15–20 cm) away from the tomato stem. The total circle diameter ends up about 14–18 inches (35–45 cm). - Decide how many cloves to use.
For one plant — 6–8 cloves spaced evenly around the circle. For strong indeterminate varieties — up to 8–10 cloves. - Plant at the correct depth.
We plant cloves about 2 inches (5 cm) deep. In heavy soil — slightly shallower. In loose soil — standard depth. - Pay attention to soil conditions.
Garlic prefers well-drained soil. Ideal pH is 6.0–7.0. If the soil stays too wet, cloves can rot. That’s why we add compost and make sure drainage works properly. - Choose the right timing.
If it’s spring garlic, we plant it in spring at the same time as tomato transplants.
If it’s winter garlic, it’s already growing green shoots — then we simply plan tomato placement around it. - Control watering.
Garlic does not like constant oversaturation. We use drip irrigation so water goes mainly to the tomato root zone, not flooding the entire ring.
A practical detail that matters
Garlic is not a barrier against all pests. It works best in combination with other practices:
- Good air circulation
- No overcrowding
- Mulch
- Regular inspection of the underside of leaves
One year, aphids still showed up. But on plants without garlic rings, the infestation was clearly heavier. This isn’t a lab experiment. It’s a garden. But the difference is visible.
Garlic rings are a simple way to reduce aphid and whitefly pressure without chemicals. It may not look especially decorative. But systems work because of details like this.
3. Onion Rows to Confuse Tomato Hornworms

The tomato hornworm teaches vigilance. Miss one day — and half the plant is stripped. In our first year on a new property, Lindy and I lost several strong indeterminate plants simply because we underestimated how fast these caterpillars work. They can grow up to 3–4 inches (7–10 cm) and remove a significant amount of foliage in just a few days.
Since then, onions have been a required element in our tomato rows. And yes, the system justifies itself.
What happens in practice
Hornworms locate tomatoes by scent when choosing where to lay eggs. Onions and other plants from the Allium family also release strong aromas. In mixed plantings, these different scents blend together, making it harder for the insect to clearly detect its host plant.
This is not total protection and not a guaranteed method. But scent diversity in the bed can lower the likelihood of heavy infestation. At the garden scale, that already matters.
Another advantage: onions have a compact root system and do not compete with tomatoes for light. They occupy vertical space that would otherwise remain unused.
How we plant onion rows
This is not random planting. It’s a deliberate line.
- Placement.
We plant one row of onions along each side of the tomato bed. If the bed is 4 feet (120 cm) wide, that’s enough. If it’s wider, we may add an inner row between tomato plants, but only if airflow remains open. - Spacing between bulbs.
4–6 inches (10–15 cm). We usually keep about 5 inches (12 cm) — that allows full bulb development. - Distance from tomato stem.
Minimum 6 inches (15 cm), ideally 8 inches (20 cm). This reduces moisture competition and makes mulching easier. - Planting depth.
Sets are planted about 1 inch (2–3 cm) deep. The tip remains slightly visible. Planting deeper slows development. - Soil.
Onions prefer loose, structured soil with pH 6.0–7.0. We always add 2 inches (5 cm) of compost before planting. In heavy clay, bulb formation suffers, so we may incorporate sand to improve drainage. - Feeding.
Early growth requires moderate nitrogen. Too much produces heavy tops but weak bulbs. We use mild organic feed early in the season and stop once bulb formation begins. - Watering.
Regular, without standing water. Once bulbs begin forming (usually when the green tops reach about 0.5 inches / 1–1.5 cm in thickness), we gradually reduce watering. - Pest monitoring.
Even with onion rows, we inspect the underside of tomato leaves every few days during warm periods. Hornworms are more active above 75°F (24°C). Early detection makes the difference.
What onion rows give us mid-season
When we started planting onions along every tomato row, the change became visible by mid-summer. Especially in July, when temperatures stay above 75°F (24°C) and insect activity peaks.
Here’s what we observe:
- Fewer large-scale foliage losses. Plants stay fuller and greener longer.
- Slower buildup of caterpillars. Infestation is less sudden.
- More even plant development. Stressed plants recover faster.
- Slight buffering of heat at the lower bed level. The soil surface stays more protected.
This is not a radical shift. But in a garden, stability often comes from these subtle adjustments.
We understand that onions do not solve the entire problem. They reduce the probability of outbreak. After that, vigilance still matters. We continue checking leaf undersides and reacting early.
In a garden, there is rarely one solution. It’s a combination: crop diversity, airflow, spacing, and regular observation.
Why we always use this scheme
It’s simple. Onions are growing for the kitchen anyway. At the same time, they contribute to tomato resilience. And I appreciate when a bed looks intentional — when each row serves a role, not just space.
4. Carrot Underplanting for Loose Soil and Better Drainage

Planting carrots next to tomatoes shows how roots work in different soil layers.
When Lindy and I started seriously improving the structure of our land in Idaho, the soil was heavy, compacted, and in some spots almost sealed shut. Tomatoes grew, but after heavy rain the water would just sit there. And tomato roots do not tolerate waterlogging. At all. That’s when we began underplanting carrots directly beneath tomatoes.
Not between the rows. Right inside the tomato bed.
What happens underground
Tomatoes form a strong root system, but most of their active roots stay in the upper 12–18 inches (30–45 cm) of soil.
Carrots grow deeper — often 10–12 inches (25–30 cm) or more, depending on the variety and soil structure.
This creates:
- Vertical separation of root zones
- Natural soil loosening
- Better drainage after rain
- Less compaction
Research on intercropping systems shows that plants with different root depths tend to compete less for water and nutrients. When one crop works near the surface and another goes deeper, resources are used more evenly.
In simple terms, different levels mean less direct competition.
How we underplant carrots
Underplanting carrots beneath tomatoes requires attention. It’s not just scattering seeds. You have to balance moisture, airflow, and space for both crops at the same time.
Here’s how we do it.
- Prepare the soil in advance.
Before sowing, the top layer should be loose to at least 10 inches (25 cm). We break up clods, remove stones and old roots. If you skip this step, carrots will grow crooked or forked. Tomatoes are more forgiving. Carrots are not. - Keep distance from the tomato stem.
We sow seeds 4–6 inches (10–15 cm) away from the stem. If planted closer, young seedlings compete for moisture, especially during hot weeks. We made that mistake once — germination was weak. - Control planting depth carefully.
Seeds should be placed about ¼ inch (0.5 cm) deep. That’s shallow. If planted deeper, especially in heavy soil, seedlings may not reach the surface. After sowing, we gently firm the soil with our palm, but never compact it hard. - Follow a clear row pattern.
Rows are spaced 6–8 inches (15–20 cm) apart. After seedlings emerge, we thin them to about 2 inches (5 cm) within the row. Without thinning, roots stay thin and underdeveloped. - Manage moisture early on.
During the first 10–14 days, the soil must stay slightly moist. Not soaked — just evenly damp. If the surface dries out, germination drops sharply. Sometimes we cover the area with a thin layer of light mulch or row cover to hold moisture. - Mulch after emergence.
Once true leaves appear, we add a thin layer of mulch. This stabilizes soil temperature and protects the surface structure, especially during hot spells.
Carrots do not tolerate sharp swings in moisture. Consistency matters more than heavy watering.
The result
During seasons with heavy summer rain, we saw a difference. Where carrots grew under tomatoes, water drained faster. The soil didn’t crust over. When we dug plants in fall, tomato roots looked healthier.
There’s also a practical bonus — you harvest from the same space. We like when a bed works in multiple layers at once.
When not to underplant carrots
Carrot underplanting is not universal. There are conditions where this scheme does more harm than good.
We do not underplant carrots:
- If the soil is heavy clay and poorly drained
- If the bed is already overcrowded with poor airflow
- If intensive nitrogen feeding is used
- If the area sits in deep shade
Carrots are especially sensitive to excess nitrogen. Roots become forked and weak. In compacted soil, they simply cannot grow straight.
Before underplanting, we always evaluate the bed. If the soil is loose, alive, and tomatoes are spaced properly, carrots become a strong lower layer. If conditions are not right, we improve the soil first.
In a living bed, systems only work when conditions support every participant.
5. Lettuce Shade Planting to Keep Roots Cooler

During hot seasons, the root zone of tomatoes can heat up above 85°F (29°C). At those temperatures, roots begin to function less efficiently: water and nutrient uptake drops, and the plant enters stress. And that directly affects fruit set.
We saw this in one especially hot year. The tops of the plants looked strong, but flowers started dropping. The soil under the mulch felt hot to the touch.
That’s when lettuce stopped being just dinner greens and became a microclimate tool.
What happens in the root zone
Lettuce forms a dense but shallow rosette. Its roots stay mostly within the top 4–6 inches (10–15 cm), without competing with tomatoes, which grow deeper.
When planted densely, lettuce creates:
- Additional shade at soil surface
- Reduced moisture evaporation
- More stable topsoil temperature
- Less soil crust formation
Research shows that living soil cover can lower surface soil temperature compared to bare ground (Agricultural Water Management). Even a small reduction during heat waves helps roots function more steadily and reduces plant stress.
This isn’t theory. It’s simple logic: less direct sun means less heat.
How we underplant lettuce beneath tomatoes
Lettuce requires more attention to placement than it seems.
- Choose the right varieties.
Leaf types and romaine work best. Head lettuces need more space and take longer to mature. - Define the planting zone carefully.
We transplant lettuce 8–10 inches (20–25 cm) away from the tomato stem. Closer than that creates moisture competition. - Use a staggered layout.
We place lettuce in a staggered pattern between tomatoes, filling the lower layer of the bed. We keep about 8 inches (20 cm) between plants to maintain airflow. - Prepare the soil properly.
Soil should be loose and rich in organic matter. Ideal pH is 6.0–6.8. We incorporate 1–2 inches (2–5 cm) of compost before planting because lettuce responds quickly to nutrient shortages. - Maintain steady watering.
Lettuce needs consistent moisture. If it dries out, leaves turn bitter. A drip system works best to keep moisture even without oversaturation. - Time planting wisely.
We plant lettuce in early spring or early summer before peak heat. Under tomato shade, it can grow longer than in full sun. - Harvest gradually.
We use the “cut-and-come-again” method — removing outer leaves without pulling the plant. This extends the harvest window.
When lettuce is especially helpful
In hot regions or seasons when temperatures rise above 90°F (32°C), lettuce becomes more than a crop. It becomes part of temperature regulation.
We’ve noticed that beds with a living lower layer hold moisture longer. Tomatoes handle heat better and drop fewer flowers.
This doesn’t mean lettuce solves extreme drought. But it adds another layer of resilience and stability.
When not to underplant lettuce
There are situations where underplanting lettuce can cause problems. We avoid this scheme:
- If the bed is already overcrowded
- If the climate is very humid and airflow is weak
- If fungal diseases are present
- If the soil is heavy and dries slowly
Lettuce likes moisture, but stagnant air increases disease risk. Plant density must stay under control.
Lettuce under tomatoes shows how the lower layer supports the upper one. It works quietly. But in hot seasons, these details help keep the system steady.
6. Pepper Neighbors for Shared Trellis and Airflow

Peppers next to tomatoes allow for efficient vertical use and proper airflow.
In the past, Lindy and I planted peppers in a separate bed. It took up too much space. At the same time, the peppers still stood below the tomatoes and received part of their shade anyway. So we redesigned the layout.
Now peppers are support neighbors, not a separate crop.
What happens in a shared planting
Tomatoes form the upper tier — 5–7 feet (150–210 cm) in indeterminate varieties. Peppers rarely exceed 24–36 inches (60–90 cm). This naturally separates them by height.
With the right layout, we get:
- One shared support structure
- Better use of space
- More even air circulation
- Less crowding
Research on mixed planting shows that when crops of different heights grow together, they can use space and light more effectively. If enough distance is maintained, air moves freely between plants and leaves dry faster after rain. And when leaves dry faster, the risk of fungal disease decreases.
The key factor is not height alone — it’s proper spacing.
How we place peppers next to tomatoes
It’s not just about planting them close. It’s about using a clear layout.
- Distance between tomato and pepper.
At least 12 inches (30 cm) from stem to stem. Planting closer reduces airflow and increases humidity around foliage. - Offset placement.
We stagger peppers slightly relative to tomatoes. This allows more light to reach the lower tier. - Shared support system.
We use one row of trellis or string support for tomatoes, and tie peppers to the same structure at a lower level. This saves materials and simplifies maintenance. - Trellis height.
Tomatoes — 6–7 feet (180–210 cm). Peppers — tied at about 2–3 feet (60–90 cm). - Soil conditions.
Peppers prefer warm, well-drained soil. Ideal pH is 6.0–6.8. We add 2 inches (5 cm) of compost before planting and avoid overwatering. - Water management.
Peppers are more sensitive to moisture swings than tomatoes. Soil should remain evenly moist. If it dries out, peppers drop flowers quickly. - Density control.
If foliage begins to touch and restrict airflow, we remove lower tomato leaves. This restores air movement and reduces fungal risk.
Peppers do not shade tomatoes, and tomatoes do not overwhelm peppers — if spacing is correct. Together they form a denser but still ventilated row.
We’ve noticed that with this layout, the bed looks cleaner and requires fewer individual stakes. More importantly, plants stay more stable in wind. A shared structure handles load better than isolated supports.
When not to use this layout
There are situations where separating the crops is better:
- If the climate is very humid and fungal risk is high
- If the site has poor airflow
- If tomatoes are already planted too densely
- If using determinate tomatoes with a wide canopy
In those cases, giving plants more space is the better choice.
Growing peppers and tomatoes together is about intentional layering. When height, spacing, and support work together, the bed becomes stable not only visually, but functionally.
7. Cucumber Trellis Pairing with Tomato Spacing Rules

The idea of growing cucumbers and tomatoes on the same trellis first seems like a smart way to save space. But if proper spacing isn’t respected, it turns into a humid, crowded tunnel where air barely moves.
Cucumbers are vining plants. Tomatoes are upright plants with strong vertical growth. They can work together — but only if the space is distributed intentionally.
What happens in a shared planting
Cucumbers quickly produce side vines and large leaves. They transpire heavily. Tomatoes also create dense foliage, especially indeterminate varieties.
If spacing is ignored, this leads to:
- Weak air circulation
- Higher humidity inside the row
- Increased risk of fungal diseases
- More difficulty with plant maintenance
But when spacing is respected, the result is an efficient vertical growing system.
Research on plant density management shows that adequate distance between plants directly affects disease levels in vegetable crops. The logic is simple. The better the airflow, the lower the disease pressure.
How we combine cucumbers and tomatoes
This is where clear structure matters.
- Separate vertical zones.
We train tomatoes up a trellis 6–7 feet (180–210 cm) tall.
Cucumbers use the same structure, but we guide them slightly to the side or along a separate string line to prevent overlap. - Keep proper distance between tomatoes.
At least 24–30 inches (60–75 cm) between plants. This is the foundation. Without this spacing, nothing else works. - Maintain space between cucumber and tomato.
No less than 18 inches (45 cm) from stem to stem. It may feel excessive, but this gap preserves consistent airflow. - Use a staggered layout.
The most functional pattern looks like this: tomato — 18 inches (45 cm) — cucumber — 24 inches (60 cm) — tomato. This reduces direct leaf overlap and improves light distribution. - Control leaf mass regularly.
We remove lower tomato leaves up to 12–18 inches (30–45 cm) from the ground.
On cucumbers, we prune overcrowded side vines to prevent excessive density and maintain ventilation. - Manage soil and watering carefully.
Cucumbers require more consistent moisture. Irrigation must stay balanced so tomatoes do not sit in overly wet soil.
When this system works best
Pairing cucumbers and tomatoes on one trellis is not universal. It depends on climate conditions, airflow, and consistent plant management.
This layout performs best when:
- The climate is moderately dry
- There is natural wind movement or open exposure
- Vertical training is used instead of free sprawl
- Regular pruning and density control are maintained
When these conditions are met, the bed doesn’t turn into a dense tunnel. Air remains present. Light is distributed more evenly. Maintenance becomes easier.
If summers are humid and the bed sits in a low, stagnant area, separating the crops may be wiser. Sometimes more space truly means fewer problems.
This system requires discipline. But when managed correctly, the bed functions like a structured vertical garden, not a green wall without air.
8. Zucchini as a Living Mulch Around Tomato Beds

When I planted zucchini along the edge of the tomato bed, it was mostly practical. The space was empty, weeds were coming in fast, and we were short on mulch. Zucchini covered the soil in just a couple of weeks. And that’s when it became clear — this is living mulch.
What happens at soil level
Zucchini quickly forms large leaves, often 12–18 inches (30–45 cm) in diameter. They create dense shade at the soil surface.
As a result:
- Moisture evaporation decreases
- Soil overheats less
- Weed growth is suppressed
- The upper soil layer stays more stable
The effect is simple: less direct sun hitting bare soil means less temperature fluctuation.
How we place zucchini around the tomato bed
It’s important to understand: zucchini is an aggressive grower. You can’t just plant it anywhere. Here’s how we handle it.
- Plant only along the perimeter.
Zucchini goes along the outer edge of the tomato bed, never inside the row. This prevents overcrowding. - Keep distance from tomatoes.
At least 24 inches (60 cm) from the nearest tomato stem. Zucchini expands fast. - Space zucchini plants properly.
We keep 30–36 inches (75–90 cm) between zucchini plants. Each plant needs room for its leaf mass. - Guide the direction of growth.
We turn leaves toward the pathway, not toward the tomatoes. In the first weeks, we gently adjust leaf direction by hand. - Prepare nutrient-rich soil.
Zucchini prefers soil rich in organic matter. We incorporate 2–3 inches (5–8 cm) of compost before planting. It is a heavy feeder. - Monitor moisture carefully.
Under dense foliage, moisture lingers longer. That means tomatoes must not be overwatered. A drip irrigation system helps maintain balance. - Remove aging leaves.
We trim lower, damaged, or overcrowding leaves to preserve airflow.
When this system works best
Using zucchini as living mulch is not universal. It works best:
- In hot and dry climates
- On open, sunny sites
- Where row spacing is wide
- When tomatoes are trained vertically
In those conditions, zucchini helps retain moisture and reduce soil overheating.
If the site is humid, poorly ventilated, or tomatoes are planted too tightly, zucchini can trap excess moisture around plant bases.
It’s important to remember: zucchini is a vigorous crop. It actively occupies space. Without control, it can overwhelm neighbors. The key word here is management.
When the perimeter of the bed is shaded by large leaves, weeds decrease, soil stays softer, and during hot weeks tomatoes remain more stable. Over the season, the difference is noticeable.
9. Squash Spillover Planting for Weed Control Pathways

Sometimes the real issue isn’t the bed itself — it’s the pathways between beds. That’s where weeds appear fastest. The soil is compacted, mulch gets scattered, and constant hand-weeding becomes routine.
So instead of fighting the pathways, we populate them. That’s how the “spillover” method appeared — when vining squash partially extends beyond the bed and covers the walkway with living foliage. It’s not chaos. It’s directed growth.
What happens in the pathway zone
Vining squash varieties produce long runners — often 6–10 feet (180–300 cm) in a season. Their leaves are large and dense, creating consistent shade.
When vines are directed into the walkway:
- Weeds receive less light
- Soil overheats less
- Moisture remains longer
- The path stays cleaner with less frequent weeding
Research shows that dense plant cover can reduce weed germination because it blocks sunlight and alters surface conditions (Weed Science).
This is not total control and not a replacement for weeding. But weed pressure usually drops noticeably.
How we guide squash into the pathway
- Choose true vining varieties.
Bush types won’t work. They’re compact and won’t cover the walkway. We use varieties that reliably produce 6–10 foot (180–300 cm) runners. The wrong type makes the system fail immediately. - Plant strictly at the bed edge.
We position each plant about 18 inches (45 cm) from the bed center so the root zone doesn’t compete with tomatoes. Planting closer increases moisture competition during hot weather. - Train direction early. When vines reach 12–18 inches (30–45 cm), we gently turn them toward the pathway. If you miss this stage, the plant spreads both ways and becomes harder to redirect.
- Maintain pathway width.
The walkway should remain at least 18–24 inches (45–60 cm) wide. If vines start blocking access, we pinch excess growth. Pruning is best done in dry weather to reduce infection risk. - Protect stems at soil contact. Where vines touch the ground, we add a thin mulch layer. This lowers rot risk and keeps fruit cleaner.
- Monitor moisture carefully. Under dense foliage, soil stays moist longer. Irrigation must be adjusted — especially mid-season. Overwatering increases fungal risk.
- Remove aging leaves. Yellowing or overcrowding lower leaves are trimmed to preserve air movement and reduce humidity buildup.
When vines are guided correctly, the pathway stays usable but doesn’t overgrow with weeds. The difference is immediate — less weeding, less soil drying, less dust during heat.
When this system makes sense
Spillover squash isn’t universal. Before using it, evaluate row width, climate humidity, and your ability to manage growth consistently.
This method works best when:
- The climate is dry or moderately warm
- Row spacing is wide — at least 30–36 inches (75–90 cm)
- Pathways receive direct sun
- You can regularly guide vines and remove excess foliage
In these conditions, dense leaf mass suppresses weeds without trapping excess moisture.
If the climate is humid, pathways are narrow, or airflow is limited, spillover planting can increase dampness and raise fungal risk. In those cases, traditional mulch or other weed-control methods may be safer.
The key here is evaluating conditions, not copying a system blindly.
Why we kept this method
After several seasons, it became clear: directing vining squash into pathways significantly reduces weeding. Not completely — but noticeably. Fewer weeds. Softer soil under the vines even in heat. Pathways stopped being constant maintenance zones.
I like when a bed works in layers — tomatoes in the center, squash along the edge, the pathway partially shaded but still controlled. It looks natural, yet remains structured.
This method isn’t universal. But in wide-row systems and drier climates, it absolutely justifies itself.
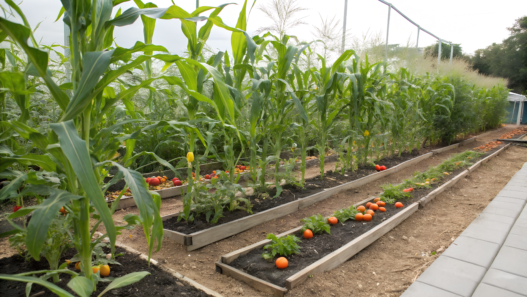
10. Corn and Tomato Layout That Avoids Shade Problems

Corn and tomatoes are a pairing that’s easy to ruin, shoots up fast — 6–8 feet (180–240 cm) or even taller. If placed incorrectly, it will steal light from tomatoes, especially in the morning or evening.
This isn’t just about companion planting. It’s about sun orientation.
What happens with poor placement
Corn forms a dense vertical wall of foliage. If planted on the south side, it:
- Blocks direct sunlight
- Shades the lower tomato canopy
- Increases humidity within the planting
- Slows leaf drying after rain
Tomatoes require at least 6–8 hours of direct sun daily. Without it, flower production drops and fruit development slows.
Here, light is the deciding factor.
How we position corn near tomatoes
Before planting, we observe the sun’s path throughout the day. This isn’t optional. It’s foundational.
- Place corn north of tomatoes.
In the Northern Hemisphere, this is critical. Shadows fall northward — not onto tomatoes. - Maintain generous row spacing.
Keep at least 36–48 inches (90–120 cm) between the corn row and tomato row. It feels excessive, but it preserves airflow and light penetration. - Plant corn in a block, not a strip.
Corn requires block planting (minimum 3×3 plants) for proper pollination. Stretching it in a thin line along tomatoes reduces yield. - Control tomato height and density.
With indeterminate tomatoes, we prune excess shoots and manage foliage thickness to maintain light penetration. - Consider wind impact.
Corn acts as a wind barrier. This can help in exposed sites. But if airflow is already weak, increase spacing to prevent stagnant humidity. - Account for seasonal growth speed.
Corn grows rapidly in early summer. If tomatoes are transplanted later, plan for where shade will fall in July and August, not just at planting time.
When to reconsider this layout
Corn next to tomatoes is not always justified. It works best when:
- Beds run east to west
- Corn is planted strictly north of tomatoes
- Row spacing is sufficient
- The site has good natural airflow
If the space is small, sunlight is already limited by buildings or trees, or spacing drops below 36 inches (90 cm), separate them. Reduced sunlight quickly affects tomato yield.
Use this layout carefully
Corn is a powerful crop. It produces food, creates structure, and offers wind protection. But poorly positioned, it becomes a competitor.
We kept this layout only after we began strictly aligning crops by cardinal direction. Before that, results were inconsistent.
Sometimes yield isn’t about the number of plants — it’s about their orientation.
Proper Companion Placement
Planting corn next to tomatoes is not a way to crowd a bed. It’s a decision that requires planning and foresight.
You need to picture how the garden will look at peak season — when both crops reach their full height and foliage density. A mistake in orientation or spacing can cost tomatoes the sunlight they depend on — and that directly affects yield.
We use this layout only where we can preserve full sun for tomatoes and maintain adequate spacing between rows.
If there’s any doubt, we separate the crops without hesitation.Yield matters more than experimentation. If you’ve tried this pairing before, share in the comments how you positioned the crops and whether it affected your harvest.