Caesar has long been more than just a salad. It can be hot, crispy, baked, wrapped, layered. Because it already has everything we love: the salty bite of parmesan, the creaminess of the sauce, juicy chicken, fresh greens. In this article, I’ve put together 10 non-standard chicken сaesar formats that are easy to repeat. No complicated techniques, no showing off. These are recipes that are easy to cook at home, serve to guests, eat with your hands, and reheat the next day.
And in every case, Caesar behaves differently while still staying recognizable.
1. Chicken Caesar Smash Tacos with Parmesan Crust
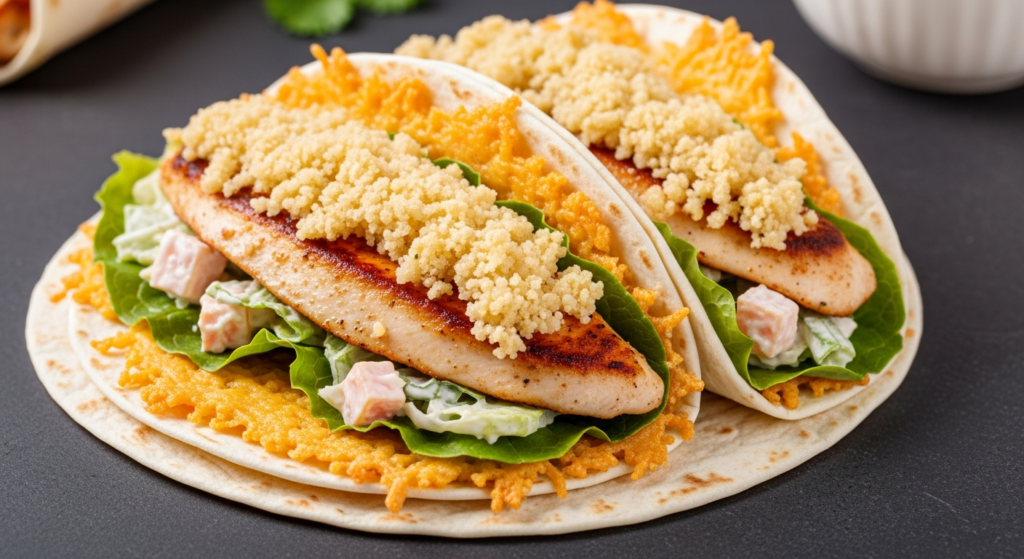
In this recipe, the chicken doesn’t sit inside. It becomes part of the crust. And the parmesan isn’t a garnish — it’s the foundation of the whole dish.
What you get is a thin tortilla with a dense, cheesy crust. Juicy chicken seared right onto the tortilla. Inside is a classic Caesar, but at the same time it’s food that’s easy to hold in your hands and genuinely enjoyable to eat slowly.
Ingredients (for 6 tacos)
For the base:
- 6 small wheat tortillas
- 1 ½ cups boiled or roasted chicken, finely chopped (≈ 220–240 g)
- ¾ cup grated parmesan (≈ 70–80 g)
- 1 tbsp olive oil
- freshly ground black pepper
For the filling:
- 2 cups chopped romaine (≈ 90–100 g)
- ⅓ cup Caesar dressing (≈ 80 ml)
- ¼ cup extra parmesan
- optional: bacon bits or crouton crumbs for texture
How to cook
- Prepare the “smash” layer. In a bowl, mix the chicken with ¾ cup parmesan and a little black pepper. No eggs, no binders. The cheese does all the work here and later turns into the crust.
- Assemble the tacos. Lay the tortillas on the table. Spread the chicken mixture evenly on one side of each tortilla and press it firmly into the tortilla with your palm. The layer should be thin but compact — this helps it hold during cooking.
- Cook properly. Heat a skillet over medium heat and add a little olive oil. Place the tortilla in the pan chicken-side down and don’t touch it for the first 2–3 minutes — this is when the parmesan melts, “glues” the chicken to the tortilla, and forms a crispy crust.
- Flip. Carefully flip the taco and warm the other side for about one more minute — just enough to make the tortilla warm and flexible, without drying it out.
Assemble the Caesar inside
- Toss the romaine with Caesar dressing so the leaves are coated but not drowning.
- Place the salad on the clean side of the hot tortilla.
- Add a little extra parmesan — this is when it sticks best.
- Optionally sprinkle with bacon bits or crouton crumbs for texture contrast.
- Fold the taco in half and serve immediately while the crust is still crisp.
Tips that make all the difference
Parmesan is the base of the dish. You need real hard cheese here, not powdered stuff from a can. It’s what creates the crust and holds the chicken together.
The chicken must be finely chopped, not shredded. That way it cooks evenly and doesn’t fall out of the layer.
Go light on the sauce. This is a taco, not a salad bowl. A light coating of the leaves is all you need.
Medium heat matters. Too much heat will burn the cheese before it turns crispy.
Eat it right away. Ten minutes later it’s still good, but that exact texture contrast won’t be the same.
Everything is made from the most basic ingredients. Clear, fast, and genuinely delicious.
2. Caesar Pizza with Garlic Flatbread Base
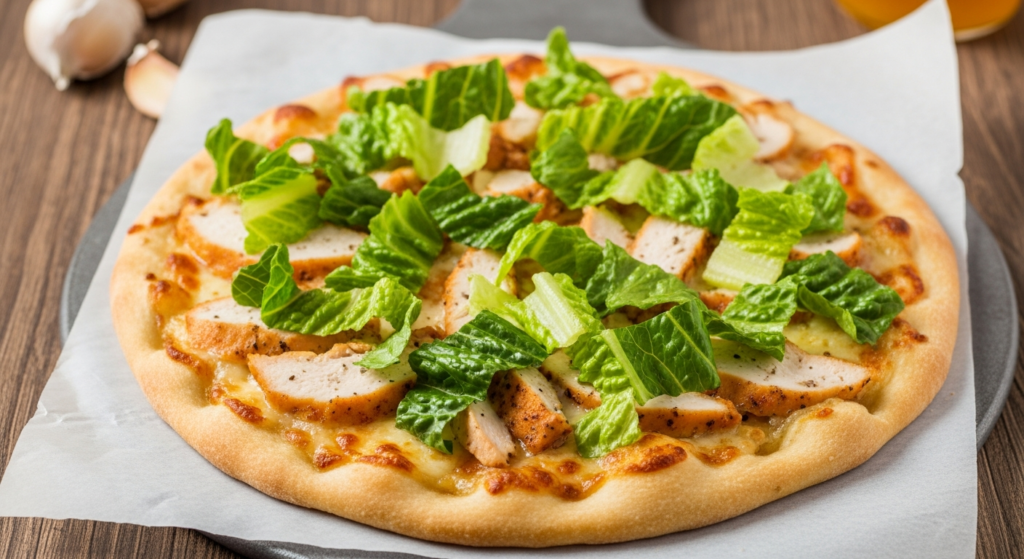
Want pizza, but don’t feel like dealing with dough? In that case, garlic flatbread becomes the perfect base — thin, aromatic, and sturdy enough to handle sauce and chicken.
This is a Caesar that behaves like pizza. And it does it confidently. A thin, crispy base with garlic aroma. Warm Caesar sauce that doesn’t run. Chicken that stays juicy. And fresh romaine added at the very end to keep its flavor and texture.
Very easy to slice, eat, repeat.
Ingredients (for 2 medium pizzas)
For the base:
- 2 ready-made flatbreads or naan
- 2 tbsp olive oil
- 1 garlic clove, finely grated
For the topping:
- ¾ cup Caesar dressing (≈ 180 ml)
- 1 ½ cups roasted or grilled chicken, sliced (≈ 220–240 g)
- 1 cup shredded mozzarella (≈ 110–120 g)
- ½ cup grated parmesan (≈ 45–50 g)
- freshly ground black pepper
After baking:
- 1 ½ cups chopped romaine (≈ 70–80 g)
- a little extra parmesan
How to make
- Prepare the base. Preheat the oven to 425°F (≈ 220°C). Mix the olive oil with grated garlic and brush the flatbread on both sides. This adds flavor and helps protect it from getting soggy.
- Pre-toast. Place the flatbread on a rack or baking sheet and bake for 3–4 minutes. The base should become slightly crisp, but not browned.
- Assemble the pizza. Spread a thin layer of Caesar dressing over the pre-toasted flatbread. Add the chicken, then the mozzarella, and finish with parmesan. A little black pepper is enough.
- Bake. Return the pizza to the oven for 7–9 minutes, until the cheese melts and develops light golden spots. Don’t overbake — lightness matters here.
- Final touch. Take the pizza out and let it rest for a minute. Only then add the fresh romaine and a bit more parmesan.
Small details that matter
- The Caesar dressing should be thick. A watery sauce will soak the base, even if you pre-toast it.
- Flatbread works better than classic pizza dough. It holds its shape and doesn’t compete with the Caesar flavor.
- Add romaine only after baking. Warm lettuce doesn’t belong here.
How to serve
Slice right away while the base is still warm.
You can lightly drizzle the romaine with extra sauce separately instead of covering the whole pizza.
Serving it on a wooden board works especially well — visually, it reads as an unusual Caesar pizza, not leftover salad on bread.
3. Warm Croissant Caesar Melt with Bacon

A croissant is a delicate thing. You can’t just stuff salad into it and expect it to work. But if you turn it into a warm Caesar melt, where the Caesar becomes part of the filling instead of a cold add-on, everything falls into place.
This isn’t a sandwich. On the outside, it’s a warm, lightly crisp croissant. Inside, there’s chicken, bacon, Caesar dressing, and melted cheese. And only after that comes the fresh romaine on top — adding balance without turning into wilted greens.
Ingredients (for 4 servings)
- 4 large croissants
- 1 ½ cups cooked chicken, sliced (≈ 220–240 g)
- 6 strips of bacon, cooked and crumbled
- ½ cup Caesar dressing (≈ 120 ml)
- ¾ cup shredded cheese (provolone or mozzarella, ≈ 85–90 g)
- 1 ½ cups chopped romaine (≈ 70–80 g)
- freshly ground black pepper
How to make
- Prepare the croissants.Slice the croissants lengthwise, but not all the way through. Place them on a baking sheet, cut side up.
For melt-style recipes like this, I always use a heavy carbon steel sheet pan like Nordic Ware Natural Aluminum Commercial Baker’s Half Sheet. It doesn’t warp, holds heat evenly, and gives a clean crust without drying anything out. - Build the warm filling. In a bowl, mix the chicken with Caesar dressing and a little black pepper. Add the bacon and stir gently — the pieces should stay distinct.
- Form the melt. Fill the croissants with the chicken mixture, then add the shredded cheese on top. Don’t pack it down — the croissant needs space.
- Bake. Transfer to an oven preheated to 375°F (≈ 190°C) and bake for 8–10 minutes. The cheese should melt, and the croissant edges should turn lightly golden.
- Add freshness. Remove from the oven and only then add a little fresh romaine inside. Close the croissant and serve immediately.
What matters most here
- Don’t overheat it. A croissant doesn’t like high temperatures — it dries out fast.
- Add the Caesar dressing to the chicken, not the salad. This keeps the filling warm and cohesive while the greens stay fresh.
- The bacon needs to be crispy. Soft bacon gets lost next to the sauce and cheese.
4. Caesar Dip with Rotisserie Chicken and Herb Oil
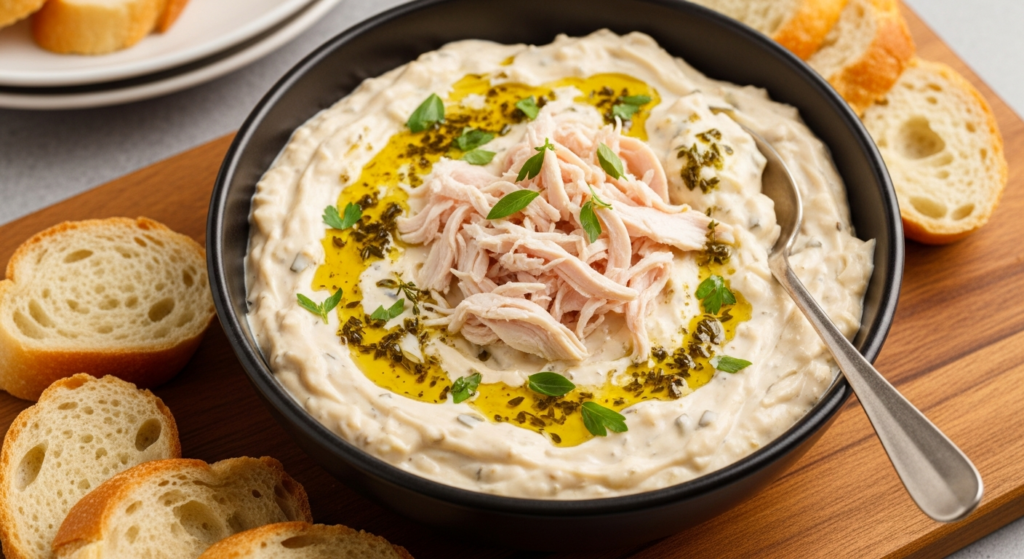
You know, a dip can be eaten however you want. And whenever you want. It can just sit on the table while conversations move along at their own pace.
Rotisserie chicken plays a key role here — it’s already flavorful, juicy, and needs no extra cooking. The result is a creamy, rich but not heavy Caesar dip. With real pieces of chicken you can feel. And with fragrant herb oil on top — the kind you want to scoop up together with the dip.
By the way, it works especially well with vegetables and warm bread.
Ingredients (for a large bowl)
For the dip:
- 2 cups finely chopped rotisserie chicken (≈ 280–300 g)
- 1 cup thick Greek yogurt (≈ 240 g)
- ½ cup Caesar dressing (≈ 120 ml)
- ½ cup grated parmesan (≈ 45–50 g)
- 1 tbsp lemon juice
- freshly ground black pepper
For the herb oil:
- ¼ cup olive oil (≈ 60 ml)
- 1 tbsp finely chopped parsley
- 1 tbsp finely chopped dill or basil
- 1 small garlic clove, grated
- a pinch of salt
How to make — step by step, without rushing
- Prepare the chicken. Remove the skin from the rotisserie chicken and finely chop the meat with a knife, not by pulling it apart with your hands. We want clean pieces, not strands — it looks better and feels better in the dip.
- Mix the base. In a large bowl, combine the Greek yogurt, Caesar dressing, lemon juice, and parmesan. Mix well until smooth and dense. The base should be creamy but hold its shape on a spoon.
- Add the chicken. Gently fold the chicken into the sauce using a spatula. Don’t overmix — the pieces should stay intact.
- Check the balance. Add a little freshly ground black pepper. Usually there’s no need to add salt — the parmesan and dressing already provide enough. Taste and adjust if needed.
- Make the herb oil. In a small bowl, mix the olive oil, herbs, garlic, and a pinch of salt. Let it sit for 3–5 minutes so the oil absorbs the herb aromas.
- Assemble the dip. Transfer the dip to a serving bowl, smooth the surface with a spoon, and pour the herb oil over the top. Don’t mix it in — let the oil stay as a separate layer.
What to keep in mind
- Greek yogurt must be thick. A thinner one will make the dip watery and it will quickly lose its structure.
- Chicken without skin only. Extra fat isn’t needed here — it makes the flavor heavier.
- Add the herb oil at the end. If you mix it in, the aroma gets lost.
How to serve
- with warm flatbread or lavash
- with lightly toasted baguette slices
- with vegetables: celery, cucumber, sweet pepper
This dip easily replaces a salad and unexpectedly becomes the center of the table.
5. Grilled Lettuce-Wrapped Caesar Egg Rolls
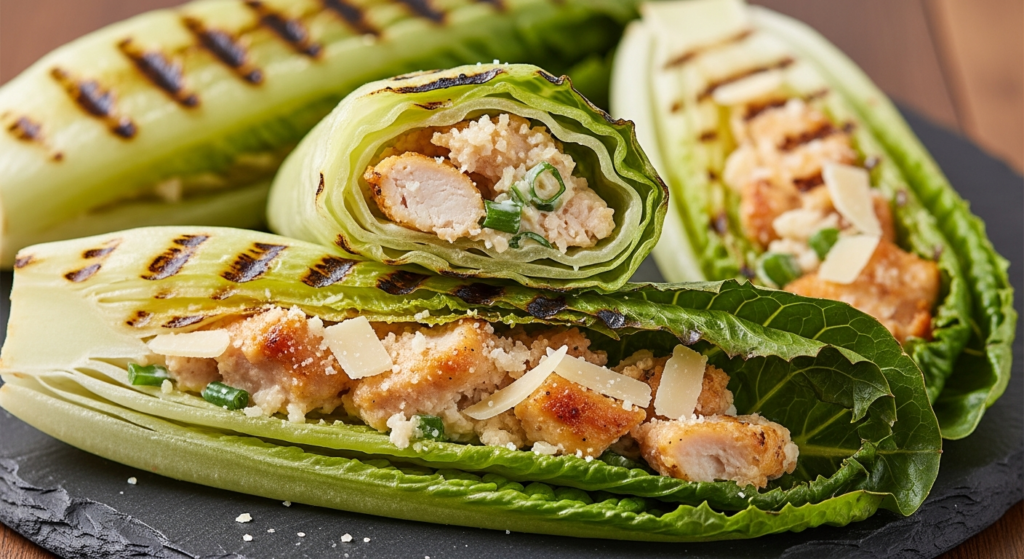
Here, the lettuce leaves act as the wrapper. When you quickly grill them, they turn soft and flexible, with a light smoky note. And surprisingly, they hold the filling really well.
These are not classic egg rolls. This is a warm, juicy filling with chicken and parmesan inside a lightly grilled romaine leaf. On the outside — a gentle grill aroma. On the inside — the creaminess and saltiness of Caesar. And no crumbs all over the table.
Ingredients (for 8 rolls)
For the filling:
- 1 ½ cups cooked chicken, finely chopped (≈ 220–240 g)
- ⅓ cup Caesar dressing (≈ 80 ml)
- ½ cup grated parmesan (≈ 45–50 g)
- freshly ground black pepper
Wrapper:
- 8 large romaine leaves
- 1 tbsp olive oil
Serving (optional):
- lemon wedges
- extra Caesar dressing
A grill surface really matters here. A ridged pan gives better flavor and results. For recipes like this, I often use Lodge Cast Iron Grill Pan — it heats quickly and holds temperature without spikes.
How to make — step by step, without rushing
- Prepare the leaves. Carefully separate the large romaine leaves and rinse them. Dry them completely — this matters, otherwise they’ll steam instead of grill. Lightly trim the thick central rib with a knife so the leaf becomes flexible.
- Make the filling. In a bowl, mix the chicken, Caesar dressing, parmesan, and a little black pepper. The filling should be rich but not runny. If it feels too soft, add a pinch more parmesan.
- Form the rolls.Place a romaine leaf on a board, shiny side down. Spoon 2–3 tablespoons of filling near the base. Fold the bottom edge up, then the sides, and gently roll into a tight roll.
- Prep for grilling. Lightly brush the rolls with olive oil on all sides. This helps the leaves brown and prevents sticking.
- Grill. Heat a grill or grill pan over medium heat. Place the rolls seam-side down and cook for 1–2 minutes per side, until the leaves soften and grill marks appear.
- Finish and serve. Remove from heat and let rest for about a minute. Serve right away, with lemon wedges or a little Caesar dressing on the side.
Tips tested in practice
- Leaves should be large and fresh. Smaller ones won’t hold the filling.
- Don’t overcook. Romaine should soften, not fall apart.
- The filling needs to be dense. A loose mixture will leak during grilling.
How to serve
- cut in half — looks great on a plate
- whole — like street food, no utensils
- with a light sauce on the side, not drenched
This is a recipe that surprises mainly because of its form. Caesar stays recognizable here, but behaves in a completely different way.
6. Mini Chicken Caesar Tostadas with Crispy Shallots

This format is perfect for guests, but it works just as well for a regular evening.
Here you get a small, crispy base. On top — warm chicken with Caesar dressing. Then fresh romaine. And the final touch — crispy shallots, bringing that exact restaurant-style contrast.
Ingredients (for 10–12 mini tostadas)
The base:
- 10–12 mini tostadas or corn tortillas
- 1 tbsp olive oil
Filling:
- 1 ½ cups cooked chicken, finely chopped (≈ 220–240 g)
- ⅓ cup Caesar dressing (≈ 80 ml)
- ½ cup grated parmesan (≈ 45–50 g)
- freshly ground black pepper
Fresh layer:
- 1 ½ cups chopped romaine (≈ 70–80 g)
Crispy shallots:
- 2 medium shallots, thinly sliced into rings
- ¼ cup vegetable oil (≈ 60 ml)
- a pinch of salt
How to make
- Cook the shallots. Heat the vegetable oil in a small skillet over medium heat. Add the shallots and cook, stirring, until they turn golden and crispy. This takes about 5–7 minutes. Transfer to a paper towel and lightly salt.
- Prepare the chicken. In a bowl, mix the chicken with Caesar dressing and parmesan. Stir gently so the pieces stay intact. Add a little black pepper.
- Dry out the base. Lightly brush the tostadas with olive oil and place them in an oven preheated to 375°F (≈ 190°C) for 3–4 minutes. They should become warm and even more crispy.
- Assemble the warm layer. Spoon the chicken mixture onto the hot tostadas and return them to the oven for another 2–3 minutes — just enough to warm the filling and help it come together.
- Add freshness and crunch. Remove the tostadas from the oven, add a little romaine on top, and finish with crispy shallots. Serve immediately.
What keeps the balance
- Shallots are the key element. Without them, this is just a mini Caesar on a flat base.
- The chicken should be warm, and the salad cold. This contrast is what makes the dish feel alive.
- Don’t overload the topping. The mini format only works when it’s easy to eat.
How to serve
- on a large flat plate, in a single layer
- all at once, without reheating
- with napkins — the crunch is real
7. Caesar-Stuffed Sweet Peppers with Crunchy Topping
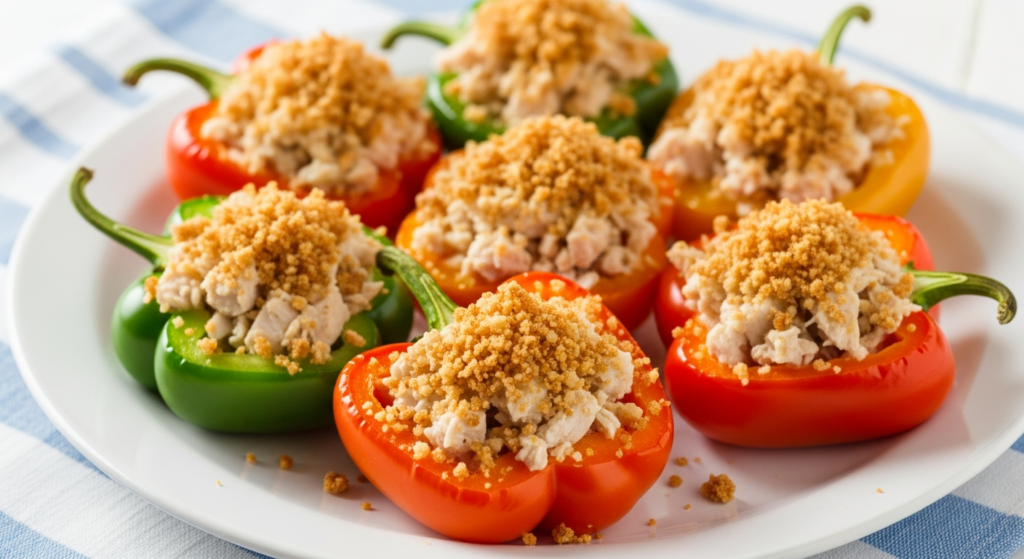
Once, I tried making Caesar inside sweet mini peppers, without turning it into a heavy bake and without weighing it down with cheese. Just slicing the peppers in half, keeping their juiciness and shape, and adding crunch on top.
The result was sweet, fresh pepper halves filled with chicken Caesar and topped with a crunchy crumb of parmesan and olive oil. Light, put together, without that baked-casserole feeling.
This format is ideal for appetizers and buffet-style serving.
Ingredients (for 10–12 halves)
Base:
- 5–6 sweet mini peppers
- 1 tsp olive oil
For the filling:
- 1 ½ cups cooked chicken, finely chopped (≈ 220–240 g)
- ⅓ cup Caesar dressing (≈ 80 ml)
- ½ cup grated parmesan (≈ 45–50 g)
- freshly ground black pepper
For the crunchy topping:
- ½ cup panko breadcrumbs (≈ 25–30 g)
- 2 tbsp grated parmesan
- 1 tbsp olive oil
Regular breadcrumbs don’t give the right texture. I use something like Kikkoman Panko Bread Crumbs — light, airy, and they brown perfectly.
How to make
- Prepare the peppers.Slice the peppers lengthwise in half and carefully remove the seeds. Brush the inside lightly with olive oil and place them on a baking sheet, cut side up.
- Make the filling. In a bowl, mix the chicken with Caesar dressing, parmesan, and a pinch of black pepper. The filling should be creamy but not runny. It should hold on a spoon.
- Fill the peppers. Gently spoon the filling into the pepper halves without packing it down. A little less is better than too much — the shape should stay clean.
- Make the crunchy layer. In a separate bowl, mix the panko, parmesan, and olive oil. The crumbs should be lightly moistened but still loose.
- Bake. Sprinkle the crunchy topping over the peppers and transfer to an oven preheated to 400°F (≈ 205°C) for 10–12 minutes. The peppers should warm through, and the top should turn golden and crisp.
- Let them settle. Remove from the oven and let rest for 2–3 minutes before serving. This helps the flavors come together and the filling stabilize.
How to serve
- slightly warm, not hot
- on a large platter, in a single layer
- without extra sauce — it’s already inside
Where it’s easy to go wrong
- Don’t overbake the peppers. They should keep their shape and freshness, not turn soft.
- The topping needs to stay dry and crunchy. Too much oil will make it heavy.
8. Caesar Waffle Sandwiches with Jalapeño Slaw
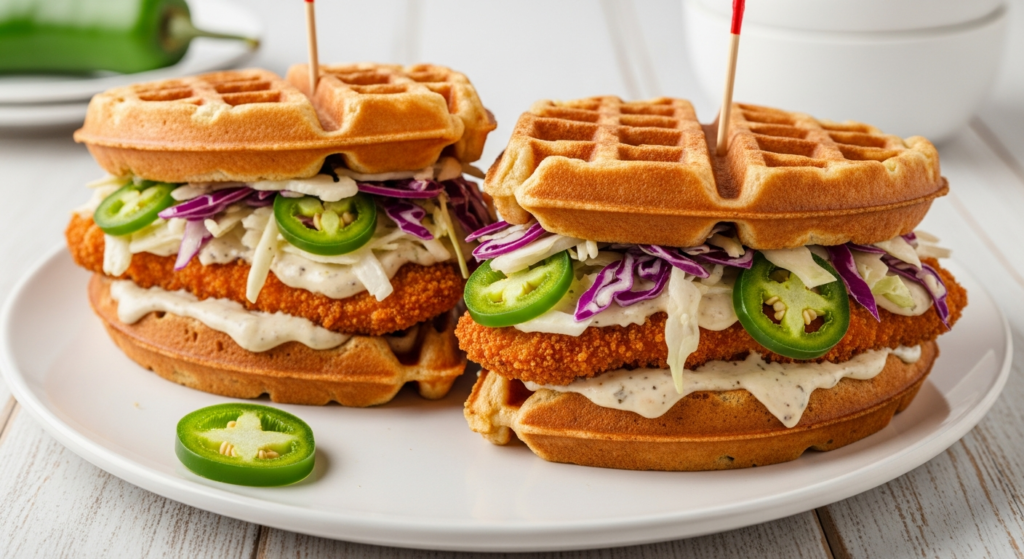
We really love waffles. They’re a great base for savory, structured, easy-to-hold sandwiches — especially when what’s inside is Caesar, not syrup.
Add jalapeño slaw to the mix, and what you get is two warm waffles with a clear, crisp crust. Inside — chicken with Caesar dressing and parmesan. On top — cold, crunchy jalapeño slaw that balances the richness and adds a sharp, distinctive bite.
Ingredients (for 4 sandwiches)
Waffles:
- 4 Belgian waffles (homemade or frozen)
- 1 tsp butter, for browning
Filling:
- 2 cups cooked chicken, sliced (≈ 280–300 g)
- ½ cup Caesar dressing (≈ 120 ml)
- ½ cup grated parmesan (≈ 45–50 g)
- freshly ground black pepper
For the jalapeño slaw:
- 1 ½ cups thinly sliced cabbage (≈ 90–100 g)
- 1 small jalapeño, very finely chopped (seeds removed for a milder heat)
- 2 tbsp mayonnaise
- 1 tbsp lemon juice
- a pinch of salt
How to make — step by step, without rushing
- Prepare the slaw in advance. In a bowl, mix the cabbage, jalapeño, mayonnaise, lemon juice, and salt. Stir well and refrigerate for at least 10 minutes. The slaw needs to be cold — this contrast matters.
- Prepare the chicken filling. In a bowl, mix the chicken with Caesar dressing, add parmesan and a little black pepper. The mixture should be creamy but not runny, with clearly defined pieces of chicken.
- Heat the waffles. Warm the waffles in a toaster or in a dry skillet. Then quickly brush them with a thin layer of butter and return them to the skillet for 30–40 seconds to form a crust.
- Warm the filling. Add the chicken mixture to a skillet and warm it for 2–3 minutes, stirring constantly. Don’t fry it — just bring it to a warm state so the sauce becomes more cohesive.
- Assemble the sandwiches. Place the warm chicken filling on the bottom waffle, top with a generous spoon of jalapeño slaw. Cover with the second waffle and gently press.
Where the flavor really comes from
- The waffles need to be crispy. Soft ones simply get lost in the filling.
- The slaw should be cold. That temperature contrast is what makes the sandwich feel alive.
- Jalapeño should be finely chopped. It’s meant to support the flavor, not steal the spotlight.
How to serve
- right away, while the waffles are still warm
- cut in half — it’s easier to eat
- without extra sauces, the balance is already there
9. Caesar-Stuffed Puff Pastry Pockets
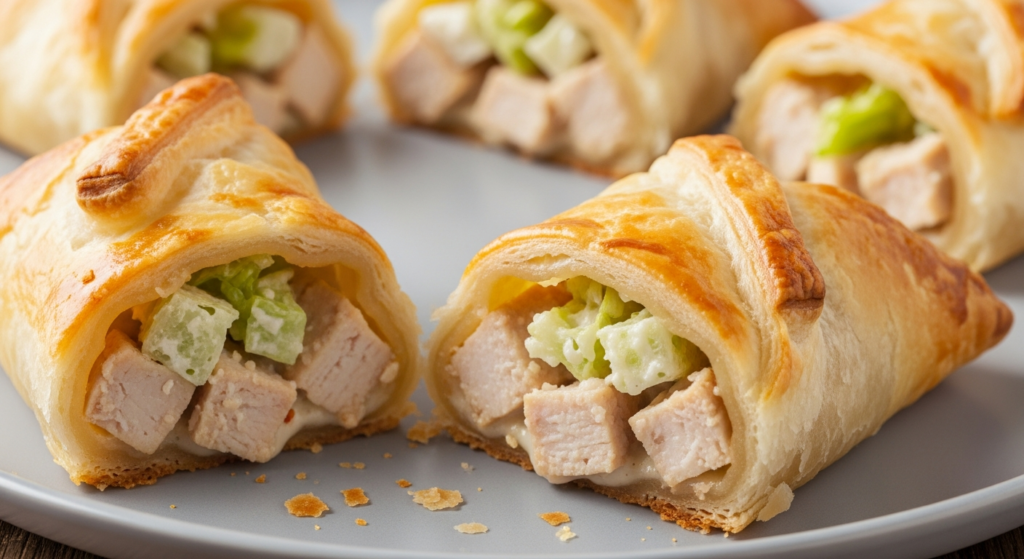
Wrap Caesar in puff pastry, and it instantly stops being a salad. It turns into something between an appetizer and a полноценное hot dish.
The result is genuinely good — golden puff pastry pockets with a crisp shell. Inside, there’s warm chicken in Caesar dressing, held together by parmesan. No pools of melted cheese, nothing leaks out, everything keeps its shape. Easy to eat with your hands. Just as easy to serve to guests.
Ingredients (for 8 pockets)
- 1 package puff pastry, thawed
- 2 cups cooked chicken, finely chopped (≈ 280–300 g)
- ½ cup Caesar dressing (≈ 120 ml)
- ¾ cup grated parmesan (≈ 65–70 g)
- 1 egg, beaten (for brushing)
- freshly ground black pepper
How to make
- Prepare the filling.In a bowl, mix the chicken, Caesar dressing, parmesan, and a little black pepper. The mixture should be dense and hold its shape well. If the filling feels too soft, add a bit more parmesan.
- Work with the pastry.Unfold the puff pastry on a lightly floured surface and cut it into squares about 4×4 inches (≈ 10×10 cm). Don’t roll it too thin — the pastry needs structure.
- Form the pockets.Place 2–3 tablespoons of filling in the center of each square. Fold the pastry diagonally or cover with a second square to form a “pocket.” Press the edges gently with a fork.
- Prep for baking.Arrange the pockets on a parchment-lined baking sheet. Brush the tops with beaten egg — this gives even color and crispness.
- Bake.Transfer to an oven preheated to 400°F (≈ 205°C) and bake for 18–22 minutes. The pockets should puff up well and turn a deep golden color.
- Let them rest.Remove from the oven and let sit for 5 minutes. The filling is very hot, and the flavor opens up better once it settles a bit.
How to serve
- slightly warm
- whole or cut in half
- without extra sauce — everything is already inside
What to pay attention to
- The filling must be thick. Too much liquid sauce will leak and soak the layers.
- Don’t overfill the pockets. Puff pastry needs space to rise.
This is a format built from very familiar ingredients. Puff pastry here isn’t decoration — it’s the frame that holds Caesar in a new shape.
10. Baked Caesar Mac-and-Chicken Cups
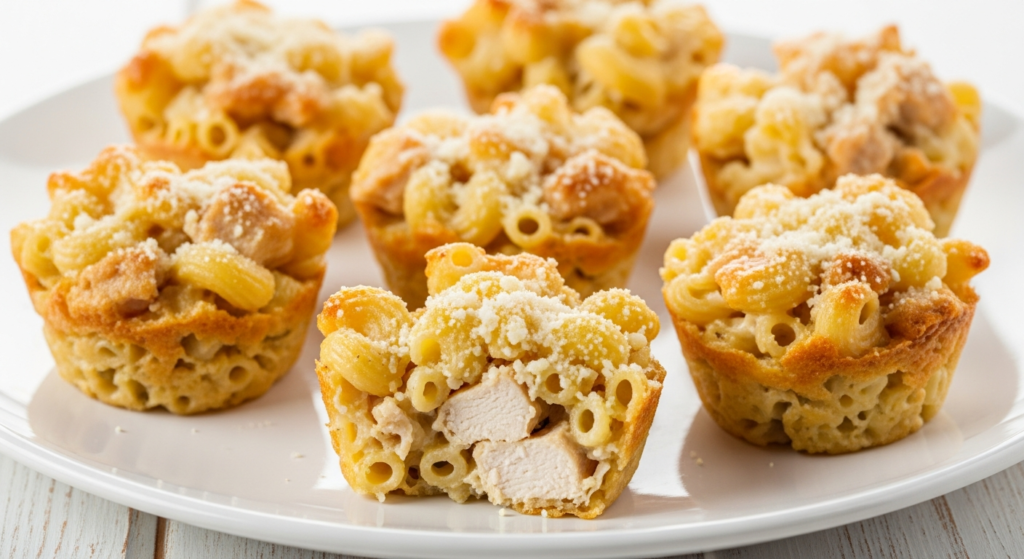
Let’s be honest — very often you want food that’s easy to pick up, put on a plate, eat, and not feel like you’ve just powered through half a pot.
And this is exactly that. Small baked “cups” with crispy edges. Inside — pasta, chicken, parmesan, and Caesar, all holding together instead of falling apart. On top — a light golden crust, without dryness.
This works really well for family dinners, lunches, and situations where you want to cook once and eat both now and later.
Ingredients (for 10–12 cups)
- 2 cups cooked pasta (penne or curved pasta) (≈ 160–180 g dry)
- 1 ½ cups cooked chicken, finely chopped (≈ 220–240 g)
- ½ cup Caesar dressing (≈ 120 ml)
- ¾ cup grated parmesan (≈ 65–70 g)
- ½ cup shredded mozzarella (≈ 55–60 g)
- 1 egg
- freshly ground black pepper
- 1 tsp olive oil (for the pan)
How to make — step by step, without rushing
- Cook the pasta. Boil the pasta in salted water until al dente. It will finish cooking in the oven, so don’t overcook it. Drain well and let all excess water run off.
- Mix the base. In a large bowl, combine the pasta, chicken, Caesar dressing, egg, parmesan, mozzarella, and a little black pepper. Mix gently with a spatula so the pasta doesn’t break.
- Prepare the pan. Grease a muffin tin with olive oil. This matters — the cups should release easily after baking and keep their shape.
- Form the cups. Divide the mixture between the muffin cups, pressing lightly with a spoon. Don’t pack it too tightly — some lightness should stay inside.
- Bake. Transfer the pan to an oven preheated to 375°F (≈ 190°C) and bake for 20–25 minutes. The tops should turn golden, and the edges should become crispy.
- Let them set. Remove from the oven and let rest for 5–7 minutes. This is important — during this time the cups settle and become easy to remove.
What matters here specifically
- Pasta must be al dente. Soft pasta turns everything into mush.
- The egg is essential. It binds the filling and helps the cups hold their shape.
- Cheese is about balance. Parmesan brings flavor, mozzarella adds softness. One without the other works worse.
How to serve
- slightly warm
- with a simple green salad or vegetables
- as a main dish or a substantial appetizer
Here, Caesar stops being a salad and becomes a full, warm meal — and a very good one.
Your personal Caesar
If you made it this far, Caesar is clearly more than just a salad for you too. When the form changes, the familiar dish starts to feel different. A bit warmer, more convenient, more interesting.
I’m genuinely curious which format felt the most unexpected — and which one you’d actually make in your own kitchen.
Maybe you already do Caesar in a completely different way. Or maybe there’s a version that’s been sitting in your head but hasn’t made it to the stove yet.
Write it in the comments — I read everything, and new recipe ideas often start right there.