A small balcony quickly shows which ideas actually work in real life and which ones stay pretty only in photos. In this article, I put together 10 practical solutions for small balconies that can be adapted for an apartment, condo, or rental without any major renovations.
There are no universal recipes “for everyone” here. But there are working principles that help you get results — both visual and practical. All the ideas on this list are tested specifically in conditions of limited space, wind, changing sunlight, and a normal city rhythm.
If you have a balcony and want to use it to the fullest, this article will help you.
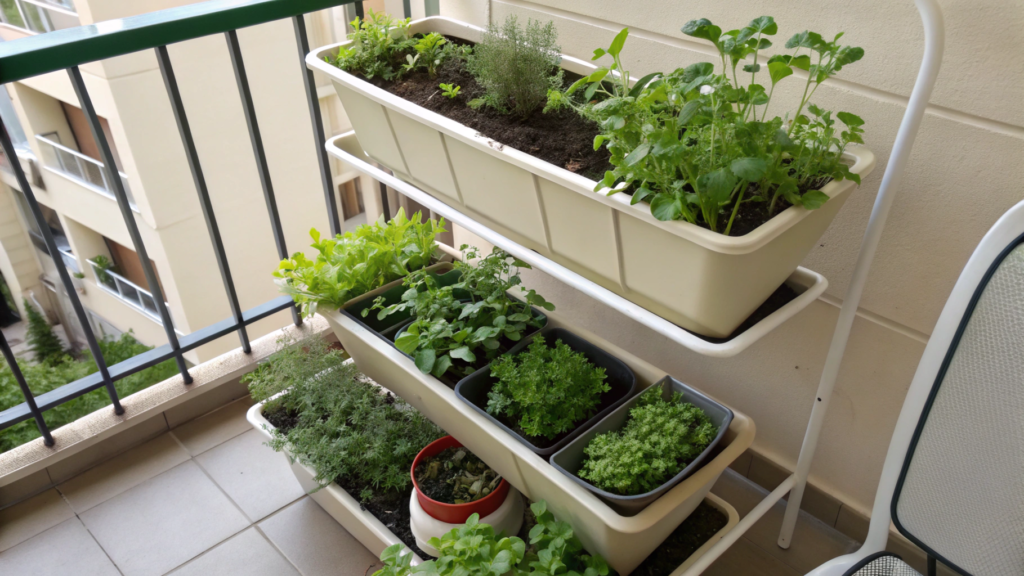
1. Compact Herb Garden in Tiered Planters
Start with herbs. Even on a tiny balcony. Even if you’ve never grown anything before.
When space is critically limited, tiered planters simplify everything — one corner, and you already have a mini garden.
Why this works specifically for a balcony
- Herbs have a shallow root system — most need only 6–8 inches of soil depth (15–20 cm).
- Containers make it easier to manage drainage and watering control.
- A tiered system uses vertical space instead of width — and that solves the tight-space problem.
What you can grow
I usually start with a set that almost always works:
- Basil — container from 1 gallon (≈3.8 L)
- Parsley — 6–8 inches deep
- Thyme — lives comfortably even in 0.5 gallon
- Rosemary — loves drainage, hates “swamps”
- Mint — only separately, otherwise it spreads and takes over space
Size and Weight (Important for a Balcony)
For a balcony, two things matter: the height of the structure and the weight when wet.
In terms of height, tiered planters around 24–30 inches (60–75 cm) are usually ideal — roomy enough but not turning into a “sail” in the wind.
For weight, use this as a guideline: one tier with soil and a plant after watering usually weighs about 8–12 lbs (3.5–5.5 kg). If you have three levels, that’s already 24–36 lbs (11–16 kg) in one spot. That’s why it’s better to place this kind of setup in a corner or closer to a wall, not at the edge of the balcony, and avoid putting two more heavy containers next to it.
Which Planters to Choose
I’d choose models where three things are immediately clear: stability, drainage, and material.
- Stable base. A wide base or the ability to add weight at the bottom. On a balcony, wind is a real factor, especially on higher floors.
- Drainage holes. Mandatory. Without them, herbs will “suffocate” in moisture, especially basil and rosemary.
- Material. UV-resistant plastic or composite is better — lighter and less likely to crack. Terracotta looks nice, but it’s heavy and dries out faster.
If you want a ready-made solution without extra hassle, look at a Tiered Herb Planter on Amazon — these usually fit well in a corner and assemble quickly.
How to Do It: Step by Step
- Choose the spot based on light.
Ideally, 4–5 hours of sun per day. If there’s less sun, it’s still fine — just focus on parsley, thyme, mint, and green onions, while basil will grow more slowly. - Place the planter and check stability.
Shake the structure with your hands. If it wobbles, move it closer to a wall or corner, or add weight to the bottom tier (for example, a larger container with soil). - Prepare the right soil.
Use container potting mix, not soil from outside. Container soil is lighter, holds air better, and doesn’t turn into a “brick” after a few waterings. - Do drainage without overdoing it.
If the planter has proper holes, a thin 1–2 inch (2.5–5 cm) layer of clay pebbles or stones is enough — or you can skip them entirely. But make sure there’s a tray or water collection system so you don’t flood the neighbors below. - Plant herbs with size in mind.
Put what you cut most often (basil, parsley) on the upper levels, and longer-living plants (thyme, rosemary) below. Mint is best kept in a separate pot and simply placed into a tier so it doesn’t spread its roots. - Water correctly the first time.
Water until it starts coming out of the bottom, then let it drain. Don’t add extra “just in case” — the first watering is about evenly saturating the soil. - Adjust watering during the first 7 days.
Check the soil every day with your finger at 1 inch depth (2.5 cm). Dry — water. Moist — skip. This helps you quickly understand the rhythm of your specific balcony (wind and sun change drying speed a lot).
After a week, you’ll have a clear system: how much to water, what grows faster, what needs more light. From there, it’s simple: once every 7–10 days — light feeding (if you use it), once a week — trimming herbs so they stay bushy, and you get fresh greens for your kitchen without “dying pots” in the corners.
2. Hanging Baskets with Trailing Blooms

If a balcony is small, hanging baskets are a fast way to add volume without taking up a single inch of floor space. I was cautious about them for a long time: they seemed beautiful but impractical. In reality, it turned out to be the opposite — with the right plant and hardware choices, this is one of the most stable formats for a balcony.
Hanging flowers work especially well where:
- there’s little space for containers,
- there are railings, a ceiling, or an upper beam,
- you want visual greenery at eye level, not just near your feet.
Why trailing plants are the best choice
Plants with cascading growth don’t fight for vertical space — they gently fill it. They don’t shade each other, get better airflow, and suffer less from overheating.
They perform best with petunia (especially wave series), surfinia, lobelia, dichondra Silver Falls, bacopa, and ivy (if the balcony isn’t too hot).
Important: all of these plants grow well in containers 8–10 inches deep (20–25 cm) and don’t require a huge soil volume.
Size and Weight (What to Consider in Advance)
Hanging baskets weigh noticeably more after watering than they seem at first glance. A basket with a 10–12 inch diameter (25–30 cm) usually weighs 10–15 lbs (4.5–7 kg) when wet. That’s why it’s better to choose hardware with a margin — at least 18–20 lbs (8–9 kg).
It’s important to attach baskets to a reliable surface: a concrete ceiling, a beam, or a sturdy railing bracket. On windy balconies, it’s better to place baskets closer to the wall and avoid very long chains so they don’t swing.
Which Baskets to Choose
For a balcony, lightweight hanging baskets with liners work best.
Pay attention to:
- plastic or composite instead of metal (metal overheats),
- coconut or fabric liners — they retain moisture without turning soil into a swamp,
- adjustable chains, so you can raise or lower the basket depending on the season.
How to Do It: Step by Step
- Choose the hanging point.
A spot with morning or diffused daytime sun works best. Constant midday sun dries baskets out very quickly. - Check the hardware in advance.
Make sure the hook or bracket is rated for at least 20 lbs (≈9 kg). Weight margin is essential — especially if there’s rain. - Prepare the basket.
If there’s a liner, lightly moisten it before planting — it will hold its shape and moisture better during the first days. - Fill with soil, but not to the edge.
Leave 1–1.5 inches (2.5–4 cm) at the top so water doesn’t overflow during watering. - Plant with growth in mind.
Place a more compact plant in the center, cascading ones around the edges. Don’t pack the roots — they need air. - Water until evenly moist.
Water should start coming out from the bottom, but not in a stream. After that, let the basket drain completely. - Monitor moisture daily in the first days.
Hanging baskets dry out faster than containers. Check soil with your finger at 1 inch depth (2.5 cm).
Hanging baskets need more frequent but lighter watering. In summer, this can be daily, but in small amounts.
Every 7–10 days, I add a liquid fertilizer with lower nitrogen — flowers keep their shape and don’t go all-in on leaves.
As a result, you get a blooming garden at eye level, without cluttering the balcony and with a clear, manageable care routine.
3. Vertical Wall Shelves for Succulent Displays
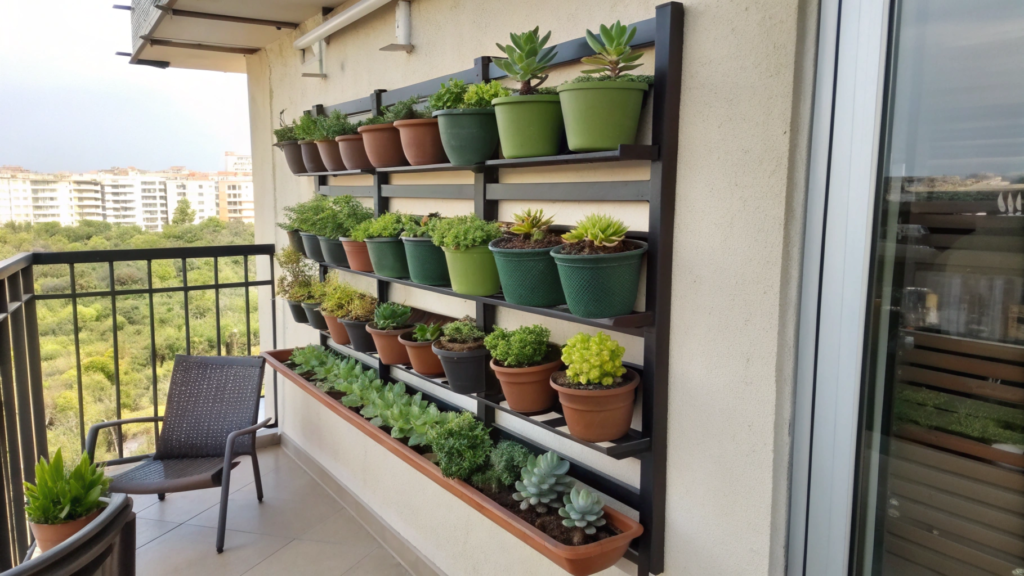
Succulents are almost ideal plants for a balcony. They don’t need frequent watering, handle wind calmly, and look especially good when used vertically. A wall or solid side panel of a balcony turns from “nothing” into a functional green zone.
I like this format because it’s very controlled. Each pot has its place, nothing hangs over your head, nothing blocks the walkway. And at the same time, the balcony instantly looks more put-together.
Why succulents work well on a wall
Succulents have a compact root system and low water needs. Most of them need only 4–5 inches of depth (10–13 cm), which means you can use shallow shelves without heavy-duty mounts.
They also don’t require daily attention. For a balcony, this is a huge plus — especially in summer, when heat and wind quickly exhaust any “delicate” plants.
They perform well: echeveria, haworthia, crassula, aloe, gasteria.
I try not to mix them with moisture-loving plants — the watering routine should be the same.
Dimensions and Load (Short and to the Point)
For a balcony, shelves 5–7 inches deep (13–18 cm) are optimal. That’s enough for pots 4–6 inches in diameter (10–15 cm).
One succulent pot weighs about 2–3 lbs (0.9–1.4 kg), so even a shelf with 4–5 plants rarely exceeds 12–15 lbs (5.5–7 kg). This is a safe load for a wall with proper mounting.
Which Shelves to Choose
Narrow wall-mounted shelves with a lip work best. The lip prevents pots from shifting in the wind and keeps the arrangement neat.
Material — wood with a protective coating or powder-coated metal. The main thing is that the shelf isn’t afraid of moisture.
Plant Wall Shelf Floating Wooden Wall Mounted Shelf for Plants is a wall planter shelf that’s convenient specifically for plants on a balcony or in an apartment, allowing you to display greenery nicely on the wall without cluttering the floor.
How to Do It: Step by Step
- Choose a wall with good light.
Succulents need bright but not scorching sun. An east or southeast exposure works best. - Mark the height in advance.
Leave 10–12 inches (25–30 cm) between shelves so plants don’t shade each other and are easy to reach. - Mount the shelves securely.
Use anchors or wall plugs suitable for your wall type. The shelf should not shift when pressed by hand. - Pick matching pots.
One size and style make the composition visually calm, even if the plants themselves are different. - Use light succulent soil.
It dries faster and reduces overall weight. - Space the plants slightly apart.
Don’t press pots tightly together — airflow needs space, especially on enclosed balconies. - Water rarely, but intentionally.
Usually once every 10–14 days, depending on weather and balcony exposure.
Vertical shelves with succulents are a way to add greenery without sacrificing usable space. They need minimal care, look tidy year-round, and scale easily: you can start with one shelf and gradually add more without reworking the entire balcony.
4. Foldable Furniture with Built-in Plant Space

Foldable furniture with built-in plant zones works really well on a balcony. When folded, it takes up almost no space, and when unfolded, it gives you both functionality and a sense of a “living” space.
Why this format is actually convenient
- Saves space. Foldable furniture moves back to the wall when not in use, while the plants stay in place and continue to work visually for the balcony.
- Allows you to change usage scenarios. The balcony easily shifts from a passage area into a place for breakfast, work, or relaxation without rearranging pots.
- Removes floor clutter. Built-in plant zones eliminate separate containers that usually get in the way and look messy.
- Creates a sense of cohesion. When furniture and plants are combined into one structure, the balcony looks intentional, not assembled from random items.
Dimensions and Load (Briefly)
The optimal width of a foldable balcony table or bench is 20–30 inches (50–75 cm). Built-in planting zones are usually designed for containers 6–8 inches deep (15–20 cm), which works well for herbs, compact flowers, and decorative greenery.
When it comes to load, it’s important to consider not only plants but also people. Good foldable furniture is rated for at least 150–200 lbs (68–90 kg). The weight of plants in these setups usually adds only 10–20 lbs (4.5–9 kg), but it’s still worth checking the total allowed load.
What Furniture to Choose
Models where plants are integrated on the side or at the back work best, not directly under the tabletop. This reduces the risk of spilling water and makes plant care easier.
Materials should be moisture-resistant wood, composite, or metal with a protective coating. If the furniture is foldable, always check the mechanism: it should lock into place, not rely only on weight.
An example of a foldable table with integrated plant space suitable for a balcony is 3 Tier Foldable Plant Stand Plant Holder with Trays for Balcony.
How to Do It: Step by Step
- Define the main use scenario.
Think about what you’ll actually do on the balcony most often: drink coffee, work on a laptop, have dinner, read. If it’s “coffee and laptop,” you need a table; if it’s “sit and relax,” a foldable chair or bench works better. Choose a model where plants don’t interfere with the main function. - Check dimensions folded and unfolded.
Measure the balcony depth and leave at least 18–24 inches (45–60 cm) for a comfortable walkway. Then check how much space the furniture takes against the wall when folded — it shouldn’t block the door, drying rack, or access to the railing. - Choose plants based on container volume.
If the planting zone is shallow (6–8 inches / 15–20 cm), go for herbs (parsley, thyme, basil), compact flowers (lobelia, viola), or decorative greenery. Avoid plants with aggressive roots or those that require constant moisture — in small volumes, that turns into an ongoing struggle. - Use light soil and add a loosening component.
Fill with container potting mix, not “soil from the park.” To simplify care, add some perlite or coarse sand — this prevents water stagnation and helps roots breathe. - Plan drainage in advance.
Ideally, built-in containers should have drainage holes. If they don’t, place separate plastic pots or liners inside with drainage and a saucer, so excess water doesn’t drip onto the floor or damage the furniture. On a balcony, this really matters. - Position the furniture for stability and flow.
The best spot is closer to a wall or in a corner: less swaying in the wind and fewer accidental kicks. If the balcony is sunny, avoid placing it where built-in planters will be baking all day — soil dries out much faster. - Check plant access and make care easy.
Sit down, unfold the furniture, open and close it a few times, and make sure you can easily water plants, trim greenery, and remove dry leaves. If every watering turns into a quest, you’ll stop doing it — and everything will decline.
Foldable furniture with built-in plants helps keep the floor clear, flexibility high, and order intact. This solution is especially good for balconies where furniture can’t stay unfolded all the time, but you still want greenery to be part of everyday space rather than a separate element.
5. Rail Planters with Overflowing Flowers
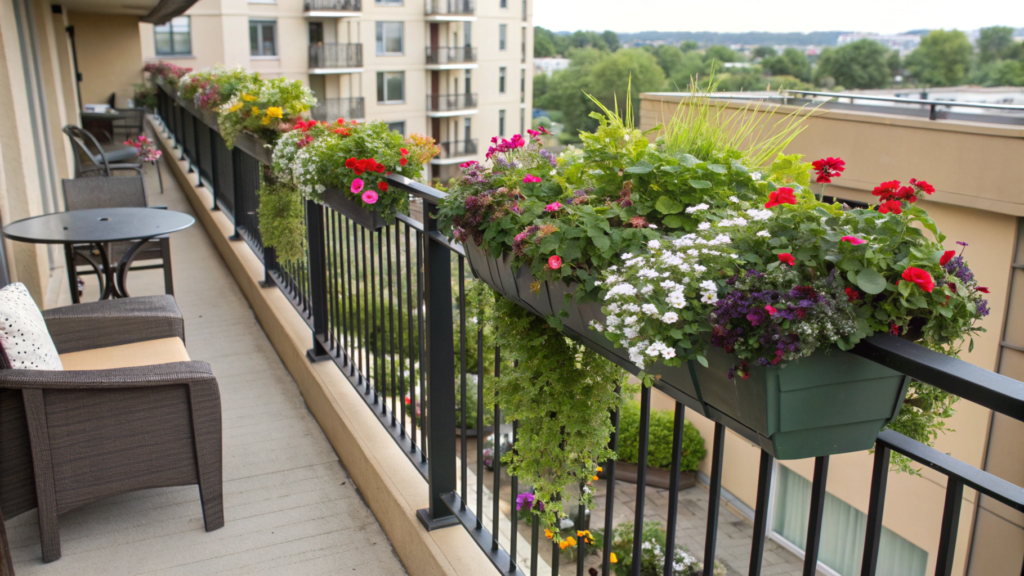
Balcony railings are most often unused. And yet, this is exactly where you can place plants so that they work without taking up space. This technique is especially helpful on narrow balconies, where every extra pot underfoot is felt immediately.
Why railing planters work so well
- They don’t take up floor space at all. Everything is mounted outside or along the top line of the railing.
- They create a strong visual effect. Cascading flowers instantly soften the hard geometry of the balcony.
- They’re easy to maintain. Watering and trimming happen at hand level, without bending down or moving pots.
- They’re well ventilated. This reduces the risk of rot and fungal issues.
For plants, railings are one of the most successful spots: there’s usually plenty of light, plus constant air movement. That’s exactly why cascading flowers feel especially confident here.
Petunias, surfinias, calibrachoa, bacopa, nasturtium, and lobelia work best. These plants grow quickly, hang beautifully, and handle container growing well.
Dimensions and Weight
For railings, boxes 24–30 inches long (60–75 cm) and 6–8 inches deep (15–20 cm) are ideal. This is enough to prevent plants from drying out in a single day while keeping the container from becoming too heavy.
After watering, such a box usually weighs around 15–25 lbs (7–11 kg). This is fine for standard balcony railings if you use brackets with proper fixation rather than simple hooks. I always check that the mounting secures the box both at the top and bottom — this prevents it from tilting outward.
Which Boxes and Mounts to Choose
- Boxes with dual mounting that grip the railing instead of just hanging from it.
- Lightweight materials — plastic or composite rather than ceramic.
- Water drainage directed inward toward the balcony or into a tray, so it doesn’t drip down.
How to Do It: Step by Step
- Measure the railing width.
This matters because not all mounts are universal. Make sure the chosen box fits your railing thickness and sits tightly. - Install the box without soil and check balance.
Secure the empty container first and gently press on it. It shouldn’t tilt inward or outward. - Fill with container soil.
Use a light mix and don’t fill it to the very top — leave 1–1.5 inches (2.5–4 cm) for watering. - Plant with extra space in mind.
Don’t pack flowers too tightly. Cascading plants grow fast, and they need airflow between them. - Water evenly.
The first watering should soak the entire soil volume without flooding. Excess water should drain calmly through the holes. - Monitor moisture in the first days.
Railing boxes dry out faster than floor containers because of wind. Check the soil every other day, especially in hot weather. - Trim regularly.
Light trimming once a week helps plants stay bushy and creates that “overflowing flowers” effect instead of long, stretched stems.
Railing planters don’t take up usable space. With proper mounting and the right plant choices, they’re reliable, easy to maintain, and deliver fast visual results just a couple of weeks after planting.
6. Mini Vegetable Garden in Containers
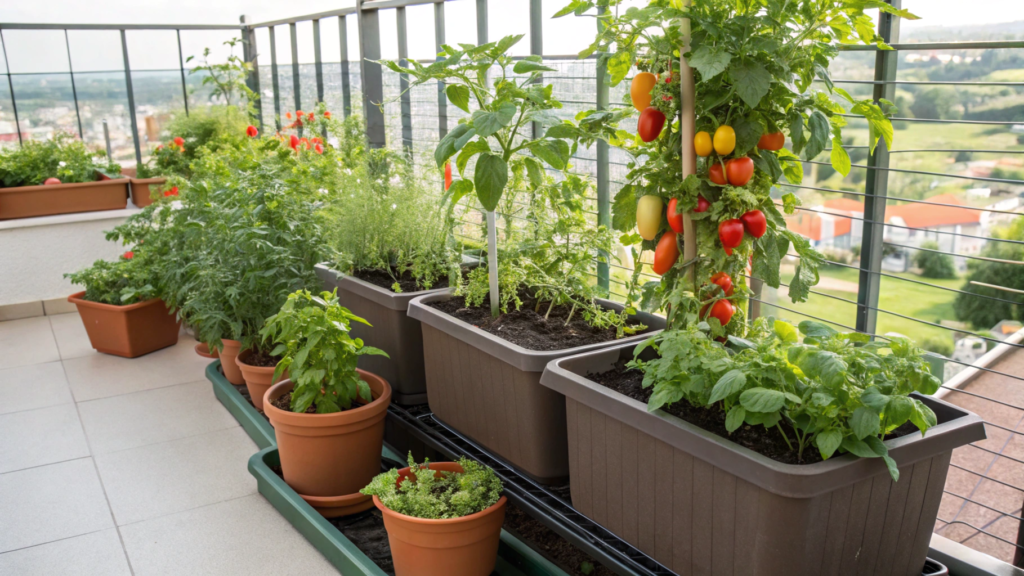
Container vegetables help a balcony become not only “green” but also practical. Not in the sense of “feeding a family,” but in the sense of a regular, clear result: pick, use, repeat.
And yes, this works well even in a small space — as long as you don’t try to grow everything at once.
Why vegetables in containers are a solid idea
- Full control over the soil. No surprises with compaction, waterlogging, or depletion.
- Fewer diseases. Containers are better ventilated than garden beds.
- Flexibility. A pot can be moved, turned toward the sun, or shifted into shade.
- Predictable results. You immediately see what works and what doesn’t.
If we talk about crops that actually make sense on a balcony, I’d start with compact and fast-growing ones:
- cherry tomatoes (dwarf or patio varieties),
- peppers (sweet or chili),
- lettuce and arugula,
- green onions,
- radishes,
- dwarf eggplant varieties.
Potatoes, zucchini, and corn are a different league — not for starting out.
Container Sizes and Weight
For vegetables, what matters more is volume below, not space on top.
Tomatoes and peppers do fine in 5-gallon containers (≈19 L). Lettuce and radishes are fine with 2–3 gallons (7–11 L).
After watering, a 5-gallon container weighs about 35–45 lbs (16–20 kg), and a 3-gallon container around 20–25 lbs (9–11 kg).
Because of this, it’s best to place these pots near a wall or in a corner and avoid clustering everything in one spot on the balcony.
Which Containers to Choose
For vegetables, I prefer fabric grow bags or lightweight plastic containers. They’re lighter than ceramic, don’t overheat as much, and “breathe” better.
Pay attention to:
- the presence of drainage holes,
- a stable shape (so they don’t tip over in the wind),
- dark or neutral colors — transparent containers are not suitable for vegetables.
How to Do It: Step by Step
- Choose a sunny spot.
Vegetables need at least 6 hours of direct sunlight per day. If there’s less sun, choose lettuce and greens instead of tomatoes and peppers. - Match the container to the plant.
Don’t plant a tomato in a small pot “just in case.” Small volume equals constant stress for the plant and weak yields. - Fill the container with the right soil.
Use vegetable or container potting mix. It’s lighter than regular soil and holds moisture and nutrients better. - Add drainage and don’t compact too much.
If there are holes, extra drainage should be minimal. Firm the soil lightly with your hands, but don’t press hard — roots need air. - Plant at the correct depth.
Tomatoes can be planted deeper along the stem; lettuce and peppers should be planted exactly at root-ball level. - Water slowly and thoroughly.
Water should soak the entire container. If it runs out immediately, the soil is too dry — water again after a couple of minutes. - Support tall plants.
For tomatoes and peppers, install a stake or cage right away. Doing it later is harder and risks damaging roots. - Monitor nutrition.
In containers, nutrients wash out faster. Usually, feeding is needed every 7–10 days, especially during flowering and fruiting.
A mini container vegetable garden isn’t an experiment for the sake of it. It’s a way to get a stable, understandable result on a balcony without unnecessary complexity. Start with two or three containers, see how they behave in your specific conditions, and only then expand the system.
7. Shaded Corner with Ferns and Palms
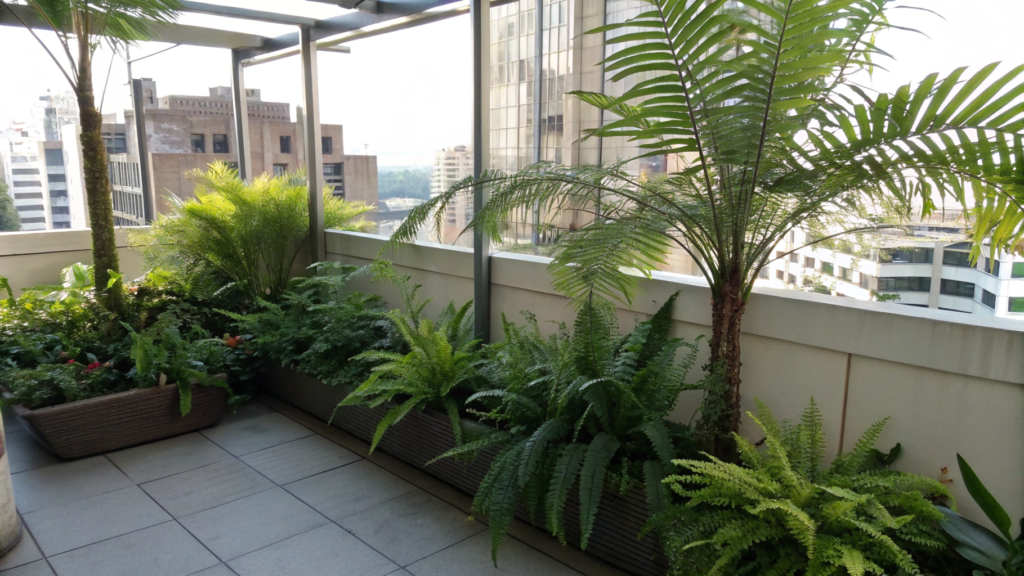
Not every balcony is flooded with sunlight. And that’s normal. More than that, shade is a resource if you stop fighting it. Many balconies have a corner where the sun only passes briefly or doesn’t reach at all.
Ferns and compact palms actually prefer these conditions. They don’t need direct sun, feel comfortable in diffused light, and visually soften the space — especially if the balcony faces north or is blocked by neighboring buildings.
Why a shaded corner is worth using
- Plants dry out less, which makes care easier.
- No leaf burn, which often appears on sunny balconies.
- Greenery looks denser and calmer, without harsh contrasts.
- “Dead zones” get used, areas that usually sit empty.
In shaded areas, not just any plants work, but those that are evolutionarily adapted to understory and filtered light.
The best candidates: ferns (Boston fern, nephrolepis), chamaedorea, areca, aspidistra, calathea.
I try to avoid mixing these plants with succulents — they have opposite moisture requirements.
Container Sizes and Weight
Ferns and palms need stability, so containers are better slightly wider than deep.
For ferns, a pot 8–10 inches in diameter (20–25 cm) is usually enough. Compact palms are comfortable in containers 10–14 inches (25–35 cm).
After watering, these pots weigh on average 15–30 lbs (7–14 kg), so it’s better to place them not at the edge of the balcony, but closer to a wall or in a corner where the load is distributed more safely.
Which Pots and Materials Work Best
In shade, plastic or composite pots perform well — they retain moisture longer and don’t overheat.
Drainage holes are essential, but without aggressive runoff: ferns like evenly moist soil.
If you want a more stable setup, you can use a heavy outer planter with a lightweight inner pot — this balances weight and ease of care.
How to Do It: Step by Step
- Find a truly shaded corner.
Observe where sunlight appears the least during the day. These plants need bright, diffused light without direct rays. - Choose plants with the same “pace.”
Group plants that like similar moisture and light conditions. Care becomes easier, without adjusting to each plant individually. - Pick stable containers.
Pots should be heavy or stable enough not to tip over from wind or accidental contact. - Use moisture-retentive soil.
Add some coconut coir or vermiculite to the container mix so the soil stays evenly moist longer. - Water after planting without flooding.
Water should fully saturate the soil but not sit in the saucer. Excess water is always better drained. - Monitor air humidity.
On enclosed balconies, ferns appreciate occasional misting, especially in hot weather. - Remove old leaves regularly.
This isn’t just about looks — it helps the plant direct energy into new growth and keeps the corner tidy.
A shaded corner with ferns and palms allows you to use the entire balcony, not just sunny areas. These plants always look good, don’t require constant monitoring, and create a visual sense of depth and completion in the space.
8. String Lights Woven Through Greenery

When string lights on a balcony aren’t just hanging separately, but are carefully woven into plants, the space starts working differently right away. Soft light, clear zones, and good visibility without harsh lamps.
I resisted string lights for a long time — they felt kind of temporary. But once the light became part of the greenery instead of a separate element, everything clicked.
Why string lights and plants are a good combination
- Light becomes diffused, doesn’t glare and doesn’t cut the space.
- Plants look more dimensional in the evening, especially leaves and textures.
- The balcony doesn’t “end” after sunset — it stays usable.
- No extra lighting is needed if everything is done right.
For this format, string lights with small, frequent bulbs and warm light work best. Not large bulbs, not cool white — exactly a soft warm tone that doesn’t compete with greenery.
Plant-wise, it’s simple: ferns, ivy, spider plants, palms, cascading flowers, even herbs in the upper part of the arrangement. The key is having something to visually “catch” the light — not a bare wall.
Length, Size, and Power
For a standard balcony, a string light 20–30 feet long (6–9 m) is usually enough. That’s sufficient to run along a railing, wall, or ceiling line and still dip slightly into the plants.
The most convenient option is LED string lights powered by batteries or USB. They barely heat up and are safe for foliage. If the balcony is open, always check for an outdoor or waterproof rating.
How to Do It: Step by Step
- Define the lighting zone.
Decide what you want to highlight: a seating area, a green wall, railings, or a plant-filled corner. This prevents the light from being “everywhere and nowhere.” - Plan the path in advance.
Before attaching anything, lay the lights out in place — on the floor or temporarily on hooks. This shows where the light feels dense and where it’s lacking. - Attach to structure, not plants.
The string should be supported by hooks, clips, or thin wire — not by stems. Plants are for visual effect, not load-bearing. - Gently weave light into the greenery.
Guide the string between leaves, lightly dipping into the canopy, but don’t wrap it tightly. Leaves should move freely and get airflow. - Test the evening setup.
Turn the lights on in the dark and sit on the balcony for 5–10 minutes. If something feels too bright or too dim, now is the time to adjust. - Secure excess wiring.
Hide loose ends behind pots or along the wall. The fewer visible wires, the cleaner the balcony looks. - Keep plant access clear.
Make sure you can water, trim, or move pots without dismantling the entire lighting setup.
String lights woven through greenery make the balcony usable in the evening and visually cohesive. When placed correctly, the light doesn’t interfere with plants, doesn’t need constant attention, and works every day — not just “when you’re in the mood.”
9. Color-Coordinated Pots for a Stylish Arrangement
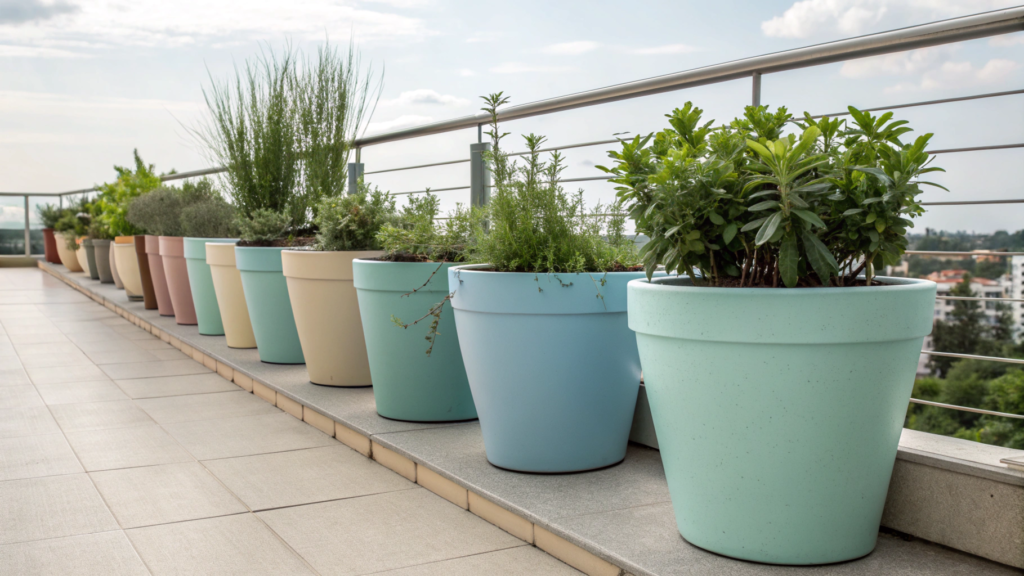
The color of pots may seem like a small detail, but it’s exactly what decides whether a balcony looks cohesive or like a collection of random plants. And it doesn’t matter how much greenery you have — three pots or fifteen. What matters is that the colors don’t compete with each other.
I didn’t come to this right away. At first, I had pots that were “beautiful on their own.” Together, they looked… noisy. Once I limited the palette, the plants suddenly started looking better. The same plants. The background just became right.
Why a color system actually works
- The eye can rest. No visual chaos, even with lots of plants.
- Plants come forward, not the pots themselves.
- The balcony looks bigger and cleaner, especially in small spaces.
- It’s easier to add new plants without breaking the composition.
Color coordination doesn’t mean “everything the same color.” It means a limited palette where shades work well together.
The most reliable options:
- warm neutrals (beige, sand, terracotta),
- cool neutrals (gray, graphite, white),
- one base color plus one accent.
I almost always choose a maximum of 2–3 colors for the entire balcony.
Size and Shape Are Part of the Color Too
Color only works when shape doesn’t argue with it. For balconies, pots of the same type but different sizes work best:
small — 6–8 inches (15–20 cm), medium — 10–12 inches (25–30 cm), large — 14–16 inches (35–40 cm).
Even if the plants are different, repeating shape and color ties everything into one composition. Weight is secondary here, but most filled pots usually weigh 10–25 lbs (4.5–11 kg) — standard and safe.
Which Pots to Choose
I recommend looking for series, not single pieces. It’s easier to keep a consistent style and avoid searching for “almost the same one” later.
Pay attention to:
- a matte finish (less marks, calmer look),
- the same rim or shape,
- drainage holes or inner liners.
How to Do It: Step by Step
- Choose your palette before shopping.
Decide on one base color (for most pots) and one accent (for just a couple). The safest start: base — beige/gray/terracotta, accent — black or dark green. Write it down in one line so you don’t drift in the store. - Account for balcony colors.
A quick rule: if walls and flooring are warm (beige, wood, terracotta), choose warm pots. If they’re cool (gray concrete, white walls, metal), choose cool ones. This makes the setup feel cohesive even without decor. - Pick one shape, but three sizes.
For example: 6–8 inches, 10–12 inches, 14–16 inches (15–20 / 25–30 / 35–40 cm). One shape visually “stitches” everything together, while different sizes add movement. If shapes vary, color won’t save it. - Decide in advance where the accent goes.
Use the accent color in one or two spots: near a chair, at the balcony entrance, or at the end of the composition. Don’t spread accents evenly — that creates a sense of clutter and visual noise. - Arrange empty pots first and step back.
Set them up like a mockup: large ones in the back or corners, medium along the sides, small closer to walkways or shelves. Step back a couple of steps and check if it feels too uniform or, on the contrary, too scattered. - Plant while leaving “air.”
Don’t fill every spot. Leave at least 10–20 percent of space empty (a free shelf section, a gap between pots). This makes the composition look more refined and simplifies care. - Check from three angles and lock it in.
Look at the setup:
— from the balcony entrance,
— seated (if there’s a chair),
— from the side.
If one pot stands out by color, it’s better to replace it or move it to a less visible spot. Decide right away which positions are permanent so you’re not rearranging everything every week.
Color-coordinated pots are a tool that makes a balcony look tidy and visually predictable, regardless of how many plants there are. When the background is calm, greenery always wins.
10. Mixing Edibles and Ornamentals in Tight Spaces
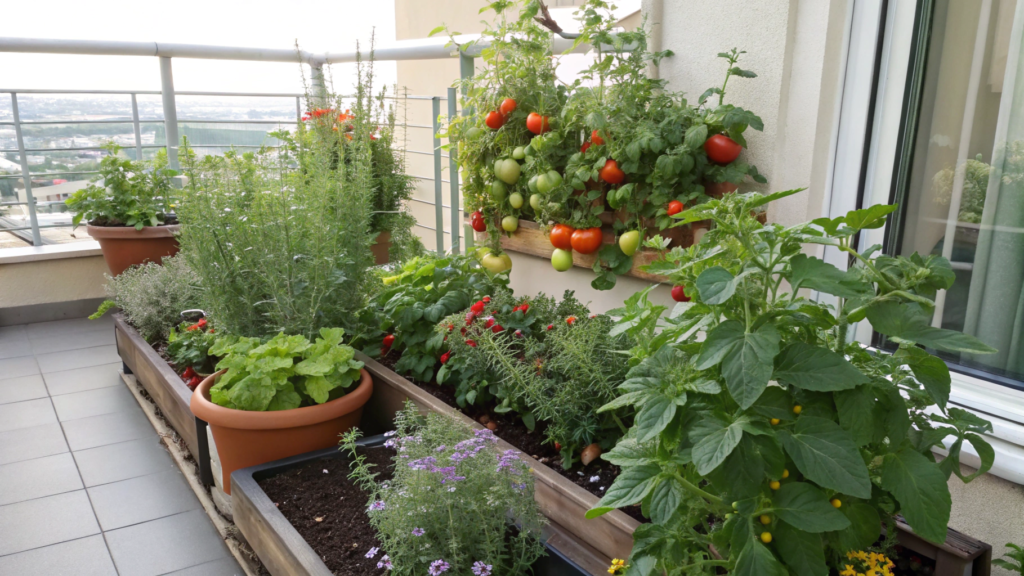
This approach solves two problems at once: the balcony looks good and is actually useful. Not “either–or,” but together.
For some reason, many people divide plants into two camps: either food or decor. In reality, mixing them creates the most stable and logical result — especially where space is limited.
I’ve seen many balconies where vegetables looked like a temporary garden bed, and ornamental plants looked like a display. When you combine them, the space starts to feel alive instead of functionally split.
Why mixing plants is a good solution
- Saves space. One container serves two purposes.
- Softens the “vegetable garden” look. Decorative plants balance the visuals.
- Simplifies care. Fewer pots mean less watering and rearranging.
- The balcony feels finished, not like a temporary experiment.
For mixed plantings, plants with similar light and water needs work best.
From edibles: basil, parsley, thyme, green onions, lettuce, strawberries, dwarf peppers.
From ornamentals: lobelia, bacopa, alyssum, nasturtium, marigolds, ornamental cabbage.
I avoid mixing succulents with edibles — their watering needs are too different.
Container Sizes and Placement Logic
For mixed plantings, containers that are wider than deep work best.
The sweet spot is 12–18 inches long (30–45 cm) and 8–10 inches deep (20–25 cm). This volume lets roots coexist without harsh competition and keeps moisture more even.
After watering, these containers usually weigh around 15–30 lbs (7–14 kg), which makes them easy to place on the floor near a wall, on low shelves, or on stable stands.
Which Containers and Styles Work Best
Neutral containers with simple shapes perform best. When food and flowers share one pot, the container itself shouldn’t steal attention.
I prefer:
- rectangular boxes,
- matte-finish pots,
- matching series (to avoid visual noise).
How to Do It: Step by Step
- Define the container’s role.
Decide in advance whether it’s food-focused or decorative. If it’s food-first, place the edible plant in the center. If it’s visual-first, let the ornamental plant lead and keep edibles secondary. - Choose plants with the same care routine.
Check light and watering needs. Basil plus alyssum works. Basil plus a succulent does not. This removes constant compromises. - Distribute plants by height.
Place taller or bushier plants toward the center or back of the container, and lower or trailing plants along the edges. This keeps everything readable instead of blending into one mass. - Use light, nutrient-rich soil.
A breathable container mix matters because different plants share the same volume. Don’t pack the soil tightly. - Plant with space to grow.
Leave 1–2 inches (2.5–5 cm) between plants. In containers, everything grows faster than it seems at the start. - Water evenly and observe in the first days.
After planting, soak the entire container, then watch how quickly the soil dries. Sometimes ornamentals “drink” more than edibles — that’s normal, just factor it into watering. - Trim regularly instead of waiting for harvest.
Mixed plantings benefit from frequent trimming. Herbs get bushier, ornamentals don’t stretch out, and the container keeps its shape longer.
Mixing edible and ornamental plants is a way to balance usefulness and appearance. This kind of balcony doesn’t look like a temporary garden, but it still delivers real results in the kitchen.
The key is not trying to squeeze everything in, but building a thoughtful, compact system that works in your specific conditions.
Your Balcony — Your Rules
A balcony works when it’s used in a way that’s convenient for you. Not like in a photo. Not like it’s “supposed to be.” But in a way that makes you want to step out there every day.
A small space doesn’t need complex structures or rare plants. It needs clear decisions: where furniture goes, where the light falls, which plants don’t demand constant attention and don’t block movement. When these things line up, the balcony becomes a comfortable and favorite part of the home.What is your balcony like right now — sunny or shaded, empty or already planted? Write in the comments what resonated most and what you’d try first.