
Halloween is that one night when the kitchen turns into a mad scientist’s lab and food becomes part of the decor. When else can you turn a burger patty into a monster or build a veggie skeleton — and no one will think you’ve lost your mind?
I love cooking for these kinds of nights because of the atmosphere itself — when food makes people smile, when aromas, colors, and textures mix together, and ordinary ingredients turn into a playful experiment.
Lindy and I have been making these dishes for years — and every time, we add something new: a bit of humor, a touch of spice, a dash of chaos. Everything is simple, unpretentious, but made with love for the details. And that’s exactly what makes these dishes the real stars of the night — effortless, yet full of personality.
1. Jack O’Lantern Quesadillas
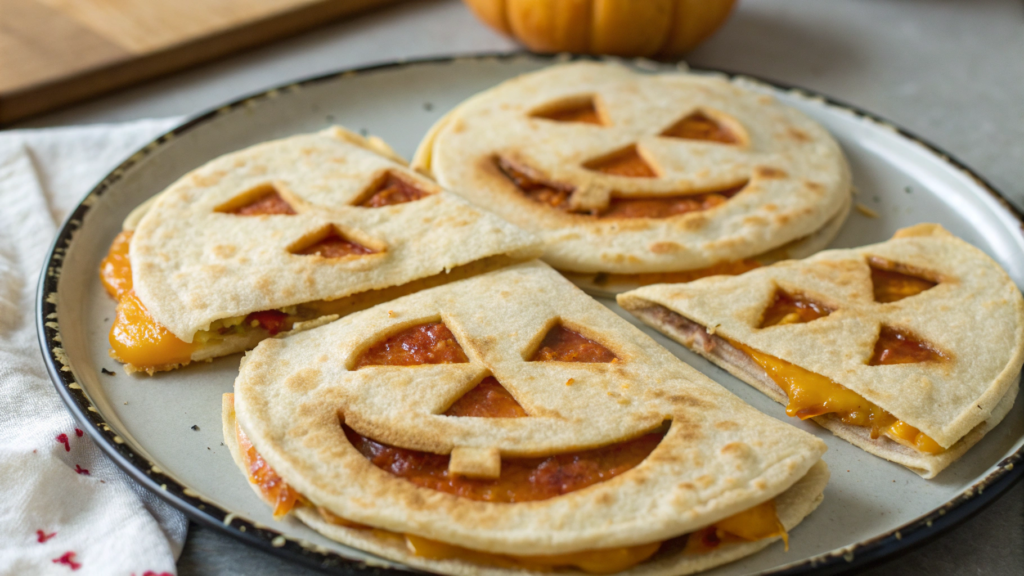
These quesadillas are a perfect way to start the party. They look like little pumpkins with spooky smiles, and inside — melted cheese, a touch of spice, and a crisp golden crust. It’s simple, but those are usually the dishes that become everyone’s favorites.
You don’t just eat a quesadilla — you lift it up and see the pumpkin’s “smile,” with gooey cheese stretching through it. It makes everyone around the table grin. Plus, they can be made ahead of time and simply reheated before serving.
What You’ll Need:
- 8 large flour tortillas
- 2 cups shredded cheddar cheese (about 8 oz / 200 g)
- ½ cup shredded mozzarella (about 2 oz / 50 g)
- 1 small sweet pepper, finely chopped
- 1 teaspoon smoked paprika
- 1 tablespoon butter
- A sharp knife or a pumpkin-shaped cutter
How to Make It:
- Prepare the tortillas. Lay them out on the counter and cut out “eyes” and a “smile” on half of them (four) using a knife or a cutter. Don’t make the cuts too narrow — melted cheese should peek through nicely later.
- Build the base. On each whole tortilla, spread the shredded cheese, add a bit of pepper, and sprinkle with paprika. Keep the cheese about half an inch (1 cm) from the edge so it doesn’t leak while cooking.
- Assemble and cook. Place the cut-out tortilla on top and press lightly with your hand. Heat a skillet over medium heat, melt the butter, and cook each quesadilla for 2–3 minutes per side until golden and crisp.
- Watch the cheese. Once melted cheese starts to bubble through the “eyes,” it’s time to flip. That’s how you get a crunchy crust and gooey center at the same time.
- Serve right away. Slice in half and serve with a simple dip — sour cream with lime juice and a hint of garlic gives the perfect balance.
If you want to make them more filling, add a bit of cooked chicken, corn, or beans. For kids, skip the paprika and go heavier on the cheese. Sometimes I serve them with a quick lime-garlic sour cream sauce — it’s easy to make, but the flavor is pure perfection.
2. Mini Monster Burgers
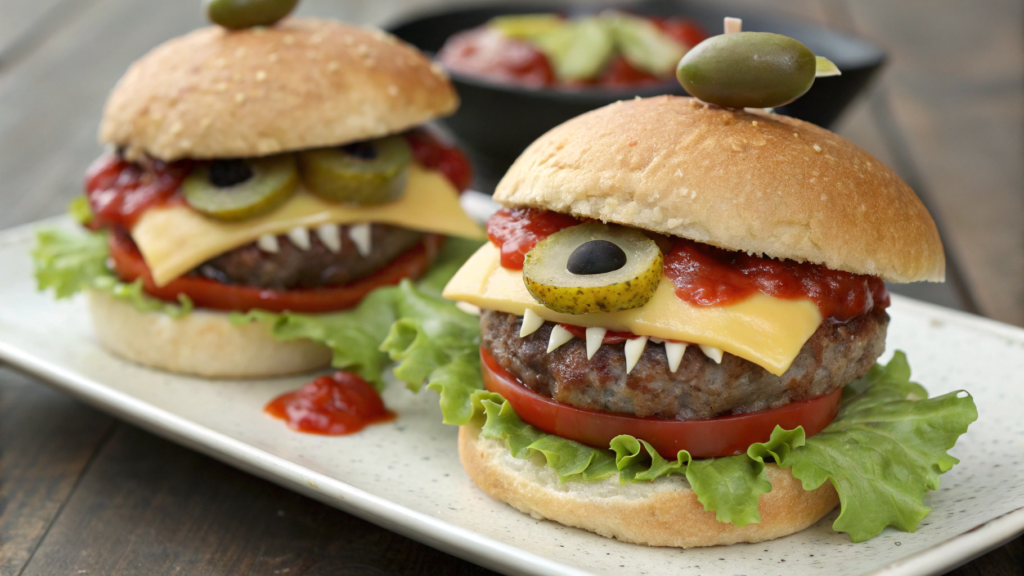
These mini burgers always look fun — with olive “eyes,” cheese “teeth,” and a little tongue made of pickled pepper. But inside, they’re real, juicy burgers: flavorful patties, soft buns, and everything disappears from the plate down to the last crumb.
What You’ll Need:
- 1 lb (450 g) ground beef
- 1 egg
- ¼ cup breadcrumbs (about 25 g)
- 1 teaspoon Dijon mustard
- 1 teaspoon Worcestershire sauce
- salt and pepper to taste
- 8 mini slider buns
- 4 slices cheddar cheese
- lettuce, tomato, ketchup
- a few pitted olives
- wooden skewers
If you don’t have mini buns, a slider buns pack works perfectly — the size is ideal, not too sweet, and sturdy enough to hold all the fillings.
How to Make It:
- Mix the beef. In a bowl, combine ground beef, egg, breadcrumbs, mustard, Worcestershire sauce, salt, and pepper. Mix with your hands — but not too long, so the meat stays tender and doesn’t get dense.
- Shape the patties. Divide the mixture into 8 balls and flatten them — about ½ inch thick (1.2 cm). Press a small dent in the center with your finger to keep them from puffing up while cooking.
- Cook them up. Heat a skillet or grill, add a bit of oil, and cook patties for 3–4 minutes per side until golden brown. One minute before they’re done, place a slice of cheese on top so it starts melting.
- Assemble the burger. Split the buns, lightly toast the cut sides, and layer lettuce, the patty with melted cheese, a tomato slice, and a touch of ketchup.
- Add the “monster.” Cut small zigzag “teeth” from cheese slices and stick them between the buns. Skewer two olives on top — and there you have your little monster staring at you.
If you want to give your “monster tongue” more character, tuck in a strip of pickled pepper or a thin tomato slice peeking out from the side.
Tip. These mini burgers are great for prepping ahead — you can cook the patties in the morning and reheat them in the oven before the party. And if you serve them with a simple homemade sauce (sour cream, garlic, and a touch of mustard), guests will completely forget they’re technically “kids’ food.”
3. Skeleton Veggie Platter

Try serving your veggies shaped like a skeleton! The Skeleton Veggie Platter is such a fun idea for Halloween — and honestly, it helps balance out all the sweet and heavy party foods with something fresh and crunchy.
What You’ll Need:
- 1 large serving tray or board
- 1 cup baby carrots
- 1 red bell pepper
- 1 yellow bell pepper
- 1 cucumber
- 1 cup broccoli florets
- 1 cup cauliflower florets
- a few pitted olives
- ½ cup cherry tomatoes
- 1 small bowl of dip (like hummus or ranch)
How to Make It:
- Prep the base. Lay out your tray or board. Wash and dry all the veggies. Slice the peppers into long strips, cut the cucumber into rounds, and break the broccoli and cauliflower into small florets. The smaller the pieces, the easier it’ll be to shape the skeleton later.
- Start with the head. Place the bowl of dip at the top of the tray — that’s the “head.” Add two olives on top for eyes. If you gently press them into the dip, they’ll stay put and look extra expressive.
- Build the spine. Make a vertical line of baby carrots leading down from the dip bowl. Don’t line them up perfectly straight — a little unevenness makes it look more natural. You can even tuck cherry tomato halves between the carrots as “discs” between vertebrae.
- Add the ribcage. On both sides of the “spine,” arrange the pepper strips in curved shapes to mimic ribs. Alternate red and yellow for a more striking look. A small piece of broccoli on each side makes great “shoulders.”
- Form the arms and legs. Use long cucumber slices for arms and finish them with broccoli “hands.” For legs, use carrots again, and make cauliflower florets the “feet.” Don’t worry about perfect symmetry — a slightly uneven skeleton looks even more fun.
- Add details. Olives make perfect “joints,” and cherry tomato halves can serve as “knees.” For a playful touch, place a mini carrot in the skeleton’s hand as if it’s holding a microphone — a little joke that always gets smiles.
Tip. To keep your veggie skeleton from falling apart, assemble it right before serving. If you need to prep ahead, cover the tray tightly with plastic wrap and refrigerate until party time.
This platter looks festive, stays fresh, and adds a splash of color to any table — exactly what you need to balance out all the rich Halloween snacks and sweets.
4. Pumpkin Mac and Cheese Bites
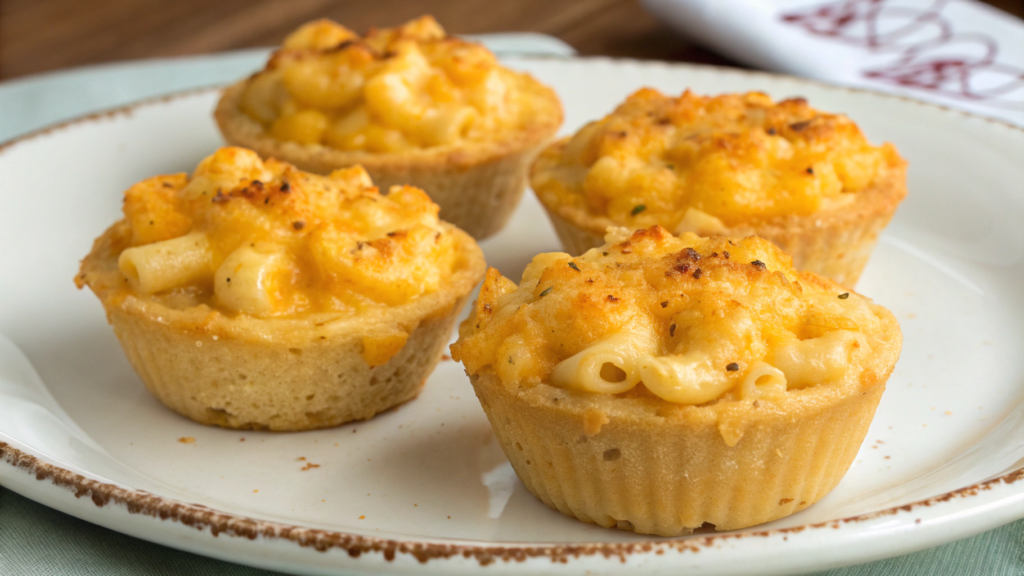
These little mac and cheese muffins with pumpkin purée are warm, creamy, slightly sweet, and topped with a golden crust. They’re easy to eat with your hands and perfect for parties — especially when you don’t want to deal with serving individual portions.
What You’ll Need:
- 2 cups elbow macaroni
- 1 cup pumpkin purée (about 240 ml)
- 2 cups shredded cheddar cheese (about 8 oz / 225 g)
- ½ cup milk (120 ml)
- 2 tablespoons butter
- 1 egg
- ½ cup breadcrumbs (about 50 g)
- salt, pepper, and a pinch of nutmeg
- mini muffin pan (24-count)
If you don’t have a pan like this, a nonstick mini muffin pan works perfectly — it doesn’t stick and is just the right size for bite-sized appetizers.
How to Make It:
- Cook the pasta. Bring water to a boil, add a pinch of salt, and cook the macaroni one minute less than the package directions. They should be slightly firm, or they’ll turn mushy in the oven. Drain and set aside.
- Make the sauce. In a small saucepan, melt the butter. Add the pumpkin purée and milk, whisking until smooth and slightly thickened. Remove from heat, stir in the cheddar (saving a bit for topping), and mix until creamy.
- Combine everything. Pour the pumpkin-cheese mixture over the pasta. Add the egg, nutmeg, salt, and pepper. Stir well — you should get a thick, aromatic mix.
- Prep the pan. Grease the muffin cups or line them with paper liners. Sprinkle a pinch of breadcrumbs on the bottom of each — it gives the bites a crispy base.
- Fill and bake. Spoon the pasta mixture into each cup, pressing it down gently. Sprinkle with the remaining cheese and bake at 375°F (190°C) for about 15–18 minutes, until golden and slightly crisp around the edges.
- Cool and serve. Let them rest in the pan for about 5 minutes so they hold their shape. Then carefully loosen them with a knife or silicone spatula and transfer to a plate.
Tip: For extra flavor, add a pinch of dried sage or thyme — both pair beautifully with pumpkin.
These pumpkin mac and cheese bites are delicious warm or at room temperature. We often make them the night before a party — just store them in a container and reheat in the oven before serving. It’s simple, tasty, and festive without the fuss.
5. Blood Red Velvet Cupcakes
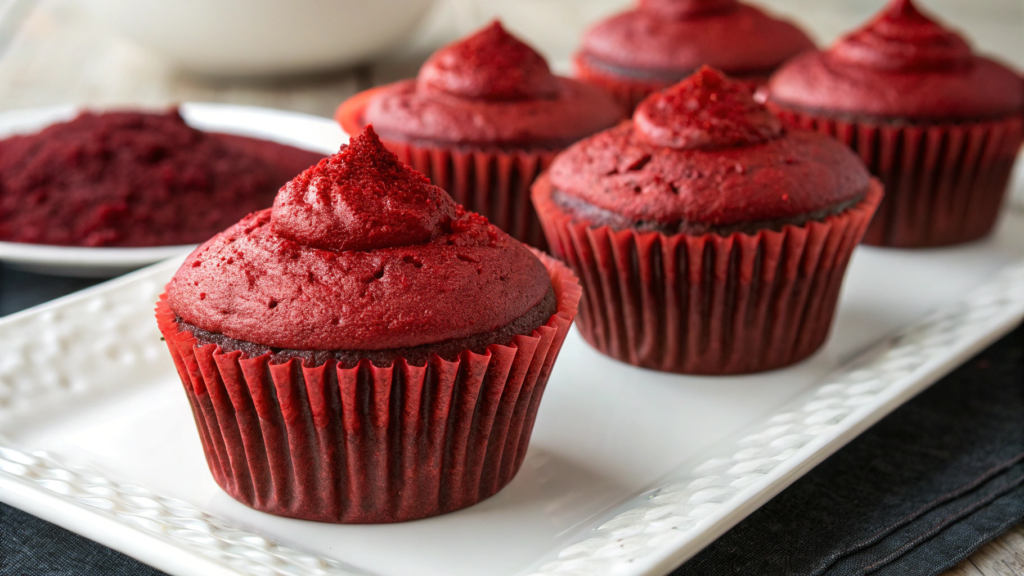
These cupcakes are simple, striking, and charming — exactly what you want for Halloween. On the outside, they’re a deep scarlet red; inside, the texture is moist and velvety with a hint of cocoa.
What You’ll Need:
- 1½ cups all-purpose flour (about 190 g)
- 2 tablespoons cocoa powder
- ½ teaspoon salt
- ½ teaspoon baking soda
- ½ cup vegetable oil (120 ml)
- 1 cup sugar (200 g)
- 2 eggs
- ¾ cup buttermilk (180 ml)
- 1 teaspoon vinegar
- 1 teaspoon vanilla extract
- 2 teaspoons red food coloring (or more for a richer shade)
- ½ cup cream cheese (for frosting)
- ¼ cup butter, softened
- 1½ cups powdered sugar
- ¼ cup raspberry or strawberry sauce for the “blood” effect
How to Make It:
- Mix the dry ingredients. In a bowl, combine the flour, cocoa, baking soda, and salt. Whisk well so the cocoa distributes evenly — that keeps the color smooth and bright without dull gray patches.
- Prepare the wet base. In another bowl, beat the eggs, sugar, and oil until slightly foamy. Add the buttermilk, vinegar, vanilla, and red coloring. The color should be bold — something close to ripe beetroot. If it looks too pale, add another drop of food coloring.
- Combine everything. Gradually add the dry ingredients to the wet, mixing gently with a spatula. Don’t overmix — the batter should stay slightly thick and airy.
- Bake. Divide the batter into cupcake liners, filling them about ¾ full. Bake at 350°F (175°C) for 18–20 minutes. Check with a toothpick — if it comes out clean, they’re ready. Let cool completely before frosting.
- Make the frosting. Beat the softened butter with cream cheese until smooth. Add the powdered sugar and whip until light and fluffy. If you want a touch of tang, mix in a few drops of lemon juice.
- Decorate. Spoon or pipe the frosting onto the cupcakes. Drop a spoonful of raspberry sauce on top — it should drip slowly down the sides like “blood.” For more drama, drag a toothpick through the sauce to create thin streaks.
Tip. If your sauce is too runny, warm it on the stove for a minute with a teaspoon of cornstarch — it’ll thicken and hold its shape better.
These red velvet cupcakes keep beautifully in the fridge for up to two days, and the flavor actually gets deeper. Lindy and I usually make a double batch — half with “blood,” half with plain white frosting. The contrast looks amazing on one platter.
6. Spooky Pretzel Bones

These pretzel bones made from pretzel sticks and mini marshmallows look like real Halloween décor — and they taste crunchy, slightly salty, and sweet in white chocolate. They’re the perfect balance of sweet and salty, and everyone loves them — kids and adults alike.
What You’ll Need:
- 1 bag thin salted pretzel sticks
- 1 bag mini marshmallows
- 10 oz (about 280 g) white chocolate or candy coating
- 1 teaspoon coconut oil (for smoother coating)
How to Make It:
- Assemble the “bones.” Take a pretzel stick and push one mini marshmallow onto each end. They should fit snugly but not too deep — about ½ inch (1–1.5 cm). If the marshmallows are too soft, chill them briefly in the fridge before assembling.
- Prepare the coating. In a microwave-safe bowl, melt the white chocolate with the coconut oil in short 15–20 second bursts, stirring each time. The mixture should become smooth and glossy, without lumps.
- Dip the “bones.” Submerge each pretzel piece into the chocolate, turning it gently so it’s evenly coated. Let the excess drip off, then place it on a parchment-lined baking sheet. Using a fork or kitchen tongs makes this easier.
- Let them set. Once all the “bones” are coated, chill them in the refrigerator for 15–20 minutes. If you’d like, sprinkle with white sugar pearls or shredded coconut before they harden — it gives them a fun, aged-bone texture.
- Serve them nicely. Arrange the “bones” on a black plate or wooden board. Dust a bit of cocoa powder around the edges for contrast — it really makes them pop.
Tip. If making ahead, store them in an airtight container at room temperature. Avoid refrigerating — it can make them lose their crunch.
I love serving these with a quick chocolate dipping sauce — just melt a bit of dark chocolate with a spoonful of cream. It turns into a “puddle of darkness” perfect for dipping the white bones into. It looks fantastic — especially by candlelight.
7. Candy Corn Parfaits
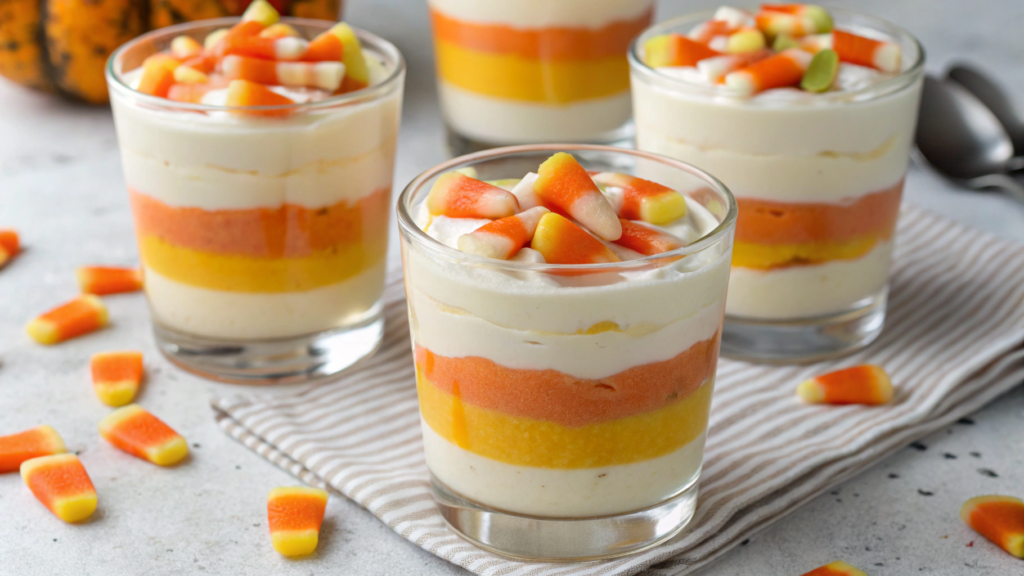
These no-bake desserts come together in just 10 minutes but look absolutely stunning. The bright layers — white, orange, and yellow — create a perfect Halloween contrast, while the taste is creamy, light, and not overly sweet.
What You’ll Need:
- 1 box vanilla instant pudding mix
- 2 cups cold milk (480 ml)
- 1 cup pumpkin purée (about 240 ml)
- 2 tablespoons honey or maple syrup
- ½ teaspoon cinnamon
- 1 cup whipped cream
- yellow food coloring (optional)
- Candy Corn candies or cookie crumbs for topping
How to Make It:
- Prepare the pudding. In a bowl, whisk the pudding mix with cold milk. Let it sit for about 5 minutes until thickened. Divide the mixture evenly into two bowls.
- Create the “orange layer.” In one bowl, stir in the pumpkin purée, honey, and cinnamon until smooth. You’ll get a soft autumn shade with a gentle spice aroma.
- Make the “yellow layer.” Add a few drops of yellow food coloring to the other portion of pudding — this gives your parfaits a brighter contrast between layers.
- Assemble the dessert. In clear glasses, layer the mixtures carefully: start with the yellow pudding, then spoon in the pumpkin-orange layer, and top with a dollop of whipped cream. To keep the layers clean, spoon the pudding slowly along the side of the glass.
- Decorate. Finish each parfait with a Candy Corn on top or sprinkle with cookie crumbs. For a bit more texture, you can add a teaspoon of granola between the layers.
Tip. These parfaits can be made ahead — they keep perfectly in the fridge for up to 24 hours. Just add the whipped cream right before serving so it stays fluffy.
Sometimes I make a kid-friendly version using vanilla and pumpkin yogurt instead of pudding — same bright look, but a bit healthier. And for adults, I’ll sneak in a splash of bourbon into the pumpkin layer. Because honestly, why not?
8. Zombie Brain Dip

This dip looks incredible — especially when served in a clear bowl or a silicone brain mold. It’s creamy, slightly tangy, and just a bit spicy — the perfect blend for nachos or chips at any Halloween party.
What You’ll Need:
- 8 oz (225 g) cream cheese, softened
- 2 ripe avocados
- 2 tablespoons sour cream or Greek yogurt
- 2 tablespoons lime juice
- 1 small garlic clove, minced
- ½ teaspoon salt
- ¼ teaspoon cayenne pepper (optional)
- ½ cup salsa or tomato sauce (for the “blood”)
- fresh cilantro for garnish
- nachos, chips, or veggie sticks for serving
If you want to make the presentation extra fun, use a brain gelatin mold — it makes the “brain” look realistic but still playful, not over the top.
How to Make It:
- Prepare the base. In a large bowl, beat the cream cheese until soft and fluffy. It should be smooth — this gives the dip that silky texture.
- Add the avocado. Mash the avocado flesh with a fork and mix it into the cheese. Add sour cream, lime juice, garlic, salt, and cayenne. Stir until smooth. If you want a completely creamy consistency, blend it all in a food processor.
- Check the flavor. Taste and adjust — you might want an extra pinch of salt or a few drops more lime juice to brighten it up. The flavor should stay fresh and balanced, not heavy.
- Shape the “brain.” If you’re using a mold, line it with plastic wrap and spoon in the mixture, pressing gently to fill it evenly. If not, mound the dip onto a plate and shape it into a dome with uneven grooves to mimic “brain folds.”
- Add the “blood.” Pour the salsa or tomato sauce over the top and spread lightly to create natural dripping streaks. Sprinkle cilantro for a touch of “green life” among the zombie chaos.
Tip. For extra heat, swap part of the salsa for jalapeño sauce or add a few drops of Tabasco. You can also garnish with bits of red bell pepper or tomato for a fun “brain fragment” effect.
Serve it with warm nachos or toasted baguette slices — this Zombie Brain Dip always becomes the centerpiece of the table.
9. Haunted Pizza Bites
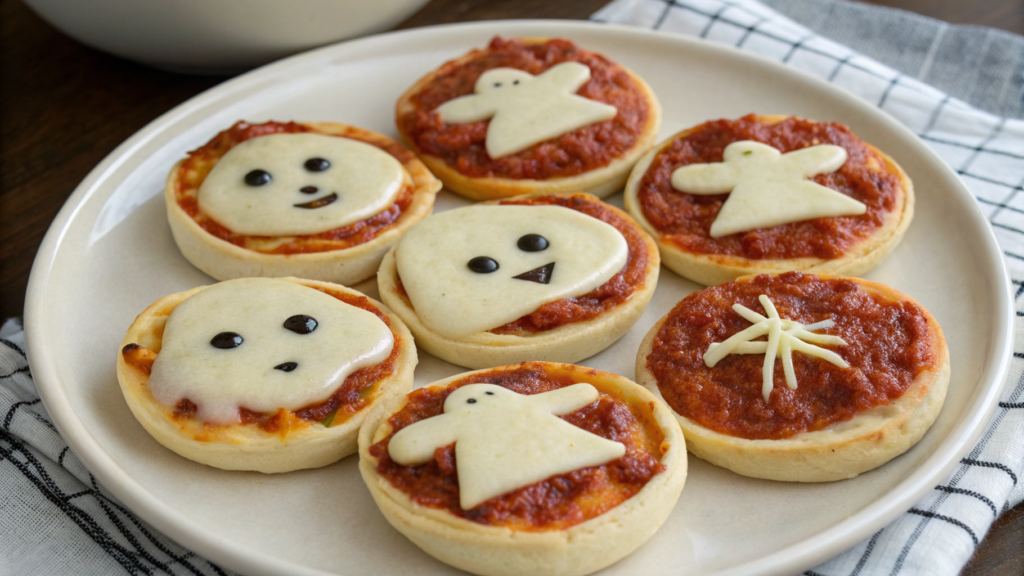
Everyone loves these — crispy dough, gooey cheese, a hint of oregano, and those perfectly browned edges. But for Halloween, these mini pizzas transform into ghosts, mummies, and pumpkins! They’re super easy to make — and honestly, it’s a fun activity to do with kids. The result? Playful and delicious.
What You’ll Need:
- 1 package pizza dough (or puff pastry)
- ½ cup tomato sauce
- 1½ cups shredded mozzarella cheese (about 150 g)
- ½ cup sliced pepperoni
- 1 tablespoon olive oil
- a pinch of oregano
- black olives for eyes (optional)
- cookie cutters shaped like pumpkins, ghosts, or skulls
How to Make It:
- Prepare the dough. Roll it out on a lightly floured surface to about ¼ inch thick (0.5 cm). Use the cookie cutters to cut out fun shapes — ghosts, pumpkins, skulls — and place them on a parchment-lined baking sheet.
- Make the base. Brush each shape with a thin layer of tomato sauce. Don’t overdo it — too much sauce will make the dough soggy. Sprinkle a little oregano on top for that classic pizza aroma.
- Add the cheese. Spread shredded mozzarella evenly. For “mummies,” cut cheese into strips and layer them in a crisscross pattern, leaving space for “eyes.” For “ghosts,” melt a smooth layer of cheese. For “pumpkins,” add a few pepperoni circles to accent the shape.
- Add the details. Cut small circles from olives for eyes, and use bits of pepperoni for mouths or “scary smiles.” A small knife or mini cutter works great for this.
- Bake. Place in a preheated oven at 400°F (200°C) and bake for 10–12 minutes, until edges are golden and the cheese has melted. Watch closely — these mini pizzas cook fast!
Tip. For deeper flavor, layer some caramelized onion or basil under the cheese. For a kid-friendly twist, make “eyes” from mozzarella rounds with a dot of ketchup — it looks funny, not scary.
Serve them warm. We usually bake a big batch and arrange them on a wooden board — ghosts, mummies, and skulls all mixed together. Everyone picks their own “monster,” and it always turns into a little show.
10. Chocolate Spider Nest Cookies
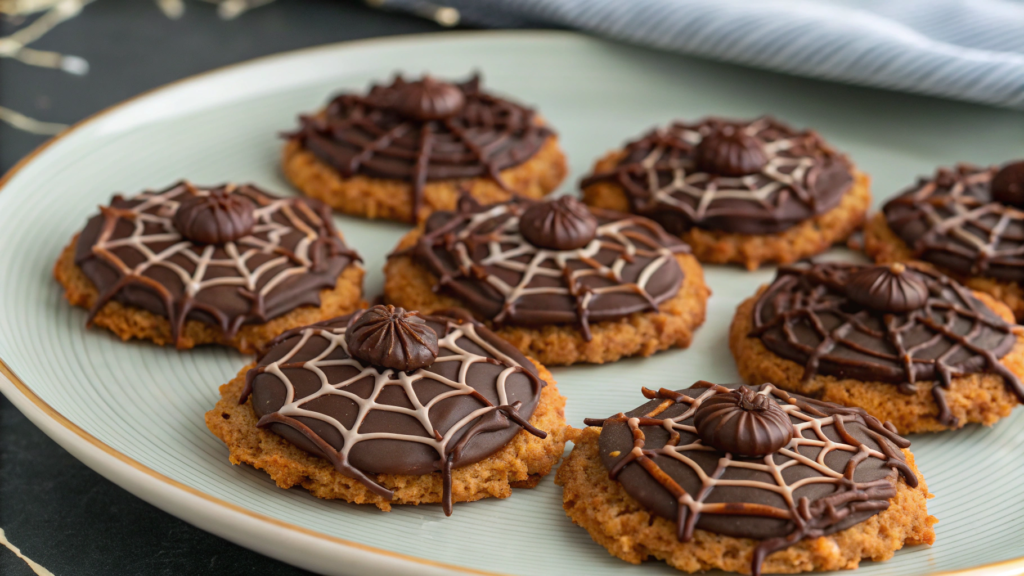
These no-bake cookies are made from crispy noodles and melted chocolate. The flavor is rich but not overly sweet — a perfect mix of silky chocolate, nutty peanut butter, and gentle sweetness. They’re always a hit at parties, and guests can’t help reaching for seconds.
What You’ll Need:
- 2 cups crispy chow mein noodles (or rice cereal)
- 1 cup milk chocolate chips
- ½ cup peanut butter (or almond butter)
- ¼ cup honey or corn syrup
- small chocolate candies or candy eyes for decorating
How to Make It:
- Melt the base. In a microwave-safe bowl, combine the chocolate chips, peanut butter, and honey. Microwave in short 20–30 second bursts, stirring each time, until the mixture becomes smooth and glossy.
- Add the noodles. Gently fold in the crispy noodles until each strand is coated in chocolate. Work carefully — if you mix too vigorously, the “nests” will become dense, and you want those light, tangled webs of texture.
- Shape the nests. Line a baking sheet with parchment paper. Spoon portions of the mixture onto the sheet, forming small mounds about 2½–3 inches (6–7 cm) wide. Press a tiny indentation in the center — that’s where your little “spiders” will sit later.
- Decorate. While the chocolate is still soft, place a small candy in the center or add candy eyes on top. Raisins work too — they look surprisingly realistic!
- Chill. Refrigerate for 20–30 minutes until firm. Once set, remove from the paper and arrange on a serving plate.
Tip. Mix milk and dark chocolate for a deeper flavor. For a kid-friendly version, swap peanut butter for Nutella — it’ll taste smoother and slightly caramel-like.
These spider nests always draw attention — people laugh, point, and take pictures before finally digging in. I’ve often seen adults hesitating, trying to decide where to take the first bite just so they don’t ruin the “artwork.” That’s when you know you’ve nailed it — when food makes people feel something, not just eat.
When Food Sets the Mood
When these dishes hit the table, I know the evening’s already a success. People don’t just eat — they laugh, chat, take photos, remember their childhood costumes, and giggle at the “spider nests.”
That’s what this holiday is about — where imperfection becomes style, and simple dishes steal the spotlight.So don’t be afraid to experiment. Cook calmly, in good spirits, and add a little of yourself — maybe a new sauce, a fun garnish, or that old family recipe that somehow fits perfectly on a Halloween table.
What turned out best for you this year? I’d genuinely love to know. Share it in the comments — I always enjoy seeing how everyone’s creations come to life in their own way.


