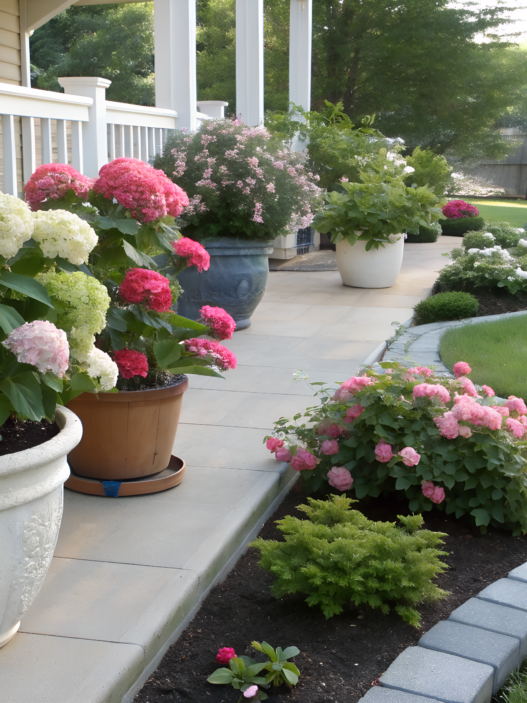

The thought of privacy shows up the moment it becomes clear that you want more seclusion. Fewer eyes. Less of that feeling that your yard is open from every side.
Lindy and I noticed this not only at our own place. On trips, in small courtyards, on balconies and patios — people solve the same problem, but each time in a different way.
Trellises and climbing plants offer a rare combination: they create a boundary without making the space feel sealed off. They grow, change, soften lines, and often deliver results faster than you expect. But only if the structure and the plant actually fit each other.
Here you’ll find 10 trellis ideas along a fence that provide privacy while still looking neat and intentional. These solutions work for small yards, patios, balconies, and more open spaces — with real plant growth and how structures behave over time in mind.
1. Rustic Cedar Trellis with Jasmine Vines
A cedar trellis with jasmine is one of the most reliable ways to cover a fence so it doesn’t look like a fence. Especially when you don’t want a solid screen, but still need privacy from neighbors, a road, or utility buildings.
We used this option both in Idaho and later on our new property. It turned out to be stable, predictable, and very rewarding to maintain.
What You’ll Need
Materials:
- Cedar boards (slats)
- Stainless steel screws
- Trellis mounting brackets
- Jasmine plants (star jasmine)
- Drip irrigation or a garden hose with a timer
Tools:
- Drill/driver
- Level
- Tape measure
- Saw
How to Build It
- Assemble the trellis frame on a flat surface
It’s easiest to build the rectangle on the ground first. This lets you square the corners and check the diagonals right away. If the frame goes out of alignment here, fixing it on the fence will be much harder. - Add horizontal or diagonal slats
The optimal spacing is 8–12 inches (≈ 20–30 cm). This interval gives jasmine enough anchor points and speeds up the formation of a dense green wall. - Mount the trellis with a gap from the fence
Leave 2–4 inches (≈ 5–10 cm) between the trellis and the fence. This is crucial for ventilation: the wood lasts longer, and the plant is less likely to suffer from fungal issues. - Plant jasmine at the correct distance
Place plants 12–18 inches (≈ 30–45 cm) from the base of the trellis. The roots get more space, and the plant moves upward faster instead of just sitting in place. - Train the vines during the first season
During the first year, tie young shoots by hand. Yes, it takes time. But later the jasmine holds itself and doesn’t try to live its own life away from the trellis.
After rooting, jasmine clings to the slats on its own and keeps its shape without constant intervention.
Tip. Don’t rush to overplant. Fewer plants, correctly trained, work better.
If the cedar trellis looks too “empty” in the first season, that’s normal. Lindy and I know this from personal experience. Jasmine rarely takes off aggressively — it needs time to root and understand the direction.
By the second year, it starts closing the space calmly and evenly, without sudden spurts or distortions. An overloaded structure almost always looks worse than one that was given time.
Why Cedar Works Better
Western red cedar is valued for its natural resistance to rot and insects. According to the USDA Forest Products Laboratory, it’s considered a species with high biological durability and can be used outdoors without chemical treatment.
For trellises along a fence, this means less maintenance and a longer lifespan.
Tip. If the area is open and sunny, don’t save on the gap between the trellis and the fence.
Those extra 2–3 inches (≈ 5–7 cm) matter more than they seem: jasmine grows more evenly, the wood lasts longer, and you won’t have to rebuild the structure in a couple of years. We cut this corner once — and later had to redo the entire section.
2. Modern Metal Panels and Ivy
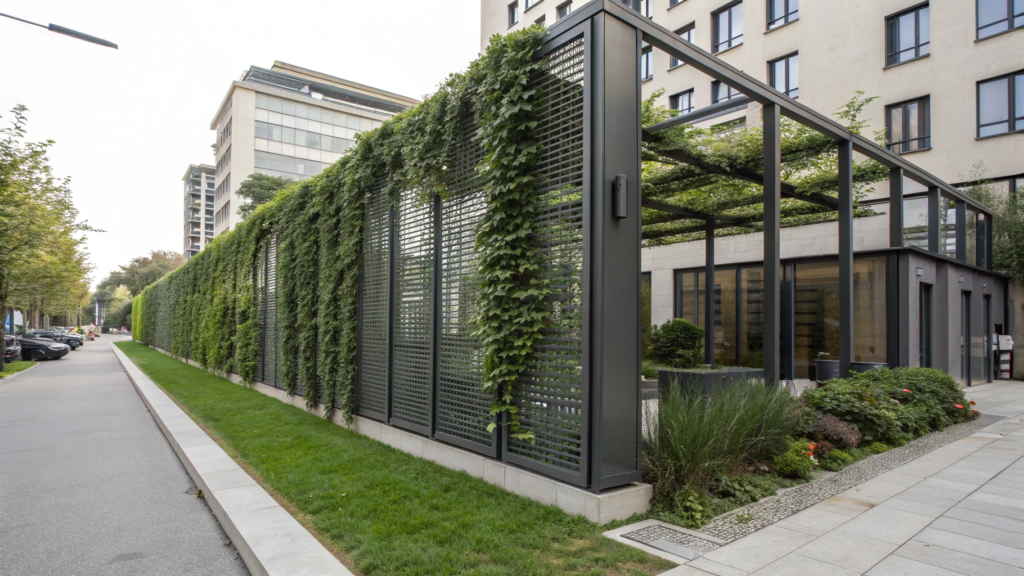
We truly appreciated metal panels with ivy for the first time not at our own place, and not even at friends’ homes, but while traveling through cities where modern architecture sits very close to greenery. In those settings, wood often feels out of place, while metal, on the contrary, becomes a logical extension of the house. And it’s the ivy that makes this strictness feel lived-in.
This solution isn’t right for every property. But where you want clear geometry, clean lines, and at the same time a living surface, the combination of metal and ivy works especially well.
What You’ll Need
Materials:
- Metal panels (steel or aluminum)
- Fasteners with anti-corrosion coating
- Standoff mounts to create a gap from the wall or fence
- Ivy plants (English ivy or suitable local varieties)
- Mulch for the root zone
Tools:
- Drill or driver
- Level
- Tape measure
- Pruning shears
How to Build It
- Choose panels with simple geometry
The more complex the panel pattern, the worse ivy spreads across it. Panels with vertical and horizontal lines work best, without small decorative elements. Ivy needs a clear surface, not ornamentation. - Mount the panels with a required gap
Leave 2–4 inches (≈ 5–10 cm) between the panel and the fence or wall. This improves ventilation, reduces moisture buildup, and helps prevent corrosion. Ivy doesn’t like stagnant air, even if it looks low-maintenance. - Check structural rigidity before planting
The metal panel should not flex or vibrate. Once ivy grows and gains mass, any weak spots will become obvious. Fixing them later is much harder. - Plant ivy at the correct spacing
The optimal distance is 18–24 inches (≈ 45–60 cm) between plants. Dense planting gives a faster visual effect but worsens airflow. It’s better to give ivy space and guide its growth. - Control direction during the first season
At first, ivy grows chaotically. You’ll need to regularly spread it across the panel so it covers the surface evenly instead of gathering into dense patches.
Tip. If the lower part of the panel stays bare for a long time, lightly pinch the top shoots — this stimulates lateral growth.
During our trips, we repeatedly noticed how metal panels with ivy are used as a background rather than an accent. At first they look cold and strict. But after a season, greenery softens the lines, and the structure stops drawing attention to itself.
Fact
According to U.S. university horticultural extension programs, ivy forms more even coverage on rigid vertical supports where shoots can be regularly guided, compared to freely hanging surfaces.
If your yard or home leans toward a modern style, don’t try to soften it with wood at any cost.
Metal and ivy often deliver a more durable result, especially where a clean line and minimal maintenance matter.
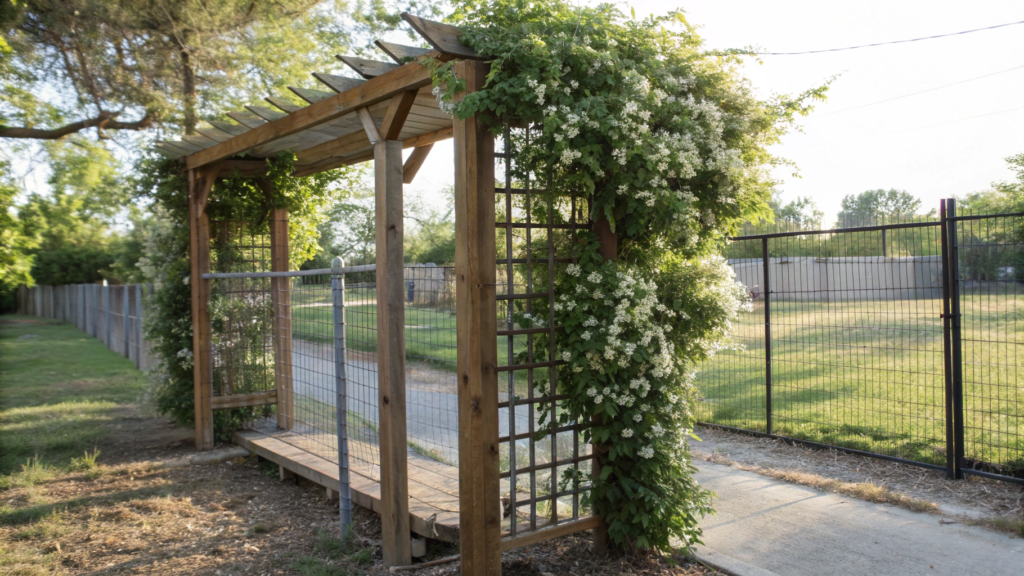
3. Lattice Fence with Climbing Roses
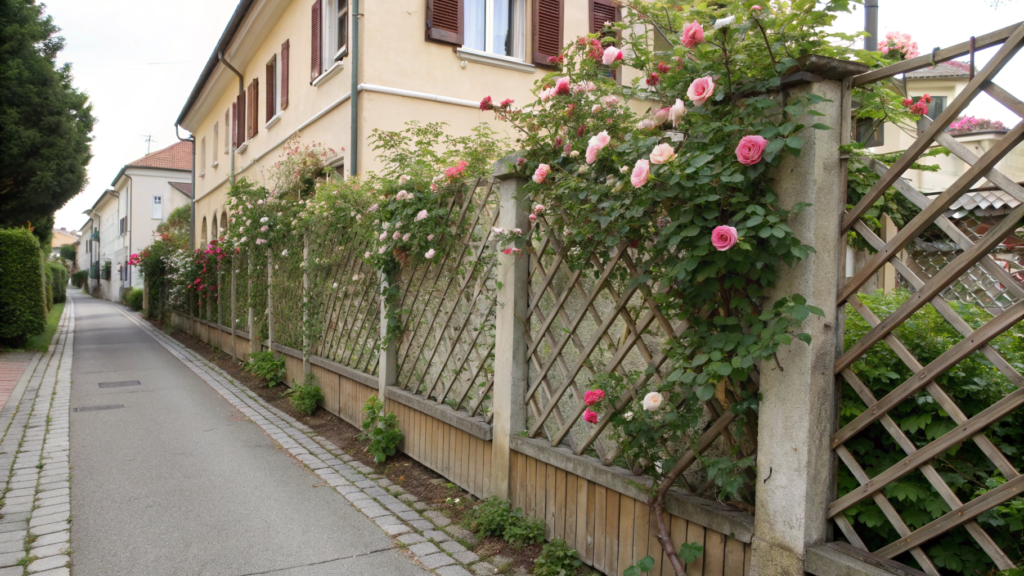
Lindy and I often saw lattice fences with climbing roses in old European neighborhoods, where fences stopped being just a boundary a long time ago. There, roses don’t “decorate” — they live on the structure. They cling, rest, intertwine, and over time completely change how the place feels.
Roses don’t cover a fence instantly, but when everything is done right, the result looks calm, mature, and very stable over time.
What You’ll Need
Materials:
- Wooden or composite lattice panels
- Timber for a reinforced frame
- Screws with anti-corrosion coating
- Mounting hardware for attaching to a fence or posts
- Climbing or semi-climbing roses
- Mulch for the root zone
Tools:
- Drill/driver
- Tape measure
- Level
- Pruning shears
For ready-made sections, it’s convenient to use Wood Garden Lattice Panels (Amazon) — they have stable geometry and predictable cell size.
How to Build It
- Choose lattice with large openings
For roses, cells 6–8 inches (≈ 15–20 cm) work best. Fine lattice looks neat, but it’s too tight for roses — shoots rub, break, and distribute poorly. - Always add a rigid frame
One of the most common mistakes is attaching lattice without a frame. Under the weight of roses (especially after rain), the panel starts to bow. A frame made from timber at least 1½ inches (≈ 38 mm) thick solves this problem. - Mount the structure with a gap from the surface
Leave 2–3 inches (≈ 5–7 cm) between the lattice and the fence. This improves ventilation, reduces disease risk, and makes caring for the shoots easier. - Plant roses with extra space
Space plants 24–36 inches (≈ 60–90 cm) apart. Roses don’t like crowded roots. Fewer plants with room to grow works better than dense planting. - Regularly train shoots horizontally
This is the key point. Climbing roses set more flower buds on horizontal shoots. In the first seasons, Lindy and I always spend time gently fixing and redistributing branches.
Tip. Don’t rush to let roses “run” upward — first form the plane, and only then allow vertical growth.
Climbing roses bloom more willingly when their shoots are spread sideways along the lattice instead of being pulled straight up. If you let a rose grow as a single vertical “stick,” it will focus more on length than flowering. When branches are trained horizontally, the plant starts setting more buds along the entire shoot.
Our Observations
While traveling, we repeatedly noticed how lattice with roses looks modest for the first couple of years — and that’s exactly what often discourages people. It feels like “nothing is happening.” Then, step by step, the lattice disappears from view, leaving only a green surface and flowers.
Roses don’t like being rushed. And honestly, there’s a certain pleasure in watching a fence change gradually, without sudden jumps.
If you choose lattice with roses, plan in years, not in a single season.
This isn’t the fastest privacy screen, but it’s one of those that only looks better over time and requires less and less intervention.
4. Espaliered Fruit Trees for Living Walls
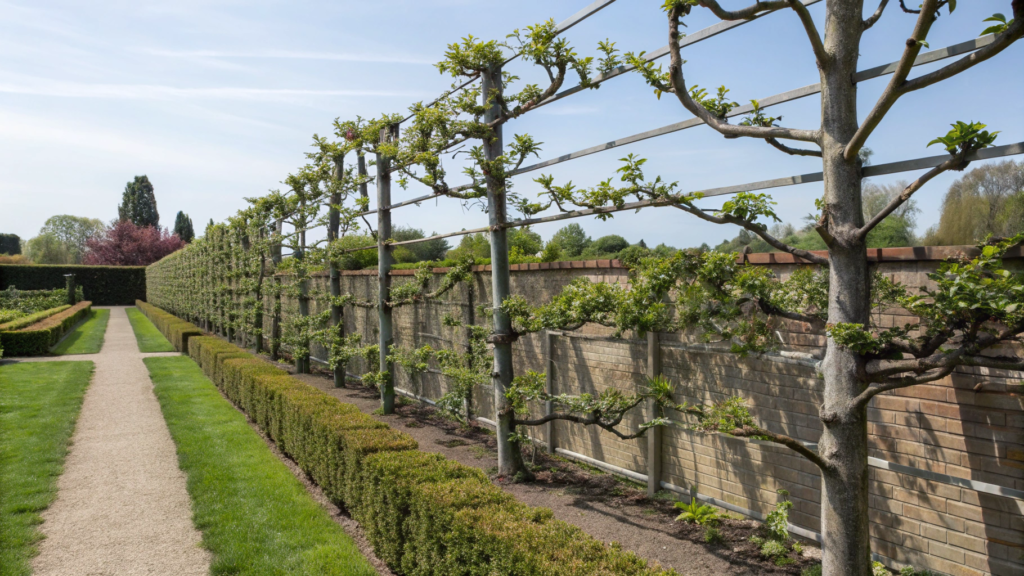
Espalier is not a fast way to cover a fence. In this approach, fruit trees don’t take up space — they become the wall. A living one. Useful, structured, and very disciplined. And when everything is done right, the result looks calm and deeply confident.
Fruit trees trained in espalier start producing earlier because energy goes not into crown growth, but into developing fruiting buds on horizontal branches.
What You’ll Need
Materials:
- A sturdy trellis or tensioned wire system
- Posts or a rigid wall/fence
- Mounting hardware and tensioners
- Fruit tree saplings (apple, pear, fig — climate-dependent)
- Mulch for the root zone
Tools:
- Pruning shears
- Tape measure
- Level
- Soft-coated wire or garden ties
For these systems, it’s convenient to use a Stainless Steel Trellis Wire System (Amazon) — it holds its shape for years and allows easy tension adjustment.
How to Build It
- Choose the right tree and rootstock
For espalier, dwarf or semi-dwarf trees work best. Fast-growing varieties constantly try to “escape” the plane and require much more pruning. - Install a rigid, perfectly level support
Wires or slats must run strictly horizontal, spaced 12–18 inches (≈ 30–45 cm) apart. Any misalignment will eventually show in the shape of the tree. - Plant the tree close to the support, but not tight
The optimal distance is 12–18 inches (≈ 30–45 cm). Roots get enough room, and the trunk is easy to guide into position. - Form the main branches in the first season
This is the most critical stage. Young shoots are gently bent and fixed horizontally. Later, the wood hardens, and correcting the shape becomes difficult. - Maintain the form with regular pruning
Espalier is not a one-time job. Light pruning 2–3 times per season keeps the tree flat and pushes energy toward fruiting rather than excess growth.
Tip. If you skip the first year of training, the tree almost always “wins” over the structure, not the other way around.
Our Observations
We’ve seen living espalier walls during our travels — sometimes you don’t even recognize them as trees at first. Just a green plane. And then suddenly — apples or pears right at eye level.
It creates a strange feeling: it’s clearly a garden, but highly controlled. And it’s exactly this sense of discipline that makes espalier such a powerful solution for small spaces.
5. Bamboo Screens with Star Jasmine
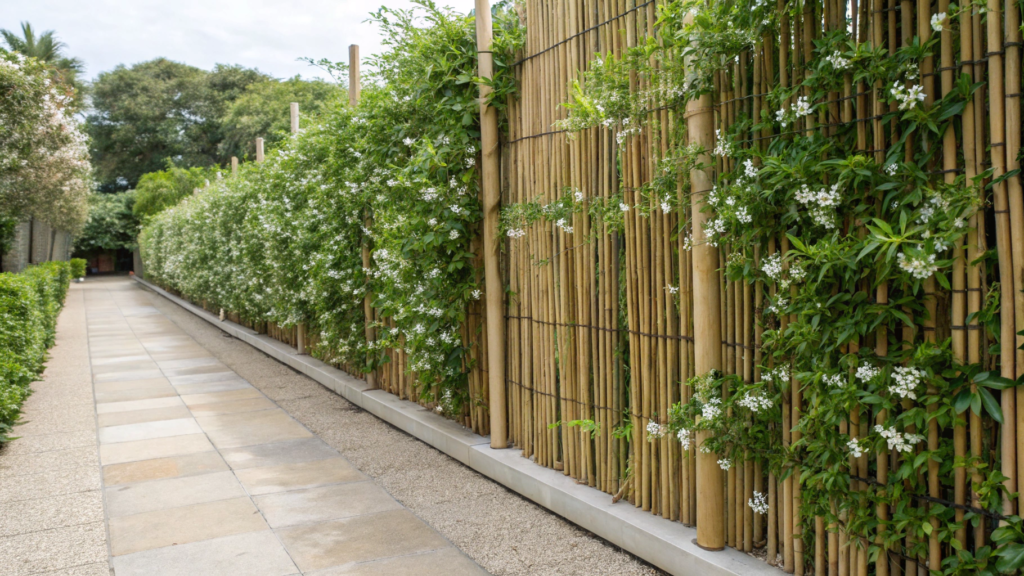
Lindy and I love these solutions for their predictability: the structure is there right away, and the greenery comes in without rush or chaos.
Bamboo provides vertical rhythm, while star jasmine adds softness and scent. Together, they create a dense yet living screen that feels especially natural near patios, pathways, and relaxation areas.
With a vertical support and regular watering, star jasmine can add up to 3–6 ft of growth per season (≈ 1–2 m), which makes it a practical choice for screens where a predictable result matters.
What You’ll Need
Materials:
- Bamboo privacy screens or slats
- Wooden or metal posts
- Anti-corrosion fasteners
- Star jasmine plants
- Mulch for the root zone
Tools:
- Drill/driver
- Tape measure
- Level
- Pruning shears
For ready-made options, it’s convenient to use Natural Bamboo Privacy Screen Panels (Amazon) — they hold their shape and don’t require building from scratch.
How to Build It
- Mount the screens to a rigid base
Bamboo is lightweight, but in the wind it acts like a sail. Secure the screens at at least three points vertically so they don’t flex or loosen over time. - Leave a gap between the screen and the surface
A minimum of 2 inches (≈ 5 cm). This extends the life of the bamboo and gives star jasmine proper airflow. When bamboo sits flush, it darkens and cracks faster. - Plant jasmine with full coverage in mind
Space plants 18–24 inches (≈ 45–60 cm) apart. Closer becomes crowded and humid; farther apart means the screen fills in more slowly. - Set shoot direction immediately
In the first months, it’s better to weave shoots between the slats rather than just tying them. This helps the plant spread evenly and close the screen faster. - Watch the lower section of the structure
If the bottom stays bare for too long, pinch the top shoots. Star jasmine responds well to this and starts branching more actively.
Tip. If the screen sits next to a seating area, leave small “windows” in the bamboo — jasmine will naturally soften them over time.
We’ve noticed more than once that bamboo with jasmine works best where heavy structures aren’t needed. The screen is there, the privacy is there, but the space still feels light. Another plus: if you want to change the layout after a few years, bamboo is easier to replace or reposition than permanent panels.
If you need a screen with a fast start and a gentle evolution over time, bamboo and star jasmine are a reliable pairing that rarely needs reworking.
6. Wire Grid Trellis for Wisteria

Wisteria is strong, heavy, and very stubborn. Lindy and I understood this back when we first saw how it literally pulls along structures that originally seemed solid.
That’s why a wire grid trellis for wisteria is not a compromise and not a budget option. It’s an engineering solution where every little detail matters. If you do it right, you get a dense, living wall that lasts for decades. If not, rebuilding is unavoidable.
Wisteria is a woody vine that thickens its stems over time to several inches and can deform weak structures, which is why only rigid supports with adjustable tension are recommended for it.
What You’ll Need
Materials:
- Steel cables or thick galvanized wire
- Turnbuckles and anchors
- Metal posts or very strong wooden posts
- Anti-corrosion fasteners
- Wisteria plants
- Mulch for the root zone
Tools:
- Drill
- Wrenches for the tensioners
- Tape measure
- Level
- Pruning shears
How to Build It
- Choose a location with extra space and sun
Wisteria loves sun and hates tight spaces. Aim for at least 6–8 hours of direct light per day. Don’t plant it where you’ll later regret giving up space — it will take it anyway. - Install load-bearing posts or a support built for adult plant weight
A mature wisteria weighs a lot, especially after rain. The support must be rigid, set deep, and secured like you’re building a pergola, not a trellis. - Mount the wire grid with a tight, even spacing
The optimal distance between horizontal lines is 12 inches (≈ 30 cm). Less makes maintenance harder. More and wisteria will sag and pull downward. - Use tensioners and don’t skip tightening them
Wire stretches over time. We always build in the option for regular re-tensioning, otherwise in 2–3 seasons the structure loses its shape. - Train the plant from the first year
Young shoots need to be spread across the grid immediately, fixed gently but firmly. If you let wisteria grow “however it wants,” it quickly turns into one thick rope.
Tip. Never run wisteria along gutters, railings, or weak fences — it will simply destroy them.
We’ve seen more than once how people plant wisteria “like a normal vine,” and then a few years later they look in surprise at leaning fences and ripped-out fasteners. And the opposite is also true — where a strong wire system is built from the start, the plant looks collected and manageable, even with all its power.
If you’re ready to invest time and attention at the beginning, wisteria pays you back with stability and impact for decades. But it doesn’t tolerate weak solutions — here it’s better to do it once, and do it right.
7. DIY Wooden Frames with Clematis
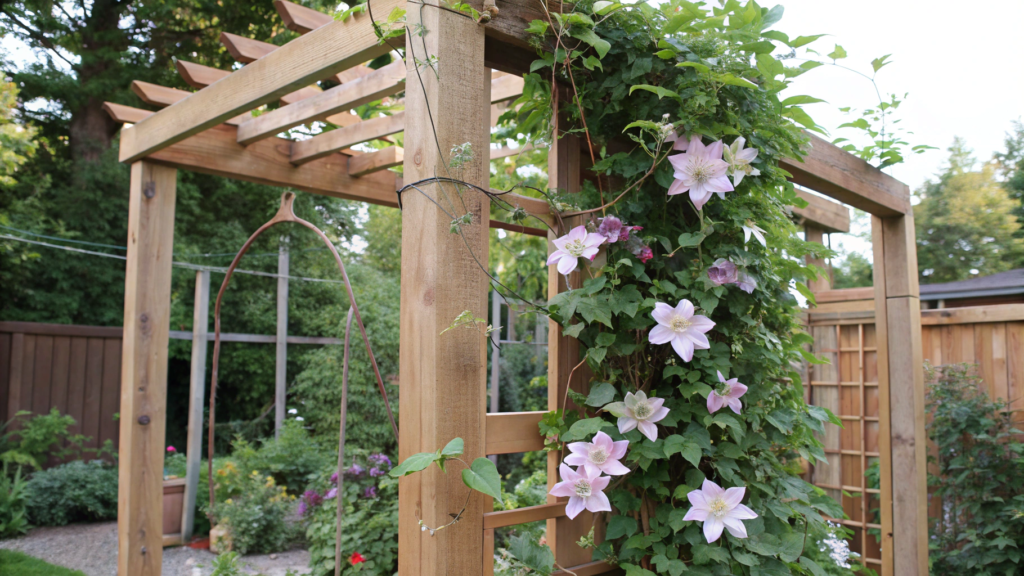
Clematis is one of those plants that immediately shows how carefully the structure is built. It’s not as aggressive as wisteria, and not as forgiving as jasmine. Clematis needs a frame that helps it — not one that gets in the way.
Lindy and I love wooden frames because they’re easy to work with, simple to adapt to a site, and — just as important — they look appropriate almost everywhere, from a small courtyard to a long fence.
What You’ll Need
Materials:
- Wooden beams for the frame
- Wooden slats or thin strips for infill
- Anti-corrosion screws
- Mounting hardware for attaching to a fence or posts
- Clematis plants (choose varieties based on climate and pruning group)
- Mulch for the root zone
Tools:
- Drill/driver
- Tape measure
- Level
- Saw
- Pruning shears
How to Build It
- Size the frame for the specific location
For clematis, a frame 5–6 ft tall (≈ 150–180 cm) and 24–36 inches wide (≈ 60–90 cm) works best. Too wide makes shoot distribution harder, while too narrow quickly looks overloaded. - Assemble a rigid rectangular base
Use beams no thinner than 1½ inches (≈ 38 mm). We always assemble the outer rectangle first, check diagonals, and only then add inner elements. This prevents warping. - Add a light but dense inner grid
Clematis clings with leaf petioles, not tendrils. That’s why spacing between slats should be 4–6 inches (≈ 10–15 cm). Thick beams don’t work — the plant simply can’t grab onto them. - Mount the frame with a gap from the surface
Leave 2 inches (≈ 5 cm) between the frame and the fence. This improves air circulation and lets clematis grow evenly across the entire plane, not just along the edges. - Plant clematis correctly and set direction immediately
The root zone should stay shaded, while the top grows in the sun. We almost always mulch the base and gently guide shoots during the first weeks while the plant “learns” the structure.
Tip. If clematis struggles to attach, add temporary thin strings — after one season, they won’t be needed.
We’ve often seen beautiful wooden frames that clematis simply ignored — elements too thick, grid too sparse. And the opposite is also true: the simplest frames, built from thin slats, completely disappeared under greenery and flowers within a couple of seasons.
Clematis values clear structure, not mass.
If you want flowers instead of an endless fight with shoots, adapt the structure to the plant — not the other way around. With clematis, this rule works without exceptions.
8. Reclaimed Pallet Trellis with Morning Glories
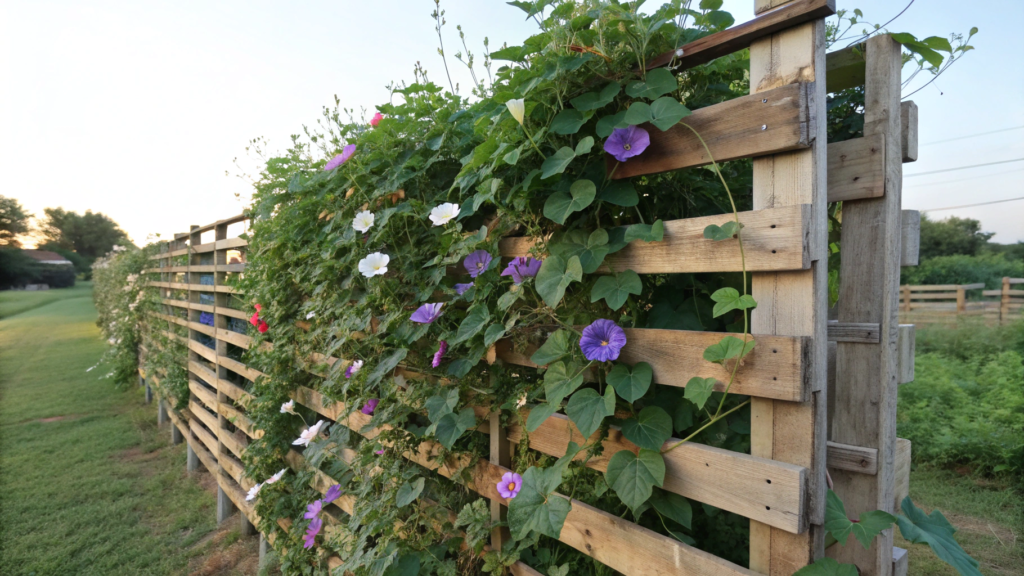
It happened that we needed to close off a space quickly, without investing in materials. Old pallets were already on hand, and morning glories are exactly the kind of plants that don’t require long deliberation — sow them, guide them, and they go.
This solution helps use what you already have in a sensible way. And in that role, pallets + morning glories work surprisingly well.
Morning glory is an annual vine that, with support, can grow 6–10 ft in a single season (≈ 1.8–3 m). It forms a dense green mass within one summer, not gradually over many years.
What You’ll Need
Materials:
- Wooden pallets in good condition
- Timber for reinforcing the structure
- Anti-corrosion screws
- Mounting hardware for attaching to a fence or posts
- Morning glory seeds or seedlings
- Mulch for the root zone
Tools:
- Drill/driver
- Hammer
- Pry bar or nail puller
- Tape measure
- Level
How to Build It
- Select pallets and check their condition
Only pallets without rot or deep cracks are suitable. Darkening and roughness are fine. Soft, crumbling wood is not. Make sure the pallets are not chemically treated (look for the HT marking). - Disassemble and rebuild the section if needed
Sometimes it’s better not to use a pallet as-is, but to remove a few slats and assemble a more open trellis. This improves airflow and makes it easier for morning glories to cling, since they prefer frequent but thin elements. - Reinforce the structure before installation
Pallets are not designed for vertical use on their own. Add support beams on the back or sides so the trellis doesn’t flex or tip under the weight of greenery. - Mount the trellis with a small gap from the surface
Leave 1½–2 inches (≈ 4–5 cm) between the trellis and the fence. This extends the life of the wood and allows shoots to distribute evenly. - Sow morning glories and set growth direction immediately
Morning glories start fast. In the first weeks, it’s important to guide the shoots by hand until they find their anchor points. After that, the plant manages on its own.
Tip. Don’t try to make the trellis too dense — morning glories need light between slats, otherwise the lower section quickly becomes bare.
We’ve seen many times how pallet trellises are thrown together quickly in spring — and by mid-summer, you can’t see the fence or the structure behind them. In fall, everything is removed without regret, and the next year the solution is either repeated or replaced with something more permanent.
And yes — not every solution needs to last for decades.
If you need fast, seasonal privacy and have access to pallets, don’t overcomplicate it. A simple structure and morning glories deliver results faster and more calmly than trying to turn a temporary solution into a permanent one.
9. Decorative Privacy Screens with Honeysuckle

Lindy and I love honeysuckle for how quickly it softens lines, adds volume, and makes a space feel alive, without demanding complex structures.
Decorative screens with honeysuckle create a well-balanced semi-transparent boundary. Light still passes through, air keeps moving, and yet the sense of privacy clearly appears.
What You’ll Need
Materials:
- Decorative privacy screens (wood, metal, or composite)
- Posts or mounting hardware
- Anti-corrosion screws and anchors
- Honeysuckle plants (climbing varieties suitable for your climate)
- Mulch for the root zone
Tools:
- Drill/driver
- Tape measure
- Level
- Pruning shears
For ready-made options, it’s convenient to use Decorative Outdoor Privacy Screen Panels (Amazon) — they provide instant structure and don’t require building from scratch.
How to Build It
- Choose a screen with enough anchor points
Honeysuckle doesn’t cling as aggressively as ivy. The screen should have vertical and horizontal elements where shoots can be guided and fixed during the first seasons. - Mount the screen rigidly with a gap from the surface
Leave 2–3 inches (≈ 5–7 cm) between the screen and the fence or wall. This improves air circulation and reduces the risk of fungal issues, especially in dense plantings. - Plant honeysuckle with future growth in mind
Space plants 24–36 inches (≈ 60–90 cm) apart. Honeysuckle gains mass quickly, and tight spacing leads to overcrowding and a bare lower section. - Guide shoots regularly in the first season
Young shoots are flexible, and this is the moment to spread them across the screen, instead of letting them bunch into one cluster. After a year, the wood stiffens and reshaping becomes harder. - Control growth after flowering
Light pruning right after flowering helps keep the screen’s shape and encourages side branching, rather than chaotic outward growth.
According to U.S. university horticultural extension programs, climbing honeysuckle branches and blooms better with regular post-flowering pruning, rather than minimal care. This directly affects the density of the green screen.
Tip. If the screen looks “empty” at the bottom, leave one shoot specifically to train horizontally along the base.
We’ve noticed that honeysuckle works especially well near seating areas. During the day, it provides soft shade and privacy, and by evening it starts to “live its own life” — the scent becomes stronger, the atmosphere shifts, even though the screen itself hasn’t changed.
10. Stone Fence Accent with Bougainvillea
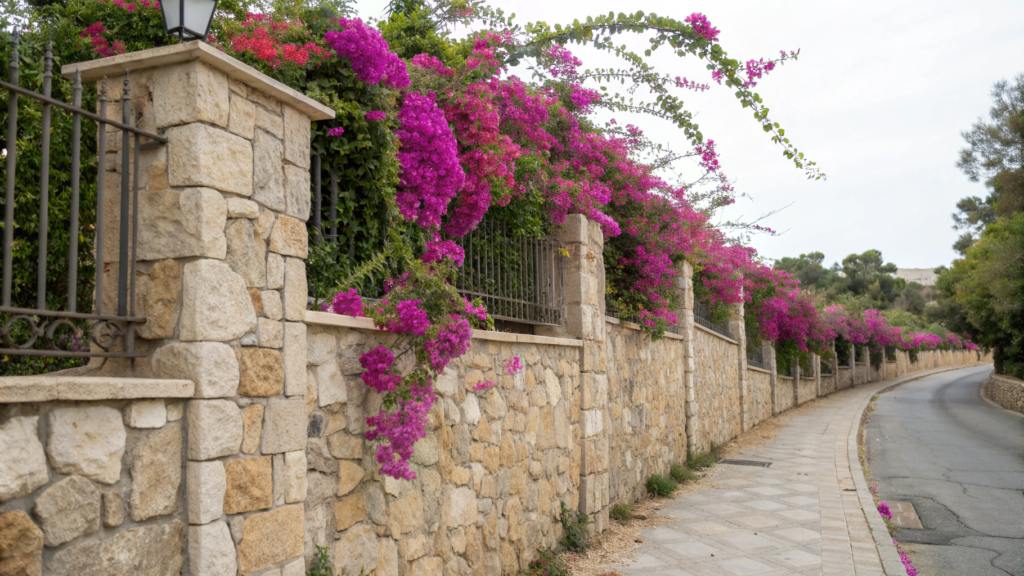
A stone fence on its own is heavy, solid, sometimes even a bit oppressive. And this is exactly where bougainvillea works differently — it doesn’t hide the stone or fully “soften” it, but breaks the rigidity with movement and color.
Lindy and I love these combinations, where the structure stays visible, but stops being the main thing.
Bougainvillea is not for rushing, and it’s not for cold regions. But where the climate allows, it turns a stone surface into a living accent that changes with the seasons and never feels accidental.
What You’ll Need
Materials:
- Stone fence or stone wall
- Metal anchors or masonry fasteners
- Coated wire or thin steel cables
- Turnbuckles
- Bougainvillea plants
- Mulch or gravel for drainage
Tools:
- Drill with a masonry bit
- Wrenches for turnbuckles
- Level
- Pruning shears
For stonework, it’s convenient to use Stainless Steel Wall Trellis Anchors (Amazon) — they’re designed for load-bearing applications and don’t damage masonry when installed correctly.
How to Build It
- Assess the condition and type of stonework
This matters. Bougainvillea becomes heavy over time, especially during active growth. The masonry must be stable, with no crumbling joints. If there’s any doubt, it’s better to mount supports on freestanding posts in front of the wall rather than directly into the stone. - Create a support system, not a solid grid
Bougainvillea doesn’t need dense mesh. Vertical and diagonal lines with spacing of 18–24 inches (≈ 45–60 cm) work best. This gives the plant freedom and highlights its natural growth pattern. - Use standoff mounts
Leave 2–4 inches (≈ 5–10 cm) between the stone and the wire. This protects the masonry from constant moisture and gives bougainvillea proper airflow. - Plant with root space and drainage in mind
Bougainvillea hates wet feet. Ensure good drainage and don’t bury the root crown. Stone nearby retains heat — that’s a plus — but standing water quickly becomes a problem. - Shape growth gradually
In the first year, don’t try to cover the entire wall. Guide shoots selectively, leaving open areas. Bougainvillea looks better with air between the plant and the stone, not as a solid mass.
Tip. Work in heavy gloves — bougainvillea has thorns, and they harden over time.
Bougainvillea flowers more actively when the plant experiences light stress — including good drainage and moderate watering. Excess moisture encourages leaf growth but reduces flowering.
Our Observations
We’ve seen how bougainvillea completely changes the perception of a stone wall. The stone stays the same — heavy, cool, textured. But once bougainvillea starts climbing, it stops feeling like a barrier and becomes a background.
And the simpler the support structure, the more expressive the result looks.
Comfortable trellises
Over time, it becomes clear that a good privacy screen along a fence isn’t the one that simply blocks the view, but the one that’s easy to live with. It doesn’t block light, doesn’t complicate maintenance, and doesn’t require constant reworking. These solutions tend to look appropriate and work for years.
Some trellises are planned as temporary and unexpectedly stay for a long time. Others look perfect at the start but need adjustments after just one season. That’s normal — the site changes, and structures change with it.If you already have experience with trellises or climbing plants along a fence, share it in the comments. What worked right away? What had to be redone?
These details often help others avoid extra work and choose a more suitable solution.