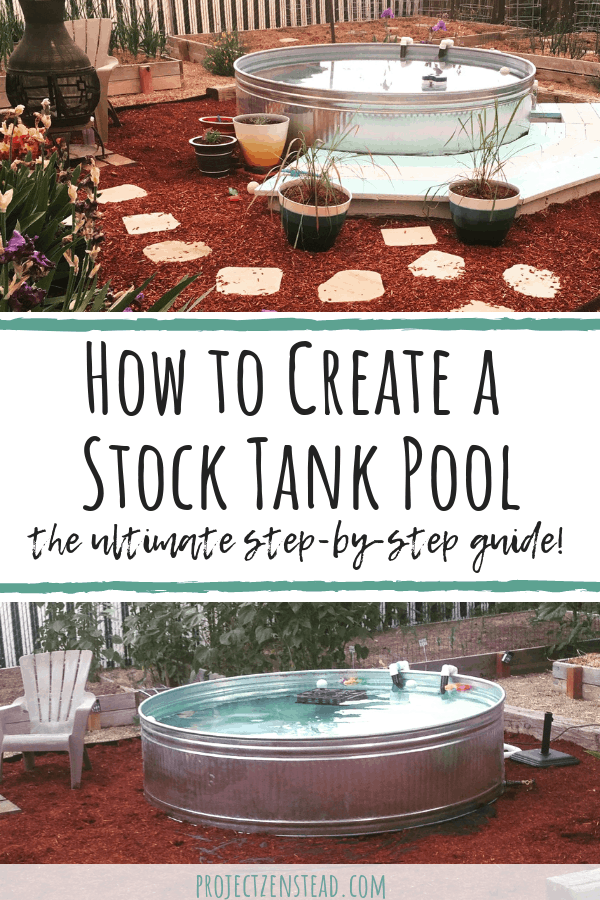
Stock tank pools are all the rage! And it’s easy to see why: they provide a convenient, affordable and low-maintenance way to cool off during hot summer days! Our step-by-step guide will help you create and maintain your own DIY stock tank pool!
One hot summer day, I turned to the love of my life and said those three little words that forever changed our lives:
Stock. Tank. Pool.
“I love you” is great too. But when it’s 100+ degrees, you’re doing physical labor all day to renovate a dilapidated property and you have no air conditioning, “stock tank pool” takes the cake!
Two years ago, we moved into our fixer-upper home. During our first summer here, we were working crazy long days renovating the house, reviving the garden area and building a hay barn. It was hot. We were sweaty. And our home is the only one I know of in the area that has absolutely no air conditioning! (Check out this post for other tricks we use to stay cool without air conditioning!)
Our stock tank pool came into existence mostly out of desperation! Was it a necessity? Nope. Was it a planned project? Definitely not. Was it one of the best investments we’ve made thus far in our renovation? Oh, heck yes!
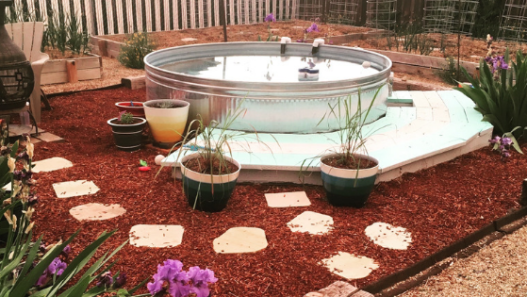
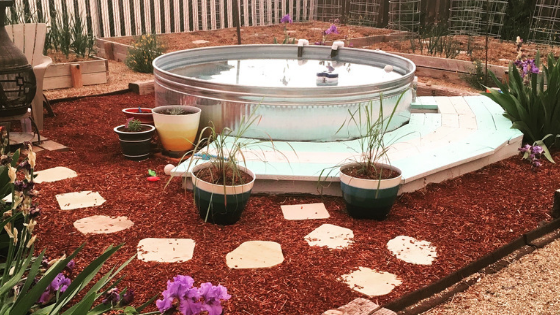
The stock tank pool is still one of my favorite features of our home! We plopped it right into the middle of the garden, mostly because that’s where we had the space. Now we can garden poolside and cool off after long days of outdoor work projects. It’s pure bliss!
Enough about me though, let’s talk about you and why you seriously need a stock tank pool in your life! It’s what your summer weekends are missing. Just imagine floating around in your pool, shades on, rosé in your hand… Ahhhh! Summer as it should be!
And the best part is that stock tank pools are affordable, easy to set up and easy to maintain! Let’s face it: it’s the kiddie pool of your adult dreams! And this is a project that you can do in a weekend! So let’s get into it!
Advantages of a stock tank pool:
Stock tank pools are seriously awesome! Here are some of the advantages that we have discovered so far:
- More affordable than traditional in-ground or above-ground pools
- Hard sided so they last much longer than soft-sided above ground pools
- Lightweight and easy to move if needed
- Made to last for many years
- They don’t have to be put away before winter since stock tanks are designed to be outside year-round
- Easy to clean and maintain
- Smaller footprint and variable sizes so they can fit in small spaces
- The metal heats and cools the pool efficiently, so there is no need for a pool heater
Overview of Supplies & Project Cost:
- Galvanized stock tank:
Depending on what size stock tank you get, prices will vary. Generally, you can buy a smaller 4-foot tank for around $150. We decided to go big and bought our 8-foot round pool for $375 at our local feed store. This size is perfect for 2+ adults and even has room for a couple floaties – major bonus! - Pump:
We will get into this in more detail in the Filtration System section of this post, but the best place to find an appropriately-sized pump is on Craigslist or Facebook Marketplace. They will generally cost anywhere from $20-$60, depending on who you buy it from. You can also buy them new for around $100 and sometimes they go on sale at the end of the season. - Universal Hose Set:
We bought the Summer Waves Universal Hose Set at Walmart for about $25. Any brand of universal hoses for above ground pools will work. - PVC pipes:
PVC pipes are used to adapt the pool filter hoses to fit securely over the side of the stock tank. These can be bought at a hardware store for fairly cheap. I think we spent around $20 on PVC pipe pieces. - Filters:
Filters can be purchased online, at Walmart or at a pool & spa store. You can generally get a 4-pack (which lasts us through the summer season) for about $25. - Chemicals:
Chlorine tabs and a chlorine float can be purchased for around $10-20 online, at Walmart or at a pool & supply store. - Pool Skimmer:
Super cheap and super necessary to keep the little nasties out! - Floaties and accessories:
‘Cause let’s be real, you gotta accessorize the pool!
Buy Supplies for this Project:
**This post contains affiliate links for the products that we used for this project. We may receive a commission at no expense to you if you choose to purchase items using these links. See our full affiliate disclosure here and thanks for supporting this blog! **
Create your DIY Stock Tank Pool:
Step 1: Prep your Area
You will need a level area for your stock tank pool. Start by measuring your area and marking the perimeter with spray paint. Lay a 2x4x8 board across your area and place a level on top of it. Level the ground by either digging down or building it up as needed. Continue moving your 2×4 with the level around the marked are to ensure the entire space is level.
It’s okay to place the pool over grass, but make sure that it is very dry before placing the tank on top of it, to reduce the chances of rust developing. If the area is rocky, remove as many rocks as you can since they could potentially puncture or dent the tank if enough pressure is put on it. You can also use a layer of sand to create a level area on top of less-than-perfect surfaces.
Step 2: Purchase & Delivery of Stock Tank
Once your area is prepped, it’s time to get your pool! Your stock tank can be purchased at a feed store. They will have a variety of stock tank shapes and sizes to choose from, so you can find one that fits your space and your needs. Again, we went with the 8-foot round tank. We love the size of it! It’s big enough for a about 4-5 adults or 2 adults on floaties.
Many feed stores offer delivery of stock tanks for an additional charge. If you don’t have a truck or trailer, this is going to be your best option! If you decide to move it yourself using a truck or trailer, there’s a couple ways to secure it. You can lay the tank at an angle in your truck bed/trailer and it will hang over one side a bit. This works especially well with 6-foot tanks.
If you are feeling adventurous, you can use the method we used. It’s affectionately known as “strap the hell out of it, weigh it down with hay bales and pray there are no strong winds”. I’m pretty sure there were people taking pictures of us as we drove home that day…
Step 3: Set up your stock tank pool
Alright, now that you have your tank, you can put it in place. If it’s a round pool, you can roll it to its new location. Or you can carry it with the help of a friend as they aren’t too heavy. Once it is in place, lay your level in the pool and make sure that it is still level. Use sand or dirt to adjust and re-level it as needed.
Your tank should come with a plug for the drainage hole. Make sure the plug is secure and then you can start filling that bad boy up!
Step 4: Set up your pump & filtration system
You may be thinking that you don’t really need a full pump and filtration system on a stock tank pool. But you do. Otherwise, you’re going to be floating around sipping your rosé in tank full of scum. And that’s just not much fun, so get a pump and filter!
The Pump:
The tricky thing about stock tank pool filtration systems is that most pool and pond pumps are designed for large areas. And they are expensive! After discouragingly driving to every pool store in our area, we finally found a super helpful clerk who told us what we really needed for our pool. He said that the pumps for standard pools are way too big and powerful for a small stock tank pool. But, Intex above ground pools (sold at stores like Walmart) come with a standard pump that really isn’t adequate for that size of pool. He told us that people will generally sell these small pumps on Craigslist and then buy a full-sized one with a sand trap.
Bingo! We went on Craigslist and had a brand new, in-the-box pump within an hour! And the best part was that we only paid $20 for it! Save yourself the time and headache and check Craigslist or Facebook Marketplace for your pool filter. (Read more about my Craigslist obsession and how we use it to get free/cheap supplies!)
We have the Intex 1500 pool pump (See updated note below regarding the pump) which fits the Intex type “A” or “C” filters
. We buy a 4-pack of filters at the beginning of the season and they last us through the summer. The filters sell out fast in stores like Walmart, but you can purchase them online or at specialty pool and spa stores. We have used this pump system for two seasons now and couldn’t be happier with it!
**UPDATE FOR 2019** Well, our pump finally kicked the bucket after 3 years of use. Forgetting to clean it and put it in the shed over winter also probably didn’t help its lifespan! But, all in all, three years of use isn’t bad for a $20 pump!
The model that I originally used (the Intex 1500) has become harder and harder to find. So this year, we ordered the Intex 28633EG model from Amazon for around $70. It’s a little more powerful than the original one. The hoses for it are also a bit bigger and they came included with the pump. So, if you are buying the Intex 28633EG, double check to see if the hoses are included like ours were. This pump still takes the “A” or “C” size filters.
The Hoses:
Along with the pump and filters, you will want to purchase a Universal Hose Kit (See updated note below regarding the hoses). You can simply hook these hoses to the pump and then drape them over the side of the pool, but they may not stay put very well. They tend to float to the top and out of the water.
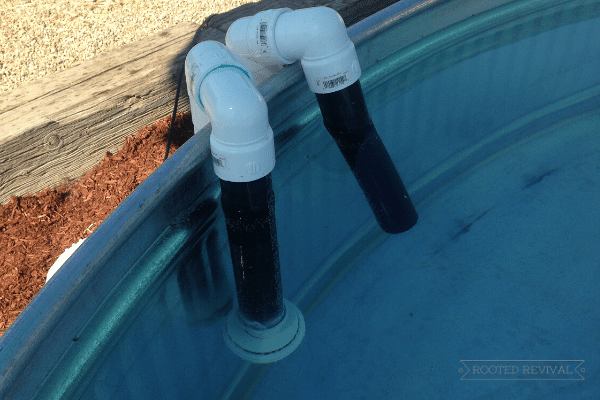
To avoid this, we hooked the hoses to PVC piping pieces that hook over the side of the stock tank. After playing MacGyver in Home Depot for several hours, we finally found all the pieces that fit together perfectly! Basically, we hooked the hoses to two PVC elbow pieces. This creates the “hook”. We then attached the other end of the elbow pieces to a straight piece of pipe which runs the water out of/back into the pool.
Depending on what type of hoses and pump you buy, you may need to try out some different PVC pieces until you find the ones that fit. I highly recommend taking the hoses to the lumber store with you so you can make sure all the bits and pieces work together.
**UPDATE FOR 2019**
The pump model that I originally used (the Intex 1500) has become harder and harder to find. When ours finally stopped working this summer, we ordered the Intex 28633EG model from Amazon for around $70. It’s a little more powerful than the original one. The hoses for it are also a bit bigger and they came included with the pump. So, if you are buying the Intex 28633EG, double check to see if the hoses are included like ours were. If you are wanting to use PVC piping to hold the hoses in place, be sure to size them appropriately.
Chlorine:
Chlorine tabs will also help to maintain a gunk-free pool. Also, be sure to use a Chlorine Float rather than putting the tabs directly into the pool. If the chlorine is too strong, it can strip the metal coating and create opportunities for rust to grow.
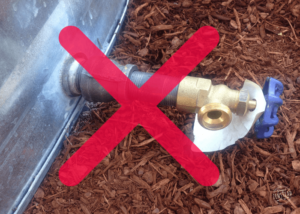
NOTE: We spent a lot of time retro-fitting a drain with a hose hook-up onto our stock tank pool. I highly recommend that you don’t go through the work of MacGyver-ing this! We originally thought this would be useful when draining the pool, but we realized that we could just use the pump to pump the water out of the pool at the end of the season. It was one of those “well duh” moments for sure! We actually ended up sawing the drainage valve off, removing it and replacing it with standard plug that originally came with the stock tank.
Step 5: Fill with floaties & enjoy!
That’s really all it takes, making it a perfect weekend project! Now it’s time to doll it up with plants and pool floaties and crack out the BBQ!
Maintaining your Stock Tank Pool:
Regular Maintenance for your pool:
Maintaining your pool is pretty easy. Make sure that you have your chlorine float in the pool and that you set the pump to run 4-6 hours each day. Depending on your water and environment, filters will need to be replaced every 2 weeks to a month. Use a pool skimmer to remove any debris from the surface of the pool every couple days or so. Using your pool regularly will also help keep it cleaner because it stirs everything up so that it can be skimmed and filtered more easily.
Every once in a while, you may notice a larger than usual build-up of scum in your pool. When this happens, use pool test strips to test your water and adjust your chemicals and filtration as needed. You may need to do a shock treatment as well. The Clorox Pool Care Kit for Small Pools has all the chemicals you need and is well worth the investment! This is the only kit that we have found that actually worked for this size of pool.
Over-wintering your stock tank pool:
Overwintering your stock tank pool is easy peasy! Use the pump to drain the pool of water. Scrub it down and hose it out to remove any funkiness or hard water deposits that may have built up over the season. You can leave the pool empty, flip it over or cover it with a tarp depending on your preference. We scrub the pump and hoses as needed (we have really hard water so we tend to get a lot of build-up). We also store the hoses and pump inside over the winter to help them last longer.
Ready to create your own DIY stock tank pool? You won’t regret it! You can create your own oasis this weekend and enjoy it all summer long! Have questions about setting up your stock tank pool? Or maybe you have some brilliant ideas for a stock tank pool! Drop them in the comments below!











This is amazing and such a good idea. We are buying our first home in June and I am so excited to start making it our own. Maybe I can convince the hubby to let me do a stock tank pool also! Although I wonder, would it work with salt water rather than chlorine?
I haven’t looked into it, but I bet there’s a way! You’ll have to let us know what you find out if you decide to go that route! 🙂
you just have to buy a pump that is for salt water and the pool salt
Good to know!
Forwarding this on to the hub’s, would go great in our newly full sun yard!
That would be a perfect spot! And I’m sure it will make a great addition to his “honey-do” list! 😉
I love this so much! I’ve seen people make hot tubs with these, too!
Yesss! I would LOVE to have a wood-fired hot tub someday! It’s definitely on the list! 😀
Oh my goodness I’m so glad to meet someone that finally did this lol. I’ve been wanting to put one up on our little homestead, but had thought maybe a smaller one for the kids!! Thanks for detailed write up on how to do it, it looks fab!
The kids will love it! And a small one would be so easy to tuck into a corner and create a fun little oasis! 😀
what size pvc pipe finally worked with the flexible hoses? Did you glue them in or did they seal adequately with just shoving them inside? So glad to see someone go over the edge and not drill holes in the side… ☺
Yeah we weren’t about to try to figure out how to cut holes AND make it still hold water ? We ended up using 2″ PVC pipes, but definitely take your hoses into the hardware store and make sure everything fits together! We glued the elbow pieces to the straight pieces using waterproof PVC glue (the kind used for sprinkler lines). But we didn’t glue the hoses in so that we could remove them and clean all the attachments at the end of the season. Good luck with your pool! Let me know if you have any other questions I can help with!
Our hoses have pump fittings on both ends. Obviously one needs to be cut off, so it can fit into the pvc. Is this what you did?
We actually brought the hoses to Lowes with us so that we could fit the hose to the PVC pipe without having to cut them. Our hose ends fit perfectly into 2″ PVC pipes. But, depending on what type of hoses you have, the sizes may vary. Take them with you to the hardware store and see if you can find a good match! 🙂
Is your pump noisy and does it make a lot of vibration?
I want to have this done on my condo roof next summer
Thanks
It is a little noisy but it doesn’t cause too much vibration. One nice things is that it doesn’t need to run all the time. A couple hours a day (we usually do 4) will do fine since it’s such a small space to keep clean. So if we are out in the pool, we just turn it off during that time. 🙂
2′ x 4′ (2′ tall) this is the $99 tank that gets you started for about the cost of a grocery run! It’s compact, so we dubbed it the “tiny home” of stock tank pools. It gets the job done!
That’s a great size for a private one-person pool! And, like you said – it’s nice and compact so you can fit it anywhere! Perfect to cool off in on a hot summer day! 😀
How did you run your electricity to the pump?
We used a long outdoor extension cord and ran it to our outdoor shed which has power inside. I looked into solar options but apparently it takes a lot of solar power to run a pump. But, it might be looking in to if you don’t have power nearby. 🙂
What needs to be attached to the hoses in the pool? Do you need a strainer?
Hi Brittnye!
The hose set that we bought has a filter tip that we attached to the PVC pipe that goes into the pool. You can see it in the picture under the “chlorine” sub-heading. This is for the hose that sucks up the water. The one that pushes the filtered water back into the pool doesn’t need a filter tip at all.
Did you glue the filter tip? I was able to size every other thing at Home Depot. But the filter fitting is smaller than the pipe on the inside.
We were able to make ours fit so securely that it didn’t need glue or putty. However, if yours isn’t as tight, using some glue or irrigation putty would definitely be beneficial!
How often do you run the pump? I am worried about where to plug it in and when to leave it running. How did you run electricity to your pump/filter? Thanks!
Hey there! I completely understand forgetting about it – I would do the same! Luckily, these pumps have a timer so you can set them and pretty much forget about it! You can set them to run anywhere from 4-12 hours a day! We would set ours to run about 4-6 hours a day, depending on the time of year and how much was needed. We used a heavy duty outdoor electrical cord and ran it from the pump to our garden shed which had electricity.
How did you get your pump to work just dropping it over the sides? I see most are gravity fed pumps and mine isn’t suctioning the water into the filter?
It might depend on what type of pump you got. Ours had a strong enough motor to pump the water up and into the filter chamber. However, when you first set to up, you do need to get the suction going. You will need to fill the filter chamber with water and it will need to flush the air out for a couple of minutes to get the suction properly going. From there on out, you should be good to go unless it gets clogged or needs a new filter. Best of luck with your new pool!
I’ve been having trouble with this exact thing and you are the only one, after looking and looking, who explains how to fix it! Going to try this on my set up first thing!
Oh good! I hope it helps! Keep us posted!
Your info is wonderful ! I was wondering if you could help me please? Yes it’s late in the summer, leave it to me! I am putting a liner inside of my tank pool. I’m not crazy about drilling holes through the liner to put the inlet and outlet things in. Could you take closer pictures of what you have done and explain to me what I need to do to Attach it over the side instead of through as you did? I would really appreciate any help you could give me. Thanking you in advance
PJ. ?
Hi PJ!
I’m glad that the info has been helpful! For the pump, we actually took the hoses with us to Home Depot and we sat in the plumbing aisle for about an hour figuring out how we could make it all connect. I would take some more photos or videos for you, but we actually moved earlier this year. So, I did the second best thing, which is a diagram. I’ve updated the post with the new diagram – check it out and see if it helps! Let me know if you have any other questions. 😀
Love the idea of not cutting holes in the tank just seems simpler for me
So much easier! I just didn’t trust myself to cut those holes accurately enough – eek!
is there a pdf available for the stock tank pool for us old fossils who like a piece of paper in hand? Love your site.
Hi Debbie! I don’t have a pdf available, but you should be able to copy and paste the instructions onto a word document and then print it out that way. Hope that helps!
Excellent info! We are excited to get our front yard in shape and adding a stock tank pool. Do you have any DIY info for the adorable deck you put around yours? I would love to have the plans!
So glad you like it! I hope your pool turns out amazing! As for the deck, that was a bit of a Frankenstein project! We used scrap lumber pieces that were leftovers from a previous project. So we basically created the frame to make sure it fit around the pool and then started in the middle and worked our way to the outside to make the angles a little easier to figure out. Sorry we don’t have better plans or measurements for it!
Can you leave the same water in year after year, or do you have to drain it?
We would have to have our water trucked in for this project (long story) so I would like to avoid this extra purchase every year if possible. We live in Ohio so we have 4 seasons. In the winter, our coldest temps are usually around 0 degrees F, so it would definitely freeze.
Do you think we could get away with not draining it?
Well I haven’t personally tried it myself, but I think if you keep it really clean, you could go quite a while without changing it. Definitely try to keep debris out by either covering it or skimming out debris often, change the filters regularly, keep chlorine in it, and monitor the pH levels. The cleaner you can keep it, the longer the water could go! During the winter, you might have to experiment a bit because the pump won’t be workable if the water freezes. But it’s worth a try to see how long the water can go. 🙂
Love the idea as I have been hanging my hoses over and using a boat anchor to keep them down. Used Intex 1000 for that setup. So I am trying your setup but the pump (filter housing) an Intex 1500 has water running out of the top. I don’t have anything attached to the inlet or outlet pipes in pool. And the outlet pipe is shorter than the inlet pipe in the pool. Do think the difference in length of the pipes or not having a filter could be causing the overflow. The sucking pipe is strong but the outlet is weaker.
I have a filter cartridge in the filter housing but I don’t have a filter top on the pipe. Just clarifying my last comment
Folks, thank you so much for this guide, and I like the way you setup the hosing, I’d probably just add some support for the PVC so that they weren’t knocked about and potentially crack. but I also like the setup cause someone already mentioned using it as a hot spa during the winter and this makes the hoses portable for when you don’t need the wood stove. Now if I can just find a way to make the water ice cold in the summer 🙂