Fall is a chance to see your garden from a different angle. When summer flowers are already tired, fall plants bring structure, volume, and depth. They can handle cold nights, fog, and even the first frost — and still look great.
In this article, you’ll find 10 fall flower bed and mix ideas that don’t just decorate your garden but also keep their shape and color until the end of November.
You’ll find options for any garden style. Each idea has been tested in real conditions, fits real climates, and doesn’t need constant care.
If you don’t want your garden to look dull but want it to feel alive, well-kept, and resilient — these combinations will give you a solid base.
1. Viburnum + Heuchera Low-Maintenance Bed
The combination of viburnum and heuchera works perfectly: viburnum creates structure and volume, while heuchera adds color and texture near the ground. Both plants are incredibly unpretentious — they don’t need regular watering, rarely get sick, and look fresh and beautiful all fall.
How I Set It Up
- Choose the spot. Pick a place with morning sun and light afternoon shade. Viburnum loves light but not full blazing sun all day. Mine grows on the east side of the house, where it gets morning light and soft, diffused sun after noon.
- Prepare the soil. Both plants tolerate different soil types, but the best result comes from loose, slightly moist, neutral soil. I added a bit of compost and bark mulch — and since then, I’ve barely touched that corner.
- Planting. For viburnum (Viburnum dentatum or Arrowwood Viburnum), I left about 4 feet (1.2 m) between bushes — they grow fast and form a dense hedge.
Between them, closer to the edge of the bed, I planted heuchera. You can mix colors: from burgundy to caramel. My favorite is Heuchera ‘Caramel’ — it gives a soft amber glow even on cloudy days. - Care. Super simple. In spring, I add a bit of compost, and in fall, I trim old heuchera leaves. Viburnum takes care of itself — I only trim the tops occasionally to keep the shape.
If you want the bed to look neater, add some decorative bark mulch around — it highlights heuchera’s foliage color and helps retain moisture.
In fall, viburnum just glows — its leaves turn raspberry red, and blue berries hang from the branches, loved by birds. Heuchera, on the other hand, keeps its foliage even after the first frosts, creating a lively backdrop under the shrubs.
You can also place a few decorative stones or small lanterns between the bushes — it looks especially nice in the evening when the sunlight turns soft.
As a result, the bed looks tidy even in December, when everything else is already under snow. And the best part — no constant maintenance.
2. Ornamental Grass Rows with Autumn Sedum Pops
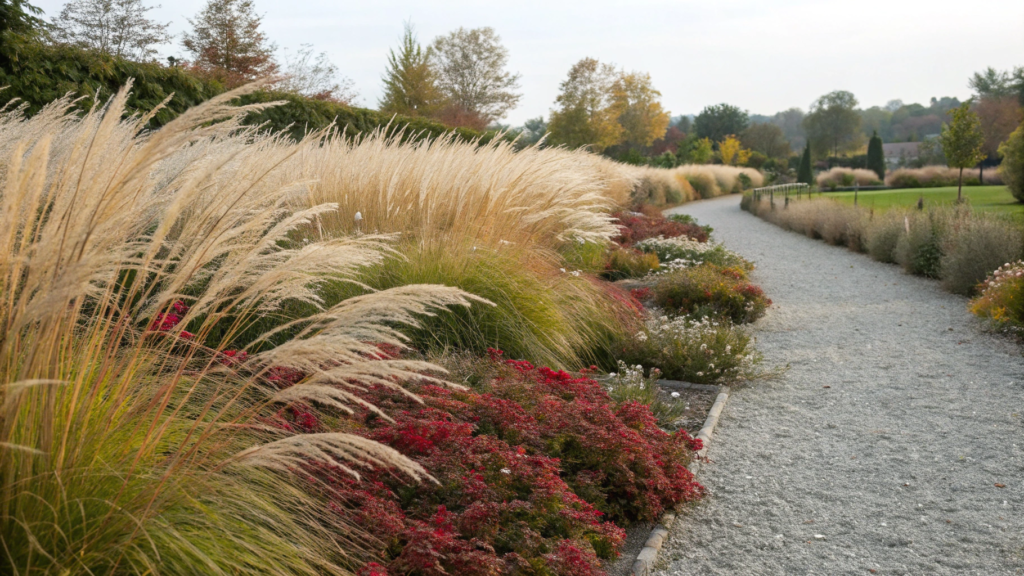
There are flower beds that seem to live their own life — rustling, shimmering, and swaying in the wind. These are rows of ornamental grasses with sedum patches, which I planted along our gravel path.
Why It Works
Grasses bring motion and background, while sedum adds focus and structure. Together, they create that rare balance when a flower bed looks both lively and tidy — even without regular care.
Plus, both plants are drought-, frost-, and poor-soil tolerant. And you don’t need to run around with a watering can every week. Perfect, right?
How to Plant This Composition
- Choose the grasses. Along my path, I planted Miscanthus sinensis ‘Morning Light’ and Panicum virgatum ‘Shenandoah’ (Red Switchgrass). Both form soft waves about 4–5 feet tall (1.2–1.5 m).
Between them, you can add Pennisetum alopecuroides — its fluffy “brushes” look especially beautiful at sunset. - Add the sedum. The autumn favorite is Sedum ‘Autumn Joy’. It forms dense raspberry-colored blooms that last until the first snow. Plant them in clusters of 3–5, spaced about 2–3 feet (60–90 cm) apart between the grass rows.
- Prepare the soil. The key is good drainage — these plants hate standing water. I mix in some sand and compost, then mulch the top with gravel. It’s both beautiful and practical.
- Watering and care. During the first month after planting, water regularly. After that — you can forget about it. Grasses and sedum are almost self-sufficient. In spring, simply cut back old grass stems and trim the sedum flower heads — that’s it.
In spring, the bed is calm — just fresh green shoots. In summer, it becomes lush, with a soft wave of motion.
By fall, the grasses turn golden, and the sedum shifts from pink to deep wine-red. Every time the wind runs through the grasses, I remember why I got into permaculture — so the garden could live, breathe, and move on its own.
And if you use fabric grow bags (like Smart Pots 5-Gallon Fabric Planters), you can easily move your compositions around — handy if you’re still searching for the perfect spot.
A small tip. Plant a couple of white dogwood shrubs behind the grasses — in winter, their red branches contrast beautifully with the dry miscanthus plumes.
3. Front Walkway Lined with Asters & Sage

This composition appeared almost by accident — leftover asters from the previous season and a couple of sage bushes I didn’t know where to plant. A year later, I had my favorite little corner by the entrance.
Why Asters and Sage
First, they bloom when most plants are already giving up.
Second, both species handle drought, frost, and full sun perfectly. That makes them an ideal duo for the front yard, where soil usually dries out faster.
Bees and butterflies absolutely love this mix. In late fall, when almost everything else has finished blooming, these two plants keep feeding pollinators — and I love that!
How I Set It Up
- Prepare the walkway. If you have a concrete or gravel path, leave about 18–24 inches (45–60 cm) of soil along the edges for planting. I simply dug out the old border grass and loosened the soil.
- Plant the sage. Start with sage — it creates a fragrant base.
Try Salvia nemorosa ‘Caradonna’ or ‘May Night’. Space the plants about 16–18 inches (40–45 cm) apart, leaving room for the asters. After planting, mulch everything with wood chips — the scent under the warm sun will be amazing. - Add the asters. Asters love company. I alternate them with sage: one sage bush, one aster bush.
Aster novae-angliae ‘Purple Dome’ or Aster oblongifolius ‘October Skies’ look great together. Mix shades — lavender, lilac, sky blue. - Watering and care. After planting, water regularly for a couple of weeks, then the plants can handle themselves. In spring, cut back old stems, and in fall — just tidy up what looks messy.
Small Details That Bring It to Life
- Between the plants, you can add a few stones or low succulents like Hens and Chicks (Sempervivum). They fill empty spaces beautifully and need no care.
- If you want a bit more movement, plant a few ornamental allium stems — in spring, they’ll give early flower globes, and in summer, their greenery will support the walkway’s overall line.
- If you’d like a clean border, use stone edging along the bed — I have it running all along the front path.
And every time I look at it, I think: you don’t need to be a designer to make something beautiful. Sometimes it’s enough to plant wisely — things that love to live.
4. Corner Bed Combo: Rudbeckia, Coneflower & Lamb’s Ear
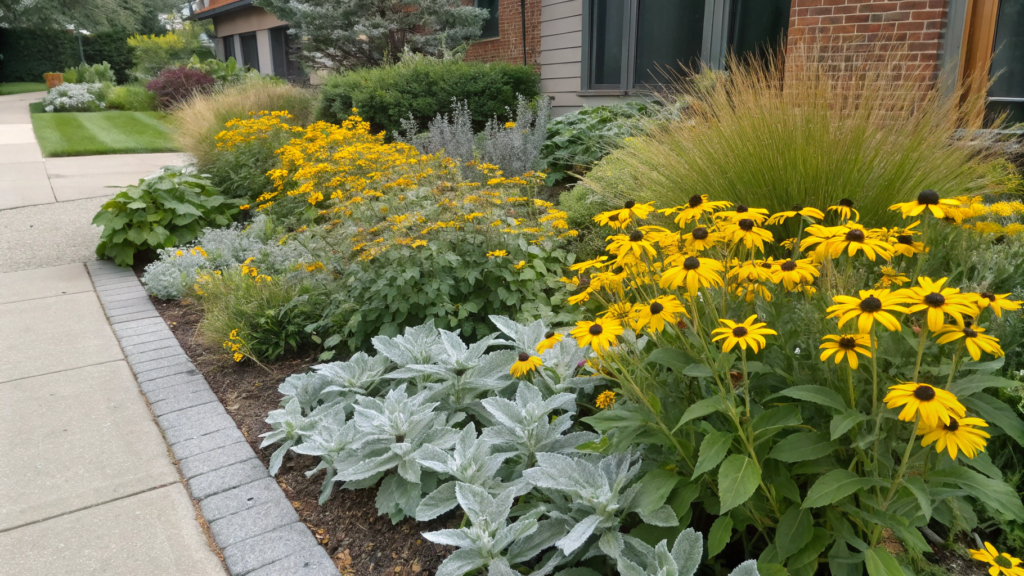
Every garden has that “problem corner” — the spot where nothing grows, the sun burns all day, and even the weeds look tired. We had one like that by the fence, where the soil was always dry and cracked. That’s how this bed of rudbeckia, coneflower, and lamb’s ear came to be — simple, resilient, and most importantly, alive.
All three plants handle heat, poor soil, and dry conditions without needing water every other day.
Rudbeckia adds bright yellow color, coneflower brings structure and height, and lamb’s ear — with its silver leaves — softens contrasts and creates a sense of volume.
They also bloom for a long time, almost until November. When the rest of the garden is preparing for winter, this corner still breathes warmth.
How to Create This Bed
- Choose a sunny spot. This is key. Rudbeckia and coneflower won’t survive in shade. If your corner gets at least 6–8 hours of sun a day, you’re good.
I slightly raised the soil level by adding a couple of wheelbarrows of garden soil and compost. This “mini hill” helps prevent water stagnation. - Plant the coneflower (Echinacea purpurea). Start from the back row. These plants reach about 2–3 feet (60–90 cm) tall and form a vertical backdrop.
Space them about 18–24 inches (45–60 cm) apart. I add a handful of compost to each hole — coneflowers respond with strong blooms.
When they flower (around July), the bed turns into a butterfly field — they love echinacea. - Add rudbeckia (Rudbeckia fulgida ‘Goldsturm’). Rudbeckia is the heart of the composition. Its sunny caps, about 2 feet (60 cm) tall, create a solid stream of color.
I plant the bushes in a staggered pattern, closer to the front edge, so the flowers blend into each other and form a dense, seamless structure. - Finish with lamb’s ear (Stachys byzantina). This plant grows like a carpet, and its leaves almost reflect light. Plant it along the edge, every 10–12 inches (25–30 cm).
It spreads quickly and forms a soft, velvety border that stays beautiful even in winter.
Just don’t water too often — overwatering can make it rot. - Watering and care. After planting, water regularly for the first three weeks while the roots establish. Then you can relax — all three plants are drought-tolerant.
In spring, I remove dry stems and add a bit of compost at the base. In summer, I simply enjoy it.
In fall, I leave the seed heads of coneflowers and rudbeckias — they decorate the bed and feed the birds.
A Tip from Me
Your layout doesn’t have to be symmetrical. Let one coneflower bush lean slightly forward and the lamb’s ear spill into the gravel path. That bit of natural imperfection makes the composition feel alive.
I bought my seedlings in the Perennial Garden Collection for Pollinators on Amazon — and yes, every single one took root right away.
Now I know even the driest, harshest spot can come back to life — if you choose the right plants and simply let them grow.
5. Backyard Red Switchgrass Statement Lineup
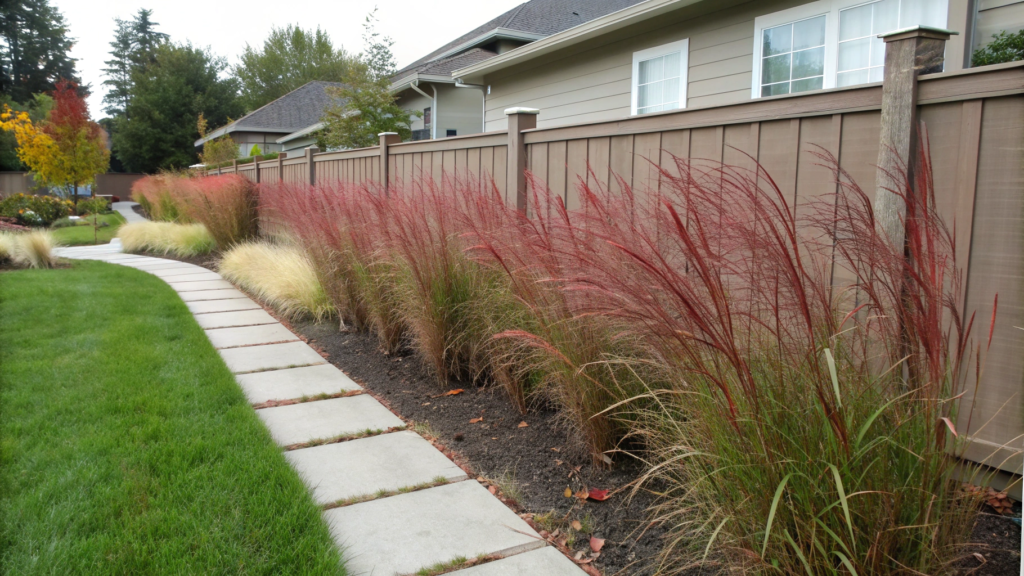
For a strong garden accent without exhausting daily care or trimming, Red Switchgrass (Panicum virgatum) is a perfect choice. This plant is tough, long-lived, and almost fearless — it handles heat, wind, and drought with no problem. I planted it along the back edge of our yard, where there used to be just a fence and emptiness. Now there’s structure, color, and movement all season long.
Why Choose Red Switchgrass
- Low maintenance. Plant it once — and forget it.
- Great winter hardiness. No need for covering.
- Seasonal color change. Green in spring, deep in summer, and red-burgundy by fall.
- Perfect for zoning. Great for creating a natural border or hiding an unattractive fence.
- Eco-friendly choice. Its roots grow deep (up to 10 feet / 3 m), improving soil structure and preventing erosion.
How to Plant a Switchgrass Line
- Choose the location. Open and sunny — at least 6 hours of direct light per day. Shade will dull its color.
I measured a strip about 2 feet (60 cm) wide along the fence and slightly raised the soil to improve drainage. - Prepare the soil. Switchgrass isn’t picky, but if your soil is heavy clay, add 1–2 buckets of sand and compost per square meter (10 sq. ft.).
The main rule — don’t overfertilize: too much nitrogen makes the stems weak. - Planting. I used Panicum virgatum ‘Shenandoah’. Space the plants about 24–30 inches (60–75 cm) apart for a solid wall, or up to 3 feet (90 cm) apart for a lighter, airier row.
Plant them at the same depth as in the container — don’t bury the crown. - Watering and care. Keep the soil slightly moist for the first 2–3 weeks. After that — only water during extreme heat.
In spring, before new growth begins, cut the dry stems down to about 4–6 inches (10–15 cm) — that’s it. No other maintenance needed. - Shape control. If you want a clean, straight line, install a plastic or metal garden edging — it prevents the roots from spreading too far.
Within a year, the plants form a dense line about 4–5 feet (1.2–1.5 m) tall.
By fall, they turn burgundy-red, and the feathery plumes sway gently in the wind. In winter, the dry stems keep their shape and create texture against the snow.
Switchgrass is one of those choices that looks high-end but takes almost no effort. And even after years, the bed stays stable without freezing or replanting.
6. Firebush + Fall Ferns for Woodland Vibe
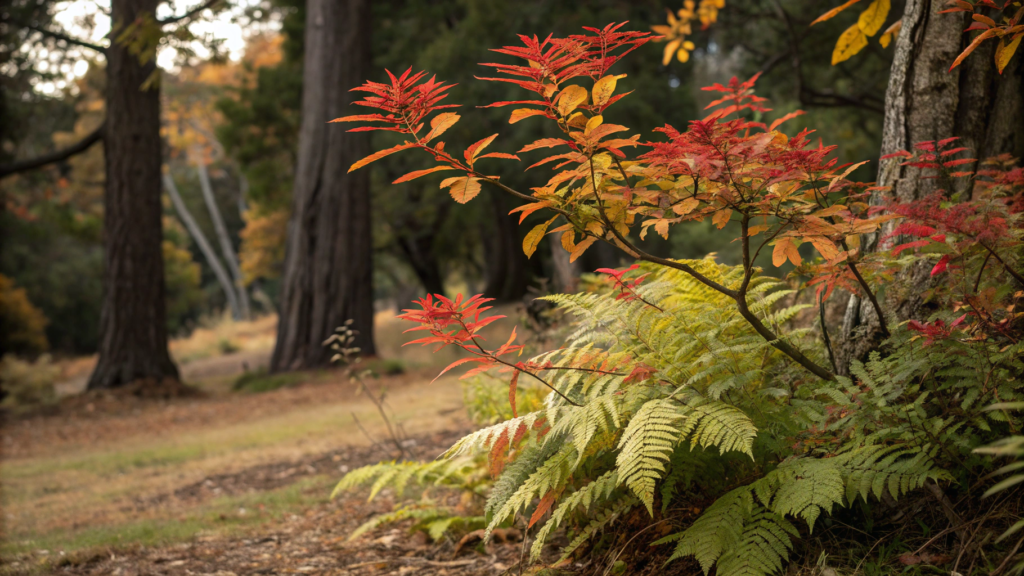
Part-shaded areas are often underrated — not quite sunny, but not full shade either. That’s exactly where I once planted Firebush (Hamelia patens) and autumn ferns. Now that spot looks incredible: warm tones, soft light, and not a hint of boredom.
Why This Combination Works
Firebush brings energy — its fiery orange-red flowers appear in midsummer and last until frost. It grows quickly and fills space where you need a splash of color.
Ferns are the opposite: calm, restrained, but with stunning texture. They add depth and create a background. Together, these two plants form a natural, balanced composition that looks well-kept even without regular care.
How to Create This Bed
- Choose the right spot. Partial shade is ideal. Mine grows along the north side of the house, where the sun reaches only in the morning. Firebush loves light, but its leaves can burn in midday sun, so light protection from trees or a fence helps.
The soil should stay moist but never soggy. Check drainage: dig a 1-foot (30 cm) hole, fill it with water — if it drains in 2–3 minutes, it’s perfect. - Prepare the soil. The soil should feel like forest floor — loose and rich. I mix in 2–3 inches (5–7 cm) of compost and a bit of shredded leaves, then rake everything together.
To retain moisture, add some coconut coir or peat. This helps especially under trees where roots steal water fast. - Plant the Firebush. Place the bushes in the back, spacing them 3–4 feet (90–120 cm) apart — they’ll fill out within a year. Add a couple handfuls of compost into each hole and water thoroughly (about 1 gallon / 4 L per plant) right after planting.
If you want the bushes to stay neater, add a small garden stake for support — stems grow fast and can lean a bit. - Add the ferns. In front of the Firebush, plant Dryopteris erythrosora (Autumn Fern) or Athyrium niponicum (Japanese Painted Fern). Space them 18–24 inches (45–60 cm) apart.
After planting, mulch everything with leaves or bark — about a 2-inch (5 cm) layer. It helps keep moisture and suppress weeds. - Care. Water moderately. Firebush once a week during heat; ferns can be misted lightly in the morning.
In spring, prune Firebush by one-third to encourage new growth. Trim ferns at the base once the fronds dry out.
Once a year, sprinkle a bit of compost under the mulch — that’s all they need.
How It Looks Through the Seasons
- Spring — ferns unfurl, adding soft green highlights.
- Summer — Firebush bursts into bloom, with ferns forming a dense textured base beneath.
- Fall — Firebush leaves turn copper-red, ferns shift to bronze.
- Winter — only dry shapes remain — minimalistic yet elegantly restrained.
Practical Tip
If you want consistent moisture, install a drip irrigation system — I use the Rain Bird Drip Irrigation Kit from Amazon. It’s almost invisible but perfectly keeps the ferns hydrated without soaking the roots.
This little corner is a self-sustaining micro-ecosystem — alive when others fade, and it needs nothing but one calm hour to plant it wisely.
7. Spilled Pot Rock Garden with Creeping Jenny
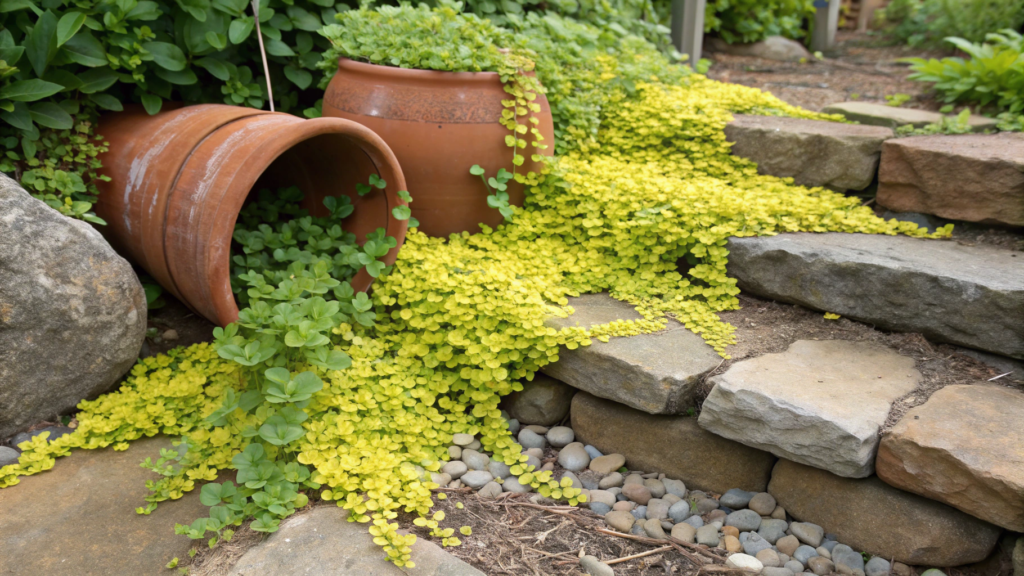
This composition is a simple and striking way to bring movement into the garden without complicated structures.
Lysimachia nummularia ‘Aurea’ — that very same Creeping Jenny — grows fast, forms a dense carpet, and beautifully drapes over rocks. Its bright green, almost golden leaves look especially vivid next to natural stone or terracotta pots.
It handles both shade and sun well and, most importantly, keeps its neat form without constant care.
How to Make a “Spilled Pot” Garden
- Choose the pot. A ceramic or terracotta container about 12–16 inches (30–40 cm) wide works perfectly. It’s even better if it’s cracked or bottomless — that way drainage happens naturally.
I prefer slightly aged, faded pots — they add a natural, timeless feel. Place it at an angle, as if it “fell over” and the greenery is spilling out. - Prepare the base. Lay a 2-inch (5 cm) layer of gravel or small stones on the ground — this creates drainage and a “stream” of rock.
If you’re making the setup in a shady spot, mix in a bit of sand and compost to improve the soil texture. - Plant the Creeping Jenny. Plant several seedlings inside the pot and along the “stream’s edge.” Leave about 6–8 inches (15–20 cm) between them — the plant spreads fast and will soon cover the area.
After planting, water well (around 0.5 gallons / 2 L) and lightly press the soil around the stems to secure them. - Add the stones. Use flat or rounded rocks — they make the “flow” feel realistic. Arrange them gradually: larger near the pot, smaller along the “stream.”
I often mix in a few darker stones among the greenery — the contrast makes the Jenny’s color pop even more. - Watering and care. During the first month, water 2–3 times a week, then only on hot days. Creeping Jenny loves slightly moist soil but not soggy conditions.
In spring, refresh the edges by trimming back excess stems with scissors — it regrows within a couple of weeks.
When the Composition Looks Its Best
- Spring — the foliage is bright, almost lemon-yellow.
- Summer — the carpet thickens, shiny and full, filling every gap.
- Fall — leaves turn warm bronze-green, and the stones take on softer tones.
To make the whole setup feel complete, add a couple of small flowering accents, like mini irises or sedums between the rocks. They won’t overpower the Jenny but will bring little seasonal bursts of color.
This “spilled pot” adds life to any garden. And unlike elaborate flower beds, it requires no constant care or experience — just stones, a bit of soil, and the right tilt.
8. Shrub Base with Chrysanthemums & Straw Mulch
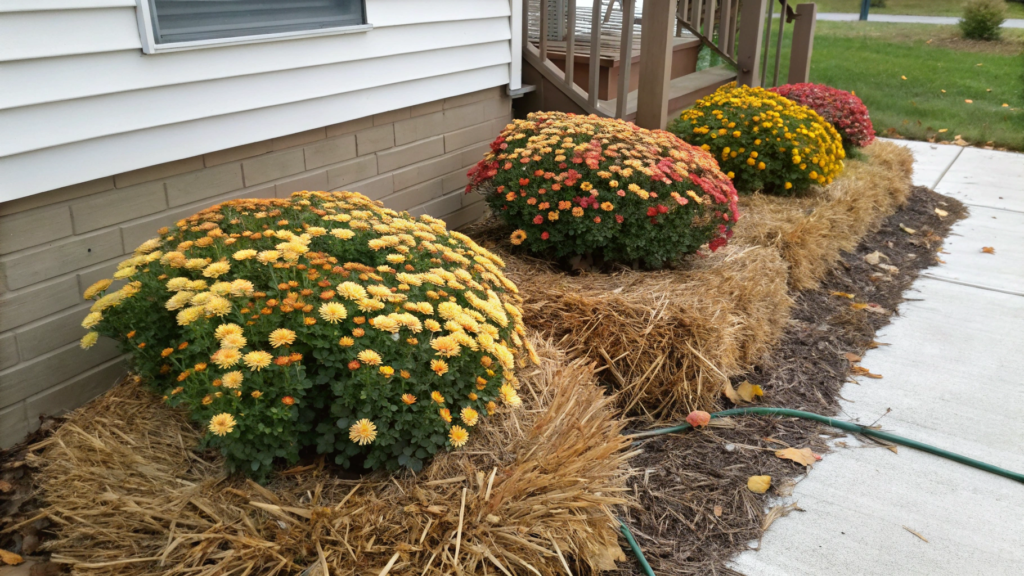
If you have shrubs near the house or along a fence, add chrysanthemums and straw mulch. It’s one of the easiest ways to quickly refresh your landscape — especially before Halloween or Thanksgiving. It looks neat, natural, and takes almost no effort.
Why It Works
In fall, most ornamental plants lose their brightness, but chrysanthemums (mums) do the opposite — they’re just getting started. They bloom powerfully, richly, and for a long time — right up to the first frost.
Straw mulch adds texture and a golden backdrop, highlighting the flowers and making even old shrubs look visually fresh.
Plus, it’s practical: straw keeps moisture, protects roots from temperature swings, and suppresses weeds.
How to Style the Base of Shrubs
- Prepare the area. Remove old mulch and weeds in a 2–3-foot (60–90 cm) circle around the base of each shrub. Loosen the soil slightly with a rake so it can “breathe.”
If the soil is too dry, water it first — chrysanthemums root better in moist ground. - Choose the chrysanthemums. Fall varieties like Chrysanthemum morifolium ‘Autumn Glory’ or ‘Bronze Elegance’ form dense blooms in shades of copper, gold, and burgundy.
Space them about 12–15 inches (30–40 cm) apart. If you’re planting around a large shrub, plant in a ring, alternating colors.
When planting, add a bit of compost to each hole and water well (around 0.5 gallons / 2 L per plant). - Add the straw. Once the mums are planted, spread a 2–3-inch (5–7 cm) layer of straw around them. Don’t pile it right against the stems — leave 1–2 inches (2–5 cm) of space to prevent rot.
For a tidier look, sprinkle a bit of decorative bark on top — it keeps the straw in place and adds a finished touch. - Watering and care. Keep the soil slightly moist for the first two weeks, then reduce watering. Mums in fall don’t like being overwatered.
After blooming, cut off the spent flowers but leave the roots in the ground — they’ll sprout again in spring. You can leave the straw as a winter insulating layer.
How It Looks
- September. lush chrysanthemum domes create bright color spots around the shrub bases.
- October. Straw darkens into a soft honey tone that enhances the foliage.
- November. Even after the blooms fade, the structure remains tidy and decorative.
To add more fall atmosphere, tuck a few mini pumpkins or ornamental pears between the mums — it works perfectly as natural seasonal décor, especially near the porch.
This combination is an easy way to make your yard look put-together for fall. A bit of straw, a few dozen chrysanthemums — and your shrubs transform from background elements into a focal point, without extra work or expense.
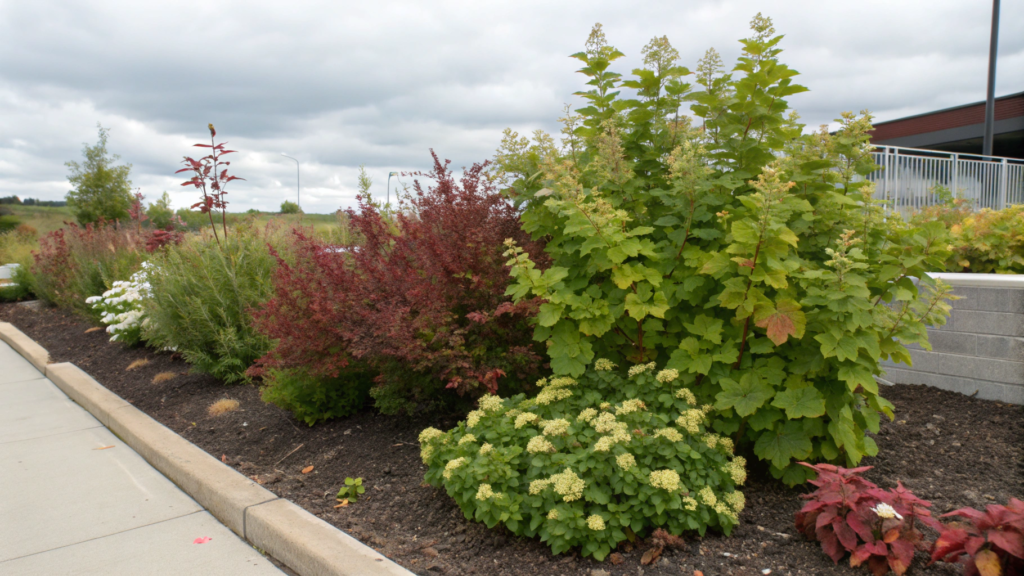
9. Rustic Fall Bed: Ninebark, Kale & Fountain Grass
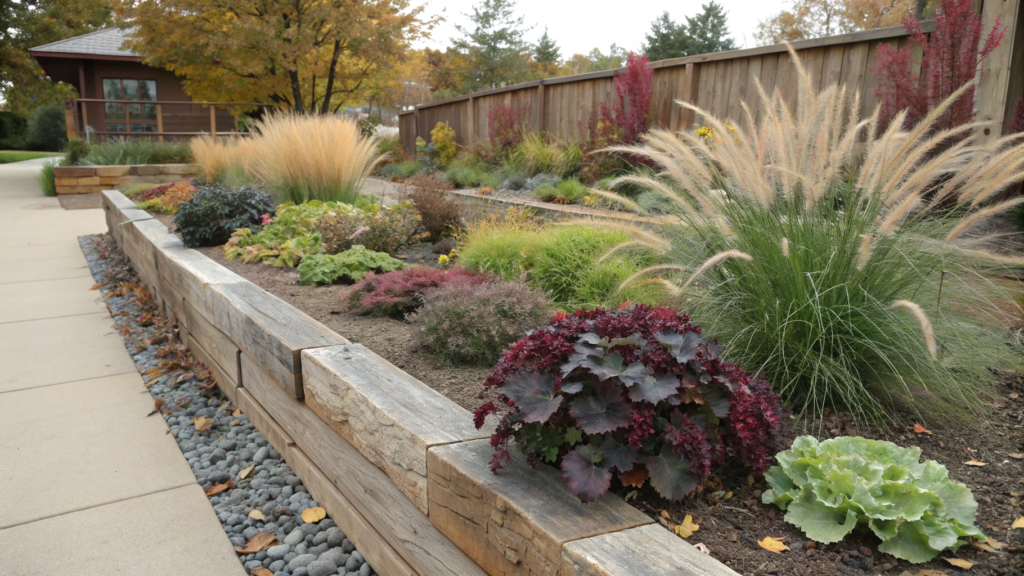
Fall is the perfect time to add structure and color to the garden — Ninebark, ornamental kale, and Fountain Grass create a combination that feels rich but requires little maintenance or preparation.
Why These Plants Work
- Ninebark (Physocarpus opulifolius) — a hardy shrub with textured bark and deep burgundy-purple leaves. In fall, it becomes even brighter, especially in sunny spots.
- Ornamental kale — adds texture and a cool-toned contrast. It’s frost-resistant, keeps its form until winter, and visually softens the overall composition.
- Fountain Grass (Pennisetum alopecuroides) — brings height and motion. Its soft plumes catch the evening light beautifully.
Together, they create a long-lasting fall bed that holds strong until the first frosts.
How to Create This Bed
- Choose the location. Ideally, pick a sunny or lightly shaded spot.
Mine grows along a gravel path — full sun by day, soft shade in the evening.
The soil should drain well and never stay soggy. If it’s clay-heavy, mix in 1–2 buckets of sand per square meter. - Plant the Ninebark. This is the skeleton of the bed. Each bush takes about 4–5 feet (1.2–1.5 m) of space, so plan the distance carefully.
I use the variety ‘Diabolo’ — with rich, dark red leaves. It grows fast and doesn’t need pruning every year.
After planting, water deeply and mulch the base with compost or wood chips. - Add the Fountain Grass. Plant Pennisetum alopecuroides ‘Hameln’ or ‘Little Bunny’ between the Ninebark shrubs, spacing them 2–3 feet (60–90 cm) apart.
Fountain Grass adds volume and movement, especially when the wind blows.
Important: don’t plant it too close to the shrubs — the leaves should not block airflow at the base. - Place the ornamental kale. Kale is the finishing accent. Its rosettes grow about 10–12 inches (25–30 cm) tall and perfectly cover the lower section of the bed.
Plant it in small groups of 3–5, closer to the edge. You can combine white and purple varieties — that creates a natural contrast.
After planting, lightly firm the soil and add a layer of straw or dry leaves — kale loves coolness and steady moisture. - Watering and care. For the first two weeks, water every other day, then only during hot spells.
In spring, trim Ninebark by one-third to shape it, and cut back the grasses at the end of winter to about 4–6 inches (10–15 cm).
Kale will need to be replanted each year — but it’s worth it: bold, resilient, and beautiful.
When This Composition Shines
- September. Grasses are at their peak, plumes fluffy, Ninebark rich and burgundy.
- October. Kale brings cool tones, and Fountain Grass starts to shimmer silver.
- November. Even after the first frost, kale stays firm, while dry grass plumes catch the light and add texture.
You can also add a few low evergreen plants like Carex oshimensis ‘Evergold’ at the base — they’ll fill the space when kale fades away.
10. Zero-Water Zone: Lavender, Yarrow & Stonecrop
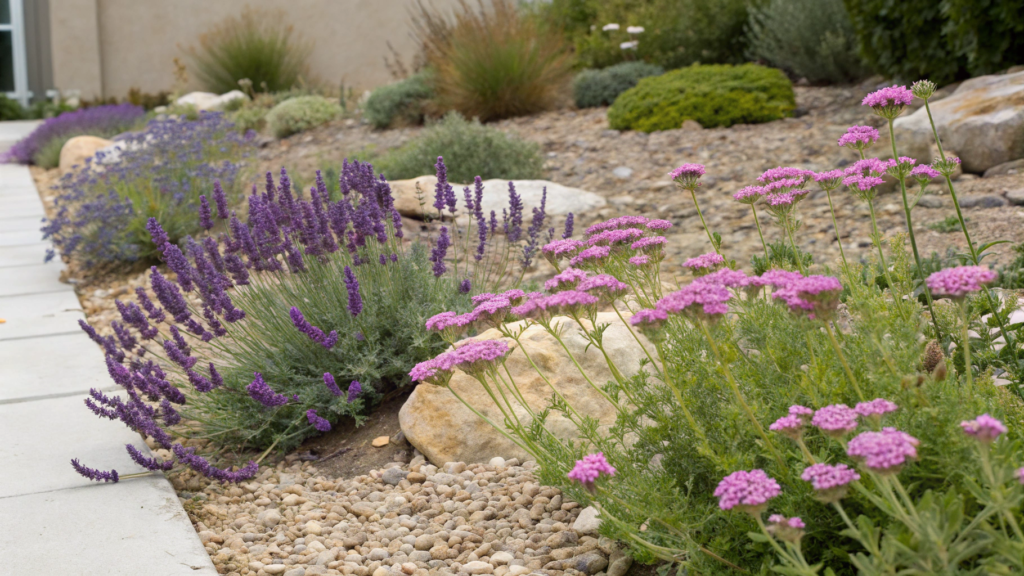
Lavender, yarrow, and stonecrop — the perfect trio. This “zero-water” bed can handle drought, blazing sun, and poor soil while staying beautiful from spring through fall.
Why This Trio Works
These plants come from naturally dry climates, so heat and sandy soil don’t scare them.
- Lavender adds fragrance, color, and structure — its silvery-green foliage stays decorative year-round.
- Yarrow (Achillea millefolium) brings dense flower clusters in yellow, pink, or coral tones.
- Stonecrop (Sedum) forms a low, succulent carpet, filling the gaps between other plants and preventing weeds.
The result is a bed that looks like a Mediterranean hillside — simple, textured, and resilient.
How to Make a “Zero-Water Zone”
- Choose the sunniest spot. At least 6–8 hours of direct sun per day — these plants can’t handle shade.
I made mine on the south side of the house, where it gets full sun and wind all day. No watering — just the occasional summer rain. - Prepare the soil. Light, rocky, or sandy soil is ideal. If your soil is clay-heavy, add one bucket of sand per square meter and a bit of gravel.
Don’t add too much organic matter — excess nutrients make the plants loose and reduce lavender’s fragrance.
Top it off with a mulch layer of gravel or crushed stone (about 1–2 inches / 3–5 cm). It holds warmth and keeps weeds away. - Plant the lavender (Lavandula angustifolia). Space the bushes 18–24 inches (45–60 cm) apart. Lavender needs air circulation — it hates being crowded.
After planting, water deeply (about 1 gallon / 4 L per bush), then let it dry out.
For a clean, structured look, plant lavender along the front edge — it creates a fragrant border that defines the bed. - Add the yarrow (Achillea millefolium). Plant it in the middle row, spacing 12–15 inches (30–40 cm) apart. I love the varieties ‘Terracotta’ and ‘Paprika’ — their warm hues contrast beautifully with lavender.
Yarrow spreads fast, so use a stone edging if you want to keep it in place. - Finish with stonecrop (Sedum). Try Sedum spurium ‘Dragon’s Blood’ or Sedum acre. It quickly covers the ground and ties the whole bed together.
Plant small plugs or stem cuttings — stonecrop roots easily.
The main rule: don’t overwater — succulents hate excess moisture.
Watering and Care
Water only for the first 2–3 weeks after planting, until the roots settle. After that — no watering at all.
In spring, trim dry lavender stems, and refresh yarrow and stonecrop if needed.
Every couple of years, add a bit of gravel to keep the bed tidy and bright.
How It Looks Through the Seasons
- Spring. lavender strengthens, and yarrow sends up its first stems.
- Summer. Peak bloom — intense scent, vibrant yarrow clusters, and a soft carpet of stonecrop below.
- Fall. Lavender stays silvery-green, and stonecrop turns into burgundy-pink shades.
- Winter. The dry shapes keep their pattern — the bed stays clean and graphic, even without foliage.
To highlight the natural look, add a few flat stones between the plants — they store heat and help keep the soil dry.
This kind of zero-water garden doesn’t just save water — it looks natural, like part of a slope shaped by nature itself. And the best part? You never have to worry about forgetting to water — these plants simply don’t need it.
The Fall Garden
A fall garden is calm, resilient beauty. When the sun hangs lower and the air turns heavier, these plants set the tone for the whole yard.
Their leaves and textures contrast with fallen foliage, stones, and damp soil. It’s a garden that lives in its own steady rhythm — without rush, on its own terms.If you’ve tried any of these combinations, share which ones worked best for you.
And if you haven’t yet — pick one of the ten and start small. Fall is the perfect time to plant something that will keep rewarding you for years to come.