
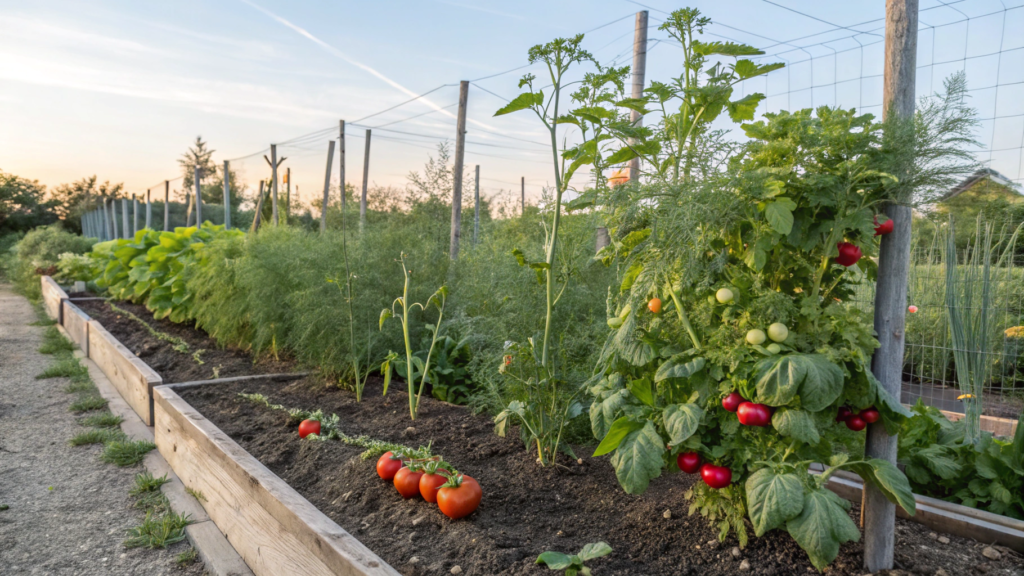
If you’ve ever faced a failed growing season — a pot of wilted basil, seedlings that didn’t survive past day three, or a raised bed overtaken by weeds — welcome to the club. Lindy and I have been there more than once. But here’s the truth we’ve learned through all those trials: successful gardening doesn’t require perfect conditions. The secret lies in small discoveries — clever gardening tips that make everything easier. A smart watering trick. One foolproof plant variety. Or even a single layer of mulch that saves your cabbage from the heat.
This article is a collection of exactly those things. Stuff that actually works. No myths, no complicated systems. Just straight to the point — from one former brown thumb to another.
1. Laundry Basket Carrot Growing
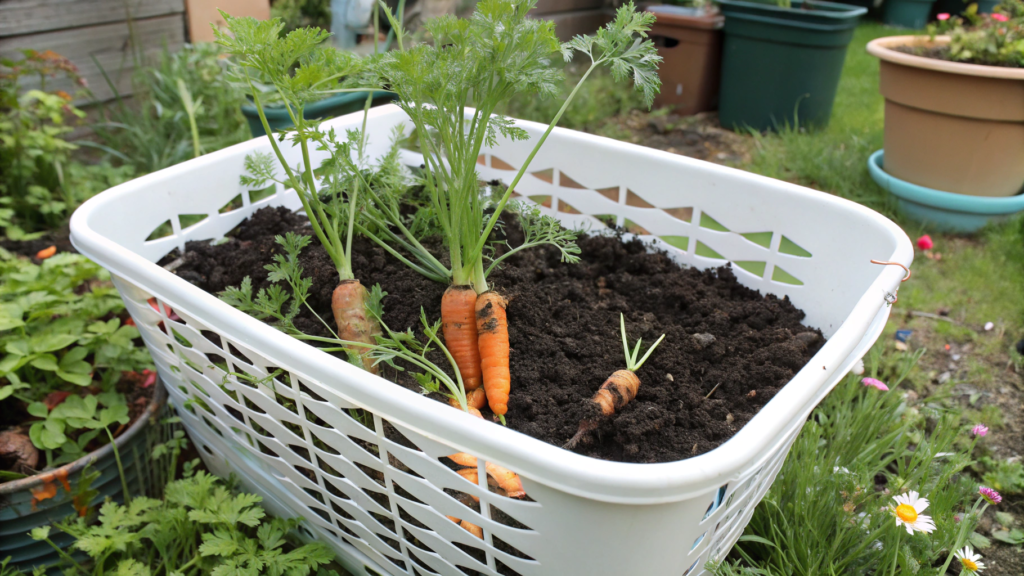
Sounds odd, right? Growing carrots in a regular laundry basket? We already have plenty of weird experiments going on in the garden.
But then I saw my neighbor down the street doing it (everything in her yard grows like it’s on steroids!) — and I had to try.
Why a basket?
The key here is depth and drainage. Carrots need loose, deep soil to grow straight down without hitting rocks or compacted dirt — like ours did that one year when we first tried.
A laundry basket with side holes is the perfect mini-container. The soil breathes, water drains out, and if needed, you can move it into partial shade during peak heat.
Something like the Sterilite Ultra™ Laundry Basket (1.6 Bushel) works great. Just make sure it has holes along the sides and bottom, and that it’s at least 12–14 inches deep (30–35 cm).
What you’ll need:
- A laundry basket with holes
- 1 bag of lightweight potting mix, around 40 qt (38 L)
- 1–2 packets of carrot seeds (look for long-root varieties like Danvers, Scarlet Nantes, etc.)
- Cardboard or coconut fiber to line the bottom
- A bit of perlite or vermiculite (optional)
Step-by-step — how we do it:
- Prep the basket. Line the bottom with cardboard, jute, or coconut fiber — this keeps the soil in place while still letting water drain. Sometimes I just use an old rag — works just as well.
- Add the potting mix. The soil needs to be super loose! No heavy garden dirt. We mix something like Miracle-Gro Potting Mix with a handful of perlite — and that’s more than enough.
- Sow the seeds. Carrots like to be left alone — don’t transplant them later. Sow the seeds directly on top of the soil and gently press them in. I space them about 1 inch (2.5 cm) apart — it works beautifully.
- Moisturize. Be gentle here. Use a spray bottle, or just lay ice cubes across the surface — they melt slowly and don’t flood the bed.
- Shade for the first week. Yes, even carrots need a little privacy. We drape an old cloth over the basket until the sprouts peek through.
- Water and wait. Once the sprouts are up, water carefully so you don’t wash away the soil. After 50–75 days, depending on the variety, you’ll have straight, juicy carrots — like they came off a conveyor belt.
From three seasons using baskets, here’s what we got: roughly 4–5 pounds of carrots (about 1.8–2.2 kg) per basket, with a germination rate holding steady around 90%, as long as we didn’t let the soil dry out that first week. We usually sow between March and June, depending on our USDA zone and the weather — and after 2 to 2.5 months, we’re pulling out crisp, sweet roots.
And guess what? This method really works. Last year we grew three full baskets of Danvers, and ended up with so much that I was tossing carrots into everything: muffins, stews, soups, and yes — even jam (don’t ask — it was an experiment).
2. Ice Cube Watering for Delicate Seedlings
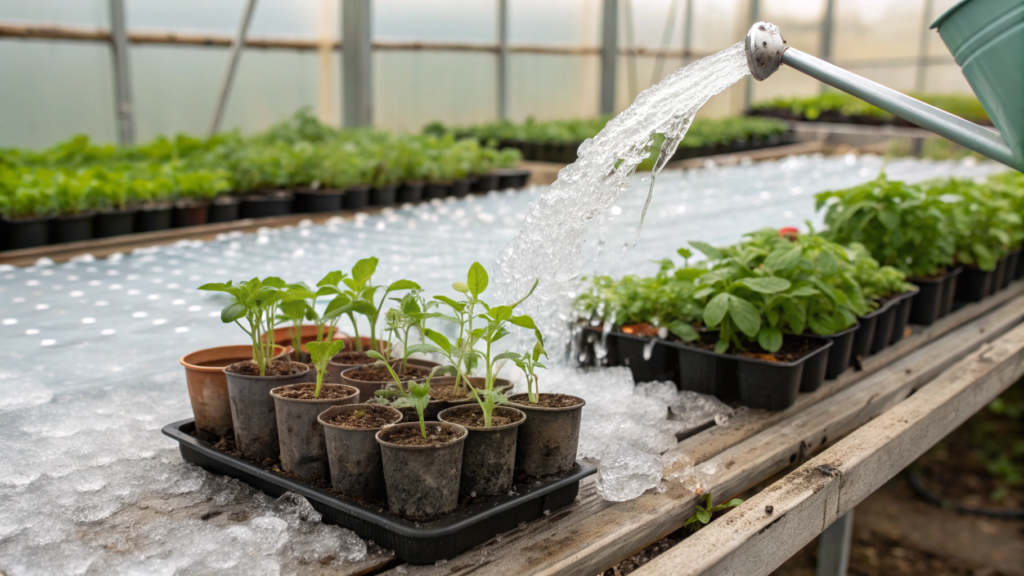
You’ve planted the seeds, they’ve sprouted, they’re tiny and fragile like newborns — and there you are, holding the watering can, hand shaking, terrified of drowning your little babies.
This is especially true for basil, petunias, tomatoes, and other seedlings that start as thin threads. Too much water — and that’s it. Their root systems are barely there, and any excess moisture leads to fungus, rot, or plain old stress. That’s where this weirdly simple trick comes in: watering with ice cubes.
How does it work?
You’re not pouring water from above, not blasting the soil, not risking scattering seeds to the edges. Instead, you just place 1–2 ice cubes directly on the soil, right next to the seedlings.
The ice melts slowly, gently and evenly hydrating the soil without overwhelming those tender roots or stirring up a fungal disaster.
When I was training as a Gardenary Certified Garden Coach, we were taught this method for microgreens and seedlings with super delicate roots. It was especially recommended for windowsill trays and mini greenhouse containers. I didn’t believe it at first — but I tried it… and got hooked.
Now I use ice cubes for pretty much everything I start in seed trays and egg cartons. Especially during spring, when indoor heating dries out the soil way too fast.
What to know ahead of time:
- One ice cube = about 1 tablespoon (15 ml) of water. That’s enough to gently hydrate 3–4 seedlings.
- Don’t place the cube directly on the sprout — put it off to the side, closer to the edge of the container.
- Use filtered or at least settled water, especially if your tap water is hard.
- Sometimes I freeze herbal teas — like chamomile or calendula. These cubes are especially good for tender herbs like thyme, sage, or basil.
These Silicone Mini Ice Cube Trays with 0.5-inch (1.3 cm) cubes are perfect. Small, neat, and they melt quickly without soaking the soil.
This method hasn’t gone through lab testing — but it’s passed my personal three-spring trial, and that’s good enough for me. What is backed by research: excess moisture in the root zone increases the risk of rot and fungal disease, as noted by University of California Agriculture & Natural Resources. So this kind of slow, measured watering isn’t a quirky habit — it’s a practical way to protect your seedlings.
Worth noting:
Ice cube watering doesn’t work outdoors. In open beds, the cold can shock the roots — especially on cool spring nights or when the weather swings.
And in soil with good drainage, the meltwater escapes too fast to do much good.
This trick isn’t perfect or universal, but for indoor starts, greenhouse trays, or small containers, it gives you the control, gentleness, and precision that early seedlings really need.
3. DIY Bottle Irrigation Hack
There’s a spot in our garden that always dries out. The soil acts like a sponge — water it in the morning, and by noon it’s cracking. Especially during those hot July weeks, when it gets about ten minutes of shade and that’s it.
I got tired of chasing it with the watering can — so Lindy and I built our first bottle irrigation system.
What is it, exactly?
It’s a DIY drip irrigation setup: you take a plastic bottle, punch holes in it, bury it next to your plant, and fill it with water.
The water seeps slowly into the soil, directly to the roots — no evaporation, no surface runoff, no stress for the plant.
This isn’t some brand-new hack. But it works like clockwork, especially if you’re growing tomatoes, peppers, eggplants, or zucchini. Those plants hate drying out, but they don’t like being overwatered either.
What you’ll need:
- 1 plastic bottle (2 liter or more — a Gatorade 1 Gallon Jug works great if you want extra capacity)
- Awl, nail, or small drill bit
- The bottle cap
- Knife or scissors
- Gloves and a bit of patience
How to make it — step by step:
- Clean the bottle and remove labels. That keeps it from overheating or growing mold under the plastic.
- Make 3–5 holes on the lower part of the bottle (not in the very bottom — on the side, close to it). Hole size: no more than 1 mm.
We use a small nail heated on the stove — it melts through cleanly. - Leave the cap on, but with a tiny hole — that slows the water down. If you leave it open, it drains faster.
- Bury the bottle vertically next to your plant, about two-thirds deep. The holes should be below soil level, right where the roots are.
- Fill it with water — and that’s it. The bottle will drain slowly over 6–12 hours, depending on the heat and soil type.
Last August, when it hit 95°F (35°C), we placed one bottle by each tomato — and not a single fruit cracked. That was the first time we didn’t need to water twice a day.
We also put a couple bottles between our raspberry bushes — and for the first time ever, we had berries growing all the way to the top, not just at the base.
Important note:
This method only works well on small beds or container gardens. If you’ve got a full field to water — bottles won’t cut it. You’ll need proper drip tape.
And yes — sandy soil drains faster, clay soil holds water longer. Adjust the number of holes based on what kind of soil you’ve got.
4. Companion Planting for Beginners
I still remember the time we planted everything together — tomatoes, peppers, dill, and radishes — just because we liked it all, it was growing well, and we wanted “everything, all at once.” It looked great… for about two weeks. Then the chaos started: radishes bolted, dill flowered before anything else — you get the idea.
That’s when I first realized that “good neighbors” in the garden aren’t just a cute idea — they’re the difference between chaos and harvest.
What is companion planting?
It’s a system where you grow different plants together so they help each other: by deterring pests, attracting beneficial insects, improving flavor, and even enhancing soil structure. Sometimes it’s just about balancing the layout visually and creating shade where it’s needed.
It’s not magic. It’s an eco-partnership that’s stood the test of time.
Examples that actually work
Here are a few simple pairings we use every season:
1. Tomatoes + Basil + Marigolds
– Basil improves tomato flavor and helps repel whiteflies and aphids.
– Marigolds release compounds that suppress soil nematodes.
– And it all looks nice and tidy — no need for separate beds.
2. Carrots + Onions
– Onions repel carrot flies, and carrots help push back onion pests.
– They grow great in the same bed with light spacing.
3. Cabbage + Dill
– Dill attracts parasitic wasps that eat cabbage worms.
– It also grows taller and offers a bit of shade during hot days.
4. Corn + Beans + Squash — the classic “Three Sisters” setup
– Beans add nitrogen to the soil
– Corn acts as a natural trellis
– Squash covers the ground, suppressing weeds and locking in moisture
– This system has worked since Mayan times. It’s time-tested.
Things you shouldn’t do
- Fennel doesn’t get along with anyone. Keep it in its own bed.
- Tomatoes and potatoes are a bad match — they share diseases and compete for the same nutrients.
- Beans next to onions or garlic don’t mix well — they stunt each other’s growth.
According to a review in Horticulture Research (2021), companion planting can increase yields by 16–20%, reduce pests, and even improve crop flavor.
And research from Clemson University shows that basil with tomatoes, and onions with carrots, are some of the most consistently effective pairings — even for beginner gardeners.
How to start if you have no clue?
- Start with just 1–2 plant pairings — don’t try to build a jungle.
- Use a simple layout sketch in a notebook to track who grows where.
- Add a few flowers — they’ll bring in pollinators. Marigolds, calendula, nasturtium — all simple, affordable, pretty, and useful.
5. Fastest Growing Lettuce Varieties
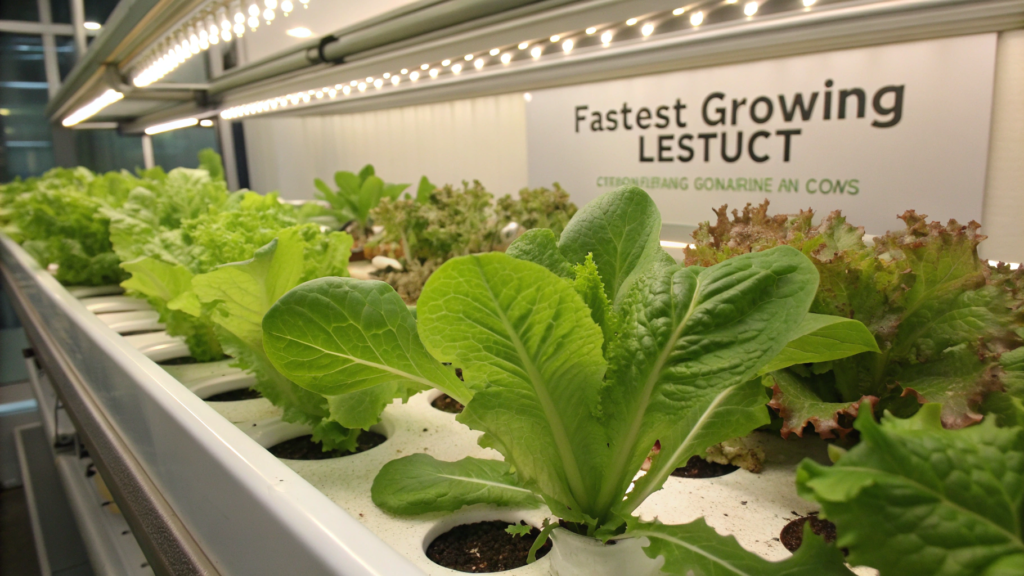
I think you already know that some types of lettuce can be harvested in just 20 days.
And they’re perfect for quick yields, especially if you’re just getting started with your garden or want fast results on a windowsill, in a greenhouse, or in a container.
Why it matters
First, lettuce is one of the most forgiving crops. It doesn’t need perfect soil, germinates quickly, and tolerates mistakes. It also acts as a great indicator for moisture and sun: if the leaves start wilting or turning bitter, it’s already sending you a message as a gardener.
Second, if you’re growing in containers, raised beds, or on a balcony, you want results fast. Space is limited, and you need to harvest and replant as soon as possible.
Top varieties that grow the fastest
So here are 5 tried-and-true varieties I use every season. Some of them are perfect for lazy (or let’s say, busy) gardeners—like all of us in spring!
1. Black Seeded Simpson. Harvest in: 21–28 days (for baby leaf). This is one of the earliest types—and a favorite of American gardeners for over 150 years.
The leaves are light green, tender, slightly crinkled. It germinates well even at 40°F (4°C)—so you can plant it super early.
2. Buttercrunch (Boston Bibb). Harvest in: 28–35 days. This one gives juicy, buttery leaves, perfect for sandwiches and wraps. It doesn’t love overheating but tolerates partial shade and denser planting quite well.
3. Oak Leaf Lettuce (Green or Red). Harvest in: 25–30 days. I love it because it rarely turns bitter, even in the heat. Great for cut-and-come-again—just trim the outer leaves and it keeps growing.
4. Lollo Rosso. Harvest in: 25–30 days. Not only tasty but makes any bed or salad bowl prettier. Bright red, curly leaves that are tender with a light crunch. Works for both baby leaf and full heads.
5. Little Gem. Harvest in: 30–35 days (early harvest). A small, compact romaine with soft texture and a tight core. Perfect for pots and narrow containers, and gives a high yield even in small spaces.
Tips to speed up growth
- Sow more sparsely than the seed packet says. Crowded beds slow things down.
- Use row covers at first — they create a mini-greenhouse effect and boost germination.
- Feed with liquid compost tea on day 7–10 after sprouting — your lettuce will shoot up.
- Water in the morning to prevent fungus and bitterness.
According to a review from Iowa State University Extension, varieties like Black Seeded Simpson and Buttercrunch are among the most reliably fast and stress-tolerant options for beginner gardeners.
6. Eggshells in Soil: Worth It or Not?
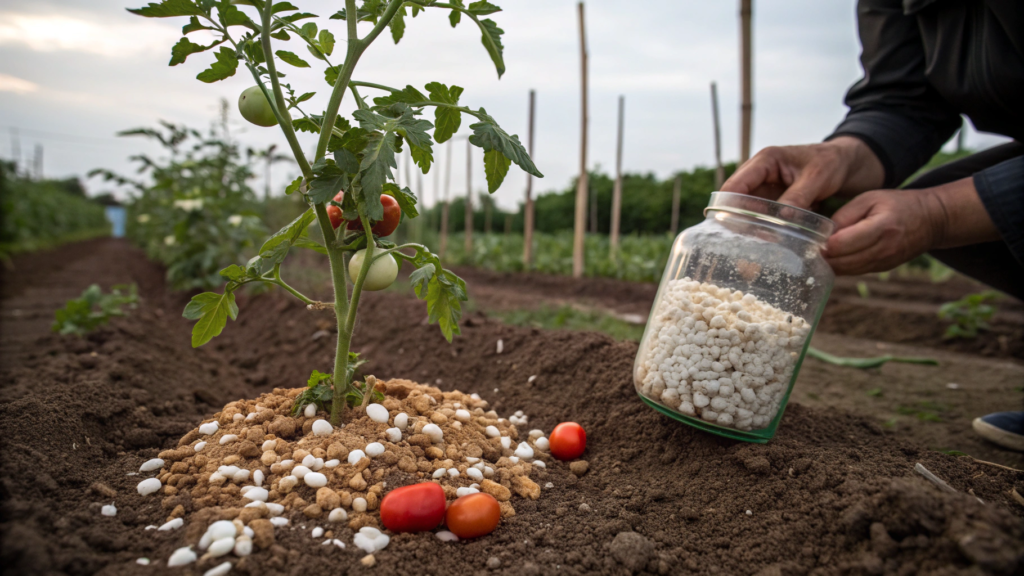
Have you ever actually seen a result from putting eggshells in the soil? Me neither. But let’s break it down for real: what’s truth, what’s myth, and is it even worth the effort?
What do gardeners say?
Back in the early days, Lindy and I used to collect eggshells like they were gold. We stored them in jars, dried them on the windowsill, crushed them in a mortar… and generously tossed them into the planting holes for tomatoes and peppers.
At first, it all made sense: calcium → strong stems → less blossom end rot. But over the years, I started noticing there was just no difference between beds with eggshells and beds without. No difference in yield, disease, or even taste.
What’s actually in an eggshell?
Eggshells really are almost completely made of calcium carbonate (CaCO₃) — about 95% of the shell. The rest is magnesium, phosphorus, and organic proteins.
Sounds like a great soil additive, right?
Yeah… if it weren’t for one thing: under normal garden conditions, eggshells decompose very slowly. So slowly, in fact, that full chunks might still be there after a whole season. Which means the calcium doesn’t reach the roots when plants actually need it.
What do researchers say?
According to a study from Washington State University Extension:
“Crushed eggshells take several growing seasons to break down enough to release a meaningful amount of calcium. They do not significantly impact soil pH or nutrient content in the short term.”
So yes — theoretically there’s a benefit, but the effect shows up in a year or two, not right away.
When is it actually worth using eggshells?
If you’re composting. In a compost pile, eggshells break down faster, especially if you grind them in a coffee grinder or blender.
As a slug deterrent (sort of). Some gardeners scatter larger eggshell pieces around seedlings to keep slugs away. It’s hit or miss, but sometimes works. The key: sharp edges and dry conditions.
For drainage in small pots. You can use them as a bottom layer in containers instead of clay pebbles — if tossing them out just feels wasteful.
Here’s when you shouldn’t bother:
- Don’t toss eggshells under tomatoes hoping to stop blossom end rot. This issue isn’t just about calcium levels — it’s often caused by inconsistent watering, not a soil deficiency.
- Don’t try to adjust soil pH with eggshells. They’re not lime or dolomitic powder. The effect is basically zero.
The takeaway?
Eggshells aren’t a magical fertilizer. They’re a slow-release material that can be used wisely — but don’t expect miracles.
If you want a reliable source of calcium for your soil, better options include:
- Dolomitic lime
- Gypsum (Calcium sulfate)
- Liquid calcium feeds if you need a quick fix
As for us? We keep it simple: collect the shells, grind them into powder, and toss them into the compost. That way, they’ll actually help in a season or two.
7. The Myth of “More Sun Is Better”

In my early gardening years, I was convinced: if a plant is labeled “sun-loving,” the more sun it gets, the better the harvest. So I placed all our tomato and basil containers in the most exposed, hottest part of our yard.
The result? By week three, the leaves had turned yellow-red, the basil tasted bitter, and the tomatoes cracked before they could ripen. Sun is necessary—but too much of it can be just as bad as too little.
What really happens when there’s too much sun?
- Leaf burn. Especially common in young plants and in USDA Zones 8–10. You’ll see classic white or brown spots, like someone ironed the leaves.
- Root overheating in containers. The foliage may still look green, but underground, the plant is under stress—and growth stalls.
- Wilting in heat despite full watering. It’s not a water shortage; the plant simply can’t keep up with the evaporation through the leaves.
- Bitterness in greens. Basil, lettuce, arugula and similar crops produce more oils under heat stress and turn tougher and sharper in taste.
This is especially relevant in hot, arid regions, like many southern U.S. states, where midday sun can literally cook tender leaves.
Which crops don’t like blazing afternoon sun?
- Leafy greens like buttercrunch lettuce, spinach, arugula
- Cabbage and broccoli
- Basil and cilantro
- Strawberries (in some zones!)
- Raspberries—especially those grown in greenhouses
What can you do if your plot gets full sun all day?
- Use dappled shade. Trees with lacy canopies like walnut or apple are perfect for this. Or create artificial shade using cloth or panels.
- Try a removable shade cover. Something like the Aluminet Shade Cloth 40%, 6×12 ft works wonders. It’s lightweight, lets air through, and noticeably lowers the temperature.
- Move containers around. I often place greens behind our corn bed—they get a “midday break” from the heat.
- Mulch generously. It’s not just the leaves—sun overheats the soil too. A thick mulch layer keeps roots cool and reduces water loss. (We go deeper into this in our cheap mulching tricks article.)
What does the research say?
According to a study by the University of Georgia Extension, when temperatures rise above 90°F (32°C) with full sun, many vegetable crops actually reduce photosynthesis—even with more than enough light. In other words: growth slows.
And the Cornell Cooperative Extension notes that partial shading improves yields of leafy crops and prevents premature bolting.
How much sun is ideal?
- 6–8 hours of morning and early afternoon sun — perfect for tomatoes, peppers, eggplants
- 4–6 hours of morning sun + shade after 2–3 PM — ideal for greens and herbs
- 3–4 hours of sun + dappled light — good for shade-tolerant crops like spinach and Swiss chard
8. Garden Pests You Didn’t Know Were Killing Your Plants
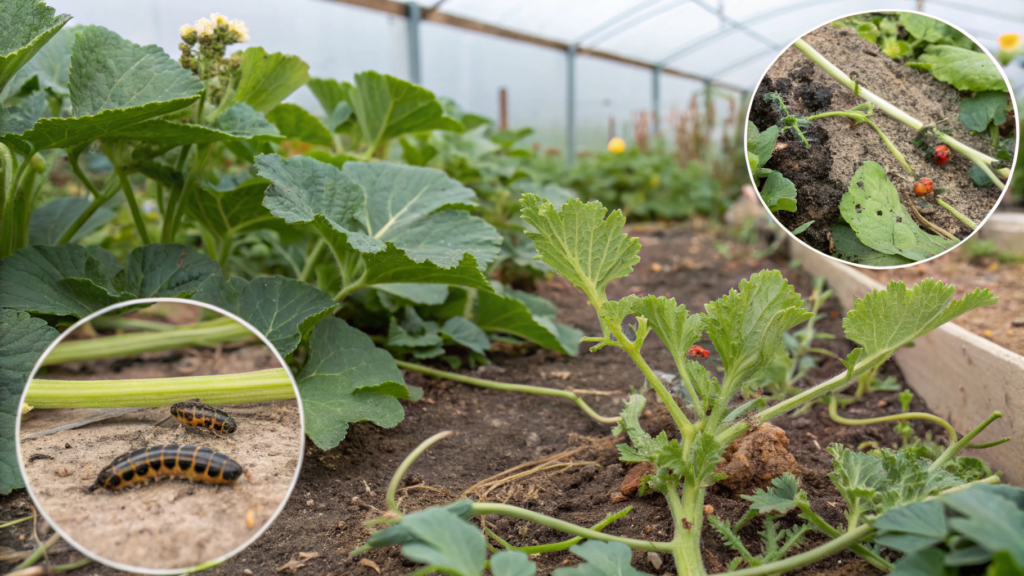
Pests aren’t just aphids and slugs you can spot right away. There’s a whole hidden league of plant killers—silent operators that work slowly, methodically, and usually right on schedule.
Here are the ones actually damaging your garden—but often staying under the radar:
1. Root Weevil.
You don’t see them because they’re working underground. The larvae chew through the roots of strawberries, raspberries, peppers, sage, and many ornamental perennials.
What you notice: wilted plants, stunted growth, or even complete collapse. It’s easy to blame drought—but check below the surface.
If the leaves look like someone took a hole punch to the edges—that’s the adult weevils munching away.
What helps:
- Plant “trap crops” like nasturtiums nearby
- Mulch with sharp materials like pine bark or crushed eggshells
- Try beneficial nematodes, like Steinernema feltiae, available in garden centers
2. Leaf Miner.
This pest doesn’t sit on the leaf—it lives inside it, tunneling through the tissue.
You’ll see thin, white, squiggly lines, like someone scribbled with invisible ink.
Common targets: spinach, beets, chard, tomatoes
What helps:
- Remove affected leaves immediately
- Space your plantings—miners dislike open layouts
- Use row covers early in the season to block adults
3. Thrips.
Tiny, almost invisible grey-black bugs that look like tiny sticks with wings.
They suck sap from leaf cells, leaving behind silver streaks and twisted foliage.
Crops they love: onions, garlic, cabbage, strawberries, cucumbers
What helps:
- Spray with soapy water or garlic tea (works surprisingly well)
Set up Sticky Blue Thrip Traps like those from Kensizer. Keep weeds down—they often host thrip colonies
4. Nocturnal Slugs & Snails.
If you see chew marks in the morning but no slugs in sight, they’re likely night-shift feeders, especially active on cloudy or wet days.
Favorite snacks: lettuce, cabbage, and any tender seedlings
What helps:
- Go out with a flashlight at night—you’ll catch the slime parade
- Line your beds with copper tape (they hate the shock)
- Try a beer trap (yes, really—it works)
Use Sluggo Iron Phosphate Pellets — safe for pets and kids, but deadly to slugs
5. Spider Mite.
These show up in hot, dry weather—especially in greenhouses or indoor gardens.
First, you’ll spot tiny white specks on the leaves, then a fine web.
It’s not a spider—it’s a sap-sucker. The leaves turn dull, pale, and may curl.
Plants they love: beans, eggplant, tomatoes, houseplants
What helps:
- Raise humidity levels (they hate moisture)
- Hose off leaves, especially the undersides
- Spray with Neem Oil, like Bonide Ready-to-Use Neem Oil
Don’t forget! Not every pest shows itself.
If your plant starts drooping or slowing down, don’t immediately blame the weather or watering—it could be something hiding under the leaves… or in the soil.
And yes—check the underside of leaves and root zones regularly. That’s where most of the sneaky pests hide.
9. Cheap Mulch Tricks That Actually Work
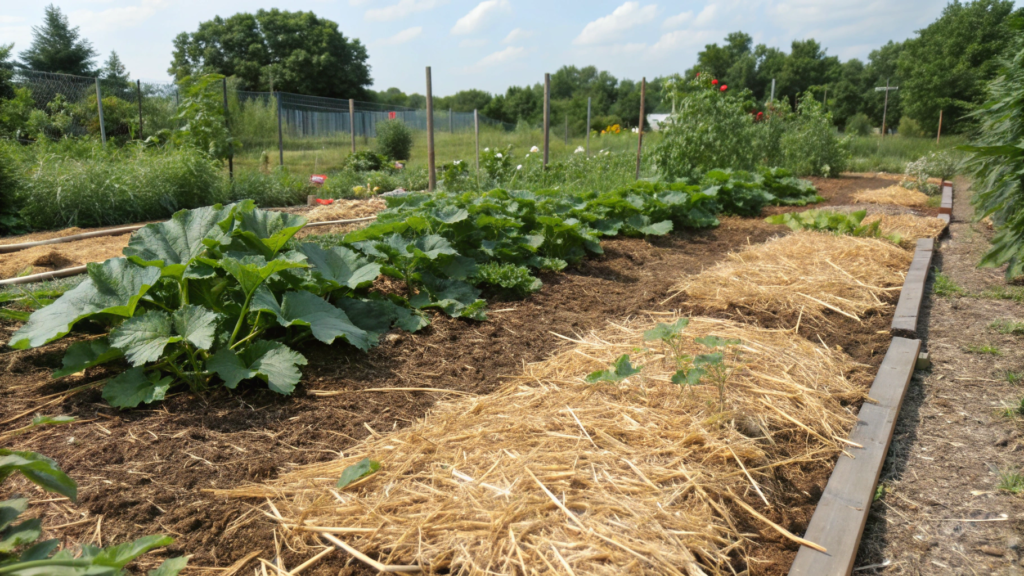
Back in June, on the third day of a heat wave, even our zucchinis started wilting — and I knew: we needed protection. Fast.
Buying expensive bark or coconut fiber for the whole garden? Mmm… nope.
That’s how our saga began with cheap (and honest!) mulch that actually works — and doesn’t require maxing out a credit card.
What mulch does (if you’re new to this)
- Retains moisture in the soil
- Shields roots from overheating
- Suppresses weeds
- Improves soil structure if it decomposes
- Saves your sanity in summer when everything needs watering twice a day
Here are 5 mulch materials we’ve tried ourselves:
1. Cardboard (plain cardboard)
Yes, those regular Amazon boxes. Just no colored print or tape.
How to use. Remove the tape, cut them open, and lay 1–2 layers directly on the soil — especially between rows or under shrubs.
You can toss some straw or hay on top so the cardboard doesn’t fly away.
Pros:
- Free
- Kills weeds like a champ
- Decomposes nicely over the season
Cons:
- Doesn’t look pretty
- Needs something on top to hold it down, especially on windy days
2. Newspaper (not glossy)
Old newspapers (black and white print only!) are a solid option too.
How to use. Lay 2–3 layers, wet them, and place between garden rows.
Best not to put them right under plants — they can “crease” or fold oddly.
We use it under cabbage and between garden beds — especially in May, before there’s grass to mow.
3. Grass Clippings
But not fresh! Only dry and wilted — otherwise it’ll start fermenting, turn slimy, and smell bad.
How to use. Let the grass dry out in the sun for 1–2 days, then lay it in a 1–2 inch layer.
Don’t pile it right on the plant stems — place it around, like a ring.
Important! Grass must be free of herbicides and seeds!
4. Shredded Leaves
They act as mulch now and future food for your soil.
What to do. Collect leaves in the fall, store them in bags. In spring, run them through a mower or tear them up by hand — otherwise they’ll clump and block airflow.
Fun fact: earthworms love this mulch.
5. Bark and Wood Chips — but from free sources
Nope, we’re not suggesting you buy 20 bags from a garden center.
Pro tip. Many U.S. cities and counties offer free wood mulch.
Just Google “free mulch near me” or check your local Parks & Recreation site.
Also, you can get chips from local arborists through ChipDrop — you either pay a small fee (or nothing at all), and they bring a whole pile to your yard!
The combo we use:
- Tomatoes — grass + cardboard
- Cabbage — leaves
- Between rows — newspaper + bark
And all of it works — without spending a single extra cent.
10. How to Tell If Your Soil Is Totally Wrong
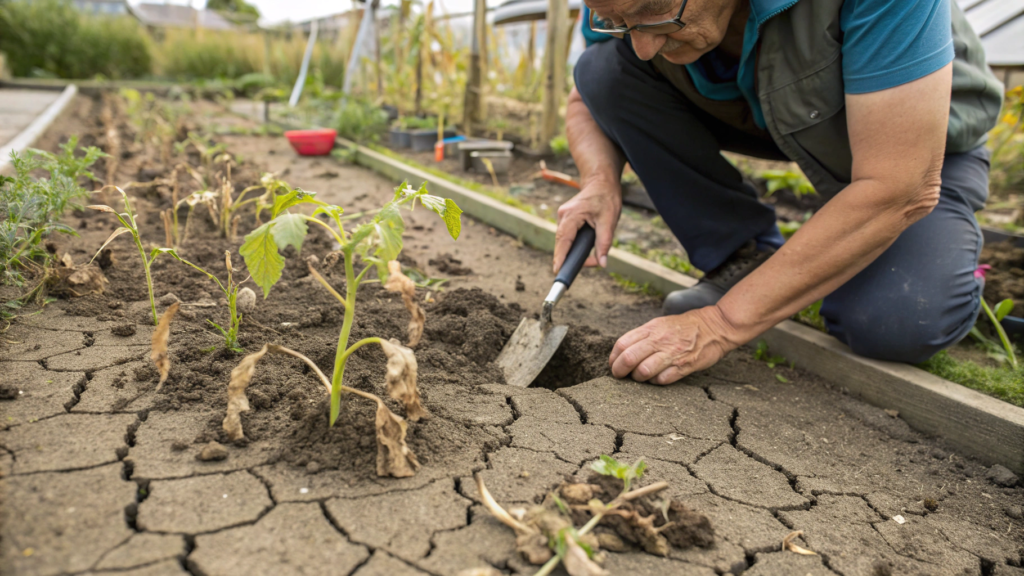
Soil can be a silent saboteur in your garden, keeping your plants from thriving.
And unfortunately, you can’t just “feed” it like a kid — sometimes it needs testing and serious change.
Yep, even if you dumped compost in there and sang to it.
6 signs your soil is totally wrong — and what to do about it:
1. Water disappears in 3 seconds or sits for hours
If you water and it vanishes instantly — your soil is probably sandy and doesn’t hold moisture.
If the opposite happens — puddles form and everything stays soggy — you’re likely dealing with compacted or clay-heavy soil.
What to do:
– Test the drainage with a jar and water.
– For sandy soil, add compost, coconut coir, or vermiculite.
– For clay soil, use perlite, sand, compost, and raised beds.
– BTW, I use Vermiculite by Espoma (8qt bag) under my greens to help hold moisture.
2. You’re constantly fertilizing — and it’s doing nothing
If your plants look pale, weak, and just won’t bulk up despite fertilizers, your soil probably can’t absorb nutrients.
Why? Wrong pH or poor structure that’s blocking roots from getting food.
What to do:
– Run a soil test. A simple one like Luster Leaf Rapitest Soil Test Kit is affordable and gives you info on pH, phosphorus, potassium, and nitrogen.
– Ideal pH for most veggies is 6.0–6.8.
– If it’s over 7.5 or under 5.5 — you’ll need to adjust it, or your nutrients are just sitting there unused.
3. Your soil is too “alive” or too “dead”
If you dig and find worms, bugs, and fungi — that’s great. If it’s empty and sterile like a bag of store soil — yikes.
But if it’s full of wireworms, beetle grubs, or other nasty underground crew — you’ve got a different problem.
What to do:
– Add compost and mulch to revive sterile soil.
– For underground pests — rotate crops and use organic pest control.
– I’ve had success with Neem Cake Fertilizer (4lb bag) — it feeds and protects at the same time.
4. Soil clumps like bricks or crumbles into dust
Grab a handful of soil, squeeze it… and you either get concrete or sand falling through your fingers.
That means the structure is wrecked: no organic matter, no air, no spongey texture.
What to do:
– Add a thick layer of organic mulch right on top
– Don’t dig deep — just loosen the surface
– Plant cover crops like radish, clover, or oats
5. Plants look… weird
– Pale leaves? Probably a nitrogen deficiency, especially if older leaves yellow first.
– Purplish tint? Could mean phosphorus deficiency, especially in cold or compacted soil.
– Dry brown edges? Might be a potassium issue or drought stress.
– Yellow leaves with green veins? Could be iron deficiency (young leaves) or magnesium (older ones).
If this all happens even in “normal” soil — the problem’s probably not the presence of nutrients, but that they’re unavailable due to pH, watering, or poor root health.
6. The soil smells weird
Yep, seriously. If you dig and smell something sour, rotten, or like sulfur — your soil might be anaerobic, meaning it lacks oxygen. This happens in overwatered spots, low areas, or when using peat without drainage.
What to do:
– Build up a raised bed
– Mix in sand and compost
– Let it dry out between waterings
Soil is a living foundation. And if that foundation is off, no “fertilizer” will save your garden.
The best thing you can do? Observe, touch, dig, smell, and take notes.
We even keep a little journal of soil observations — logging how each crop behaved in each bed.
Your “living” garden.
Gardening doesn’t start with a greenhouse or an agronomy course. It starts right here, the moment you decide to try.
Not everything will work — and that’s okay. It didn’t work for us either. But we keep going.
If even one idea from this article helps — then it was worth writing. And if you feel like sharing your first harvest (or your flop — that counts too), drop a message.
We love those stories. They’re better than any manual.So go for it. Try just one trick from this article. Plant. Water. Mess up. Replant.
And enjoy it all.


