Fall is that time of year when the air feels fresher, the sunlight turns softer, and the colors around you seem designed to inspire change. On days like this, you just want to step onto the porch with a cup of coffee and watch how your home and yard together create that perfect fall mood.
Over the past few years, I’ve realized that fall decor can make any space feel warm, alive, and functional.
In this article, I’ve gathered 10 simple ideas to help you turn any space — from a small patio to a full garden — into a thoughtfully designed and atmospheric fall corner. Each idea has been tested by time, wind, and rain, and every one of them adds that special warmth we all love about this season.
1. Rustic Pumpkin Planters on the Porch

There’s nothing cozier than a few bright pumpkins turned into planters and set out on the porch. They add warmth, color, and a sense of festivity — and this is exactly where the first signs of fall truly come alive.
How to Make Pumpkin Planters
- Choose the right pumpkins. Pick 3–4 pumpkins of different sizes — a large one (about 14 inches / 35 cm), a medium (10 inches / 25 cm), and one or two smaller ones (6–8 inches / 15–20 cm). Mixing sizes makes the arrangement look more natural and balanced.
- Prepare the base. Cut off the top and scoop out the inside with a spoon. Make sure to create a drainage hole at the bottom to prevent standing water. To extend the life of the planter, you can place a plastic pot inside — it’ll keep the pumpkin from rotting.
- Add drainage and soil. Place a thin layer of gravel at the bottom, then fill it with a well-draining potting mix for containers. I usually use soil with peat or coconut fiber — it holds moisture well but doesn’t turn soggy.
- Plant the flowers. Fall favorites like chrysanthemums, asters, sedum, heather, and ornamental cabbage look best. Mix colors — burgundy, cream, gold, and green — for a warm, layered look. When the sun sets, these tones almost seem to glow.
- Arrange your display. Group pumpkins in threes — large, medium, and small. Add a few dried wheat stalks, pinecones, or corn husks between them for extra texture and a harvest-season feel.
- Add height and texture. Place your planters on wooden crates, old buckets, or barrels. They create visual levels and give the setup that charming rustic character.
If you don’t want to deal with soil, you can simply place a potted plant inside the pumpkin — it looks just as nice and takes less effort.
A Few Useful Tips
- If you live in a warmer climate, add a little moisture inside the pumpkin to help plants last longer.
- In northern regions, you can use artificial pumpkins — modern faux pumpkin planters on Amazon look so real that no one will notice the difference.
- When the real pumpkins start to dry out, don’t toss them — just compost them. Nature will handle the rest.
To keep your display fresh all season, replace the plants inside your pumpkins every two to three weeks. Compost the old ones and insert new ones into the same openings. It only takes a few minutes, but your porch will always look tidy and lively.
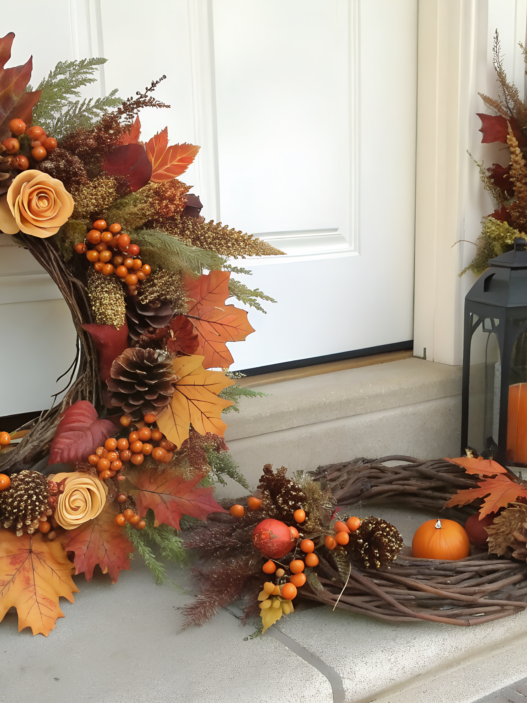
2. DIY Harvest-Themed Wreaths

My first fall wreath was simple and homemade: an old wire frame, a few wild grasses, corn leaves, and a couple of dried orange slices. Not much has changed since then — those small details still create that genuine, “living” fall feeling.
How to Make a Fall Wreath
- Choose the base. A metal or grapevine ring about 18 inches (45 cm) wide works perfectly. It should be sturdy enough to support the weight of your decorations.
- Prepare your “harvest” materials. You’ll need dried flowers, wheat stalks, small branches, mini pumpkins, acorns, pinecones, or colorful leaves — anything that feels like the harvest season and the start of cooler days.
- Create the base of color and texture. Start with the larger elements — branches, stalks, and wheat. Then add accents: mini pumpkins, cotton pods, dried orange slices, or a burlap ribbon. It’s best to work clockwise, attaching everything with thin wire.
- Add dimension. Don’t be afraid to mix textures. Combine dried grasses with bright red berries or soft oak leaves. The main thing is to avoid a flat look — let some pieces stick out slightly to make the wreath look natural and full.
- The final touch. Add a ribbon for hanging — wide linen or jute works best. It highlights the rustic character of the design and adds a finishing touch.
Useful Tips
- Want your wreath to last longer? Spray the dried plants with hairspray — it helps preserve their shape and prevents shedding.
- For outdoor doors, choose sturdier materials like twigs, acorns, and artificial leaves.
- If you’re worried that birds might go after your wreath, replace real berries with artificial ones — they look surprisingly realistic these days.
- A grapevine or rattan base is not only eco-friendly but also naturally beautiful and long-lasting.
You can reuse your finished wreath for more than one season. Just store it in a dry place, like a box or paper bag. In spring, refresh it by replacing some of the dried pieces with greenery or herbs — and your decor will look brand new again.
3. Fire Pit Seating With Cozy Textures

I’ve always believed that fall was made for evenings by the fire — when there’s a comfortable spot to sit and just enough texture and warmth to make the space feel alive.
How to Set Up a Cozy Fire Pit Area
- Define the zone. The fire pit area should be about 8–10 feet (2.5–3 m) in diameter so everyone has enough room. The surface can be gravel, brick, or simply compacted soil — the main thing is that it’s safe and dry.
- Choose the right furniture. The best company for a fire pit includes wicker chairs, wooden benches, or sturdy chairs with cushions. You can also add a couple of folding canvas chairs — they’re light and easy to move. If you plan to host gatherings, set up 5–6 seats so no one’s left standing.
- Add textiles. Throw a few wool or fleece blankets over the chairs and mix in textured pillows — linen, canvas, or boucle work great. I love using mustard, burgundy, and warm gray tones — they look especially cozy in the firelight.
- Don’t forget the fire pit itself. A good outdoor fire pit bowl is the center of it all. Go for something sturdy and deep (about 24–30 inches / 60–75 cm). I’ve been using an outdoor fire pit bowl — nothing fancy, but incredibly reliable.
- Add lighting. The fire alone often isn’t enough. Include string lights, outdoor lanterns, or candles in glass jars. The light should be soft and subtle so it complements the flames instead of competing with them.
- Add a small table. Even a wooden crate or tree stump works — just enough space to set down mugs, a teapot, or a plate of snacks.
Practical Tips
- Keep a basket of blankets nearby — guests will appreciate it when the temperature drops.
- Avoid synthetic fabrics near the fire — they melt easily and can catch fire.
- If you have kids or pets, install a protective screen or stone border around the pit. It’s a small step that prevents burns and accidents.
- Always place candles and lights on stable surfaces and never leave them burning unattended — especially on windy evenings.
- After each gathering, douse the coals with water and stir the ashes — even faint heat can smolder through the night.
The key is to keep everything within reach — blankets, wood, and lanterns. When everything’s ready to go, your fire pit zone stops being just “decor” and turns into a fully functional outdoor space where you’ll actually want to spend your evenings.
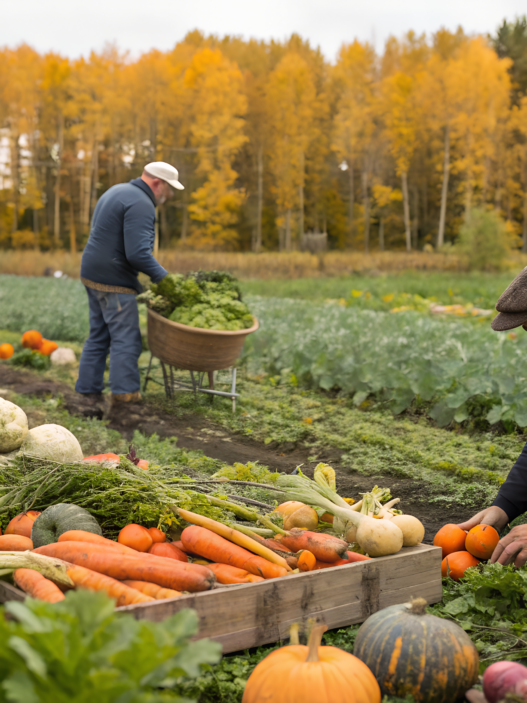
4. Autumn Flower Bed Transformations

Fall is the perfect time to make your garden look neat and alive, even when most plants have already finished blooming. Autumn flower beds aren’t about lush flowers — they’re about structure, texture, and well-placed accents.
How to Refresh Your Flower Beds for Fall
- Clean up the area. Start by clearing the beds. Remove everything that won’t come back to life — wilted annuals, old stems, and fallen petals. Anything that’s disease-free can go straight into the compost. After cleaning, loosen the soil and add a layer of mulch — it will protect the ground and help retain moisture.
- Add late-season plants. Your garden needs a bit of new energy this time of year. Plant varieties that keep blooming and stay colorful even in cooler weather:
- Chrysanthemums — hardy, bright, and long-lasting.
- Asters — tolerate cold well and bloom until frost.
- Sedum — shifts shades from green to deep burgundy.
- Heather or Erica — give the bed dense texture and color even into November.
For variety, include low ornamental grasses like blue fescue — they keep their shape even under the first snow.
- Divide and transplant perennials. Fall is the perfect season to divide and rejuvenate perennial clumps. The soil is still warm, so plants have time to root before winter. Do it 4–6 weeks before consistent frost, water well afterward, and mulch with peat or dry leaves.
- Add containers with seasonal plants. If your beds are already past their peak, place containers nearby with fall plants — ornamental cabbage, calluna, or mini pumpkins. Containers are easy to move and mix, which helps when the weather changes suddenly.
- Prepare the soil for winter. After all the updates, cover the surface with compost, wood chips, or shredded leaves (2–3 inches / 5–7 cm thick). It locks in moisture and keeps roots from freezing.
Tips
- Don’t leave bare soil after trimming — cover it with mulch to prevent weeds.
- Now’s the perfect time to plant bulbs like tulips, daffodils, and crocuses — your bed will bloom in spring with almost no effort.
- Check your drainage, since heavy fall rains can damage roots.
- If your beds are exposed to wind, add a low border or stones to protect small plants.
- Before winter, clean, sharpen, and oil your garden tools — you’ll save time when spring arrives.
That way, your flower bed will not only keep a tidy look but also transition smoothly into winter. Come spring, there’ll be minimal work to do — everything will already be ready for a new season of growth.
5. Lantern Lighting for Cool Evenings

Light in the garden doesn’t just illuminate pathways and corners — it sets a calm, soft, and warm evening atmosphere. And you don’t need an elaborate outdoor lighting system: just a few well-placed lanterns and candles can completely transform your yard or porch.
How to Create Cozy Evening Lighting
- Define your light zones. Start by deciding where you want the focus: near the entrance, along the path, by the fire pit, or on the patio. It’s best when the light is layered — table lanterns, hanging ones, and low ground lights. This makes the space look deeper and more dimensional.
- Choose the lantern style. For a rustic look, go with metal or wooden lanterns with frosted glass. For a modern touch, choose simple black or white frames without patterns. I especially like models that give off a soft amber glow — they don’t strain your eyes and keep the natural tones of the garden.
- Use candles wisely. Real flames create the warmest and most natural light, but they require caution. Place candles only in glass or metal lanterns with lids to protect them from the wind. If you have kids or pets, choose LED candles — they look real but are completely safe.
- Mix different light sources. Combine a few large lanterns near the steps, medium ones on the table or next to chairs, and several small ones along the pathway. One of my favorite options that I use myself is solar lanterns for outdoors. They charge during the day and turn on automatically when it gets dark.
- Consider light temperature. Warm tones (around 2700–3000 K) make the space cozy and relaxing, while cool white light is better reserved for functional areas — like the utility yard or workspace.
Tips
- If you use real candles, place them only on stable surfaces and never leave them unattended.
- To soften the light, use frosted glass covers or lampshades.
- Small solar string lights work great for pergolas, railings, or fences — they highlight shapes gently without feeling overly festive.
- Make sure all electrical parts are outdoor-rated (IP65 or higher) — fall weather means moisture and rain.
- Don’t place lanterns too close to plants — hot glass can burn leaves.
This kind of lighting doesn’t require a big budget but completely changes how your space feels. When the evening light is set up right, your garden remains functional and inviting long after sunset. Just keep the glass clean, check the power sources, and don’t be afraid to rearrange your lanterns whenever the mood changes.
6. Decorative Hay Bale Corners

Hay bales are probably the easiest way to bring a touch of fall charm to any corner of your yard. They’re affordable, natural-looking, and instantly create that classic harvest-season vibe. We often use them not only as decoration but also as functional elements — stands, seats, or even bases for temporary flower beds.
How to Create Decorative Corners with Hay Bales
- Choose the right spot. The best locations are the porch, a garden corner, or a spot near the fire pit. Just make sure the bales don’t sit directly on wet ground — place a board or wooden pallet underneath to help them keep their shape and avoid mold.
- Get quality straw or hay. For decor, pick medium-density bales (about 20×40×15 inches / 50×100×40 cm). Very tight bales are hard to decorate, while loose ones fall apart quickly. I usually go for straw rather than hay — it’s lighter in color and doesn’t have a strong grassy smell.
- Build your composition. Stack the bales in two levels — one horizontal and one vertical on top. This gives the display structure and allows you to arrange decorations at different heights. Between them, place planters, baskets, or even a crate of apples.
- Add fall accents. Use pumpkins, corn husks, bundles of herbs, wreaths, sunflowers, or chrysanthemums — anything that feels like harvest time. The key is not to make it symmetrical; a little asymmetry makes the setup look more natural.
- Include fabric textures. A plaid blanket, burlap piece, or checkered tablecloth can be thrown over the top to soften the look. Textiles add warmth and visual texture. If the setup feels too even, add an old bucket or basket to balance the composition.
- Add lighting. Everything looks better at dusk with some soft light. One lantern with a warm glow or a small battery-powered string light can make the whole display look straight out of a magazine. Battery lights are the best choice — safe, quick to install, and wire-free.
Tips
- Don’t place hay bales directly against house walls — they absorb moisture and can damage siding.
- Keep them at least 10 feet (3 m) away from the fire pit or open flames.
- On windy days, secure the bales with garden stakes so your setup stays in place.
- After the season, reuse the straw as mulch for garden beds or bedding for chickens — nothing goes to waste.
- For a cleaner look, lightly spray the surface with water before setting up — it helps reduce dust.
This kind of corner can be assembled in under an hour but looks like you spent all week preparing for fall. And the best part — it’s easy to take apart and reuse next season.
7. Warm Color Pots and Foliage

Warm-toned pots and foliage with red, copper, and golden accents can completely transform the look of your yard or porch. And the best part — you don’t need much money, just a bit of taste and attention to detail.
How to Create a Warm Fall Arrangement
- Choose pots in a warm palette. Orange, terracotta, brick, and mustard tones pair beautifully together. If you prefer something more neutral, add one or two gray or cream-colored pots to balance the setup. Use different sizes — from 8 to 14 inches (20–35 cm) — to keep it looking natural and relaxed.
- Pick plants with autumn character. For vibrant accents, go for chrysanthemums, asters, calendula, marigolds, coleus, or ornamental peppers. Add contrast with foliage plants — for example, heuchera with bronze or purple leaves. It holds up beautifully even at +40°F (+4°C).
- Create levels. Group pots in threes: tall in the back, medium in the middle, and small up front. You can place them on wooden crates or bricks to add height. Layering makes the whole composition look richer and more structured.
- Add texture and background. Between the pots, place branches, ceramic spheres, or small baskets with mini pumpkins. These details tie everything together. If the pots are against a wall, hang a wreath or a wooden sign with a fall message nearby.
- Think about lighting. Light helps highlight colors, especially in the evening. One outdoor spotlight or a few solar lanterns can make the foliage look warmer and deeper.
Tips
- Skip the shiny plastic pots — choose clay, ceramic, or cement instead. They look natural and handle cold weather better.
- If frost is expected at night, move the pots closer to the house or cover them with garden fabric.
- For a unified look, repeat colors — for example, use the same pots with different plants.
- To save time on watering, mix hydrogel or vermiculite into the soil — they help retain moisture.
- Don’t forget drainage holes. Even the prettiest plants won’t last long without them.
Don’t try to create the perfect setup right away. In fall, pots are easy to move — just swap their places when some plants fade and others start to shine. This way, your yard will stay vibrant and “alive” right up until the first frost.
8. Outdoor Blanket Baskets Setup

Outdoor blankets are that thoughtful detail that makes fall evenings by the fire or on the patio much more comfortable. When the temperature drops, it’s the small touches like these that decide whether guests stay longer or head home early. Blanket baskets solve two problems at once: they decorate the space and make it feel welcoming.
How to Organize Outdoor Blanket Baskets
- Choose the right baskets. The best options are woven baskets made of rattan, jute, or willow. They allow airflow, resist moisture, and look natural. For a small patio, one basket about 16–18 inches (40–45 cm) wide is enough; for a larger terrace, use two or three in different sizes.
- Pick blankets by material and color. The most practical fabrics are wool, fleece, or acrylic — warm but lightweight, and they dry quickly if the air is damp. Stick to fall tones like brick, mustard, burgundy, and beige. Add one bright throw as an accent piece.
- Place baskets strategically. Put them near the fire pit, chairs, or porch steps — wherever someone would naturally reach for a blanket. If you have a lounge area with a sofa, set one basket right next to the armrest.
- Add small decorative touches. Place a pillow, pine branch, or mini pumpkin inside the basket for a finished look. If evening moisture is a concern, cover the top with burlap or a light cloth to protect the blankets.
- Plan for storage. After each evening, bring the blankets indoors or store them in a closed container — it keeps things neat and protects the fabric from dew. This way, they’ll stay dry and last longer.
Tips
- Never leave wool blankets out in the rain — even a bit of moisture can linger for days.
- On chilly nights, add a hot water bottle or small heater near the seating area.
- Don’t pack blankets too tightly — air circulation prevents musty smells.
- If the baskets sit directly on the ground, place a rubber mat or wooden base underneath to block moisture from below.
- For guests, add a small tag or sign that says “Take One” — it’s simple but always makes people smile.
This setup takes little effort but works every time. These blanket baskets may seem like a small touch, but they truly make outdoor evenings more comfortable. Keep everything within reach, and your seating area will always be ready whenever you feel like stepping outside for some fresh air.
9. Mini Scarecrow Accents

Mini scarecrows are perfect for porches, flower beds, planters, or hay bale corners. Unlike full-size versions, these are light, portable, and can easily fit into any composition without taking up much space.
How to Make Mini Scarecrows for Fall Decor
- Prepare the base. Use thin wooden sticks about 12–18 inches (30–45 cm) long. Tie them together in a cross using twine or wire — that’s the “body.” If you want the scarecrow to stand on its own, insert the bottom part into a pot with soil or into a hay bale.
- Create the clothes. The easiest way is to use old fabric or small outgrown clothes. A tiny shirt, a piece of denim, or a handkerchief works great. Lightly stuff the sleeves with straw for shape. If you don’t have fabric, make a shirt out of burlap — it holds its form perfectly.
- Make the head. Take a small piece of burlap, stuff it with straw or cotton, tie it into a ball, and draw a face with a permanent marker. You can add button eyes and a piece of fabric for the mouth. A simple, slightly uneven look gives each scarecrow its own charm.
- Add details. A straw hat, a bow around the neck, or a mini pumpkin in the hands — the more small accents, the livelier the setup. One of mine holds a tiny wreath, another a piece of corn — small differences make them feel more personal.
- Set them up. Stick the scarecrows into flower beds, planters, or near hay bales. Arrange them in groups of three with varying heights and faces. For longer durability, spray the fabric with waterproofing spray to protect it from rain and moisture.
Tips
- Avoid water-based markers — the design will smear in the rain.
- Secure scarecrows with garden stakes or thin wire so they don’t blow away.
- For outdoor displays, use materials that handle moisture well: jute, burlap, or heavy cotton.
- If you don’t want to craft them yourself, you can buy ready-made sets like mini scarecrow decorations outdoor — they usually come in groups and look great together.
- Add small battery-powered LED string lights for extra dimension in the evening.
These mini scarecrows bring character and life to your garden, especially when placed in different corners of the yard. You can easily refresh them every year by changing hats, ribbons, or clothing — it only takes a few minutes, but keeps your fall decor looking fresh and fun season after season.
10. Pumpkin Pathway Borders

A pumpkin-lined pathway is one of the easiest yet most impressive ways to decorate your garden or porch in the fall. This kind of decor sets the mood from the very first steps — it’s warm, natural, and instantly brings that festive autumn feeling even without other decorations.
How to Make Pumpkin Borders Along a Pathway
- Choose the right pumpkins. The best choice is medium-sized pumpkins (8–10 inches / 20–25 cm in diameter) — they’re stable and hold their shape well. Mix colors like classic orange, pale cream, and muted gray-green. This variety looks richer and more natural.
- Prepare the pathway. Clear away fallen leaves and even out the ground where the pumpkins will sit. If the soil is soft, place a small board or flat stone underneath each pumpkin to keep it from touching the damp ground — that helps prevent rotting.
- Arrange the composition. Set the pumpkins every 1.5–2 feet (45–60 cm) along both sides of the path. For longer walkways, alternate large and small pumpkins to create a natural rhythm. Add decorative touches here and there — mini pumpkins, corn bundles, or potted chrysanthemums work great.
- Add light. Garden lanterns, solar lights, or string lights look beautiful between the pumpkins. For a safe option, use LED candles — they give a soft, warm glow without open flames.
- Secure the setup from wind. Autumn gusts can roll away smaller pumpkins. Just insert a short garden stake nearby and tie them lightly with wire or twine to keep everything in place.
Tips
- Don’t place pumpkins too close to the lawn edge or mower path — equipment can easily damage them.
- In rainy climates, wipe or spray pumpkins with a vinegar solution (1 part vinegar to 10 parts water) — it slows mold growth.
- Artificial mini pumpkins work too, especially if you want the display to last until winter.
- When the season ends, compost the real pumpkins — the perfect way to close the fall cycle naturally.
If you add lanterns or candles between pumpkins, always check for dry leaves nearby — they’re a common cause of fire. LED candles are safer and give the same cozy look.
Cozy Yard
Fall in the garden isn’t the end of the season — it’s a chance to reset your space for a new rhythm of life. You don’t need to spend a lot of time or money — just a few thoughtful touches can bring warmth and life even to cooler days.
Start small: place a lantern by the path, add a pumpkin planter, or set out some blankets outside. From there, everything falls into place — step by step, week by week.Which of these ideas speaks to you most?
Share in the comments what you’ve already tried or plan to do this fall — I’d love to see how your porches and gardens transform this season.