For hydrangeas, the choice always matters — not even the variety, but the shape, material, and placement. The same shrub can look calm, strict, temporary, or grounded. Everything depends on what it’s planted in and where it stands.
We learned this the hard way. First in Idaho, on a small property where every container was a practical decision. Then — after moving to the Pacific Northwest, where the space felt different, and the demands on containers changed along with the climate and the rhythm of the seasons. In some places, heavier forms were needed so the space wouldn’t feel like it was falling apart. In others — lighter ones, because there were already plenty of details around.
Here I’ve put together 10 ways to use hydrangeas in containers that work for everyday life. You’ll quickly see there’s no universal solution. What you do get is an explanation of why one container works and another doesn’t, and how to choose something that feels right for you.
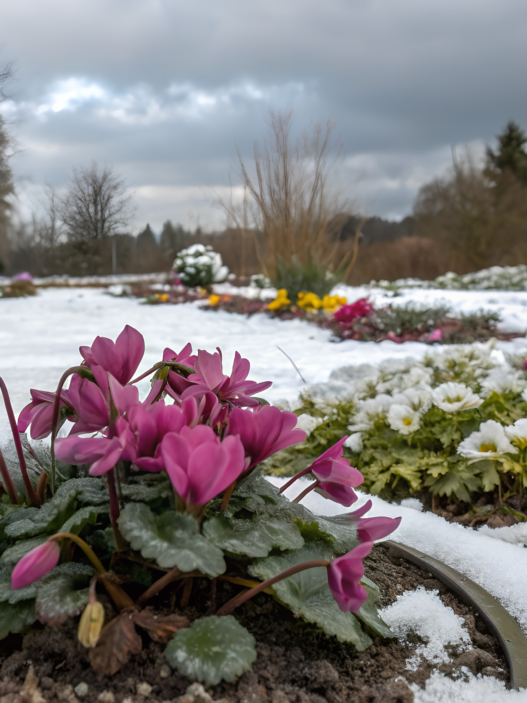
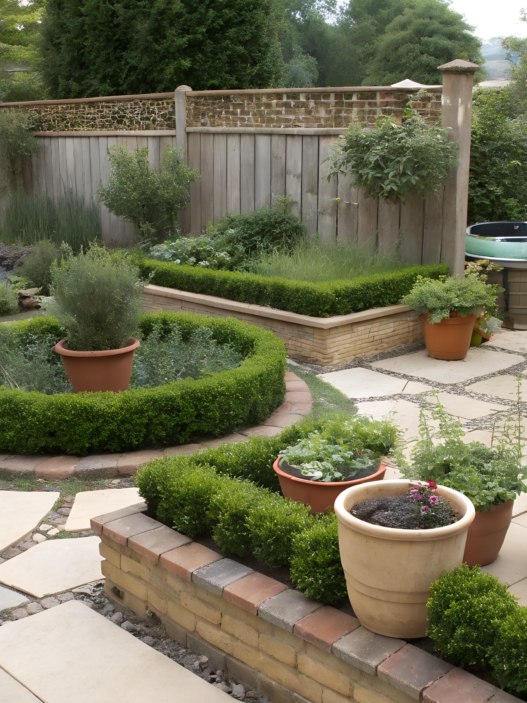
1. Clay Pots with Rustic Hydrangeas
With clay pots, the yard just starts to feel normal. Calm. Without the sense that something is extra or out of place.
We didn’t come to this right away. On our first property in Idaho, there was just bare ground, old shrubs, awkward corners. We planted things wherever there was room, without thinking about composition. And at some point it became obvious that clay pots with hydrangeas were what tied everything together.
They didn’t look new. And maybe that’s exactly why they worked.
What you’ll need
The list is actually short. And that’s a good thing.
- A simple clay pot
No glaze, no patterns, heavy enough not to feel temporary. One that stays put once you place it and doesn’t beg to be replaced after one season — for example, The HC Companies 20 Inch Terrazzo Clay Planter. - A hydrangea
We most often use bigleaf or panicle varieties — they handle containers well and respond nicely to regular watering. - Soil with organic matter
A ready-made container soil plus compost. Not straight peat and not garden soil scooped from under an apple tree. The soil should be loose but not fluffy, so after watering the water doesn’t sit on top or rush straight through. - A bit of compost
Even a small amount makes a noticeable difference.
How to do it so everything looks natural
Here it’s not about tricks, but about approach.
- Don’t try to make clay “perfect”
Clay is good because it doesn’t look new. Over time, stains appear, water marks show up, the color becomes uneven. That’s normal. We never try to remove this. After one season, the pot looks better than it did on the day we bought it. - Mix the soil by hand, not by formula
We usually combine regular container soil with compost and add a bit of bark — not for a recipe, but for structure. The soil should be loose, not sticky. When you grab it in your hand, it shouldn’t clump into a dense ball. - Plant the hydrangea calmly, without force
I place the plant in the pot, add soil around the sides, and gently press with my palms. No pushing. After a couple of days, the shrub looks steadier — the leaves sit more evenly, and the plant stops leaning to one side. - Water regularly, especially in heat
Soil dries out faster in clay, and you can feel it. In summer, I usually check the pots every morning. If the top 1–2 inches (≈ 2.5–5 cm) are dry, I water. Sometimes that’s almost every day, sometimes every other day. That’s fine. In clay pots, water moves evenly without stagnating. - Don’t move the pot unnecessarily
Place it — and leave it. Clay pots work best when they become part of the place, not when they’re constantly moved around in search of a “better angle.”
These pots aren’t meant to be the center of attention. They just stand where you pass every day — by the door, along the porch, next to a bench or table. After a while, you catch yourself thinking that without them, the space feels empty. Not because it’s “pretty,” but because you’ve gotten used to them.
Tip
If you don’t know where to start, place one clay pot with a hydrangea where you’re every day — near the entrance or on the porch. Live with it for a couple of weeks. Notice how the place feels in the morning and in the evening. After that, decisions about the rest of the yard become much easier — you already have a reference point.
2. Wooden Barrel Hydrangea Planters
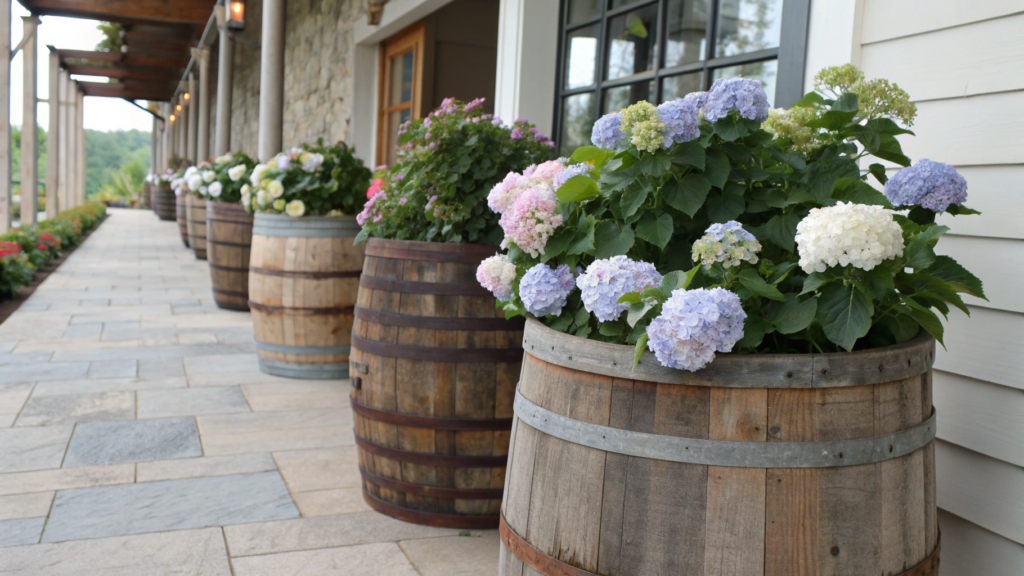
Wooden barrels for hydrangeas create a completely different mood.
If clay feels neutral, wood immediately adds weight and a sense of something meant to stay. The kind that feels like it was here before you — and will likely remain after.
Wood and hydrangeas work very well together, as long as everything is done without rushing.
What you’ll need
Here, it’s not about quantity, but about choosing the right things.
- A wooden barrel or half barrel
Wine or whiskey barrels made of oak work best. They’re thick, heavy, and hold their shape well. A new barrel can work too, but a used one looks calmer and less “polished.” - A hydrangea
Panicle varieties perform especially well in barrels — the shrub fills out quickly and doesn’t look lost. - Soil with good structure
Ready-made container soil with added compost and a small amount of bark. This mix holds moisture but doesn’t compact, which is especially important in wooden barrels. - Compost
A must. The root zone in a barrel is large, and the plant needs consistent nutrition.
How to keep the barrel from looking “decorative”
Wood is easy to push into stylization. The key is to avoid that.
- Don’t treat the barrel with varnish or stain
Let the wood age on its own. Rain, sun, cold. After a year, the surface becomes more matte, small cracks appear, and the barrel starts to look natural. - Always check drainage
There must be holes at the bottom. If there aren’t any, make them yourself. Wood holds moisture longer than clay, and without drainage the soil can stay wet for too long. - Fill the barrel in layers, slowly
I usually add some soil first, place the plant, then add the rest. No packing it down. Just gently press with my hands so the shrub stands steadily. - Water less often than clay
Soil dries out more slowly in wooden barrels. In summer, watering 2–3 times a week is usually enough, depending on the weather. I check by hand: if the top layer is dry but it feels cool underneath, everything is fine. - Leave a bit of air at the top
Don’t fill soil all the way to the rim. A couple of inches of space makes watering easier and prevents soil from washing out.
Where these barrels work especially well
Wooden barrels are great where you need a sense of stability.
- at the entrance to the house
- next to porch steps
- against the wall of a house or shed
- in a corner of the yard that needs visual weight
They don’t get lost in the space and don’t feel temporary. After a while, you start to see them as part of the site’s architecture.
Tip
If a hydrangea in a wooden barrel starts wilting in hot weather, don’t rush to water more. Moisture stays in wood longer than it looks from the surface. Instead, check the soil 4–5 inches (≈ 10–12 cm) deep. If it’s moist there, the issue isn’t lack of water but overheating of the root zone. A simple fix often helps — move the barrel so it gets morning sun and shade in the afternoon. The effect is noticeable within a few days.
3. Modern Concrete Planter Styles
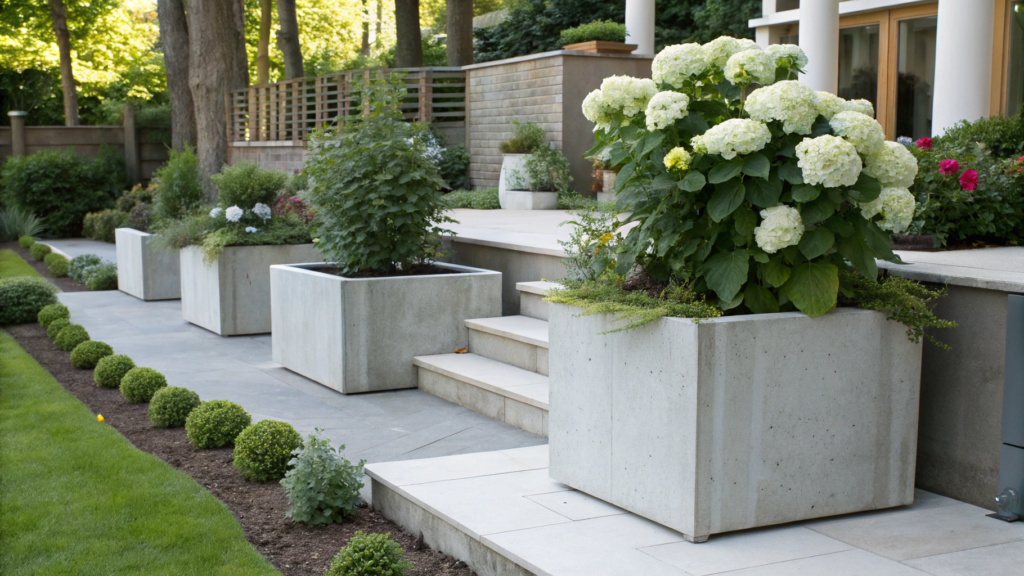
When you hear about concrete planters, questions come up right away. Too cold? Too harsh? Not very “garden-like”?
But over time it became clear that concrete creates order and stability, especially when there’s a lot of greenery around.
Hydrangeas look different in concrete than they do in clay or wood. The foliage feels denser, the shape of the shrub reads more clearly, and the whole corner of the yard immediately looks more put together — even if not everything around it is finished yet.
What you’ll need
Here it’s important not to overcomplicate things and not try to “soften” concrete with decor.
- A concrete planter with a simple shape
No texture, no patterns, no imitations. Round or cylindrical works best. Straight lines create a calm background for the lush foliage of hydrangeas. - A hydrangea
Both panicle and compact bigleaf varieties look good in concrete. The shrub shouldn’t be too small — concrete visually adds weight to the composition. - Soil with good moisture retention
Container soil with added compost and a small amount of perlite or bark. The soil should hold moisture but not turn into a dense, wet mass. - Compost or well-rotted manure
Nutrition is especially important in concrete containers — the volume is large, and the plant grows actively.
How to make concrete feel natural, not cold or “foreign”
This is where rushing doesn’t help. Concrete needs a bit more attention to detail.
- Start with the right location
A concrete planter is best placed where it will stay permanently. It’s heavy, and constant moving gets old fast. I always “test” the spot first — place the empty planter, walk around it for a couple of days, and see how it looks in the morning and in the evening. - Think about drainage in advance
A drainage hole at the bottom is essential. If there are several — even better.
Unlike clay, concrete doesn’t forgive standing water. If the soil stays wet too long, the roots react almost immediately. - Mix the soil a bit denser than for clay
I usually take a universal potting mix, add compost, and a bit of coarse sand or fine bark. The soil should feel firm but not heavy. When you squeeze it in your hand, it holds its shape but breaks apart easily. - Planting
I place the plant, add soil around the sides, and gently press it down. In concrete, it’s especially important that the shrub stands straight — any tilt is immediately noticeable. - Water less often, but more carefully
In concrete planters, I water less frequently than in clay. In hot weather, that’s usually twice a week, sometimes three times. Before watering, I check the soil with my fingers at a depth of 3–4 inches (≈ 7–10 cm). If it feels cool and moist there, I wait. - Don’t rush with feeding
In concrete, plants grow steadily, without sudden bursts. Less, but regularly, works better. Usually it’s enough to add compost at the beginning of the season and a bit more in mid-summer.
Where concrete planters work best
Concrete holds space well where clarity is needed.
- at the entrance to a modern home
- on a terrace with minimalist furniture
- along straight pathways
- next to wooden or metal elements
Concrete planters don’t pull attention toward themselves. After a while, you stop seeing them as separate objects — they become the background. As a result, attention stays on the hydrangea itself: the shape of the shrub, the color of the leaves, the blooms. This is especially noticeable in areas that already have a lot of details — doors, steps, railings, furniture.
Tip
If a hydrangea in a concrete planter looks neat but seems “stuck” — not gaining volume and holding the same shape for too long — check the top layer of soil. In concrete, it often compacts faster than it appears. Once a month, I gently loosen the top 2–3 inches (≈ 5–7 cm) with a small hand fork, without going deeper toward the roots. After that, the plant usually starts growing more actively — new shoots appear, and the shrub looks livelier, without changing watering or feeding.
4. Tiered Hydrangea Pot Arrangements
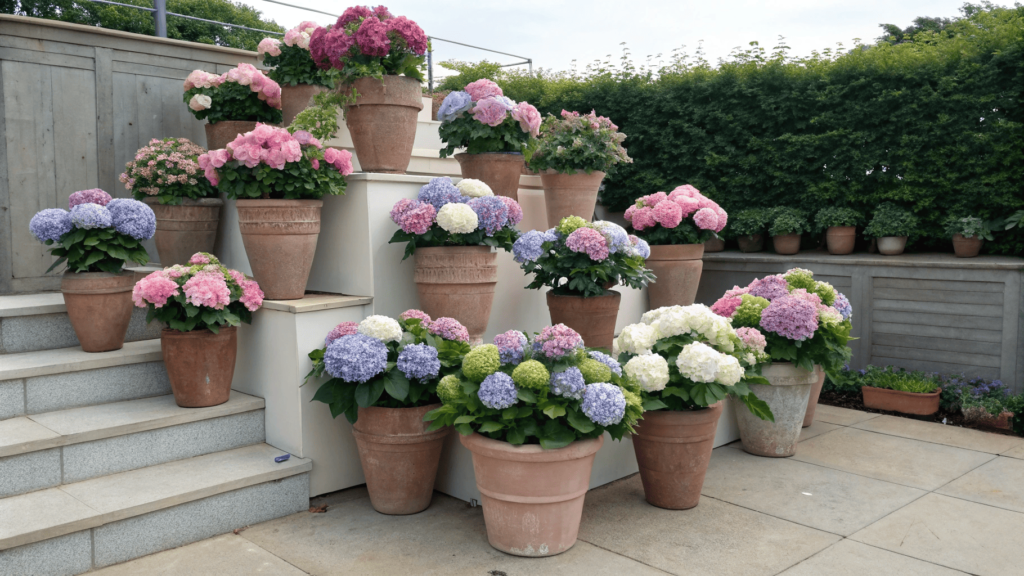
We came to tiered arrangements out of necessity. Sometimes there’s a spot where a hydrangea in a large container looks right, but the area around it feels empty. You add a second pot — and it instantly feels cluttered. But when plants sit at different heights, the composition suddenly becomes readable.
What you’ll need
Here, it’s not about the number of elements, but about their differences.
- Two or three containers of different heights
They don’t have to be different diameters. Sometimes identical pots at different levels work better than mixed shapes. - One main hydrangea
This is usually the largest shrub that sets the volume for the whole composition. - Additional plants or a smaller hydrangea
This can be a compact variety or a younger plant — not everything needs to be at its peak. - A stand, step, or low platform
Wood, concrete, stone — it doesn’t matter. The key is that it looks stable and doesn’t feel like furniture. - Soil and compost
The same as for single containers. No need to reinvent anything here.
How to build a composition that doesn’t look staged
- Start with the largest pot
I always begin there. It determines where the composition belongs at all. Not “centered,” not “symmetrical,” but where it makes sense — by a wall, a porch corner, a column. If the first pot is placed wrong, the rest won’t fix it. - Add the second level slightly to the side, not directly next to it
A common mistake is stacking pots straight on top of each other. Real life rarely looks like that. When the second container is shifted a few inches to the side, the composition immediately feels less formal. - Height matters more than diameter
The difference in height needs to be obvious. If the second pot is only a couple of inches higher, the eye won’t read it. Fewer elements with a clear height difference work better. - Don’t make all plants equally mature
When every shrub is the same size and density, the arrangement looks like a display. It feels much more natural when one plant is already “in shape” and another is still filling out. This creates a sense of time passing, not a frozen scene. - Watch the spacing
Pots shouldn’t touch each other tightly. Small gaps let each element breathe. If you have to push containers too close together, there are too many levels.
Tiered arrangements are especially useful where the eye naturally moves vertically — by an entry door, next to stairs, near columns or supports, or in corners where a single pot looks lost.
In spaces that already stretch upward, different levels feel logical and don’t need explaining.
Tip
If the composition feels overloaded, remove one element instead of adding another. Most of the time, the issue isn’t that “something is missing,” but that the levels are too close in height or volume. I usually take away the smallest pot and live with the arrangement for a couple of days. If it feels calmer without it — it was unnecessary.
It’s a simple approach, but it saves a lot of time and prevents constant tweaking.
5. Hydrangeas in Hanging Baskets
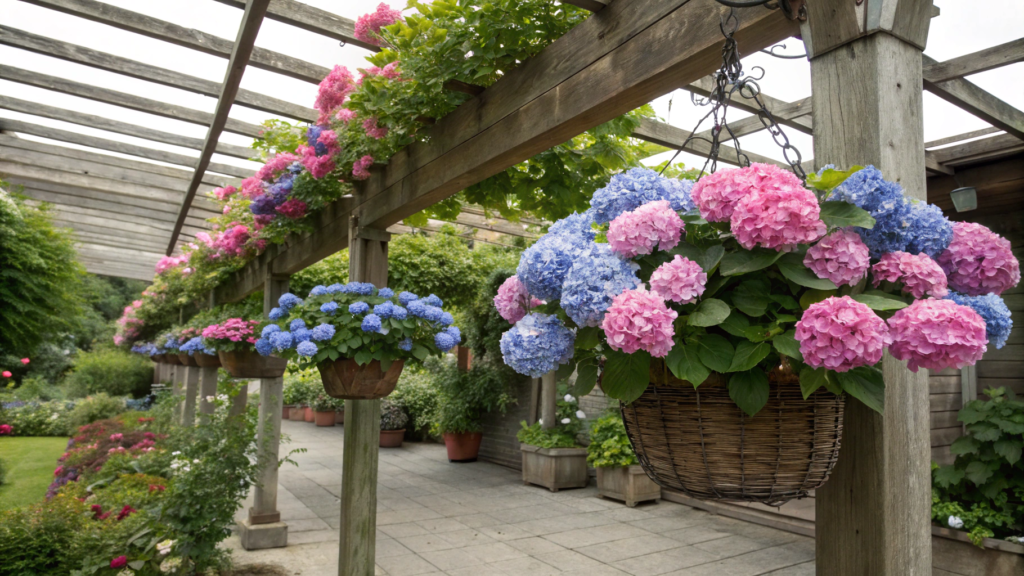
We avoided this idea for a long time. Hanging baskets are usually associated with something seasonal, temporary, almost disposable. And hydrangeas are plants that live for years. But when you treat a hanging basket not as a decoration, but as a full-fledged container, it starts to work in a completely different way.
What you’ll need
A hanging hydrangea is not a “use whatever you have” situation.
- A very sturdy hanging basket
Metal or reinforced plastic, with reliable chains and крепления. Lightweight coco baskets are out right away — they’re simply not designed for this kind of weight. For example, Achla Designs Hanging Flower Basket with Chain. - A compact hydrangea
A young plant or a variety that doesn’t spread too wide. Hanging baskets are not for giant shrubs. - Nutrient-rich but lightweight soil
Container soil with added compost and a small amount of perlite or coconut coir. The soil holds moisture but doesn’t make the hanging basket heavier than it already is. - Hooks and hardware you can trust
No compromises here. The weight of a mature hydrangea with wet soil is not a small thing.
How to keep a hanging hydrangea from looking awkward
- Choose the location before planting, not after
A hanging basket with a hydrangea is hard to move around. I always decide where it will hang first — porch, overhang, beam, awning. Only then do I plant the hydrangea. - Don’t hang it too high
A common mistake is hanging the basket almost at ceiling height. Hydrangeas are visually heavy, and when they hang too high, they feel like they’re pressing down from above. It looks much better when the basket sits around eye level or slightly lower. - Watch the shape of the shrub from the start
In a hanging basket, a hydrangea shouldn’t grow in all directions. I usually remove weaker side shoots early so the plant keeps a compact shape. This kind of pruning also helps balance the weight. - Water more often than you expect, but carefully
Soil in hanging baskets dries out faster than in ground-level containers. In warm weather, I check moisture almost every day. I water slowly, letting the water soak in instead of rushing straight through the drainage holes. - Account for wind
Even light swinging affects both the plant and the hardware over time. If the spot is windy, it’s better to skip the idea or choose a very sheltered location.
Hanging hydrangeas don’t work everywhere. And that’s okay.
- under roofs and overhangs
- on enclosed porches
- near entrances with overhead support
- in places with very limited horizontal space
They’re especially useful where there’s simply no room on the ground for another container.
Tip
If you’re unsure whether a hydrangea will work in a hanging basket in your conditions, start with a temporary setup. Hang the basket in the intended spot for a couple of weeks and observe: how quickly the soil dries, how much it swings in the wind, how convenient it is to water. Those two weeks will tell you more than any advice — and help you avoid disappointment halfway through the season.
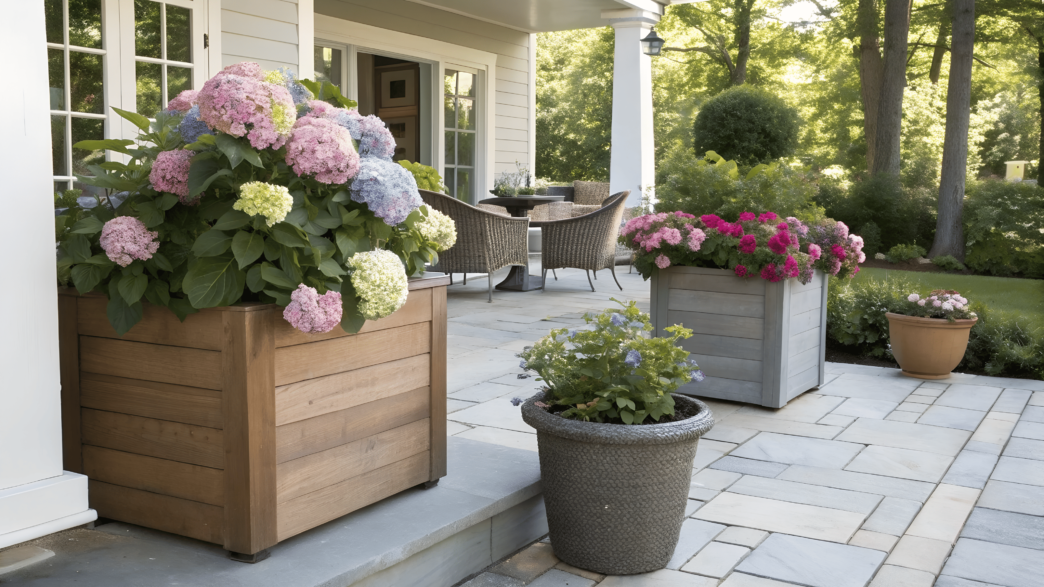
6. Mixing Hydrangeas with Annuals in Planters
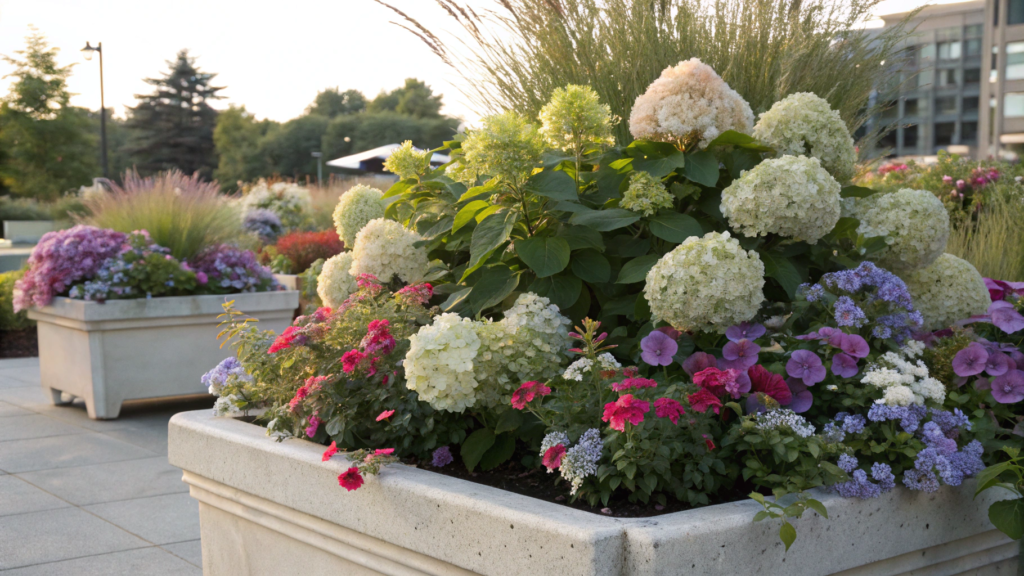
When we moved to the Pacific Northwest, we had to rethink a lot about how we use containers. The climate is different. The light is different. Even the rhythm of the season feels different. Where a hydrangea used to look complete on its own, here it sometimes felt like it needed a bit more movement.
That’s when we started mixing hydrangeas with annuals in containers again. Not as a decorative trick, but as a way to make plantings more flexible.
What you’ll need
The list is simple, but it matters why each element is here.
- One hydrangea as the base
It sets the volume and stays the same throughout the season. This is the anchor of the composition. - 1–3 annual plants
For filling gaps and softening the shape. It’s best to choose different heights and textures. - A container with extra room
Roots need space to grow. If the pot fits the hydrangea exactly, it’s already too small for a mix. - Nutrient-rich soil
Container soil with added compost. Annuals grow fast and actively use nutrients, so the soil needs to start with a reserve, not be рассчитана only for one shrub.
How to mix plants so it looks intentional, not random
- Hydrangea always comes first
I place it in the container first and look at how it “sits.” Not centered for symmetry, but positioned so the shrub feels stable. Sometimes a slight shift back or to the side is enough to create depth. - Annuals
Annuals work better not as a frame, but as a way to fill open space inside the container. When they appear on one side or toward the front, the composition immediately feels more dimensional. - Mix textures, not colors
Trailing, spreading plants with fine foliage work better than just bright flowers. Leaves keep the planting cohesive even after blooming slows down. - Leave empty space
Yes, really. There’s no need to fill everything right away. In a couple of weeks, the plants grow and the container settles on its own. When everything is packed from day one, the planting feels heavy. - Be ready to adjust as the season goes on
Annuals are a flexible element. Something stretched too much, something didn’t work, something just didn’t feel right — remove it, replace it. The hydrangea stays; everything else can be adjusted.
Annuals that work especially well with hydrangeas
We keep coming back to these options because they don’t compete with the shrub’s form:
- lobelia — for soft trailing lines
- bacopa — when you need to fill the edge
- coleus — if you want foliage instead of flowers
- alyssum — for a light background
Not because they’re the “best,” but because they come with fewer surprises.
Where these containers work best
Mixed plantings are great where you want a bit more movement. Usually that’s near an entrance you see every day, on a porch or terrace, next to a seating area, or in spots where a single hydrangea would feel too static.
Tip
If you’re unsure which annuals will work for you, don’t buy everything at once. Start with one option and plant it next to the hydrangea. After a week, check how it behaves: does it grow too aggressively, does it cover the shrub, is it easy to care for? Adding one more plant later is much easier than fixing an overloaded container.
7. Hydrangeas in Tall Porch Urns
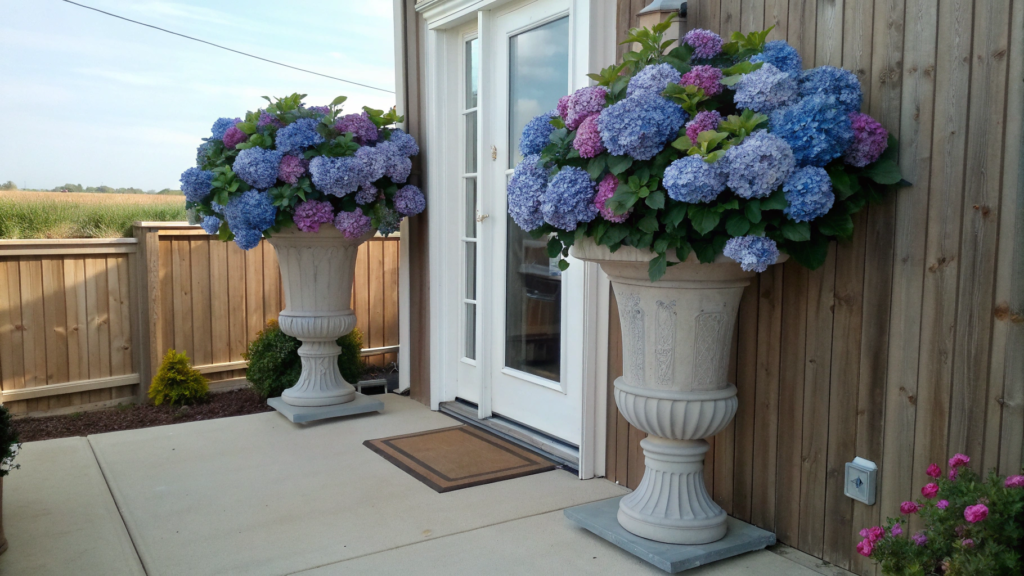
Tall outdoor urns are one of those cases where hydrangeas start behaving differently. Not better, not worse. Just differently. The height of the container changes not only how the plant looks, but also how it distributes its energy.
And that’s important to understand upfront.
What you’ll need
This is not a “use whatever you have” situation. Tall urns require deliberate choices.
- A tall floor urn
Narrow or slightly flared at the top. The key thing is stability. If an urn looks lightweight, it usually is — both visually and physically. - A hydrangea with a clear vertical form
Panicle varieties feel the most confident here. Compact bigleaf types can work too, but the shrub shouldn’t be too sprawling. - Heavy but structured soil
Container soil with compost and an addition of bark or perlite. The soil needs enough weight to hold the shrub upright, but it shouldn’t be clay-like, or water will sit at the bottom. - Compost and a bit of coarse filler
Bark, coconut coir, or something similar helps prevent compaction over time.
How to plant a hydrangea in a tall urn so it looks grounded
Here, the small details make all the difference.
- Don’t fill the urn completely with soil
At the bottom, I almost always leave part of the volume empty and fill it with a lightweight drainage material. Not for water, but for balance. This lowers the center of gravity and makes the urn more stable. - Place the plant slightly deeper than in a regular pot
Not burying the stem, but positioning the root ball lower than the rim. This helps the shrub settle into the shape of the urn instead of sitting on top like it’s in a vase. - Watch the vertical line from the start
In tall urns, any tilt is noticeable right away. I always step back a couple of feet and look at the plant from the side. If the shrub visually leans, it’s better to fix it immediately than to live with it all season. - Don’t add companion plants right away
Unlike wide containers, tall urns don’t like competition. The hydrangea needs time to adjust to the depth and shape. Everything else can come later — if it’s needed at all. - Give the plant time to show itself
In these containers, hydrangeas often look restrained at first. After a few weeks, the form starts to open up, and it becomes clear why the height mattered in the first place.
Tall urns aren’t needed everywhere. But in the right spots, they solve several problems at once.
- by the front door
- on both sides of a porch
- next to columns or supports
- in places where the eye naturally moves upward
They help fill vertical space and make the area feel more balanced, especially when architectural elements are nearby.
Tip
If a hydrangea in a tall urn looks neat but too “narrow,” don’t rush to change the variety or the container. Often the issue is that the soil has settled over time, and the root crown ends up too deep. I usually carefully lift the plant 1–2 inches (≈ 2.5–5 cm), add soil underneath, and place it back. After that, the shrub often starts filling out more actively and looks much more natural.
8. Vintage Metal Bucket Hydrangea Planters
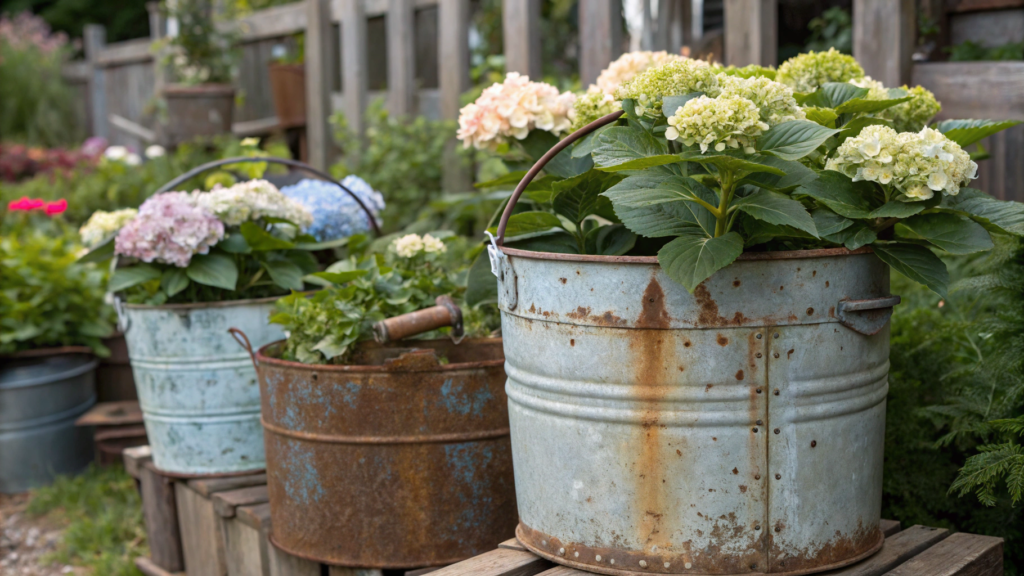
Vintage metal buckets demand respect. They’re not a “floral accessory,” but a working container with a history you can literally touch.
What you’ll need
- A metal bucket with history
Not shiny and new, but one that’s already been warmed by sun and rain. Real patina shows how the bucket behaves across seasons. - A medium-sized hydrangea
Old buckets are usually not very deep, so a small or medium shrub works better than a large variety. - Nutrient-rich but lightweight soil
Container soil with compost and a small amount of perlite or coconut coir. The soil holds moisture without adding extra weight to the metal bucket. - Compost or well-rotted organic material
This provides additional nutrition and helps the plant avoid feeling “suffocated” in a simple container.
If you want a ready-made option with the right look and without too much decoration, take a look at Vingli Vintage Rustic Metal Bucket Planters Set — they feel solid and understated.
How to plant a hydrangea in a metal bucket so it looks natural
- Clean the bucket, but don’t polish it
We don’t want new metal. Remove only the sharp rust spots that could damage roots during planting. Light patina is completely fine. - Add drainage, but gently
Wood likes porosity, concrete likes stability, and metal likes coolness. To keep water from standing, I usually place a small layer of expanded clay or gravel at the bottom. This helps water move down and not linger right at the roots. - Use soil with organic matter
This matters because metal heats up in the sun more than other materials. Organic matter (compost) helps the soil retain moisture and acts as a buffer. - Plant the hydrangea slightly above the rim level
Buckets are usually shallow, and if the plant sits too low, it can feel “lost” in the soil. Lift the root ball so the upper shoots sit just above the rim. - Watch how the bucket reacts to weather
Metal cools quickly at night and heats up during the day. In the first days, I observe the plant closely: whether the leaves droop in heat, how the soil behaves. This helps adjust watering before stress shows up.
Where these buckets work best
Vintage metal buckets are all about texture and contrast.
- by the porch, next to wooden steps
- against a brick wall
- among stones or an old fence
- next to other materials that already have a history
They blend in and, over time, become part of the landscape rather than a decorative object.
Tip
If the bucket heats up too much in the sun, especially on hot days, try placing it on a lighter surface — light-colored concrete or tile. This reduces heat buildup before the soil overheats. As a result, the plant stays calmer even in mid-season, and you won’t have to constantly worry about scorched leaves.
9. Minimalist White Pot Hydrangeas
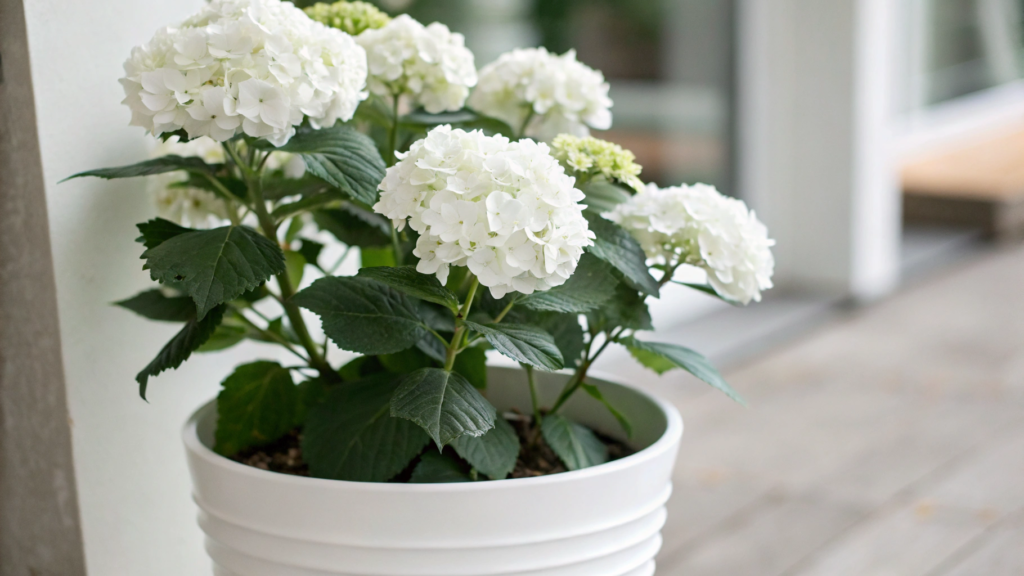
White pots show everything right away: the shape of the shrub, the condition of the leaves, even small care mistakes. There’s nowhere to hide behind texture or patina like with clay or wood. That’s why hydrangeas in white containers instantly reveal when something is off.
But when used intentionally, white pots offer something rare — a visual pause. A place where the eye can rest.
What you’ll need
- A white container with a simple shape
No texture, no ornament, no complex lines. Round or cylindrical works best. The simpler the form, the less it competes for attention. - A hydrangea with a clean, tidy silhouette
White pots emphasize shape. If the shrub looks messy or falls apart, the container will only highlight that. - High-quality soil without unnecessary additives
Container soil with compost, without large chunks. In white pots, it’s immediately noticeable when soil settles unevenly or washes out. - Mulch or a neat top layer
Not for nutrition, but for appearance. Bare dark soil in a white container looks harsh.
How to work with white pots so they don’t feel “showy”
- Watch the pot-to-plant proportion
In a white container, a small hydrangea looks even smaller. It’s better to choose a shrub that already has some volume, or a pot that doesn’t dominate in height. - Plan the top layer from the start
I almost always cover the soil with a thin layer of light mulch or fine bark. It softens the contrast and makes the planting look finished without feeling decorative. - Place white pots where there’s already visual noise
It sounds counterintuitive, but that’s where they work best. Against wood, stone, dark walls, or dense greenery, a white container helps the eye focus on the plant instead of the surroundings. - Don’t group many white containers together
One works well. Two — maybe. Three already feels intentional in a bad way. White pots are better spread out than clustered. - Keep them clean, but not obsessively
Water stains, dust, and soil marks show up immediately on white surfaces. I just wipe the pot with a damp cloth a couple of times per season. No more. A bit of “life” is fine — sterility is not.
White containers work especially well near entrances with lots of details, on porches with dark flooring, next to stone or brick walls, or in areas where greenery is already dense and active.
They don’t add another accent — they help the eye focus on the plant’s shape and color.
Tip
If you’re unsure whether a white pot fits a specific spot, place it there empty for a couple of days. See how it looks in the morning, midday, and evening, how it changes with light and background. If an empty container already feels out of place, adding a hydrangea will only make it harder. This simple test saves a lot of disappointment before planting.
10. Recycled Container Hydrangea Displays
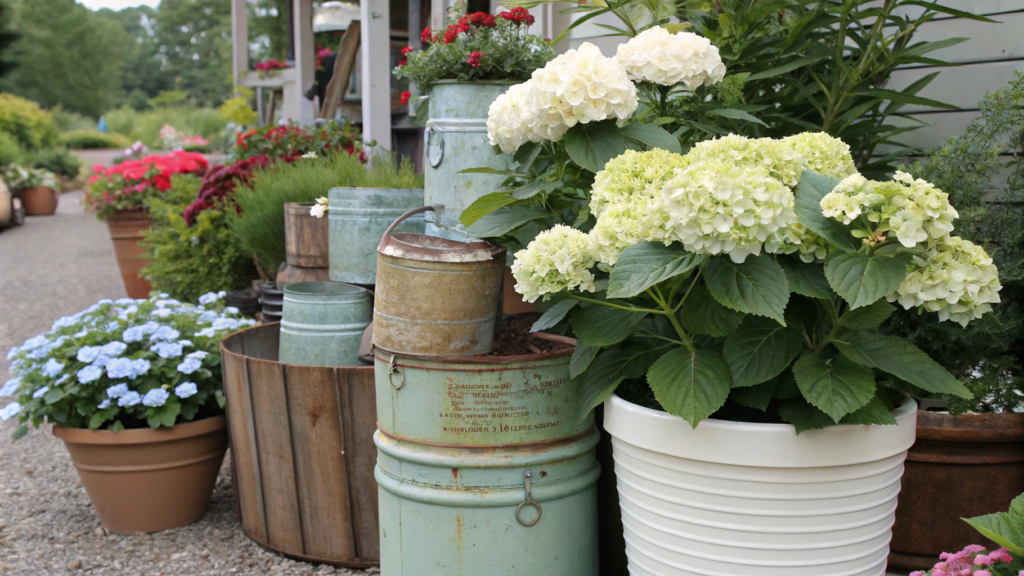
The idea of using recycled containers usually sounds simpler than it turns out to be. Everyone loves the thought of “using what you already have.” But with hydrangeas, the nuances show up fast. Because a hydrangea is not an annual you can repot in a month and forget about. It’s a plant that stays for years. And the container has to handle that — both physically and visually.
This is something you need to approach without romance.
What you can use — and what actually works
Here it’s not about what the container used to be, but how it behaves now.
- Wooden boxes and crates
Old tool boxes, fruit crates, wine boxes. What matters most is wall thickness and stability. Thin plywood gives up quickly. - Metal containers
Buckets, tanks, old utility containers. Not decorative “vintage” pieces, but real working metal. - Ceramics and thick plastic
Old planters, mismatched containers, oddly shaped storage pieces. If they hold their shape and don’t crack, they’re already candidates. - Unusual items
Old drawer boxes, storage crates, utility containers. The key here is knowing when to stop and not turning the planting into an art object.
How to prepare a recycled container so the hydrangea actually lives in it
- Start by assessing the size
If the container feels small, it is small. Hydrangeas don’t tolerate volume compromises. One large recycled container is better than three small “interesting” ones. - Check heat and moisture behavior
Metal and dark plastic heat up fast. Wood holds moisture longer. I always think less about looks and more about what will happen to the soil in July. - Make proper drainage
Recycled containers are rarely perfect. Drainage holes need to be where water actually exits. Sometimes that means several holes around the base, not just one in the center. - Line the inside if needed
For wood and metal, I often use dense landscape fabric or coconut fiber. Not for looks — to prevent soil washout and direct root contact with the material. - Build the soil with a seasonal buffer
This is not the place to save soil. I add more compost than I would in a standard pot. Repotting a hydrangea mid-season is the last thing you want. - Accept that the container and plant will age together
Scuffs, water marks, color changes are not a problem — they’re part of the story. But if the container starts breaking down, its time is simply over. That’s normal.
Where these plantings make the most sense
Recycled containers aren’t universal — and that’s their strength.
- near utility buildings
- along fences and enclosures
- in transition zones between “polished” and working spaces
- where a perfectly neat pot would feel out of place
Tip
If you’re using a recycled container for the first time, don’t plant your favorite hydrangea in it. Choose one you wouldn’t mind repotting or replacing. Watch how the container behaves over a season: how it holds moisture, whether it overheats, whether it starts to deteriorate. After that, it becomes clear whether this approach is worth repeating — and in what form.
Transforming the Porch
Hydrangea containers rarely turn out perfect on the first try — and that’s normal. Most workable solutions come from experience, when something turns out to be more stable, more convenient, or simply more pleasant in everyday use.So what container has worked best for you? Clay, wood, metal, something repurposed — or clean minimalism without extra details?
Share in the comments what you’ve already tried and what worked best in your conditions.
Those observations are always more valuable than any recommendations — because they come from real experience, not a catalog.