Hibiscus, wherever it is placed, can do more than it seems. It sets an accent, helps divide space, adds depth. In one place it works as a living border, in another — as the center of a composition, and somewhere it simply gathers a relaxation area around itself.
And if you get the idea to use hibiscus in landscaping — here are 10 ideas that actually work in practice.
Here you’ll explore different approaches — from hedges to containers and relaxation zones — and you’ll be able to choose what fits your yard best.
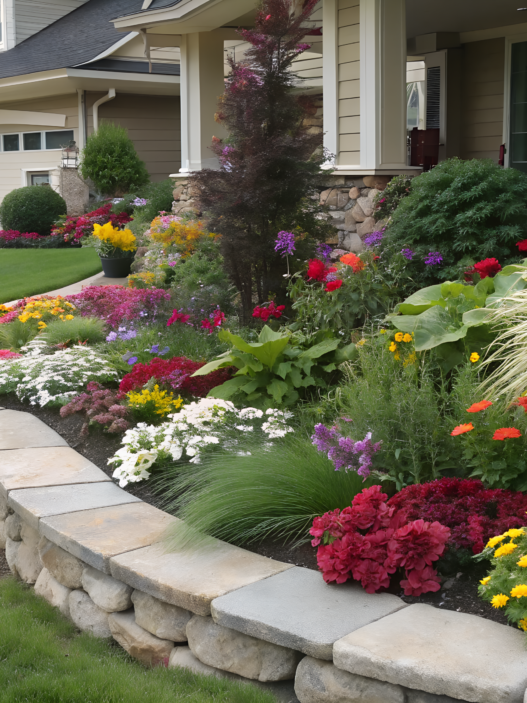
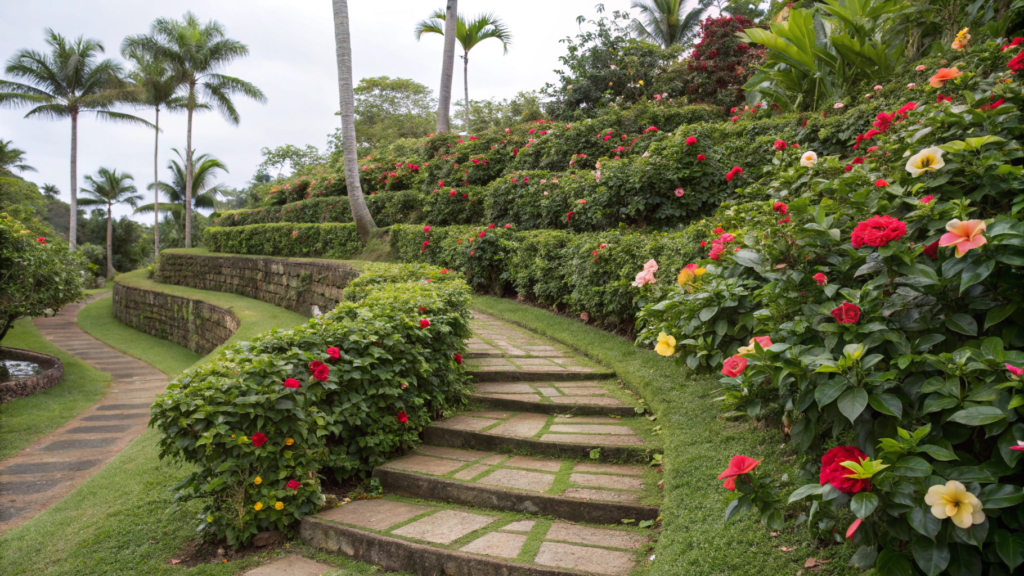
1. Hibiscus Garden Borders with Subtle Color Transitions
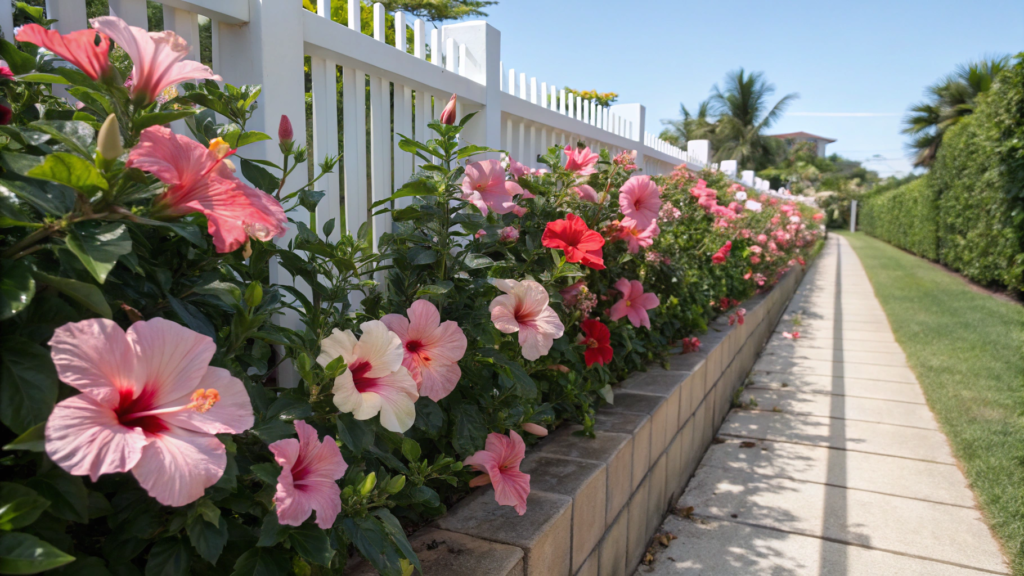
At one point we planted hibiscus by the principle “this one is beautiful, and this one too”. As a result, we got a pretty colorful line along the fence. Of course, all the flowers were beautiful, but together they created visual noise.
But when we approached working with shade transitions more thoughtfully, the yard started to look calmer, and even the space felt wider.
Studies, for example from University of Florida IFAS Extension, show that smooth color transitions make the landscape more harmonious and reduce visual overload. This is one of those cases where theory fully matches practice.
What you’ll need
- 3–5 hibiscus varieties with different color intensity
- nutrient-rich soil or compost
- mulch (layer 2–3 in. / 5–7 cm)
- watering (hose or drip system)
- pruning shears for care and shaping
By the way, a convenient option is Miracle-Gro Raised Bed Soil nutrient mix.
Before planting, it’s better to immediately understand where you most often look at the border from. This affects where to start with color and how the whole transition will read.
How to create a smooth color transition (without overload)
- Start with the lightest shade at the point where the eye lands first. This creates a soft entry into the composition.
- Move by color intensity, not random combinations. After light, it makes sense to go to deeper shades.
- Plant hibiscus in groups of 2–3 bushes, not one by one. This forms solid color
blocks. - Avoid sharp jumps between colors. If the transition feels rough — add an intermediate shade.
- Use neutral plants between groups to soften the transition and give the eye a “break”.
- Keep a distance of about 3–5 ft. (90–150 cm) between bushes so plants develop evenly.
- Mulch right away — it gives a neat look and helps retain moisture.
How lighting affects hibiscus color
There’s one more thing that seems small at first, but actually affects the result. It’s about how hibiscus behaves in different lighting.
If you consider this in advance, you can even slightly control the final effect — increase contrast or, наоборот, make the transition softer.
- in full sun the color becomes brighter and more насыщенный
- in light partial shade tones look softer and calmer
- the same variety can look different in different parts of the border
- because of this, the color transition may slightly change during the season
This is normal. Even good. The border doesn’t look static, it lives a bit of its own life — and that’s exactly its strength.
Such borders work especially well along fences, along the edges of paths, near patios and around relaxation areas. They don’t overload the space, but at the same time make it feel intentional and well-designed.
2. Hibiscus and Palm Pairings for a Lush Look
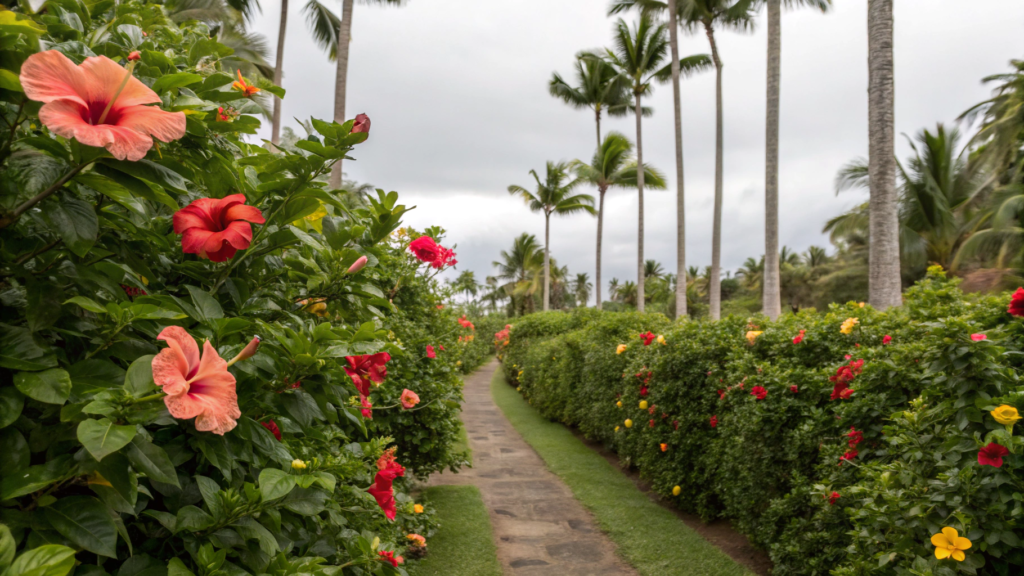
The combination of hibiscus and palm pairings helps make your yard feel visually deeper and richer, even if you don’t have much space. Hibiscus brings color and density, while palms add height and rhythm. Together they start to complement each other really well.
What you’ll need
- 1–2 palms as a vertical accent
- 2–4 hibiscus bushes for the lower level
- nutrient-rich soil with good drainage
- mulch (2–3 in. / 5–7 cm)
- watering (drip or regular)
- pruning shears for shaping
Keep in mind right away that the palm sets the scale. It’s not an “addition” — it’s the main element of the scene.
How to combine hibiscus and palms the right way
- Place the palm as the main vertical, not strictly in the center.
This creates a more natural composition and avoids the feeling of “artificial symmetry”. - Plant hibiscus around the base of the palm, but not too close — leave at least 2–3 ft. (60–90 cm). This gives roots space and allows each plant to develop without competition.
- Use hibiscus of different heights to create a layered effect.
Lower plants in the front and taller ones in the back build depth and make the planting feel more volumetric. - Stick to 1–2 hibiscus shades in one area.
This keeps the composition readable and prevents it from turning into a colorful mix. - Leave some open space around so the palm can “read” clearly.
Without this, it can get lost in the foliage and stop working as an accent. - Consider how light falls and what kind of shade the palm creates.
This matters because lighting directly affects the intensity of hibiscus blooming.
Why this works
When you look at plantings like this, you immediately feel they are well thought out, even if there aren’t many plants. This is not random. It’s the combination of form, height, and density.
When a composition has only one level — for example, just bushes — the yard feels flat. As soon as a vertical appears, the eye starts to perceive depth differently.
- palms create a vertical and a visual “framework”
- hibiscus adds density and color volume
- together they build a layered structure
- the space starts to feel deeper and more interesting
That’s why even a small yard can look more engaging. Not because of the number of plants, but because of how they work together.
How not to overload the composition
With these combinations, there’s one risk — you want to add more and more. Another bush, another color, another palm. And at some point the composition starts to feel heavy, even though it was meant to be light. To avoid that, it’s better to set limits from the start and stick to them.
- keep 1 dominant palm, maximum two
- use no more than 1–2 hibiscus shades in one area
- don’t fill all the space — leave visible gaps
- avoid dense planting where plants start overlapping each other
When there are constraints, the composition looks cohesive.
In the end, this combination works not because of the number of plants, but because of the right distribution of roles. Even with just a few plants, you can build something that looks structured and logical — if you set the right foundation from the start.
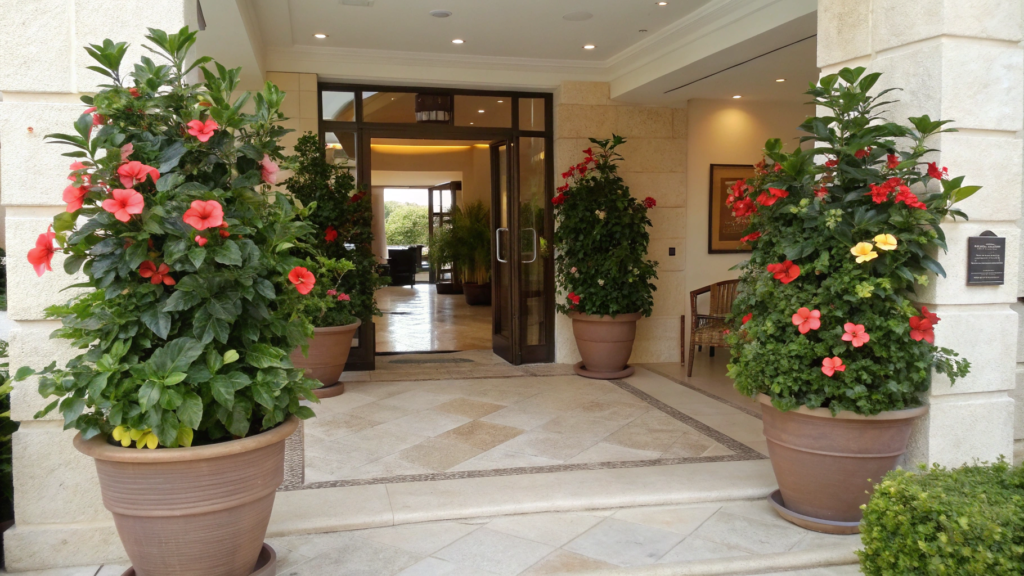
3. Patio Corners Framed with Bold Red Blooms
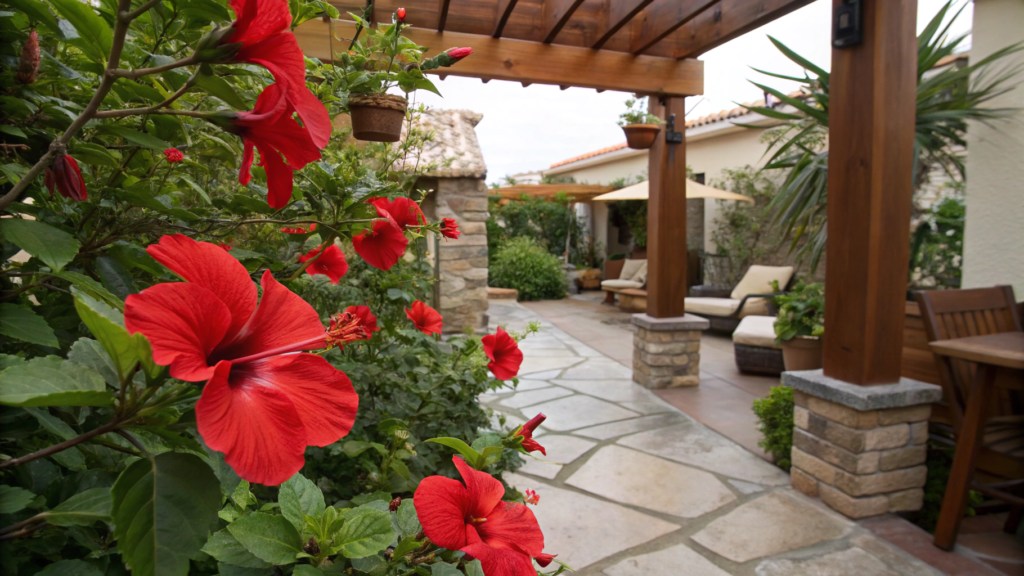
Patio corners with hibiscus make the space feel alive and natural. And they create a sense of a finished relaxation zone.
Red hibiscus instantly draws attention and gathers the space around itself.
What you’ll need
- 2 red hibiscus bushes (preferably the same variety)
- containers, for example Classic Home and Garden Honeysuckle Resin Planter or planting spots in the ground
- nutrient-rich soil with good drainage
- mulch (2–3 in. / 5–7 cm)
- watering (regular, without drying out)
- pruning shears to maintain shape
Before starting, it’s important to understand how this corner is used: whether people relax there or just pass by. This affects the planting density.
How to design a patio corner with hibiscus
A patio corner is often just a piece of space that is not used. So the goal here is not just to plant plants, but to set boundaries and a focus, so the corner starts to work as a separate zone.
- Place hibiscus on the sides of the corner, not in the center.
This creates a framing effect, and the space inside is automatically perceived as a separate zone, not a pass-through place. - Keep a distance from the patio edge of about 1.5–2 ft. (45–60 cm).
This distance allows plants to grow freely and not interfere with movement, especially if there is furniture nearby. - Use one bold color, preferably red.
It immediately gathers attention in one point and helps avoid scattering accents across the patio. - If you use pots, choose the same shape and size.
Repetition of form creates a sense of order, even if the plants themselves look slightly different. - Maintain the height of bushes at about 3–5 ft. (90–150 cm).
This is the optimal level — enough to create a feeling of framing, but without blocking the view. - Add a light background — a wall, fence, or greenery.
On a calm background, bright hibiscus looks stronger and does not get lost, even if there are not many plants.
Why this works
Corners are weak points in any yard. If you don’t design them, they stay empty and “blur” the space. But when you add an accent there, everything starts to come together.
- red color attracts attention and sets a clear focus
- symmetry on the sides makes the corner look neat
- plants form boundaries without hard lines
- the space starts to feel like a complete zone
Because of this, even a small patio looks very nice.
Don’t overdo it
With hibiscus, it’s easy to overdo. It’s already bright, and if you add too many elements, everything starts to “shout”.
- don’t add more than 2–3 plants in one corner
- avoid combining with too many other bright colors
- don’t use oversized pots that eat up the space
- leave room for air and movement
Sometimes two bushes do more than five different plants.
How lighting affects the result
Before finalizing the composition, it’s worth observing how light behaves in this corner. It affects not only growth, but also how the color is perceived.
- in the sun, red becomes brighter and deeper
- in partial shade, it looks calmer and slightly darker
- different lighting can change the shade during the day
- because of this, the corner may look different in the morning and evening
This is normal. This effect makes the space feel more alive.
Such corners work best near relaxation areas, at the entrance to the patio, next to chairs or small tables. Wherever you want it to feel comfortable and inviting.
4. Layered Hibiscus Beds for a Multi-Level Tropical Feel
A layered hibiscus bed gives a noticeable sense of volume and depth, not just dense greenery.
We had one of these areas appear along a path where there used to be just a line of plants of the same height. We added a second and third level — and the yard immediately started to look completely different. Here, hibiscus plays the role of the middle layer, and everything else is built around it.
What you’ll need
- hibiscus (2–4 bushes) for the middle level
- tall plants or shrubs for the background — options like areca palm, windmill palm (Trachycarpus fortunei), banana plant (Musa basjoo), and more resilient choices like oleander or tall ornamental grasses such as Miscanthus sinensis
- low plants or ground cover for the front edge — sweet potato vine, creeping thyme, dwarf mondo grass, coleus, caladium, or compact varieties of hosta work well
- nutrient-rich soil
- mulch (2–3 in. / 5–7 cm)
- watering (preferably stable)
- pruning shears
Before planting, it helps to simply stand at a distance and imagine how the bed will look at eye level, not from above.
How to create a layered hibiscus bed
Each layer should be visible. If the back level blocks everything, or the front is too tall — the effect is lost. This works on a “step” principle, where each level is clearly read.
- Place the tallest plants in the background.
This can be something above 5–6 ft. (150–180 cm) to set the backdrop and height of the entire composition. - Plant hibiscus in the middle layer, at a distance from the background plants.
This is usually the 3–5 ft. (90–150 cm) zone, which becomes the main accent. - Add low plants in the front to cover the edge of the bed.
They create a clean line and make the transition to the ground feel softer. - Use different leaf textures, not just flowers.
The contrast in leaf shapes makes the planting more interesting even outside the blooming season. - Don’t align everything in one straight line.
Slight shifting of plants creates a more natural, living look. - Leave space between the layers.
If planted too densely, the levels merge and the sense of depth disappears.
Layering is a basic principle used in almost all natural landscapes. And it translates best into a garden.
When there is only one level, everything feels flat. But as soon as height separation appears, the picture changes.
- the back layer gives background and height
- the middle layer (hibiscus) adds color and accent
- the front layer makes the edge neat
- together they create depth and structure
To avoid overloading the layers, use 3 clear levels, don’t mix too many colors, avoid dense planting without gaps, and leave “air” between plants. When the layers are readable, the bed looks neat.
How lighting affects layering
Before fixing the planting, it’s worth observing how light behaves. This affects not only growth, but also the perception of the whole composition.
- the back layer can cast shade on the hibiscus
- in the sun, flowers look brighter and more contrasting
- in partial shade, transitions between layers are softer
- during the day, depth can look different
If you take this into account in advance, you can enhance the effect instead of accidentally losing it.
These beds look great along paths, near fences, next to relaxation areas, or as a background for a patio. They don’t require a huge space, but give the feeling that the yard is thought out down to the details. And as the plants grow, the bed becomes even more impressive.
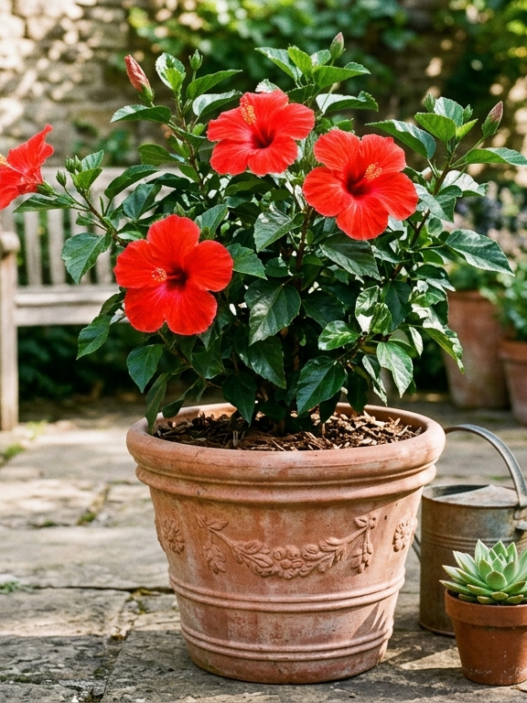
5. Container Hibiscus Displays for Small Spaces and Patios
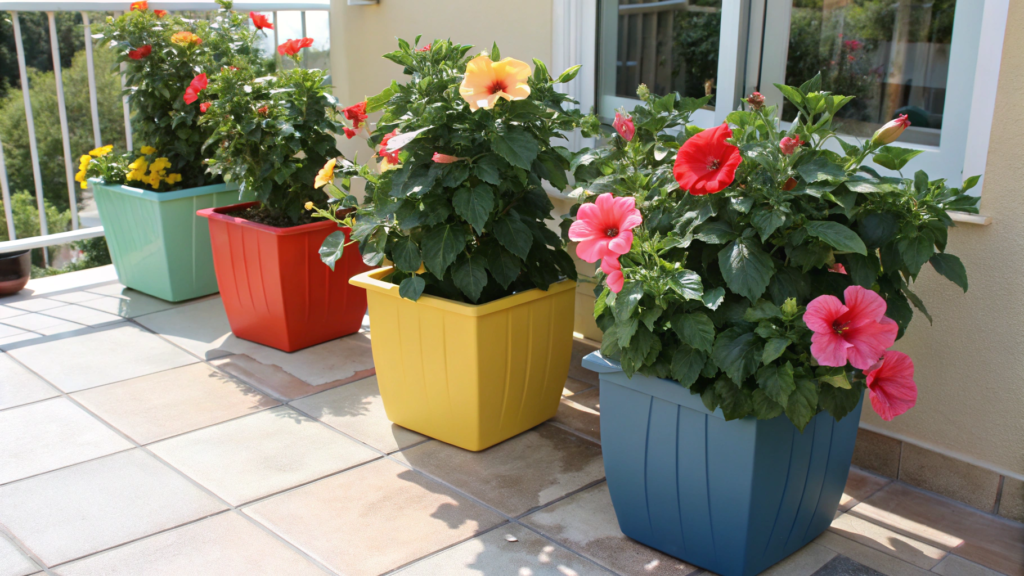
Hibiscus in containers gives an important advantage — mobility. You can change placement, adapt to the sun, and even “build” a zone for a specific purpose.
What you’ll need
- pots with a volume of at least 10–15 gallons (38–57 L)
- hibiscus (1–3 plants)
- quality container soil (Miracle-Gro Potting Mix)
- drainage (holes or a layer at the bottom)
- regular watering
- fertilizer for flowering plants
The size of the pot is not a small detail. In a small volume, hibiscus quickly suffers from drying out and root overheating.
How to create a container hibiscus composition
With containers, there is one specific thing — if you just place a couple of pots, it almost always looks random and disconnected. To make the composition feel like part of the design, not a temporary solution, you need to give it a bit of structure.
- Don’t place all pots in one line.
When containers are at different heights, you get depth and movement, and even a simple setup starts to look more interesting. - Limit yourself to 1–2 hibiscus shades.
In a small space, extra colors create visual noise, while one accent color works much stronger. - Choose pots that are similar in style.
If containers differ in shape and color without logic, it immediately breaks the feeling of cohesion. - Place plants in a group, not individually.
When hibiscus is gathered in one zone, it looks like a single composition, not a set of separate points. - Consider how the sun moves during the day.
Containers can be easily moved so hibiscus gets enough light and blooms better. - Leave some free space around.
This helps the composition “breathe” and makes it feel lighter and cleaner.
When everything is done this way, even two or three containers start to look like a thought-out part of the patio, not just plants in pots.
Why containers are convenient
Containers give flexibility that planting in the ground doesn’t have. This is especially important if space is limited or conditions are not ideal.
- you can move plants depending on the sun
- it’s easy to change the composition without replanting
- it’s convenient to control watering and nutrients
- it works for places where planting in the ground is not possible
Because of this, even a small space can be put together much faster.
How to avoid mistakes
With containers, there are several typical things that affect the result.
- too small pot → fast overheating and drying out
- irregular watering → plant stress
- lack of drainage → risk of root rot
- random mix of pots → visual chaos
If you keep these things under control, hibiscus in containers feels just as good as in the ground.
These compositions work best on small patios, balconies, near the entrance to the house, or next to a relaxation area where you want to diversify the space and add color without complex soil work.
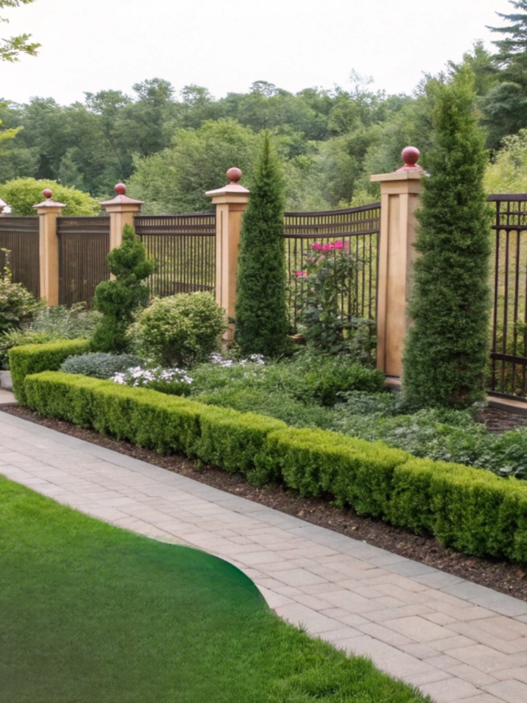
6. Hibiscus Hedges for Privacy with a Tropical Touch
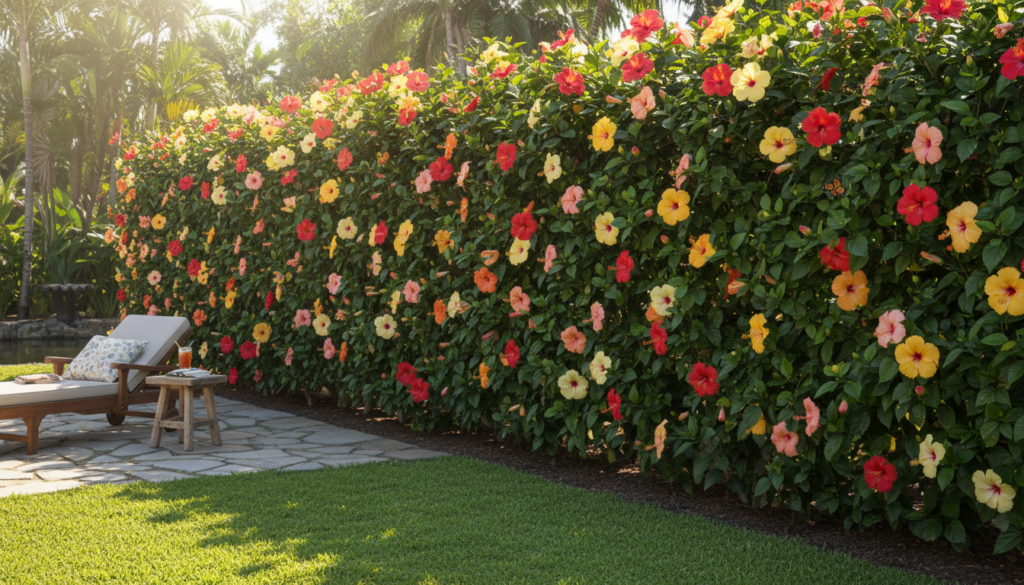
A hibiscus hedge gives privacy, but at the same time looks light and does not “press” on the space. It provides not only seclusion, but also color, and this strongly changes the feeling of the yard.
What you’ll need
Keep in mind that a hedge is not for one season.
- several hibiscus bushes of the same variety
- nutrient-rich soil or compost
- mulch (2–3 in. / 5–7 cm)
- regular watering
- pruning shears for shaping
- planting line marking
It’s better to choose one variety right away — this way the hedge will look even and clean, not mixed.
How to plant a hibiscus hedge
Before planting, decide whether you want to fully close off the space or just create a feeling of privacy. This affects the density and spacing between bushes.
- Mark a straight planting line.
This helps set a clean geometry right away and avoids a wandering line. - Plant bushes at a distance of 3–4 ft. (90–120 cm) from each other.
This allows them to grow together over time, but not interfere with each other. - Choose one hibiscus variety for the entire line.
This makes the hedge look like a single surface, not a mix of different plants. - Consider the mature height of the plant (usually 4–6 ft. / 120–180 cm).
This is important so the hedge actually blocks the view, not just stays decorative. - Add mulch right after planting.
This helps retain moisture and gives a neat look from day one. - Start light shaping already in the first season.
Regular pruning helps bushes become denser and fuller.
Why this works
A hedge gives several effects at once that are hard to achieve in other ways. And it’s not only about privacy.
- dense foliage blocks the view
- blooming adds visual interest
- soft shape looks lighter than a fence
- the space becomes more private and calm
Landscape design research shows that hedges help create a feeling of protected space without making it feel closed off.
How not to turn the hedge into a “wall”
With hibiscus, it’s easy to make mistakes and go to extremes. You want it denser, taller, and at some point the hedge starts to look heavy and overwhelming. It begins to feel like the space is just shrinking.
That’s why it’s important to keep balance. Don’t plant bushes too close and don’t let them grow upward without control. Light regular pruning helps maintain the shape and makes the hedge denser but not overloaded.
And there’s no need to mix many different varieties. When the line is even and uniform, it looks clean. And if you really want variety, it’s better to add it in nearby zones.
Lighting impact
Before planting, it’s worth checking how much sun the future hedge line gets. This directly affects the result.
- in full sun, the hedge will be denser and bloom more brightly
- in partial shade, it will become more loose
- different sections may look different
- this affects the overall density of the line
If you take this into account in advance, you can avoid a situation where one part of the hedge looks better or worse than another.
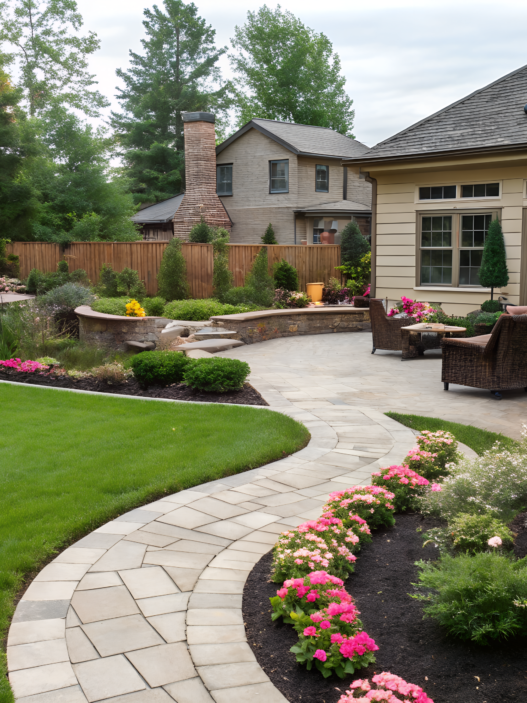
7. Mixed Tropical Flower Beds with Hibiscus as the Focal Point
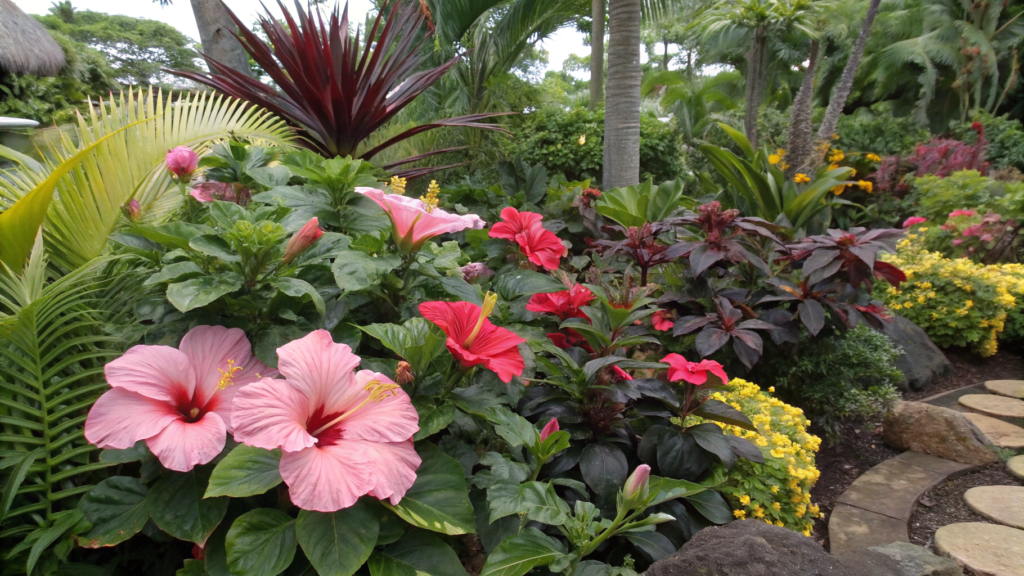
Now let’s talk about how to create a mixed tropical flower bed where hibiscus does not get lost, but stays the center of the composition.
University of Florida IFAS Extension notes that in landscaping it is important to highlight a main element so the composition remains clear and does not look overloaded. It’s like in interior design — if everything is an accent, attention gets scattered.
What you’ll need
- 1–3 hibiscus bushes as the main focal point
- 2–4 plants with large foliage (for example, canna, banana plant)
- several low plants for the front layer
- green neutral plants for balance
- nutrient-rich soil
- mulch (2–3 in. / 5–7 cm)
- watering
It’s important to understand from the start: hibiscus here is the center, everything else is support.
How to create a mixed flower bed with hibiscus
Mixed beds easily turn into chaos if you don’t set a structure. So it’s better to first think about where the main element will be and how everything else works around it.
- Place hibiscus as a central point or slightly shifted accent.
It’s better to move it a bit away from the center so the composition looks more natural and not too symmetrical. - Add plants with large foliage around it.
They create a background and enhance the visual weight of hibiscus without competing with its blooming. - Use plants of different heights to create layers.
Tall — in the back, medium — near hibiscus, low — in the front, so the bed does not look flat. - Limit the color palette.
If hibiscus is bright (for example, red), it’s better for the other plants to be calmer in color. - Add green plants without flowering.
They give the eye a “rest” and help avoid overloading the composition. - Leave some free space between groups.
This helps each plant be read separately, instead of blending into one mass.
Why this works
When a composition has a main element, the eye immediately understands where to look. Everything else starts to feel like support, not competition.
- hibiscus sets the main accent
- foliage creates background and depth
- different levels add volume
- the composition becomes clear and calm
That’s why even with a small number of plants, you can get a strong visual effect.
The most common mistake is trying to add too much at once. It’s better to keep hibiscus as the main element and not try to “enhance” it with other bright colors. When there are too many accents, the main element gets lost. Sometimes it’s easier to remove one plant than to add another. And almost always, this makes the flower bed better.
8. Entryway Accents with Potted Hibiscus Plants
Entryway accents with potted hibiscus plants make the entrance neat, lively, and clear in structure, without complex changes. And hibiscus works perfectly here — it adds color, height, and a clear accent that is visible right away.
What you’ll need
- 2 pots of the same size
- 2 hibiscus bushes (preferably the same variety)
- quality container soil
- drainage in the pots
- regular watering
- pruning shears
It’s better to choose pot sizes of at least 10–15 gallons (38–57 L) so the roots don’t overheat and don’t dry out too quickly.
How to design an entryway with potted hibiscus
- Place pots on both sides of the entrance to create a clear frame.
This visually defines the entrance boundary, and even a simple opening starts to look like a designed zone, not just a door. - Keep a distance from the door of about 1–2 ft. (30–60 cm).
This is important not only for удобство прохода, but also so the plants don’t look “pressed” against the wall or door. - Choose one hibiscus color, without mixing shades.
At the entrance, a clean, clear accent works better — it looks neater and does not distract. - Select containers that match the style of the house.
If the facade is minimalistic — simple shapes work better; if more classic — you can add texture or decor. - Keep plant height around 3–4 ft. (90–120 cm).
This size creates a feeling of framing, but does not block the view or make the entrance feel tight. - Rotate pots so the flowers are visible when approaching.
This seems like a small detail, but it’s exactly these things that make the composition feel alive, not random.
Why this works
If the entrance is designed nicely and thoughtfully, the whole yard feels more put together.
- symmetry creates a sense of order
- hibiscus adds color and accent
- containers define the form
- the space looks complete
Even two plants can completely change perception.
The entryway is always in focus, even if you don’t plan it. That’s why it’s important not to add extra elements, but instead keep only what is really needed. If you start adding different pots, additional plants, decor — the entrance quickly loses its clarity. The right decision is to keep just two plants and let them do their job.
9. Hibiscus and Ornamental Grasses for Texture Contrast
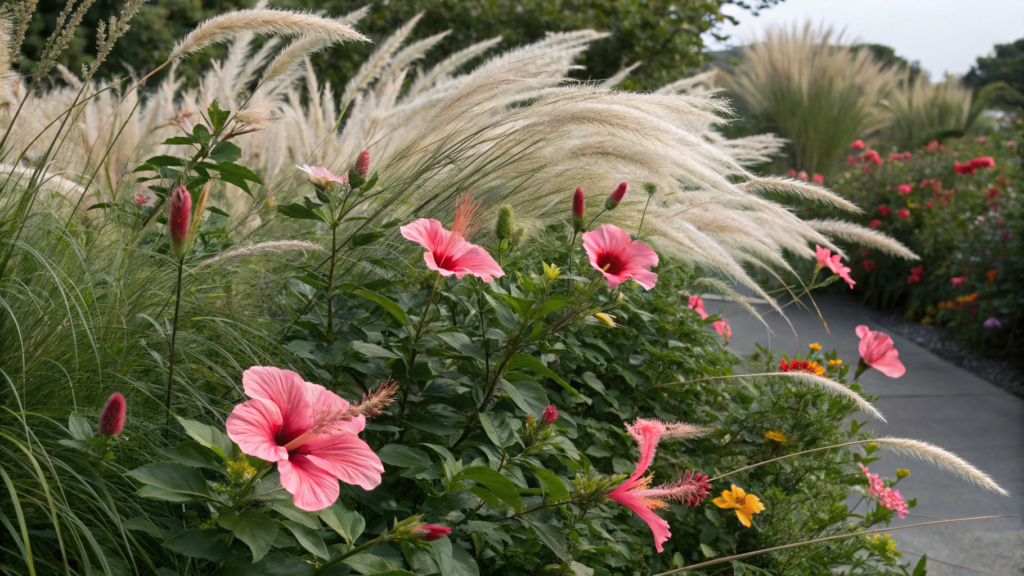
Hibiscus and ornamental grasses enhance each other through texture contrast, not by competing for attention; provides density and bright blooms, while grasses add air and soft movement. Together, they create a balance that is hard to achieve with other combinations.
What to use for this composition
Here it’s important to choose the right contrast, not just pick “any grass”.
- 2–3 hibiscus bushes as the main focal point
- 1–3 types of ornamental grasses (for example, miscanthus, fountain grass, blue fescue)
- nutrient-rich soil
- mulch (2–3 in. / 5–7 cm)
- watering
- pruning shears or scissors for grasses
It’s better to choose grasses of different heights to enhance the contrast.
How to combine hibiscus and ornamental grasses
Here it’s important not just to “plant them nearby”, but to make the plants enhance each other. If placed randomly, grasses may cover the hibiscus or get lost against it. So it’s better to set a clear structure from the start.
- Place hibiscus as the main dense element.
It should be noticeable right away, so choose a spot where the eye lands first — then the whole composition will build around it. - Add grasses to the side or behind, not in front of the bushes.
If planted in front, they can block the flowers, but from the side or back they create a soft background and add depth. - Use grasses of different heights.
For example, taller ones can go closer to the back, and shorter ones closer to the edge to create a smooth level transition. - Leave space between plants about 2–4 ft. (60–120 cm).
Grasses need room to spread in width, otherwise they will look compressed and lose their natural form. - Limit the number of grass types.
When there are too many, the sense of structure disappears, while 1–2 types keep the composition clean and readable. - Consider wind on the site.
If there is light airflow, grasses start to move and “play”, adding liveliness to the whole planting, especially next to the more static hibiscus.
What creates the effect
When plants with the same dense foliage stand next to each other, the eye quickly gets tired. But when contrast appears, the gaze starts to move through the composition.
- hibiscus gives density and clear form
- grasses add lightness and movement
- together they create texture contrast
- this creates a feeling of depth and air
That’s why even a small planting starts to look more interesting. Not because of the number of plants, but because of how they work together.
Such combinations work especially well along paths, at property edges, near patios, or in places where you want to add a bit of movement. Ornamental grasses look good even outside the blooming season, so the composition stays visually attractive longer.
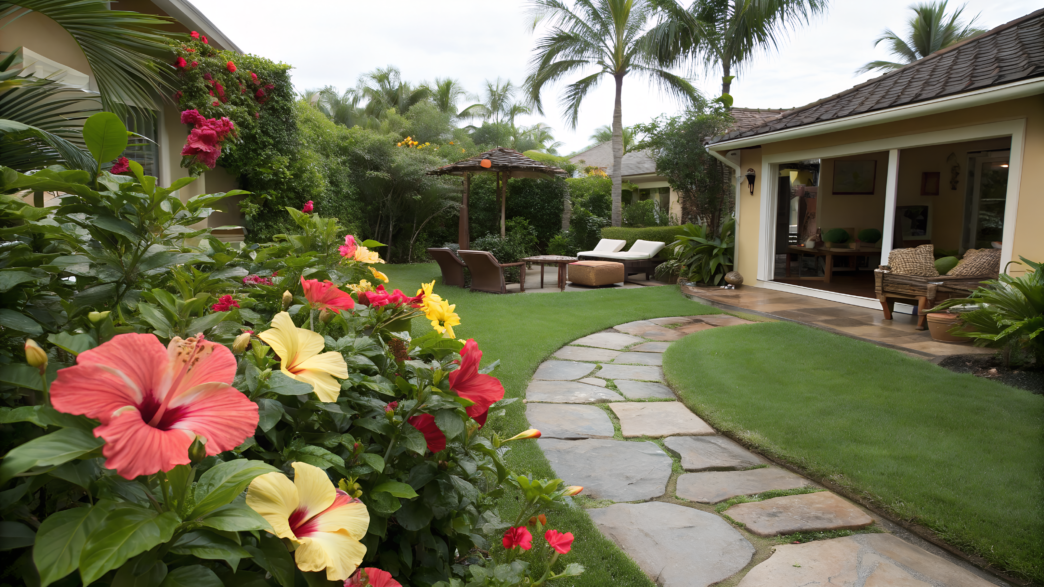
10. Backyard Lounge Areas Surrounded by Hibiscus Blooms
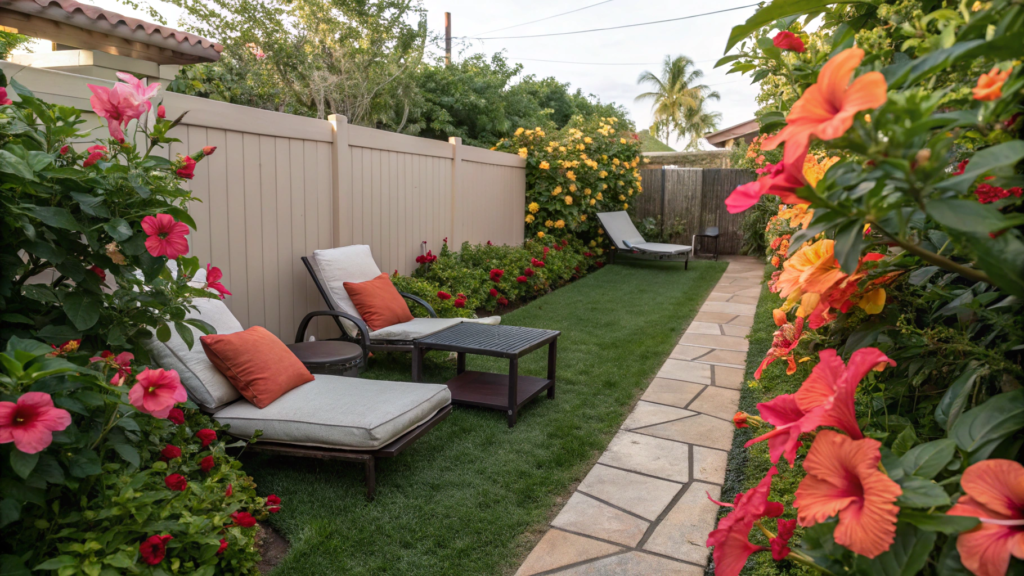
The technique with hibiscus blooms around a lounge area works great. Hibiscus here acts as a living boundary that softly separates the relaxation zone from the rest of the yard.
What you’ll need
- 3–6 hibiscus bushes
- a lounge area (chairs, sofa, table)
- nutrient-rich soil or containers
- mulch (2–3 in. / 5–7 cm)
- watering
- pruning shears (Fiskars SingleStep Bypass Pruner P26)
It’s worth thinking in advance about where the walkways will be, so plants don’t interfere with movement.
How to design a lounge area with hibiscus
In this case, the goal is not just to plant something, but to create a feeling of a “frame” around the place where you sit. At the same time, it’s important to keep the space light so it doesn’t feel closed.
- Place hibiscus around the perimeter of the lounge area, not inside it.
This creates a soft boundary and makes the space more comfortable without interfering with the furniture. - Leave one or two open pathways.
This is important so the area does not feel closed and remains easy to enter and exit. - Keep a distance from the furniture of about 2–3 ft. (60–90 cm).
This way plants won’t touch people and will keep their shape without constant pruning. - Use one main hibiscus color.
This helps keep the area calm and avoids visual overload. - Maintain bush height around 3–5 ft. (90–150 cm).
This is enough to create a feeling of privacy, but not completely block the space. - Add a background — fence, greenery, or wall.
Against a background, hibiscus looks denser and the boundary is more clearly defined.
What creates the feeling of a “room”
The space does not have to be fully enclosed to feel separate. It’s enough to define boundaries.
- plants form a soft perimeter
- repetition of bushes creates rhythm
- color unifies the space
- a feeling of a private zone appears
Even without walls or partitions, the place starts to feel like your own space. When planting, it’s better to leave some air between bushes and not try to close everything completely. When there are gaps, the space stays light and more comfortable to be in.
How lighting affects the result
Before final placement, it’s worth observing how light behaves in this area. This affects both the look and the comfort.
- in the sun, flowers look brighter
- in partial shade, the area feels calmer
- at different times of day, the atmosphere changes
- this affects the overall perception of the space
If you take this into account in advance, you can make the area even more pleasant for relaxing.
Such solutions work especially well on patios, in yard corners, near terraces, or anywhere you want to create a place you want to come back to.
Hibiscus in the Backyard
In the end, what matters is not the number of plants, but how they are arranged. When there is logic, even simple solutions start to look intentional and harmonious.
It’s interesting — which of these feels closer to you: creating a lounge area, adding privacy, or just organizing your plantings? Write in the comments what you’ve already tried or what you want to do.And don’t forget: even small changes can really transform the feeling of your yard. Sometimes just one well-chosen plant is enough to shift the space for the better.