If you’ve been thinking about growing your own food but feel limited by space, time, or budget, a Raised Garden Bed can quietly solve more than you expect. They’re one of those simple ideas that don’t look life-changing at first — until you actually try them.
What makes raised beds especially appealing is how flexible they are. You don’t need a big backyard, perfect soil, or complicated tools to begin. Whether you’re working with a small corner, a patio, or just testing the waters, there’s always a way to make it work.
In this guide, we’ll look at a few raised bed options that fit different needs, spaces, and levels of commitment — so you can find something that feels right for you without overthinking it.
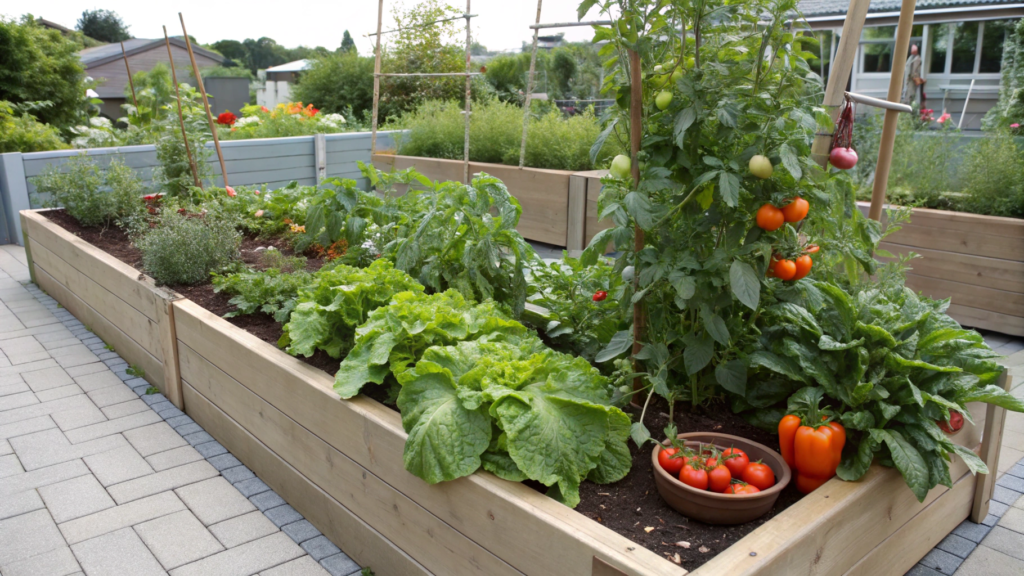
1. Smart Layouts for Small Vegetable Gardens
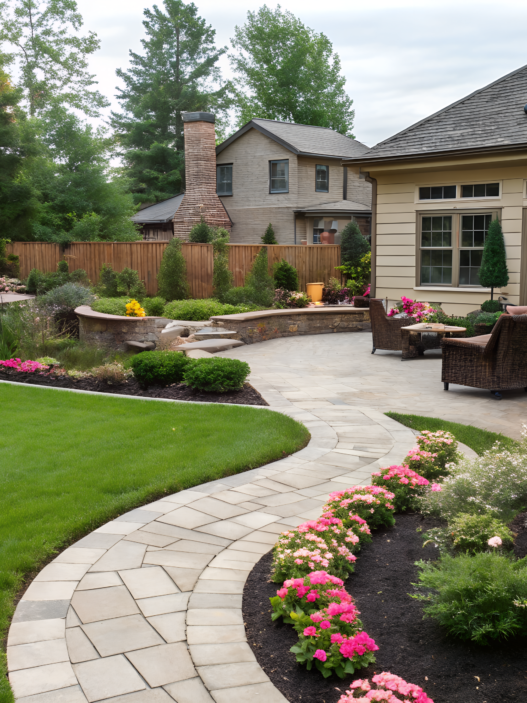
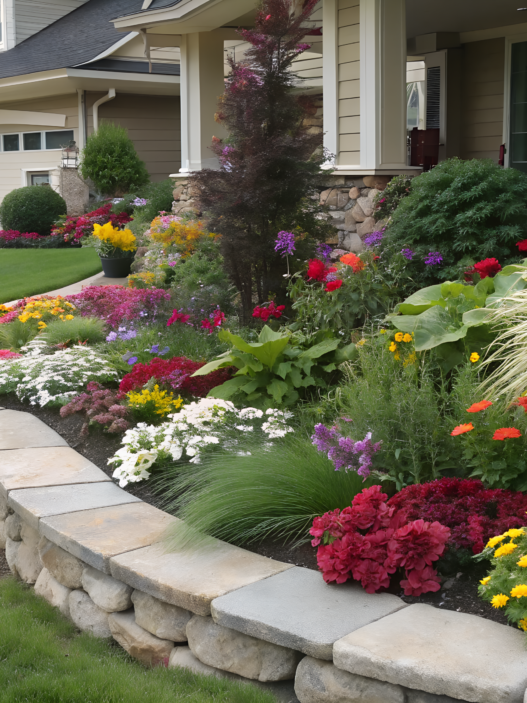
Small raised beds can be more convenient and easier to understand than big plantings where everything quickly starts getting in each other’s way. The point is not to try to cram in everything at once, but to build a small garden in a way that lets you walk through it спокойно, water it quickly, and pick something for dinner without a lot of hassle.
In raised beds, you can often get more harvest from a small area, because the plantings are usually done more densely and with a more practical layout.
How We Approach Layout Planning (Our Real Process)
I don’t draw an “ideal garden.” I build a system. Just like a constructor set — where each part does its own job. Here’s what it looks like for us:
1. We Define Zones (Not Plants!)
At first, it’s not “where the tomatoes will go,” but:
- active harvest zone (lettuces, greens)
- long-season crop zone (tomatoes, peppers)
- experiment zone (there’s always something strange)
It sounds simple, but it really changes everything. For example, our greens are always closer to the house — because you cut them every day. And tomatoes can спокойно grow a little farther away and “wait for their time.”
2. We Consider the Sun (Otherwise It’ll Hurt)
- Tall plants — on the north side
- Low plants — on the south side
Otherwise one bed just “eats” the light from another. And at first you don’t really notice it, and then one day you look — and half the plants are stretched out and barely hanging on.
3. We Make Beds You Can Actually Reach
The golden rule:
- bed width — no more than 4 ft (120 cm)
- paths — at least 18–24 inches (45–60 cm)
If you have to step into the bed — the layout is already broken. The soil gets compacted, the roots suffer, and you make life harder for yourself. Once, we made a bed too wide “by eye”… and then every time we had to reach across it, breaking leaves. Since then — only proven sizes.
3 Working Layouts for a Small Vegetable Garden
These are real layouts we used or tested.
1. Classic Grid Layout
The most understandable and stable one.
How it looks:
- several rectangular beds
- straight paths between them
- the same size (for example 4×8 ft / 120×240 cm)
Pros:
- easy to scale
- easy to install drip irrigation
- ideal for beginners
Cons:
- doesn’t always use space as efficiently as possible
This layout works really well if you plan to add beds gradually. You just keep extending the grid — and everything looks neat.
2. U-Shape Layout
How it works:
- the beds go around the perimeter
- you stand inside the “U” and work from all sides
Pros:
- maximum access
- minimum extra steps
- the feeling of a “room in the garden”
Cons:
- takes a little more planning
We made a layout like this near the kitchen… and it became the most-used spot. Seriously. I step out for greens literally in slippers.
And one more thing — with this layout, it’s convenient to put a small table or a bucket right in the center. Everything is within reach, and you don’t have to carry things back and forth.
3. Intensive Planting (Square Foot Style)
This is when every square is under control.
Example:
- 1 square foot (30×30 cm)
- in it: 1 tomato, or 9 spinach plants, or 16 carrots
Pros:
- maximum harvest from a minimum area
- fewer weeds
- easier to plan
Cons:
- you need to watch soil nutrition
A Small Reference Table
| Crop | Number per 1 sq ft |
| Tomatoes | 1 |
| Lettuce | 4 |
| Carrots | 16 |
| Basil | 4 |
We love this system when we need to “get the most” out of a small area. But it’s important — the soil really has to be good, otherwise the plants start competing too hard.
Small Tricks
These are the things people usually don’t write about… but they’re exactly what makes the difference:
- Leave room for a bucket or wheelbarrow — we forgot, and then had to carry everything by hand… don’t repeat that
- Group plants by watering needs — cucumbers and rosemary are not friends
- Think ahead — some crops, like radishes, free up space pretty quickly, so it’s better to decide in advance what will grow there next
- Use vertical elements even in the layout — plan your trellises into the design right away
As you can see, it’s not the size of the yard that decides it, but how you lay it out by function, light, and access. And if you do it right, even a small backyard starts working like a full vegetable garden.
2. Affordable Materials for Backyard Raised Beds
When you get to the point where you need to choose materials for your raised beds, it always seems like the more expensive, the better. We thought that too. I mean, it sounds logical.
But later we realized that a good garden is not defined by expensive materials, but by the right choices.
Why the Material Matters at All
The material affects three things:
- how long the bed will last
- how the soil behaves inside it
- how much you’ll spend (and your nerves too)
For example, if the sides start breaking down too fast, the soil starts “spreading out,” the shape gets lost, and moisture escapes faster. And if the material overheats, the roots really do suffer in the heat.
5 Affordable Materials That Really Work
Below is not theory, but what we’ve actually seen work in real life.
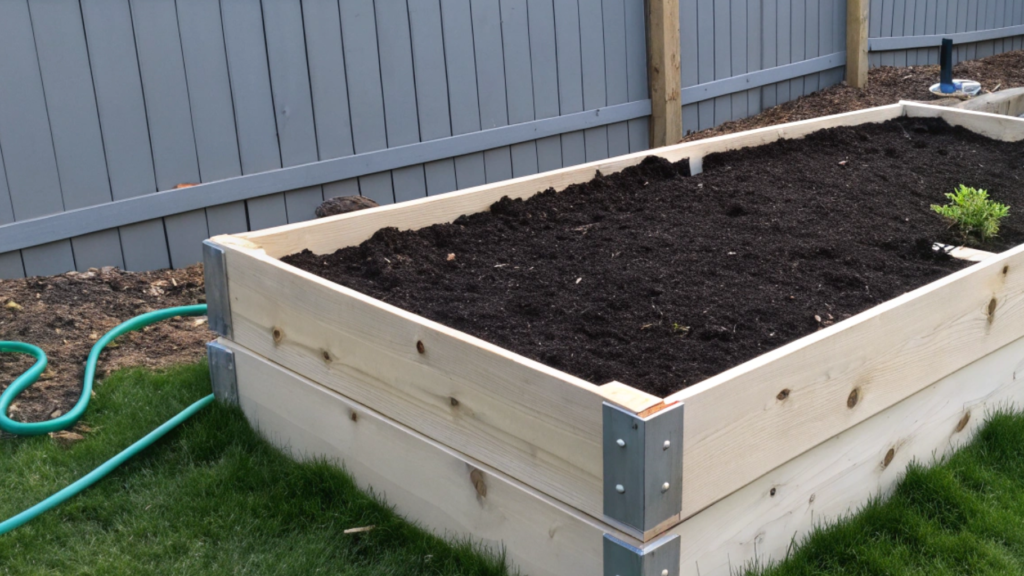
1. Regular Boards (Pine / Softwood)
This is the easiest place to start.
What matters:
- thickness — at least 1 inch (2.5 cm)
- height — usually 6–12 inches (15–30 cm)
Pros:
- cheap
- easy to find
- easy to build with
Cons:
- they last 3–5 years, then they start to rot
If you’re just getting started, that’s really not a problem. By then, you’ll already understand what you need and be able to navigate this whole thing much better.
2. Cedar
This is more of a “build it and forget it for years” level.
Why people love it:
- naturally resistant to rot
- doesn’t need chemical treatment
Pros:
- lasts 10–15 years
- looks neat
Cons:
- more expensive
We put cedar off for a long time… and then made one test bed. And the difference is noticeable even visually — it ages nicely instead of falling apart.
3. Pallet Wood
This is where the real savings begin.
Pros:
- often free
- easy to take apart into boards
Cons:
- you need to check the markings (important!)
- the thickness and quality vary
And this part really matters: only use pallets marked HT (heat-treated). Avoid MB (methyl bromide) — that’s a chemical treatment.
Research confirms that methyl bromide is toxic and can build up in the soil, so this is not the place for experiments.
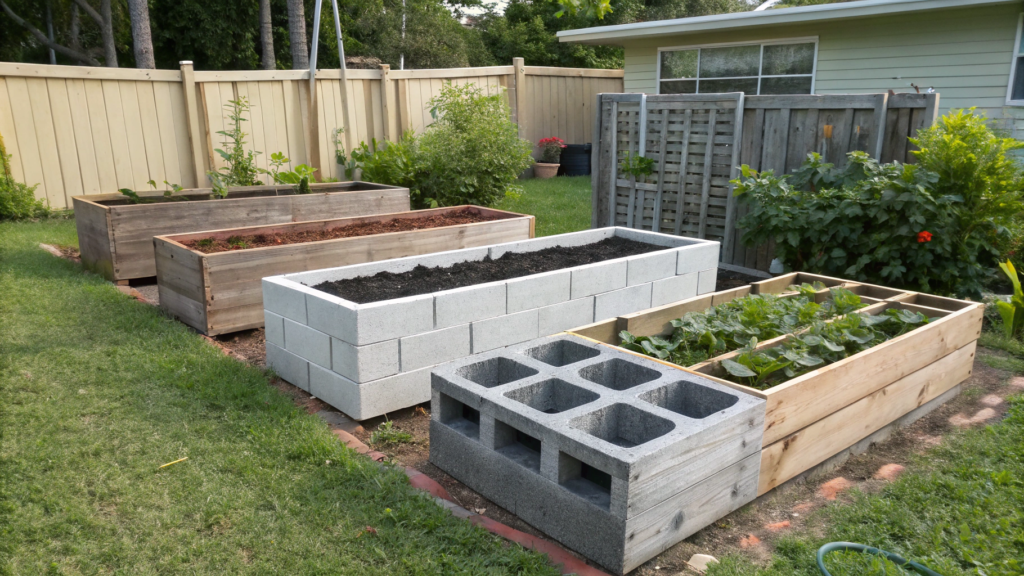
4. Concrete Blocks
At first it seems a little strange… and then you realize how convenient it actually is.
Pros:
- very strong
- don’t rot
- can be assembled without tools
Cons:
- heavy
- can heat up in the sun
A lot of people use 8 in. x 8 in. x 16 in. Concrete Cinder Block — it’s a classic size that’s easy to work with.
And by the way, the holes in the blocks can be used as mini containers for herbs. We planted basil in them once — and it looked surprisingly good.
5. Metal Beds (Galvanized Steel)
Right now, this is a real trend.
Pros:
- last 15–20 years
- quick to assemble
- look neat
Cons:
- can get hot in summer
Galvanized steel is a popular material for raised beds because it lasts a long time and resists corrosion really well.
Quick Comparison of Materials
| Material | Lifespan | Price | Difficulty |
| Pine | 3–5 years | low | low |
| Cedar | 10–15 years | high | medium |
| Pallets | 2–4 years | very low | medium |
| Concrete blocks | 10+ years | medium | low |
| Metal | 15–20 years | medium | low |
So What Should You Choose
If I were starting again:
- minimum budget → pallets or pine
- balance of price and durability → concrete blocks
- want to build it once and keep it for years → cedar or metal
What the bed is made from is not as important as what’s inside it. Soil, organic matter, mulch — that’s where the real work happens. And if those are in good shape, even the simplest structure can give you a really solid result.
3. Vertical Design Plans for Tight Spaces
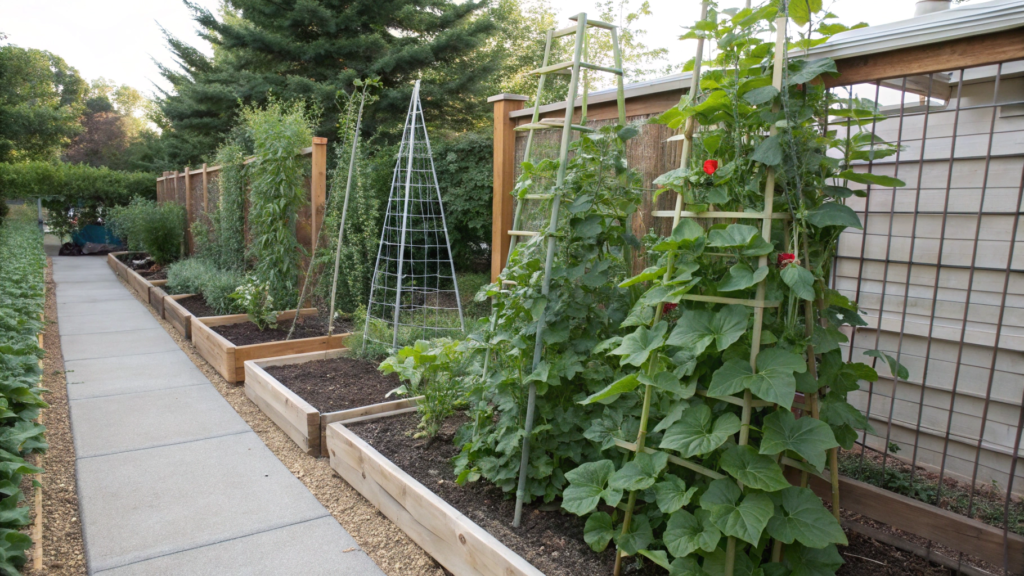
We ignored vertical growing for a long time. Like, well, a bed is a bed. Until one day the cucumbers started crawling all over the ground, grabbing onto everything around them, and taking up half the path. Since then, everything that can grow upward — grows upward.
And it makes sense, because vertical structures help:
- increase harvest without increasing space
- improve air circulation (fewer diseases)
- make harvest easier
University of California Agriculture & Natural Resources says that with vertical growing, plants get better airflow, more light, and the fruit doesn’t sit on the ground. Because of that, plantings often stay healthier, and this is especially useful for cucumbers, tomatoes, and beans.
In real life, that usually means less dirt, fewer rotting fruits, and less hassle in the middle of the season.
Which Vertical Solutions Are Actually Convenient
Below are options that really work well for small spaces.
1. Classic Trellis
This is a simple vertical support about 5–6 ft (150–180 cm) tall, placed at the edge of the bed, and the plant grows upward instead of spreading across the ground.
This option works best for:
- cucumbers
- beans
- peas
- some small-fruited squash varieties
The advantages here are obvious too:
- it takes up almost no space in width
- it makes harvesting easier
- it makes the bed look neater
If you don’t want to build one from scratch, you can use Panacea Products Garden Trellis 60-Inch Black.
A trellis doesn’t make the garden more complicated — it actually makes everything easier. You can see the fruit right away, the leaves dry faster after watering, and the paths stop feeling like an obstacle course.
2. Arch Over the Path
This option looks more interesting, but it still stays very practical. Basically, you’re using the space above the path, which usually sits empty.
For an arch, people usually choose:
- beans
- cucumbers
- peas
- light climbing varieties
What’s convenient about it:
- the plants don’t take up space in the bed itself
- the path stays usable
- you get a nice green canopy above
For arches like this, people often use strong metal wire panels. They hold their shape well and work great for climbing vegetables.
There’s also a simple everyday bonus: the harvest hangs right in front of you. No need to bend down and search for it under the leaves.
3. Vertical Pockets
This is a more compact solution. Especially if the yard is tiny to the point of being ridiculous, or if we’re talking about a small patio, terrace, or fence near the beds.
People usually plant these in pockets:
- lettuce
- basil
- parsley
- strawberries
- other shallow-rooted greens
For this format, people often use vertical garden planters with hanging grow bags.
But there’s one important catch:
- there isn’t much soil in the pockets
- moisture disappears faster
- in summer, you have to water more often
So this is a good option not for everything, but for crops you cut often and want to keep close at hand. For greens — it works really well.
4. Tiered Structures
This isn’t exactly “vertical” in the pure sense, but for tight spaces it works really well. Several levels give you more planting area without making it feel like everything is piled on top of each other.
What does especially well in this kind of setup:
- strawberries
- greens
- low herbs
- compact lettuce varieties
Tiered beds have their own strong sides:
- easy to harvest from
- plantings are easy to see
- you can nicely separate crops by level
We made a similar setup for berries, and nothing gets lost under the leaves, everything stays visible, and care becomes easier.
5. Hanging Containers
At first, this option seems a little strange. Especially when we’re talking about hanging tomatoes. But in a small space, it can be really useful.
In hanging systems, people usually grow:
- cherry tomatoes
- strawberries
- greens
- decorative edible crops
Here’s what you need to keep in mind:
- the soil volume is limited
- feeding and watering need more attention
- heavy plants need strong support
But the ground underneath stays free. And that’s already a big deal when every square foot counts.
What Actually Works Best in the End
Usually, you don’t need one “perfect” vertical format for the whole garden. It’s much easier to combine a few solutions.
For example:
- a trellis — for cucumbers
- an arch — over a narrow path
- pockets — for greens by the wall
That way, the space starts working in volume, not just in a flat layout. And you really feel it. The area is the same, but somehow it feels like there’s more room.
What to Pay Attention to Before Installation
Not every vertical idea is equally convenient in real life. Sometimes a structure looks great in photos, but in practice it’s not that comfortable.
So before installing anything, it’s better to think about three things right away:
- Weight of the structure. Especially after watering. Water adds weight, and that matters.
- Access for harvesting. If you have to stretch or stand on something every time, that gets annoying fast.
- Shade from vertical elements. Tall structures can block light from other plants.
This is exactly the kind of thing where a couple of extra minutes of planning really saves your nerves later.
And in the end, what you get is not an overloaded garden, but a balanced one. Where there’s height, space, and air between the plants. And the best part is that you start using the area not just in one flat plane, but in volume. And that feels completely different.
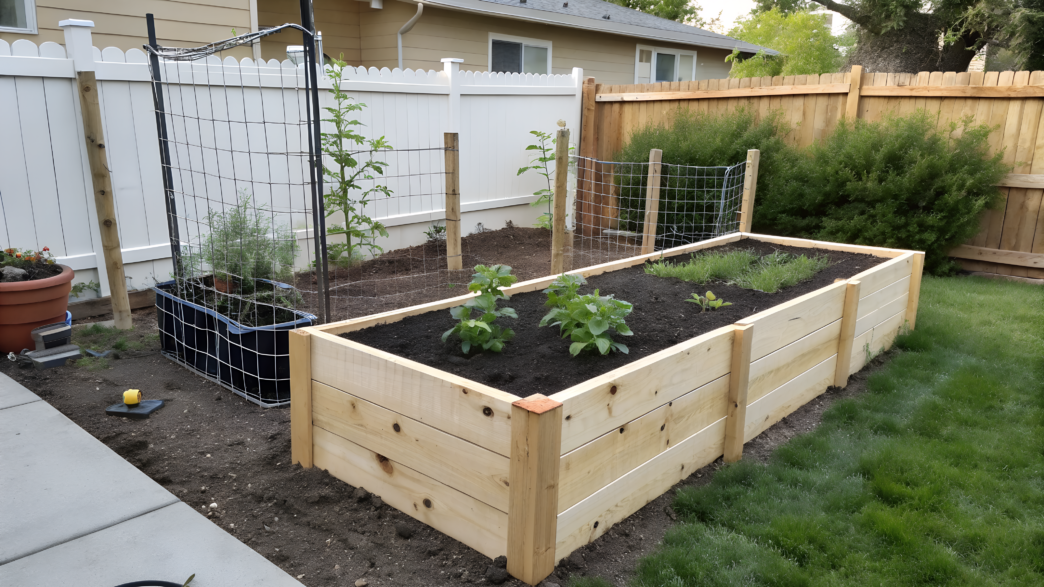
4. Step-by-Step Pallet Raised Bed Build
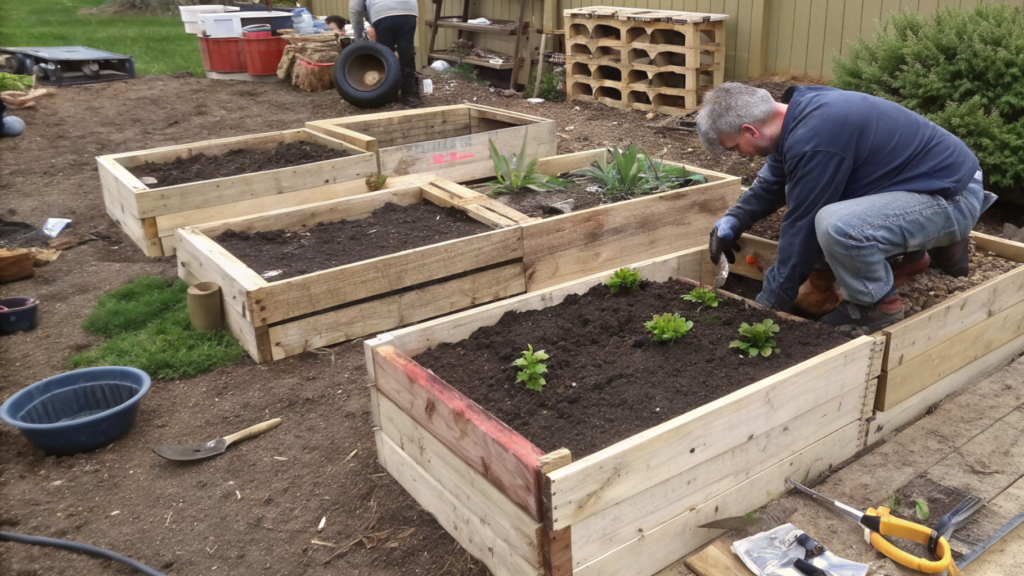
A pallet raised bed is cheap, clear, and really something you can make without a lot of experience. If your hands work more or less fine, and you’ve got a couple of decent pallets lying around in the yard, you can build a working bed in a day and start planting.
But not every pallet works for vegetables. This is something you really do need to pay attention to. For the garden, you should only use pallets marked HT — that means heat treated. But MB should not be used. Those pallets were treated with chemicals, and for raised beds, that’s a bad idea.
What You’ll Need for This Kind of Bed
- 2–3 pallets marked HT
- a drill or driver
- wood screws
- a pry bar or nail puller
- gloves
- a tape measure
- a saw, if you need to trim the boards
- cardboard or landscape fabric for the bottom
- soil and compost
If you want to make the build a little easier, you can use DEWALT 20V Max Cordless Drill/Driver Kit. Not because nothing will work without it, but because with a decent drill, everything goes a lot calmer and faster.
Where to Start
First, you need to look over the pallets properly. Not in a rush, but carefully. Sometimes everything looks fine on top, but once you start touching it, the board is already soft, cracked, or full of sticking-out nails.
It’s better to check right away that:
- the wood is dry
- there’s no heavy mold
- the boards are not crumbling at the edges
- there are no traces of paint or some weird treatment
- the fasteners are not sticking out
This stage is boring, but it really matters. A good pallet raised bed doesn’t start with assembly, but with making sure you didn’t drag trash into your garden.
Step by Step: How to Build a Pallet Raised Bed
- Choose the bed size
Usually, a width of about 3–4 ft (90–120 cm) is enough so you can reach the middle without a whole circus act. The length depends on your space. It’s better to make it a little more compact, but more удобный. - Take the pallets apart
Boards on pallets are often attached tightly, and if you rip everything apart too fast, you can easily break half of them. Carefully lift with a pry bar, slowly loosen the fasteners, and remove the boards in a way that saves as many full pieces as possible. - Sort the boards
After taking them apart, lay the wood out in piles: straighter boards for the sides, stronger ones for the corners and supports, and anything questionable off to the side. This helps a lot. Later, you won’t be scrambling in the middle of the build trying to figure out what to use for the last corner. - Build a rectangular frame
The easiest option is a basic box. No complicated shape, no extra bends. Four sides, strong corners, normal geometry. For a small yard, this is almost always better than trying to make something “interesting.” - Add corner supports
A lot of people skip this, and then the bed starts shifting around. It’s better to place inner wooden posts in the corners right away and screw the sides into them. The whole structure becomes much stronger right away. - Check the height
For most vegetables, a height of 10–12 inches (25–30 cm) works well. For lettuce and greens, it can be a little lower. If your wood pieces are different sizes, just make sure the bed doesn’t end up too shallow and doesn’t look crooked. - Prepare the spot
Before installing the bed, it’s better to remove big weeds, level the ground, and understand where the paths will go. If you put the bed “kind of here,” and then it turns out one side is hard to reach, that’s not much fun. - Put cardboard or landscape fabric on the bottom
This helps hold weeds back a bit from below. Cardboard is actually a good calm option. It breaks down over time, but at the start it helps keep the bed from getting overrun too quickly. - Fill the bed
At the bottom, you can put rougher material — little branches, old grass, some organic matter. On top goes a proper layer of soil and compost. No need to overcomplicate it. The main thing is that the top layer, where the roots will grow, is good and loose. - Think about the planting right away
A pallet raised bed works especially well when you don’t try to cram everything into it. It’s better to choose a couple of good crops and plant them calmly than to create a crowd inside a small box.
What Crops This Option Is Especially Good For
A pallet raised bed works best for simple and normal compact plantings.
These usually grow well in it:
- lettuce
- spinach
- green onions
- radishes
- beets
- carrots
- bush beans
- basil
Tomatoes can work too, but it’s better to choose something more compact and think about support right away. But large zucchini or sprawling squash are already not the most convenient scenario.
Step-by-step pallet raised bed build is a good option if you want to make your first proper bed cheaply, quickly, and without a complicated build. Not perfect, but very workable. You find good pallets, build a simple box, fill it with soil — and you’re already growing. For a small garden, that’s a really good start.
5. Quick Setup Beds for Instant Gardening
Quick raised beds are not some temporary option. Very often, they’re the most reasonable way to start. Especially if your space is small, the budget is tight, and you want to test the idea before putting time and money into something more permanent.
A quick bed is not just something you can assemble in 20 minutes. It also shouldn’t wear you out. Usually, these kinds of setups share a few simple features:
- minimal cutting
- simple shape
- materials that are easy to find
- assembly without complex tools
- a clear volume that’s easy to fill with soil
This is one of those cases where simplicity really works for you. You don’t need to spend half a day measuring, fixing, and stressing over one uneven corner.
Which Quick Beds Are the Most Convenient
1. Ready-Made Raised Frame
This is the most direct option. You buy a kit, lay out the parts, connect them, put it in place. That’s it.
These beds are useful when:
- you want to start without extra hassle
- you don’t have time to cut boards
- your space is already more or less planned
Usually, these are sizes like 4×2 ft (120×60 cm) or 4×4 ft (120×120 cm). For a small family, that’s already enough to grow greens, radishes, and a couple of tomato or pepper plants.
2. Concrete Block Bed
This is one of the most underrated quick options. No cutting, no drilling, no trying to level everything perfectly. You just lay out the blocks in a rectangle — and the base is already done.
It works best if you want:
- a strong structure
- clear shape
- assembly without special skills
Yes, the blocks are heavy. But that’s also the advantage: you place them once, and they stay in place. No feeling that everything might shift after the first rain.
3. Fabric Bed or Grow Bag
This is for when you don’t want to build anything at all. You unfold it, place it, fill it with soil, and plant.
These work especially well for:
- lettuce
- herbs
- potatoes
- cherry tomatoes
- peppers
They don’t look like classic wooden beds, and that can feel strange at first. But in real use, they work very well, especially when you need to quickly start planting on a terrace, in a yard, or in a space you’re still figuring out.
4. Simple Box from Ready Boards
If you still want to build something yourself, but without the drama, this is the calmest option: four ready boards, a rectangle, a few screws — and you’re done.
Usually, people use boards around 8 ft (240 cm) long and make a base size like 4×8 ft (120×240 cm), or smaller if space is limited. A height of 6–12 inches (15–30 cm) is already enough for most vegetables.
This is a good option if you want not just to save money, but also to make a bed that actually fits your space, not just whatever size comes in a kit.
Where These Beds Really Help
Quick setups are not just for beginners. Sometimes they help even when you already have experience.
For example, they’re useful when:
- you need to transplant overgrown seedlings quickly
- part of your old beds has fallen apart and you need a fast replacement
- you want to add one more small bed for a seasonal crop
- your yard is still being rearranged, but it’s already time to plant
This is where you see that a garden doesn’t always follow a perfect plan. Sometimes it’s more like “we build it now from what we have.” And that’s completely normal.
What Not to Overcomplicate at the Start
The most common mistake with quick beds is trying to make them both quick and perfect at the same time. That doesn’t work.
You don’t need to think about decorative corners, perfect paint, complex shapes, or expensive materials right away. It’s much more useful to ask a simple question: will this bed help me start planting in the next day or two?
If the answer is yes — then it’s already doing its job.
What to Plant in a Quick Bed
Quick beds work especially well for crops that give you results fast. That matters. When you’re just starting a new space, it’s nice to see something happening soon.
Usually, these grow well:
- greens
- radishes
- lettuce
- bush beans
- basil
- dwarf tomatoes
- green onions
None of these need deep soil or complicated setups. You plant them — and soon you already see that the bed is not just there, it’s working.
And there’s something really satisfying about that. Not spending a month preparing the “perfect start,” but just beginning. Sometimes that’s exactly how the best ideas in a garden appear.
6. Reclaimed Wood Raised Bed Designs

With old boards, raised beds turn out really cozy-looking. And for a small garden, that’s often even better, because the space is already limited, and overly polished structures can sometimes feel too heavy there.
But not every old board is right for a vegetable bed. If the wood was painted with who-knows-what, smells like chemicals, falls apart in your hands, or spent years rotting in the rain, it’s better not to use it. Everyone wants to save money, that makes sense. But not at that cost.
Old boards have some very clear advantages:
- they often cost less than new lumber
- you can find them without spending much
- beds made from them are easier to size for your space
- they look more interesting than a lot of new materials
Which Design Options Look Best
With reclaimed wood, it’s better not to overcomplicate things. Old boards already look interesting on their own, so a complicated shape usually isn’t needed. The simpler the structure, the better it looks in a small garden.
These options usually work best:
1. Regular Rectangular Bed. The simplest option. You can place it almost anywhere: along a path, near a fence, next to the house. And it will look calm, without too much visual noise.
2. Long Narrow Bed. This works well for tight spots where there isn’t much width. It’s good for greens, onions, radishes, carrots, and other crops that don’t need a lot of space.
3. Short but Taller Bed.This works if the space is really small. A bed like this takes up less room, and it’s easier to care for because you don’t have to bend down as much.
4. Low Simple Box. A great option for lettuce, dill, parsley, and other greens. It looks light and doesn’t pull all the attention to itself.
5. Bed for a Corner or an Awkward Spot. If your space is inconvenient, that’s not a problem. That’s one of the nice things about reclaimed wood — you can size the boards to the actual space instead of trying to force a ready-made shape where it doesn’t fit.
In a small garden, this matters even more. The simpler the shape, the neater everything looks overall. And the bed itself doesn’t compete with the plants.
What to Check Before Building
This is not the place to rush. Sometimes an old board looks completely fine, and then you start taking it apart and immediately see it’s already too far gone for a raised bed.
Before building, it’s worth checking:
- whether there’s old paint or varnish
- whether there are soft, rotting spots
- whether old nails or staples are sticking out
- whether the wood smells chemical
- whether the edges are crumbling
It’s better to spend a little more time sorting through the material than rebuilding the whole thing later. The actual build usually goes faster than this slow part where you sort and figure out what’s really usable.
How These Beds Look in the Yard
In the yard, these beds usually don’t jump out at you, don’t fight with the plants, and don’t make it feel like you dropped something foreign into the space. That stands out even more in a small garden, where every large detail gets noticed right away.
Old boards look good next to a wooden fence, a garden path, mulch, gravel, or simple greens. Altogether, it feels more tied together. Not too “new,” not too polished — just natural. A bed like this doesn’t pull all the attention to itself, it just fits into the overall look of the garden.
Don’t Overcomplicate It
There’s no need to start sanding everything to perfection, leveling every single board, or trying to make it look like it isn’t old wood at all. There’s not much point in that. Usually, it’s enough to:
- clean the boards
- remove sticking-out hardware
- smooth out the roughest spots
- build a simple and sturdy shape
Reclaimed wood is a good option if you want to build a bed more cheaply, size it to your space, and avoid that feeling that you just bought a ready-made box and dropped it in the yard. But it’s important not to grab just anything. If the wood is solid, clean, and safe, it can make a really good raised bed. And if the material feels questionable, it’s better to keep looking. The garden already has enough surprises without that.
7. Concrete Block Beds for Sturdy Vegetable Gardens
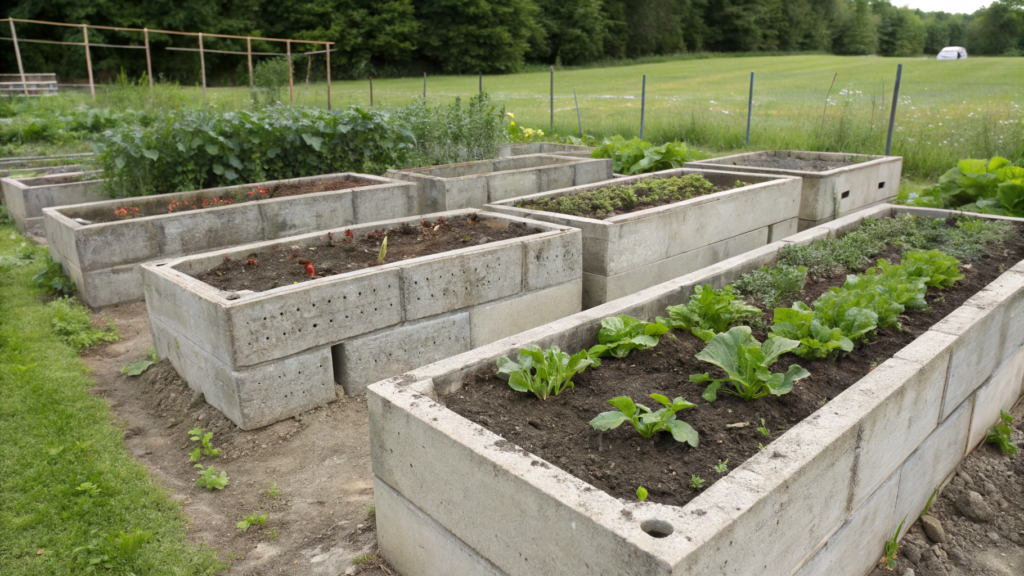
For a lot of people, concrete blocks feel too rough for a garden at first. Like, this is something from a construction site, not from a vegetable patch. But in real life, these beds work really well.
Concrete blocks have some very clear strengths:
- they’re strong and can sit there for years
- they don’t rot from moisture
- they don’t mind wet soil or mulch
- they make it easy to build a bed without complicated tools
- if you want, you can change the shape and move it later
Plus, these beds hold their shape really well. The soil doesn’t “spread out,” the sides stay in place, and the whole garden looks more pulled together. You notice that especially after heavy rain or a lot of watering.
Which Options Look and Work Best
With blocks, it’s better not to try anything too complicated. They’re already heavy and pretty visually noticeable on their own, so a simple shape almost always works best here.
These are usually the best options:
1. Regular Rectangular Bed. The most obvious option. Easy to build, easy to fit along a path or a fence, and easy to take care of later.
2. Long Low Bed. Good for narrow spaces. It doesn’t look too bulky and still gives you enough room for vegetables and greens.
3. Short but Taller Bed. Useful when there isn’t much space. A bed like this takes up less room in length, and it’s easier to work with.
4. Bed with Two Rows of Blocks. This works if you want taller sides. But here it’s especially important that everything stands straight and stable.
5. Bed with Plants in the Block Openings. This is a nice bonus. You can plant thyme, basil, or compact flowers in the empty holes along the edges. It’s a small detail, but it looks good.
After a list like that, blocks stop feeling like something too “construction-like.” Instead, it becomes clear that this is just another way to quickly build a strong raised bed without extra drama.
What’s Special About Blocks
This is one of those cases where the material doesn’t impress you most at the moment you buy it, but later. Blocks don’t need repainting, sealing, or rescuing after rain. They handle heat, damp weather, and changing conditions without a problem. And if your yard is a real working space, with watering cans, mulch, kids, a wheelbarrow, and all the normal garden mess, you really feel that.
Another plus is stability. These beds are hard to move by accident, bump out of place, or twist. You put them down, and they stay there. For a garden where you want things simple and reliable, that’s a real advantage.
What’s Better to Think About Ahead of Time
Of course, this is not the perfect material for every situation. There are a few things that are better to understand right away.
First, the blocks are heavy. If you’re building beds on your own and don’t enjoy carrying extra weight, that can get old pretty fast. Second, in strong heat they warm up more than wood. Not in some dramatic way, but in full sun you do notice it.
And one more thing — with blocks, it’s better to choose the spot right away. Because “we’ll move it later” sounds great only until you actually start moving concrete blocks around the yard.
Where to Place Beds Like This
These beds look especially good where you want a cleaner, more structured look. For example, along paths, next to gravel, near a paved area, or in an urban backyard where wood might feel too soft and you want something more solid.
If the space is small, concrete block beds can even help make everything look more organized. They give clear shape. The whole garden starts to look more orderly, and that feels good.
Concrete block beds are a good option if you want a strong bed with very little upkeep. Not the lightest one, not the most airy-looking one, but very clear and very reliable. Here, practicality really wins. You place it, fill it, plant it — and after that, you think less about the structure and more about what’s growing in it.
8. Low-Maintenance Drip Irrigation Layouts
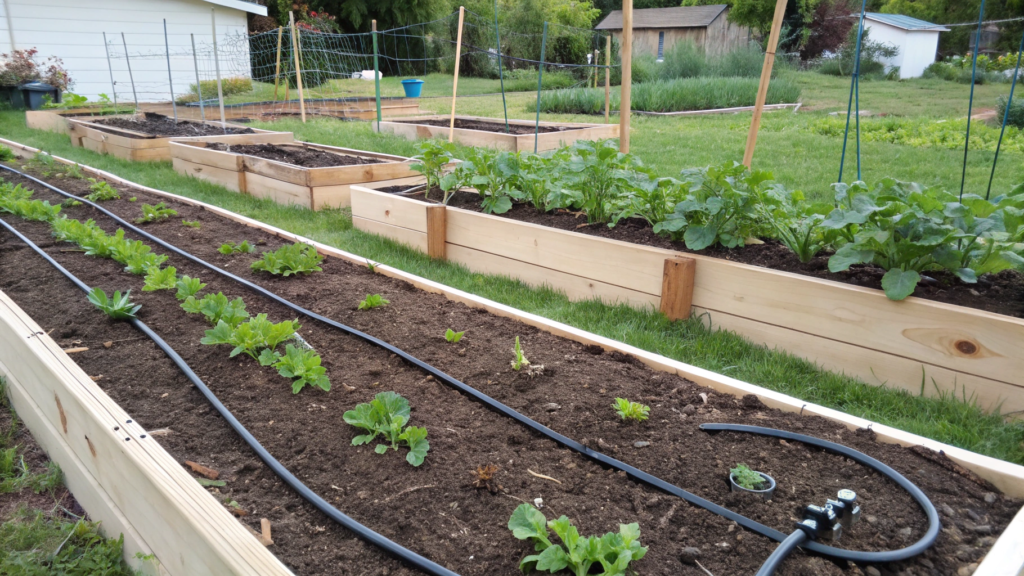
Drip irrigation works really well in raised beds. Not because it’s something “professional,” but because there’s less fuss with it. Water goes where it’s actually needed, instead of spraying all over the paths, the leaves, and your shoes.
Drip watering is good not only because it saves time. You don’t keep running around every time thinking, “Will I manage to water everything properly today?” The system is already in place, and you don’t have to reinvent the process every evening.
Another important thing is evenness. When you water by hand, some spots get more water, some get less. That’s normal, it happens to everyone. But then the plants grow unevenly, and you can see it. With a drip layout, the bed usually stays more even in moisture. For vegetables, that’s a really nice thing.
Which Layouts Work Best in Raised Beds
You don’t have to make anything complicated here. Usually, these options work best:
1. One Main Line Along the Edge and Short Drip Lines Across the Bed
A good option for rectangular beds. Everything is clear, everything is easy to check, and if something needs replacing, you can quickly see where.
2. Two Parallel Lines Along a Long Bed
This works for beds about 3–4 ft (90–120 cm) wide. One line often doesn’t water everything evenly enough, but two lines usually give a much more even result.
3. A Loop or Closed Layout for a Compact Square Bed
This is useful when the bed is small but planted densely. Water spreads more calmly, without obvious “dry corners.”
4. A Separate Line for Plants That Need More Water
Cucumbers, tomatoes, and zucchini are often easier to keep on their own line instead of mixing them with calmer crops.
5. A Simple Layout with a Timer at the Water Source
This is honestly one of the nicest options. You set it up once — and after that, the system works almost without your involvement.
And here, you really don’t need to overcomplicate things. A small garden benefits not from lots of details, but from the fact that everything works without extra stress.
What Feels Convenient in Real Life, and What Starts to Get Annoying Later
The easiest layouts are usually the ones where you clearly understand where the water is going.
If the bed is long, two rows of planting are almost always more convenient than one; if it’s short, a simpler layout may suffice. If the plantings are mixed, it’s best to consider the water consumption of each individual. Because basil and tomato may look cute next to each other, but they don’t always want the same amount of water.
And one more little thing that is actually not little at all: when the tubes lie too close to the edge, part of the water goes somewhere other than where you wanted it. So it’s better to pull them slightly inward right away. It just makes life easier later.
What to Think Through Before Installation
These are the things that don’t sound very exciting to talk about… until you run into them on a hot day:
- where the water connection will be
- whether there is enough pressure for all the beds
- whether you need a timer
- how you’ll flush the system
- whether the tubing gets in the way of mulch, paths, or harvesting
If you think all this through in advance, the layout won’t just work — it will be comfortable. And that’s a big difference. Because watering can either be something that “kind of exists,” or something you almost never think about. And the second option is always nicer.
If you don’t want to build the whole system piece by piece, the easiest way to start is with a basic kit. For example, Raindrip Automatic Container and Raised Bed Drip Watering Kit works well for small raised beds where you don’t need a complicated setup, but just want to connect it, lay out the lines, and start. Kits like that are especially good in the beginning, when you’re still figuring out what kind of watering setup is actually most convenient for your beds. Later, you can always add, change, simplify, or expand things.
In real life, the best drip layouts are usually just a couple of neat lines, a clear water path, and very little effort from your side. You’re not spending your energy every evening doing the same thing again and again. For a small backyard vegetable garden, honestly, it’s one of the nicest upgrades you can make.
9. Best Vegetables for Compact Garden Beds
For compact garden beds, the best choice is usually not just your favorite vegetables in general, but the ones that give a good harvest from a small space and don’t turn the bed into a jungle after three weeks.
In compact beds, the crops that usually work best are the ones that:
- grow neatly
- give a lot of harvest from one spot
- don’t need huge depth
- don’t choke their neighbors
- are easy to harvest
And this is exactly where it matters not to chase a huge number of different crops. It’s much nicer when a bed has 5–6 good vegetables that really work.
Which Vegetables Work Best
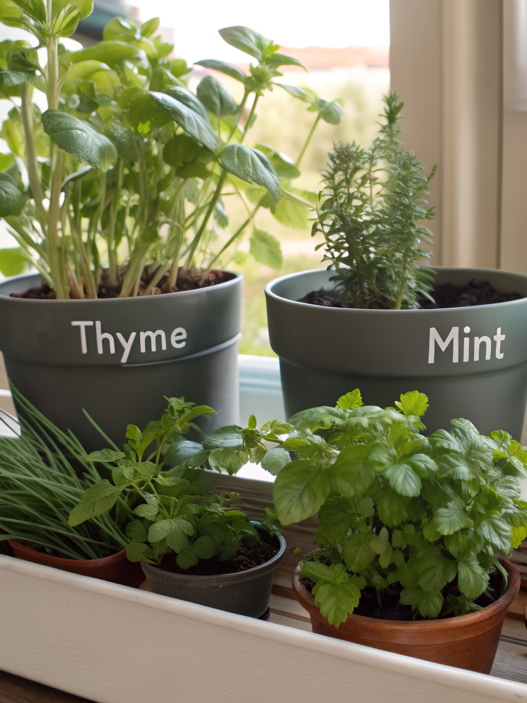
- Lettuce
One of the most rewarding options for a small bed. It grows fast, doesn’t need much space, and gives a clear, quick result. It’s especially good along the front edge of the bed, where you can cut it every couple of days. - Radishes
A very convenient crop for small spaces. They don’t take up much room, mature quickly, and fit well between slower vegetables. While the tomatoes are only just getting started, the radishes can already be harvested and the space opens up again. - Green Onions
These are just great in compact beds. They stay calm, don’t ask for much room, and look tidy. Plus, they’re easy to tuck into open spots where something else has already been harvested. - Carrots
They don’t need a huge bed, but they do need loose soil. In small raised beds, they often do even better than in heavy ground. The main thing is not to sow them too thickly. - Beets
They’re nice because they give you two things at once: the root and the greens. In the bed, they look neat, don’t fall all over the place, and live pretty well next to other crops.
After vegetables like these, one general rule becomes pretty clear: in a small garden, the crops that work best are the ones that don’t need much space per plant. They just behave more calmly.
What Else Is Worth Planting If You Want More Return
If you want the bed not only to look neat but also to give you more food from each square foot, I would also look at these:
- Bush Beans
Not as aggressive as climbing beans, and still very productive. They work well in smaller beds where you don’t want to build a lot of supports. - Peppers
One plant doesn’t take up that much room, and the return is pretty solid. Especially if you choose compact varieties. For small beds, this is a very convenient crop. - Dwarf or Determinate Tomatoes
Not every tomato works in a compact planting. But if you choose a more restrained variety and give it support right away, it can fit into a small raised bed just fine. - Spinach
Good for the early and cooler part of the season. It grows fast, doesn’t take much room, and comes out easily when it’s time to plant something more summery. - Kale
If you like greens that you can keep cutting, this is a really good option. One plant can keep producing for a long time, and it still looks pretty tidy. - With a compact garden bed, you’re not trying to cram in everything. You choose what really earns its place.
What Is Better Not to Plant First
Not because these crops are bad. Just because in a small bed, they often start taking over everything else very quickly.
I’d be careful with these:
- zucchini — one plant can take up a huge amount of space
- pumpkins — for compact beds, they’re usually too demanding in terms of area
- corn — it needs more room and a group planting, not just a couple of plants in the corner
- large indeterminate tomatoes — without control, they quickly turn into their own ecosystem
- sprawling cucumbers without a trellis — on the ground, they instantly take over the paths
That doesn’t mean you can never grow them. It just means that in a small space, they almost always need their own separate solution, not a “well, let’s just stick them in here too.”
If the bed is compact, the most successful mix is usually something simple: one or two “main” crops, some greens, and something fast for an early harvest. For example, peppers, lettuce, and radishes. Or a supported tomato, basil, and green onions. Or carrots with beets and a strip of spinach along the edge.
The bed doesn’t feel overloaded, the plants don’t start fighting for every inch, and it becomes much easier for you to take care of everything.
10. Elevated Garden Bed Designs for Urban Spaces
Elevated garden beds help you grow vegetables in places where a regular bed is not very convenient. They really do make life easier. You bend down less, the area stays cleaner, and the garden itself looks more put together. And in an urban space, that feels especially nice, because every little detail stands out there.
With a regular bed, you still depend on what kind of soil you have on the site, what used to be there before, and how comfortable it is to dig around in that spot at all. But an elevated bed sort of separates your garden from everything else. You get your own little zone: your own soil, your own height, your own shape.
There are also very practical everyday advantages:
- less mess around it
- easier to take care of the planting
- easier to keep everything in order
- less strain on your back and knees
- easier to fit a garden into a small city yard
Which Elevated Bed Designs Are the Most Convenient
With beds like these, simple shapes usually work best. In the city, there’s already a lot going on around you: walls, paths, corners, fences. So complicated structures are rarely needed.
These are the options that most often turn out to be the most convenient:
1. A Long Narrow Bed Along a Wall or Fence
A very good format for a patio, side passage, or small yard. It doesn’t take up too much space, and at the same time gives you enough room for greens, lettuce, peppers, or compact tomatoes.
2. A Small Tall Bed on Legs
This works well for a terrace, pavement, or a place where you don’t want to put a heavy structure directly on the surface. And it’s easier to care for because it sits higher.
3. A Compact Square Bed
A good option if there’s very little space. No need to try to cram in too much. Sometimes one neat zone for greens and herbs works better than three cramped beds.
4. A Corner Elevated Bed
Useful in places where a regular rectangular shape leaves an awkward empty spot. Especially helpful in small courtyards.
5. A Two-Level Structure
A convenient option if you want to use the space a little smarter. You can keep greens on one level, and something bigger on the other.
Now it’s easier to see that an elevated bed is simply a convenient way to set up a garden where a regular bed would not be the best idea.
What’s Especially Important to Think About in Advance
With elevated beds, there are a few things that are better to understand before buying or building.
First, the height. If the bed is too low, part of the convenience is lost. If it’s too high, it can be heavy and not very practical for deeper crops.
Second, the width. If it’s hard to reach the middle, that starts getting annoying fast. So it’s better to choose a size that will actually feel comfortable for you to work with.
Third, the soil volume. This matters. Not every elevated bed will suit every vegetable. Some are great for greens and radishes, while others can easily handle peppers or compact tomatoes.
Which Crops Do Best There
This is where it’s better not to try to plant everything at once. Elevated beds are especially good for crops that don’t need too much depth and that are easy to harvest often.
These usually grow well in them:
- lettuce
- spinach
- green onions
- basil
- parsley
- radishes
- beets
- peppers
- dwarf tomatoes
If the structure isn’t very deep, it’s better not to focus on large root crops or very heavy-growing plants. But greens feel excellent in beds like these. You step out, snip what you need, and move on. For the city, that’s a very convenient format.
A Few Things We’ve Noticed from Experience
The simpler the elevated bed, the better it usually works. There’s no need to try to make something overly complicated right away. What matters much more is that the bed is:
- stable
- comfortable in height
- not too wide
- has proper drainage
- fits your real space
If all of that is there, then you can calmly think about the details later.
Elevated garden bed designs for urban spaces are great because they help you grow vegetables where a regular bed would be inconvenient or just unnecessary. With them, the garden becomes neater, easier to manage, and easier to care for. And in the city, you feel that especially clearly.
Raised Bed Options
I think this is probably a topic that feels close to home for you. And most likely, you already have an idea in your head of which option would fit your space best. There’s no single right answer for everyone, and that’s part of what makes it good.
The nicest thing about small raised beds is that they don’t need perfect conditions or a huge budget to get started. Sometimes one good bed is enough to get everything moving. And little by little, even a very modest corner starts feeding you for real.If you want, write in the comments which kind of raised bed you would build first at your place. I’d really love to know what feels closer to you: a quick start, a sturdier build for years, or something compact for a really small space.