Every September, I can feel the air turning cooler, the leaves getting darker, and suddenly the porch becomes the coziest place in the world again. That’s when I start wanting to create our fall arrangements.
And you don’t need to be a designer to make your porch look beautiful. All it takes is a bit of courage — to mix plants, textures, and colors.
Over the years, Lindy and I have tried it all and now we know for sure: fall décor doesn’t have to be standard. It can be minimalist, bold, moody, or classic — it all depends on the plants you choose.
In this list, I’ve gathered 10 tried-and-true ideas — the ones that always work. Some of them take only an hour to make, others require a bit more attention. But all of them will help you create a warm and lively fall vibe right on your porch.
1. Kale & Pansy Combo for Dramatic Fall Contrast
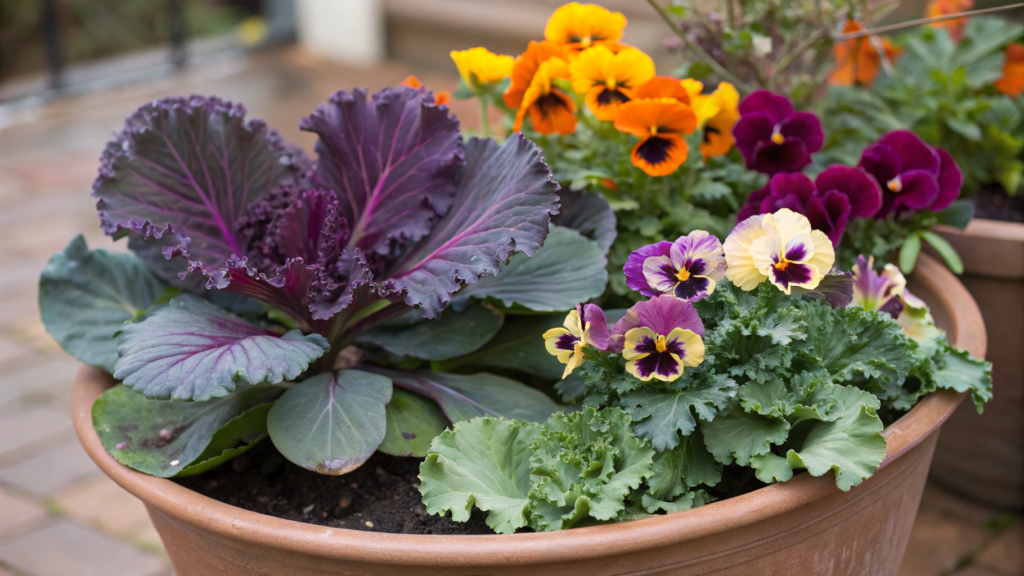
You might think, what could be easier than planting a couple of flowers in a pot? But it’s not that simple. You need to combine textures, colors, and shapes with care. For example, our favorite pair — kale and pansies.
No special skills needed. Everything works on its own if you pick the right varieties and plan the composition just a bit.
What you’ll need:
- 1 ornamental kale (about 1 gallon / 4 L)
- 3–4 pansies in different shades — purple, burgundy, or lemon yellow
- Quality container soil mix
- Medium pot (12–14 inches / 30–35 cm in diameter)
- A bit of mulch or small decorative stones
- Optional: a mini pumpkin or eucalyptus branch for a finishing touch
How to assemble the arrangement:
- Choose your centerpiece. Start by preparing the pot — add a drainage layer of small pebbles or expanded clay at the bottom so the roots won’t sit in water. Add some soil so that the kale sits slightly above the pot’s rim — this way, the leaves will hang beautifully, creating a lush volume. When placing the kale, turn it a bit so the largest leaves face outward — it makes the whole composition look open and natural.
- Add contrast. Now for the fun part — plant the pansies around the kale. Arrange them in a circle, slightly tilted toward the center so they “face” the kale. Don’t be afraid to mix colors! Deep purple pansies highlight the bluish-green kale, while yellow ones add warmth. I sometimes throw in one white bloom — it brightens the whole arrangement, like a light spot in a painting.
- Fill the gaps. Carefully add soil between the plants, pressing it gently with your fingers. Don’t pack it too tightly — the roots need air. After that, lightly shake the pot so the soil settles evenly, then top it off if needed. If you want, stick in a couple of decorative branches or dried grasses — they’ll add height and texture.
- Water and decorate. Water thoroughly so the soil is fully soaked and the excess drains out. Then add a thin layer of mulch or small pebbles — they’ll look nice and help retain moisture. And here’s the final touch — place a mini pumpkin next to the pot or tuck in a eucalyptus branch. That little detail will make the whole thing pop.
Pro tips from us:
- Kale handles cold perfectly, even light frost — its leaves only get more vibrant.
- Pansies love cool weather but prefer morning sun, so keep the pot closer to the light.
- To keep them blooming longer, remove faded flowers regularly — it encourages new buds to form.
Lindy and I once made this combo right in front of our house, and our neighbor thought a professional designer had done it. You see? Just kale and flowers. But together, they look like a high-end arrangement.
So if you’re not sure where to start — start with kale and pansies. Minimum effort, maximum wow effect.
2. Mums + Grass + Gourds Layered Planter
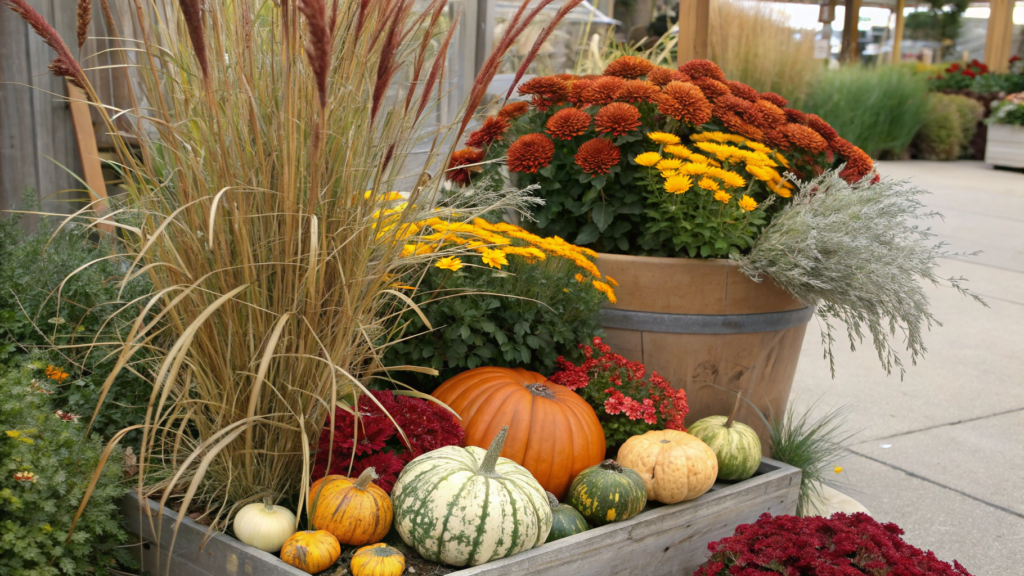
The first time I tried a layered fall arrangement — with mums, ornamental grasses, and gourds — everything on my porch changed. The pot suddenly looked like a mini farmers’ market display.
What you’ll need:
- 1 large pot or outdoor planter (18–20 inches / 45–50 cm in diameter)
- 1 chrysanthemum bush (mums) — bright yellow, burgundy, or copper tones
- 1 bunch of ornamental grass (like purple fountain grass or carex)
- 3–4 small decorative gourds
- Quality potting mix (for example, FoxFarm Ocean Forest Potting Soil)
- A bit of moss, pinecones, or fallen leaves for decoration
How to assemble the arrangement:
- Create the base. Fill the pot about two-thirds full with potting mix. For large planters, it’s important that the soil is light and well-draining — ornamental grasses hate “swampy” conditions. You can add a bit of compost for nutrients. I sometimes mix in sand — it helps water drain just right.
- Add height. Plant the ornamental grass in the center. It’ll be your “lantern” — tall and airy, adding movement, especially when the wind blows. If you want a more striking look, go for purple fountain grass — it pairs beautifully with the warm tones of fall.
- Build the main accent. Arrange the mums around the grass. I like to place them asymmetrically — two close together, one slightly off to the side — so the composition feels more natural, not too perfect. You can mix the colors — yellow and burgundy make a bright fall contrast, especially against the texture of the grass.
- Add a bottom layer. Gently place the decorative gourds right on the soil, between the plants. They not only decorate but also visually anchor the base, giving the arrangement a finished, full look. If you want, add moss or a few fallen leaves for a natural touch.
- Water and set in place. After planting, water evenly but don’t overdo it. It’s better to water more often but lightly. Mums don’t like excess moisture, especially on cool nights.
Pro tips:
- Mums prefer sunlight, but a bit of afternoon shade will help them bloom longer if the days are hot.
- You can leave ornamental grasses even through winter — the dried plumes look beautifully atmospheric in the frosty air.
- For that “shop window” effect, add a string of micro-lights — the arrangement will glow with a soft golden light in the evening.
And here’s my advice — don’t be afraid to mix plants, shapes, and materials. Let a lush mum sit next to a fancy grass, with a tiny gourd tucked between them. Fall loves layers — in colors, textures, and feelings.
3. Ornamental Peppers with Purple Fountain Grass

Ornamental peppers and purple fountain grass — this duo looks like something straight out of a designer magazine. But no, it’s just a bit of boldness and the right mix of textures.
What you’ll need:
- 1 purple fountain grass plant
- 2–3 ornamental peppers in various shades, from yellow to deep purple
- Large container or pot (14–16 inches / 35–40 cm in diameter)
- Well-draining potting mix
- Small stones or bark for mulch
- Bloom-boosting fertilizer (optional)
How to assemble the arrangement:
- Prepare the base. Add a 1–2 inch (2–5 cm) drainage layer of pebbles or broken clay at the bottom of the pot. Then fill it almost to the top with soil, leaving a couple of inches below the rim. Ornamental peppers dislike soggy roots, so make sure water drains freely. If you’re using a peat-based organic mix, combine it with sand — it creates the perfect texture.
- Plant the “lantern.” Place the grass in the center or slightly toward the back — depending on where the arrangement will sit. Its long, flowing leaves add motion and life; even a light breeze makes the whole thing “come alive.”
- Add color and energy. Plant the ornamental peppers around the grass. They’re compact but vibrant — like tiny glowing bulbs against dark foliage. Arrange them asymmetrically: two close together, one a little farther away. If you want extra contrast, choose peppers in different fruit colors — purple, orange, and yellow together look incredibly lively.
- Decorate and set in place. After planting, press the soil gently and water until it drains out the bottom. Then spread a thin layer of decorative mulch — I love using fine bark or black gravel. It deepens the colors and gives the whole setup a clean, polished finish.
- Final touch. Want more depth? Stick in a few dry branches with berries — rosehip or hypericum work beautifully. They add that natural, wild look — the kind you see in the fields in late fall when everything is still colorful, yet calm in its own way.
From experience:
- Ornamental peppers handle sunlight well but start struggling below 50°F (10°C), so in cooler regions, keep them under a covered porch.
- Water moderately — too much moisture makes the leaves lose their firmness.
- Fountain grass lives longer than peppers. When the season ends, just transplant it into a separate pot — it overwinters beautifully indoors or under light cover.
So if you want your fall décor to move and shimmer with every breeze, try pairing ornamental peppers with purple fountain grass. It’s simple — but unbelievably beautiful.
4. Rustic Crate with Fall Ivy & Mini Pumpkins

I have a weakness for old wooden crates — not the smooth, lacquered ones, but those with cracks, rough boards, and darkened corners.
And it was with one of those crates that Lindy and I created one of our favorite fall arrangements ever — a rustic wooden box filled with ivy and mini pumpkins.
What you’ll need:
- 1 vintage or plain wooden crate (you can also use a basket or an apple box)
- 2–3 pots of fall ivy (English ivy, variegated ivy, or Algerian ivy)
- 4–5 mini pumpkins (varied shapes and colors)
- A bit of dry straw or moss for the base
- Optional: a battery-operated string light with a warm glow
- Optional: wooden tags, dried orange slices, or cinnamon sticks for scent
- Slow-release fertilizer (like Osmocote Smart-Release Plant Food)
How to assemble the arrangement:
- Prepare the crate. If it’s an old one, just shake off the dust and, if you like, line the bottom with thick paper or burlap so the soil or straw won’t spill out. I love leaving imperfections and chips — they add charm. Sometimes I lightly sand the corners to “open” the wood grain and let out that natural scent.
- Create the base. Place a layer of straw or moss at the bottom — it gives a soft background and slightly lifts the plants, making the arrangement look fuller. If you’re using live ivy in pots, simply sink them into the straw so the pots aren’t visible. You can sprinkle a little moss on top of the soil to keep it tidy and natural-looking.
- Add the ivy. Position one plant in the center and two on the sides so they can drape down. Ivy loves to “wander,” and that’s exactly what gives the design its movement. After a couple of weeks, the vines will start spilling over and framing the pumpkins — as if it all grew naturally.
- Decorate with mini pumpkins. Arrange the mini pumpkins between the plants: try mixing white “Baby Boo,” striped “Tiger Stripe,” and classic orange varieties. Just avoid symmetry. Let one lie sideways, another slightly higher, and a third peek out from under the ivy. This creates a natural farmers’ market look — casual and full of character.
- Add accents. Scatter a few dried orange slices, cinnamon sticks, or pinecones between the pumpkins. If your arrangement sits on the porch, add a warm micro-string light — the thin kind on a copper wire with a soft amber glow (fairy lights work great). I simply weave it through the ivy leaves, and by evening, the whole piece starts to glow softly.
From our experience:
- Ivy prefers partial shade, so don’t place the crate under direct sun.
- If using real mini pumpkins, don’t wash them — just wipe with a dry cloth. They’ll last much longer.
- Mist the ivy once a week, especially if the crate is outdoors — autumn wind dries the leaves faster than you’d expect.
Dry straw, weathered wood, ivy, and the sweet scent of pumpkins — together they create the feeling of warm September days, even when the wind outside has already turned cold.
So don’t hunt for fancy planters. Grab an old crate, a bit of ivy, and a few pumpkins. Sometimes the simplest things bring out the truest feeling of home.
5. Mixed Pot of Asters, Dusty Miller & Trailing Vines

The combination of asters, silver Dusty Miller, and trailing vines creates a soft, gentle mood — everything looks muted yet elegant at the same time.
What you’ll need:
- 1 medium-sized aster bush (purple, lilac, or pink shades)
- 2–3 Dusty Miller plants (silver cineraria)
- 1–2 trailing plants — ivy, dichondra, or ornamental sweet pea
- Medium pot (14–16 inches / 35–40 cm in diameter)
- Quality potting mix for flowering containers
- A bit of perlite (optional, for lightness and drainage)
- Small stones or bark for surface decoration
How to assemble the arrangement:
- Start with texture. Fill the pot with soil almost to the top, leaving a couple of inches (about 5 cm) of space. Fall planters look best when plants slightly “spill over” the edges. Plant Dusty Miller first — two bushes near the sides, close to the rim. Their silvery leaves form a soft, misty backdrop that sets the tone.
- Add a bright center. Now plant the aster in the center. Its bright star-like blooms against the silver look absolutely magical (and I’m not exaggerating). Choose dense-blooming varieties — deep purple or rich blue ones add depth and become the focal point. If your aster is tall, mound a bit of soil around the base to keep it steady.
- Create movement. Around the rim, plant your trailing vines. Ivy or dichondra will gently cascade down like a waterfall. I often use Silver Falls Dichondra — its silvery leaves echo Dusty Miller, creating perfect balance. Leave some space between vines so they can grow freely and not tangle.
- Water and decorate. After planting, water thoroughly until it drains out the bottom. Then finish with a decorative layer — fine gravel, bark chips, or even dry leaves. I like to scatter a few pinecones — it’s a small detail, but it completely changes the mood.
A few tips:
- Dusty Miller handles cold well, and asters love cool nights — a perfect fall pairing.
- To extend aster blooms, trim off faded flowers regularly.
- You can gently guide the trailing vines downward by tucking or tying them — it keeps the arrangement tidy.
- Fertilize lightly every two weeks with a liquid feed for blooming plants.
Each time, this combination looks a bit different. Sometimes the asters bloom early, sometimes later — but it always turns out alive, calm, and effortlessly beautiful.
6. Cozy Porch Bin with Heuchera + Bronze Fern
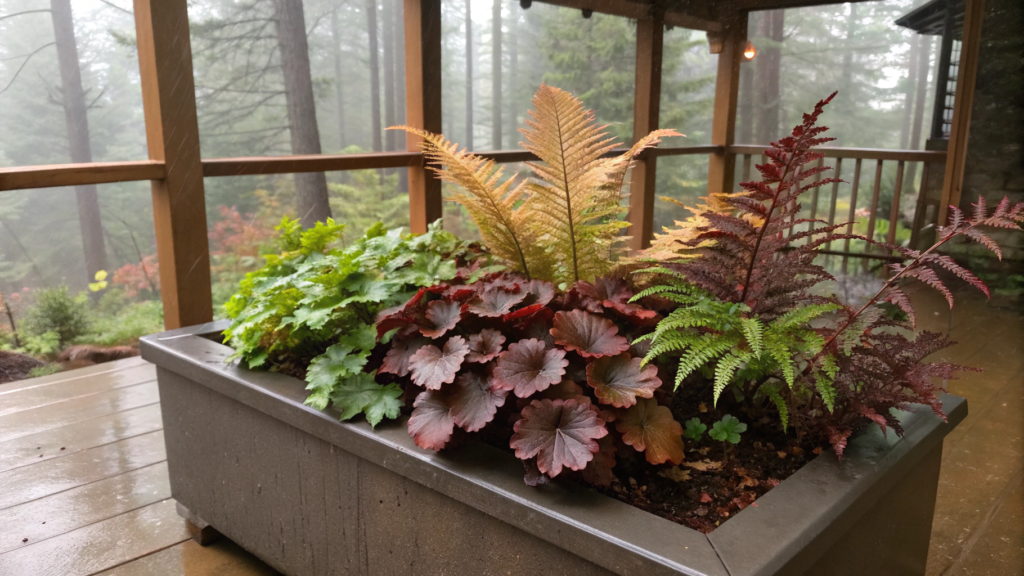
A mix of Heuchera and bronze fern feels like your porch has turned into a tiny forest nook after the rain — damp leaves, soft light, and muted tones of copper and chocolate.
What you’ll need:
- 1–2 Heuchera plants in warm shades — caramel, amber, or berry smoothie
- 1 bronze or autumn fern
- Deep container or galvanized metal bucket (12–14 inches / 30–35 cm)
- Potting mix for shade-loving plants
- A bit of fine moss or bark to decorate the surface
- Optional: an old blanket, piece of burlap, or decorative pot stand
How to assemble the arrangement:
- Prepare the container. I love making fall arrangements in old galvanized buckets or wooden boxes. If there are no drainage holes, pour about 2 inches (5 cm) of pebbles at the bottom — it’ll protect the roots from excess moisture. Add soil almost to the top, leaving a bit of space for the plants.
- Plant the Heuchera. Heuchera leaves come in copper, raspberry, and burgundy tones — each shifts subtly depending on the light. Plant it slightly off-center so the leaves can fan out to one side, as if moved by a gentle breeze.
- Add the fern. On the opposite side, plant the bronze fern. Its feathery leaves add depth and texture, bringing the whole composition to life. Ferns and Heuchera are perfect companions — both love indirect light and moist, but not soggy, soil.
- Create coziness. Add a bit of moss or small bark pieces between the plants. It’s not just pretty — it helps retain moisture. For that “fall vibe,” place a small jar candle nearby or wrap the container in burlap. Lindy and I once did this, and suddenly our whole porch looked like a magazine photo.
- Water and set the accents. Water moderately so the soil settles, then add a thin layer of mulch. Place the arrangement on a crate or stand so it sits slightly higher than floor level — the leaves will catch the light better, especially in the evening.
From experience:
- Heuchera tolerates light chills but should be moved closer to the house during frost.
- The bronze fern only gets more beautiful in fall — its leaves shift from green to copper tones.
- To calm the look, add a few simple decorative stones — they highlight the foliage’s texture.
There’s no flashiness in this pair, but if you want to create a quiet, atmospheric corner on your porch — try combining Heuchera and fern. Fall loves not only colors but also gentle shadows.
7. Pumpkin Pot DIY with Marigolds and Moss
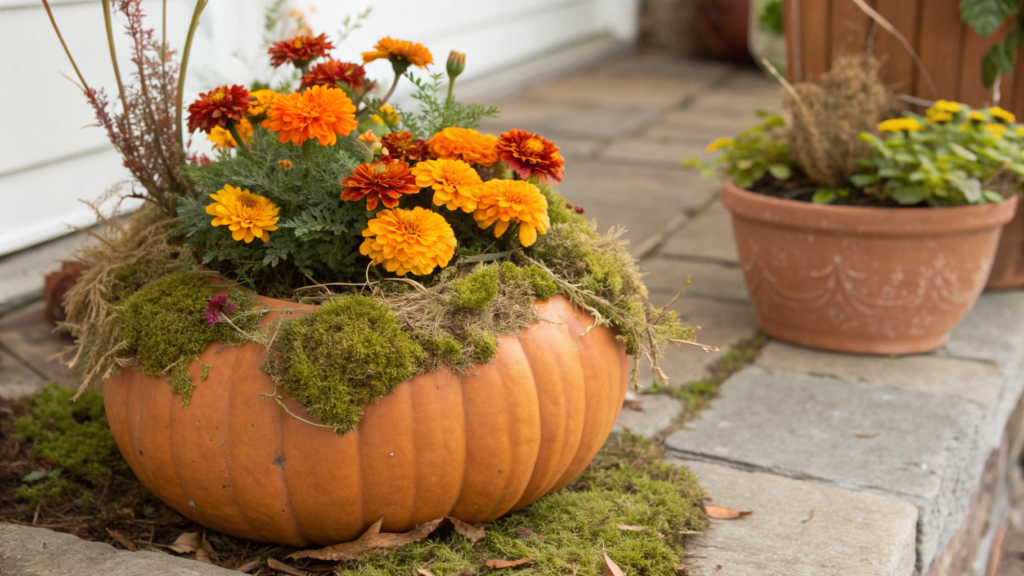
In fall, I don’t just eat pumpkins — I plant them, paint them, carve them, and even use them as planters. And it works beautifully. Especially when you combine marigolds and moss — the result feels warm, rustic, and full of harvest charm.
What you’ll need:
- 1 large pumpkin (smooth and sturdy, about 10–12 inches / 25–30 cm in diameter)
- 2–3 marigold plants — bright orange or yellow varieties
- A bit of fresh or decorative moss
- Potting mix for flowering plants (like Miracle-Gro Potting Mix)
- Sharp knife and spoon for carving
- Plastic liner or film (to protect the inside of the pumpkin from rotting)
- Scissors and garden gloves
How to assemble the arrangement:
- Prepare the “planter.” Choose a medium pumpkin — not too heavy but stable. Cut off the top (about one-third from the top) and scoop out the insides with a spoon. Don’t toss the pulp — Lindy and I usually save it for pie or soup. Wipe the inside dry and insert a plastic liner or container to keep the pumpkin from rotting too fast.
- Fill the base. Add a layer of potting soil, leaving about 2–3 inches from the rim. If you want, mix in a bit of sand or perlite for airflow — marigolds like light, well-draining soil. I sometimes add a few organic fertilizer granules — it’s enough to keep them happy all season.
- Plant the marigolds. Arrange the marigolds in a circle, leaving a little space between them. They grow quickly, and once they bloom, your pumpkin will turn into a glowing orange bouquet. If you have varieties of different heights, plant taller ones in the center and shorter ones along the edge to create a soft dome shape.
- Decorate with moss. Now for the fun part — add moss. It hides the soil and gives a woodland feel. You can use fresh garden moss (just make sure it’s bug-free) or decorative store-bought moss. Damp moss helps retain moisture and makes the whole arrangement feel warm and alive.
- Water and display. Water carefully so it doesn’t pool inside. It’s better to water lightly but more often. The pumpkin itself will slowly dry out — that’s normal. It’ll last up to 3–4 weeks, especially if kept cool.
Inspiration ideas:
- To make the display last longer, use an artificial pumpkin — it looks almost identical and will last for years.
- Add a few eucalyptus sprigs or dried seed heads for extra height and texture.
- Once the marigolds fade, swap them out for mini mums or succulents — it gives the same cozy harvest vibe.
The first time I made a “pumpkin vase,” Lindy just laughed: “Did you really plant flowers in lunch?” Yes — and it was amazing! The whole porch glowed orange, smelling of moss and fresh earth.
Since then, it’s become our yearly tradition — pumpkin planters with marigolds. Simple, vibrant, a little messy — but so warm. If you want to breathe a bit of life into fall, start with this project. The result will surprise you.
8. Galvanized Bucket Arrangement with Sage and Mums
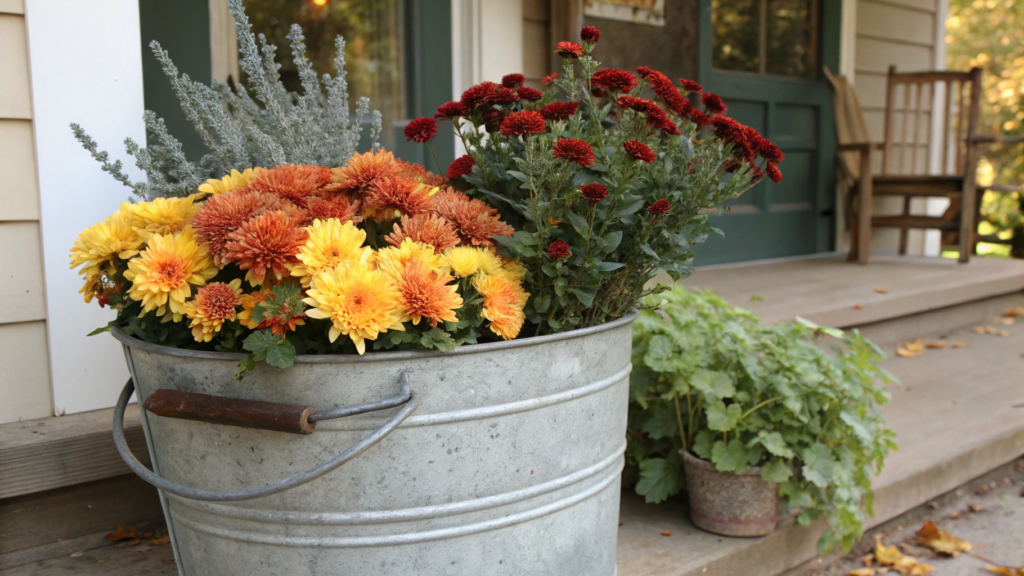
Behind our house, there’s an old galvanized bucket that once served as a chicken waterer. The metal has dulled, the handle is bent — but one day I saw in it the perfect fall container for mums and sage.
Sometimes the simplest things become the most beautiful when you give them a chance.
What you’ll need:
- 1 large galvanized bucket or metal container (3–5 gallons / 12–20 L)
- 1 mum plant in a warm tone — amber, terracotta, or deep burgundy
- 1–2 sage plants — either common or variegated ornamental sage
- Potting mix for container plants (like FoxFarm Ocean Forest Potting Soil)
- Expanded clay or small pebbles for drainage
- A bit of moss or mulch for decoration
- Optional: a few mini pumpkins, dried wheat stalks, or lavender sprigs
How to assemble the arrangement:
- Prepare the bucket. If the bottom is solid, drill 3–4 holes so excess water can drain. Add a 2-inch (5 cm) layer of drainage material, then a layer of soil. Metal containers age beautifully but heat up quickly, so don’t place them in direct sun — especially if you live in a warm climate.
- Plant the mums. Place the mums slightly off-center — they’ll be the main focus. I love varieties with dense, rounded blooms — they look like tiny suns. When they open, their warm shades literally make the space feel cozier.
- Add the sage. Plant 1–2 sage bushes on the opposite side. Their silvery-green leaves create perfect balance with the vibrant mums. If you use variegated sage, it’ll add a touch of coolness — like a breath of fresh air.
And it’s not just for looks — sage smells divine. When you brush past it, the air fills with that spicy autumn scent that makes a porch feel complete. - Add texture and finish the look. Tuck in some moss, bark chips, or ornamental grasses between the plants. If you want a bit of rustic charm, scatter a few mini pumpkins along the rim. Sometimes I stick a couple of dried wheat stalks into the soil on the side — as if the wind just left them there.
- Water and care. Water moderately — mums love moisture, but not soggy soil. Sage, on the other hand, prefers it drier. I usually direct the watering stream closer to the mums rather than the sage. You can feed both plants every two weeks with a liquid fertilizer for flowering plants if you like.
Tips:
- To keep the arrangement looking fresh longer, use artificial mini pumpkins or dried wheat — they’ll hold their shape for weeks.
- In cold regions, simply move the bucket into a garage or shed when the nights get frosty.
- At the end of the season, replant the sage into your garden bed — it’s a perennial and will survive the winter perfectly.
The first time I put this bucket together, Lindy stepped onto the porch, inhaled deeply, and said, “Smells like home.”
And it really did — sage, metal, a hint of damp soil, and the warmth of mums blended into that peaceful October atmosphere.
If you want a simple yet striking fall arrangement, try this one. No fancy tricks — just natural beauty, a bit of rust, and the scent of fresh sage.
9. Minimalist Black Pot with White Ornamental Cabbage
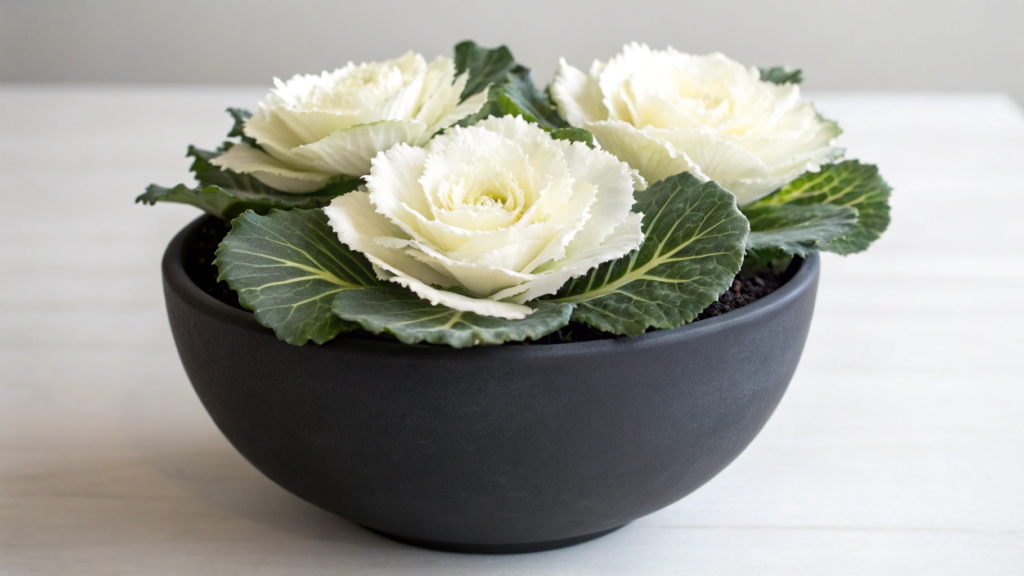
Sometimes, after all the bright fall colors, you just want to take a pause. No pumpkins, no orange — just purity, form, and contrast. That’s exactly when I first created an arrangement with white ornamental cabbage in a matte black pot.
It turned out understated, stylish, and… unexpectedly modern. Lindy said, “It’s like a little Tokyo on our porch.”
What you’ll need:
- 1 light-colored ornamental cabbage (white ornamental cabbage or flowering kale)
- 1 black matte pot or concrete container (12–14 inches / 30–35 cm in diameter)
- Potting mix for containers (like Miracle-Gro Potting Mix)
- A bit of gravel or sand for drainage
- Fine black pebbles or stones for surface decoration
- Optional: a few dried twigs or white feathers for a vertical accent
How to assemble the arrangement:
- Prepare the pot. A matte black container beautifully emphasizes the texture and light of the ornamental cabbage. Add 1–2 inches (2–5 cm) of drainage material at the bottom, then fill the pot almost to the top with soil. If you want a more striking effect, group several pots of different heights together.
- Plant the cabbage. Place the ornamental cabbage in the center. Its leaves should gently drape over the edge, giving the illusion of marble-like petals. When planting, don’t bury the stem too deep — cabbage needs room to breathe. After planting, press the soil lightly around the base and water to help it settle.
- Decorate the surface. Add a layer of black pebbles or small stones — the contrast with the white leaves is stunning. Sometimes I insert a few dried twigs or pale feathers at an angle — it looks like a minimalist Japanese ikebana arrangement.
- Water and place it right. White ornamental cabbage loves cool, bright light but not harsh midday sun. Place the pot where it gets morning or evening light. When watering, avoid leaving droplets on the leaves — that can cause spotting.
Tips:
- White ornamental cabbage becomes even prettier with the first cool nights — the leaves firm up and the center develops a soft creamy tint.
- To make the arrangement last longer, mix in some slow-release fertilizer.
- Regularly remove fallen leaves and wipe dust off the pot — even small details affect the overall look.
If you want to create a calm yet striking display, try this one. Sometimes minimalism brings real warmth — no extra décor, just the right balance of form and light.
10. Tiered Apple Crate Display with Mixed Fall Blooms

Tiered crate arrangements look amazing on a porch. With flowers in them, it’s like having your own mini farmers’ market display.
Every year it turns out a little different — and that’s exactly what makes it special.
What you’ll need:
- 2–3 wooden crates (old apple crates or vintage vegetable boxes work great)
- A mix of fall plants:
- 1–2 pots of mums
- 1 aster or heather plant
- 1 pot of ornamental cabbage
- 1–2 containers with ivy or dichondra
- 1–2 pots of mums
- A few mini pumpkins, apples, or pears for decoration
- A bit of straw or dry leaves
- Optional: string lights with a warm glow
- Potting mix or small stands to adjust height levels
How to assemble the arrangement:
- Create the base. Find a wall or porch corner where the crates can stand securely. Place one horizontally — that’ll be your bottom “floor.” Set the second crate vertically or at an angle so each level is slightly offset from the other. Sometimes I add a smaller side crate to make the setup look more natural and not too symmetrical.
- Arrange the plants by level. On the bottom tier, place large, grounded plants like mums and ornamental cabbage — they form the visual base. On the middle tier, set asters or heather to add softness and texture. And on the top, add trailing plants like ivy so their vines cascade down, visually tying all levels together.
- Add fall accents. Scatter mini pumpkins, apples, pears, or pinecones between the pots. I love adding a bit of straw or dry leaves — it makes the display look freshly gathered from the farm. To highlight that “market stall” feel, wrap a crate or two in burlap or place an old watering can beside them.
- Add light. In the evening, weave a warm string of fairy lights through the crate handles or along the back edges. When the sun sets, everything starts to glow — and it feels like sitting on a cozy New England porch.
- Water and care. Water each plant separately so the lower levels don’t get oversaturated. I usually use a small watering can with a long spout to reach deep pots. In fall, plants drink less, but they still enjoy humid air — especially heather and asters.
From experience:
- Mums and ornamental cabbage pair beautifully if you mix tones — for example, purple cabbage with amber mums.
- To make the setup feel like part of your home rather than just décor, add something personal — an old mug, a small sign, or a lantern.
- When the season ends, reuse the crates for winter décor — fill them with candles, pinecones, and evergreen branches.
This kind of arrangement always makes a great impression. And if you want a larger fall display, start with old crates. It’s more than just decoration — it’s a little story that feels right on a warm autumn afternoon.
Fall on Your Porch
Fall teaches us to slow down, notice details, and turn the simple into the beautiful.
An old bucket becomes a planter, a pumpkin turns into a vase, and a few ivy vines become a full design.
Every year I choose new combinations — sometimes minimal, sometimes bright, sometimes totally unpredictable. But one thing never changes: that feeling of warmth when you light a lantern, sit down with a cup of tea, and admire what you’ve created.
Don’t search for inspiration in home décor stores. It’s already around you — in your garden, your kitchen, your shed. Just pick one idea, add a little imagination, and make something of your own.I’d love to hear from you — tell me what you chose and how it turned out.