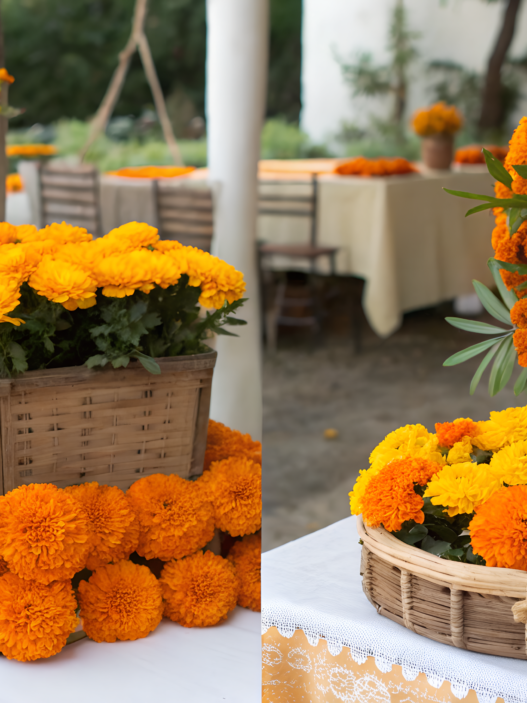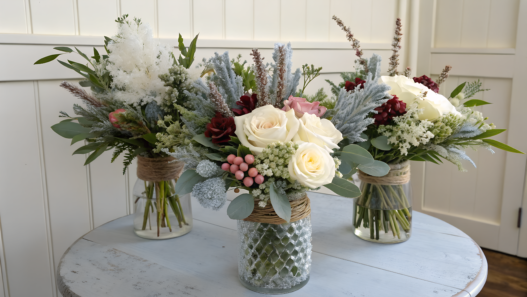

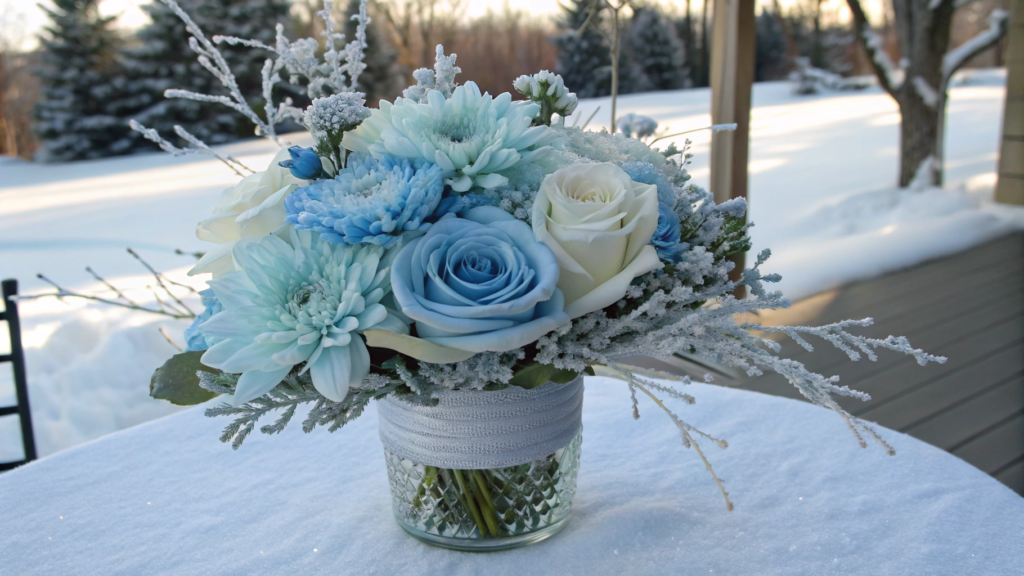
Flowers in winter styling behave differently: calmer, colder, more precise. And that’s exactly their strength. This article brings together 10 arrangement ideas that work for homes, holidays, weddings, photoshoots, or simply to add winter where it’s missing.
Everything can be assembled by hand, without complicated materials or expensive decor. The main thing is the mix of color, texture, and a bit of light.
Each arrangement is basically a simple framework you can easily adapt to your interior. In some places you can swap materials, in others — add something you already have at home.
1. White Rose and Frosted Branch Centerpiece
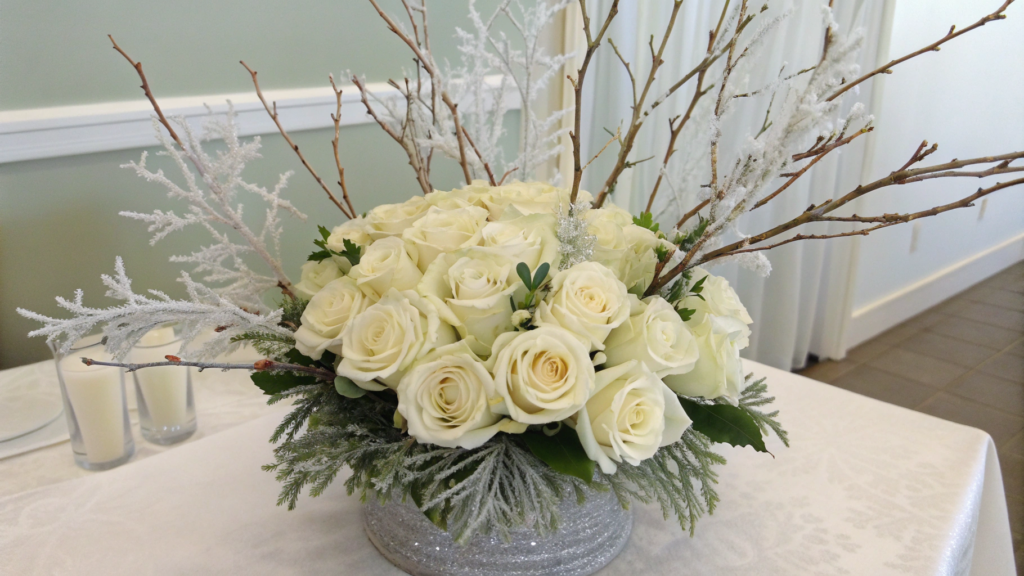
A centerpiece made from white roses and frosted branches looks festive but not overdone, suitable for a home, a winter wedding, or a photo zone. White roses create a “clean” base, while the branches add structure and a cold feel. It’s a great option if you don’t want to spend much time but still need a clear, beautiful result.
What You’ll Need:
- White roses (7–15 pcs.)
Fresh or artificial. Choose varieties with firm petals (like Vendela or Polo). Artificial roses are convenient — you can assemble the arrangement in advance. - Frosted decorative branches (3–5 pcs.)
Artificial with snow spray or glitter, or natural ones coated with aerosol snow. Branches should be taller than the roses to create height. - Floral foam (oasis)
For stabilizing stems. If using fresh flowers, soak the foam beforehand. For artificial ones, foam or dry oasis is fine. - A wide glass bowl or low vase
Recommended height: 6–8 inches (15–20 cm), width: about 5–7 inches (13–18 cm). A clear vase works best so you can add decor inside.
Optional:
- decorative snow or clear pebbles,
- a mini battery-powered string light,
- a couple of silver or white pine cones,
- baby’s breath or dusty miller as filler.
How to Assemble:
- Prep the vase and foam. Trim the foam to fit the vase. If using fresh flowers — soak it for at least 15 minutes. Place it tightly so it doesn’t wobble.
- Start with the roses. Insert the central roses first — they should sit slightly above the vase rim. Then place the rest evenly around, forming a rounded dome.
- Add the branches. Place the branches between the roses so they lift upward or sideways, creating a subtle vertical structure.
- Add small elements. Place decorative cones or berries if using them. Around the base, add clear stones or artificial snow.
- Final touch. If you want light, run the string lights along the inside of the vase or hide them between the flowers. Check the piece from different angles — it should look balanced.
We put together a similar arrangement a couple of years ago when my mom came to visit us for Christmas. She immediately said: “What is this, a store display?” But they were just artificial roses and branches from our seasonal decor box. A bit of snow spray, a couple of cones — and it looked real.
And yes, she left with the same arrangement in her hands — “as a keepsake.”
This arrangement looks great on a dining table, especially if it’s centered with enough breathing room around it. But you can also use it on a mantel, coffee table, or even as a wedding table centerpiece.
2. Crystal Glass Vase Winter Display
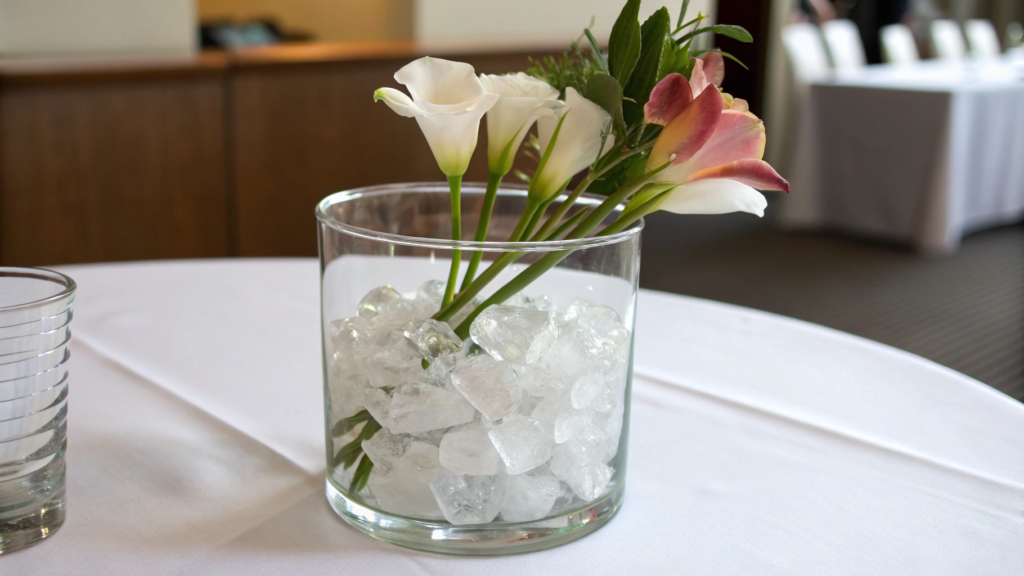
A simple glass vase, a handful of “ice pieces,” and a couple of well-chosen flowers — and you’ve got winter decor that looks clean and stylish. Works for home, a photo zone, a buffet setting, or as a quick elegant gift when you need to bring something beautiful.
What You’ll Need:
- Glass vase (10–12 inches / 25–30 cm tall)
Choose one with thick glass or a faceted texture — the light plays beautifully. The opening should be medium width (not narrow).
(Godinger Dublin Crystal Vase – 12″ Tall) - White or silver flowers (3–5 stems)
Orchids, amaryllis, calla lilies, or roses. Both artificial and fresh work. The main thing is not to overload it — the arrangement should stay light and vertical. - Decorative branches (1–2 pcs.)
Frosted or glittered. They can sit slightly taller than the flowers so the whole thing looks elongated and wintry. If you can’t find any, spray dry yard branches with artificial snow. - Bottom filler
Clear acrylic “ice,” glass pebbles, coarse salt, or quartz sand. Pour about 1–1.5 inches (2.5–3.5 cm). - Battery string lights (optional)
Cool-tone micro lights — placed inside the vase or wrapped around the flowers. Especially beautiful in the evening.
How to Assemble:
- Prep the vase. Wash and dry it thoroughly so the glass shines. Add the filler to the bottom — it will stabilize the flowers and create a subtle “winter ice” look.
- Set the flowers. Insert the flowers directly into the filler or secure them with tape (criss-cross over the opening like a grid). Start with the central stems, then add the side ones to create a balanced shape.
- Add the branches. Place the branches near the back or slightly to the sides. They should stand a bit taller than the flowers to define the structure.
- If you’re adding lights. Distribute the string lights gently inside — between the glass and the stems or right on top of the filler layer. Hide the battery pack behind the vase.
This arrangement fits perfectly in the center of a dining table — especially if the tablecloth is light or neutral. On a mantel or a living-room console it will catch the reflections from candles or string lights in a really nice way.
We once placed this vase in the entryway, right on the console table, and even with the simplest setup it created the right mood the moment you walked in.
If you want warmth in the kitchen, you can put the vase on the windowsill or next to the sink. Yes, even beside the fermentation jars — anything glass and winter-frosted pairs surprisingly well with garlic and sauerkraut.
This arrangement also works in an office, especially at reception or by the window — it looks clean, structured, and wintery without overwhelming the space.
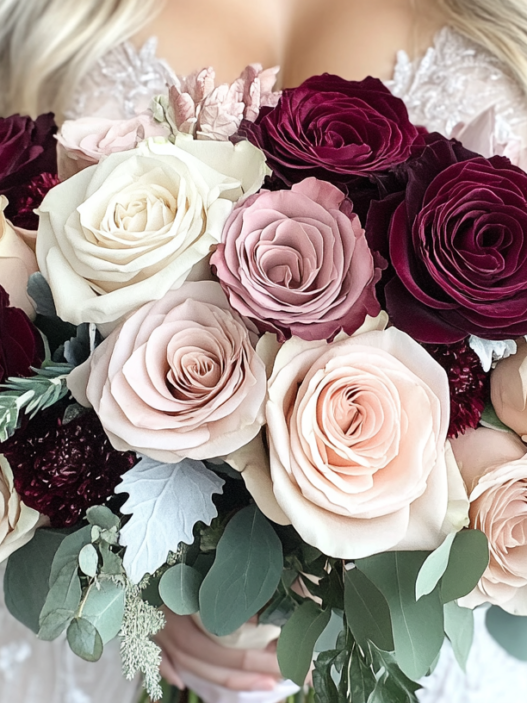
3. Snow-Dusted Floral Wedding Bouquet
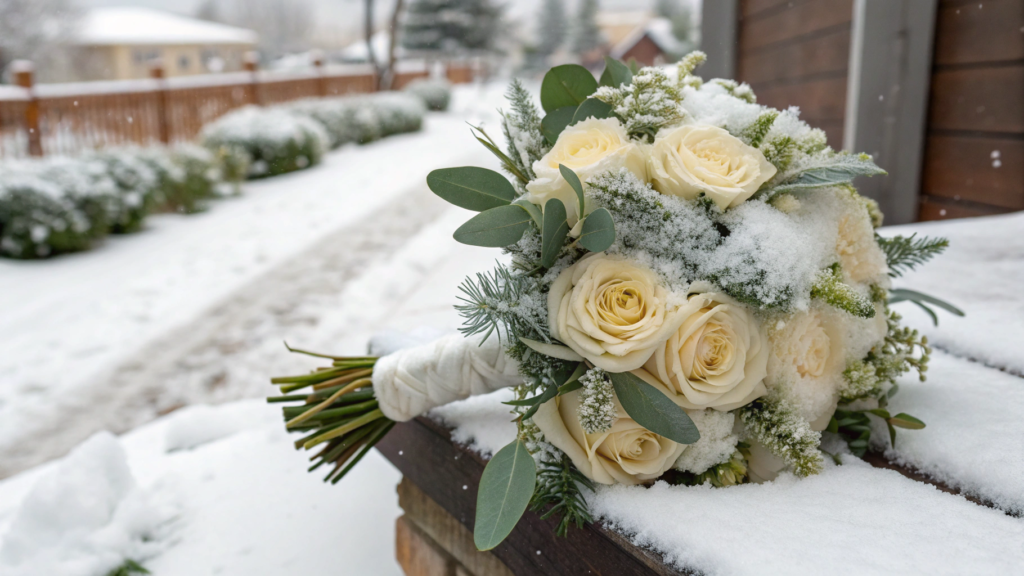
This bouquet is easy to assemble at home and keeps its shape perfectly, even if it’s freezing outside. It’s made from light flowers and matte greenery, and then lightly dusted with artificial snow on top. It looks fresh, neat, and doesn’t require advanced skills.
It’s perfect for winter weddings, photoshoots, or simply as a seasonal gift bouquet. You can use both fresh and artificial flowers — the snow effect works in both cases.
What You’ll Need:
- White roses, ranunculus, or anemones (7–9 stems)
It’s best to use flowers with velvety or multi-layered petals. Fresh or silk both work. Fresh gives fragrance and “life,” artificial is easier to assemble and keeps its look longer. - Dusty Miller or frosted eucalyptus (4–5 sprigs)
Adds a winter shade and creates the needed “powdered” look. Both dried and artificial options are fine. - Artificial snow spray
Sold in seasonal aisles. Applies quickly, doesn’t stain, lasts 2–3 days on fresh flowers. One light layer is enough. - White berries, baby’s breath, or mini cones
Add 2–3 pieces — just for texture. Don’t overload. - Linen or velvet ribbon, twine
For tying the stems. Velvet for a dressed-up look, linen or twine for something more natural. - Floral tape, scissors, wire (if using artificial flowers)
How to Assemble:
- Prep the flowers. If using fresh flowers — trim the stems at an angle and place them in cold water for 2–3 hours. For artificial flowers, fluff them: reshape petals and leaves, and trim stems to the same length — about 9–10 inches (22–25 cm).
- Create the base with larger flowers. Start with 3–4 central roses or anemones. Position them slightly higher than the rest — they set the shape. Hold the stems at slight angles so the bouquet opens naturally rather than forming a tight bunch.
- Add greenery and texture. Insert sprigs of Dusty Miller or eucalyptus between the flowers. Don’t add too much — they work as background. Add 1–2 sprigs on each side without crowding the center.
- Add decorative accents. Place white berries, baby’s breath, or small cones near the edges of the bouquet. This adds lightness and gives extra structure, especially in photos.
- Secure the stems with floral tape. Once you like the shape and everything is held in your hand, wrap the stems tightly with tape at the base. Make sure nothing slips out.
- Apply the artificial snow. From a distance (about 10–12 inches / 25–30 cm), lightly spray the top part of the bouquet. It’s better to do this before tying the ribbon so it stays clean. One layer is enough.
- Tie with ribbon or twine. Wrap the stems from the taped area down to the ends. Tie a bow or a simple knot — whichever suits the style. You can leave long ribbon tails — especially nice with velvet or linen.
Where and How to Use This Bouquet
This is a classic option for a winter bride — especially with snow, pine trees, or wooden interiors in the background. But even if it’s not a wedding, the bouquet works as a table arrangement if placed in a narrow glass vase, or as a thoughtful seasonal gift.
We once made almost the same bouquet for Lindy’s friend, whose birthday was on January 2 — she didn’t put it down even when she was cutting the cake.
4. Frozen Look Flower Arrangement Tutorial
The frozen look is striking, but without any shiny tinsel. It appears as if the flowers were standing outside in the early morning frost. The key is the right palette, a bit of texture, and a subtle cold accent. This arrangement works for home, displays, or as winter table decor.
What You’ll Need:
- Cool-toned flowers (7–9 stems)
White, cream, bluish-gray. Roses, ranunculus, lisianthus, anemones. Fresh or silk. - Gray-tinted greenery (3–4 sprigs)
For example, Dusty Miller, artificial frosted eucalyptus, or lamb’s ear. The main thing is a matte texture and a cold-toned color. - Frosted decorative branches (2–3 pcs.)
With an icy, glitter, or fine frost effect. - Floral foam or a grid
For stability. If the vase is tall, you can skip this — especially with artificial flowers. - Clear medium-height vase (8–10 inches / 20–25 cm)
A tall narrow shape works best — it creates that frosty vertical line. - Artificial snow spray (optional)
Adds a frosted effect. Easy to apply, stays 2–3 days on fresh flowers.
How to Assemble:
- Prep the vase and base. If using foam — soak it (for fresh flowers) and trim it to fit. For artificial flowers, use dry foam. Or make a tape grid across the vase opening.
- Start with the main flowers. Insert 3–4 focal flowers in the center. They set the height and shape. If working without foam, place the longest stems first to anchor the structure.
- Add greenery and supporting flowers. Fill gaps with gray-green sprigs. They should peek out but not cover the main shape. Ideally, the greenery sits slightly lower or along the sides.
- Insert the decorative branches. Place them asymmetrically — taller on one side, slightly lower on the other. This creates a natural, organic feel. The branches can extend a bit beyond the main arrangement.
- Final touch — the frost. From 10–12 inches (25–30 cm) away, spray a thin layer of artificial snow over the top section. Don’t cover everything — it looks better when the frost sits only on the “upper edge.”
This arrangement works well as a centerpiece, especially on glass or wooden surfaces. You can use it for a wedding setup, a photo studio, a display window, or simply as winter decor in the living room.
We once placed one like this in the entryway, right against the frosty window — and in the evening half-light it looked like a continuation of the outdoors, just inside the house. Nobody walked past without stopping.
5. Silver-Blue Petal and Pine Accent Combo

Try creating a silver-blue arrangement with a pine accent. It looks refined, balanced, and fits both classic and Scandinavian styles. It’s a great option if you’re tired of tinsel but still want a sense of celebration.
What You’ll Need:
- Flowers with a silver-blue tint (5–7 stems)
For example, artificial roses in “dusty azure,” white-blue hydrangeas, or anemones with a cool tone. Artificial ones work best — these colors are hard to find in fresh flowers. - Pine or spruce branches (2–3 pcs.)
Natural branches (if the arrangement is temporary) or artificial ones with a light frost or snow effect. Use small pieces, about 4–6 inches (10–15 cm) long. - Silver-tinted greenery (3–4 sprigs)
Dusty Miller, frosted eucalyptus, or lamb’s ear — for creating a cold background. - Decorative accents (2–3 elements)
Silver berries, mini cones, or dry glittered twigs — optional. - Low or medium vase (6–8 inches / 15–20 cm)
Matte or gray surface works well, or clear glass. A cylinder or bowl shape fits. - Floral foam or grid (if using fresh branches)
How to Assemble:
- Prep the flowers and branches. Fluff artificial flowers — shape petals and adjust leaves. Gently loosen pine pieces, especially if they were compressed in packaging. Trim everything to the needed length (based on the vase).
- Create the flower shape. Start with 3–4 main flowers — place them slightly asymmetrically, not in a strict circle. Leave space for the pine and additional accents. Flowers should rise 1–2 inches above the vase rim.
- Add the pine and greenery. Insert the pine branches and silver greenery between the flowers. The pine should stick outward, slightly extending past the edge — it adds life and structure. Alternate the height for a natural look.
- Add the decorative elements. Distribute mini cones or berries closer to the edges so they don’t crowd the center. It’s better if they peek out subtly, rather than stand out sharply.
- Check the silhouette. The arrangement should look airy, not dense. Step back and check whether the shape has shifted toward a bouquet look. If needed, add a bit more greenery on one side for balance.
This arrangement is especially good on a dining table — not too tall, not blocking the view, but still creating an atmosphere. It also works well on a hallway console, a work corner, a kitchen window, or an entry area.
We once put one together in about 20 minutes when unexpected guests arrived before Christmas — and we placed it right next to the kettle. It stayed there for the whole holiday season.
6. Transparent Vase Winter Bloom Layers

Here the vase itself works as part of the decor. The transparent walls let you show not only the flowers on top but everything happening inside: the layers of decorative fillers, stems, snow, beads. The result is not just a bouquet but a construction that looks cohesive and neat. And most importantly, assembling this arrangement is not difficult at all.
What You’ll Need:
- Clear cylindrical or oval vase (10–12 inches / 25–30 cm tall)
The main thing is clean, even glass without unnecessary texture.
👉 See on Amazon: Libbey Cylinder Vase Set - White or blue flowers (5–7 stems)
Tulips, roses, anemones, orchids. Artificial ones work better so the inside layers stay intact. - Layer fillers (your choice)
You can use:
– clear pebbles
– coarse salt
– glass beads
– moss
– mini pine cones
– acrylic ice pieces
– dried berries or beads - Battery-powered string lights (optional)
Micro lights can be woven into the lower layers or placed along the vase edge. For example, Twinkle Star 7ft Battery Operated Fairy Lights, 20 LED — thin wire, cool light, battery-powered, easy to hide inside the arrangement. - A little snow spray (optional)
To lightly dust the top layer and give it a frosty effect.
How to Assemble:
- Prep the vase and fillers. Wash and polish the vase until it shines. Decide in which order you’ll layer the fillers — it’s best to alternate light and darker tones (for example: salt → pine cones → beads → salt again).
- Create the bottom layers. Start with something neutral — like clear acrylic stones. Then add a darker layer (cones, beads), then a white one. Each layer should be 1–2 inches (2.5–5 cm) tall. The main rule: don’t shake the vase after layering so the sections don’t mix.
- Set the flowers. Insert 3–5 flowers into the center. To keep them from shifting, you can use a thin piece of foam at the top or secure them with a grid/tape at the rim. If using artificial flowers — bend the stems slightly so they stand upright without falling.
- Add the lights (if using string lights). Run the lights along the inside edges, between layers, or even among the stems. Hide the battery pack behind the vase or at the base behind decor.
- Finish the top layer. The top should be something light: salt, artificial snow, clear beads. You can give it a gentle snow-spray mist.
This vase looks best in a well-lit spot where all the layers are visible — on a windowsill, on a glass shelf, at the center of a table, or on an entry console.
We once placed one like this in the bathroom on a shelf — with blue flowers and layers of salt and glass — and it was one of those rare cases when I went to change towels just to look at the arrangement again.
7. Sparkling Ice Crystal Rose Ensemble

In this arrangement, artificial or fresh white roses decorated with crystals and a light frost effect become a centerpiece that looks festive but not overdone. The main thing is the combination of textures and a hint of light.
What You’ll Need:
- White or light-cream roses (5–9 stems)
Preferably varieties with large petals. Fresh or silk both work. - Artificial crystals/rhinestones (acrylic)
It’s best to use adhesive ones or clear beads you can apply manually. - Clear acrylic ice pieces or glass stones
For decorating the bottom of the vase or base. - Glitter spray or silver shimmer lacquer
A light coat gives a frosted, luminous effect. - Floral foam or styrofoam
For stability, especially convenient with artificial flowers. - Low vase or decorative bowl
Ideally glass, mirror, or white porcelain. Diameter 6–10 inches (15–25 cm). - Mini string lights (optional)
Micro-lights on thin wire, preferably with a cool tone.
How to Assemble:
- Prep the roses. If using fresh roses — trim stems at an angle, leaving 6–8 inches (15–20 cm). Artificial ones can be bent to the right height. Gently loosen petals if they’re too tight.
- Apply the sparkle and crystals. Spray glitter from about 10 inches away. While the surface is slightly tacky, attach 2–3 crystals to the petals of each flower — closer to the edges. This creates a frosted look.
- Prep the vase or base. Place foam or styrofoam inside the vase or bowl. Cover the edges with moss, ice pieces, or simply decorate with acrylic stones.
- Set the roses. Insert the central rose first, then place the rest around it to form a rounded shape. Don’t make it too dense — the sparkling details should remain visible.
- Add the clear elements. Place acrylic ice pieces, clear beads, or small silver-tipped cones between the roses. If you’re adding lights — weave the micro-lights through the petals, hiding the wire.
- Final check. Look at the arrangement under different lighting — it should reflect and catch the light beautifully. Avoid making it too “wet” with glitter — a light sheen is enough.
This is clearly a centerpiece piece: for a mantel, a holiday table, a reception area, a display window, or a wedding table.
Our friends once made one for a New Year’s dinner — they placed it on a low mirror in the middle of the table with candles around it, and when they turned off the overhead light, everything sparkled like ice in the sun. Nobody even wanted to start eating.
8. Frozen Garden Mix with White Hydrangeas

White hydrangeas bring volume and a soft “fluffy” look, while frosty accents — glass-like elements, dried stems, iced branches — create that frozen-winter effect. The result is a neat, intentional arrangement with a hint of a cold morning.
What You’ll Need:
- White hydrangeas (2–3 large heads)
Artificial ones work best: fresh hydrangeas lose their shape quickly without water. - Additional garden flowers (4–6 stems)
Soft artificial peonies, roses, spray ranunculus, delphiniums. The key is staying in a cool palette. - Frosted branches and dried stems (3–4 pcs.)
Choose branches with artificial frost or use natural dried ones and coat them with snow spray. - Cool-toned greenery (2–3 pieces)
Eucalyptus, lamb’s ear, Dusty Miller — they add depth and keep the mix looking garden-inspired. - Low wide vase, bowl, or planter (6–8 inches / 15–20 cm wide)
Matte gray or white works best, or textured ceramic. - Floral foam (oasis)
Dry foam works too if the arrangement is artificial. Avoid using fresh greenery without water. - Snow spray and a mini string light (optional)
How to Assemble:
- Prep the base. Place the foam into the vase. If it sticks out — trim it so it sits flush. Secure it tightly. If using natural branches, spray them with snow ahead of time and let them dry.
- Place the hydrangeas. Start from the center: set 2–3 hydrangea heads so they form a soft “pillow” and occupy most of the volume. They are the foundation of the whole arrangement.
- Add the additional flowers. Insert the extra flowers evenly between the hydrangeas — slightly higher or lower to create depth. Peonies and roses blend naturally into hydrangeas and create smooth transitions.
- Insert the branches and dried stems. Position them asymmetrically — for example, more on the left and fewer on the right. This makes it look like the arrangement was “touched by frost” from one side. Use no more than three branches to avoid overcrowding.
- Add the greenery. Place eucalyptus or Dusty Miller around the edges, closer to the lower part, so the shape extends outward. This gives the design a natural, garden-like outline instead of a simple dome.
- Final touches. Lightly dust the top with snow spray. If using a string light, run it beneath the flowers or along the greenery near the edges. Avoid placing the lights deep inside — the glow will be lost.
This arrangement works well in the living room, near the fireplace, on a dining table, or even in the entryway.
The Frozen Garden Mix is a perfect choice when you need an impressive yet neutral accent that doesn’t rely on a specific holiday — it looks grounded and calm.
9. Mirror Tray and Glacial Flower Base

A mirror tray creates reflections, and on top of it sits an “icy” flower mix, as if just brought in from a frozen garden. It’s perfect for a low arrangement that doesn’t overwhelm the space. And the best part — assembling it takes no more than half an hour.
What You’ll Need:
- Mirror tray or mirror-surface tile (10–14 inches / 25–35 cm diameter)
A ready-made tray, a square tile, or even a circle from an IKEA wall mirror without the frame will work. - Artificial cool-toned flowers (6–8 stems)
White, blue, silver: roses, anemones, ranunculus, hydrangeas. Choose small or medium sizes so the arrangement stays light. - Small pine pieces or artificial moss (2–3 pcs.)
For the textured base layer. - Acrylic ice pieces, glass stones, crystals
To create the “ice” on the mirror. - Hot glue gun (if you need stability) or double-sided tape
Especially useful if the tray will be moved. - Mini string lights or LED “dew drops” (optional)
Cool white light works best.
How to Assemble:
- Prep the tray. Wipe the mirror clean from fingerprints and dust. Make sure it sits stably on the table — use non-slip pads on the bottom if needed.
- Place the central flowers. Form the base with 3–4 main flowers in the center. You can lay them as a soft “cap” or let them tilt slightly toward each other. If needed, secure them with a dot of hot glue or tiny glue-gun points.
- Add texture around the edges. Lay moss or pine pieces around the center to hide the lower parts of the flowers and give the arrangement a “winter ground.” They should stay low, not higher than the flowers.
- Lay out the ice pieces and crystals. Spread them across the mirror surface around the arrangement, and optionally between the flowers. They add volume and a melting-ice effect.
- Add the lights (if using). Run the lights gently around the tray edge or between the crystals. Hide the battery pack behind the tray or under a piece of fabric.
- Final touch — positioning. Check the reflection — the arrangement should look good from above and in the mirror. If you like, lightly mist the edges of the flowers and moss with snow spray.
This design looks best at the center of a coffee table or dining table, on a mantel, on a hallway console, or even on a bar counter. The mirror tray creates an interesting visual effect even with minimal lighting.
We made one for New Year’s just as an experiment — and ended up placing it in the bedroom on the dresser, where it worked like a night light. Minimal height, maximum glow.
10. Twinkling Snow Lily Table Accent

A low, compact arrangement of snow lilies with soft twinkling lights doesn’t interrupt conversations at the table, doesn’t take up much space, but sets exactly the right mood. Perfect as an additional accent — at the end of the table, near place settings, or on a coffee corner.
What You’ll Need:
- Artificial white lilies (2–3 stems)
Preferably textured, with velvety petals and a natural size.
White Artificial Lilies, 3pcs Stem – Amazon - Small clear bowl, low jar, or flat dish (4–6 inches / 10–15 cm)
The key is a low profile and stability. You can even use a clear dessert cup or a candle holder. - A bit of frosted or silver-tinted greenery
Eucalyptus, Dusty Miller, mini pine — 2–3 short sprigs. - Acrylic “ice” pieces, glass beads, or coarse salt
To create the icy base. - Mini battery string light
Short, wire-based, cool-toned (up to 3 ft / 1 m). - Snow spray (optional)
How to Assemble:
- Prep the base. Pour acrylic ice pieces or salt into the bowl — about a 1-inch (2.5 cm) layer. This acts as “ice,” helping the shape hold and reflecting the light.
- Place the lilies. Insert 2–3 lilies in the center, gently opening the petals. If the stems are long, trim them or bend them slightly so the flowers sit neatly inside without sticking out.
- Add the greenery. Tuck short sprigs of silver-toned greenery between the flowers. Don’t overload — the greenery is just a backdrop. It’s best when placed slightly below the petal level.
- Add the lights. Run the wire with the lights in a circle between the ice pieces and the flowers. The lights should illuminate the arrangement from below, not shine directly upward. Hide the battery pack under a napkin or behind the vase.
- Final touch — a light frost. Lightly mist the top of the flowers and greenery with snow spray. One layer is enough — especially with the lights, since the shine will be visible in reflection.
This arrangement is perfect for the center of a coffee table, the end of a dining table, a bedside table, or even on a tray in the bathroom.
Winter Mood
We didn’t come up with all these arrangements at once. Some were made quickly before guests arrived, others became part of our home’s winter decor. Some we rethought, others we added to our ongoing “winter arsenal.”
There are no rules here — only playing with light, reflection, shape, and the air around the piece.
If you try assembling any of these arrangements, be sure to share how it turned out. What you added, simplified, adapted to your space. It’s always interesting to see what works for you.
Winter looks different for everyone — I’d love to see yours.