When people talk about a patio deck, we usually imagine a simple wooden platform near the house: a table, a few chairs, a grill. But in reality, a deck can become a much more important part of the yard. It can be a place for breakfast outside, evening conversations, family dinners, or quiet rest after working in the garden.
Over the last few years, patio decks have started to change. Many are built on multiple levels, people add pergolas, place them near pools, or create compact platforms for smaller yards. Even a simple wood deck can look completely different depending on the layout, materials, and how the space is organized.
Here are 10 patio deck ideas that help make a yard more comfortable and more interesting. Some work best for larger backyard spaces, others fit perfectly in smaller yards.
1. Ground-Level Deck Plans
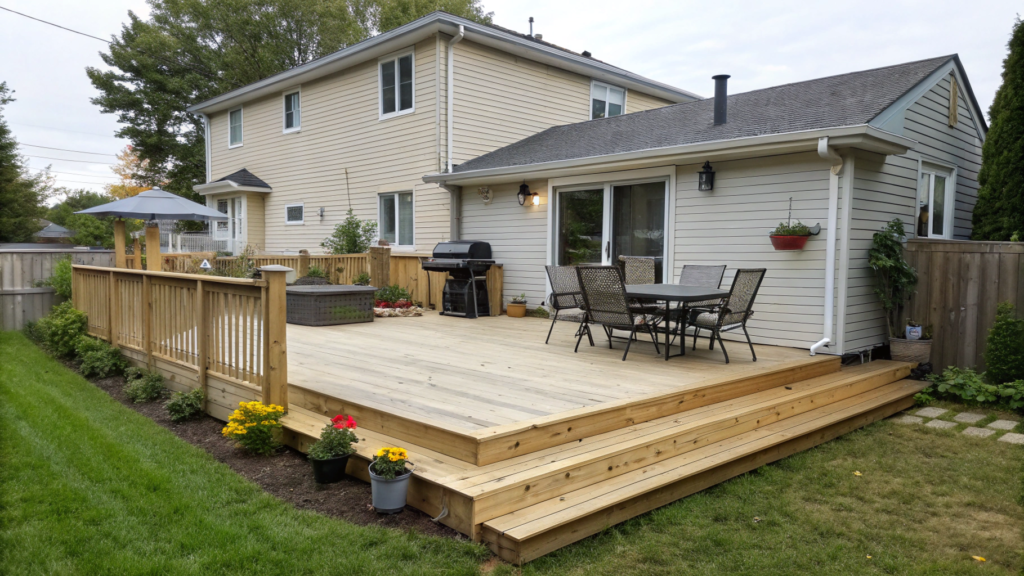
A ground-level deck sits almost at ground level, usually about 6–12 inches (15–30 cm) high. When you build it this way, the yard and the deck start to work as one connected space.
When we first started setting up our first property in Idaho (that one under 1 acre — about 0.4 hectares), I was convinced we needed a tall deck with steps. Because that’s how most houses are built. But then real life started: baskets of vegetables, garden tools, chickens walking wherever they want. And suddenly those extra steps just got in the way.
A low deck platform turned out to be much easier. You walk straight out of the house, set up the table, bring out the grill — and everything just works.
Landscape designers often recommend this type of layout too. When the house transitions smoothly into the yard, the space becomes much easier to use. There’s no hard line between “house” and “garden.” That’s exactly why ground-level decks appear so often in modern backyard designs.
What You’ll Need
Before starting the project, it helps to prepare a basic set of materials and tools. The structure itself is simple, but a few details are better planned in advance.
Main materials
- Deck boards
Most people use pressure-treated lumber, cedar, or composite boards. - Framing lumber (joists and beams)
Common sizes are 2×6 or 2×8 inches (5×15 or 5×20 cm). - Deck blocks or concrete supports
These replace a full foundation for a ground-level deck. - Deck screws
It’s better to choose corrosion-resistant screws. - Gravel or sand for the base
- Protective oil or wood sealer
If the yard is not perfectly level, adjustable deck supports can be extremely useful. They allow you to level the frame without complicated concrete work.
How to Build a Ground-Level Deck
- Choose the location and determine the size.
Mark the future deck area with stakes or rope. This helps you see how the deck layout will fit the yard. A small sitting area often works well at 12 × 12 feet (≈3.6 × 3.6 m). A more flexible size is 16 × 20 feet (≈4.9 × 6 m). If you want a larger entertaining space, many people build around 20 × 24 feet (≈6 × 7.3 m). - Prepare the base.
Remove the grass and level the soil. Then lay down landscape fabric and add 2–3 inches of gravel (5–7 cm). This layer improves drainage and reduces moisture under the structure. - Install the supports.
Place deck blocks or adjustable supports in a grid about 4–6 feet apart (1.2–1.8 m). Check the level carefully across the entire area — the final surface depends on this step. - Build the frame.
The outer frame is usually built from 2×6 or 2×8 inch boards. First assemble the rectangular perimeter, then check the diagonals so the structure stays square. - Install the joists.
Interior joists are typically installed 16 inches apart (≈40 cm). This spacing is standard and gives the deck surface enough strength. - Lay the deck boards.
Attach the boards on top of the frame, leaving a gap of about 1/8 inch (≈3 mm) between them. This allows ventilation and helps water drain away. - Protect the wood surface.
If you use natural wood, apply a protective oil or exterior wood sealer. This helps protect the boards from moisture and sun. For example, many homeowners use Ready Seal Exterior Wood Stain and Sealer on Amazon. - Finish the deck edge.
Many decks include a wide step along one side, about 16–18 inches (40–45 cm) deep. It creates a smoother transition to the lawn and can also work as extra seating.
Materials for a Ground-Level Deck
The material you choose affects both the look of the deck and how much maintenance it will need later.
- Pressure-treated wood. One of the most affordable options. It handles outdoor conditions well and is widely used in budget deck projects. Still, it needs occasional care if you want the surface to keep looking clean.
- Cedar. A very attractive material with natural resistance to moisture and insects. Cedar often feels warmer and more natural than treated lumber, and it ages beautifully. It does cost more, but visually it’s a completely different level.
- Composite decking boards. A practical choice if you don’t want to deal with sealing, sanding, or seasonal maintenance. Composite decking doesn’t rot, rarely cracks, and keeps a neat appearance for many years. Some people feel it looks too perfect, but for modern backyard designs that can actually work very well.
A Few Layout Ideas
1. Simple square platform
A classic layout for smaller yards. Perfect for a table and a few chairs.
2. Deck with flower beds around the edges
Raised beds along the perimeter create the feeling of a garden room. Lavender, ornamental grasses, and sage work especially well.
3. Deck with a built-in bench
This saves space and makes the outdoor deck feel more comfortable.
Typical bench dimensions:
- height 18 inches (≈46 cm)
- depth 16–20 inches (40–50 cm)
4. Deck with a wide step
Even if the deck sits almost at ground level, adding a wide step about 16–18 inches (40–45 cm) can make the space feel larger. It also works as extra seating.
Sometimes the simplest projects become the most lived-in ones. Our first ground-level deck had no fancy design details — just a wooden platform. But almost every summer evening happened there: dinners after working in the garden, conversations with neighbors, and chickens that clearly believed the deck belonged to them too.
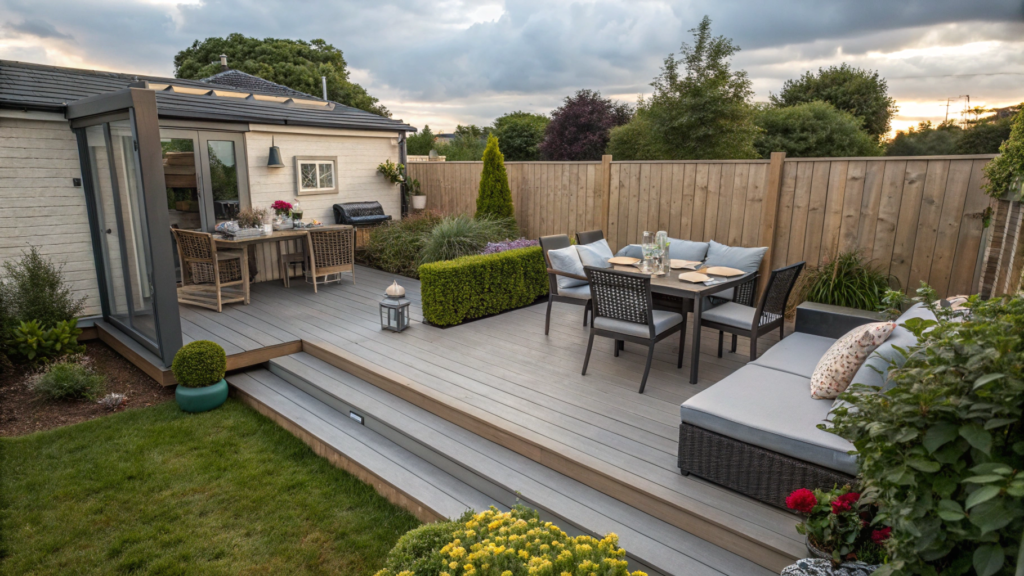
2. Two-Level Deck Inspirations
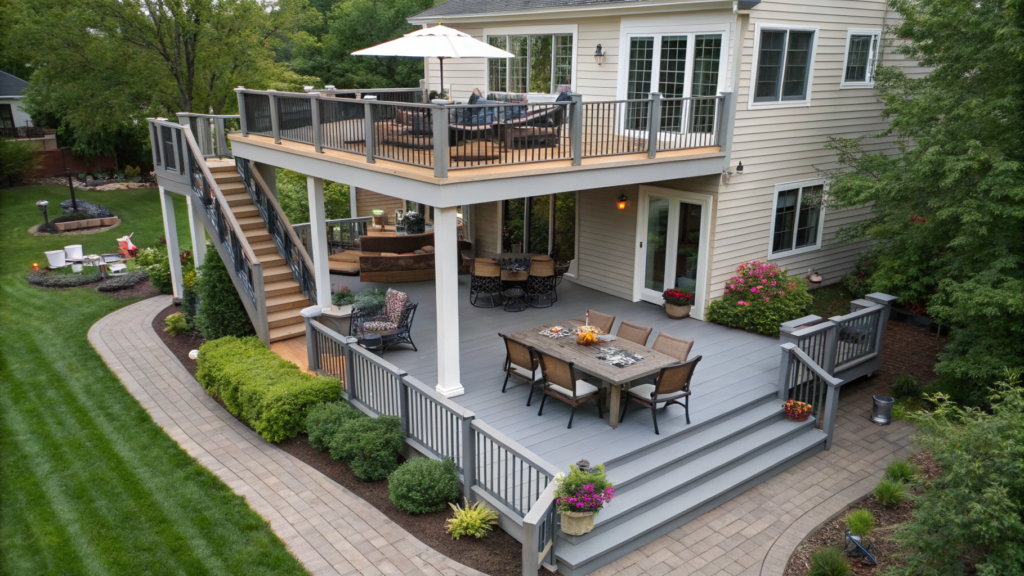
We started looking at solutions like this when we were planning one of the outdoor seating areas on our property. There was enough space, but the land had a slight slope. At first it seemed like a problem.
In the end, the idea came up to divide the space into two levels. The upper part became a place for the table and dinners, and the lower one turned into a calmer zone with chairs. It ended up feeling much cozier than one large flat platform.
So dividing the space into functional zones makes the yard more comfortable and increases the time people spend outside.
When a Two-Level Deck Makes Sense
This format works especially well in several situations.
- If the yard has a slope.
Instead of leveling the ground and moving tons of soil, it’s often easier to build two levels of decking. The upper part sits closer to the house, and the lower level gently follows the natural shape of the land. Visually it looks natural and often even improves the look of the yard. - If you want to separate relaxation areas.
When the entire deck is on one level, furniture often ends up grouped in one place. Two levels help separate the space more naturally. For example, the upper level can hold the table and chairs, while the lower one can be used for lounge chairs, a small sofa, or sun loungers. - If there is a pool or hot tub nearby.
One level can be dedicated to equipment or water features, while the second level holds loungers and a seating area. This makes the space safer and easier to move around. - If the deck is large.
On platforms around 20 × 24 feet (≈6 × 7.3 m) or larger, a single level can sometimes look too empty. Adding a second level helps make the space feel more comfortable and visually interesting.
What You’ll Need
A two-level deck uses the same basic materials as a regular deck project, but the structure becomes a little more complex.
Main elements
- deck boards
- framing lumber 2×8 or 2×10 inches (≈5×20 or 5×25 cm)
- supports or concrete blocks
- joist connectors
- deck screws
- protective oil or wood sealer
For projects like this, adjustable deck supports are very convenient because they make it easier to set the height of each level precisely.
How to Build a Two-Level Deck
- Determine the purpose of each level.
Before construction, it helps to understand how each platform will be used. For example, the upper level can be about 12 × 14 feet (≈3.6 × 4.2 m) for a dining table, while the lower one can be around 10 × 12 feet (≈3 × 3.6 m) for chairs or a lounge area. - Determine the height difference.
Usually the difference between levels is about 18–30 inches (≈45–75 cm). This allows you to add one or two steps that feel comfortable for everyday use. - Prepare the base.
Remove the grass, lay down landscape fabric, and add 2–3 inches of gravel (≈5–7 cm). This layer helps water drain away from the structure and reduces moisture buildup. - Build the frame for the upper level.
The upper platform is most often placed closer to the house. The frame is usually built from 2×8 or 2×10 inch lumber so the structure can support furniture and people. - Build the frame for the lower level.
The lower part is usually positioned a little farther from the house or closer to the garden. The distance between levels is often around 2–4 feet (≈60–120 cm). - Build steps between the levels.
A comfortable step height is about 7 inches (≈18 cm) and the depth about 10–11 inches (≈25–28 cm). These dimensions are considered comfortable for daily use. - Install the deck boards.
Boards are installed with a small 1/8 inch gap (≈3 mm) between them. This helps water drain and prevents wood from warping. - Protect the wood with a sealing finish.
To extend the life of the boards, they are treated with oil or a protective wood sealer.
Two-Level Deck Layout Ideas
1. Dining + Lounge
The upper level is used as a dining area with a table and chairs. The lower level becomes a more relaxed space with chairs or a small sofa. This separation allows people to eat and relax at the same time without getting in each other’s way.
2. Grill Station + Dining Area
The lower level can be dedicated to the grill station and food preparation area. The upper level stays a clean dining space with the table. This way smoke and cooking activity stay a little away from the table, while moving between the zones still feels easy.
3. Fire Pit Deck
The lower level works very well for a round seating area around a fire pit. A few chairs and a small table can create a cozy place for evening conversations. The upper platform can remain a flexible space for dinners or daytime relaxation.
4. Garden View Deck
The upper level is built closer to the house, while the lower one sits nearer to the garden or vegetable beds. This creates a pleasant viewing spot: you sit in a chair and look out over the beds, trees, or flower borders. It feels especially nice in the evening when the light becomes softer and the yard looks completely different.
A Small Note
Wide steps between the levels work extremely well. If you make a step about 16–18 inches wide (≈40–45 cm), it starts functioning as extra seating. During barbecues guests often sit there naturally. And in real life those wide steps usually become the most used spot on the entire deck.
3. Wood Deck Styles
Even today, when composite materials are becoming more affordable, many homeowners still choose wood decks. Wood creates a feeling of warmth and comfort that is hard to achieve with other materials. At the same time, different wood species, board layouts, and finish colors can create completely different moods — from rustic patios to modern outdoor spaces.
Main Wood Deck Styles
1. Natural Cedar Deck
Cedar decks are valued for their natural texture and color. Cedar has a soft warm tone that can slowly turn more silver over time if it is left without oil treatment.
This type of cedar deck works especially well for:
- natural-style gardens
- yards with a lot of plants
- homes with wood architecture
Cedar also has natural resistance to moisture and insects. Because of its natural oils and resins, it breaks down more slowly and lasts longer than many other softwood species.
At the same time, it is important to remember that to protect the wood and preserve the color, cedar should be treated with exterior wood oils designed for outdoor use.
2. Rustic Farmhouse Deck
This style resembles classic country-style decks. Builders often use rougher wood, sometimes with visible grain patterns and knots.
Typical characteristics of this style include:
- wider boards
- a slightly weathered wood appearance
- warm honey or walnut-colored finishes
These decks are often complemented with:
- wood pergolas
- solid, heavy outdoor furniture
- large planters with herbs or flowers
Decks in this style are often slightly larger — for example around 20 × 24 feet (≈6 × 7.3 m). The space needs to feel open enough to fit a long table for family dinners.
3. Modern Horizontal Deck
Modern wood decks are often designed with very clean geometry. Narrow boards and straight lines are commonly used.
Main characteristics include:
- minimalist furniture
- clean shapes
- darker wood tones
Sometimes boards are installed not parallel to the house but diagonally or in more complex patterns. This approach can make even a small deck platform look more visually interesting.
4. Wide Plank Deck
This style uses wider boards, usually 6–8 inches (≈15–20 cm). Because of that, the deck surface looks calmer and more unified.
A wide plank deck works especially well for:
- spacious yards
- homes with a classic architectural style
- properties with views of natural landscapes
Wide boards are often finished with light oil to highlight the natural wood grain.
What Affects the Look of a Wood Deck
Even if the same wood species is used, the appearance of a deck design can vary significantly. Several factors play a key role.
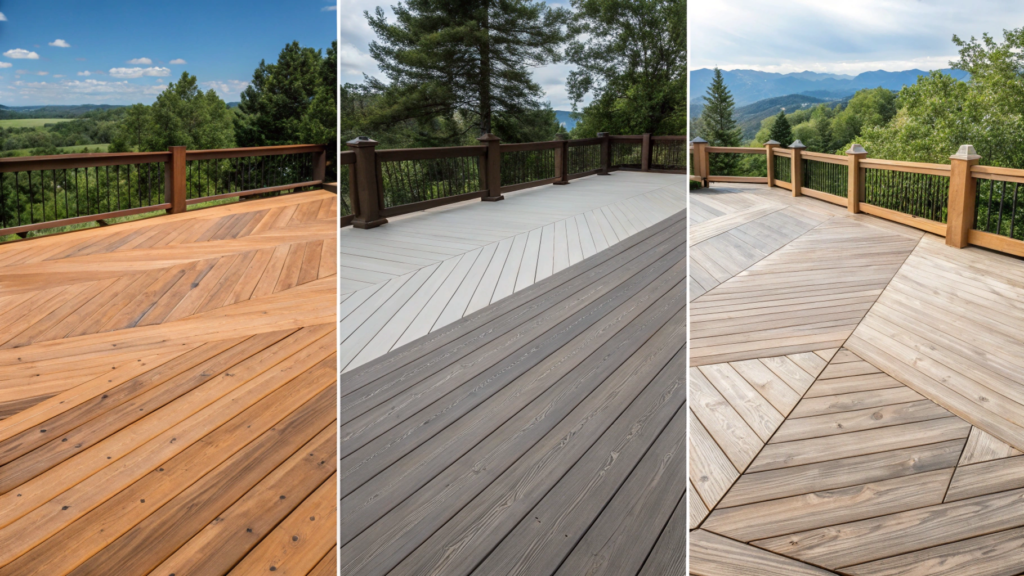
1. Board Direction
Boards can be installed:
- parallel to the house
- perpendicular to the house
- diagonally
- in a herringbone pattern
Each layout creates a completely different feeling of space.
2. Color of the Protective Finish
The color of oil or wood stain can completely change the style of the deck. For example:
- light tones highlight the natural wood texture
- dark finishes make the deck look more modern
- natural oils keep the wood close to its original color
3. Board Width
Boards 4–5 inches wide (≈10–12 cm) create a more modern appearance.
Boards 6–8 inches wide (≈15–20 cm) give the deck a more traditional feel.
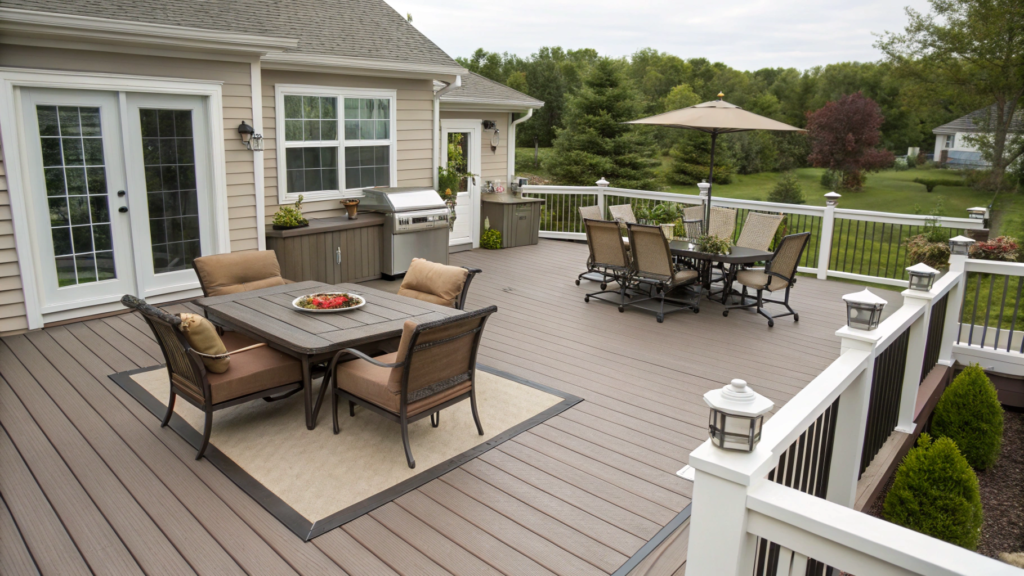
Professional builders often create a frame around the deck perimeter. This means the boards are installed so the edge of the platform is outlined with a separate border line.
This border can be the same color as the rest of the deck, a contrasting shade, or even made from a different wood species. This simple detail makes the deck surface look cleaner and visually complete.
4. Deck Layouts with Functional Flow
A deck should be comfortable. Not only beautiful, but truly comfortable in everyday life. It matters how people move across it, where the table stands, where the grill is placed, and whether you can walk calmly between the chairs. It also matters if there is a place to set down a tray of food without walking around the furniture in circles.
When everything is planned well, the deck layout starts getting used all the time. If the layout is uncomfortable, the opposite happens: the platform looks nice, but people step outside only a few times during the season.
What “Good Movement Flow” Means
The simplest rule — people should be able to move around the deck space easily. Usually that means leaving at least 36 inches (≈90 cm) of clear walkway between the main areas. If the deck is often used for guests, the passage is better increased to 48 inches (≈120 cm).
This space should stay open even when chairs are pulled out and people are sitting at the table.
Main Zones Commonly Used on a Deck
To create a logical layout, a deck is usually divided into several functional zones.
- Dining Zone
This is one of the most common parts of any outdoor deck. Usually a table and several chairs are placed here. For a comfortable table setup for six people, you typically need about 10 × 12 feet (≈3 × 3.6 m).
It’s important to leave extra space around the table so chairs can be pulled back easily.
- Grill Zone
The grill area is usually placed closer to the edge of the deck. This helps smoke move away and keeps more open space in the center.
A space of about 6 × 8 feet (≈1.8 × 2.4 m) is usually enough. But it’s important to leave a small working area next to the grill for plates and tools.
For example, many homeowners use compact grill stations that work well for medium-sized patio decks.
- Lounge Zone
This is the space for chairs, a small outdoor sofa, or loungers. Usually a small table is placed here where you can set drinks or books.
A comfortable lounge area usually needs around 8 × 10 feet (≈2.4 × 3 m). If the space allows, an outdoor rug is sometimes added — it visually connects the furniture.
- Transition Space
This is the most underestimated part of the layout. The passages between zones should be wide enough so people can walk through them comfortably, even during dinner or a gathering.
These pathways create the functional flow that makes a deck feel easy and natural to use.
How to Organize a Comfortable Layout
For a deck design to work as one space, it helps to follow a few simple principles.
- Place the dining area closer to the house. This makes it easier to carry food and dishes from the kitchen. The shorter the distance, the easier the deck becomes to use every day.
- Place the grill near the edge of the deck. This allows smoke to move away instead of gathering in the center.
- Position the lounge area in a quieter part of the deck. This might be the side with a garden view or the area where more shade appears in the evening.
- Leave clear pathways between zones. The minimum comfortable width is 36 inches (≈90 cm).
Deck Layout Ideas with Good Functional Flow
1. Dining + Grill Layout
The table is placed in the center or closer to the house, while the grill station is positioned along the side edge of the deck. A walkway remains between them. This layout allows you to cook and serve food quickly.
2. Dining + Lounge Layout
One part of the deck is used for dinners, while the other is for relaxing. These areas can be separated by a small distance or an outdoor rug.
3. Grill + Lounge Layout
This works well for smaller patio decks. The grill sits along the edge of the platform, and nearby there is a small seating area with chairs for conversation.
4. Three-Zone Layout
For larger decks around 20 × 24 feet (≈6 × 7.3 m), it’s possible to create three zones at once: dining, grill, and lounge.
This layout is often used for backyard patios where many guests gather.
Observation from Experience
An outdoor rug or a large planter can act as a visual boundary between areas. It doesn’t block movement, but it helps the eye understand where one part of the deck ends and another begins.
Because of that, the deck space starts to look more organized and becomes easier to use in everyday life.
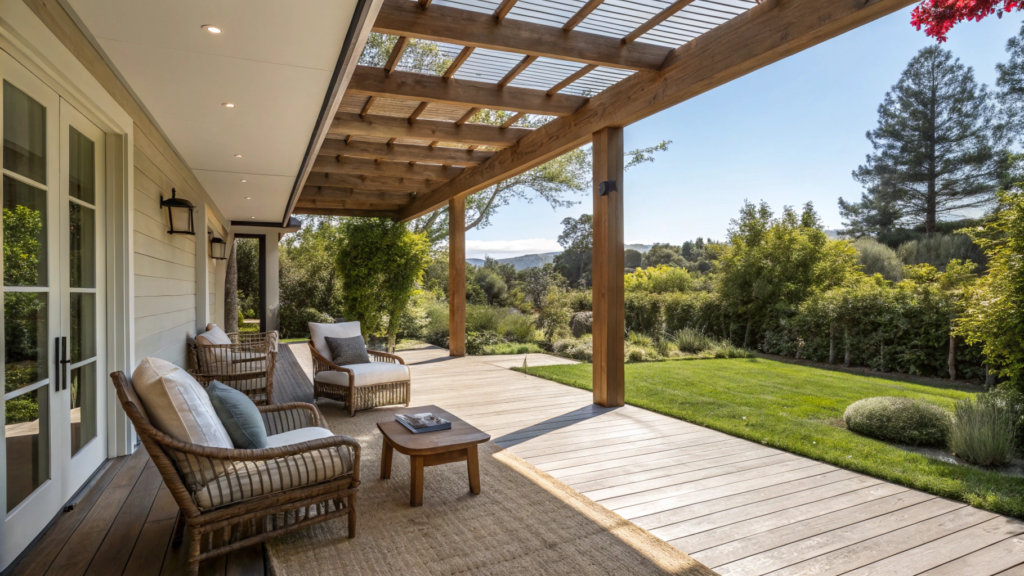
5. Deck Designs with Pergolas
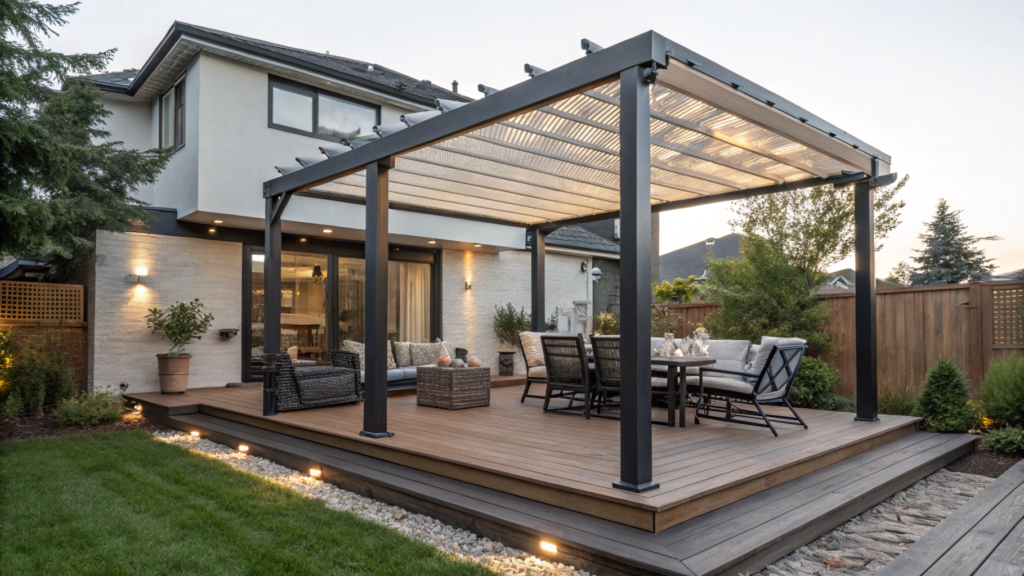
A pergola does more than decorate a deck. It creates the feeling of a separate room in the yard. You get light shade, a clearer structure to the space, and a spot where it feels comfortable to sit even on a hot day.
In modern landscape designs, pergolas are very popular because they create shade without adding a full roof. This is especially useful in gardens and smaller yards where you still want to keep the feeling of open space.
When a Pergola Really Makes Sense
A pergola does not work on every deck, but in some situations it completely changes the space.
- If the deck is on the sunny side. When the sun is high, an open deck can become too hot. A pergola creates soft shade and makes the space more comfortable.
- If you want to define a seating area. Sometimes a patio looks like one large open platform. A pergola helps visually separate the dining area or the lounge space.
- If you want to add vertical structure. Decks often look flat. A pergola adds height and gives the space more dimension.
- If there are plants nearby. A pergola works very well with climbing plants like grapes, clematis, or wisteria. Over time the structure becomes part of the garden.
What You’ll Need
The pergola structure is fairly simple, but it’s important to use strong materials.
Common materials include:
- support posts 4×4 or 6×6 inches (≈10×10 or 15×15 cm)
- beams and cross rafters
- metal post brackets
- exterior screws or bolts
- protective wood finish
If the pergola is installed directly on a deck, it is better to attach the posts using metal bases. For example, many builders use Simpson Strong-Tie Post Base Connector on Amazon — these brackets help secure the posts firmly and protect the wood from moisture.
How to Build a Pergola on a Deck
- Determine the size and location of the pergola.
The pergola should cover the part of the deck where people spend the most time. In most cases this is the dining table or the lounge area. For a standard table for six people, a pergola around 10 × 12 feet (≈3 × 3.6 m) works well. If you plan to place a sofa and chairs under it, the structure can be slightly larger — about 12 × 14 feet (≈3.6 × 4.2 m). Before building, it helps to mark the area with rope or a garden hose so you can see how the pergola will look on the deck. - Install the support posts.
Most pergolas use 4 or 6 posts made from 4×4 or 6×6 inch lumber (≈10×10 or 15×15 cm). If the pergola stands directly on the deck, the posts are attached using metal bases so the wood does not touch moisture. The typical distance between posts is about 8–10 feet (≈2.4–3 m). - Secure the main beams.
The beams connect the tops of the posts and create the main frame of the pergola. Builders usually use 2×8 inch boards (≈5×20 cm). These are attached with bolts or heavy exterior screws so the structure can handle wind and weight. At this stage it is important to check the level — any tilt will be visible right away. - Add the cross slats.
The slats are usually made from 2×4 inch boards (≈5×10 cm) and placed about 8–12 inches apart (≈20–30 cm). The closer the slats are to each other, the more shade the pergola will create. Sometimes the slats are placed with a slight decorative offset instead of perfectly parallel, which makes the structure look more interesting. - Protect the wood with a finish.
After installation, the wood should be treated with exterior oil or protective sealer. This helps protect the pergola from moisture and sun.
Ideas for Using a Pergola on a Deck
1. Dining Pergola
A pergola above the dining table makes this part of the deck feel more comfortable and protected from the sun. Even a simple wooden frame immediately creates the feeling of a defined space. Usually a table and several chairs are placed under the pergola, leaving enough room to move around.
2. Lounge Pergola
If you place a sofa, a couple of chairs, and a small table under the pergola, it becomes a calm lounge area. This is a place where you can read, drink coffee, or sit outside in the evening. Many people add an outdoor rug or a couple of large planters so the space looks more complete.
3. Pergola with Climbing Plants
A pergola is perfect for climbing plants. If you plant grapes, clematis, or honeysuckle nearby, after a few seasons the structure starts to look like a green arch. The leaves create natural shade, and the deck slowly becomes part of the garden.
4. Minimal Pergola Frame
Sometimes the simplest design works best — four posts and a few beams on top. This minimal pergola frame fits well with modern decks. It does not overload the space, but it adds height and makes the deck visually more interesting.
A Useful Addition
Outdoor string lights work especially well with pergolas. They add soft evening light and make the patio feel warmer. For example, many homeowners use Brightown Outdoor String Lights on Amazon — these lights can be attached directly to the pergola beams.
6. Decks with Hot Tubs
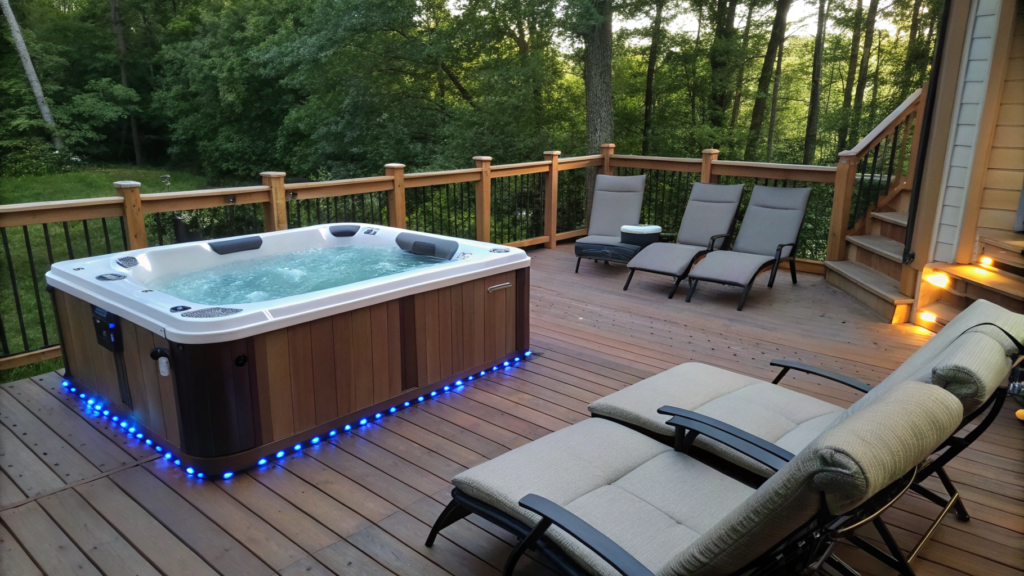
A hot tub on a deck immediately changes the atmosphere of the space. But it’s important to remember one thing: a hot tub is very heavy. If the deck is not designed for that load, the structure can start to sag over time. That’s why a deck with a hot tub is usually designed a little differently than a standard patio deck.
What to Consider Before Installing a Hot Tub
Before placing a hot tub on a deck, it’s worth thinking through a few things.
- Load on the structure. A typical hot tub for 4–6 people weighs about 700–900 pounds (≈320–410 kg) when empty. Once it’s filled with water and people step in, the total weight can reach 4,000–5,000 pounds (≈1800–2300 kg).
Because of that, the deck frame needs to be reinforced. - Maintenance access. A hot tub needs at least 18–24 inches (≈45–60 cm) of open space on one side. This allows access to pumps and filters for maintenance.
- Placement near the house. In most cases, the hot tub is placed about 6–10 feet (≈1.8–3 m) from the house. This makes it easier to run electricity while still leaving enough space around the tub.
- Privacy. Many homeowners add a pergola, a hedge, or wooden screens nearby to create a more private and relaxing space.
What You’ll Need
For this type of project, stronger materials are usually required.
Main elements include:
- reinforced joists 2×10 or 2×12 inches (≈5×25 or 5×30 cm)
- additional structural supports
- concrete blocks or adjustable deck supports
- deck boards
- exterior construction fasteners
- protective wood finish
If the deck is built specifically for a hot tub installation, builders usually add extra supports every 3–4 feet (≈90–120 cm) under the frame.
How to Build a Deck for a Hot Tub
- Choose the installation location.
It is usually best to place the hot tub along the edge of the deck or in a separate zone. This makes maintenance easier and leaves enough space to move around it. - Reinforce the base.
Before building the structure, prepare a level base with a gravel layer about 3–4 inches (≈7–10 cm) thick. This helps distribute the load evenly. - Build a reinforced frame.
For this type of structure, builders typically use 2×10 or 2×12 inch joists. The spacing between them is also reduced to about 12 inches (≈30 cm). - Add additional supports.
Under the hot tub area, more supports are installed than under the rest of the deck. This helps distribute the weight evenly across the structure. - Install the deck boards.
Boards are attached with a small 1/8 inch gap (≈3 mm) between them so water can drain properly. - Prepare electricity and water access.
A hot tub requires an electrical connection and sometimes a dedicated safety switch. Because water and electricity are close to each other, it is important to use a protected power line and a GFCI breaker, which automatically shuts off electricity if a current leak occurs. This is a standard safety measure whenever water and electricity are present in the same area. - Protect the wood with a finish.
In the hot tub area, wood is exposed to water more often, so a protective wood sealer becomes especially important. Many people use Exterior Wood Stain and Sealer products for this type of project.
Hot Tub Deck Layout Ideas
1. Corner Hot Tub Layout
The hot tub is placed in the corner of the deck. This is one of the most popular options because it saves space and leaves more room for furniture.
2. Sunken Hot Tub Deck
Sometimes the tub is installed slightly below the deck surface. The top edge stays at the level of the decking, which makes entering the water much easier.
3. Pergola Hot Tub Area
A pergola over the hot tub creates a cozy atmosphere and adds some privacy. It also allows you to hang string lights or lanterns above the water.
4. Garden View Hot Tub
If the yard opens to a garden or a scenic view, the hot tub can be positioned so that while sitting in the water you look out at the plants or landscape.
It’s very useful to add a step or small bench nearby. This becomes a place where you can put a towel or set down drinks. Another popular addition is hot tub steps, which make getting in and out of the water much safer.
A deck with a hot tub often becomes the center of the entire outdoor relaxation area. People naturally gather there.
7. Poolside Deck Concepts
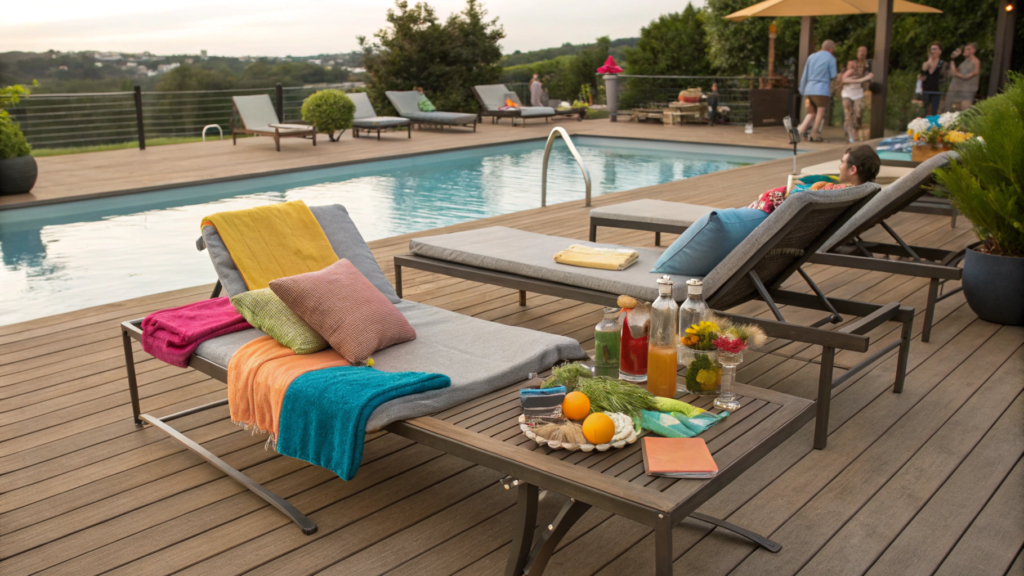
A poolside deck makes the water area much more comfortable. It creates a place where you can set up lounge chairs, leave towels, put drinks down, or simply sit after swimming. As a result, people usually spend more time around the pool when there is a comfortable deck area next to it.
What to Consider Near the Pool
Before building a deck near a pool, there are a few things worth thinking about in advance.
- You need space for walking. Around the pool it is best to leave at least 3–4 feet (≈90–120 cm) of open space. This allows people to walk comfortably and place furniture.
- The surface should not be slippery. The deck material should handle water well. For this reason many people use textured wood or composite decking boards.
- Drainage matters. Water will constantly reach the deck surface. Small gaps between boards, about 1/8 inch (≈3 mm), allow water to drain away.
- A relaxation area helps. Lounge chairs, a small table, or a shaded area make the pool much more enjoyable.
What You’ll Need
For a poolside deck, builders usually use the same base materials as for a standard deck, but moisture resistance becomes more important.
Common materials include:
- deck boards made from cedar, pressure-treated wood, or composite
- framing lumber 2×8 inches (≈5×20 cm)
- concrete blocks or adjustable deck supports
- exterior fasteners
- protective oil or wood sealer
If natural wood is used, it should always be treated with a protective outdoor finish.
How to Build a Deck Near a Pool
- Determine the deck area.
First decide whether the deck will surround the entire pool or only one side. For smaller pools, many people build a platform around 10 × 14 feet (≈3 × 4.2 m) where lounge chairs and a small table can fit comfortably. - Prepare the base.
Remove grass and level the ground. Then install landscape fabric and add 2–3 inches of gravel (≈5–7 cm). This improves drainage and prevents moisture from building up under the structure. - Install the supports.
Use deck blocks or adjustable supports placed about 4–6 feet apart (≈1.2–1.8 m). - Build the frame.
The frame is usually made from 2×8 inch boards, which provide enough strength to support furniture and people. - Install the decking boards.
Boards are installed with a small 1/8 inch gap (≈3 mm) between them. This helps water drain and reduces the chance of slipping. - Protect the wood surface.
If natural wood is used, it should always be sealed with protective deck oil or stain.
Poolside Deck Layout Ideas
1. Sun Lounger Deck
The simplest and most common option. A few sun loungers and a small table are placed on the deck near the pool. A space around 12 × 14 feet (≈3.6 × 4.2 m) is usually enough. The area stays open and comfortable for relaxing after swimming.
2. Poolside Dining Area
If the pool is used often, a small outdoor dining table can be placed nearby. A platform about 12 × 16 feet (≈3.6 × 4.9 m) works well for this setup. People can swim, step out of the water, and sit down for snacks or drinks.
3. Shade Pergola Deck
If the pool is located on the sunny side of the yard, many homeowners add a pergola or shade structure next to the deck. Chairs or a small sofa can be placed underneath. This creates a comfortable place to rest between swims.
4. Wraparound Pool Deck
Sometimes the deck surrounds the pool on several sides. This layout is often used with above-ground pools because it makes entering the water easier and allows people to move around the pool comfortably.
Near a pool it’s very useful to place a basket or small storage cabinet for towels. It may seem like a small detail, but when everything is within reach, using the pool becomes much more convenient. Another helpful addition is a water-resistant outdoor rug. It makes the surface less slippery and a bit safer to walk on.
8. Deck Ideas for Small Yards
In a small yard, a deck can serve several roles at once: a place for breakfast, a small relaxation corner, and sometimes even a workspace outside. Because of that, the layout often matters more than the total size.
Small but well-organized outdoor spaces are often used more frequently than large yards that lack structure. A compact deck can help create that structure.
What to Consider in a Small Yard
When space is limited, a few details become especially important.
- Furniture size. It’s better to choose compact tables and folding chairs. Large furniture quickly overloads the space.
- Clear walkways. Even on a small deck, it’s helpful to leave at least 30–36 inches (≈75–90 cm) for walking space.
- Multi-purpose elements. A bench can work both as seating and as storage.
- Vertical space. If the yard is small, walls, pergolas, or plant trellises can be used for vertical gardening.
What You’ll Need
A small patio deck usually uses the same materials as a standard deck.
Typical materials include:
- deck boards made from pressure-treated wood, cedar, or composite
- framing lumber 2×6 inches (≈5×15 cm)
- concrete deck blocks or adjustable supports
- exterior deck screws
- protective wood oil
If the ground is uneven, adjustable supports can be very helpful. For example, MakEFast Adjustable Deck Support Pedestals on Amazon allow you to level the frame quickly without complicated concrete work.
How to Build a Compact Deck
- Choose the size and location.
A small deck is often placed near the kitchen or back entrance. A platform around 8 × 10 feet (≈2.4 × 3 m) is usually enough for a compact seating area. This size fits a small table and two or three chairs while still leaving room to move around. Before starting construction, it helps to mark the area with rope or a garden hose so you can see how much space the deck will take in the yard. - Prepare the base.
Remove the top layer of grass and level the ground. Even a small slope should be corrected early so the deck does not become uneven later. After leveling the surface, install landscape fabric to reduce weed growth. Then add 2–3 inches of gravel (≈5–7 cm). This layer works as drainage so moisture does not collect under the deck. - Install the supports.
For a compact deck, deck blocks or adjustable supports are usually placed about 3–4 feet apart (≈90–120 cm). This spacing provides enough structural strength without requiring too many supports. Each support should be checked with a level to keep the frame even. - Build the frame.
The frame for a small deck is usually built with 2×6 inch boards (≈5×15 cm). First the outer rectangular frame is assembled, then interior joists are installed about 16 inches apart (≈40 cm). This spacing is standard and helps prevent deck boards from bending. - Install the deck boards.
Deck boards are attached on top of the frame using exterior screws. A small gap of about 1/8 inch (≈3 mm) is left between boards. This allows ventilation and water drainage after rain. Even on a small deck, this gap matters because wood expands and contracts with moisture changes. - Plan the edges and furniture.
Compact furniture works best on a small deck. For example, a table about 30–36 inches in diameter (≈75–90 cm) with two chairs leaves enough space to move around. Some homeowners also build a small bench along the edge of the deck. This saves space and can provide storage for outdoor cushions or small garden tools.
Small Deck Layout Ideas
1. Corner Deck
A small corner deck frees up the center of the yard. A typical size is about 8 × 10 feet (≈2.4 × 3 m). This space can hold two chairs and a small table.
2. Breakfast Deck
A small deck near the kitchen works well for morning coffee or a quick breakfast. A platform around 8 × 8 feet (≈2.4 × 2.4 m) with a small table is often enough.
3. Bench Deck
On a compact deck, a built-in bench along the edge can be very practical. It saves space because chairs do not need to be moved constantly.
4. Plant Deck
If you want to add more greenery, planters or narrow flower beds can be placed along the edges of the deck. This helps the small outdoor space feel more comfortable.
On compact decks, folding furniture can be very useful. When it is not needed, it can be stored away easily and the space becomes open again.
9. Multi-Use Entertainment Decks
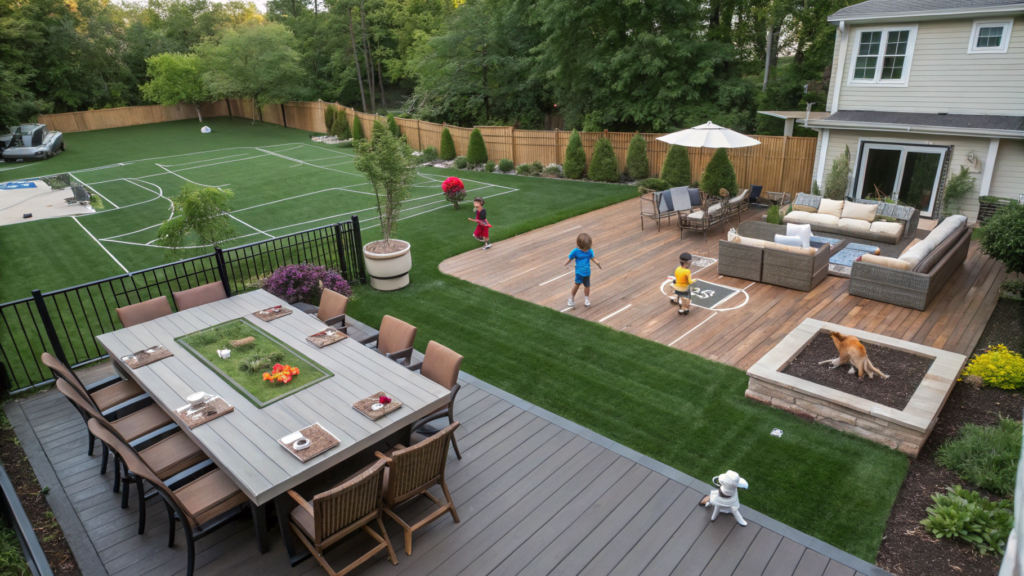
A multi-use deck is not built for just one purpose. These decks are usually a bit larger than standard ones because they need space for several zones. But size alone is not the main factor. The most important thing is organizing the layout so people can move freely and not get in each other’s way.
Yards with several functional outdoor zones tend to be used much more often than those with just one seating area.
What to Consider
Before building a multi-use entertainment deck, it helps to think through a few details.
- Enough space. To fit multiple zones, the platform is usually at least 20 × 24 feet (≈6 × 7.3 m). This size comfortably fits a dining table, seating area, and grill.
- Walkways between zones. Between pieces of furniture it’s best to leave at least 36 inches (≈90 cm) of space. This allows people to move around easily, even during a gathering or party.
- Clear separation of spaces. Zones can be defined using furniture, outdoor rugs, or large planters. This helps the deck look more organized.
- Lighting. If the deck will be used in the evening, it helps to plan for soft lighting — string lights, wall fixtures, or lanterns.
What You’ll Need
A multi-zone deck usually uses standard materials, but the structure should be strong enough to support furniture and a larger number of people.
Typical materials include:
- deck boards made from cedar, pressure-treated wood, or composite
- framing lumber 2×8 inches (≈5×20 cm)
- concrete blocks or adjustable deck supports
- exterior construction fasteners
- protective wood finish
If natural wood is used, it is usually sealed with protective deck oil to help protect the surface from moisture and sunlight.
How to Build a Multi-Use Deck
- Define the main zones.
Start by deciding how the deck will be used. In most cases there are three main areas: dining, lounge, and grill. - Mark the layout.
Before construction, it helps to mark on the ground where the table, chairs, and other elements will go. This makes it easier to understand how much space each area needs. - Prepare the base.
Remove grass, level the soil, and add 2–3 inches of gravel (≈5–7 cm) to improve drainage. - Build the frame.
For larger decks, builders usually use 2×8 inch boards to ensure the structure stays strong. - Install the decking boards.
Boards are installed with a small 1/8 inch gap (≈3 mm) between them. - Plan lighting and furniture.
After the deck is built, the furniture layout and lighting should be arranged carefully to support all zones.
Entertainment Deck Layout Ideas
1. Dining + Lounge Deck
One part of the deck is used for outdoor dining, while another area holds a sofa or a few chairs. A walkway remains between the zones. This layout works well for family dinners and gatherings with friends.
2. Grill + Dining Layout
The grill station is placed near the edge of the deck, while the dining table is positioned nearby. This setup makes cooking and serving food easier.
3. Fire Pit Area
A small seating area with chairs around a fire pit creates a cozy place for evening conversations. It is often placed toward the far end of the deck.
4. Party Deck
On larger decks, several zones can be combined at once: a dining table, a lounge corner, and a grill area. This type of deck works especially well for barbecues and gatherings.
A multi-use deck often becomes the most active space in the yard. This is where dinners happen, friends gather, and quiet evenings take place after working in the garden. Over time, this platform naturally becomes the center of everyday life outside.
10. Timeless Patio Deck Aesthetic
A timeless patio deck is the kind of outdoor space that still looks good years later. These designs rely on simple materials, calm colors, and a practical layout.
There’s nothing overly complicated here: clean geometry, natural materials, and comfortable furniture. Everything feels balanced and natural.
What Makes a Deck “Timeless”
Several principles help create a patio that won’t feel outdated after a few seasons.
- Natural materials
Wood remains the most versatile option. Cedar and pressure-treated lumber work especially well. They slowly change color over time but never feel out of style. Composite decking can also work if you choose a natural, neutral tone. - Simple geometry
Most timeless decks use a rectangular or square layout. The size can vary — for example 16 × 20 feet (≈4.9 × 6 m) — but the shape stays simple. Complex shapes may look impressive at first but often become visually tiring over time. - Calm color palette
Natural wood tones, soft gray, or warm brown shades blend well with the garden. Very bright colors tend to age quickly. - Plants around the space
Even the most carefully built deck looks better with greenery nearby. Planters, small garden beds, or ornamental grasses soften the space and make it feel more natural.
What You’ll Need
Creating this type of patio does not require anything unusual. The key is using reliable base materials.
Most projects use:
- cedar, pressure-treated wood, or composite decking boards
- framing lumber 2×8 inches (≈5×20 cm)
- concrete deck blocks or adjustable supports
- exterior construction fasteners
- protective wood stain or sealant
If natural wood is used, it’s important to refresh the protective coating periodically. It protects the surface from moisture and sun exposure while helping maintain the natural color.
How to Create a Classic-Looking Deck
- Choose the size and shape.
For many yards, a rectangular deck around 16 × 20 feet (≈4.9 × 6 m) works well. It provides enough room for a table, several chairs, and comfortable walking space. - Use natural wood or materials with a wood texture.
Wood blends naturally with plants and gradually becomes part of the garden environment. - Add a few large elements instead of many small ones.
For example, a large table, a few chairs, and several planters. The space feels calmer and more organized. - Plan the lighting.
Soft evening lighting makes the deck more inviting. Wall lights or string lights work well. - Leave room for plants.
Even small planting beds along the edges help visually connect the deck with the garden.
Timeless Patio Deck Design Ideas
1. Classic Dining Deck
A large wooden dining table and several chairs create a simple and functional outdoor dining area. The layout stays open so people can move around easily. This setup works well for family dinners and gatherings with friends.
2. Lounge Patio
Instead of a dining table, you can create a relaxed lounge area with a sofa and a few chairs. A small coffee table and an outdoor rug often complete the space.
3. Garden-Framed Deck
Plants surround the deck — garden beds, ornamental grasses, or shrubs. This creates the feeling that the deck sits naturally within the garden.
4. Pergola Patio
Adding a pergola makes the space feel more defined and provides gentle shade. It also helps visually frame the patio area.
Simple LED lanterns or string lights can add soft lighting and make the patio especially pleasant in the evening. Over time, these decks often look even better. The wood gradually changes tone, plants grow around the space, and the furniture becomes part of the familiar outdoor setting.
Which Patio Deck Idea Would You Try?
A deck rarely stays just a wooden platform near the house. Over time it gains furniture, lighting, plants, sometimes a grill or a hot tub. Gradually it becomes the place where many summer evenings happen.
Even a small deck can turn part of a yard into a comfortable outdoor retreat. A larger entertainment deck can become the center of gatherings and family dinners.It would be interesting to know which patio deck idea you liked the most. Share it in the comments — sometimes a single good example helps you see your yard in a completely new way.