If you’re looking for practical solutions for organizing your vegetable garden, I think bucket stands might come in handy. No matter how much space you have, these stands allow you to make the best use of space, make plants more accessible for care and improve drainage.
In this article, we’ll share 10 practical bucket stand plans (for 5-gallon buckets and more) that will suit different needs and types of plants.
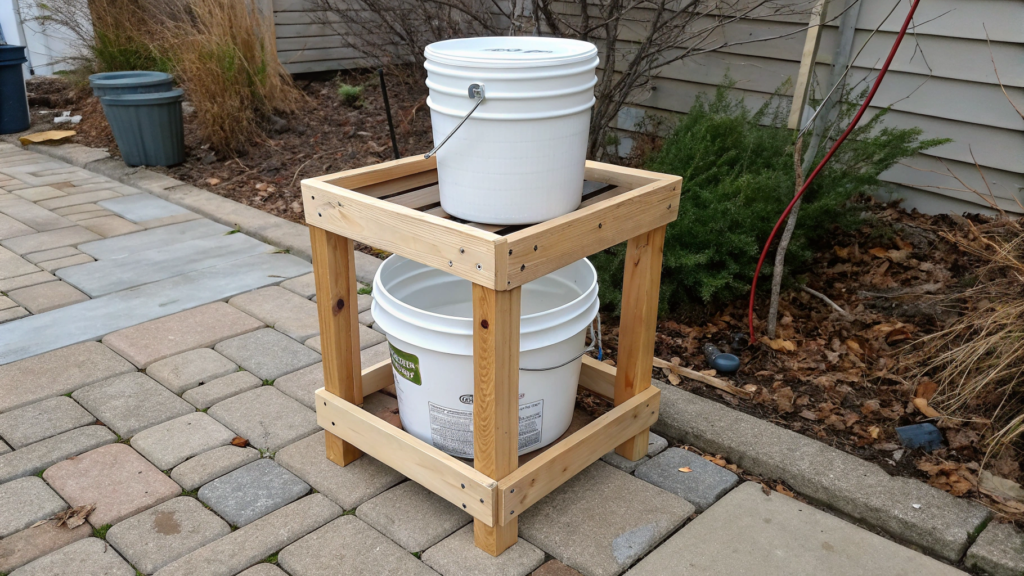
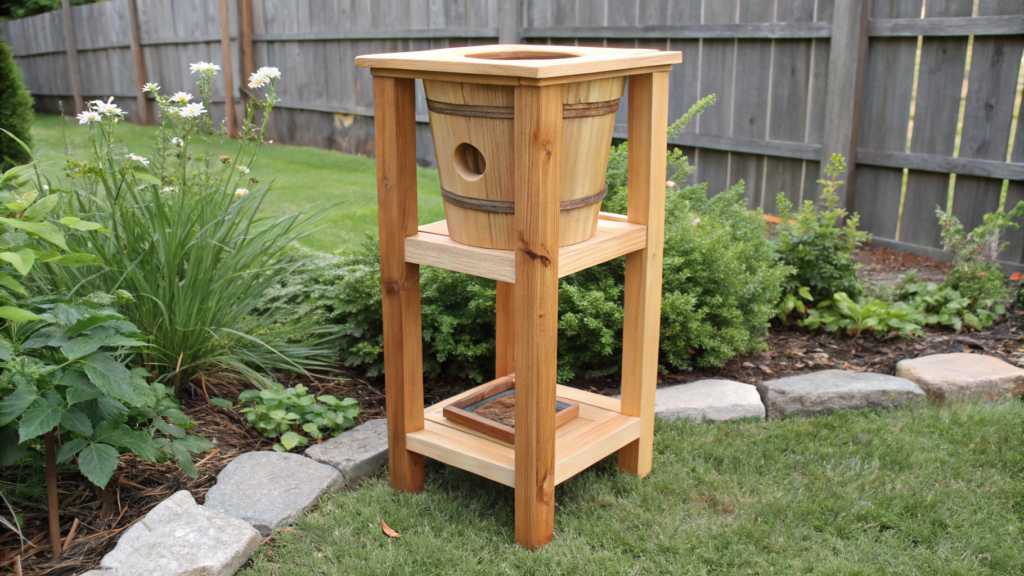
1. Easy DIY 5-Gallon Bucket Stand with Built-In Drainage

If you need a simple, sturdy and functional bucket stand, this model with drainage hole is perfect for you. It will save your plants from rotting and you from constant bending over and back pain.
What you’ll need:
- 3 pieces of 5×10 cm, about 60 cm long (2×4″, 24″) – for the legs
- 2 pieces of 5×5 cm, about 45 cm long (2×2″, 18″) – for the base
- 1 piece of 18 mm thick plywood, about 40×40 cm (¾-inch plywood, 16 “x16”) – for the top platform
- Jigsaw or crown (diameter ~9-10 cm) (hole saw 3. 5″-4″)
- Screws 60mm (2.5″ screws)
- Screwdriver
- Optional: varnish or paint to protect from moisture
- Optional: grating for bucket lid or wire mesh for drainage
How to make
- Prepare the wood. If you don’t have pre-cut scraps, cut bars to the right length. Plywood – into a square of about 40×40 cm.
- Assemble the base. Lay two bars 5×5 cm crosswise. Fix them in the center. This will be the base that will prevent the stand from wobbling.
- Screw on the legs. Fix three 5×10 cm bars vertically by screwing them to the ends of the base. Position them so that they face outward at a slight angle – the stability will be higher.
- Make a drainage hole. Take plywood and saw a hole in the center with a diameter of 9-10 cm (under the bottom of the bucket). Excess water will drain through it.
- Screw the plywood on top. Align the plywood with the legs and fasten with screws. The bucket will stand exactly above the hole – the water will flow down freely.
- Put a container for drainage (optional). You can place a tray, bowl or even an old baking tray underneath the stand so you can collect the water and water other plants.
Why it works. Raising the bucket improves ventilation and prevents fungus and rot, and the hole in the plywood provides drainage, which is especially important when using self-watering or mulch. You can paint it any color you wish.
This simple stand is where we started – and now we have an army of them around the perimeter of the greenhouse. If you’re just starting out, this is a great solution: cheap, fast and reliable.
2. How to Build a Vertical Bucket Stand

If you have a small plot, a balcony, or just want more crops from a smaller area, this project will definitely work for you. It will utilize vertical space and allow you to grow three times as much as you would on the ground.
And don’t worry – no welding machines or workshop needed. Just wood, a screwdriver, and a little bit of desire.
What you’ll need (for 3 levels):
- 4 wooden blocks 5×5 cm, 180 cm long (2×2″, 6 feet)
- 6 planks 45 cm (18″) long – to support the buckets
- 3 buckets of 18 liters (5 gallons)
- 18 screws, about 60 mm long *(2.5″)
- A 9-10 cm diameter crown *(3.5-4″)
- Screwdriver and drill
- A tape measure and a pencil
- Optional: stain or moisture resistant paint
Step-by-step instructions
- Cut and prepare the wood
- 4 posts of 180 cm (6 feet) each made of 5×5 cm (2×2″) lumber.
- 6 planks of 45 cm (18″) – the buckets will stand on them.
- Assemble the vertical frame
- Make a rectangular structure out of four posts.
- At the bottom, screw 2 boards, connecting the posts in pairs.
- Similarly screw the boards on the middle level and on the top.
Tip. Make the bottom level about 25 cm (10“) above the ground, the second level about 90 cm (35”), and the third level about 150 cm (60″).
- Make pail holders
- In each plank, saw one hole in the center, 9-10 cm (3.5-4″) in diameter.
- The hole should be slightly smaller than the bottom of the pail – so it sits firmly and doesn’t fall through.
- Add shoring at the bottom (optional)
You can screw small planks under each hole to increase support for heavy buckets.
- (Optional) Install hooks or a drip irrigation system
- Hooks can be screwed on the side for hanging small things.
- Or you can do a homemade drip irrigation from top to bottom, you know it’s one of the easiest and most effective ways to moisturize.
Why we like this design. It really saves space. We grow three times as much in the same patch. And it’s also perfect for greens, strawberries, salads, or dwarf tomato varieties like Tiny Tim.
Of course, it’s easily portable, so you can place it anywhere on the property. And if you paint it, it looks really neat. We painted it olive green – it blends right in with the greenery in the garden.
3. Galvanized Bucket Stand for Herbs

Most of our homemade crafts look like they were assembled by tired gardeners on their third mug of coffee and last screw. By the way, they were. But this stand came out really neat. And more importantly – practical and rust-proof.
If you grow thyme, mint, oregano or basil and want to keep them close at hand – especially by the porch or kitchen door – a galvanized stand is perfect. Because it lifts the plants off the ground (snails won’t get to it), is easy to clean, and won’t fall apart in the rain.
What you need (for the 3 bucket version):
- 3 galvanized buckets of 5-10 liters (1.3-2.5 gallons)
- 1 wooden board – 100×20×3 cm (approximately 40 “x8 “x1”)
- 3 metal clamps (diameter to fit your buckets – usually 15-20 cm / 6-8″)
- 3 anchors and screws for fixing
- Optional: moisture resistant paint or stain
- Optional: hooks or brackets if you will hang on the wall
Two ways of assembly
You can make a floor version or a wall version. Both are simple – I’ll tell you about them.
Option 1. Floor stand
- Prepare the board. Sand it and, if desired, coat it with a protective compound. Put the board vertically – this will be the “back” of the rack.
- Mark the fasteners. Mark three points at an equal distance from each other – 20-25 cm between the buckets.
- Screw on the clamps. Drill a hole in each clamp and screw it into the marked point. It will hold the bucket.
- Insert the buckets. Insert the bucket into the clamp and tighten – it will hold tight, even in windy conditions.
- Backfill and plant! Put down drainage (pebbles or shards), then soil and weed. Put it by a sunny wall or porch.
Option 2. Wall-mounted (on a fence or patio)
Even easier!
- Screw a board horizontally to a wall or fence.
- Screw on the clamps as in the previous option.
- Insert the buckets, fill in the soil – done!
Why it works
Galvanized steel won’t rust, even after heavy rains.
The buckets are easy to remove and replace. Loosen the clamp and go.
Great for “porch herbs” – go pick some basil and put it straight into a paste!
Lots of air and light – less risk of mold and rot.
And it’s just beautiful. It really is. Even the guests notice.
What you can plant. 1. Basil – likes the sun, better upstairs. 2. Oregano and thyme – tolerate dryness, grow well in a bucket. 3. Mint – aggressive! She a separate bucket, otherwise it will take over everyone.
4. Backyard 10-Gallon Bucket Stand

If you’ve ever tried to grow potatoes, corn, or even watermelons in a bucket, you know that regular 5-gallon (18 liter) containers quickly become cramped. Especially if the plants have a strong root system. That’s why 10-gallon buckets (about 38 liters) became the right option for us. And yes – they need a special stand because they are really heavy, especially after watering.
We came up with this stand when we got tired of lugging heavy buckets around the yard. We made one and immediately assembled three more. Now we have a whole corner with such “barrels”. And everything grows – like on yeast!
What you will need:
- 4 bars 5×10 cm, length of 45 cm (2×4″, 18″) – legs
- 2 boards 5×10 cm, length of 50 cm (2×4″, 20″) – side walls of the base
- 2 boards 5×10 cm, length of 40 cm (2×4″, 16″) – base cross members
- 1 sheet of plywood or 50×50 cm board, 18 mm thick (20 “x20″, ¾”) – top platform
- Drill, screwdriver, 60-70 mm screws
- Hole saw or jigsaw (diameter 11-12 cm / 4. 5-5″)
- Optional: varnish, paint, silicone feet or footrests
How to make
- Assemble the base. First make a rectangular frame: join 2 long and 2 short boards (50 and 40 cm) into a rectangle. This will be the supporting contour. Screws – at an angle, through the preliminary holes, so that the wood does not crack.
- Fix the legs. Four bars (45 cm) screw vertically to the inner corners of the frame. It is desirable to turn the corner slightly outward for stability.
- Prepare the upper platform. From plywood cut out a square 50×50 cm. In the center saw out a hole with a diameter of 11-12 cm – so that water can drain. The hole should be slightly smaller than the diameter of the bucket, so that it does not fall through.
- Assembly. Screw the platform to the legs from above. That’s it! The stand is ready.
- Additional options (optional):
- A tray can be placed under the opening to collect water.
- You can screw wheels to the legs – if you move the buckets often.
- If the stand stands on open ground, you can dig the legs in 5-7 cm to prevent it from wobbling.
Why it’s worth a try. 10 gallons (38 liters) – it’s almost a full-fledged bed, only mobile. It is suitable for large crops: corn, zucchini, cucumbers, sweet potatoes. In addition, there is no need to bend over, water does not stagnate.
This design is suitable for drip irrigation – the tube can go from the top or through the side.
What we plant in such buckets:
- Potatoes – especially the variety “Yukon Gold“
- Corn mini varieties – yes, really grows!
- Small watermelons or melons – for example, Minnesota Midget
- Cucumbers on a trellis – conveniently and vertically
5. Lowes-Inspired Bucket Stand You Can Build in a Day
This is the idea we got from Lowes. They often have simple but very reliable solutions for the garden. So we adapted one of these bucket stands to fit both our 5-gallon bucket and a smaller bucket (like a 10-liter bucket).
Assembles in a day, even if you’re just learning how to use a screwdriver. And it looks neat – you can put it at the greenhouse, at the house, or even on the veranda.
What you will need:
- 2 boards 5×10 cm, 60 cm long (2×4″, 24″) – side posts
- 3 boards 5×10 cm, 45 cm long (2×4″, 18″) – crossbars
- 1 sheet of plywood 45×45 cm, 18 mm thick (18 “x18″, ¾”) – platform
- Screws 60 mm (2.5″)
- *Drill and bit (9-10 cm / 3. 5-4″) for the hole in the center
- Sandpaper, brush, stain or paint (optional)
- Option: furniture legs if you want the stand to stand higher or on the floor
How to assemble the stand (step by step)
- Making the frame. Take 2 side posts and screw between them one bar at the bottom (5-7 cm from the ground) and one at the top. You will have a letter “P” made of wood.
- Reinforce the construction. Screw the third bar in the middle – it will additionally hold the platform with the bucket and will not let it sag.
- Prepare the platform. Cut out a square of plywood 45×45 cm. In the center make a hole with a diameter of 9-10 cm – so that water can flow out of the bucket. Sand the edges, especially if the bucket has no bottom.
- Attach the platform. Put the plywood on top of the structure, level it, screw the corners to the sidewalls. Done!
Pros of this design:
- Assembles literally in an hour or two – can be done on the weekend or even in the evening.
- Materials are cheap and available – everything is sold in any building store (including Lowes or Leroy Merlin).
- No complicated angles or filings – just straight joints.
- Looks neat – especially if varnished or painted.
- Fits any bucket – from 10 to 20 liters.
How we use it. One such stand stands at our greenhouse – on it grows rosemary. The second we collected for drainage water collection from drip irrigation – just put an empty bucket and stand. And another one – under the strawberry bushes. They love good ventilation from below.
6. The Smartest Bucket Watering Stand for Lazy Gardeners
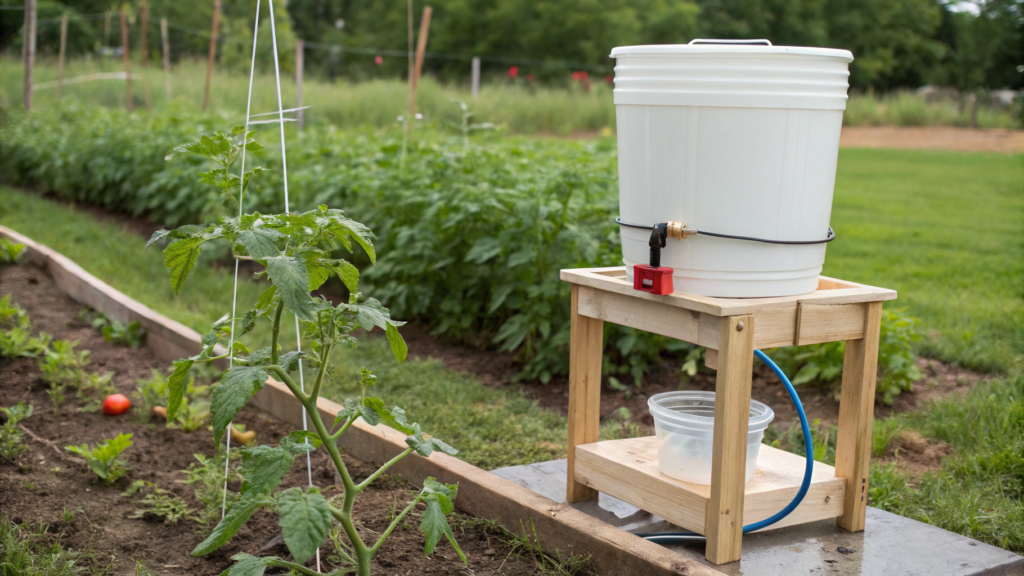
Like many people, I don’t always have the time (or desire) to run around with a watering can every day. Especially in the summer when everything dries instantly. So we made a clever stand that… waters itself. The system is simple: a stand, a container of water, wick watering – and your tomatoes live, even if you went away for 4 days.
What you will need:
- A regular 18-liter (5-gallon) bucket with drainage
- A second bucket or container without holes – for water
- A platform with a hole for the top bucket (wooden or purchased)
- Wick (for example, strips of microfiber, old T-shirts or synthetic tape)
- Gravel or expanded clay – drainage layer
- A small piece of mesh or cloth – to cover the drainage
- Optional: drip tube or auto pump (if you want to stay out of the process altogether)
How it works:
You put a bucket with a plant on top of a tank of water, with a wick in between. It soaks up the water from the bottom up. The plant takes in exactly as much moisture as it needs – no more, no less. And now for details:
How to assemble a stand with auto irrigation
- Assemble the stand. If you have already read the previous instructions – take the same platform (plywood with a hole). Or just use a metal holder/stand with a round hole
- Prepare the “bottom” bucket (reservoir). It should be a sealed bucket or container (10-20 liters), without holes.
- You pour water into it to about ⅔ of its volume.
- Make a wick system
- At the bottom of the planting bucket, make a hole in the side, closer to the bottom.
- Insert a cloth wick (20-30 cm) there, so that it reaches the water at the bottom.
- One end in the bucket, the other end inside the planting bed, under the roots.
- Put it all together
- You place the top bucket with the plant on the platform above the tank.
- Make sure the wick hangs loosely inside the water tank.
- Fill with gravel, mesh on top, then soil. Plant the plant.
That’s it. Fill the reservoir with water, and only once every 4-6 days.
Such a stand with wick watering maintains constant humidity, especially for sensitive crops: tomatoes, peppers, eggplant, which is ideal for the heat and southern sides, as plants do not overheat due to evaporation.
There is no overwatering – the plant itself “decides” how much water to take.
You can plant cherry tomatoes (especially varieties with a high demand for moisture), sweet peppers, salads and spinach, cucumbers.
7. Build a Wooden 5-Gallon Bucket Holder
Often you want to make something that will last for more than just one season, something that will look nice and won’t fall apart after the first rain. This is where a classic wooden 18-liter (5-gallon) bucket holder comes in handy.
It looks like a small stand-stool with a hole, but it’s strong enough to hold a full bucket of water or soil. And if you paint it, you’ll get an almost designer element of your garden or patio.
What you will need:
- 4 legs made of 5×5 cm (2×2″) timber, 50 cm *(20″) long
- 2 crossbars 45 cm (18″) and 2 crossbars 35 cm (14″) (for the base)
- Plywood 40×40 cm, 18 mm (¾”) thick
- Wood screws 60 mm (2.5″)
- A crown drill with a diameter of 9–10 cm (3.5–4″) or a jigsaw — for the hole
- Drill, screwdriver, level
- Optional: stain, paint, varnish
- Option: plastic tray for drainage water
Assembly
- Assemble the base. Connect 2 long (45 cm) and 2 short (35 cm) crossbars into a rectangle. This is the bottom frame.
Use angled screws and glue (if you want reliability on the century).
- Install the legs. Screw 4 legs vertically to the corners of the rectangular frame. Check the level – otherwise the bucket will stand crooked, and the water will flow in the wrong direction.
- Add the top platform
- Take a 40×40 cm plywood square.
- Drill a round hole 9-10 cm in the center – the bottom of the bucket will fit there.
- Fix the plywood to the top of the legs, screwing it in with screws.
- Finishing (optional). Sand, paint or stain. You can even add handles on the side to make it easier to carry.
This stand is convenient to use because the bucket is raised above the ground and there is no contact with wet soil, reducing the risk of mold and mildew. Drainage goes through the hole – you can put a tray and reuse the water.
This is a stable structure and will not tip over from a strong wind or an accidental push.
8. Depot DIY Stand That Works for Any Bucket

The Depot DIY Stand is a simple, practical stand that can be made from scraps and made to fit any bucket: 5, 10, or even 20 gallons.
What you’ll need:
All sizes are adaptable – this is a universal base, not a set of instructions.
- 4 legs – anything (5×5 cm timber or 2×4 inch board), 30-50 cm long *(12″-20″)
- 2-4 crossbars – about 40-50 cm long *(16″-20″)
- Platform – board or plywood, at least 40×40 cm *(16″x16″)
- A crown or jigsaw for a 9-12 cm hole *(depending on the bucket)
- Screws, self-tapping screws or even corners – whatever you have in stock
- Optional: leftover tiles, linoleum or paint – for finishing
How to assemble (we will adapt to your materials)
- Measure your bucket. The diameter of the bottom and the height of the bucket. Then subtract 3-5 cm from the diameter of the bottom – this is the size of the hole you need to make so that the bucket fits tightly.
- Assemble the frame
- Make it like a stool: 4 legs + 2-4 crossbars.
- Use whatever you have: you can make an X-shaped structure at the bottom, or simply connect the legs in pairs with boards.
- If the bucket is heavy, then you need to reinforce the platform with additional spacers.
- Screw the platform. Take a piece of plywood or board. Cut a hole the size of the bucket – no larger, so that it does not fall through. Screw it on top. Done.
We have one such holder under the compost bucket – and nothing leaks onto the ground. The second is under the tank for collecting rainwater, it holds 20 gallons (~75 liters), and the stand holds it! And the third is under the seedling buckets, when we make a temporary vegetable garden in the greenhouse in the spring.
By the way, if you do not have a crown, trace the bottom of the bucket with a pencil and cut out the contour with a jigsaw. Then sand it a little – it will be perfect for your bucket. And if the bucket has a narrow bottom – you don’t have to cut it at all, just make a small notch in the front so that the water drains.
We love this design because it doesn’t require perfection. It’s made from what’s at hand, without unnecessary stress. And it looks – if you try – absolutely great. The main thing is that it works.
9. Compact Bucket Gardening Rack for Balconies

(Even if you have a 1×2 meter balcony, you can still grow lettuce, herbs, tomatoes, and even strawberries)
For our first balcony harvest, we built a compact, stable bucket rack, and since then it has always been with us.
This design can be placed on a balcony or loggia, near the wall of a house, in a narrow area between a fence and a garden bed.
It is light, stable, and holds 3-4 buckets of 5-10 liters.
What you will need:
- 2 side supports – 5×5 cm, 90 cm *(36″) long
- 6 short boards 40 cm (16″) – for the crossbars and support platforms
- 3 shelves – boards or plywood 40×30 cm *(16″x12″)
- 60 mm screws, drill, hole saw 9-10 cm (3.5-4″)
- Optional: anchor brackets, paint, varnish
- 3 buckets 5-10 liters (1.3-2.5 gallons)
How to assemble
- Assemble the side supports. Screw the boards in pairs to two posts – at a height of about 20 cm, 50 cm and 80 cm. These will be the guides on which the shelves will lie.
- Prepare the shelves
- Take 3 boards or plywood squares 40×30 see.
- Make a hole of 9-10 cm in diameter in the center of each one so that the water can drain and the bucket can stay in place.
- Sand and varnish if you want them to last longer.
- Install the shelves
- Just put them on the guides, screw them in the corners.
- Make sure there is a slight slope back or to the side so that water does not flow into the apartment.
Why it is convenient:
Holds up to 3 buckets vertically, but takes up very little space.
Ideal for a balcony, loggia, terrace, narrow space.
Can be assembled in 1 day, even with minimal experience.
It looks neat – especially if you paint it the same color as the balcony.
Strawberries grow well in such buckets, 3-4 bushes in one bucket. You can place salads, spinach, arugula on the bottom shelf, and basil, thyme, rosemary – on top, they love the heat.
Cherry tomatoes at the bottom – so that the branches hang beautifully
10. All-in-One Vegetable Bucket Tower with Stand

If I could only keep one thing from our entire gardening arsenal, it would be the vegetable bucket tower. Why? Because it:
takes up less than 1 square meter,
holds 4-6 buckets with different crops,
and does not require beds, plowing or drip irrigation
We built one last year, “to try it out.” And by mid-summer, it already looked like a mini-jungle of tomatoes, peppers, onions and basil. And all this is on a patch of land next to the barn.
What you will need:
- 6 x 10 liter (or 5 gallon / 18 L) buckets
- 1 center post – a 150-180 cm (5-6 ft) wooden or metal pole
- 3-4 platform rings (for buckets) – plywood or metal with holes
- Support base – a cross or a heavy wooden box
- Screws, brackets, anchors, level
- A 9-11 cm crown – for holes for buckets
- Optional: drip irrigation system or wick automatic irrigation
How to assemble the tower
1. The base.
- Make a heavy platform: a cross from 2×4 or a box filled with bricks.
- This is important: the whole structure will rest on this. It is better to have it heavy than to fall over in the wind.
2. Install a vertical pole
- Screw or hammer in a pole ~150 cm high into the center of the base. It should stand level!
- This is the spine of the entire tower.
3. Prepare rings or platforms
- Cut out circles or hexagons from plywood, with 3-4 holes for buckets (10-12 cm in diameter).
- Make 3-4 levels — every 30-40 cm in height.
- Secure the platforms to the pole with brackets or corners.
4. Buckets
- Each bucket — with drainage, possibly with a wick system at the bottom.
- You can fill it with expanded clay, then soil, and plant the plants.
- The buckets are inserted into the holes in the platform and tilted slightly outward — so that the plants get more sun.
What to plant and at what level:
Top tier – cherry tomatoes, peppers (they like maximum sun)
Middle tier – basil, lettuce, spinach
Lower tier – carrots, onions, radishes (they like shade and humidity)
This works great because the entire vertical space is used, not just the area. Plus, different tiers mean different microclimates (you can combine light-loving and shade-loving crops)
Minimal care: water from above – the moisture flows down. Can be placed anywhere — concrete, grass, patio.
One stand – many benefits
The right stand for a bucket not only improves plant care, but also helps organize the space with maximum benefit.
Regardless of whether you choose a simple stand for one bucket or a multi-level design for several, each option will provide stability and comfort for plants.
We discussed several stands today, which one would you choose to implement? Share in the comments, I’m interested in how you arrange your garden.