If you want to quickly change the look of a fence or add privacy to your yard, trellises with climbing plants are one of the most practical solutions. They highlight your garden’s structure, cover inconvenient areas, create natural partitions, add architectural rhythm, and make the space feel lived-in.
Lindy and I have worked with vertical structures on our acres in Idaho and in the PNW for years, and every time I’m surprised by how many different problems a simple trellis can solve. This article brings together 10 clear, functional ideas that work for both large gardens and small backyards. You’ll see different materials, structures, and plants — and you’ll understand which trellis is easiest to adapt to your own needs.
1. Rustic Cedar Trellis for Evergreen Vines
Sometimes all you need to bring life to an ordinary fence is the right trellis.
Cedar is perfect for this. It truly changes everything. It smells like the forest, doesn’t rot for years, handles heavy winter snow and summer heat, and evergreen vines (ivy, evergreen honeysuckle, clematis with dense foliage) cling to it extremely well.
Why Cedar
I once learned about the natural oils in cedar that slow down rot and repel certain insects — and honestly, that explains everything. Cedar lasts a long time. It even ages beautifully.
Besides that:
- cedar’s strength is higher than average among lightweight woods
- it keeps its shape even through cycles of moisture and heat
- it’s easy to work with — perfect for thin slats or sturdy frames
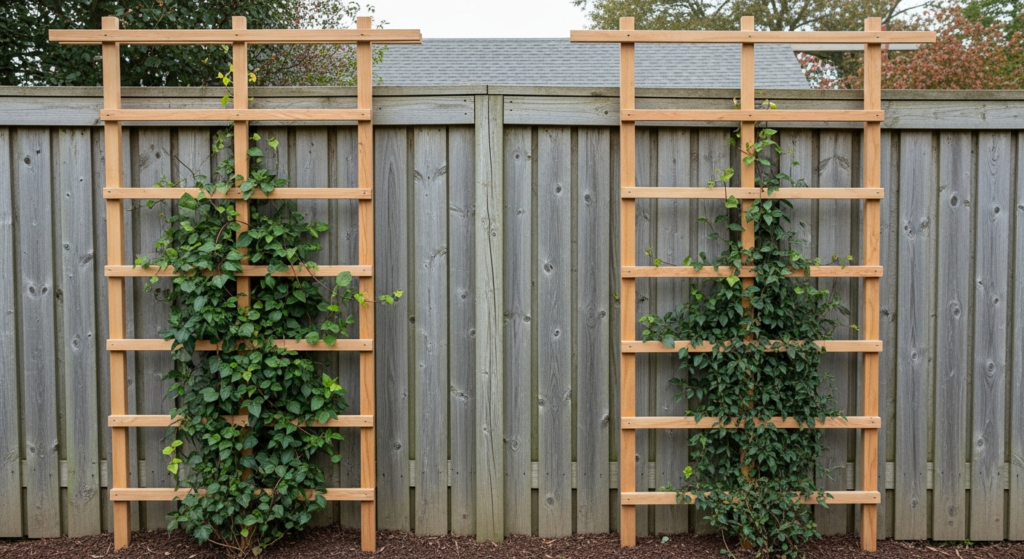
On average, a trellis 6 ft (1.8 m) tall and 3 ft (0.9 m) wide works best for a standard fence — it fills the gaps, lets vines grow evenly, and doesn’t overload the structure.
What the Ideal Rustic Cedar Trellis Looks Like
Every time I build a new trellis (and we have… many!), I follow a simple set of elements:
- a cedar frame made from 1×3 or 1×4 boards
- inner slats placed vertically or in a cross pattern
- spacing of 2–3 inches (5–7.5 cm) between slats — evergreen vines love room
- outdoor-grade, galvanized hardware
In the first few weeks it looks like a neat wooden grid. By the end of the season — it’s a soft, green privacy wall. Once we even used it to cover a part of the yard where neighbors parked their car — and a year later no one even remembered that the fence used to face someone’s side mirror.
Evergreen Vines That Work Best
Tested by years, winds, and random goats that sometimes escape the pasture:
- English Ivy (Hedera helix) — clings firmly, grows confidently.
- Evergreen Honeysuckle (Lonicera ‘Halliana’) — the aroma alone sells it. And it keeps its leaves year-round.
- Clematis armandii — grows fast and creates a dense green screen.
Tip: Plant at least 6–8 inches (15–20 cm) away from the fence. Vines need airflow, especially in year one.
Easy Step-by-Step Plan That Works Even for Beginners
- Assemble the frame. I take two 1×3 cedar boards 6 ft (1.8 m) long and two more 3 ft (0.9 m) long. I lay them out on a flat surface to see whether they “breathe” or need light sanding at the ends. Then I fasten the corners with exterior screws — cedar is soft, so pre-drilling small holes prevents cracks. And honestly, the frame turns out straighter if you first secure one corner and then the opposite.
- Add inner slats. I mark spacing at 2–3 inches (5–7.5 cm). Evergreen vines need airflow but still require density. I pre-cut all slats and lay them inside the frame to see the composition visually. Only then do I attach each slat with two small screws. If you’re short on time, you can use a ready-made option like Cedar Lattice Panel by Enclo Privacy Screens (Amazon) — it looks tidy and saves about an hour of work.
- Coat the frame with oil. A thin layer of natural exterior oil, spread with a cloth. Cedar darkens slightly, and the wood grain becomes richer. It’s not just protection — the trellis ends up looking like it’s already seen a couple of seasons, in a good way. Apply the oil before installation, especially inside joints — that’s where moisture stays the longest.
- Mount the trellis onto the fence. I like the suspended method — when the trellis isn’t flush against the fence but hangs on Z-clips. That way the wood doesn’t absorb moisture from the fence, and the back stays ventilated. If the fence is old or uneven, I slip in small wooden shims to keep the trellis straight. And I always check the level — even a tiny tilt becomes very visible once the vines start growing vertically.
- Plant the evergreen vine. I step 6–8 inches (15–20 cm) away from the fence — perennials need air and space for the root collar. I add compost mixed with regular garden soil to the planting hole. In the first season, water every 3–4 days if it’s hot. Evergreen vines love stability — otherwise, they drop young leaves. And yes, 2 inches (5 cm) of mulch works wonders — the soil stays moist longer.
Such a cedar trellis covered in evergreen vines becomes more than a vertical structure — it turns into a calm green filter for the whole yard. It softens the wind, absorbs some of the street noise, warms up the visual look of the fence, and genuinely changes the feel of the space.
2. Modern Metal Frame with Jasmine

I’ll admit, I always felt that metal was too “cold” for the garden, too technical. But one day Lindy and I installed a thin black frame along the edge of the yard where the air smelled like jasmine in the evenings… And that was it. The aesthetics question was settled forever. It turned out that minimalist geometry and the living fragrance work together better than any garden décor.
Why a Metal Frame Works So Well for Jasmine
Metal has high load-bearing strength with minimal thickness. This makes it possible to build trellises that look lightweight but stay extremely sturdy under the weight of a mature vine.
Besides that:
- steel and aluminum resist deformation during temperature swings
- the smooth surface helps young jasmine shoots grip evenly and grow in the right direction
- the structure stays stable even at 7–8 ft (2.1–2.4 m) in height
Jasmine is energetic but not heavy, and a metal trellis becomes the perfect vertical partner for it.
What a Modern Metal Trellis Looks Like
After a lot of experimenting, our favorite combination looks like this:
- a thin frame made of ¾ inch (19 mm) steel tubing
- vertical rods spaced 4–6 inches (10–15 cm) apart
- height from 6 to 8 ft (1.8–2.4 m) — enough to create a dense green screen
- matte black or anthracite finish — jasmine looks especially bright against it
How to Plant Jasmine So It Climbs Right Away
(first two months are crucial)
Jasmine doesn’t like cold roots but loves consistent soil warmth. So we:
- plant 10–12 inches (25–30 cm) away from the trellis
- dig a 12-inch (30 cm) deep planting hole
- mix garden soil with compost 50/50
- mulch around it with 2 inches (5 cm) of material to retain moisture
- water every 3–4 days in the first season when temps are over 80°F (27°C)
Jasmine shoots are flexible and lively. We gently tie the first ones with garden clips — they guide the growth and help the plant catch the structure confidently.
Step-by-Step Installation
- Mark the installation line. I simply stretch twine to see a straight line. On uneven ground, this prevents the silhouette from “dancing.”
- Install support posts. For a metal frame, it’s best to use anchors or posts buried 16–24 inches (40–60 cm) deep. This gives the structure stability even in strong winds.
- Attach the panel. We use galvanized bolts or Z-clips. Metal barely expands, but a ½-inch (12 mm) air gap between the frame and the fence improves airflow.
- Check the vertical alignment. Jasmine grows quickly, and any tilt becomes optically exaggerated. The level is our best friend.
- Shape the first growth directions. I take 2–3 young shoots and guide them diagonally — this helps the plant cover the area faster instead of growing straight upward as a thin line.
Cold metal geometry and the warm summer scent of jasmine work extremely well together. The space looks cleaner, quieter, more structured. And now your fence becomes dense, blooming, and confident. This kind of screen gives you privacy but also creates a mood you can genuinely feel as you walk down the garden path in the evening.
3. Bamboo Trellis Wall with Ivy Growth
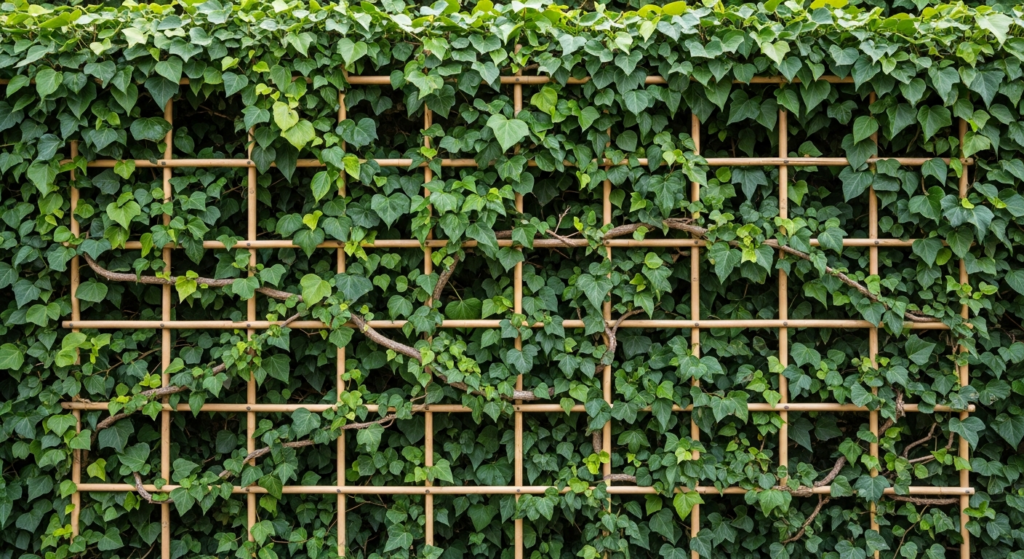
A bamboo trellis pairs beautifully with persistent English ivy. Ivy grips bamboo so firmly it feels like they were made for each other. And within a season, this wall turns into a textured green surface that softly hides anything you no longer want to see.
Why Bamboo
(and why it works better than you’d expect)
USDA Forest Service notes that bamboo has a high strength-to-weight ratio and maintains structural stability even with changes in humidity. It’s lightweight, dense, and with proper treatment performs well in outdoor structures.
And bamboo combines structure and freedom — it holds its shape but still looks organic. For ivy, which grows in waves, it’s the perfect partner.
What the Ideal Bamboo Trellis Wall Looks Like
That’s why the essential elements are:
- thin canes ½–1 inch (1.2–2.5 cm) in diameter
- horizontal crosspieces every 8–10 inches (20–25 cm) to guide growth
- overall height around 6 ft (1.8 m), but can be taller if you need to cover a high fence
- minimal ground contact so the bamboo doesn’t absorb moisture too quickly
Ivy: How to Give It the Best Start
(and make sure it grows upward instead of sideways, which it sometimes prefers)
Ivy loves two things: a stable support and moist — but not soggy — soil. So we:
- plant 6–10 inches (15–25 cm) away from the fence
- add compost with good structure to the soil
- water regularly for the first two months, especially during hot weeks
- guide the shoots every 3–4 days until they “find” their rhythm
We once had a shoot that decided to grow strictly horizontally — reaching for the light with full determination. We had to tie and redirect it. A week later it accepted the plan and climbed the trellis the way it should.
Step-by-Step Assembly
- Prepare the vertical stakes. We use 6-ft bamboo poles. In soft soil, we drive them in 6–8 inches (15–20 cm) deep. In harder soil, we first make a narrow pilot hole with a pry bar or metal rod.
- Add the horizontal crosspieces. We place them about 8–10 inches (20–25 cm) apart. We tie them with natural jute twine — it darkens over time and visually disappears. In wetter regions, UV-resistant plastic cord lasts longer.
- Check the plane. This is where most people make mistakes. The wall must be straight: if the stakes lean, the ivy will “read” that unevenness and start growing in waves. I simply sight down the whole line as if looking along a guide.
- Secure the bottom level. Bamboo tends to spread outward over time — totally normal. So I tie the bottom section into a single line to keep the structure stable.
- Plant the ivy and guide the first shoots. The first 2–3 shoots need to be literally “taught” to grow vertically — it’s easy, just gently wrap them around the bamboo and secure with a clip. I like using small garden clips; they’re neat and don’t damage the stems.
A bamboo wall with ivy is lightweight in construction, green in character, and very stable long-term. It works especially well where you want privacy without heavy structures. And honestly, after a year it’s hard to remember there was ever a fence there — your eye goes straight to the soft green surface, and the whole space feels deeper.
4. Expandable Lattice for Narrow Spaces
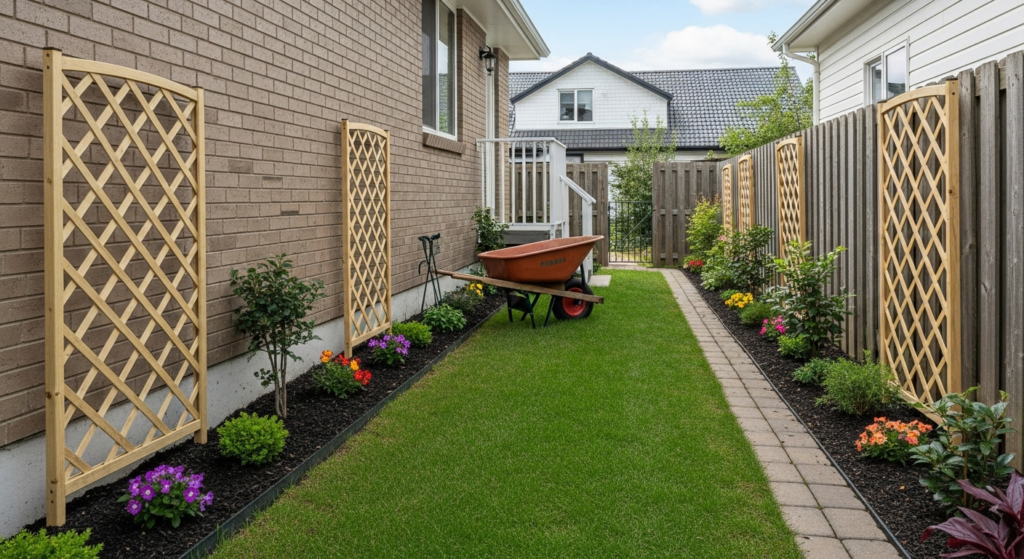
Every yard has narrow walkways, side corridors between the house and the fence — those spots where you’d love to plant something beautiful, but the space is so tight you can barely turn a wheelbarrow. That’s exactly where an expandable lattice belongs. Lightweight, flexible, mobile. It feels like it was designed for places where every inch matters.
Why an Expandable Lattice Works Perfectly in Tight Areas
Expandable lattice technology has three key advantages:
- adjustable width, usually from 12 inches (30 cm) to 60 inches (1.5 m)
- minimal weight thanks to thin wooden or composite slats
- high ventilation, which is crucial for vines in narrow “corridors”
This kind of lattice is easy to move. Today it stands along the side fence, and tomorrow it’s decorating the porch.
Modern models like Worth Garden Expandable Willow Trellis (Amazon) handle even vigorous ivy or clematis growth without sagging.
Best Plants for Narrow Verticals
(tested in our own garden)
- Clematis ‘Jackmanii’ — grows vertically without spreading sideways.
- Climbing Hydrangea (Hydrangea petiolaris) — grips strongly and loves shaded side areas.
- Boston Ivy (Parthenocissus tricuspidata) — covers space quickly yet stays controllable in narrow passages.
Step-by-Step Installation
- Determine the exact width of the space. Take a measuring tape and check three points: top, middle, bottom. Narrow corridors often taper slightly. This matters because the lattice must sit straight — otherwise it will wobble or bend. We once miscalculated by just 1 inch, and we had to redo the mounting.
- Choose the degree of lattice expansion. Open the lattice on the ground and try several widths. When fully expanded, the slats look visually thinner; when compressed, they appear denser. For tendril-based vines, a mid-range setting — about 50–70% expansion — is usually best.
- Prepare the anchor points. In tight spaces it’s hard to install full posts, so I use wall anchors or mounting strips.
first anchor point: 12–18 inches (30–45 cm) above the ground
second point: near the upper edge of the lattice
This two-point method keeps the structure stable without overloading the wall or fence.
- Install the lattice and give it slight tension. Hang the lattice on the lower anchors, then secure the upper ones. It should have a bit of tension — this prevents it from collapsing inward when the wind hits. I prefer soft plastic-coated wire because it doesn’t damage the wood.
- Plant the vine slightly away from the base. Ideal distance: 6–8 inches (15–20 cm) from the lattice. This prevents root overheating near the wall and helps the vine climb easier. Enrich the soil with compost and give it a strong first watering.
- Guide the first shoots manually. In narrow areas, light comes from above, so young shoots may grow sideways. Wrap a few stems around the slats and secure them with garden clips. They hold gently but firmly.
An expandable lattice is perfect for small spaces. It doesn’t just fill a forgotten corner; it turns an awkward spot into a vertical focal point that shifts the balance of the entire yard. Suddenly the narrow area feels deeper, greener, warmer — and you realize that even the smallest zones have huge potential once you give them something to climb.
5. Garden Fence Screen with Clematis Blooms

Lindy and I once covered a section of fencing near the chicken coop — the area was, honestly, quite boring. But once we hung a screen and let clematis climb over it, everything changed.
And when clematis blooms, that screen becomes the focal point of the entire space.
Why a Fence Screen Works So Well with Clematis
Clematis needs vertical support, light, and a structure it can grip with its simple tendrils. The slats of a screen have an ideal thickness — ¼–½ inch (0.6–1.2 cm) — exactly the size a vine willingly grabs.
Research on perennial climbing plants shows that:
- clematis grows better with good air circulation
- it needs support positioned at least 4 inches (10 cm) away from the wall or fence
- it shows more abundant blooming when given a stable support system throughout the season
Which Clematis Varieties Work Best
(from the ones that survived both heat and long spring rains)
- Clematis ‘Nelly Moser’ — soft pink-white petals, loves morning sun.
- Clematis ‘Polish Spirit’ — rich purple, long blooming.
- Clematis ‘H.F. Young’ — large blue flowers, always impresses guests.
- Clematis ‘Jackmanii’ — easy, reliable, quickly covers the screen.
Step-by-Step Installation
- Choose the right spot on the fence.
Clematis needs at least 6 hours of sunlight, but the roots must stay shaded. We often place a small decorative stone or plant a hosta at the base — protects the roots and looks great.
Check the fence condition before mounting. If the boards warp, the screen may end up crooked. - Mark the screen height. Most clematis varieties reach 6–10 ft (1.8–3 m). I place the bottom edge of the screen 4–6 inches (10–15 cm) above the ground — it avoids soil moisture and lasts longer.
- Install the mounting hardware. We use galvanized screws or mounting brackets.
It’s crucial to keep a ½–1 inch (1.2–2.5 cm) gap between the screen and the fence. This improves ventilation and helps clematis wrap around the support evenly.
We once forgot about this gap — and had to redirect several shoots that were getting stuck against the boards. - Attach the screen and check its stability. I give the structure a light shake — if there’s movement, I add a top anchor point. Mature clematis creates serious wind load, so it’s better to support it now than repair things later.
- Plant the clematis 12 inches (30 cm) from the fence. This distance is the sweet spot: roots get air, and the vine grows upward easily.
A 12-inch (30 cm) deep hole, a good layer of compost, and generous watering help the plant settle quickly. - Guide the first shoots. Young stems need gentle direction. I use garden clips or soft ties to secure a couple of shoots diagonally — this way the plant covers the screen faster.
- Mulch and protect the roots. Clematis roots handle heat poorly. A 2-inch (5 cm) mulch layer is almost essential — it keeps moisture in and protects from stress during peak temperatures.
When the screen is fully covered in blooms, it feels like the garden expands. The fence disappears — replaced by a glowing vertical plane of petals that move with the slightest breeze. And this effect is especially valuable in small spaces: clematis turns the boundary of the yard into an element of beauty you actually want to spend time near.
6. DIY Reclaimed Wood Trellis with Honeysuckle
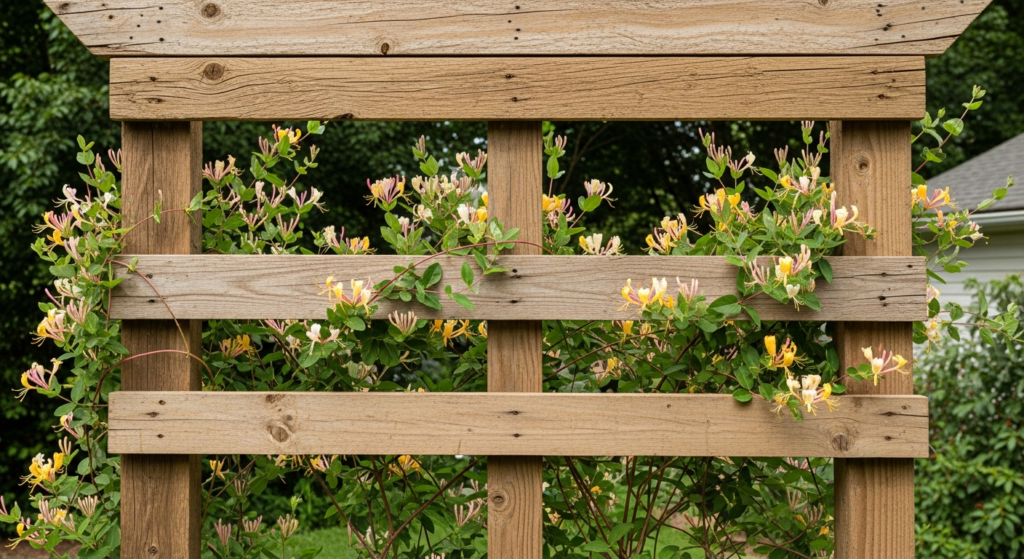
I have a soft spot for old boards. The ones left after barn repairs, porch tear-downs, or those found on Facebook Marketplace. And when I first built a trellis from reclaimed boards and let honeysuckle climb over it… it was beautiful.
Honeysuckle grows fast, smells incredible, and loves grabbing onto anything you give it. And reclaimed wood — warm, textured, full of history. Together they create a character-rich structure.
Why Reclaimed Wood Works So Well with Honeysuckle
Old wood has a denser structure than fresh lumber. It has already survived humidity, heat, and frost. This makes it less prone to warping and often full of natural resins that improve its outdoor durability.
If the wood was part of an exterior structure, it’s already adapted to moisture changes — meaning the trellis won’t twist after the first rain.
Honeysuckle prefers exactly this type of surface — slightly rough with natural micro-texture. It can grip more easily and covers the vertical frame faster.
Best Honeysuckle Varieties
(these three are our long-time favorites)
- Lonicera japonica ‘Halliana’ — fast-growing, fragrant, evergreen in mild zones.
- Lonicera periclymenum ‘Serotina’ — incredible evening scent, blooms in waves.
- Lonicera ‘Gold Flame’ — reliable, bright flowers, great for beginners.
Step-by-Step Reclaimed Wood Trellis Build
- Select boards of the right size. Ideal thickness is ¾–1 inch (2–2.5 cm).
I like mixing different widths — one 4 inches (10 cm), another 6 inches (15 cm). It creates an organic, non-factory look.
Check for rot — light discoloration is fine, soft spots are not. - Build the frame. Two vertical posts 6–7 ft (1.8–2.1 m) tall and two horizontal crosspieces 2.5–3 ft (75–90 cm) wide.
I fasten the frame with galvanized screws, pre-drilling holes — reclaimed wood can crack. - Add diagonal or vertical slats. It depends on how you want to guide the honeysuckle.
- Vertical slats encourage upward growth.
- Diagonals create dense weaving and a decorative pattern.
Spacing: 4–6 inches (10–15 cm) — enough to support heavier stems.
- Clean the wood, but keep the texture. I lightly brush the surface with a metal brush or coarse sandpaper.
Remove dirt — but not the story. Cracks and old nail holes are part of the charm. - Protect the structure. A thin coat of natural exterior oil applied with a cloth.
The oil strengthens the fibers without creating shine.
If boards were previously painted — keeping the patina looks incredibly alive. - Install the trellis. I bury the bottom 6–8 inches (15–20 cm) and reinforce it with a stake or metal support.
You can also mount it to a fence, but leave a 1 inch (2.5 cm) ventilation gap. - Plant the honeysuckle correctly. Ideal distance: 10–12 inches (25–30 cm) from the trellis base.
Honeysuckle roots prefer cool soil, so mulching is essential.
In the first season — water regularly, especially above 80°F (27°C). - Guide the first shoots. Honeysuckle is vigorous and needs gentle direction.
I use clips that hold firmly without pinching the stems.
During the first month, I shape diagonal growth — this helps the vine cover the structure faster.
There is nothing perfectly straight about this trellis. Instead, there’s texture, the smell of aged wood, the feeling of history — and living shoots filling the space as if they always belonged there.
And it feels like we gave a second life not only to the wood but to an entire corner of our yard.
7. Horizontal Slat Trellis for Privacy and Style
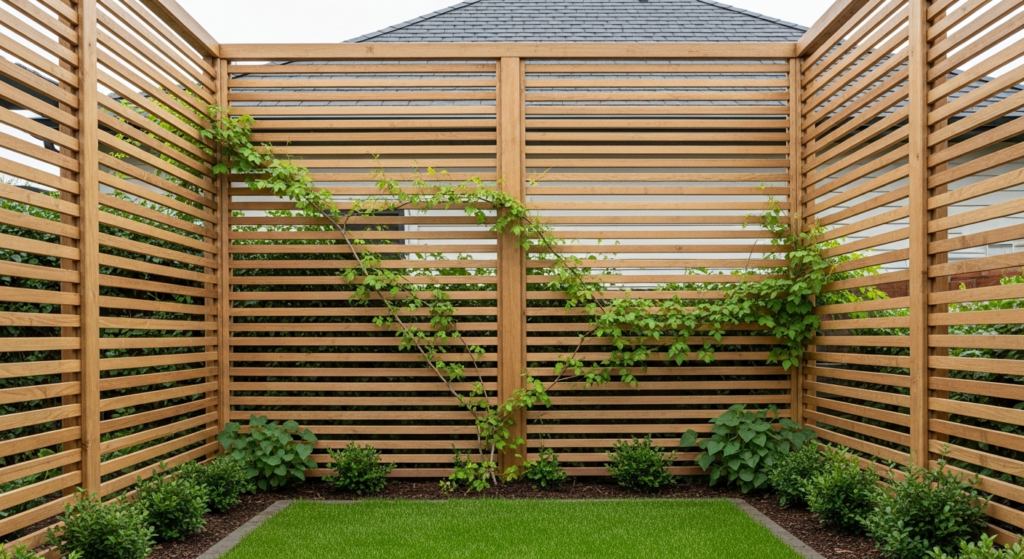
Horizontal slats are pure modern aesthetics. And when we built a structure from clean, even wooden lamellas — horizontal, simple — and let a light vine climb across it, the whole space felt deeper, calmer, more refined.
This kind of trellis works not only as support but as a design element that elevates the entire yard.
Why Horizontal Slats Work So Effectively
Horizontal lines create optical expansion — especially in narrow yards, near patios, and along side pathways.
Studies on spatial perception in garden design show that:
- horizontal lines visually elongate a surface
- they create soft privacy without a “boxed-in” feeling
- they help distribute sunlight across the plant more evenly
And a structure like this has a large surface exposed to the air — excellent ventilation, lower risk of disease for climbing plants.
Ready-made models like Enclo Horizontal Privacy Screen (Amazon) give a quick, clean result, but honestly, you can build one yourself.
Best Plants for This Style
Top choices:
- Star Jasmine (Trachelospermum jasminoides) — soft grip, never strains the slats.
- Climbing Hydrangea — moderate growth, creates beautiful planes.
- Lightweight clematis varieties — thin stems behave perfectly on wide boards.
- Evergreen Honeysuckle — wraps gently around the slats without adding weight.
Step-by-Step Build for a Horizontal Slat Trellis
- Determine the height and length of the structure. Most often you start with 6–7 ft (1.8–2.1 m) — enough to create privacy when sitting on a patio or in the yard.
Measure the area with a level, because on slopes horizontal lines can look “slanted.” - Install the vertical posts. Best choice: 4×4 cedar or treated pine posts buried 18–24 inches (45–60 cm) deep.
The accuracy of this step determines everything — if the posts tilt even half an inch, the horizontal lines will visually “drift.” - Prepare the slats. Ideal width: 1×3 or 1×4 (2.5–10 cm). Wider slats look more modern, narrower — more classic.
I always sand the edges lightly to give them a finished look and prevent snagging fabric or leaves. - Create a rhythm of gaps. This is the stylish part. Ideal spacing: ½–1 inch (1.2–2.5 cm).
Less — looks like a solid wall. More — you lose the privacy effect.
We use plastic spacers so every gap matches. - Attach the slats to the posts. Only galvanized or stainless-steel screws — they avoid streaks and corrosion.
Tip. Tack the slat with one screw, step back, look — and only then secure fully. - Add the vine and guide the first stems. Plant 12–18 inches (30–45 cm) from the structure.
Guide the first shoots diagonally — that helps you cover the area faster.
Use neat garden clips — they don’t ruin the look and can be removed instantly. - Finish with exterior oil or stain. Natural outdoor oil highlights the wood grain and protects it from moisture.
Horizontal structures show wood layers especially beautifully — one of those cases where “a little finish” makes a huge difference.
Clean lines create a backdrop where the plant becomes the main focus. This kind of element makes the yard not just green, but organized, stylish, and surprisingly private — even if there are several neighboring windows nearby.
8. Living Wall Trellis Featuring Climbing Roses

When we added a trellis for climbing roses, I realized nothing transforms a space quite like this does — even if the trellis itself is built from simple materials.
And once the roses start blooming, this “living wall” becomes the main stage of the entire yard.
Why Roses Are Perfect for a Living Wall
Climbing roses aren’t the tidy shrubs most people imagine. Biologically, they’re vines — they need support to reach their full potential of 8–12 ft (2.4–3.6 m) or more.
Research on rose growth physiology shows that:
- horizontal or fan-shaped training increases the number of flower buds
- good trellis ventilation reduces the risk of fungal diseases
- diffused light encourages even blooming across the entire height
A trellis becomes the ideal combination of structure and freedom: it sets direction while letting the plant express itself.
Best Climbing Roses for Vertical Growth
(these are the ones that performed best for us with minimal fuss)
- Rosa ‘Eden’ (Pierre de Ronsard) — large cream-pink blooms, looks like a vintage postcard.
- Rosa ‘New Dawn’ — vigorous, hardy, wonderfully fragrant.
- Rosa ‘Climbing Iceberg’ — masses of white flowers, even in cooler seasons.
- Rosa ‘Don Juan’ — deep red blooms, a classic for vertical plantings.
Step-by-Step Guide to Creating a Living Wall with Roses
- Choose the right location and lighting. Roses need 6–8 hours of direct sun.
If they get less, the blooms shift upward and the lower part of the wall stays bare.
We once placed a trellis too close to the barn’s shade — the roses tried their best but performed at maybe half their potential. - Install a strong vertical support. Trellis width: 3–5 ft (0.9–1.5 m). Height: at least 6–7 ft (1.8–2.1 m)
Mount it to a fence or posts with a 1 inch (2.5 cm) ventilation gap.
Climbing roses get heavy, so double-check the hardware — especially the top anchors. - Prepare the planting hole. Depth: 18 inches (45 cm). Width: 18–24 inches (45–60 cm)
Add compost, a bit of bone meal, and mix well.
Roses prefer loose, nutrient-rich soil and can’t tolerate standing water — drainage is essential. - Plant the rose and position the canes correctly. Plant 12–18 inches (30–45 cm) from the trellis so the roots don’t overheat near the support.
Spread young canes in a fan shape — this encourages blooming across the whole vertical.
Use soft ties or clips to secure them. - Create horizontals. One of the most important tricks for climbing roses:
the closer the cane is to horizontal, the more blooms it produces.
We train main canes at 30–45°, and some almost horizontal — then tie them in place.
Within a season, the entire structure becomes evenly covered with flowers. - Mulch and water properly. A 2–3 inch (5–7.5 cm) mulch layer keeps moisture in and cools the roots.
Water at the base every 5–7 days (more often in heat).
Never water overhead — roses dislike it, especially during active growth. - Light, consistent shaping. Remove thin, weak canes and guide the strong ones.
After the first bloom, trim spent canes lightly to encourage a second flush.
A living rose wall adds romance, depth, verticality, and that special feeling when the garden becomes more than just plants. It becomes a place where you want to drink morning tea, where the scent of roses lingers a little longer than seems possible.
9. PVC Frame Trellis for Low-Maintenance Greens
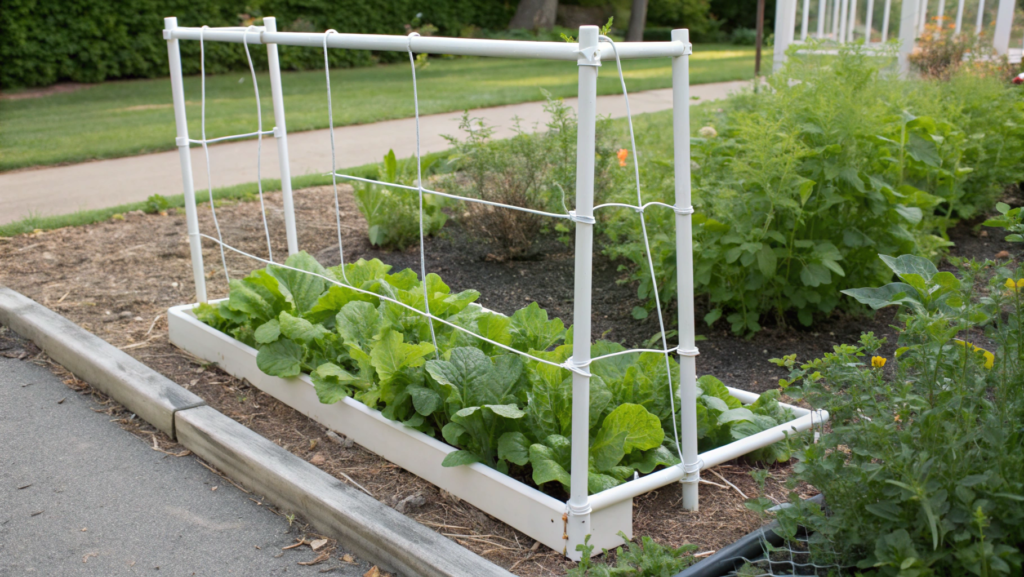
A PVC trellis is one of those rare cases where simplicity genuinely works in your favor. It’s lightweight, long-lasting, unaffected by moisture or temperature swings. We installed one next to our bed of greens — and honestly, it saved the entire area. It doesn’t rot, rust, warp, or demand attention. You can wipe it down or forget about it for a month. It will quietly keep doing its job.
And once soft vines begin climbing — sweet peas, mini cucumbers, or ornamental beans — this once-practical frame turns into a surprisingly elegant vertical accent.
Why PVC Is the Perfect Material for a “Low-Maintenance” Trellis
PVC stands up to moisture, UV exposure, and temperature fluctuations while staying lightweight and stable for years.
Its key advantages:
- Dimensional stability even in consistently damp conditions
- Resistance to fungal issues
- Low thermal conductivity, meaning it doesn’t overheat in direct sun the way metal does
If you want a structure you can install and… essentially forget about — this is the one.
Best Plants for a PVC Trellis
(and the ones that genuinely don’t demand much care)
- Sweet peas — light, fragrant, self-climbing
- Dwarf ornamental beans — quick growth, dense foliage
- Mini cucumbers (‘Bush Pickle’, ‘Spacemaster’) — look great on vertical supports
- Young honeysuckle ‘Halliana’ vines — add volume without the fuss
Step-by-Step: Building a PVC Trellis
- Prepare your pipes and fittings. Use ¾-inch or 1-inch (19–25 mm) PVC pipes — thinner ones bend in the wind.
Basic set: four verticals, four horizontals, eight corner fittings.
Tip. Peel off factory stickers with an alcohol wipe — the frame looks instantly cleaner. - Assemble the rectangular frame. Start with the top and bottom rectangles, then insert the vertical pipes.
For extra rigidity, add crossbars every 12–16 inches (30–40 cm).
A rubber mallet helps seat the fittings tightly. - Anchor the structure in the ground. Use metal stakes or rebar ⅜ inch (9 mm) thick:
- drive them 12 inches (30 cm) into the ground
- slide the bottom of the frame over the stakes
You’ll end up with a surprisingly stable structure even in windy spots.
- Add netting or twine. PVC is smooth — vines need texture to grip. Stretch plastic garden netting or jute twine spaced 4–6 inches (10–15 cm) apart.
For cucumbers, make the openings a bit wider. - Plant at the right distance. Ideal spacing is 6–8 inches (15–20 cm) from the trellis.
Sweet peas prefer cool roots, beans need steady watering every 3–4 days.
Mulch is essential, especially in sunny locations. - Guide the first tendrils. Soft vines appreciate a gentle hint:
wrap a couple of shoots around the twine and secure them with small clips. They take over from there.
A PVC trellis doesn’t need sanding, painting, touch-ups, or protection from the weather. It simply stands there and does its job.
And meanwhile, you get to focus on far more interesting garden projects — or just sit on the porch watching green shoots climb higher day after day.
10. Corner Trellis Screen for Outdoor Seating
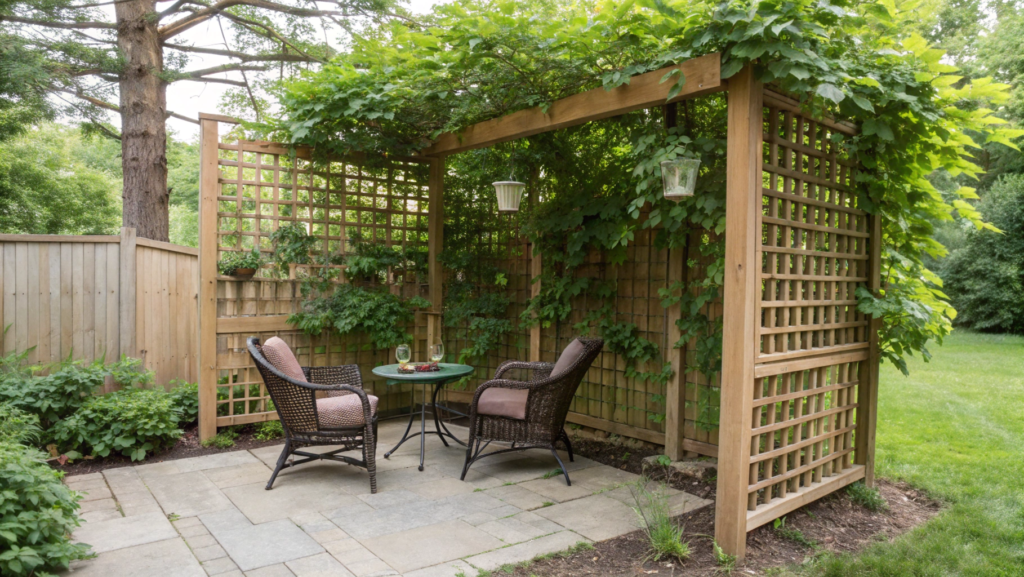
A corner trellis screen can revive a dead spot in the yard so quickly that the area starts to feel like a small outdoor room.
That’s exactly what happened by our old apple tree. The corner was useless — dark, awkward, with strange light during the day.
But once we put up a corner frame, planted a couple of vines, and added two chairs, Lindy said: “This is my spot now.”
And from that moment, it became our favorite place — where we drink tea in summer and sometimes have quiet dinners together.
Why a Corner Trellis Works So Well
Corner structures create visual boundaries without heavy walls. They give a sense of protection — the exact mood that makes a seating area feel comfortable.
Landscape psychology research indicates that partial enclosure:
- increases the feeling of privacy
- boosts comfort and the amount of time people stay in the space
- softens acoustics (corners diffuse sound more gently than flat fences)
In other words, you’re not just installing a support — you’re creating an outdoor room.
Best Plants for Corner Spaces
- Climbing Hydrangea — loves partial shade, forms soft vertical planes
- Evergreen Honeysuckle ‘Halliana’ — guaranteed fragrant summer evenings
- Star Jasmine — behaves beautifully in corners and covers panels quickly
- Clematis ‘Polish Spirit’ — adds color without overwhelming the space
Step-by-Step: Building a Corner Trellis Screen
- Identify the planting point and angle. A perfect angle is 90°, but slight variations are fine if the fence isn’t perfectly straight.
Measure both sides — sometimes they differ, and the trellis should follow what looks visually balanced rather than strict symmetry. - Install the support posts. A corner structure requires two posts set 18–24 inches (45–60 cm) deep.
I always double-check vertical alignment — even a small tilt ruins the sense of a “clean” corner. - Assemble the frames for both sides. Use wood, metal, or composite.
- Height: 6–7 ft (1.8–2.1 m)
- Width of each panel: 3–4 ft (0.9–1.2 m)
Horizontal or vertical slats both work, though vertical lines usually make a seating area look taller and more open.
- Join the panels at the correct angle. Use metal brackets or dedicated corner connectors.
Important: the panels must be rigidly connected with no wobble, or the wind will shake the entire structure.
We once tried building a corner with just standard screws — the first gust of wind made it swing like a barn door. - Add a top beam. Not required, but very stylish.
A simple decorative beam visually finishes the corner and ties both panels together. - Plant a vine 10–12 inches (25–30 cm) from one side. The vine will naturally expand across both planes if guided for the first 2–3 weeks.
Mulch the roots to keep the soil cool and moist. - Shape the growth structure. In a corner, guide stems diagonally — otherwise they bunch into the inner point instead of spreading.
- Add seating and check light conditions.
Corner trellises are perfect as a backdrop for a small table and two chairs.
If the area is shaded, hanging solar lights work beautifully.
A corner trellis is the kind of place that invites you to slow down and exhale. When the plants begin to cover the panels, the corner turns into a green cocoon where you naturally want to spend long summer evenings.
Create Your Own Corner
Any of these trellises isn’t just a pretty visual. It’s a working tool that truly improves the space: it makes the yard more private, simplifies plant care, helps you use narrow areas efficiently, and adds structure to the entire site.If you want, you can write in the comments what exact problem you need to solve on your property — blocking the neighbor’s windows, defining a corner, creating shade, boosting visual accents? I’ll tell you which of the described designs will work best or suggest an alternative that fits your conditions.