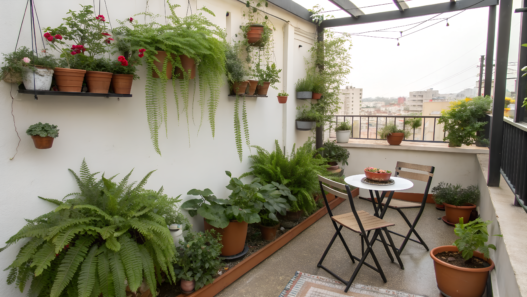

A small balcony is not a limitation. And when it comes to small balcony garden decor ideas, it becomes especially clear: the “more of everything at once” approach does not work here. What matters is logic and the feeling that the space is actually being used, not just styled.
In this article, I’ve put together 10 ideas that we’ve tested many times in real life — first on our tiny apartment balcony, and later in larger transitional spaces. These are practical solutions that help make a balcony comfortable, stable, and visually cohesive.
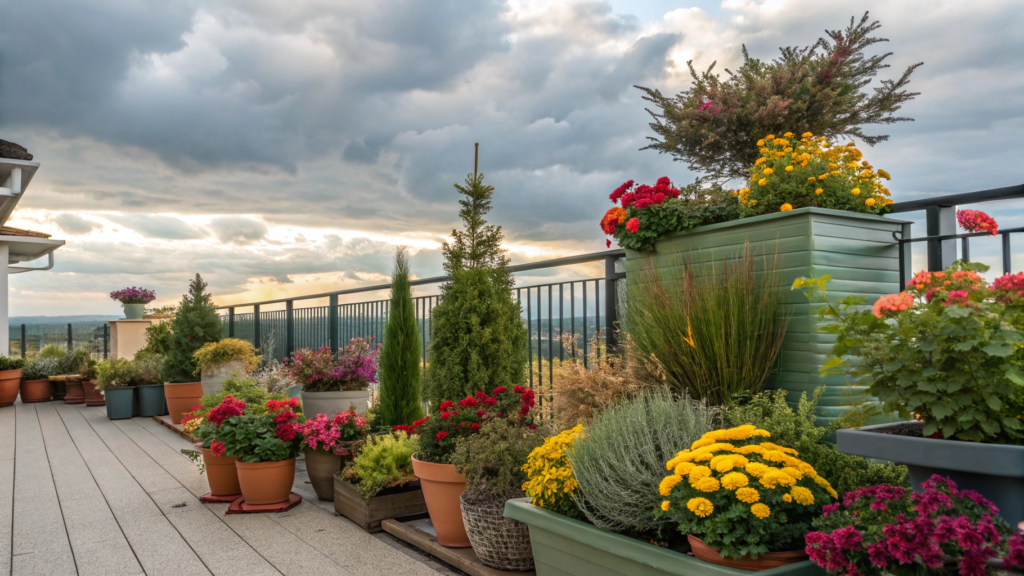
Light, textures, vertical elements, functional zones, water, and plants — all of this can be implemented even on just a few square feet, as long as you understand why each element is there.
1. Lanterns and Candlelight Among Planters
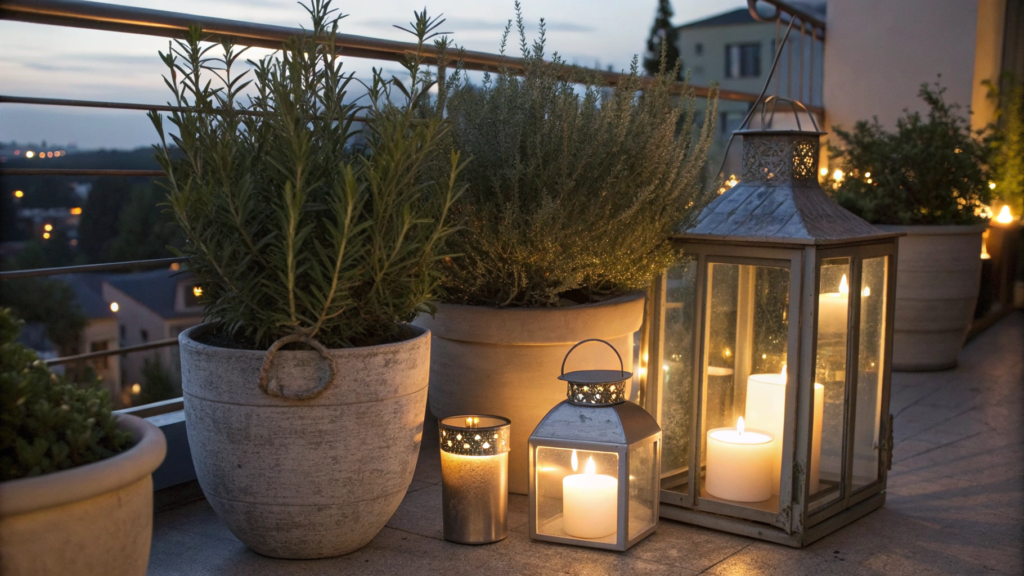
Lanterns and candlelight among planters are one of the simplest ways to make a small balcony feel truly livable.
At first, candles felt unnecessary, almost theatrical. And then one day, I placed a single metal lantern between two large rosemary planters. And yes, small details like this change the feeling more than a new piece of furniture ever could.
What really works well:
- Floor lanterns 18–24 inches tall (45–60 cm) — they don’t get lost among plants and still don’t feel bulky
- Candles about 3 inches in diameter (7–8 cm) — stable, safe, and visually balanced
- Metal or glass lanterns with ventilation — the flame burns more evenly and doesn’t go out with a light breeze
I almost always place lanterns directly inside a group of containers. For example, between a terracotta pot with bay laurel and a ceramic planter with a fern. Everything works as one composition, not a collection of separate objects.
How to place lanterns and candles on a balcony so it looks natural
- Start with the plant group, not the light. Put together a cluster of 3–5 containers at different heights. A lantern always looks better when it’s not “performing solo.”
- Place the largest lantern on the floor, closer to a wall or railing. Leave at least 6–8 inches (15–20 cm) of space around it so the light doesn’t press into the leaves or feel heavy.
- Add a second level of light. A wooden crate, a low stand, or a stool about 10–12 inches high (25–30 cm) works well. This adds depth and visual rhythm.
- Partially tuck smaller candles into the greenery. Let the light filter through the leaves instead of standing on its own. This makes the balcony feel more cohesive.
- Avoid symmetry. Slight asymmetry always looks more natural and comfortable than lanterns lined up in a row.
We use a classic metal lantern with tempered glass, designed for a standard pillar candle. It handles rain and temperature changes without any issues Decorative Outdoor Metal Lantern with Tempered Glass Panels
For everyday evenings, I often replace real flames with warm white LED candles. They’re calm, predictable, and don’t require constant attention. I use real candles less often — mostly when we’re actually sitting on the balcony and can keep an eye on the fire.
A few rules I always follow: I don’t place candles closer than 4–6 inches (10–15 cm) to foliage, I only use stable lanterns with closed sides, I never leave fire unattended, and on a wooden floor I always place the lantern on a metal or stone base. Beautiful and safe at the same time.
A balcony with lanterns among plants stops being just decor and starts working as a fully functional outdoor living area. The light makes the space usable in the evening, highlights the plantings, and visually pulls the entire balcony together.
2. Color-Coordinated Cushions and Potted Plants

Color-coordinated cushions and potted plants are a technique that works especially well in apartments where space is limited and every detail needs to support the space, not compete with it.
I ignored textiles on the balcony for a long time. But as soon as I started matching them to the color of the foliage and containers, the balcony began to look cohesive and intentional.
What actually works when choosing colors:
- One base color that already exists in the plants (sage green, olive, terracotta, warm gray)
- 1–2 supporting shades in cushions or throws
- Matte fabrics — they feel closer to nature and don’t fight with the leaves
I often start with the foliage. For example, if there are many gray-green plants on the balcony (lavender, eucalyptus, sage), I choose cushions in muted green or linen tones. If darker green dominates, I add a soft contrast: cream, sand, or warm beige.
How to build a color composition with cushions and pots
- Choose the main plant color.
Look at the foliage, not the flowers. This is the most stable element. Is the green cool or warm? Closer to olive or emerald? The entire balance depends on this. - Match cushions to plants, not furniture.
Even if the chair is black or gray, it’s better to visually “tie” the cushions to the pots and leaves. This makes the balcony feel like a single space rather than a set of objects. - Repeat each color at least twice.
If a cushion has a terracotta tone, it should appear somewhere else too — in a clay pot, a stand, or even a small decor detail. A lone color always feels accidental. - Don’t mix more than three shades in one zone.
A small balcony gets overwhelmed quickly. One base color plus two accents is more than enough to keep the space calm. - Texture matters more than pattern.
I almost always choose cushions without bold prints: linen, cotton, coarse weaves. They pair better with plants and don’t distract from the greenery.
For open balconies, I use outdoor cushions that aren’t afraid of moisture or sun exposure. For example, Outdoor Patio Seat Cushions with Fade Resistant Fabric
In the end, cushions stop being just a “soft detail.” They begin to connect plants, furniture, and space into a whole, and the balcony looks intentional even without complex decor.
3. Hanging String Lights to Enhance Greenery
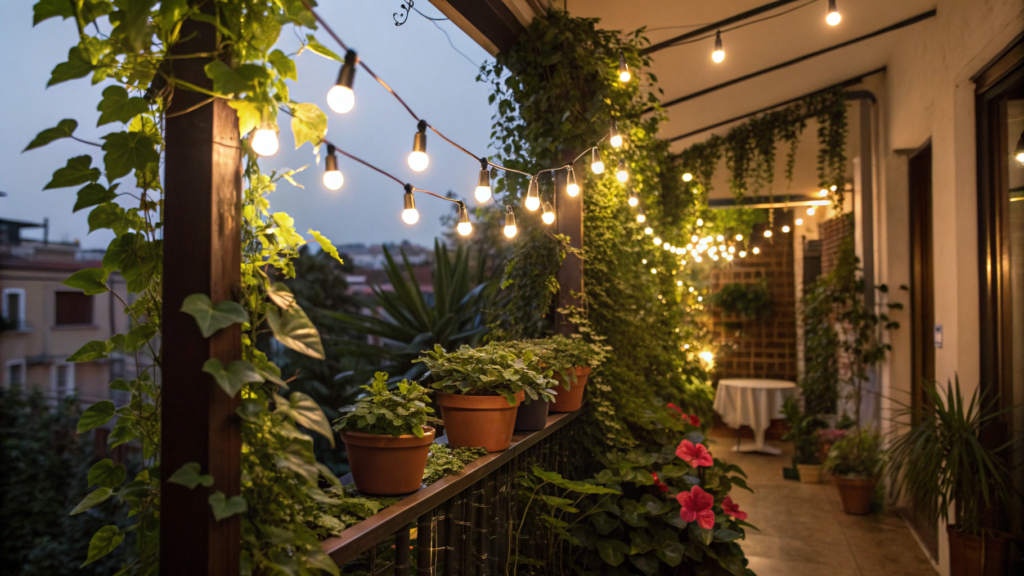
Hanging string lights to enhance greenery can either highlight plants and make a balcony feel alive in the evening, or turn into a chaotic web overhead. The difference comes down to details and placement.
It’s important to understand that string lights are not ceiling lighting, but a tool for working with greenery. They should highlight the leaves, not just hang there for brightness.
What matters when choosing string lights:
- Warm light (2700–3000K) — it doesn’t distort leaf color and feels soft
- Outdoor-rated string lights with moisture protection — especially important for open balconies
- Dark or neutral-colored wire — it visually disappears among plants
- Small bulbs (usually 1–1.5 inches in diameter, 2.5–4 cm) so the light doesn’t feel harsh
I almost never use bright bulbs or cold light. Greenery under that kind of lighting looks flat and “plastic.” Warm light, on the other hand, brings out leaf texture and creates depth.
How to hang string lights so they enhance plants instead of distracting from them
- Start by identifying the area with the most greenery.
The string lights should run above or in front of plants, not through the center of the balcony. I always ориент myself toward the densest cluster of containers or vertical greenery. - Hang the lights at a height of 6–7 feet (1.8–2.1 m).
This is a comfortable height: the light doesn’t hit your eyes, and the leaves fall into soft, side lighting. - Don’t pull the wire into a perfectly straight line.
A slight sag between attachment points looks more natural and visually supports the organic shape of plants. - Light the edges, not the center.
When light runs along railings, walls, or near hanging planters, greenery feels more dimensional and the space feels deeper. - Combine string lights with live or faux vines.
When lights run alongside ivy, hoya, or even artificial greenery, they stop feeling like a separate object and become part of the composition.
For balconies, I most often use LED string lights with a soft warm glow, designed specifically for outdoor use. They barely heat up, which is especially important near foliage, and they run reliably all season.
As a result, string lights begin to work as a background for plants, making them visible even in the evening — without extra decor or visual overload.
4. Outdoor Rugs with Garden-Inspired Motifs
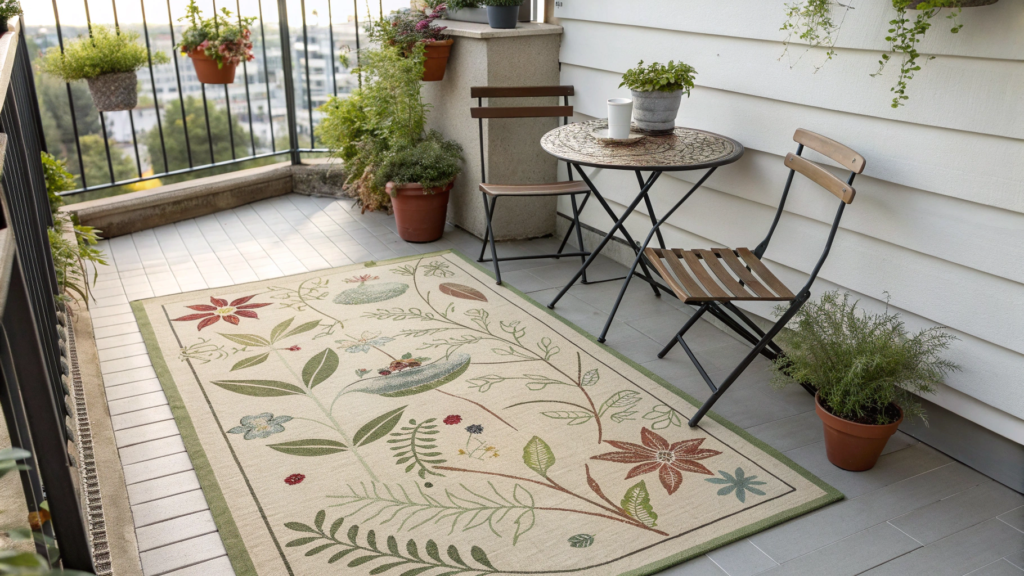
An outdoor rug on a balcony can feel like something purely “indoor,” not fully meant for outside. But the moment it appears under your feet, the balcony immediately stops feeling like a pass-through space.
A rug anchors the composition from the ground up and connects furniture, containers, and textiles into a single whole. This is especially important on small balconies, where every element needs to work toward a shared sense of order.
What matters when choosing a rug:
- Outdoor-rated material — polypropylene or recycled plastic that isn’t afraid of moisture
- Low pile or flat weave — easier to clean and faster to dry
- Calm, garden-inspired patterns — leaves, branches, or nature-driven geometry
- A size that defines the main seating area, not one that feels like a random mat
I almost always choose rugs with muted patterns. Bright ornaments quickly start competing with plants. Soft greens, terracotta tones, or sandy shades, on the other hand, support foliage and visually expand the space.
How to use an outdoor rug on a balcony so it actually works
- Define the zone the rug should anchor.
This is usually the area under chairs or a small table. The rug should be large enough that at least the front legs of the furniture sit on it — this makes the zone feel unified rather than scattered. - Choose a size with room to spare.
For compact balconies, rugs around 5×7 feet (1.5×2.1 m) work well. A rug that’s too small visually breaks up the space and loses its purpose. - Place some plants partially on the rug, not only around it.
One or two containers sitting directly on the rug help the composition feel intentional. Heavy ceramic or terracotta pots work especially well here. - Let the rug’s pattern support the plants, not copy them.
If you have lush greenery, go with a calmer design. If the plants are more minimal, the rug can afford to be slightly more expressive. - Think about drainage and maintenance.
I always leave small gaps between the rug and the walls so moisture can escape, and I lift the rug occasionally to let it dry. This greatly extends its lifespan.
For balconies, I use outdoor rugs that resist fading and can be cleaned easily with plain water. A well-chosen rug doesn’t pull attention to itself.
It simply structures the space, highlights the plants, and makes the balcony comfortable for everyday living.
5. Wooden Crates Reimagined as Planter Shelves
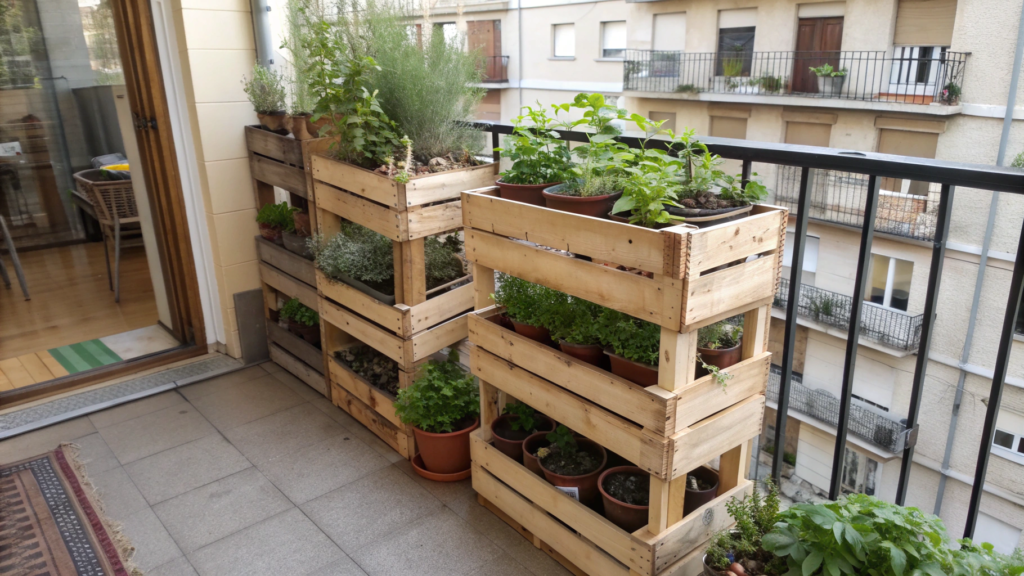
Wooden crates reimagined as planter shelves are extremely practical, especially on small balconies where every 12 inches (30 cm) of space matters.
This idea didn’t come from decor inspiration, but from necessity — when we had too many pots and not enough room. In the end, solutions like this are the ones that feel the most natural.
What to consider when choosing wooden crates:
- Natural wood or plywood without chemical treatment — especially important if edible plants will be nearby
- A depth of at least 10–12 inches (25–30 cm) so pots stay stable
- A solid, sturdy build with no wobble — the crate needs to hold the weight of plants and wet soil
- An open front — plants look lighter, and access is much easier
I often use crates in their natural state, without paint. Over time, the wood darkens slightly, and that works beautifully with greenery. Sometimes I apply a thin layer of outdoor oil — that’s usually enough for protection.
How to use wooden crates as planter shelves
- Define the function of each crate.
One for herbs, another for decorative plants, a third for seasonal accents. When each level has a purpose, the composition doesn’t feel chaotic. - Stack crates in a staggered layout.
If you build vertically, shift each crate by 4–6 inches (10–15 cm). This adds visual movement and gives plants better access to light. - Secure crates if you go higher than three levels.
Even on a balcony, safety matters. I use simple L-brackets or wall anchors, especially when the structure exceeds 36 inches (90 cm) in height. - Add drainage protection.
I place a saucer or a thin plastic mat under each pot. Wood and constant moisture don’t mix well without protection. - Mix pot sizes.
Smaller containers work better on upper shelves, heavier ones belong at the bottom. This keeps the structure visually balanced and physically stable.
Wooden crates are also great because they’re easy to move around. Today they’re plant shelves, tomorrow they can hold a lantern or store small gardening tools.
In the end, these shelves work as a flexible system for storage and greenery, one that can be adjusted to the season, the number of plants, and real-life needs — not abstract decor ideas.
6. Macrame Plant Hangers for Vertical Displays
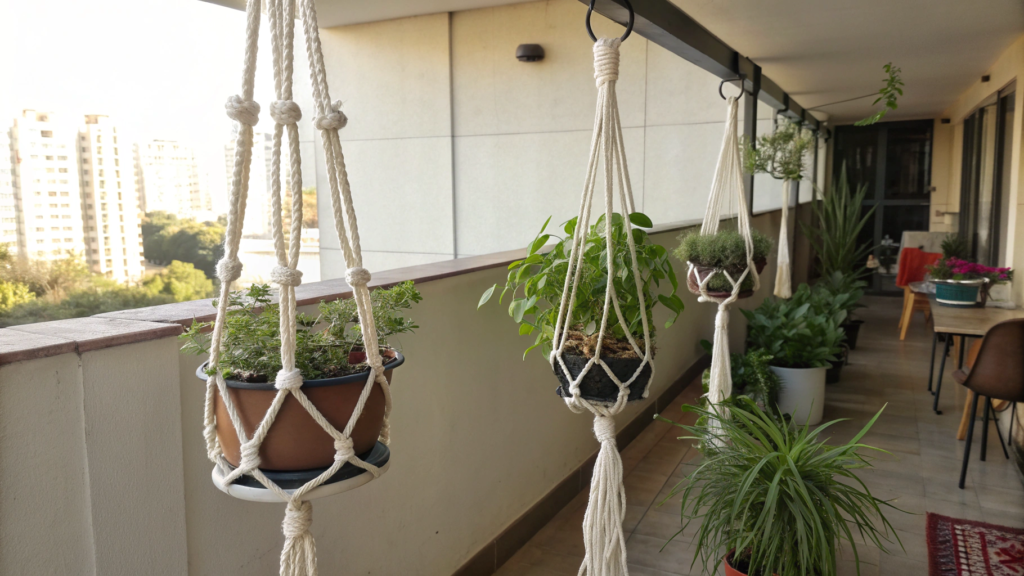
Macrame plant hangers for vertical displays are a neat way to use balcony height when the floor is already taken up by pots, crates, and furniture.
I like macrame not for the “boho vibe,” but for its practicality. Hanging plants free up space below, improve air circulation, and allow light to spread more evenly. Plus, plants at eye level always look better.
What to consider when choosing macrame hangers:
- Natural cotton cord — it looks softer and pairs better with plants
- A length of 36–48 inches (90–120 cm) — ideal for balconies with standard ceiling height
- Simple knotting without excess detail — greenery should be the main focus
- A strong top ring or loop — especially important for ceramic pots
I try to avoid overly thin or decorative models. When a plant grows and the pot gets heavier, the hanger shouldn’t look like a temporary solution.
How to use macrame hangers on a balcony
- Start with one hanging plant.
Even a single macrame hanger creates a vertical accent. Too many at once can make the space feel crowded. - Hang plants at eye level or slightly above.
The ideal height is when the bottom of the pot sits around 60–66 inches (150–168 cm). This makes the plant easy to care for and visually clear. - Choose light or medium-weight pots.
Plastic, coconut fiber, or lightweight ceramic work best. Heavy containers pull on the hanger and tend to look awkward. - Use macrame near vertical greenery.
Ivy, philodendron, hoya, or tradescantia look especially good when their leaves can hang freely and overlap with other plants. - Leave space between hangers.
At least 10–12 inches (25–30 cm) between pots allows plants to grow without competing for light and air.
For balconies, I usually choose simple cotton macrame hangers designed for standard pots 6–10 inches in diameter (15–25 cm). For example, a versatile option like Cotton Macrame Plant Hanger for Indoor and Outdoor Use
Macrame works well because it’s easy to move, remove, or add seasonally.
It helps place more plants without turning the balcony into a storage area for pots.
7. Accent Tables Surrounded by Container Gardens
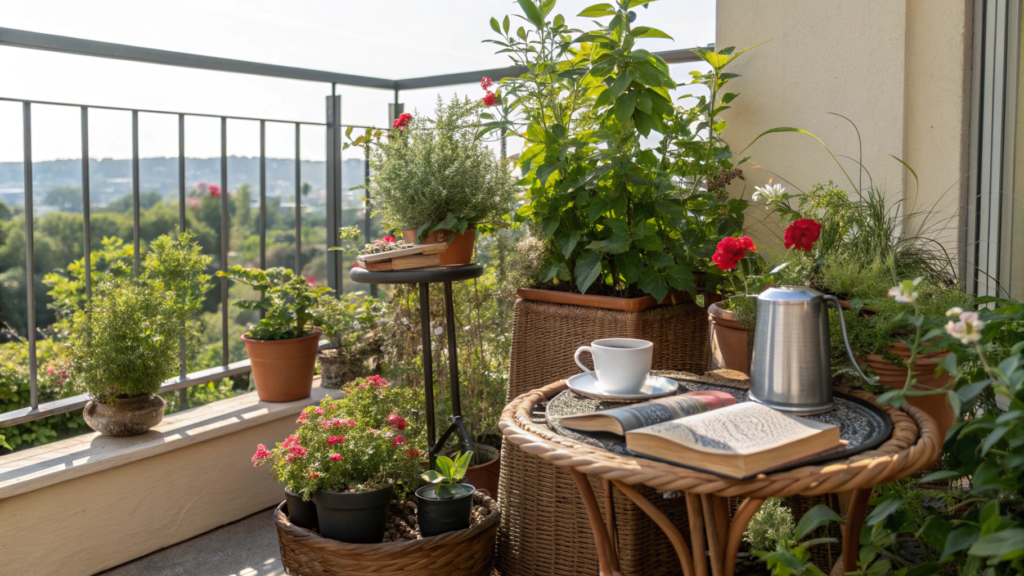
Agree — a small table among plants instantly sets the tone for the entire balcony. It becomes a place where you can set down a cup of coffee, a book, or a watering can without thinking about where it all goes.
I went without a table for a long time, thinking it wasn’t necessary. But once it appeared, everything became clear: plants next to a small table start to feel like a living environment, not just a display.
What to consider when choosing an accent table:
- A compact diameter of 12–18 inches (30–45 cm) — the table doesn’t eat up space
- Outdoor-ready materials: coated metal, treated wood, or composite
- A stable base — especially important near pots and damp soil
- A simple shape — so the table doesn’t compete with plants
I prefer tables with a minimal design. They blend easily into the greenery and don’t pull attention toward themselves.
How to place an accent table among container plants
- Choose the table’s location first, then build the plants around it.
The table is the center of the composition. Place it where you’ll actually use it, and only then arrange the pots around it. - Surround the table with containers of different heights.
Lower pots near the base, taller ones to the sides. A height difference of 6–12 inches (15–30 cm) creates depth and a sense of enclosure. - Leave working space.
There should be at least 8 inches (20 cm) between the table and the nearest pot so you can comfortably set down a cup or a book without brushing leaves. - Use the table as an extra surface.
You can place a small herb pot, a lantern, or a watering can on it. The key is not to overload the surface and leave room for everyday use. - Choose plants with similar needs.
If the table sits in shade, surround it with shade-tolerant plants. This simplifies care and keeps the composition stable.
As a result, the table becomes a functional anchor within the garden, around which greenery and everyday balcony life naturally come together.
8. Water Features in Compact Corners
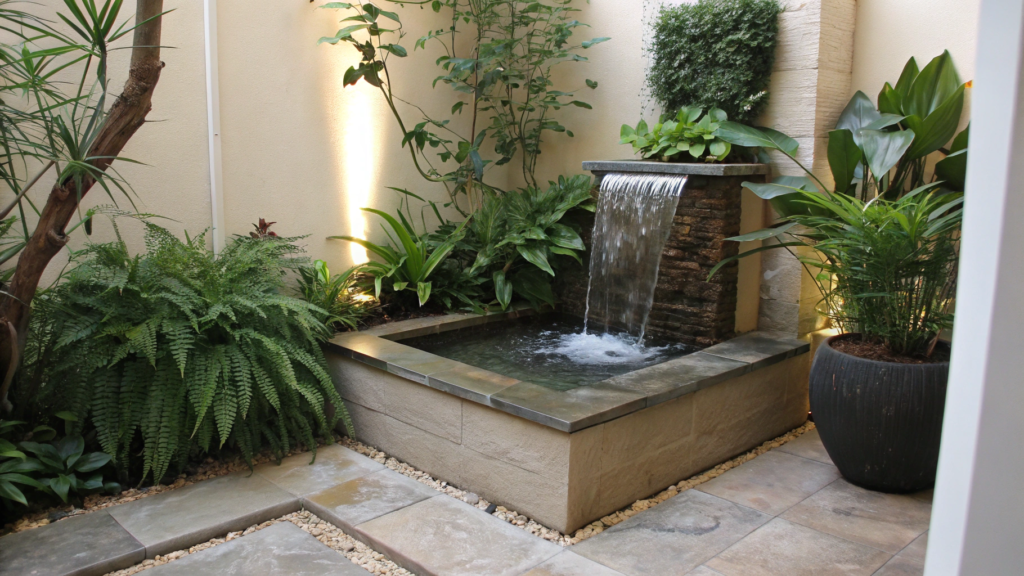
Water features in compact corners work best when a small water source is not the central element. Its role is to function in the background: sound, light reflection, and gentle water movement next to plants.
Despite my initial concerns, a compact water feature takes up less space than an extra planter and brings far more value to the atmosphere and microclimate.
What to consider when choosing a water feature:
- Compact size — usually a bowl or fountain 10–14 inches in diameter (25–35 cm) is enough
- Closed water circulation — no constant refilling
- Low noise level — the water should whisper, not hum
- Outdoor-suitable materials: ceramic, stone, or durable composite
I especially like models with a soft, continuous water flow. They don’t demand attention, but they create a clear sense of life and movement.
How to integrate a water feature into a balcony corner
- Choose the quietest corner.
Areas near a wall or railing work best, where there’s no active foot traffic. Water should act as a background element, not an obstacle. - Place the water feature on a stable base.
A stone tile, concrete stand, or heavy tray helps prevent tipping and protects the floor. A base height of 4–6 inches (10–15 cm) is usually sufficient. - Surround the fountain with moisture-loving plants.
Ferns, sedges, hostas (in containers), or ornamental grasses complement water features well and soften their shape. - Leave access for maintenance.
There should be at least 6–8 inches (15–20 cm) between the fountain and the nearest pot so you can easily refill water or clean the pump. - Use safe power connections.
Only use outdoor-rated pumps and moisture-protected outlets. It’s best to hide the cable along the wall or under containers.
For small balconies, I choose tabletop or corner fountains with a recirculating water system. They’re easy to maintain and don’t require complicated installation. A practical outdoor option with a quiet pump, Small Outdoor Tabletop Water Fountain with Recirculating Pump
A well-integrated water feature works as part of the balcony ecosystem — adding movement, softening the space, and making the seating area more stable and balanced.
9. Layered Textures with Rattan Furniture and Pots
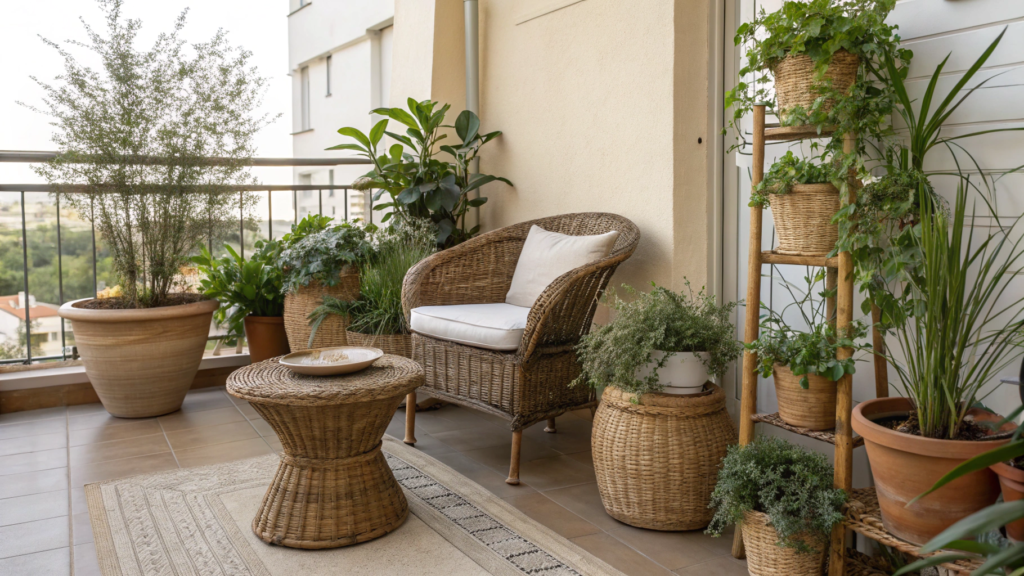
When space is limited, textures are what create depth. Rattan, woven planters, and living greenery work like layers — things you want to look at, not just use.
I noticed a clear pattern: when a balcony has plenty of plants but all the materials are the same, the space feels flat. Add rattan, and volume appears. It softens lines, adds tactility, and pairs naturally with foliage.
What to consider when choosing rattan and pots:
- Natural or high-quality synthetic rattan designed for outdoor use
- Matte finishes without gloss — visually calmer
- Contrast in textures, not colors
- Stable, weighted pots so the composition feels grounded
How to create layered texture with rattan and pots
- Start with one large rattan piece.
This could be a chair, a bench, or a compact sofa about 24–30 inches wide (60–75 cm). It sets the scale for the entire area. Warm neutral tones work best so the rattan doesn’t compete with greenery. - Add pots with contrasting surfaces near the furniture.
Smooth ceramic, terracotta, or concrete highlights woven textures well. Place them 4–6 inches (10–15 cm) from the furniture — close enough for the materials to “talk,” but not interfere. - Build the composition in layers, not a straight line.
Furniture first, then medium containers beside or behind it, followed by smaller ones. A height variation of 6–12 inches (15–30 cm) adds depth and visual movement. - Repeat the woven texture at least twice.
If there’s a rattan chair, add a woven planter or basket. Repetition makes the setup feel intentional rather than random. - Keep the color palette limited.
I stick to a simple rule: no more than three main shades. Let colors stay calm and act as a background for plants.
For balconies, I most often use synthetic rattan furniture that stands up well to moisture and sun. Thoughtfully layered textures make a balcony feel deep, warm, and functional, even when space is tight and decor is minimal.
10. Seasonal Decor Accents Mixed With Perennials
Seasonal decor accents mixed with perennials are a technique that lets a balcony look alive all year round without constantly rearranging plants. The balcony changes, but it doesn’t require starting from scratch every season.
Moving pots around, replanting, or buying new containers every few months is tiring and pointless. Replacing a few accents, on the other hand, is easy and enjoyable.
What to consider when combining perennials with seasonal decor:
- Perennials as the background — they set the structure and stay in place
- Seasonal elements that are light and mobile — easy to remove or swap out
- A neutral base in pots and furniture
- Accents that don’t interfere with plant care
How to combine seasonal decor with perennials
- Choose resilient perennials as your base.
Plants that hold their shape well in containers work best: lavender, ornamental grasses, boxwood, dwarf conifers. They stay visually stable for most of the year. - Place seasonal decor closer to eye level.
Small wreaths, lanterns, signs, or textiles work better when they’re easy to notice. A height of about 48–60 inches (120–150 cm) is ideal. - Use seasonal elements in limited amounts.
One or two accents per zone is enough. Too much temporary decor makes the balcony feel cluttered and pulls attention away from the plants. - Repeat the seasonal accent color at least once.
If you add a terracotta or copper element in fall, support it with a pot, cushion, or small detail. This makes the decor feel intentional rather than random. - Choose weather-resistant decor.
Even temporary elements should be designed for outdoor use. This removes constant worry and unnecessary moving.
For seasonal updates, I often use outdoor decor accents that are easy to rearrange and store. For example, small metal or ceramic pieces made for balconies.
This approach lets the balcony change with minimal effort. Perennials keep the structure, and seasonal decor adds a sense of freshness — practical, flexible, and without constant reworking.
A Balcony That Lives With You
A good balcony doesn’t need constant redesigns. It should be put together in a way that easily adapts to seasons, weather, and real life. When lighting is integrated into greenery, furniture doesn’t compete with plants, and decor can be swapped in small doses, the space starts working effortlessly.
A practical balcony isn’t one where everything is perfectly arranged. It’s one where you can set down a cup, water your plants, turn on the lights in the evening, and not think about anything getting in the way or feeling out of place.If even one idea from this article helps make your balcony more comfortable, then it worked. Share that in the comments — I’d genuinely love to hear about it.