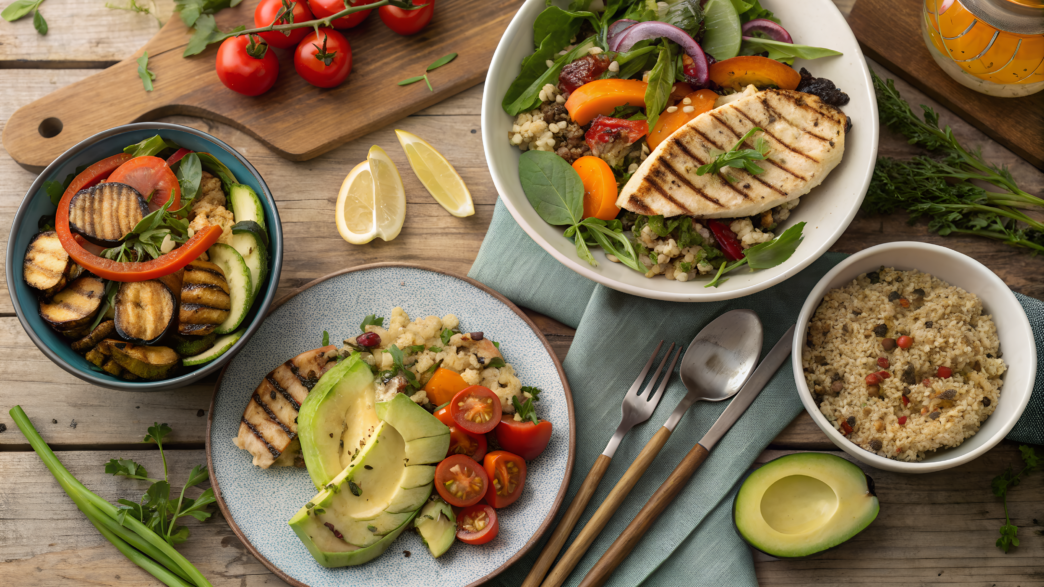
When it comes to healthy dinner recipes, everything usually looks right on paper, but in real life these dinners rarely stick around for long. You cook them a couple of times, then drift back to familiar meals, because food needs to do more than just fit the rules — it also has to bring real enjoyment.
Here you’ll find healthy dinners without complicated techniques, without hard-to-find ingredients, and without the feeling that you’re forcing yourself every evening. Vegetables, legumes, spices, and cheeses are used intentionally — not as side notes, but as the foundation of flavor. These are meals that feel satisfying, don’t feel heavy, and have proven themselves in a normal weekday routine.
I kept coming back to these healthy dinner recipes, tweaking details, simplifying steps, and adjusting them to the season and available ingredients. In the end, only the versions that turn out consistently well and don’t get boring stayed on the list.
1. Carrot Ginger Lentil Soup with Turmeric
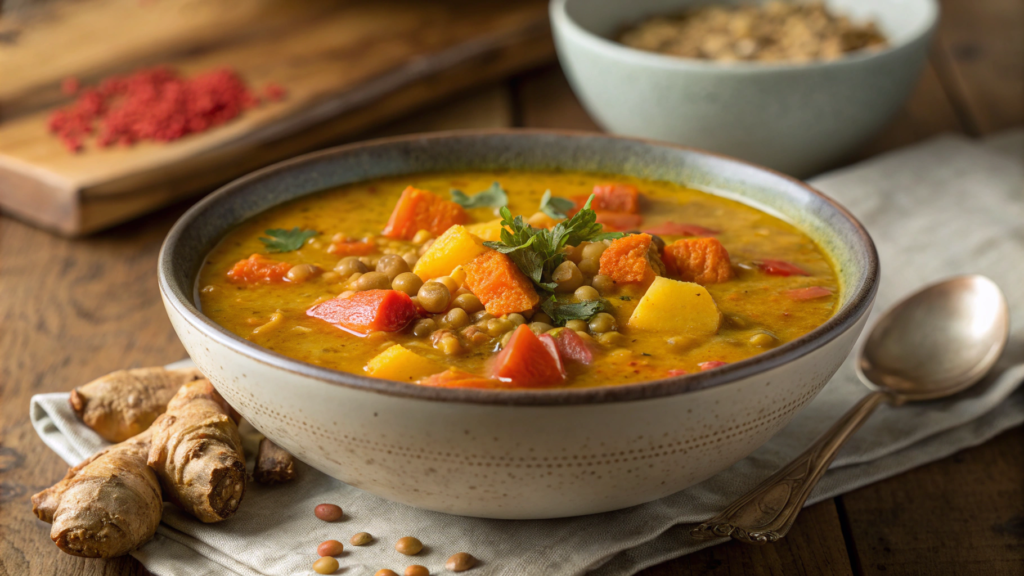
I make this soup most often when carrots are no longer watery, but firm and sweet, with real flavor instead of something meant “just for salad.” Red lentils handle several things at once here — they add body, plant-based protein, and texture without any cream. Ginger and turmeric bring warmth and spice, but the soup never turns sharp or overwhelming.
Turmeric contains curcumin, which is still being actively studied, and that’s why turmeric shows up so often in conversations about nutrition. Ginger is more familiar in that sense: it’s been added to food for a long time not “for an effect,” but because it pairs well with dishes and usually feels comfortable as part of an everyday diet.
Ingredients (serves 4)
- 2 tbsp olive oil (≈ 30 ml)
- 1 medium yellow onion, finely chopped
- 4 large carrots, sliced into rounds (≈ 450–500 g)
- 1 tbsp freshly grated ginger
- 1 tbsp ground turmeric
- 1 tsp ground cumin
- 1 cup red lentils, rinsed (≈ 190 g)
- 5 cups vegetable broth (≈ 1.2 l)
- 1 cup coconut milk (≈ 240 ml)
- salt, to taste
- freshly ground black pepper
- juice of half a lemon
How to Cook
- Heat the olive oil in a heavy-bottomed pot. Add the onion and cook over medium heat for about 6–7 minutes, until soft and translucent. Don’t brown it — sweetness matters more than color here.
- Add the carrots, ginger, turmeric, and cumin. Stir and warm everything for 1–2 minutes. The spices should bloom in the oil, and the aroma will noticeably intensify.
- Add the lentils and pour in the vegetable broth. Bring to a boil, then reduce the heat and simmer for 20–25 minutes. Both the carrots and lentils should be completely soft, with no resistance.
- Blend the soup to your preferred texture. I usually go fully smooth with an immersion blender, but sometimes leave a few small pieces — it depends on the mood.
- Add the coconut milk, lemon juice, salt, and pepper. Stir, warm for a couple more minutes, and taste. The lemon is important here — it helps balance the flavor.
This soup can be served very simply — hot, without anything extra — and it still feels like a complete healthy dinner. Sometimes, though, I want a bit more texture or contrast. That’s when I add a spoonful of plain yogurt or coconut cream straight into the bowl.
If a light crunch sounds good, lightly toasted pumpkin or sunflower seeds work well, while fresh cilantro or parsley adds brightness and makes the bowl feel more alive.
And there’s almost always warm sourdough bread nearby. Not as a side, but as a natural part of the meal. The next day, the soup tastes even more developed, which is why I often make enough for two dinners.
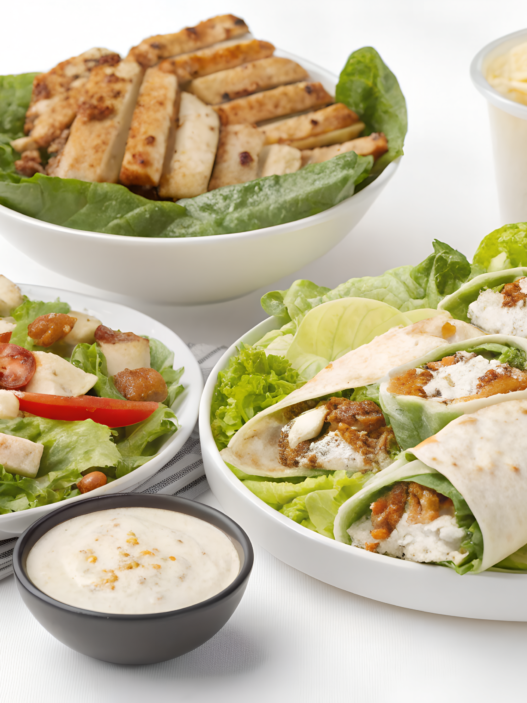
2. Crispy Chickpea & Kale Caesar Wraps

There was a time when I got tired of all the “healthy” food and started craving real crunch, proper flavor, and the feeling of a full dinner instead of a compromise. That’s how these wraps with roasted chickpeas and kale in a Caesar-style setup showed up in our kitchen.
Chickpeas here are not a meat substitute. They simply roast well, turn dense and crispy, especially if you don’t hold back on spices and give them enough time in the oven. Kale has to be massaged with the sauce, otherwise it stays tough and boring. Tested.
Ingredients (for 4 wraps)
For the chickpeas:
- 2 cans chickpeas, drained and rinsed (≈ 450 g cooked)
- 1.5 tbsp olive oil (≈ 22 ml)
- 1 tsp smoked paprika
- 1/2 tsp garlic powder
- 1/2 tsp salt
- freshly ground black pepper
For the filling:
- 4 cups chopped kale without tough stems (≈ 120–150 g)
- 1/3 cup grated Parmesan (≈ 30 g)
- 4 large wraps or tortillas
Sauce:
- 1/3 cup thick Greek yogurt (≈ 80 ml)
- 1 tbsp Dijon mustard
- 1 tbsp lemon juice
- 1 small clove garlic, very finely minced
- 2 tbsp olive oil
- salt to taste
If chickpeas turn out soft instead of crispy, the problem is almost always spices and temperature. I use Simply Organic Smoked Paprika — it gives an aroma that stays even after roasting, and the chickpeas don’t get lost inside the wrap.
How to Cook
- Preheat the oven to 425°F (≈ 220°C). High heat matters here — chickpeas need to roast, not steam.
- Dry the chickpeas and coat them with spices. After rinsing, make sure to pat them dry with a towel. Add oil, paprika, garlic powder, salt, and pepper, and mix well so every chickpea is coated.
- Roast the chickpeas for 25–30 minutes. Spread them in a single layer and stir once about halfway through. By the end, they should be dense and nicely browned.
- Make the sauce. In a bowl, mix yogurt, mustard, lemon juice, garlic, olive oil, and salt. The sauce should be thick but still pourable.
- Prepare the kale. Transfer the kale to a large bowl, add a couple of tablespoons of sauce, and massage with your hands for 30–40 seconds. The leaves will soften and darken — that’s exactly what you want.
- Assemble the wraps. Spread the kale on the wrap, add warm chickpeas, sprinkle with Parmesan, and roll tightly so the filling stays inside.
Tip. To keep chickpeas crispy longer, let them sit on the baking sheet for a couple of minutes after taking them out of the oven instead of transferring them straight to a bowl. Steam escapes, and the texture improves.
These wraps are best eaten right away, while the chickpeas are still warm and crispy. I usually cut each wrap in half — it’s easier to eat and looks more put together. If I want to boost the flavor, I add a bit more grated Parmesan or a few drops of lemon juice right before serving.
The next day, the filling can be reused, but it’s better to assemble the wrap right before eating. That’s how the contrast of textures stays intact, which is the whole point of this dish.
3. Grilled Halloumi & Watermelon Salad
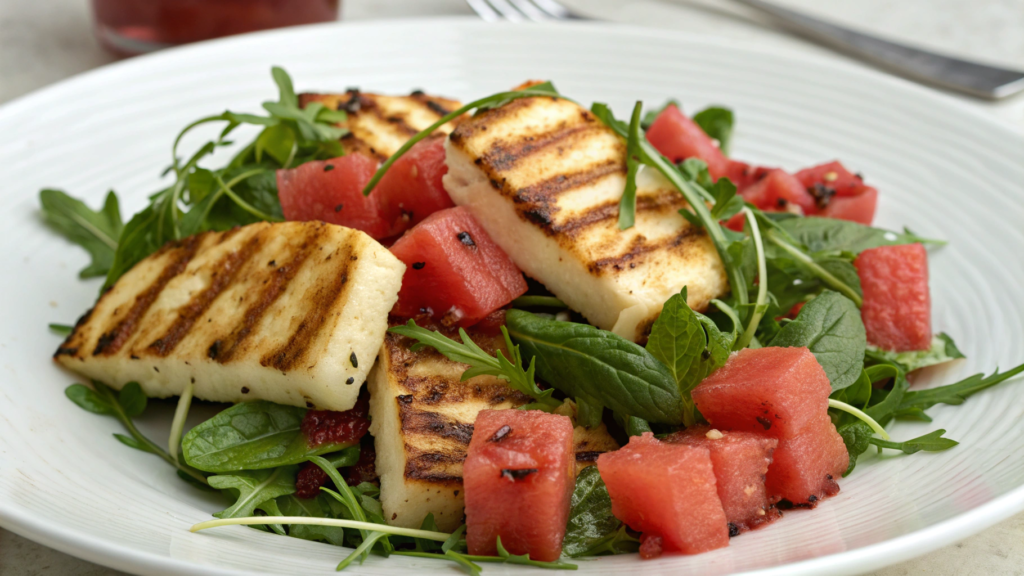
This salad looks light, but it’s actually quite filling thanks to the grilled halloumi. Halloumi is a good source of protein and calcium. Watermelon adds hydration and natural sweetness, while the greens contribute fiber. No promises of any “miracle effects” — just a balanced combination of ingredients that fits naturally into dinner.
Ingredients (serves 3–4)
- 8 oz halloumi, sliced (≈ 225 g)
- 4 cups watermelon, cut into large cubes (≈ 600 g)
- 3 cups arugula or mixed leafy greens (≈ 90 g)
- 2 tbsp olive oil (≈ 30 ml)
- juice of 1/2 lime or lemon
- freshly ground black pepper
- a few fresh mint or basil leaves
How to Cook
- Heat the grill or grill pan until properly hot. The surface needs to be fully preheated. If you place halloumi on a cold pan, it will release moisture and won’t brown properly.
- Prepare the halloumi. Cut the cheese into slices about 1 cm thick and brush them lightly with olive oil. This helps create a crust and prevents sticking.
- Grill the halloumi. Place the slices on the grill and don’t move them for the first couple of minutes. Once golden grill marks appear, flip and cook the other side. It usually takes 2–3 minutes per side.
- Prepare the watermelon and greens. Cut the watermelon into large cubes and, if it’s very juicy, gently drain off excess liquid. Rinse and dry the greens — extra moisture isn’t needed here.
- Assemble the salad base. In a large bowl, gently combine the watermelon and greens. Mix carefully to keep the pieces intact.
- Finish assembling. Place the warm halloumi on top of the salad, drizzle with lemon juice, add freshly ground black pepper, and scatter torn mint or basil leaves over the top.
Tip. If you’re cooking for guests, grill the halloumi last and assemble the salad right at the table — this helps preserve the ideal texture and prevents the cheese from turning rubbery.
This salad should be served immediately after assembling, while the halloumi is still warm. The contrast with the cold watermelon is a key part of the flavor. No extra salt is needed — the cheese provides enough on its own. Sometimes I add a couple more drops of olive oil right before serving to bring everything together.
4. Zesty Black Bean Stuffed Peppers

These stuffed peppers are light, bright, with a noticeable tang and a solid texture, without the feeling that you’ve eaten a whole pot of rice.
Black beans are the base here. They add body and help you feel full, but don’t weigh the dish down. The peppers turn soft and slightly sweet, while the filling stays juicy and aromatic.
Black beans are a source of plant-based protein and fiber, sweet bell peppers contain vitamin C, and baking keeps the flavor without extra fat.
Ingredients (serves 4)
- 4 large bell peppers
- 2 cans black beans, rinsed and dried (≈ 450 g cooked)
- 1 cup cooked brown rice or quinoa (≈ 170 g)
- 1 small red onion, finely chopped
- 2 cloves garlic, minced
- 1 tsp ground cumin
- 1/2 tsp smoked paprika
- zest of 1 lime
- 2 tbsp lime juice (≈ 30 ml)
- 2 tbsp olive oil (≈ 30 ml)
- salt and freshly ground black pepper
- 1/3 cup grated cheese (cheddar or Monterey Jack, ≈ 35–40 g), optional
- fresh cilantro, for serving
How to Cook
- Preheat the oven to 400°F (≈ 205°C). This temperature allows the peppers to soften without turning them into mush.
- Prepare the peppers. Slice them in half lengthwise and carefully remove the seeds. Place them cut-side up in a baking dish and lightly drizzle with olive oil.
- Sauté the onion and garlic. Heat a little oil in a skillet, add the onion, and cook for 4–5 minutes until soft. Add the garlic and cook for another 30 seconds, just until fragrant, not browned.
- Make the filling. Combine the beans, rice or quinoa, sautéed onion and garlic, cumin, paprika, lime zest, and lime juice. Season with salt and pepper. The filling should be juicy, but not wet.
- Fill the peppers. Pack the filling firmly into the pepper halves. If using cheese, sprinkle it on top.
- Bake. Cover the dish with foil and bake for 25 minutes, then remove the foil and bake for another 10–15 minutes, until the peppers are tender and the top is lightly browned.
Tip. If you want a more concentrated flavor, lightly mash some of the beans with a fork before mixing — the filling will be denser and hold its juices better.
These peppers are best served right out of the oven, while the filling is hot and the peppers still hold their shape. I add a bit of fresh cilantro on top and sometimes a few extra drops of lime juice — it highlights the flavor of the beans and makes the dish feel more pulled together. No extra sauce is needed, the filling is already juicy enough.
5. Sheet-Pan Harissa Shrimp with Vegetables
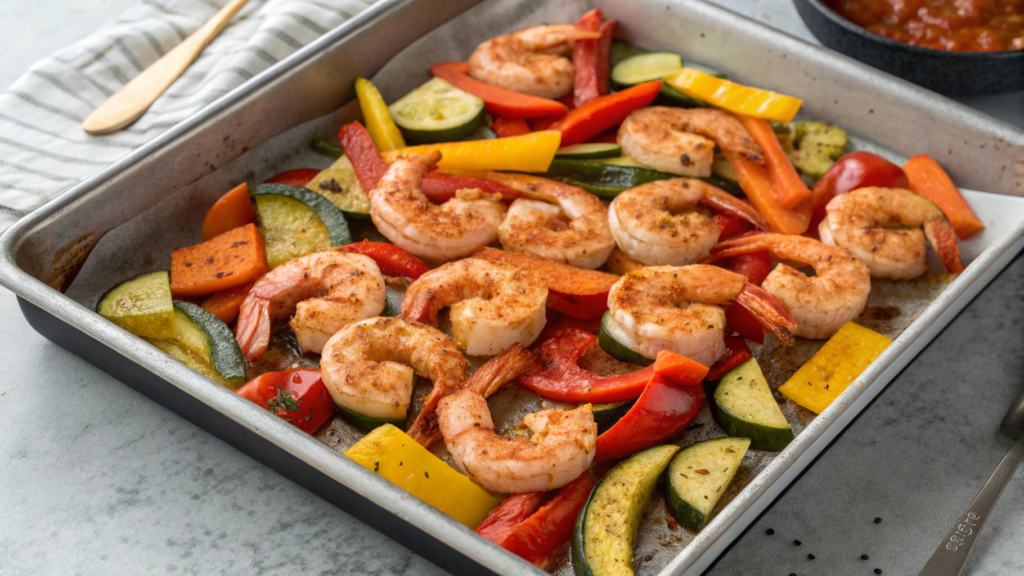
Vegetables are ready, shrimp are ready, the oven is free — that means Sheet-Pan Harissa Shrimp with Vegetables should come together on a single pan. No skillets, no sauces “added later,” no feeling that dinner took half the evening.
Harissa brings depth and a light smokiness, making the flavor feel focused and full even when the ingredients are very basic. Shrimp cook quickly (and are a source of protein and iodine), vegetables add fiber, everything browns nicely, and it all comes out of the oven at the same time, while roasting requires only a minimal amount of oil.
For a weekday dinner, this is exactly what’s needed.
Ingredients (serves 4)
- 1 lb raw peeled shrimp (≈ 450 g)
- 2 cups broccoli florets (≈ 180–200 g)
- 1 red bell pepper, cut into large pieces
- 1 small red onion, sliced into wedges
- 3 tbsp olive oil (≈ 45 ml)
- 1.5 tbsp harissa paste
- 1 tsp ground cumin
- 1/2 tsp smoked paprika
- salt and freshly ground black pepper
- juice of 1/2 lemon
- fresh parsley or cilantro, for serving
How to Cook
- Preheat the oven to 425°F (≈ 220°C). High heat is important so the vegetables brown instead of just softening.
- Prepare the vegetables. Place the broccoli, bell pepper, and onion on a baking sheet. Add 2 tbsp of olive oil, salt, and pepper, and mix well with your hands so the oil coats every piece.
- Roast the vegetables first. Transfer the sheet pan to the oven for 15 minutes. During this time, the vegetables will start to brown and soften while keeping their shape.
- Prepare the shrimp. In a bowl, mix the shrimp with the remaining oil, harissa, cumin, and smoked paprika. Stir gently so the spices coat the shrimp evenly.
- Add the shrimp to the vegetables. Remove the pan from the oven, push the vegetables aside, and lay the shrimp out in a single layer. This matters — if they’re piled up, they’ll steam instead of roast.
- Return to the oven. Roast for another 6–8 minutes, until the shrimp turn pink and firm. Don’t overcook them — they cook fast.
- Finish the dish. Right after removing from the oven, drizzle with lemon juice and add fresh herbs.
Tip. If your oven isn’t very powerful, preheat the sheet pan — this helps the vegetables start browning right away and prevents excess moisture.
I serve this dish straight from the pan while everything is hot. Sometimes I add couscous or cooked quinoa to soak up the juices, other times just warm bread. No extra sauce is needed — harissa and lemon already provide the right balance of flavor.
6. Golden Beet Risotto with Goat Cheese
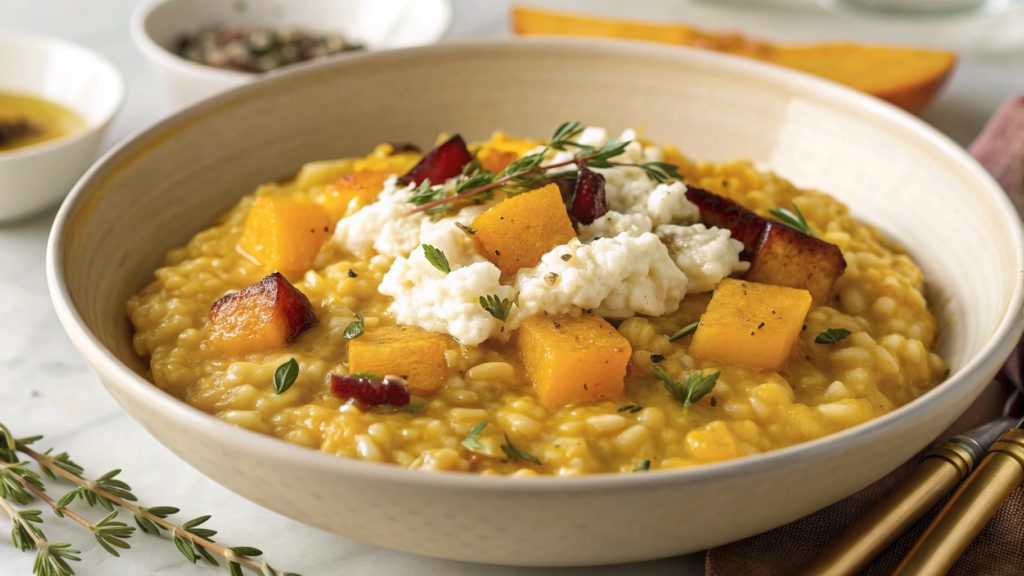
I love Golden Beet Risotto with Goat Cheese because it looks festive, yet it comes together from very familiar ingredients. Golden beets add a mildly sweet flavor and a beautiful color without staining everything around them (and without purple surprises on your hands), while goat cheese brings tanginess and a creamy texture.
Beets contain folate, and Arborio rice provides energy through carbohydrates, which makes this dish a good option for dinner after an active day. Goat cheese is a source of protein and calcium, but it’s fairly salty, so the seasoning needs to be handled carefully.
Ingredients (serves 4)
- 1 1/2 cups Arborio rice (≈ 300 g)
- 2 medium golden beets (≈ 350–450 g), roasted and diced
- 1 small yellow onion, finely chopped
- 2 cloves garlic, finely chopped
- 4 1/2 cups hot vegetable broth (≈ 1.1 l)
- 1/2 cup dry white wine (≈ 120 ml), can be replaced with extra broth
- 2 tbsp olive oil (≈ 30 ml)
- 2 tbsp butter (≈ 28 g)
- 1/3 cup grated Parmesan (≈ 30 g)
- 3–4 oz goat cheese (≈ 85–110 g)
- 1 tbsp lemon juice (≈ 15 ml)
- salt and freshly ground black pepper
- fresh thyme or parsley, for serving
If the goat cheese smells too strong, go with a soft, neutral option. I often use Montchevre Goat Cheese — it’s mild and melts well into risotto.
How to Cook
- Roast the golden beets in advance. Preheat the oven to 400°F (≈ 205°C). Wrap the beets in foil and roast for 45–60 minutes until tender (a knife should slide in easily). Let them cool, peel, and dice. This step can be done a day ahead to make dinner quicker.
- Heat the broth and keep it hot. Pour the broth into a small pot and keep it on low heat. Adding cold broth causes the rice to cook unevenly and affects the final texture.
- Cook the onion until soft. In a wide pan or saucepan, heat the olive oil and 1 tbsp of butter. Add the onion and cook for 5–6 minutes over medium heat until soft and lightly sweet. Add the garlic at the end and cook for 30 seconds, just until fragrant.
- Toast the rice so it holds its shape. Add the Arborio rice and stir for 1–2 minutes. Each grain should be coated in fat and turn slightly translucent around the edges. This helps achieve a creamy texture without turning the rice into porridge.
- Add the wine and let it cook off. Pour in the wine, stir, and wait 1–2 minutes until the alcohol smell fades and most of the liquid is absorbed. If you skip the wine, move straight to adding broth.
- Add the broth gradually and stir regularly. Add hot broth one ladle at a time, stirring until it’s almost fully absorbed. Repeat for 18–22 minutes. The rice should be tender but still slightly firm in the center — al dente, without rawness.
- Add the beets and adjust the consistency. Stir in the diced roasted beets and add a small ladle of broth if needed. The risotto shouldn’t sit in a stiff mound; it should gently flow on the plate.
- Remove from heat and add the cheese. Stir in the remaining butter, Parmesan, and lemon juice. Then gently fold in the goat cheese — you can mix some of it in fully and leave some in small pieces so it shows up in every bite. Taste first, then add salt if needed.
Tip. If the risotto thickens too much, add 2–3 tbsp of hot broth right before serving and stir quickly — the texture will loosen again.
Serve immediately while the risotto is hot and creamy. Finish with a bit of crumbled goat cheese, fresh thyme or parsley, and a few turns of black pepper. If you want extra freshness, a small drop of lemon juice on top brightens the flavor, but don’t overdo it — the beets already bring natural sweetness.
7. Turkey Meatballs with Spinach Pesto
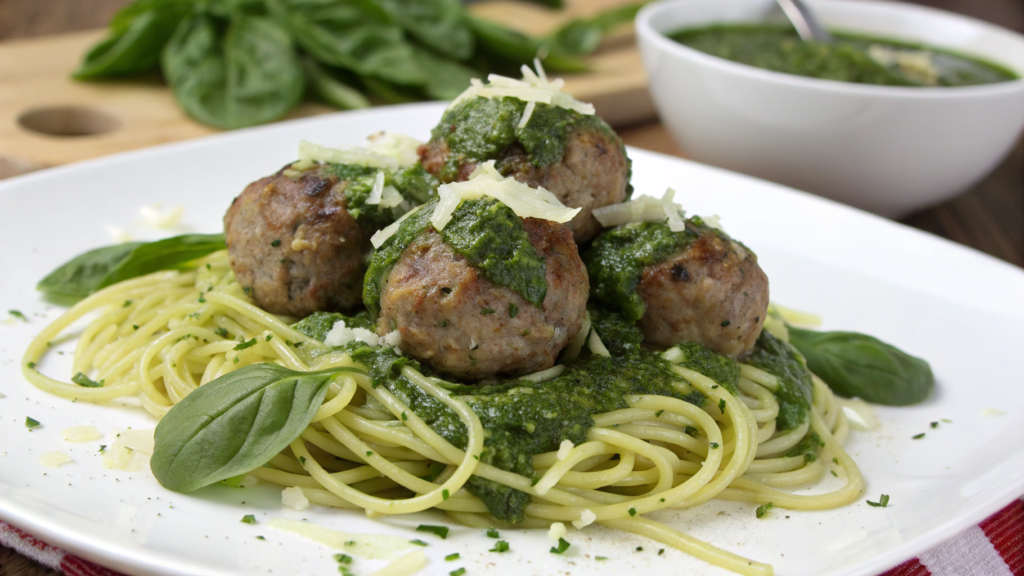
Turkey meatballs often turn out dry. It’s almost a rule. Too lean, too “correct.” In this version, though, the turkey stays juicy, and the spinach pesto adds freshness and richness without feeling heavy.
This dish fits easily into the idea of a healthy dinner, because turkey is a source of lean protein, spinach provides iron and folate, and the olive oil in the pesto adds fats that are actually needed, not in the way. Just straightforward food logic.
Ingredients (serves 4)
The meatballs:
- 1 lb ground turkey (≈ 450 g)
- 1/3 cup breadcrumbs or panko (≈ 25–30 g)
- 1 egg
- 2 tbsp milk (≈ 30 ml)
- 2 cloves garlic, finely minced
- 1/2 tsp salt
- freshly ground black pepper
- 1 tbsp olive oil (for frying)
The spinach pesto:
- 2 cups fresh spinach, tightly packed (≈ 60 g)
- 1/3 cup grated Parmesan (≈ 30 g)
- 1/4 cup olive oil (≈ 60 ml)
- 1 small clove garlic
- 2 tbsp pine nuts or walnuts (≈ 15 g)
- salt to taste
- juice of 1/2 lemon
For the meatballs, I use ground turkey with a small amount of fat, around 93% lean. Very lean turkey almost always turns out dry. For the pesto, a compact blender like the Ninja Personal Blender works well — it handles greens efficiently without overprocessing them.
How to Cook
- Prepare the base for the meatballs. In a large bowl, mix the breadcrumbs with the milk and let them sit for 1–2 minutes. They should absorb the liquid — this helps keep the meat juicy.
- Combine the meat mixture. Add the turkey, egg, garlic, salt, and pepper. Mix gently, by hand or with a spoon, without overworking it. The less pressure, the softer the meatballs will be.
- Shape the meatballs. Roll the mixture into balls about the size of a walnut. Don’t pack them tightly — they should hold together but stay loose.
- Cook the meatballs. Heat a skillet with olive oil over medium heat. Cook the meatballs in batches, turning them, for 8–10 minutes until browned on the outside and cooked through. Take your time — turkey needs it.
- Make the spinach pesto. In a blender, combine the spinach, Parmesan, nuts, garlic, and lemon juice. Slowly add the olive oil until the pesto becomes thick but still fluid. Season with salt to taste.
- Combine before serving. Toss the hot meatballs with the pesto, or spoon the pesto over the top — the flavor stays brighter and fresher this way.
Tip. If you’re cooking ahead, store the meatballs and pesto separately and combine them only right before serving — both texture and flavor will be noticeably better.
I serve these meatballs right away while they’re hot. Sometimes with a simple salad or roasted vegetables, sometimes over quinoa or whole wheat pasta. The pesto is best kept cool — a cold sauce on hot meatballs gives a more pronounced flavor and keeps the spinach tasting fresh.
8. Roasted Eggplant with Tahini Drizzle
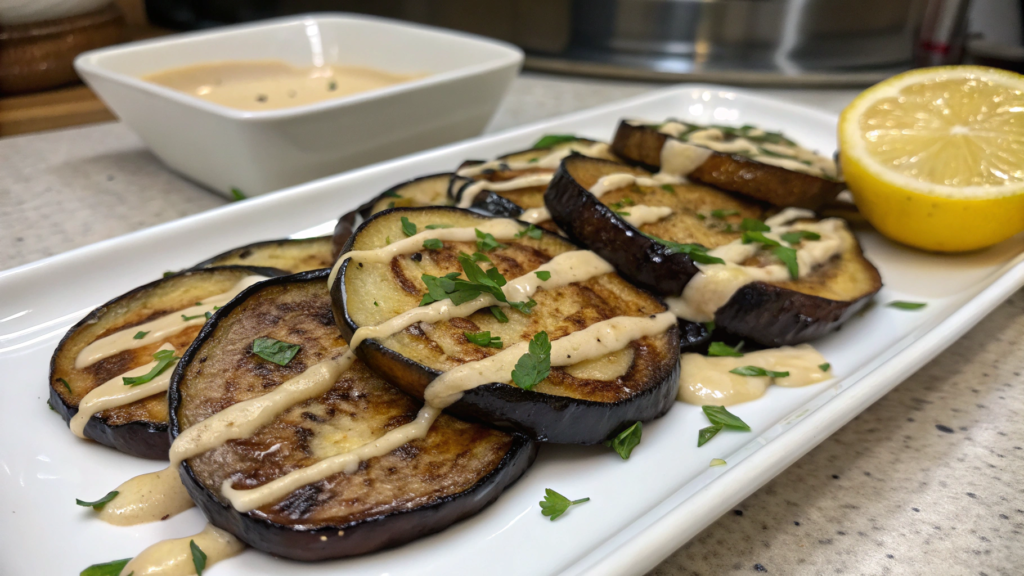
For a long time, my eggplants either soaked up oil like a sponge or came out limp and bland. The turning point came when I stopped rushing and started roasting them at high heat, giving the flesh time to soften while the edges had a chance to brown properly.
Eggplants provide dietary fiber, tahini is a source of healthy fats and calcium, and lemon juice helps the flavor stay bright instead of heavy. Simple, verifiable, and fully suitable for a healthy dinner.
Ingredients (serves 4)
For the eggplant:
- 2 medium eggplants
- 3 tbsp olive oil (≈ 45 ml)
- 1/2 tsp salt
- freshly ground black pepper
For the tahini drizzle:
- 1/3 cup tahini (≈ 80 ml)
- 2 tbsp lemon juice (≈ 30 ml)
- 1 small clove garlic, very finely minced
- 2–4 tbsp warm water (≈ 30–60 ml)
- salt to taste
How to Cook
- Preheat the oven to 425°F (≈ 220°C). The temperature is critical here. At lower heat, eggplant will soften but won’t brown, and the texture won’t develop.
- Prepare the eggplant. Cut it into large wedges or slices about 2 cm thick. Too thin and it dries out, too thick and it won’t cook through properly.
- Season and arrange. Transfer the eggplant to a baking sheet, add olive oil, salt, and pepper. Toss with your hands so every piece is coated, then spread them out in a single layer.
- Roast until golden. Roast for 25–30 minutes, flipping the pieces halfway through so both sides brown evenly. The finished eggplant should be soft inside with a golden crust on the outside.
- Make the tahini drizzle. In a bowl, mix tahini, lemon juice, and garlic. Gradually add warm water while stirring. The sauce will thicken at first, then suddenly turn smooth and pourable — that’s normal. Season with salt to taste.
- Assemble before serving. Arrange the hot eggplant on a plate and spoon the tahini drizzle over the top. Don’t mix it in — let the sauce sit on the surface.
Tip. If the eggplant turns soft but lacks a crust, try not to overcrowd the baking sheet. Space between the pieces does more for browning than an extra spoon of oil.
These eggplants are best served hot or warm. I sometimes add chopped parsley or cilantro on top, and if I want more texture, a handful of toasted pine nuts. The dish works well as a standalone healthy dinner or as part of a larger spread with flatbreads and vegetables.
9. Coconut Curry Lentil Bowls
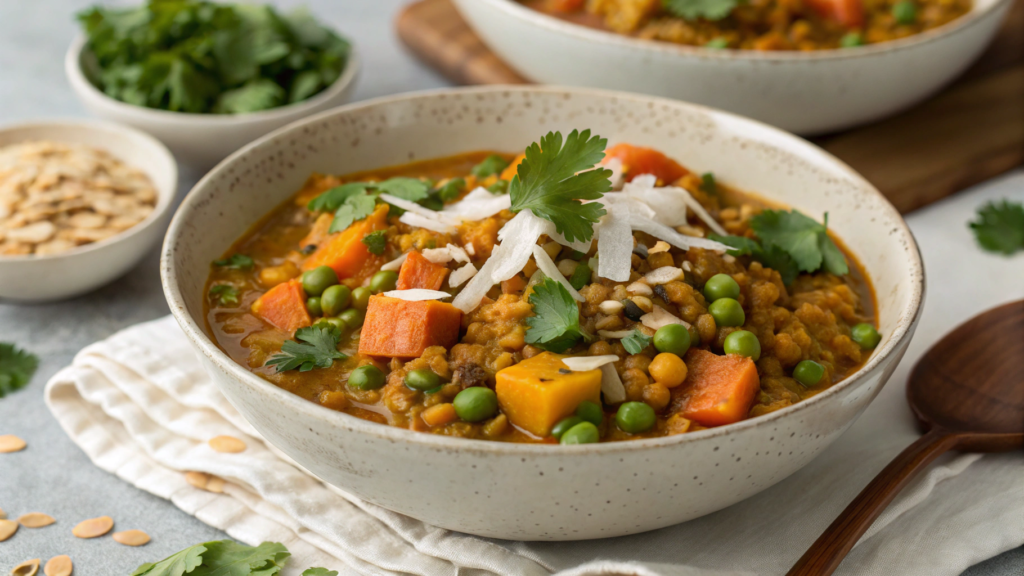
Coconut Curry Lentil Bowls are the kind of food that fills you up without feeling tiring.
There are no complicated techniques here. Just sequence and attention to detail. Lentils are a source of plant-based protein and fiber, coconut milk adds fats that help you feel full longer and bring softness, and curry spices create a flavor that pulls everything together.
Ingredients (serves 4)
For the base:
- 1 cup dry brown or green lentils (≈ 190 g)
- 3 cups water or vegetable broth (≈ 720 ml)
The curry:
- 1 tbsp coconut oil or olive oil (≈ 15 ml)
- 1 small yellow onion, finely chopped
- 2 cloves garlic, finely chopped
- 1 tbsp freshly grated ginger
- 2 tbsp curry powder
- 1 tsp ground cumin
- 1 can coconut milk (13.5 oz / ≈ 400 ml)
- 1 cup chopped tomatoes (≈ 240 ml, fresh or canned)
- salt to taste
- juice of 1/2 lime
For serving (optional):
- cooked basmati or jasmine rice
- fresh cilantro
- avocado slices
Curry powder has a big impact on the final result. I use Simply Organic Curry Powder — it’s aromatic and doesn’t have harsh bitterness.
How to Cook
- Cook the lentils. Rinse the lentils, cover with water or broth, and bring to a boil. Lower the heat and cook for 20–25 minutes, until the lentils are tender but still hold their shape. Drain any excess liquid and set aside.
- Build the curry base. Heat the oil in a deep skillet or saucepan. Add the onion and cook for 5–6 minutes, until soft and slightly sweet. This forms the flavor base.
- Add garlic, ginger, and spices. Stir in the garlic, ginger, curry powder, and cumin. Cook for about 1 minute, stirring constantly so the spices bloom but don’t burn.
- Add coconut milk and tomatoes. Stir and bring to a gentle simmer. The sauce should become smooth and slightly thickened.
- Combine with the lentils. Add the cooked lentils to the sauce and stir gently. Lower the heat and let everything warm together for 5–7 minutes so the flavors come together.
- Finish the flavor. Add salt and lime juice. Taste and adjust acidity or seasoning if needed.
Tip. If you want a thicker texture, mash a couple of spoonfuls of lentils directly in the sauce and stir — it makes the curry denser without adding anything extra.
I serve these bowls hot, most often over a bed of rice. On top, I add fresh cilantro and a few slices of avocado — not for looks, but for texture. Sometimes I skip the rice and serve the lentils as a thick stew, with warm flatbread on the side.
10. Shaved Brussels Sprout Salad with Pomegranate Seeds

Shaved Brussels Sprout Salad with Pomegranate Seeds is crisp cabbage, juicy pomegranate seeds, a bit of fat, and acidity. No cooking involved — everything is fast and straightforward. In short, about the benefits: Brussels sprouts are a source of fiber and vitamin C, and pomegranate provides antioxidants.
Ingredients (serves 4)
- 4 cups finely shaved Brussels sprouts (≈ 300 g)
- 1/2 cup pomegranate seeds (≈ 90 g)
- 1/3 cup grated Parmesan (≈ 30 g)
- 1/4 cup toasted walnuts or almonds, roughly chopped (≈ 30 g)
For the dressing:
- 3 tbsp olive oil (≈ 45 ml)
- 1 tbsp lemon juice (≈ 15 ml)
- 1 tsp Dijon mustard
- 1 tsp honey
- salt and freshly ground black pepper
When working with raw cabbage, a sharp knife really matters. I usually use a mandoline or a thin slicing attachment on a food processor — the difference in texture is noticeable right away.
How to Cook
- Prepare the Brussels sprouts. Remove the tough outer leaves, trim the base, and slice the cabbage as thinly as possible. The thinner the cut, the more tender the salad will be.
- Make the dressing. In a small bowl, mix olive oil, lemon juice, mustard, and honey. Season with salt and pepper. The dressing should feel balanced, without sharp acidity.
- Massage the cabbage with the dressing. Transfer the cabbage to a large bowl, add the dressing, and gently massage with your hands for 30–40 seconds. The leaves will soften and darken — this step matters, don’t skip it.
- Add the remaining ingredients. Gently fold in the pomegranate seeds, nuts, and Parmesan. Mix carefully to keep the textures intact.
- Let the salad rest. Leave it for 5–10 minutes before serving. During this time, the flavor becomes more cohesive.
Tip. If the cabbage tastes too sharp, add the dressing earlier and let the salad rest for about 15 minutes — the flavor will soften noticeably.
I serve this salad slightly chilled or at room temperature. It holds its shape well and doesn’t become watery, which makes it suitable both for dinner and for a larger table. Sometimes I add a bit more Parmesan right before serving, just to keep the balance of flavors.
If Cooking, Then Not Alone
Honestly, collections like this don’t make much sense without feedback.
It matters to me which dinners from this list spoke to you, which ones you’d want to cook right away, and which you’d adapt to your own kitchen. Sometimes even one small swap or personal habit completely changes how a dish feels, and that’s always interesting to see.Leave a comment and tell me which recipe from this article you’d cook first and why. And if you have your own version of a healthy dinner that actually stuck, share it too. Very often, the best recipes come out of exactly these kinds of conversations.