Chicken, Caesar dressing, and cheese are a combo that shows up in a lot of kitchens on a regular basis. The problem is that the same salad gets boring fast, and leftover chicken starts moving from one container to another. Lindy and I have been cooking at home every day for many years, and if something doesn’t fit real life, it quietly disappears from our kitchen.
So this roundup is about breakfasts, cold lunches, meal-prep food, formats you can eat with your hands or eat cold without reheating. Every recipe here has gone through the fridge, reheating, transport, and an honest test — convenient or not.
If Caesar shows up at your place often, these recipes help use it without feeling like you’re repeating yourself.
1. Caesar Grilled Cheese with Shredded Chicken
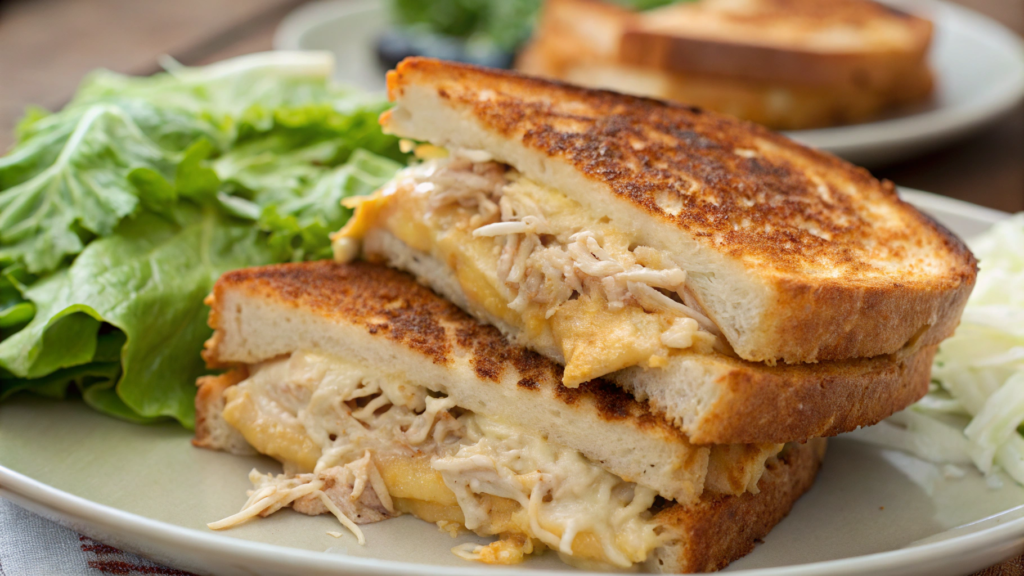
This dish really does feel like Caesar. Just in a different form. It’s a hot, stretchy, salty-creamy thing that unexpectedly starts to feel like a proper dinner. Mostly because there’s boiled chicken in your fridge, yesterday’s bread, and some Caesar dressing you don’t want to throw away.
Flavor-wise, it’s buttery crispy bread, warm shredded chicken, Caesar dressing that doesn’t soak in but coats everything, and melted cheese that holds it all together. No extra kitchen gymnastics.
Ingredients (for 2 sandwiches)
- 4 slices of bread (sourdough or sturdy white)
- 1 cup shredded chicken (about 140–150 g cooked or roasted chicken)
- ½ cup grated cheese (about 55–60 g)
mozzarella works best with a bit of Parmesan mixed in - ¼ cup Caesar dressing (about 60 ml)
I most often use Ken’s Steak House Creamy Caesar Dressing — it’s thick, not sweet, and handles heat well - 1 tbsp butter (about 14 g)
- black pepper to taste
If you want to boost the flavor, add a pinch of garlic powder or a finely grated garlic clove. Carefully.
How I put it together
- Chicken and dressing first, together. I never layer the dressing separately. When the chicken is mixed with Caesar ahead of time, every piece is coated, nothing slides around inside the sandwich, and nothing leaks out. The dressing also warms up more gently and doesn’t split into fat and acid.
- I butter the bread on the outside, thinly. I don’t add butter inside on purpose. There’s already enough fat from the cheese and the dressing. On the outside, butter gives an even golden crust and that crunch you hear when you cut into the sandwich. Too much butter and the bread fries instead of browning — those are different things.
- Cheese goes on both sides of the filling. A bit of cheese on the bread first, then chicken with Caesar, then more cheese. The bottom layer works like glue and keeps the filling in place, the top layer seals everything and creates that stretchy texture. It’s a small detail, but without it the sandwich falls apart on the first bite.
- I cook it over medium heat and don’t rush it. High heat doesn’t give the cheese time to melt. I keep the heat medium, let the first side brown calmly, flip it, then cover the pan for just a minute or two. Everything heats through, the cheese softens, and the bread stays crispy instead of drying out.
Small tweaks if you feel like it
- add finely chopped romaine inside after cooking for contrast
- swap part of the mozzarella for provolone
- finish the sandwich with a mix of Parmesan and black pepper
Sometimes I serve it cut diagonally with a small bowl of Caesar dressing on the side. Not because it’s required. Just because I want to.
This grilled cheese works especially well in the evening, when you don’t feel like “cooking” but still want a real meal.
And yes — the next day it’s not the same. This is something you eat right away.
2. Nacho-Style Caesar Dip with Crushed Tortilla Topping

Lindy and I weren’t planning to “come up with” anything at all — we just wanted something to put on the table in the evening, something you could dip into, crunch on, and not cook from scratch again.
What we ended up with is the thing people now ask for every single time someone stops by “for half an hour.” Half an hour, yes.
This is a nacho-style Caesar dip, where the Caesar gets softer and more rounded after baking, the cheese creates a dense, stretchy texture instead of just a top layer, and crushed tortilla chips add salty crunch and that nacho feel without going overboard.
Ingredients (for a dish about 8 inches / 20 cm)
- ¾ cup Caesar dressing (about 180 ml)
(Ken’s Steak House Creamy Caesar Dressing) - 1 cup grated cheese (about 110–115 g)
mozzarella or a mix of mozzarella and Monterey Jack - ½ cup softened cream cheese (about 115 g)
- 1 cup finely chopped chicken (about 140–150 g), optional
- 1 cup crushed tortilla chips (about 40–45 g)
- black pepper to taste
How I put it together and bake it
- The base first. In a bowl, I mix the Caesar dressing with the cream cheese until smooth. This matters — if the cream cheese isn’t fully incorporated, the finished dip will have dense chunks instead of a creamy texture.
- Add the cheese and chicken. I don’t add all the cheese at once and keep a small handful for the top. The chicken is optional, but if I use it, I chop it very finely, almost into crumbs. That way the dip stays scoopable and doesn’t turn into a casserole.
- Transfer to the baking dish and level it out. I don’t pack it down. I just spread it evenly with a spoon so the surface is flat — that helps it bake evenly.
- Tortilla chips and remaining cheese on top. I don’t crush the chips too finely. You want mixed sizes — some pieces brown, others stay slightly softer. The cheese on top helps lock in that crunchy layer.
- Bake at 375°F (about 190°C) for 18–22 minutes. The cue is simple: the edges start bubbling, the top turns golden, and the smell of Caesar dip shifts from cold to warm and rich.
If you want to tweak the flavor a bit
- add a pinch of smoked paprika or chili
- mix finely chopped green onion directly into the dip
- serve with cucumber slices or celery instead of only chips
We once served this dip with vegetables from the greenhouse, and it suddenly looked surprisingly nice.
3. Chicken Caesar Breakfast Taco with Eggs and Microgreens
This breakfast came together early one morning, when Lindy and I realized that the chicken from dinner was still there, and we had just enough eggs.
We didn’t want a salad or a “proper” breakfast. We wanted something warm, filling, and something you could eat with your hands, standing by the window and looking out at the garden beds.
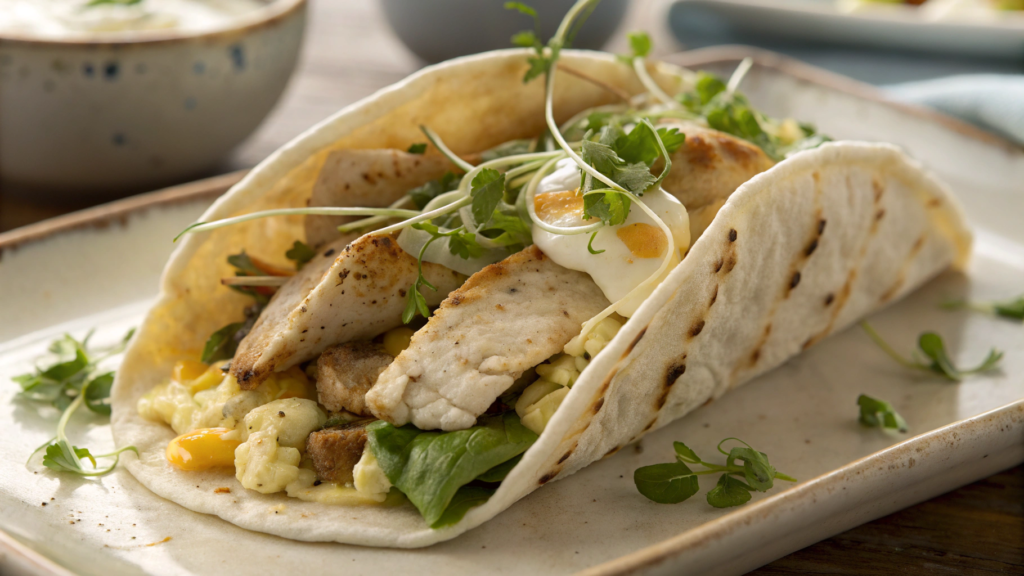
Chicken Caesar Breakfast Taco is soft and creamy, with eggs, chicken, and fresh microgreens on top. The eggs soften the flavor of the dressing and make it less sharp, the chicken adds substance without feeling like “lunch at 8 a.m.,” and the microgreens bring back freshness and balance.
Ingredients (for 4 tacos)
- 4 small tortillas (corn or flour)
- 4 large eggs
- 1 cup shredded chicken (about 140–150 g)
- ¼ cup Caesar dressing (about 60 ml)
(Ken’s Steak House Creamy Caesar Dressing) - 1 cup microgreens (about 25–30 g)
radish, broccoli, or a mix - 1 tbsp olive oil (about 15 ml)
- salt and black pepper to taste
How I put this breakfast together
- I warm the chicken first. In a skillet with a small drop of oil, I gently warm the chicken without browning it. I want it hot, but not dry. Once it’s warmed through, I take it out of the pan.
- I cook the eggs softly. In the same skillet, over low to medium heat. I don’t cook them until dry — they should stay creamy. At the end, I add a pinch of black pepper and just a spoon of Caesar dressing to make the eggs slightly more silky.
- I warm the tortillas separately. Either in a dry skillet or directly over the burner if we’re using gas. A warm tortilla is half the success here. A cold one breaks everything.
- Assembly. I layer the eggs first, then the chicken, sprinkle with Parmesan, and only then add the microgreens. They need to stay fresh and crisp, not wilted.
Small flavor shifts if you want variations
- swap part of the Caesar for Greek yogurt
- add a few drops of lemon juice on top
- use quail eggs for a richer flavor
We usually serve these tacos right on a wooden board, without plates. Warm tortillas go on the side, microgreens in a small bowl so everyone can add as much as they want.
If breakfast isn’t rushed, I put lemon wedges nearby and a small cup with extra Caesar dressing — not to pour, just to lightly touch.
Sometimes I add a few slices of avocado or radish on the side, without any kind of “composition.”
4. Air-Fried Chicken Caesar Sliders with Pickle Slaw

The air fryer really makes life easier here — everything is fast, without extra grease.
The slider format works because the portions are small but filling, and the chicken stays juicy even if you reheat it later.
No complicated techniques. Everything comes together quickly and clearly.
Ingredients (for 6–8 sliders)
- 6–8 mini slider buns
- 2 cups shredded chicken (about 280–300 g)
- ⅓ cup Caesar dressing (about 80 ml)
(Ken’s Steak House Creamy Caesar Dressing) - 1 cup grated cheese (about 110–115 g)
mozzarella or provolone - 2 tbsp melted butter (about 28 g)
For the pickle slaw:
- 1 cup finely chopped pickles (about 120–130 g)
- ½ cup thinly sliced cabbage (about 40–45 g)
- 1–2 tbsp pickle brine (about 15–30 ml)
- 1 tbsp mayonnaise (about 15 g)
- black pepper to taste
How I make them
- I start with the slaw. I mix the pickles and cabbage with the mayonnaise and pickle brine. The slaw should be juicy but not watery. I put it in the fridge while I assemble the sliders — the flavor evens out during that time.
- I mix the chicken with the dressing. I don’t drizzle it on top — I mix it in fully. This keeps the chicken juicy after the air fryer and prevents the edges from drying out.
- I assemble the sliders. I place the chicken on the bottom half of each bun, add the cheese, and cover with the top half. I brush the outside lightly with melted butter.
- I cook them in the air fryer at 350°F (about 175°C) for 6–8 minutes. The buns brown, the cheese melts, and the filling heats through. If the buns are larger, they may need another 1–2 minutes.
- I add the slaw right before serving. I lift the top bun, add a spoon of slaw, and close it again. This keeps the slaw crisp and stops the bread from getting soft.
What you can adjust to taste
- add a bit of mustard to the slaw for extra sharpness
- replace part of the Caesar with Greek yogurt
- use chicken cooked in the air fryer if you’re making it specifically for this dish
We usually serve these sliders on one shared platter, without dividing them into portions. I keep a bowl of extra slaw nearby and plenty of napkins — they always go faster than expected.
They’re best warm, but even after 15–20 minutes they still hold up well, without feeling like cold fast food.
5. Caesar Pizza Muffin Bites with Mozzarella Burst

This is not pizza and not a salad. These are small baked portions that are easy to eat with your hands and handle reheating well.
The key here is soft, melty cheese on the inside and a firm, lightly browned shell on the outside. That’s what makes them work as a snack or a lunch.
Ingredients (for 10–12 bites)
- 2 cups cooked pasta (about 160–180 g dry; penne or any short pasta with curves)
- 1½ cups finely chopped chicken (about 220–240 g)
- ½ cup Caesar dressing (about 120 ml)
(Ken’s Steak House Creamy Caesar Dressing) - ¾ cup grated mozzarella (about 85–90 g)
- ¼ cup grated Parmesan (about 20–22 g)
- 1 large egg
- black pepper to taste
How I make them
- I cook the pasta ahead of time and let it cool completely. This matters. Warm pasta will soak up the dressing and turn the mixture watery. I cook it to al dente, rinse it under cold water, and let it cool fully.
- I mix the base. In a large bowl, I combine the pasta, chicken, Caesar dressing, egg, and Parmesan. I mix gently by hand or with a spatula, without overworking it. The mixture should hold together but not turn into paste.
- I don’t add all the mozzarella at once. Some goes into the main mixture, and some I save for the center. That’s what creates the mozzarella burst inside instead of just a cheesy flavor throughout.
- I shape the muffin bites. I grease the muffin tin lightly. I add a spoon of the mixture to each cup, place a pinch of mozzarella in the center, then cover it with another spoon of the mixture. I don’t press it down hard — air keeps them from turning dense.
- I bake at 375°F (about 190°C) for 18–22 minutes. The signs are simple: the edges are browned, the top feels firm, and when you press lightly, the muffin springs back. Metal pans usually need closer to 18 minutes, silicone pans a bit longer.
- I let them rest for 5 minutes before removing. You can’t take them out right away — the inside is still very soft. After a few minutes, they hold their shape and don’t fall apart.
What you can adjust to your taste
- add finely chopped romaine directly into the mixture
- replace part of the pasta with finely chopped cauliflower
- use a mix of mozzarella and provolone for a stronger flavor
These are easiest to serve in one bowl, without arranging them individually.
They stay warm well, and they also work as a cold lunch. In the fridge, they keep for 2–3 days and reheat without losing texture.
6. Caesar-Stuffed Avocados with Spicy Drizzle
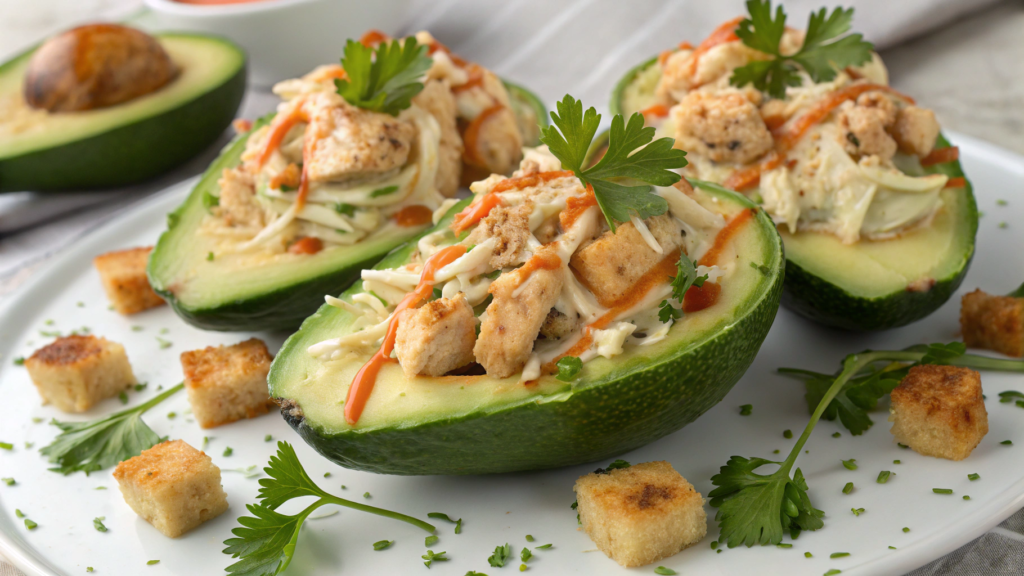
Here, avocado works both as a natural container and a rich, fatty base, while Caesar dressing with chicken makes the filling dense and satisfying. The heat on top isn’t there for show — it keeps the flavor from drifting and feeling flat.
No oven. No stove. At most, a bowl and a knife.
This format works well because nothing needs reheating, the portion is set by the avocado itself, and it’s easy to scale — for two people or for a group.
Ingredients (for 4 halves)
- 2 ripe avocados
(OXO Good Grips 3-in-1 Avocado Slicer — a tool that genuinely saves time when working with avocados) - 1 cup shredded chicken (about 140–150 g)
- ¼ cup Caesar dressing (about 60 ml)
- 2 tbsp grated Parmesan (about 10–12 g)
- lemon juice, to taste
For the spicy drizzle:
- 2 tbsp Greek yogurt or sour cream (about 30 g)
- 1–2 tsp hot sauce (about 5–10 ml, to taste)
- 1 tsp lemon juice (about 5 ml)
How I put it together
- I prepare the filling first. In a bowl, I mix the chicken, Caesar dressing, and Parmesan. The mixture should be thick, not runny. If the chicken is chopped too coarsely, the filling won’t stay put in the avocado.
- I prep the avocados. I cut them in half and remove the pit. If the cavity is small, I gently scoop out a bit of the flesh — just 1–2 teaspoons. This makes room for the filling without ruining the shape.
- I add lemon right away. Not just for color. The lemon balances the fat and makes the flavor feel tighter and more focused.
- I fill the avocados. I spoon the filling in without packing it down. A small mound works better than trying to force everything inside.
- I make the spicy drizzle. I mix the yogurt, hot sauce, and lemon until smooth. The texture should be pourable, not something you have to spread.
- I add the drizzle right before serving. I pour it in a thin stream and don’t mix it in. The sauce stays on top and works as an accent, not a second filling.
How you can adjust it
- add finely chopped celery to the chicken mixture
- replace part of the Caesar with yogurt if you want it lighter
- use smoked paprika instead of hot sauce
We usually serve these avocados on a flat platter, cut side up, with spoons on the side.
If this isn’t the only dish on the table, it helps to cut each half in two — they’re easier to grab that way.
They’re best eaten right away. After about an hour, the avocados are still edible, but the texture isn’t as clean anymore.
7. Caesar Quesadilla Pockets with Hidden Veggies
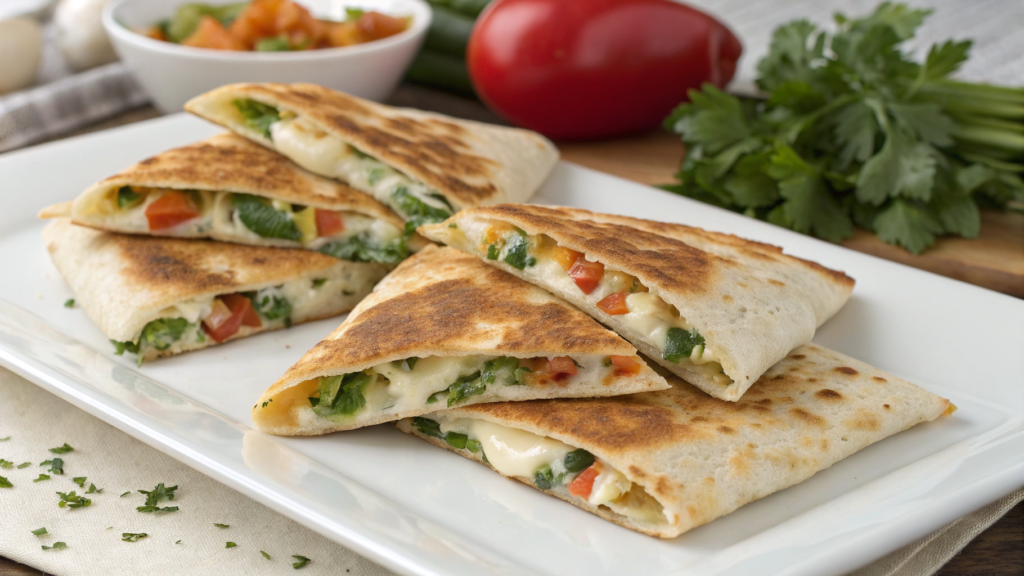
Lindy and I noticed that vegetables on their own sometimes stay on the plate, but in a quesadilla format, they disappear without discussion.
Here they’re just finely and properly prepped, and the pocket format works well: the filling heats evenly, the veggies stay inside without burning, and portions are easier to control.
Ingredients (for 4 pockets)
- 4 large flour tortillas
- 1½ cups shredded chicken (about 210–225 g)
- ½ cup Caesar dressing (about 120 ml)
- 1 cup grated cheese (about 110–115 g)
mozzarella or a mix of mozzarella and cheddar - ½ cup finely chopped zucchini (about 60–70 g)
- ½ cup finely chopped bell pepper (about 60–70 g)
- 1 tbsp olive oil (about 15 ml)
- black pepper to taste
How I make them (and where the details matter)
- I prep the vegetables first. I chop the zucchini and bell pepper very finely — small cubes, not strips. This matters: larger pieces release moisture and make the filling loose.
I quickly warm them in a skillet with a drop of oil for just 3–4 minutes. I’m not browning them, just removing excess moisture. Then I let them cool. - I mix the filling. In a bowl, I combine the chicken, vegetables, and Caesar dressing until evenly mixed. The filling should be thick and slightly sticky, not runny. If it looks too wet, I add a spoon of cheese.
- I form the pockets. I place a tortilla on a flat surface and spread the filling in a thin layer over one half, leaving space around the edges. I sprinkle cheese on top.
I fold the other half of the tortilla over the filling and lightly press the edges with my hand. - I cook them over medium heat. The pan is dry or has just a minimal amount of oil. I cook them for 3–4 minutes per side.
The cue is simple: the tortilla turns golden, the cheese inside melts, and the filling is fully heated. - I let them rest before cutting. I take them off the pan and wait 1–2 minutes. If you cut right away, the cheese stretches too much and the filling can slide out.
What you can change safely
- swap the zucchini for finely chopped broccoli
- add a bit of green onion to the filling
- use whole wheat tortillas, as long as they’re soft
We usually cut each pocket in half and serve them right away, without sauces on the side — the filling is already balanced.
For a lunch box, these quesadillas also work cold. They keep well in the fridge for a day, and reheating them in a skillet works better than the microwave, since the tortilla stays firm.
8. Chicken Caesar Bagel Melts
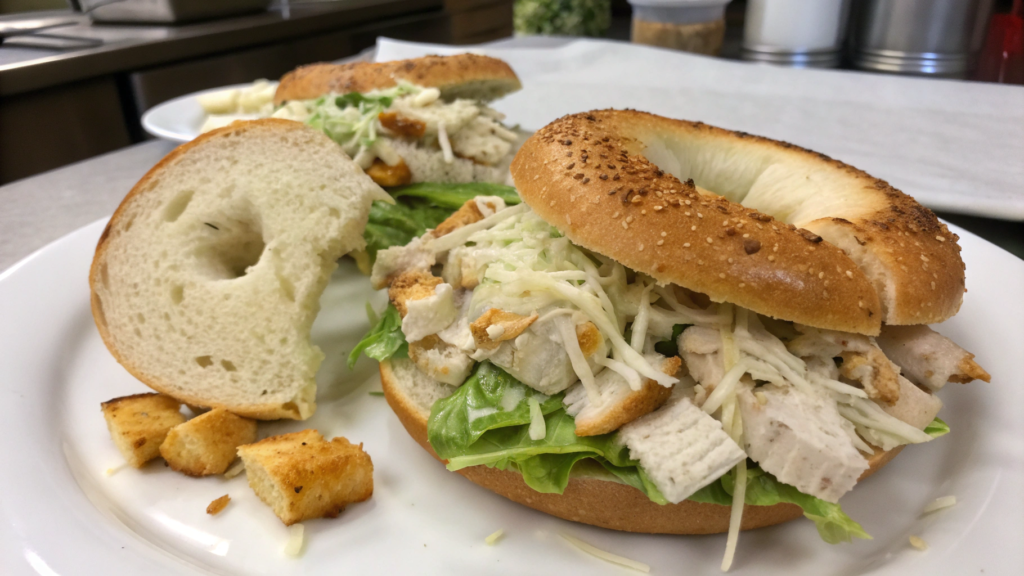
This is solid, everyday food you can put together quickly, without extra effort. A bagel’s dense crumb doesn’t soak up the dressing, the filling stays in place without sliding out or dripping, and this format works well both in the oven and in an air fryer.
If you have leftover chicken, this is one of the easiest ways to use it.
Ingredients (for 4 halves)
- 2 bagels, sliced in half
- 1½ cups shredded chicken (about 210–225 g)
- ⅓ cup Caesar dressing (about 80 ml)
- ¾ cup grated cheese (about 85–90 g)
mozzarella works well, or a mix of mozzarella and provolone - 2 tbsp grated Parmesan (about 10–12 g)
- black pepper to taste
How I assemble and bake them
- I prep the chicken first. If the chicken is pulled into large pieces, I chop it smaller. This matters: big chunks don’t heat evenly and tend to drag the filling downward. In a bowl, I mix the chicken with the Caesar dressing until evenly coated. There should be enough dressing to bind the meat, but not drown it.
- I lightly toast the bagels. I place the halves in the oven or air fryer for just 2–3 minutes at 350°F (about 175°C). This creates a light crust and helps keep the bagel from getting soggy under the filling.
- I build the layers. On the toasted bagel, I spread the chicken with Caesar evenly using a spoon. Then I add the main cheese, and only after that sprinkle the Parmesan on top — it adds flavor and a light crust.
- I bake until melted. I return the bagels to the oven or air fryer at 375°F (about 190°C) for 6–8 minutes.
The cue is simple: the cheese is fully melted, the edges are lightly browned, and the filling is hot. - I let them cool slightly. I take them out and wait 1–2 minutes. If you bite in right away, the cheese pulls too aggressively and the filling can slide.
What you can adjust to your taste
- add finely chopped romaine on top after baking
- replace part of the Caesar with Greek yogurt
- use an onion bagel or everything bagel for a stronger flavor
We usually serve the bagel melts cut in half so they’re easier to eat.
They work well with simple sliced cucumbers or something fresh on the side — not as a sauce, but as contrast.
They’re best eaten right away, but if there are leftovers, they reheat well in a skillet or air fryer and don’t turn into a soggy sandwich.
9. Caesar Chicken Pasta Cups (Cold Lunch Hit)
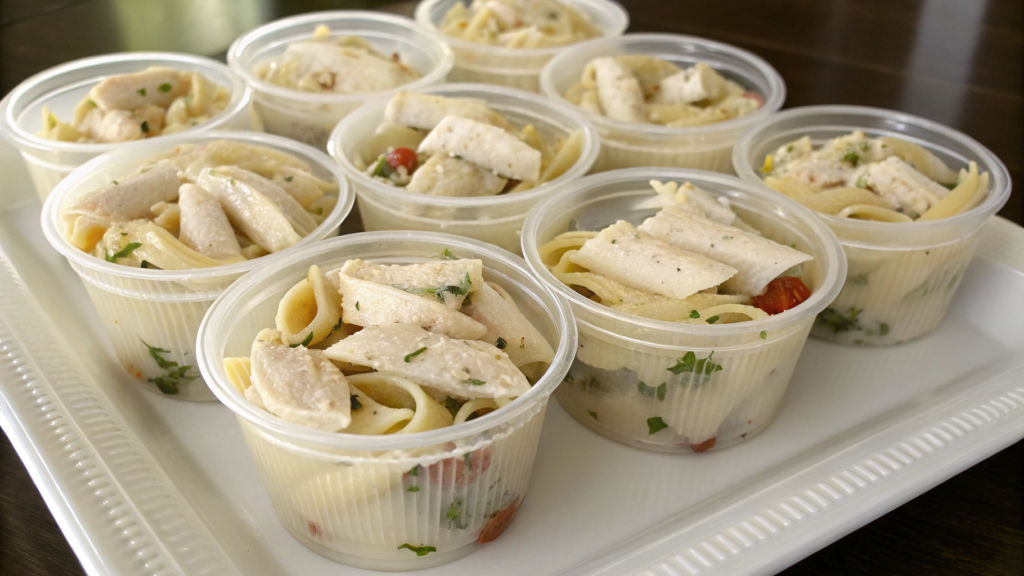
These are cold, portioned pasta cups with chicken, Caesar dressing, and cheese inside. They’re easy to take with you, easy to eat without reheating, and you don’t end up chasing food around a container.
Why cups, not just pasta
- the shape holds even when cold
- portions are already set
- the dressing stays evenly distributed instead of settling at the bottom
Ingredients (for 10–12 cups)
- 2 cups cooked pasta (about 160–180 g dry)
penne, rotini, or any curved pasta works best - 1½ cups finely chopped chicken (about 220–240 g)
- ½ cup Caesar dressing (about 120 ml)
- ¾ cup grated cheese (about 85–90 g)
mozzarella or a mix of mozzarella and Parmesan - 1 large egg
- ¼ cup finely chopped romaine or other salad greens (about 20–25 g)
- black pepper to taste
How I make them (in detail, nothing skipped)
- I cook the pasta ahead of time and let it cool completely. I cook it to al dente and don’t overcook it. After draining, I rinse it with cold water to stop the cooking and remove excess starch. Warm pasta doesn’t work here — it makes the mixture loose.
- I chop the chicken very finely. Not pulled into strands, but almost into small cubes. This matters: when cold, large pieces stand out and break the texture of the cup.
- I build the main mixture. In a large bowl, I combine the pasta, chicken, Caesar dressing, the egg, and most of the cheese. I mix gently so the pasta stays intact. The mixture should be cohesive, not runny.
- I add the greens at the end. I chop the romaine finely and mix it in last. It shouldn’t release moisture too early. This adds freshness without softening the structure.
- I form the cups. I lightly grease a muffin tin. I add the mixture to each cup and press gently in the center with a spoon to form a hollow. I don’t press the edges — the cup should hold because of its shape, not density.
- I bake at 375°F (about 190°C) for 18–22 minutes. The cue is simple: the edges are lightly browned, the top feels firm, and when pressed gently, it springs back. This is not a casserole — drying it out ruins it.
- I let them cool completely. I leave them in the pan for at least 10 minutes, then carefully remove them and cool to room temperature. Only after that do they go into the fridge.
What you can change safely
- replace part of the pasta with finely chopped cauliflower
- add a bit of lemon zest for freshness
- use smoked chicken if it isn’t too salty
We usually stack these in one container, without any extra sauces.
They keep well in the fridge for 2–3 days, don’t get soggy, and hold their shape. They’re best eaten cold — that’s when the flavor is the most even and predictable.
10. Caesar Dip-Stuffed Bell Peppers for Meal Prep
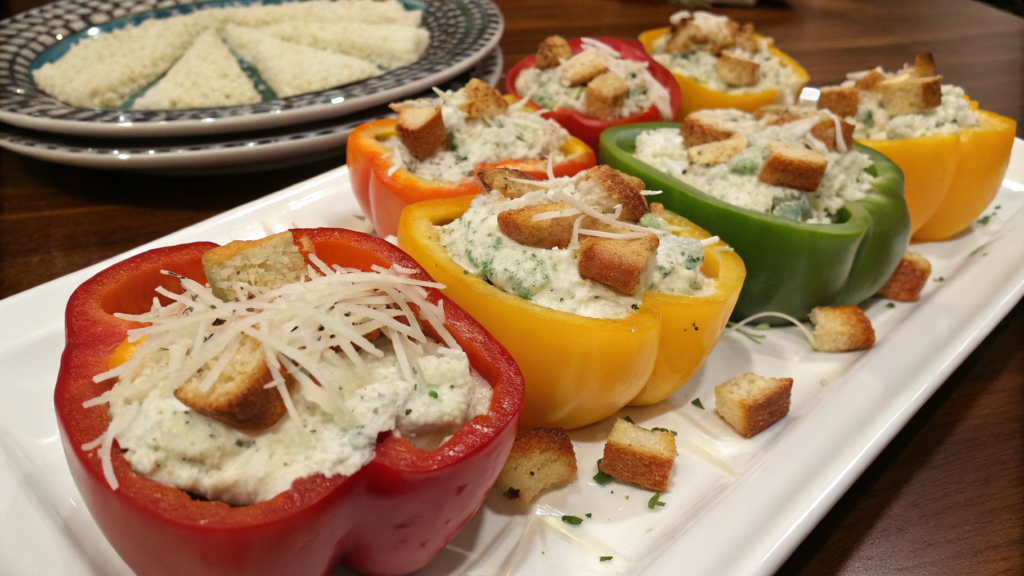
Lindy and I started making this option for days when food needs to be ready ahead of time, without surprises.
Sweet bell peppers replace bread or wraps here, and a thick Caesar dip holds its shape and flavor for several days in a row. Nothing gets soggy, portions are easy to control, and it’s simple to store and transport.
They work well both as lunch and as a filling snack between things.
Ingredients (for 6 halves)
- 3 large bell peppers
- 1½ cups finely chopped chicken (about 220–240 g)
- ½ cup Caesar dressing (about 120 ml)
- ½ cup softened cream cheese (about 115 g)
- ¼ cup grated Parmesan (about 20–22 g)
- black pepper to taste
Optional:
- finely chopped celery or green onion
- a little lemon juice
How I make them
- The filling comes first. In a bowl, I combine the cream cheese and Caesar dressing. I mix until completely smooth — this is the base. If the cream cheese isn’t fully mixed in, the finished filling will have dense chunks.
- I add the chicken and Parmesan. I chop the chicken very finely, almost into crumbs. This matters: large pieces fall out while eating and don’t sit well in the pepper. I mix in the Parmesan right away — it adds structure and flavor.
- I adjust the consistency. The filling should be thick enough to hold its shape on a spoon. If it feels too soft, I add a bit more Parmesan. If it’s too thick, I loosen it with just a teaspoon of dressing.
- I prep the peppers. I cut each pepper lengthwise in half and remove the seeds and membranes. If the bottom isn’t flat, I trim it slightly so the halves sit steady in a container.
- I fill the peppers. I spoon the filling in without packing it down. A neat mound works better than forcing everything inside — the peppers look cleaner and are easier to eat.
- I chill before storing. If the filling was just mixed and still warm, I leave the peppers uncovered in the fridge for 10–15 minutes. After that, I close the container.
What you can adjust
- add finely chopped romaine directly into the filling
- replace part of the cream cheese with Greek yogurt
- use sweet mini peppers for individual portions
We usually place the halves in one wide container, not stacked on top of each other.
They keep well in the fridge for 2–3 days, don’t release liquid, and hold their texture.
They’re easy to eat straight from the container with a fork or spoon — no bread or extra sauces needed.
If you’re prepping food for several days at once, this is one of the most reliable options in the whole lineup.
What actually sticks
We kept only the formats that don’t fall apart on day two, don’t require a special mood, and don’t turn cooking into a project. This is food that stores well in the fridge, handles transport calmly, and doesn’t annoy you when you come back to it again.
If you’ve made it this far, the question isn’t whether this is interesting — it’s what’s worth trying first.
It would be genuinely useful to see which formats work best for others: what’s easy to take with you, what gets prepped ahead of time, what disappears the fastest.Drop a comment and say which format fits you best — cold lunch, breakfast, meal prep, or something else. And if you already have your own go-to Caesar idea outside of a salad, share it too. Those are always more valuable than any roundup.
2026’s Top 10 Boldest Chicken Caesar Salad Recipes (Wraps, Dips & Sandwiches Reimagined)
Chicken, Caesar dressing, and cheese are a combo that shows up in a lot of kitchens on a regular basis. The problem is that the same salad gets boring fast, and leftover chicken starts moving from one container to another. Lindy and I have been cooking at home every day for many years, and if something doesn’t fit real life, it quietly disappears from our kitchen.
So this roundup is about breakfasts, cold lunches, meal-prep food, formats you can eat with your hands or eat cold without reheating. Every recipe here has gone through the fridge, reheating, transport, and an honest test — convenient or not.
If Caesar shows up at your place often, these recipes help use it without feeling like you’re repeating yourself.
1. Caesar Grilled Cheese with Shredded Chicken
This dish really does feel like Caesar. Just in a different form. It’s a hot, stretchy, salty-creamy thing that unexpectedly starts to feel like a proper dinner. Mostly because there’s boiled chicken in your fridge, yesterday’s bread, and some Caesar dressing you don’t want to throw away.
Flavor-wise, it’s buttery crispy bread, warm shredded chicken, Caesar dressing that doesn’t soak in but coats everything, and melted cheese that holds it all together. No extra kitchen gymnastics.
Ingredients (for 2 sandwiches)
- 4 slices of bread (sourdough or sturdy white)
- 1 cup shredded chicken (about 140–150 g cooked or roasted chicken)
- ½ cup grated cheese (about 55–60 g)
mozzarella works best with a bit of Parmesan mixed in - ¼ cup Caesar dressing (about 60 ml)
I most often use Ken’s Steak House Creamy Caesar Dressing — it’s thick, not sweet, and handles heat well - 1 tbsp butter (about 14 g)
- black pepper to taste
If you want to boost the flavor, add a pinch of garlic powder or a finely grated garlic clove. Carefully.
How I put it together
- Chicken and dressing first, together. I never layer the dressing separately. When the chicken is mixed with Caesar ahead of time, every piece is coated, nothing slides around inside the sandwich, and nothing leaks out. The dressing also warms up more gently and doesn’t split into fat and acid.
- I butter the bread on the outside, thinly. I don’t add butter inside on purpose. There’s already enough fat from the cheese and the dressing. On the outside, butter gives an even golden crust and that crunch you hear when you cut into the sandwich. Too much butter and the bread fries instead of browning — those are different things.
- Cheese goes on both sides of the filling. A bit of cheese on the bread first, then chicken with Caesar, then more cheese. The bottom layer works like glue and keeps the filling in place, the top layer seals everything and creates that stretchy texture. It’s a small detail, but without it the sandwich falls apart on the first bite.
- I cook it over medium heat and don’t rush it. High heat doesn’t give the cheese time to melt. I keep the heat medium, let the first side brown calmly, flip it, then cover the pan for just a minute or two. Everything heats through, the cheese softens, and the bread stays crispy instead of drying out.
Small tweaks if you feel like it
- add finely chopped romaine inside after cooking for contrast
- swap part of the mozzarella for provolone
- finish the sandwich with a mix of Parmesan and black pepper
Sometimes I serve it cut diagonally with a small bowl of Caesar dressing on the side. Not because it’s required. Just because I want to.
This grilled cheese works especially well in the evening, when you don’t feel like “cooking” but still want a real meal.
And yes — the next day it’s not the same. This is something you eat right away.
2. Nacho-Style Caesar Dip with Crushed Tortilla Topping
Lindy and I weren’t planning to “come up with” anything at all — we just wanted something to put on the table in the evening, something you could dip into, crunch on, and not cook from scratch again.
What we ended up with is the thing people now ask for every single time someone stops by “for half an hour.” Half an hour, yes.
This is a nacho-style Caesar dip, where the Caesar gets softer and more rounded after baking, the cheese creates a dense, stretchy texture instead of just a top layer, and crushed tortilla chips add salty crunch and that nacho feel without going overboard.
Ingredients (for a dish about 8 inches / 20 cm)
- ¾ cup Caesar dressing (about 180 ml)
(Ken’s Steak House Creamy Caesar Dressing) - 1 cup grated cheese (about 110–115 g)
mozzarella or a mix of mozzarella and Monterey Jack - ½ cup softened cream cheese (about 115 g)
- 1 cup finely chopped chicken (about 140–150 g), optional
- 1 cup crushed tortilla chips (about 40–45 g)
- black pepper to taste
How I put it together and bake it
- The base first. In a bowl, I mix the Caesar dressing with the cream cheese until smooth. This matters — if the cream cheese isn’t fully incorporated, the finished dip will have dense chunks instead of a creamy texture.
- Add the cheese and chicken. I don’t add all the cheese at once and keep a small handful for the top. The chicken is optional, but if I use it, I chop it very finely, almost into crumbs. That way the dip stays scoopable and doesn’t turn into a casserole.
- Transfer to the baking dish and level it out. I don’t pack it down. I just spread it evenly with a spoon so the surface is flat — that helps it bake evenly.
- Tortilla chips and remaining cheese on top. I don’t crush the chips too finely. You want mixed sizes — some pieces brown, others stay slightly softer. The cheese on top helps lock in that crunchy layer.
- Bake at 375°F (about 190°C) for 18–22 minutes. The cue is simple: the edges start bubbling, the top turns golden, and the smell of Caesar dip shifts from cold to warm and rich.
If you want to tweak the flavor a bit
- add a pinch of smoked paprika or chili
- mix finely chopped green onion directly into the dip
- serve with cucumber slices or celery instead of only chips
We once served this dip with vegetables from the greenhouse, and it suddenly looked surprisingly nice.
3. Chicken Caesar Breakfast Taco with Eggs and Microgreens
This breakfast came together early one morning, when Lindy and I realized that the chicken from dinner was still there, and we had just enough eggs.
We didn’t want a salad or a “proper” breakfast. We wanted something warm, filling, and something you could eat with your hands, standing by the window and looking out at the garden beds.
Chicken Caesar Breakfast Taco is soft and creamy, with eggs, chicken, and fresh microgreens on top. The eggs soften the flavor of the dressing and make it less sharp, the chicken adds substance without feeling like “lunch at 8 a.m.,” and the microgreens bring back freshness and balance.
Ingredients (for 4 tacos)
- 4 small tortillas (corn or flour)
- 4 large eggs
- 1 cup shredded chicken (about 140–150 g)
- ¼ cup Caesar dressing (about 60 ml)
(Ken’s Steak House Creamy Caesar Dressing) - 1 cup microgreens (about 25–30 g)
radish, broccoli, or a mix - 1 tbsp olive oil (about 15 ml)
- salt and black pepper to taste
How I put this breakfast together
- I warm the chicken first. In a skillet with a small drop of oil, I gently warm the chicken without browning it. I want it hot, but not dry. Once it’s warmed through, I take it out of the pan.
- I cook the eggs softly. In the same skillet, over low to medium heat. I don’t cook them until dry — they should stay creamy. At the end, I add a pinch of black pepper and just a spoon of Caesar dressing to make the eggs slightly more silky.
- I warm the tortillas separately. Either in a dry skillet or directly over the burner if we’re using gas. A warm tortilla is half the success here. A cold one breaks everything.
- Assembly. I layer the eggs first, then the chicken, sprinkle with Parmesan, and only then add the microgreens. They need to stay fresh and crisp, not wilted.
Small flavor shifts if you want variations
- swap part of the Caesar for Greek yogurt
- add a few drops of lemon juice on top
- use quail eggs for a richer flavor
We usually serve these tacos right on a wooden board, without plates. Warm tortillas go on the side, microgreens in a small bowl so everyone can add as much as they want.
If breakfast isn’t rushed, I put lemon wedges nearby and a small cup with extra Caesar dressing — not to pour, just to lightly touch.
Sometimes I add a few slices of avocado or radish on the side, without any kind of “composition.”
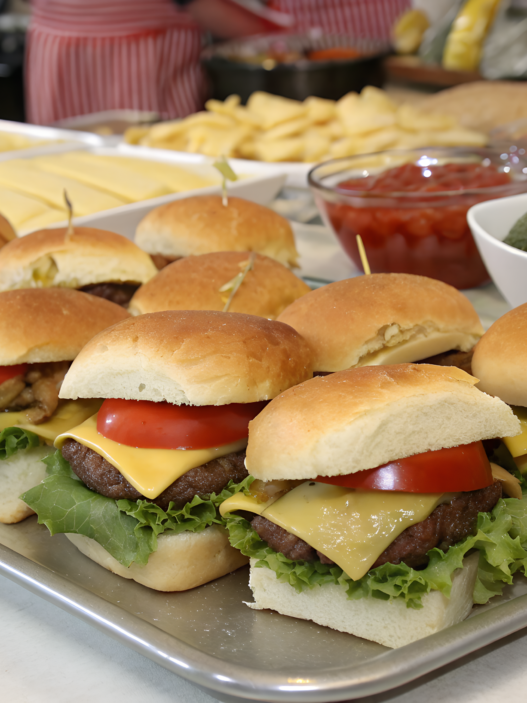
4. Air-Fried Chicken Caesar Sliders with Pickle Slaw
The air fryer really makes life easier here — everything is fast, without extra grease.
The slider format works because the portions are small but filling, and the chicken stays juicy even if you reheat it later.
No complicated techniques. Everything comes together quickly and clearly.
Ingredients (for 6–8 sliders)
- 6–8 mini slider buns
- 2 cups shredded chicken (about 280–300 g)
- ⅓ cup Caesar dressing (about 80 ml)
(Ken’s Steak House Creamy Caesar Dressing) - 1 cup grated cheese (about 110–115 g)
mozzarella or provolone - 2 tbsp melted butter (about 28 g)
For the pickle slaw:
- 1 cup finely chopped pickles (about 120–130 g)
- ½ cup thinly sliced cabbage (about 40–45 g)
- 1–2 tbsp pickle brine (about 15–30 ml)
- 1 tbsp mayonnaise (about 15 g)
- black pepper to taste
How I make them
- I start with the slaw. I mix the pickles and cabbage with the mayonnaise and pickle brine. The slaw should be juicy but not watery. I put it in the fridge while I assemble the sliders — the flavor evens out during that time.
- I mix the chicken with the dressing. I don’t drizzle it on top — I mix it in fully. This keeps the chicken juicy after the air fryer and prevents the edges from drying out.
- I assemble the sliders. I place the chicken on the bottom half of each bun, add the cheese, and cover with the top half. I brush the outside lightly with melted butter.
- I cook them in the air fryer at 350°F (about 175°C) for 6–8 minutes. The buns brown, the cheese melts, and the filling heats through. If the buns are larger, they may need another 1–2 minutes.
- I add the slaw right before serving. I lift the top bun, add a spoon of slaw, and close it again. This keeps the slaw crisp and stops the bread from getting soft.
What you can adjust to taste
- add a bit of mustard to the slaw for extra sharpness
- replace part of the Caesar with Greek yogurt
- use chicken cooked in the air fryer if you’re making it specifically for this dish
We usually serve these sliders on one shared platter, without dividing them into portions. I keep a bowl of extra slaw nearby and plenty of napkins — they always go faster than expected.
They’re best warm, but even after 15–20 minutes they still hold up well, without feeling like cold fast food.
5. Caesar Pizza Muffin Bites with Mozzarella Burst
This is not pizza and not a salad. These are small baked portions that are easy to eat with your hands and handle reheating well.
The key here is soft, melty cheese on the inside and a firm, lightly browned shell on the outside. That’s what makes them work as a snack or a lunch.
Ingredients (for 10–12 bites)
- 2 cups cooked pasta (about 160–180 g dry; penne or any short pasta with curves)
- 1½ cups finely chopped chicken (about 220–240 g)
- ½ cup Caesar dressing (about 120 ml)
(Ken’s Steak House Creamy Caesar Dressing) - ¾ cup grated mozzarella (about 85–90 g)
- ¼ cup grated Parmesan (about 20–22 g)
- 1 large egg
- black pepper to taste
How I make them
- I cook the pasta ahead of time and let it cool completely. This matters. Warm pasta will soak up the dressing and turn the mixture watery. I cook it to al dente, rinse it under cold water, and let it cool fully.
- I mix the base. In a large bowl, I combine the pasta, chicken, Caesar dressing, egg, and Parmesan. I mix gently by hand or with a spatula, without overworking it. The mixture should hold together but not turn into paste.
- I don’t add all the mozzarella at once. Some goes into the main mixture, and some I save for the center. That’s what creates the mozzarella burst inside instead of just a cheesy flavor throughout.
- I shape the muffin bites. I grease the muffin tin lightly. I add a spoon of the mixture to each cup, place a pinch of mozzarella in the center, then cover it with another spoon of the mixture. I don’t press it down hard — air keeps them from turning dense.
- I bake at 375°F (about 190°C) for 18–22 minutes. The signs are simple: the edges are browned, the top feels firm, and when you press lightly, the muffin springs back. Metal pans usually need closer to 18 minutes, silicone pans a bit longer.
- I let them rest for 5 minutes before removing. You can’t take them out right away — the inside is still very soft. After a few minutes, they hold their shape and don’t fall apart.
What you can adjust to your taste
- add finely chopped romaine directly into the mixture
- replace part of the pasta with finely chopped cauliflower
- use a mix of mozzarella and provolone for a stronger flavor
These are easiest to serve in one bowl, without arranging them individually.
They stay warm well, and they also work as a cold lunch. In the fridge, they keep for 2–3 days and reheat without losing texture.
6. Caesar-Stuffed Avocados with Spicy Drizzle
Here, avocado works both as a natural container and a rich, fatty base, while Caesar dressing with chicken makes the filling dense and satisfying. The heat on top isn’t there for show — it keeps the flavor from drifting and feeling flat.
No oven. No stove. At most, a bowl and a knife.
This format works well because nothing needs reheating, the portion is set by the avocado itself, and it’s easy to scale — for two people or for a group.
Ingredients (for 4 halves)
- 2 ripe avocados
(OXO Good Grips 3-in-1 Avocado Slicer — a tool that genuinely saves time when working with avocados) - 1 cup shredded chicken (about 140–150 g)
- ¼ cup Caesar dressing (about 60 ml)
- 2 tbsp grated Parmesan (about 10–12 g)
- lemon juice, to taste
For the spicy drizzle:
- 2 tbsp Greek yogurt or sour cream (about 30 g)
- 1–2 tsp hot sauce (about 5–10 ml, to taste)
- 1 tsp lemon juice (about 5 ml)
How I put it together
- I prepare the filling first. In a bowl, I mix the chicken, Caesar dressing, and Parmesan. The mixture should be thick, not runny. If the chicken is chopped too coarsely, the filling won’t stay put in the avocado.
- I prep the avocados. I cut them in half and remove the pit. If the cavity is small, I gently scoop out a bit of the flesh — just 1–2 teaspoons. This makes room for the filling without ruining the shape.
- I add lemon right away. Not just for color. The lemon balances the fat and makes the flavor feel tighter and more focused.
- I fill the avocados. I spoon the filling in without packing it down. A small mound works better than trying to force everything inside.
- I make the spicy drizzle. I mix the yogurt, hot sauce, and lemon until smooth. The texture should be pourable, not something you have to spread.
- I add the drizzle right before serving. I pour it in a thin stream and don’t mix it in. The sauce stays on top and works as an accent, not a second filling.
How you can adjust it
- add finely chopped celery to the chicken mixture
- replace part of the Caesar with yogurt if you want it lighter
- use smoked paprika instead of hot sauce
We usually serve these avocados on a flat platter, cut side up, with spoons on the side.
If this isn’t the only dish on the table, it helps to cut each half in two — they’re easier to grab that way.
They’re best eaten right away. After about an hour, the avocados are still edible, but the texture isn’t as clean anymore.
7. Caesar Quesadilla Pockets with Hidden Veggies
Lindy and I noticed that vegetables on their own sometimes stay on the plate, but in a quesadilla format, they disappear without discussion.
Here they’re just finely and properly prepped, and the pocket format works well: the filling heats evenly, the veggies stay inside without burning, and portions are easier to control.
Ingredients (for 4 pockets)
- 4 large flour tortillas
- 1½ cups shredded chicken (about 210–225 g)
- ½ cup Caesar dressing (about 120 ml)
- 1 cup grated cheese (about 110–115 g)
mozzarella or a mix of mozzarella and cheddar - ½ cup finely chopped zucchini (about 60–70 g)
- ½ cup finely chopped bell pepper (about 60–70 g)
- 1 tbsp olive oil (about 15 ml)
- black pepper to taste
How I make them (and where the details matter)
- I prep the vegetables first. I chop the zucchini and bell pepper very finely — small cubes, not strips. This matters: larger pieces release moisture and make the filling loose.
I quickly warm them in a skillet with a drop of oil for just 3–4 minutes. I’m not browning them, just removing excess moisture. Then I let them cool. - I mix the filling. In a bowl, I combine the chicken, vegetables, and Caesar dressing until evenly mixed. The filling should be thick and slightly sticky, not runny. If it looks too wet, I add a spoon of cheese.
- I form the pockets. I place a tortilla on a flat surface and spread the filling in a thin layer over one half, leaving space around the edges. I sprinkle cheese on top.
I fold the other half of the tortilla over the filling and lightly press the edges with my hand. - I cook them over medium heat. The pan is dry or has just a minimal amount of oil. I cook them for 3–4 minutes per side.
The cue is simple: the tortilla turns golden, the cheese inside melts, and the filling is fully heated. - I let them rest before cutting. I take them off the pan and wait 1–2 minutes. If you cut right away, the cheese stretches too much and the filling can slide out.
What you can change safely
- swap the zucchini for finely chopped broccoli
- add a bit of green onion to the filling
- use whole wheat tortillas, as long as they’re soft
We usually cut each pocket in half and serve them right away, without sauces on the side — the filling is already balanced.
For a lunch box, these quesadillas also work cold. They keep well in the fridge for a day, and reheating them in a skillet works better than the microwave, since the tortilla stays firm.
8. Chicken Caesar Bagel Melts
This is solid, everyday food you can put together quickly, without extra effort. A bagel’s dense crumb doesn’t soak up the dressing, the filling stays in place without sliding out or dripping, and this format works well both in the oven and in an air fryer.
If you have leftover chicken, this is one of the easiest ways to use it.
Ingredients (for 4 halves)
- 2 bagels, sliced in half
- 1½ cups shredded chicken (about 210–225 g)
- ⅓ cup Caesar dressing (about 80 ml)
- ¾ cup grated cheese (about 85–90 g)
mozzarella works well, or a mix of mozzarella and provolone - 2 tbsp grated Parmesan (about 10–12 g)
- black pepper to taste
How I assemble and bake them
- I prep the chicken first. If the chicken is pulled into large pieces, I chop it smaller. This matters: big chunks don’t heat evenly and tend to drag the filling downward. In a bowl, I mix the chicken with the Caesar dressing until evenly coated. There should be enough dressing to bind the meat, but not drown it.
- I lightly toast the bagels. I place the halves in the oven or air fryer for just 2–3 minutes at 350°F (about 175°C). This creates a light crust and helps keep the bagel from getting soggy under the filling.
- I build the layers. On the toasted bagel, I spread the chicken with Caesar evenly using a spoon. Then I add the main cheese, and only after that sprinkle the Parmesan on top — it adds flavor and a light crust.
- I bake until melted. I return the bagels to the oven or air fryer at 375°F (about 190°C) for 6–8 minutes.
The cue is simple: the cheese is fully melted, the edges are lightly browned, and the filling is hot. - I let them cool slightly. I take them out and wait 1–2 minutes. If you bite in right away, the cheese pulls too aggressively and the filling can slide.
What you can adjust to your taste
- add finely chopped romaine on top after baking
- replace part of the Caesar with Greek yogurt
- use an onion bagel or everything bagel for a stronger flavor
We usually serve the bagel melts cut in half so they’re easier to eat.
They work well with simple sliced cucumbers or something fresh on the side — not as a sauce, but as contrast.
They’re best eaten right away, but if there are leftovers, they reheat well in a skillet or air fryer and don’t turn into a soggy sandwich.
9. Caesar Chicken Pasta Cups (Cold Lunch Hit)
These are cold, portioned pasta cups with chicken, Caesar dressing, and cheese inside. They’re easy to take with you, easy to eat without reheating, and you don’t end up chasing food around a container.
Why cups, not just pasta
- the shape holds even when cold
- portions are already set
- the dressing stays evenly distributed instead of settling at the bottom
Ingredients (for 10–12 cups)
- 2 cups cooked pasta (about 160–180 g dry)
penne, rotini, or any curved pasta works best - 1½ cups finely chopped chicken (about 220–240 g)
- ½ cup Caesar dressing (about 120 ml)
- ¾ cup grated cheese (about 85–90 g)
mozzarella or a mix of mozzarella and Parmesan - 1 large egg
- ¼ cup finely chopped romaine or other salad greens (about 20–25 g)
- black pepper to taste
How I make them (in detail, nothing skipped)
- I cook the pasta ahead of time and let it cool completely. I cook it to al dente and don’t overcook it. After draining, I rinse it with cold water to stop the cooking and remove excess starch. Warm pasta doesn’t work here — it makes the mixture loose.
- I chop the chicken very finely. Not pulled into strands, but almost into small cubes. This matters: when cold, large pieces stand out and break the texture of the cup.
- I build the main mixture. In a large bowl, I combine the pasta, chicken, Caesar dressing, the egg, and most of the cheese. I mix gently so the pasta stays intact. The mixture should be cohesive, not runny.
- I add the greens at the end. I chop the romaine finely and mix it in last. It shouldn’t release moisture too early. This adds freshness without softening the structure.
- I form the cups. I lightly grease a muffin tin. I add the mixture to each cup and press gently in the center with a spoon to form a hollow. I don’t press the edges — the cup should hold because of its shape, not density.
- I bake at 375°F (about 190°C) for 18–22 minutes. The cue is simple: the edges are lightly browned, the top feels firm, and when pressed gently, it springs back. This is not a casserole — drying it out ruins it.
- I let them cool completely. I leave them in the pan for at least 10 minutes, then carefully remove them and cool to room temperature. Only after that do they go into the fridge.
What you can change safely
- replace part of the pasta with finely chopped cauliflower
- add a bit of lemon zest for freshness
- use smoked chicken if it isn’t too salty
We usually stack these in one container, without any extra sauces.
They keep well in the fridge for 2–3 days, don’t get soggy, and hold their shape. They’re best eaten cold — that’s when the flavor is the most even and predictable.
10. Caesar Dip-Stuffed Bell Peppers for Meal Prep
Lindy and I started making this option for days when food needs to be ready ahead of time, without surprises.
Sweet bell peppers replace bread or wraps here, and a thick Caesar dip holds its shape and flavor for several days in a row. Nothing gets soggy, portions are easy to control, and it’s simple to store and transport.
They work well both as lunch and as a filling snack between things.
Ingredients (for 6 halves)
- 3 large bell peppers
- 1½ cups finely chopped chicken (about 220–240 g)
- ½ cup Caesar dressing (about 120 ml)
- ½ cup softened cream cheese (about 115 g)
- ¼ cup grated Parmesan (about 20–22 g)
- black pepper to taste
Optional:
- finely chopped celery or green onion
- a little lemon juice
How I make them
- The filling comes first. In a bowl, I combine the cream cheese and Caesar dressing. I mix until completely smooth — this is the base. If the cream cheese isn’t fully mixed in, the finished filling will have dense chunks.
- I add the chicken and Parmesan. I chop the chicken very finely, almost into crumbs. This matters: large pieces fall out while eating and don’t sit well in the pepper. I mix in the Parmesan right away — it adds structure and flavor.
- I adjust the consistency. The filling should be thick enough to hold its shape on a spoon. If it feels too soft, I add a bit more Parmesan. If it’s too thick, I loosen it with just a teaspoon of dressing.
- I prep the peppers. I cut each pepper lengthwise in half and remove the seeds and membranes. If the bottom isn’t flat, I trim it slightly so the halves sit steady in a container.
- I fill the peppers. I spoon the filling in without packing it down. A neat mound works better than forcing everything inside — the peppers look cleaner and are easier to eat.
- I chill before storing. If the filling was just mixed and still warm, I leave the peppers uncovered in the fridge for 10–15 minutes. After that, I close the container.
What you can adjust
- add finely chopped romaine directly into the filling
- replace part of the cream cheese with Greek yogurt
- use sweet mini peppers for individual portions
We usually place the halves in one wide container, not stacked on top of each other.
They keep well in the fridge for 2–3 days, don’t release liquid, and hold their texture.
They’re easy to eat straight from the container with a fork or spoon — no bread or extra sauces needed.
If you’re prepping food for several days at once, this is one of the most reliable options in the whole lineup.
What actually sticks
We kept only the formats that don’t fall apart on day two, don’t require a special mood, and don’t turn cooking into a project. This is food that stores well in the fridge, handles transport calmly, and doesn’t annoy you when you come back to it again.
If you’ve made it this far, the question isn’t whether this is interesting — it’s what’s worth trying first.
It would be genuinely useful to see which formats work best for others: what’s easy to take with you, what gets prepped ahead of time, what disappears the fastest.Drop a comment and say which format fits you best — cold lunch, breakfast, meal prep, or something else. And if you already have your own go-to Caesar idea outside of a salad, share it too. Those are always more valuable than any roundup.
2026’s Top 10 Boldest Chicken Caesar Salad Recipes (Wraps, Dips & Sandwiches Reimagined)
Chicken, Caesar dressing, and cheese are a combo that shows up in a lot of kitchens on a regular basis. The problem is that the same salad gets boring fast, and leftover chicken starts moving from one container to another. Lindy and I have been cooking at home every day for many years, and if something doesn’t fit real life, it quietly disappears from our kitchen.
So this roundup is about breakfasts, cold lunches, meal-prep food, formats you can eat with your hands or eat cold without reheating. Every recipe here has gone through the fridge, reheating, transport, and an honest test — convenient or not.
If Caesar shows up at your place often, these recipes help use it without feeling like you’re repeating yourself.
1. Caesar Grilled Cheese with Shredded Chicken
This dish really does feel like Caesar. Just in a different form. It’s a hot, stretchy, salty-creamy thing that unexpectedly starts to feel like a proper dinner. Mostly because there’s boiled chicken in your fridge, yesterday’s bread, and some Caesar dressing you don’t want to throw away.
Flavor-wise, it’s buttery crispy bread, warm shredded chicken, Caesar dressing that doesn’t soak in but coats everything, and melted cheese that holds it all together. No extra kitchen gymnastics.
Ingredients (for 2 sandwiches)
- 4 slices of bread (sourdough or sturdy white)
- 1 cup shredded chicken (about 140–150 g cooked or roasted chicken)
- ½ cup grated cheese (about 55–60 g)
mozzarella works best with a bit of Parmesan mixed in - ¼ cup Caesar dressing (about 60 ml)
I most often use Ken’s Steak House Creamy Caesar Dressing — it’s thick, not sweet, and handles heat well - 1 tbsp butter (about 14 g)
- black pepper to taste
If you want to boost the flavor, add a pinch of garlic powder or a finely grated garlic clove. Carefully.
How I put it together
- Chicken and dressing first, together. I never layer the dressing separately. When the chicken is mixed with Caesar ahead of time, every piece is coated, nothing slides around inside the sandwich, and nothing leaks out. The dressing also warms up more gently and doesn’t split into fat and acid.
- I butter the bread on the outside, thinly. I don’t add butter inside on purpose. There’s already enough fat from the cheese and the dressing. On the outside, butter gives an even golden crust and that crunch you hear when you cut into the sandwich. Too much butter and the bread fries instead of browning — those are different things.
- Cheese goes on both sides of the filling. A bit of cheese on the bread first, then chicken with Caesar, then more cheese. The bottom layer works like glue and keeps the filling in place, the top layer seals everything and creates that stretchy texture. It’s a small detail, but without it the sandwich falls apart on the first bite.
- I cook it over medium heat and don’t rush it. High heat doesn’t give the cheese time to melt. I keep the heat medium, let the first side brown calmly, flip it, then cover the pan for just a minute or two. Everything heats through, the cheese softens, and the bread stays crispy instead of drying out.
Small tweaks if you feel like it
- add finely chopped romaine inside after cooking for contrast
- swap part of the mozzarella for provolone
- finish the sandwich with a mix of Parmesan and black pepper
Sometimes I serve it cut diagonally with a small bowl of Caesar dressing on the side. Not because it’s required. Just because I want to.
This grilled cheese works especially well in the evening, when you don’t feel like “cooking” but still want a real meal.
And yes — the next day it’s not the same. This is something you eat right away.
2. Nacho-Style Caesar Dip with Crushed Tortilla Topping
Lindy and I weren’t planning to “come up with” anything at all — we just wanted something to put on the table in the evening, something you could dip into, crunch on, and not cook from scratch again.
What we ended up with is the thing people now ask for every single time someone stops by “for half an hour.” Half an hour, yes.
This is a nacho-style Caesar dip, where the Caesar gets softer and more rounded after baking, the cheese creates a dense, stretchy texture instead of just a top layer, and crushed tortilla chips add salty crunch and that nacho feel without going overboard.
Ingredients (for a dish about 8 inches / 20 cm)
- ¾ cup Caesar dressing (about 180 ml)
(Ken’s Steak House Creamy Caesar Dressing) - 1 cup grated cheese (about 110–115 g)
mozzarella or a mix of mozzarella and Monterey Jack - ½ cup softened cream cheese (about 115 g)
- 1 cup finely chopped chicken (about 140–150 g), optional
- 1 cup crushed tortilla chips (about 40–45 g)
- black pepper to taste
How I put it together and bake it
- The base first. In a bowl, I mix the Caesar dressing with the cream cheese until smooth. This matters — if the cream cheese isn’t fully incorporated, the finished dip will have dense chunks instead of a creamy texture.
- Add the cheese and chicken. I don’t add all the cheese at once and keep a small handful for the top. The chicken is optional, but if I use it, I chop it very finely, almost into crumbs. That way the dip stays scoopable and doesn’t turn into a casserole.
- Transfer to the baking dish and level it out. I don’t pack it down. I just spread it evenly with a spoon so the surface is flat — that helps it bake evenly.
- Tortilla chips and remaining cheese on top. I don’t crush the chips too finely. You want mixed sizes — some pieces brown, others stay slightly softer. The cheese on top helps lock in that crunchy layer.
- Bake at 375°F (about 190°C) for 18–22 minutes. The cue is simple: the edges start bubbling, the top turns golden, and the smell of Caesar dip shifts from cold to warm and rich.
If you want to tweak the flavor a bit
- add a pinch of smoked paprika or chili
- mix finely chopped green onion directly into the dip
- serve with cucumber slices or celery instead of only chips
We once served this dip with vegetables from the greenhouse, and it suddenly looked surprisingly nice.
3. Chicken Caesar Breakfast Taco with Eggs and Microgreens
This breakfast came together early one morning, when Lindy and I realized that the chicken from dinner was still there, and we had just enough eggs.
We didn’t want a salad or a “proper” breakfast. We wanted something warm, filling, and something you could eat with your hands, standing by the window and looking out at the garden beds.
Chicken Caesar Breakfast Taco is soft and creamy, with eggs, chicken, and fresh microgreens on top. The eggs soften the flavor of the dressing and make it less sharp, the chicken adds substance without feeling like “lunch at 8 a.m.,” and the microgreens bring back freshness and balance.
Ingredients (for 4 tacos)
- 4 small tortillas (corn or flour)
- 4 large eggs
- 1 cup shredded chicken (about 140–150 g)
- ¼ cup Caesar dressing (about 60 ml)
(Ken’s Steak House Creamy Caesar Dressing) - 1 cup microgreens (about 25–30 g)
radish, broccoli, or a mix - 1 tbsp olive oil (about 15 ml)
- salt and black pepper to taste
How I put this breakfast together
- I warm the chicken first. In a skillet with a small drop of oil, I gently warm the chicken without browning it. I want it hot, but not dry. Once it’s warmed through, I take it out of the pan.
- I cook the eggs softly. In the same skillet, over low to medium heat. I don’t cook them until dry — they should stay creamy. At the end, I add a pinch of black pepper and just a spoon of Caesar dressing to make the eggs slightly more silky.
- I warm the tortillas separately. Either in a dry skillet or directly over the burner if we’re using gas. A warm tortilla is half the success here. A cold one breaks everything.
- Assembly. I layer the eggs first, then the chicken, sprinkle with Parmesan, and only then add the microgreens. They need to stay fresh and crisp, not wilted.
Small flavor shifts if you want variations
- swap part of the Caesar for Greek yogurt
- add a few drops of lemon juice on top
- use quail eggs for a richer flavor
We usually serve these tacos right on a wooden board, without plates. Warm tortillas go on the side, microgreens in a small bowl so everyone can add as much as they want.
If breakfast isn’t rushed, I put lemon wedges nearby and a small cup with extra Caesar dressing — not to pour, just to lightly touch.
Sometimes I add a few slices of avocado or radish on the side, without any kind of “composition.”
4. Air-Fried Chicken Caesar Sliders with Pickle Slaw
The air fryer really makes life easier here — everything is fast, without extra grease.
The slider format works because the portions are small but filling, and the chicken stays juicy even if you reheat it later.
No complicated techniques. Everything comes together quickly and clearly.
Ingredients (for 6–8 sliders)
- 6–8 mini slider buns
- 2 cups shredded chicken (about 280–300 g)
- ⅓ cup Caesar dressing (about 80 ml)
(Ken’s Steak House Creamy Caesar Dressing) - 1 cup grated cheese (about 110–115 g)
mozzarella or provolone - 2 tbsp melted butter (about 28 g)
For the pickle slaw:
- 1 cup finely chopped pickles (about 120–130 g)
- ½ cup thinly sliced cabbage (about 40–45 g)
- 1–2 tbsp pickle brine (about 15–30 ml)
- 1 tbsp mayonnaise (about 15 g)
- black pepper to taste
How I make them
- I start with the slaw. I mix the pickles and cabbage with the mayonnaise and pickle brine. The slaw should be juicy but not watery. I put it in the fridge while I assemble the sliders — the flavor evens out during that time.
- I mix the chicken with the dressing. I don’t drizzle it on top — I mix it in fully. This keeps the chicken juicy after the air fryer and prevents the edges from drying out.
- I assemble the sliders. I place the chicken on the bottom half of each bun, add the cheese, and cover with the top half. I brush the outside lightly with melted butter.
- I cook them in the air fryer at 350°F (about 175°C) for 6–8 minutes. The buns brown, the cheese melts, and the filling heats through. If the buns are larger, they may need another 1–2 minutes.
- I add the slaw right before serving. I lift the top bun, add a spoon of slaw, and close it again. This keeps the slaw crisp and stops the bread from getting soft.
What you can adjust to taste
- add a bit of mustard to the slaw for extra sharpness
- replace part of the Caesar with Greek yogurt
- use chicken cooked in the air fryer if you’re making it specifically for this dish
We usually serve these sliders on one shared platter, without dividing them into portions. I keep a bowl of extra slaw nearby and plenty of napkins — they always go faster than expected.
They’re best warm, but even after 15–20 minutes they still hold up well, without feeling like cold fast food.
5. Caesar Pizza Muffin Bites with Mozzarella Burst
This is not pizza and not a salad. These are small baked portions that are easy to eat with your hands and handle reheating well.
The key here is soft, melty cheese on the inside and a firm, lightly browned shell on the outside. That’s what makes them work as a snack or a lunch.
Ingredients (for 10–12 bites)
- 2 cups cooked pasta (about 160–180 g dry; penne or any short pasta with curves)
- 1½ cups finely chopped chicken (about 220–240 g)
- ½ cup Caesar dressing (about 120 ml)
(Ken’s Steak House Creamy Caesar Dressing) - ¾ cup grated mozzarella (about 85–90 g)
- ¼ cup grated Parmesan (about 20–22 g)
- 1 large egg
- black pepper to taste
How I make them
- I cook the pasta ahead of time and let it cool completely. This matters. Warm pasta will soak up the dressing and turn the mixture watery. I cook it to al dente, rinse it under cold water, and let it cool fully.
- I mix the base. In a large bowl, I combine the pasta, chicken, Caesar dressing, egg, and Parmesan. I mix gently by hand or with a spatula, without overworking it. The mixture should hold together but not turn into paste.
- I don’t add all the mozzarella at once. Some goes into the main mixture, and some I save for the center. That’s what creates the mozzarella burst inside instead of just a cheesy flavor throughout.
- I shape the muffin bites. I grease the muffin tin lightly. I add a spoon of the mixture to each cup, place a pinch of mozzarella in the center, then cover it with another spoon of the mixture. I don’t press it down hard — air keeps them from turning dense.
- I bake at 375°F (about 190°C) for 18–22 minutes. The signs are simple: the edges are browned, the top feels firm, and when you press lightly, the muffin springs back. Metal pans usually need closer to 18 minutes, silicone pans a bit longer.
- I let them rest for 5 minutes before removing. You can’t take them out right away — the inside is still very soft. After a few minutes, they hold their shape and don’t fall apart.
What you can adjust to your taste
- add finely chopped romaine directly into the mixture
- replace part of the pasta with finely chopped cauliflower
- use a mix of mozzarella and provolone for a stronger flavor
These are easiest to serve in one bowl, without arranging them individually.
They stay warm well, and they also work as a cold lunch. In the fridge, they keep for 2–3 days and reheat without losing texture.
6. Caesar-Stuffed Avocados with Spicy Drizzle
Here, avocado works both as a natural container and a rich, fatty base, while Caesar dressing with chicken makes the filling dense and satisfying. The heat on top isn’t there for show — it keeps the flavor from drifting and feeling flat.
No oven. No stove. At most, a bowl and a knife.
This format works well because nothing needs reheating, the portion is set by the avocado itself, and it’s easy to scale — for two people or for a group.
Ingredients (for 4 halves)
- 2 ripe avocados
(OXO Good Grips 3-in-1 Avocado Slicer — a tool that genuinely saves time when working with avocados) - 1 cup shredded chicken (about 140–150 g)
- ¼ cup Caesar dressing (about 60 ml)
- 2 tbsp grated Parmesan (about 10–12 g)
- lemon juice, to taste
For the spicy drizzle:
- 2 tbsp Greek yogurt or sour cream (about 30 g)
- 1–2 tsp hot sauce (about 5–10 ml, to taste)
- 1 tsp lemon juice (about 5 ml)
How I put it together
- I prepare the filling first. In a bowl, I mix the chicken, Caesar dressing, and Parmesan. The mixture should be thick, not runny. If the chicken is chopped too coarsely, the filling won’t stay put in the avocado.
- I prep the avocados. I cut them in half and remove the pit. If the cavity is small, I gently scoop out a bit of the flesh — just 1–2 teaspoons. This makes room for the filling without ruining the shape.
- I add lemon right away. Not just for color. The lemon balances the fat and makes the flavor feel tighter and more focused.
- I fill the avocados. I spoon the filling in without packing it down. A small mound works better than trying to force everything inside.
- I make the spicy drizzle. I mix the yogurt, hot sauce, and lemon until smooth. The texture should be pourable, not something you have to spread.
- I add the drizzle right before serving. I pour it in a thin stream and don’t mix it in. The sauce stays on top and works as an accent, not a second filling.
How you can adjust it
- add finely chopped celery to the chicken mixture
- replace part of the Caesar with yogurt if you want it lighter
- use smoked paprika instead of hot sauce
We usually serve these avocados on a flat platter, cut side up, with spoons on the side.
If this isn’t the only dish on the table, it helps to cut each half in two — they’re easier to grab that way.
They’re best eaten right away. After about an hour, the avocados are still edible, but the texture isn’t as clean anymore.
7. Caesar Quesadilla Pockets with Hidden Veggies
Lindy and I noticed that vegetables on their own sometimes stay on the plate, but in a quesadilla format, they disappear without discussion.
Here they’re just finely and properly prepped, and the pocket format works well: the filling heats evenly, the veggies stay inside without burning, and portions are easier to control.
Ingredients (for 4 pockets)
- 4 large flour tortillas
- 1½ cups shredded chicken (about 210–225 g)
- ½ cup Caesar dressing (about 120 ml)
- 1 cup grated cheese (about 110–115 g)
mozzarella or a mix of mozzarella and cheddar - ½ cup finely chopped zucchini (about 60–70 g)
- ½ cup finely chopped bell pepper (about 60–70 g)
- 1 tbsp olive oil (about 15 ml)
- black pepper to taste
How I make them (and where the details matter)
- I prep the vegetables first. I chop the zucchini and bell pepper very finely — small cubes, not strips. This matters: larger pieces release moisture and make the filling loose.
I quickly warm them in a skillet with a drop of oil for just 3–4 minutes. I’m not browning them, just removing excess moisture. Then I let them cool. - I mix the filling. In a bowl, I combine the chicken, vegetables, and Caesar dressing until evenly mixed. The filling should be thick and slightly sticky, not runny. If it looks too wet, I add a spoon of cheese.
- I form the pockets. I place a tortilla on a flat surface and spread the filling in a thin layer over one half, leaving space around the edges. I sprinkle cheese on top.
I fold the other half of the tortilla over the filling and lightly press the edges with my hand. - I cook them over medium heat. The pan is dry or has just a minimal amount of oil. I cook them for 3–4 minutes per side.
The cue is simple: the tortilla turns golden, the cheese inside melts, and the filling is fully heated. - I let them rest before cutting. I take them off the pan and wait 1–2 minutes. If you cut right away, the cheese stretches too much and the filling can slide out.
What you can change safely
- swap the zucchini for finely chopped broccoli
- add a bit of green onion to the filling
- use whole wheat tortillas, as long as they’re soft
We usually cut each pocket in half and serve them right away, without sauces on the side — the filling is already balanced.
For a lunch box, these quesadillas also work cold. They keep well in the fridge for a day, and reheating them in a skillet works better than the microwave, since the tortilla stays firm.
8. Chicken Caesar Bagel Melts
This is solid, everyday food you can put together quickly, without extra effort. A bagel’s dense crumb doesn’t soak up the dressing, the filling stays in place without sliding out or dripping, and this format works well both in the oven and in an air fryer.
If you have leftover chicken, this is one of the easiest ways to use it.
Ingredients (for 4 halves)
- 2 bagels, sliced in half
- 1½ cups shredded chicken (about 210–225 g)
- ⅓ cup Caesar dressing (about 80 ml)
- ¾ cup grated cheese (about 85–90 g)
mozzarella works well, or a mix of mozzarella and provolone - 2 tbsp grated Parmesan (about 10–12 g)
- black pepper to taste
How I assemble and bake them
- I prep the chicken first. If the chicken is pulled into large pieces, I chop it smaller. This matters: big chunks don’t heat evenly and tend to drag the filling downward. In a bowl, I mix the chicken with the Caesar dressing until evenly coated. There should be enough dressing to bind the meat, but not drown it.
- I lightly toast the bagels. I place the halves in the oven or air fryer for just 2–3 minutes at 350°F (about 175°C). This creates a light crust and helps keep the bagel from getting soggy under the filling.
- I build the layers. On the toasted bagel, I spread the chicken with Caesar evenly using a spoon. Then I add the main cheese, and only after that sprinkle the Parmesan on top — it adds flavor and a light crust.
- I bake until melted. I return the bagels to the oven or air fryer at 375°F (about 190°C) for 6–8 minutes.
The cue is simple: the cheese is fully melted, the edges are lightly browned, and the filling is hot. - I let them cool slightly. I take them out and wait 1–2 minutes. If you bite in right away, the cheese pulls too aggressively and the filling can slide.
What you can adjust to your taste
- add finely chopped romaine on top after baking
- replace part of the Caesar with Greek yogurt
- use an onion bagel or everything bagel for a stronger flavor
We usually serve the bagel melts cut in half so they’re easier to eat.
They work well with simple sliced cucumbers or something fresh on the side — not as a sauce, but as contrast.
They’re best eaten right away, but if there are leftovers, they reheat well in a skillet or air fryer and don’t turn into a soggy sandwich.
9. Caesar Chicken Pasta Cups (Cold Lunch Hit)
These are cold, portioned pasta cups with chicken, Caesar dressing, and cheese inside. They’re easy to take with you, easy to eat without reheating, and you don’t end up chasing food around a container.
Why cups, not just pasta
- the shape holds even when cold
- portions are already set
- the dressing stays evenly distributed instead of settling at the bottom
Ingredients (for 10–12 cups)
- 2 cups cooked pasta (about 160–180 g dry)
penne, rotini, or any curved pasta works best - 1½ cups finely chopped chicken (about 220–240 g)
- ½ cup Caesar dressing (about 120 ml)
- ¾ cup grated cheese (about 85–90 g)
mozzarella or a mix of mozzarella and Parmesan - 1 large egg
- ¼ cup finely chopped romaine or other salad greens (about 20–25 g)
- black pepper to taste
How I make them (in detail, nothing skipped)
- I cook the pasta ahead of time and let it cool completely. I cook it to al dente and don’t overcook it. After draining, I rinse it with cold water to stop the cooking and remove excess starch. Warm pasta doesn’t work here — it makes the mixture loose.
- I chop the chicken very finely. Not pulled into strands, but almost into small cubes. This matters: when cold, large pieces stand out and break the texture of the cup.
- I build the main mixture. In a large bowl, I combine the pasta, chicken, Caesar dressing, the egg, and most of the cheese. I mix gently so the pasta stays intact. The mixture should be cohesive, not runny.
- I add the greens at the end. I chop the romaine finely and mix it in last. It shouldn’t release moisture too early. This adds freshness without softening the structure.
- I form the cups. I lightly grease a muffin tin. I add the mixture to each cup and press gently in the center with a spoon to form a hollow. I don’t press the edges — the cup should hold because of its shape, not density.
- I bake at 375°F (about 190°C) for 18–22 minutes. The cue is simple: the edges are lightly browned, the top feels firm, and when pressed gently, it springs back. This is not a casserole — drying it out ruins it.
- I let them cool completely. I leave them in the pan for at least 10 minutes, then carefully remove them and cool to room temperature. Only after that do they go into the fridge.
What you can change safely
- replace part of the pasta with finely chopped cauliflower
- add a bit of lemon zest for freshness
- use smoked chicken if it isn’t too salty
We usually stack these in one container, without any extra sauces.
They keep well in the fridge for 2–3 days, don’t get soggy, and hold their shape. They’re best eaten cold — that’s when the flavor is the most even and predictable.
10. Caesar Dip-Stuffed Bell Peppers for Meal Prep
Lindy and I started making this option for days when food needs to be ready ahead of time, without surprises.
Sweet bell peppers replace bread or wraps here, and a thick Caesar dip holds its shape and flavor for several days in a row. Nothing gets soggy, portions are easy to control, and it’s simple to store and transport.
They work well both as lunch and as a filling snack between things.
Ingredients (for 6 halves)
- 3 large bell peppers
- 1½ cups finely chopped chicken (about 220–240 g)
- ½ cup Caesar dressing (about 120 ml)
- ½ cup softened cream cheese (about 115 g)
- ¼ cup grated Parmesan (about 20–22 g)
- black pepper to taste
Optional:
- finely chopped celery or green onion
- a little lemon juice
How I make them
- The filling comes first. In a bowl, I combine the cream cheese and Caesar dressing. I mix until completely smooth — this is the base. If the cream cheese isn’t fully mixed in, the finished filling will have dense chunks.
- I add the chicken and Parmesan. I chop the chicken very finely, almost into crumbs. This matters: large pieces fall out while eating and don’t sit well in the pepper. I mix in the Parmesan right away — it adds structure and flavor.
- I adjust the consistency. The filling should be thick enough to hold its shape on a spoon. If it feels too soft, I add a bit more Parmesan. If it’s too thick, I loosen it with just a teaspoon of dressing.
- I prep the peppers. I cut each pepper lengthwise in half and remove the seeds and membranes. If the bottom isn’t flat, I trim it slightly so the halves sit steady in a container.
- I fill the peppers. I spoon the filling in without packing it down. A neat mound works better than forcing everything inside — the peppers look cleaner and are easier to eat.
- I chill before storing. If the filling was just mixed and still warm, I leave the peppers uncovered in the fridge for 10–15 minutes. After that, I close the container.
What you can adjust
- add finely chopped romaine directly into the filling
- replace part of the cream cheese with Greek yogurt
- use sweet mini peppers for individual portions
We usually place the halves in one wide container, not stacked on top of each other.
They keep well in the fridge for 2–3 days, don’t release liquid, and hold their texture.
They’re easy to eat straight from the container with a fork or spoon — no bread or extra sauces needed.
If you’re prepping food for several days at once, this is one of the most reliable options in the whole lineup.
What actually sticks
We kept only the formats that don’t fall apart on day two, don’t require a special mood, and don’t turn cooking into a project. This is food that stores well in the fridge, handles transport calmly, and doesn’t annoy you when you come back to it again.
If you’ve made it this far, the question isn’t whether this is interesting — it’s what’s worth trying first.
It would be genuinely useful to see which formats work best for others: what’s easy to take with you, what gets prepped ahead of time, what disappears the fastest.Drop a comment and say which format fits you best — cold lunch, breakfast, meal prep, or something else. And if you already have your own go-to Caesar idea outside of a salad, share it too. Those are always more valuable than any roundup.