
If you have a backyard, then you have the chance to turn it into a true gathering spot. Lindy and I always dreamed of evenings by the fire: long talks, a mug of hot tea, and the crackle of wood. But for the longest time, it seemed like you needed a contractor, construction work, and lots of money to make it happen. In reality, building your own fire pit is something you can do with your own hands — sometimes in just one evening.
In this article we’ve collected 10 real ideas: from the most budget-friendly $50 fire pit to a full lounge zone with lighting. All the options are tested in practice — simple, accessible, and most importantly, safe.
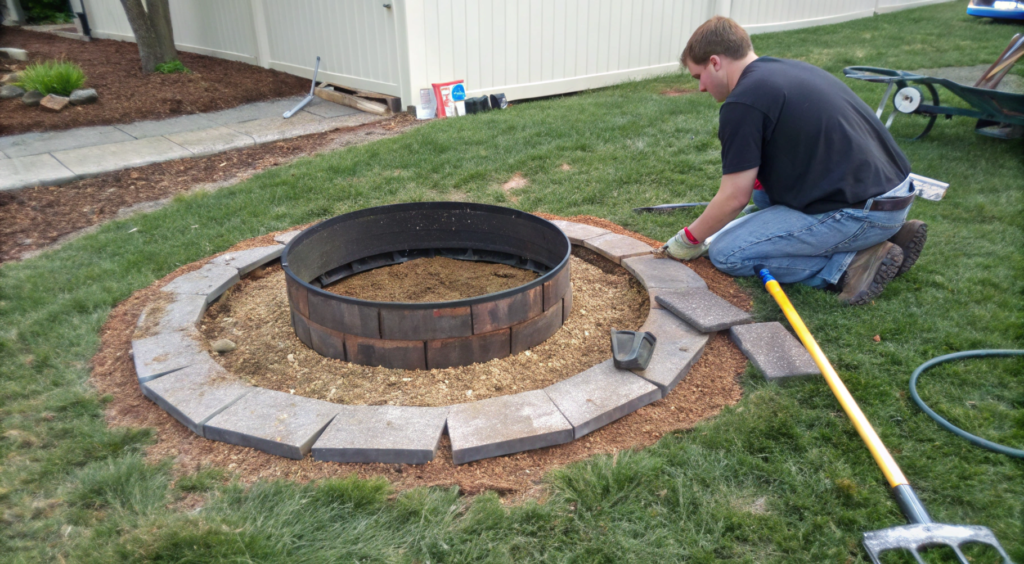
1. How We Built a $50 Fire Pit in an Afternoon
You don’t always need to invest in expensive outdoor projects to create a cozy corner for evenings by the fire. We had a huge desire to just sit by the flames. And we… built our first fire pit literally in one afternoon. We spent just over $50.
We needed something fast, safe, simple, and inexpensive. A way to test the location, see how the smoke behaves, and check if it’s comfortable to sit around. Because the placement of a fire pit decides everything. You’ll either use it every weekend — or forget about it after a week.
Materials We Used
We decided to build a fire ring about 36 inches (90 cm) in diameter and lay it directly on bare soil.
Here’s our shopping list:
- 24 concrete blocks — basic retaining wall blocks, $1.60 each
- 1 bag of gravel (~0.5 cubic yard / 380 L) — about $15
- 1 bag of sand — $5
- Brick chips — $5
- A bucket of water and a garden shovel
No metal bowl. No concrete. And yeah, no fancy gloves with stone-grip. Everything was really simple.
How We Did It
- Choosing the spot. We picked a flat area in the backyard, about 10 feet (3 m) from trees and buildings. This matters: fire safety first. Don’t be lazy — measure it out and think about how the wind will carry smoke.
- Preparing the ground. We cleared a circle about 40 inches (1 m) in diameter. Just removed the top layer of grass and debris. We didn’t dig deep. Flattened it down with our feet. Sure, a shovel would’ve done it better. But hey — this was an “evening project,” not a Pulitzer entry.
- Adding the base. First layer — thin sand (about 1 inch / 2.5 cm) so the blocks wouldn’t wobble. Then gravel on top, and a bit of brick chips for drainage and looks. Rough? Maybe. But it works great.
- Placing the blocks. We set 12 blocks in a circle — that was the first layer. The second layer went in a staggered pattern so seams didn’t overlap. That’s it. No glue, no mortar, no anchors.
- Finishing. We poured water all around (so the sand and gravel would settle) and made a couple of test fires — just to see if it held shape.
The Result
- Functional. The fire lights quickly, flames don’t “wander,” coals stay centered. Smoke goes up, not into your face.
- Safe. Gravel and sand help keep heat in and stop the fire from escaping the ring.
- Cheap. The whole thing cost us about $52. If we had known about the Sunnydaze Outdoor Fire Pit Ring – 36 Inch Heavy Duty Steel on Amazon, we probably would’ve added it right away. It starts around $30 and makes the structure last longer — especially if you want more than just a “weekend project.”
- Easy to rebuild. After a couple months, we decided we wanted a permanent spot closer to the pergola. We just tore it down in 10 minutes and rebuilt it in the new place. Totally portable.
Things to Watch Out For
- Use solid concrete blocks without holes, they hold heat better.
- Don’t build on a slope — the fire will lean one way.
- Don’t skip drainage — if rainwater pools inside, you won’t be able to use it.
- Keep water nearby (hose, bucket) — safety first.
Common Mistakes When Building a Simple Fire Pit
Don’t ignore these — they can cost you a fire or a full rebuild.
- Placing it directly on grass or mulch.
Roots can catch fire. Solution: remove the topsoil and add sand/gravel. - Too small of a diameter.
Fire spills over the edges. Minimum — 36 inches (90 cm) inner circle. - Using river or lake stones.
They’re saturated with moisture and can explode from heat, sending shards flying. For fire pits, use only fire bricks or landscape concrete blocks. - Not checking the wind direction.
Smoke can blow straight into the house or porch. Before setting up your pit, watch where the evening wind usually goes. - Not keeping water nearby.
Even if everything looks under control — water should always be within reach.
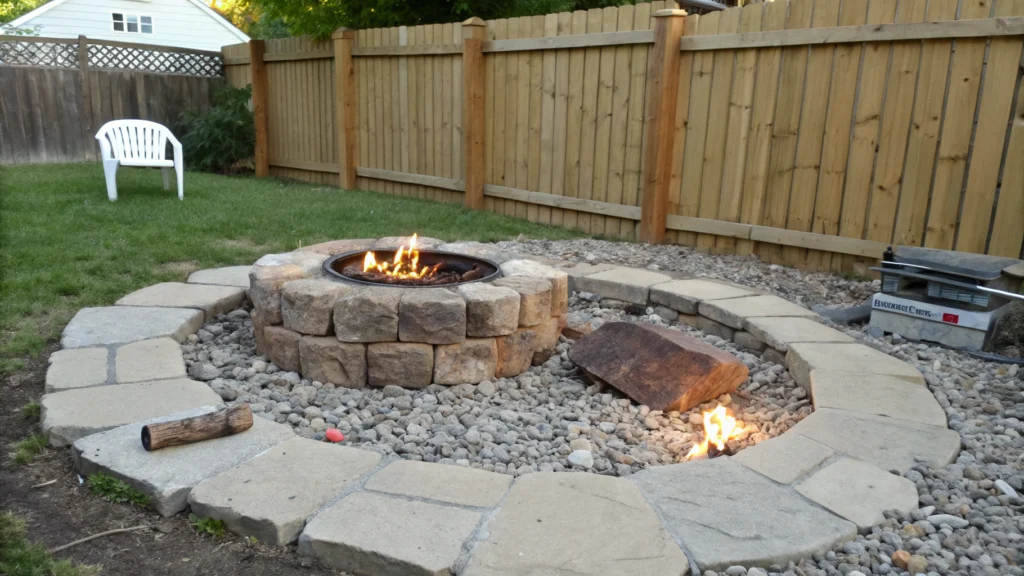
2. Easy Gravel + Brick Fire Circle Setup

You don’t always want to dig holes or build something “for the ages.” Sometimes you need a solution that’s neat, affordable, and easy to redo later. In those cases, a gravel and brick fire circle works perfectly.
The gravel base provides drainage, bricks create a clean and stable edge, and the whole construction looks tidy and well-kept. This method works great for small yards and spacious lots alike — you can put it together in a day and use it for years.
Why Choose This Method
- Doesn’t require digging or leveling the site
- Excellent drainage — no “fire pit puddle” after rain
- Looks neat, especially surrounded by lawn or gravel path
- Can be disassembled and moved if needed
What You’ll Need (materials and cost)
- Burnt brick (or clinker) — 30–40 pieces, $0.75–1 each
- Landscape gravel (pea gravel or 3/4″) — 4–5 bags (50 lb / 22 kg), $5–6 each
- Landscape fabric (for underlayer) — 1 roll (3×50 ft), $15
- Leveling sand — 1 bag, $5
- Steel fire ring (optional) — 1 piece, about $35
How to Build It
- Mark the circle. We used a rope and stake to outline a perfect circle, about 40 inches (1 m) in diameter. It’s a comfortable size for the fire and seating. We marked the contour with spray paint over the grass.
- Remove the top layer. We cut away the grass and about 2 inches (5 cm) of soil. If your soil is heavy clay, dig a bit deeper and add sand for drainage.
- Lay the underlayer. We rolled out landscape fabric to stop weeds and pinned it down with garden staples. This is crucial — without it, you’ll have grass growing between your bricks in a month.
- Add gravel. We poured a thin layer of sand (1 inch / 2.5 cm) and then 2–3 inches (5–7.5 cm) of gravel. Stomped it down with feet and shovel. The key is making sure the base doesn’t shift.
- Place the bricks. Around the perimeter, we set bricks tightly edge to edge. We didn’t use mortar or glue — just leveled the base and pressed each brick slightly into the sand/gravel. The result was a stable, neat border.
- Leave the center open. You can leave the center as gravel, or add a steel fire ring later to form the fire core. We skipped it at first and bought one half a year later, once we realized we were using the pit regularly.
Stable and Safe
- Bricks handle high heat without cracking.
- Gravel prevents water buildup — no smoke from moisture or rot.
- Ground stays clean and solid — no mud, puddles, or sinking spots.
Good to Know. Don’t use glossy bricks or decorative tiles — they can crack from heat. Choose gravel with at least 3/4″ (2 cm) size — smaller gravel compacts too fast.
Don’t make the circle edge out of wood — even treated wood will burn out over time.
Even after 3 years this fire zone will still look clean, pretty, and functional. And if you add a couple of wooden folding chairs and a solar lantern, it will become your favorite evening spot. Even in winter, with a blanket over your shoulders.
3. DIY Swing Bench Fire Pit (No Heavy Tools!)
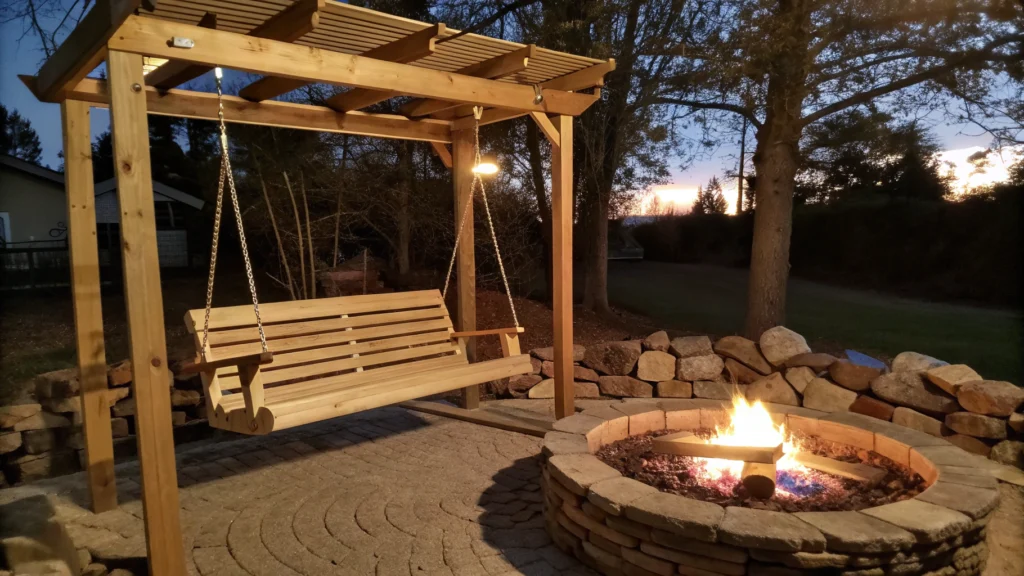
I really love the idea of hanging a porch swing bench right in front of the fire pit. It creates this half-circle: fire in the center, and you gently sway, warming your hands and watching the coals. And — what’s important — no concrete, no welding, no special equipment. You can build it together in just one day.
What You’ll Need
- Wooden posts 4×4, 8 ft (2.4 m) long — 3–4 pieces. Treated lumber is best for outdoor use.
- Metal hooks with ring — 6–8 pieces. Go for galvanized ones, rated for at least 150 lb (70 kg).
- Chain or cable (galvanized) — 15–20 ft (4.5–6 m). We used standard medium-thickness chain from a hardware store.
- Porch swing bench — 1 or 2 pieces. Light but strong. Example: Amish Heavy Duty 4ft. Treated Porch Swing on Amazon.
- Coarse gravel (3/4″) — 2 bags, 50 lb (22 kg) each. For drainage and stability in the post holes.
- Sand (optional) — 1 bag. Useful for leveling the base of posts or the bench area.
- Tools — shovel, cordless drill, tape measure, level. Just the basics.
How to Build It
- Install the posts. We picked a spot about 6–7 ft from the fire pit center and dug three holes, 18 inches deep (45 cm) in a triangle pattern. Poured a bit of gravel at the bottom and set the posts. No concrete — just packed the soil back in and topped with more gravel.
This holds up well, especially if your soil isn’t sandy. Plus, the design stays portable: you can pull the posts out and move them if you want to change the layout.
- Screw in the hooks. At about 5.5 ft (1.6 m) high, we drilled holes and screwed in metal ring hooks. These are for attaching the chain or cable.
Tip: put two hooks per post, one on each side, to spread the load evenly. This way the bench won’t twist. - Hang the bench. We used a light wooden porch swing bench, hung on chains about 3 ft (90 cm) long. The chain was attached with carabiners, so the bench can be unhooked in minutes if needed.
The swing gently moves, but doesn’t wobble — super comfortable for two people, even with mugs of something warm in hand. The distance to the fire is about 5 ft (1.5 m), which is close enough for warmth but safe for hanging.
Things to Keep in Mind
- Don’t pick a bench that’s too heavy. More weight means more inertia. Wood is better than metal here.
- Posts should be buried at least 18 inches deep. Otherwise, they’ll loosen over time.
- Treat the wood, especially the bottom sections that contact the ground.
- Think about wind direction. A swing bench can sway a little at night, and you don’t want it blowing toward the fire.
- Always have extra chain length. Easier to shorten later than to run out.
Why This Works Well
First, you can truly build it together in one day — no need to hire anyone.
Second, it’s unique. Not “just another patio with concrete and a bench,” but something lively, flexible, and full of atmosphere. Adding a solar lantern with a bracket makes it even cozier at night.
4. Backyard Fire Pit with Cinder Block Bench
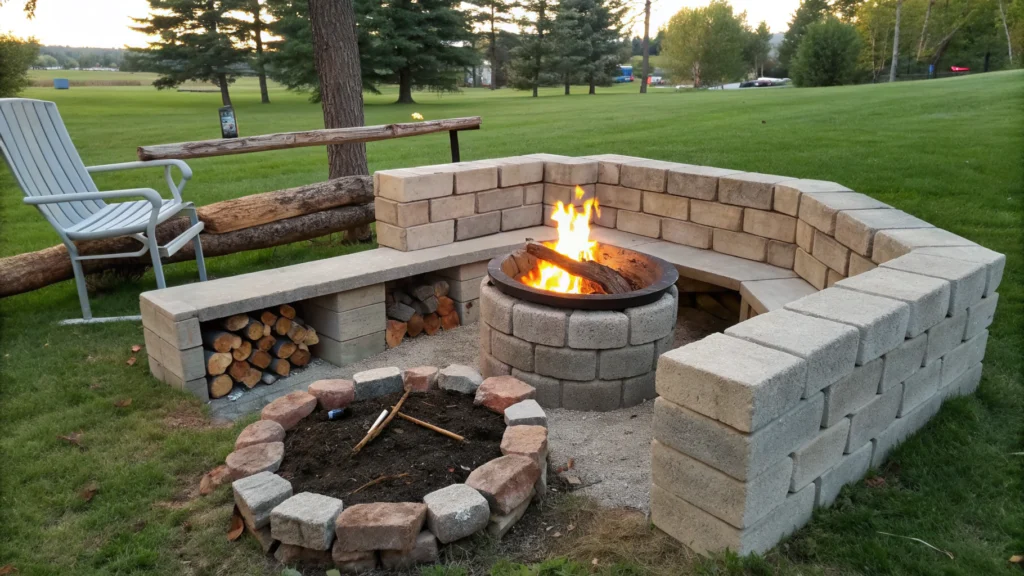
We’ve always been fans of solutions you can build from what’s already lying around the shed. And when it’s time to set up a permanent fire pit lounge area — without digging posts, pouring concrete, or locking it all in forever — cinder blocks immediately come to mind.
You’d be surprised how versatile they are. With them, you can easily build a sturdy outdoor bench that looks solid, holds weight, and doesn’t require a single screw.
What You’ll Need
- Cinder blocks 8×8×16 inches (20×20×40 cm) — 12–16 pieces, depending on bench length.
- 2×6 boards, 6 ft (1.8 m) long — 3 boards per bench. Treated wood is best.
- Landscape adhesive — 1 tube per bench, optional for added stability.
- Gravel or sand — 1–2 bags to level the base.
- Landscape fabric — for the underlayer beneath the bench zone.
- Tools — shovel, level, gloves. No saws, drills, or concrete mixers needed.
How to Build It
- Choose and level the spot. Pick an area about 5 ft from the fire pit. The surface must be flat — cinder blocks don’t forgive tilts.
Remove the top layer of soil (1–2 inches), lay down landscape fabric, and add a bit of sand and gravel. Tamp it down and check with a level. - Lay the cinder blocks — bench base. On each side of the bench, stack 2 vertical blocks on top of each other (2 layers of 2 blocks). That gives you two supports about 16 inches (40 cm) high. You can set them “well style” (holes up, along the length), or stand them vertically so the boards slide into the holes like slots.
The vertical slot method is more stable and doesn’t need extra fastening. - Insert the boards. Place three 2×6 boards, 6 ft (1.8 m) long into the holes of the cinder blocks. They fit snugly, no wobble. The result is a full bench — big enough for two or three people.
If you want extra rigidity, fix the boards to the blocks with landscape adhesive. We didn’t, since we wanted to keep it movable.
Why It’s Safe
This setup is all about stability and predictability.
Cinder blocks are non-flammable, handle high heat, and don’t crack from fire. We placed the bench at least 4.5 ft (1.3 m) from the fire pit, so the boards never get hot, even with strong flames.
The boards sit horizontally and firmly, while the whole structure rests on a compacted gravel base, which prevents wobbling.
There are no screws, no loose elements — just sit down and it feels solid.
And if you ever want to move it, you can take it apart in 10 minutes, no tools needed.
Tips
- Don’t place cinder blocks directly on grass. Always tamp the base and use fabric — otherwise the bench will shift.
- Treat the boards. Even for a simple fire pit bench, sealing against moisture will triple its lifespan.
- Consider height. If you want “couch-like comfort,” add a third layer of blocks. For most adults, 16 inches is a good seat height.
- Don’t skimp on board width. We tried 2×4 — too narrow and uncomfortable. 2×6 is just right.
Put two benches in and you’ve basically created an outdoor living room around the fire. No noise, no cement, no heavy labor. And the look is rock-solid.
Best part — if you get tired of the bench or want to rearrange, you can take it apart in half an hour and move it anywhere.
5. Quick Setup Using a Metal Ring + Mulch Base
Metal ring + mulch base is the perfect option if you want a fire “tonight,” but also want it to look neat and be safe.
What You’ll Need
- Metal fire pit ring — 30–36 inches (75–90 cm). Sunnydaze Outdoor Fire Pit Ring – 36 Inch on Amazon
- Landscape fabric — to block grass growth.
- Mulch or wood chips — 3–4 bags.
- Sand or fine gravel — 1–2 bags for leveling under the ring.
- Tools — shovel, level, scissors for fabric.
How to Build
- Prepare the site. We chose a flat spot in the yard, away from buildings and trees. Removed the top layer of grass in a circle about 40 inches (1 m) in diameter. If you don’t want to dig deep, just remove a couple inches of sod.
- Lay landscape fabric. We laid the fabric inside the circle to stop weeds from growing through the mulch. Secured the edges with stakes.
- Add the base. In the center, we poured a 1–2 inch (2.5–5 cm) layer of sand or fine gravel. This simple step keeps the ring level and steady.
- Place the metal ring. We set the ring in the middle. Checked with a level — it should sit perfectly horizontal so the fire and coals distribute evenly.
- Add mulch around it. We spread mulch in the area outside the ring. It created a neat border and a soft surface for chairs and stools.
Safety and Reliability
- The metal ring keeps the fire contained and protects the soil from overheating.
- A layer of sand or gravel underneath reduces sinking and prevents heat from reaching the ground.
- Mulch is outside the ring, not inside — it doesn’t touch the flames.
- Ring size of 30–36 inches is optimal: fire stays comfortable and controlled.
With proper spacing and a ring with blocks, this setup is truly safe.
This option can be done in just a couple of hours. The mulch circle looks tidy, and the ring gives it a finished look. Over time, the mulch will need refreshing — it darkens and settles. But the fire pit itself stays functional and safe.
6. Fire Pit Layout Without Digging or Leveling
It’s common to build a fire pit right on the surface, without digging or leveling the site. The main thing is to set it up so it’s stable and safe.
What You’ll Need
- Metal fire pit ring — 30–36 inches (75–90 cm).
- Heat-resistant blocks or bricks — 20–24 pieces to surround the ring.
- Heat-resistant fire pit mat (optional) — protects lawn or decking if the spot is temporary.
- Fine gravel or sand — 2–3 bags, for filling under the ring and blocks.
- Tools — tape measure, level (optional), gloves.
How to Build
- Pick the spot. Choose a flat area of the yard, with no trees, shrubs, or buildings within 10 ft (3 m). This step is crucial: if the ground is uneven, the fire pit will still work but look crooked.
- Lay the base. If the grass is tall, just mow it and place a heat-resistant mat or tarp. You can skip it, but the mat makes the project tidier and protects the soil.
- Place the ring and blocks. Put the metal ring in the center, and arrange blocks or bricks around it in a single layer. No glue or mortar needed — just “dry stack.” To prevent wobbling, pour a thin layer of gravel or sand under the blocks.
- Test it. Build a small fire and light it to check how the setup behaves. The ring holds shape, blocks stay in place. Everything works.
What Ensures Safety
- The fire is contained within the metal ring, and the blocks around it add extra protection.
- A layer of sand or gravel underneath reduces heat transfer to the soil and prevents root fires.
- Keeping at least 10 ft of clearance from buildings compensates for the lack of digging.
- Blocks are stacked tightly, so they don’t move even if someone bumps into them.
This solution is the fastest way to build a fire pit. It’s perfect if you’re not ready to commit to a permanent location, but want to see how it feels.
7. Portable Fire Pit + Folding Seating Combo
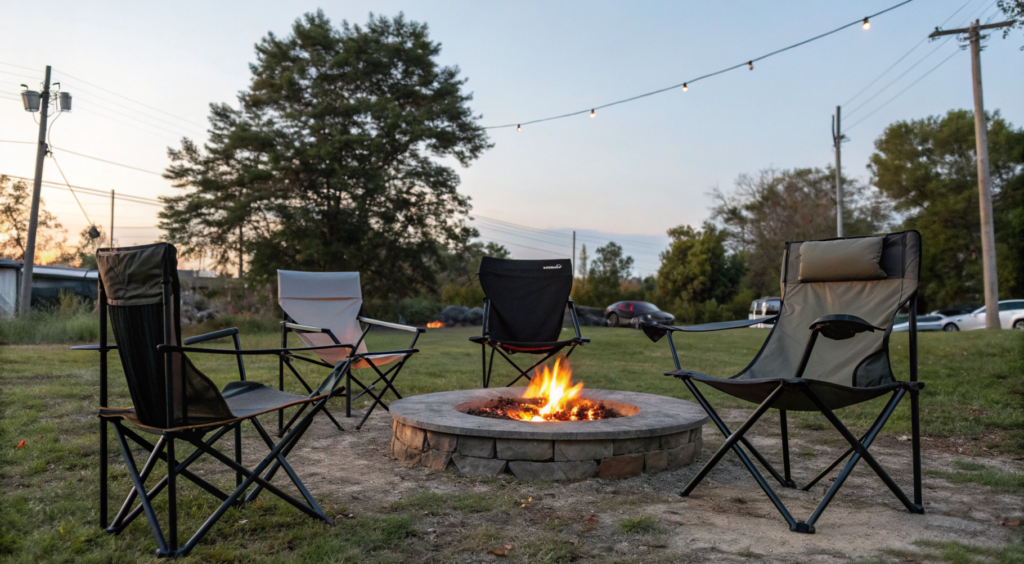
If you’re not ready for a permanent fire pit, the perfect setup is a portable fire pit + folding chairs.
What You’ll Need
- Portable metal fire pit, 24–30 inches (60–75 cm). For a wood-burning model, make sure it comes with a spark screen. If you prefer gas, check out the Outland Firebowl 893 Deluxe Outdoor Portable Propane Gas Fire Pit on Amazon.
- Heat-resistant fire pit mat — protects lawn or deck.
- Folding chairs — 2–4 pieces. Choose light but sturdy models made of wood or metal.
- Flat site — no slopes, no overhanging branches.
How to Build
- Find the spot. Pick a level area with no buildings or trees within 10 ft (3 m). If setting it on grass or decking, place a heat-resistant mat first. This step is essential for safety.
- Set up the portable fire pit. Place the bowl on the mat, check stability. Many models have legs or folding supports with locks — make sure they don’t wobble.
- Arrange the folding chairs. We like to set chairs in a half-circle — leaving space for walking and making sure heat is evenly felt. Distance: 5–6 ft (1.5–1.8 m) from the pit.
- Test it. If using a wood-burning fire pit — light a small fire and check where the smoke goes to arrange chairs correctly.
If it’s a gas model — just turn it on and see how the heat spreads.
Thought-Out Safety
- The metal bowl fully contains fire and coals, and a spark screen reduces the risk of stray sparks.
- A fire pit mat underneath protects lawn or decking from heat and embers.
- Folding chairs stay at a safe distance — minimum 5 ft from the fire.
- All equipment is portable, so in strong wind or changing weather, you can easily move it.
With proper setup and distance control, this option is truly safe even in small yards.
When we lived in Idaho, we bought a portable gas fire bowl that runs on propane and used it every week. It cost about $140, and it was money well spent: no smoke, no embers on the lawn, and the neighbors were happy too. The folding chairs are still with us — in winter we just store them in the shed.
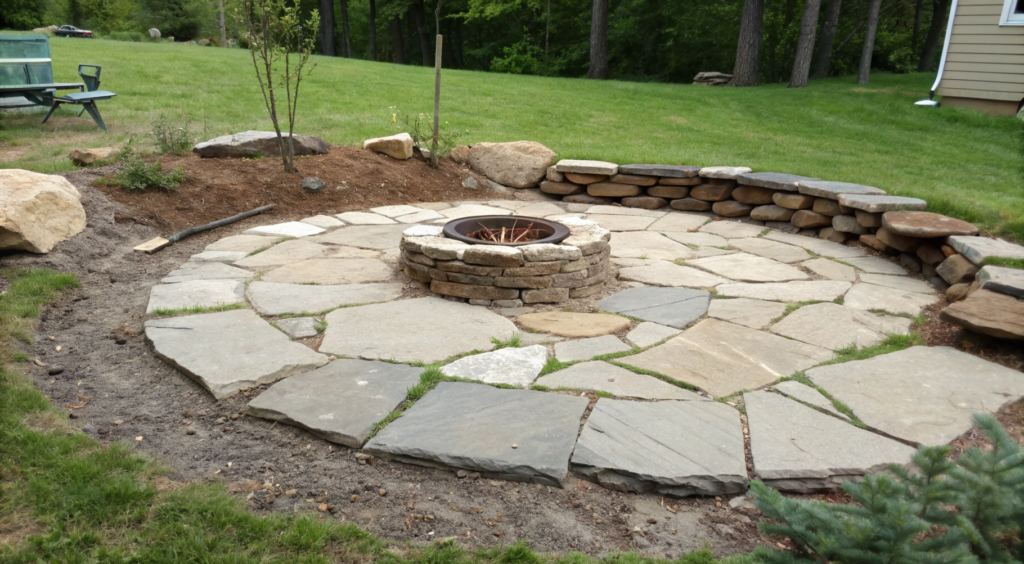
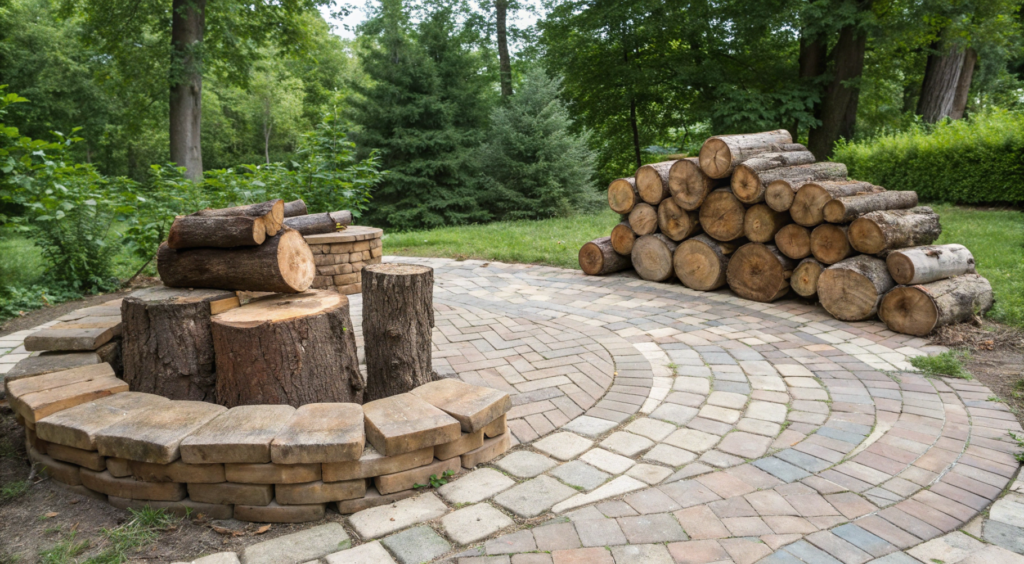
8. Rustic Fire Zone with Logs and Pavers
Sometimes concrete blocks feel too “construction-like,” and a metal bowl feels too “store-bought.” But the combo of logs + pavers gives a completely different vibe. It feels woodsy, yet still neat.
What You’ll Need
- Pavers, 12×12 inches (30×30 cm) — 12–16 pieces to make a circular base.
- Coarse gravel — 2–3 bags for a base layer under the pavers.
- Logs or stumps, 10–12 inches (25–30 cm) in diameter — 4–6 pieces for seating.
- Metal fire ring (optional) — if you want a more durable fire core.
- Tools — shovel, level, gloves.
How to Build
- Prepare the site. Remove the top layer of grass in a circle about 6 ft (1.8 m) in diameter. Depth — about 2 inches (5 cm). Fill with gravel and tamp it down.
- Lay the pavers. Place the pavers on top of the gravel to form a circle about 5 ft (1.5 m) in diameter. You can set them close together or leave small gaps to fill with sand later. This makes a tidy, even base.
- Set up the fire pit. In the center, place a metal fire ring 30–36 inches (75–90 cm). If you don’t have one, just arrange a circle of fire bricks.
- Make the seating. Instead of benches and chairs, use logs 10–12 inches (25–30 cm) in diameter, cut to about 16–18 inches (40–45 cm) high. It gives a rustic feel — simple and natural.
Reliability of the Setup
- Pavers create a fire-resistant surface, so embers and sparks don’t fall on grass.
- The fire sits in the ring at the center — no contact with grass or mulch.
- Logs are placed at least 5 ft (1.5 m) from the fire pit, keeping safe distance.
- Gravel under the pavers stops heat from reaching the soil, reducing the risk of root fires.
- With proper spacing, and using both ring and pavers, this setup is truly safe.
This option is often used for temporary or seasonal spots. Pavers stay clean even after rain, log seating is easy to replace, and the ring in the center keeps the fire controlled without harming the lawn. We saw setups like this with neighbors back in Idaho — simple, very natural-looking, and perfect if you want a “woodland” mood right in your yard.
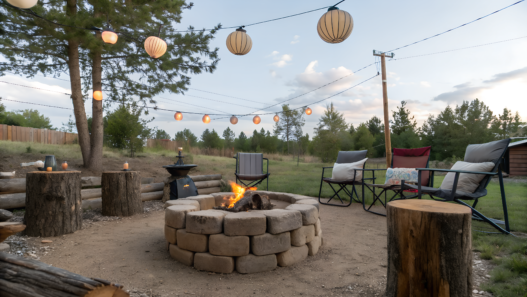
9. DIY Fire Pit Lounge with Only 5 Materials

A full fire pit lounge area can also be built quickly — with just five materials.
What You’ll Need
- Metal fire pit ring — 30–36 inches (75–90 cm).
- Pavers or concrete blocks — for the circular base.
- Coarse gravel — for the base under the pavers and around the pit.
- Garden chairs or benches — folding or stationary, your choice.
- Solar lights — to add evening light and coziness.
How to Build
- Prepare the site. Remove the top layer of grass in a circle about 8 ft (2.4 m) in diameter. That’s enough space for the fire pit in the center and chairs around it.
- Make the base. Lay landscape fabric, cover it with gravel, then place pavers on top. This creates a circle that looks like a dedicated yard zone.
- Set the fire pit. Put a 36-inch metal ring in the center. Add a little sand underneath for stability.
- Arrange the furniture. Folding garden chairs fit perfectly here. They’re easy to store in winter, but wooden benches also work. Just leave at least 5 ft (1.5 m) between the fire and the seating.
- Add the lighting. Stick 4 solar lights into the ground around the perimeter. They’re inexpensive but make the area feel complete and cozy at dusk.
How to Avoid Risks
- The metal ring keeps the fire contained, while pavers and gravel around it prevent grass from catching fire.
- Solar lights don’t heat up and work autonomously, so you can place them close to the seating without worries.
The whole setup is built without concrete or glue, making it easy to take apart or move if you want to change the layout.
This kind of “minimalist lounge” is easy to build even at a cottage or rental property: five materials, no complicated tools. And the best part — it doesn’t look temporary, even if technically it is. Pavers and lights form a neat border, and the chairs can be swapped out whenever you like. It’s an affordable way to create a complete fire pit lounge in just one day.
10. How to Add Lighting Around Your Fire Pit for $10

A fire alone already creates atmosphere. But once the coals start cooling, darkness takes over. We realized that even simple lighting around a fire pit completely changes the experience: it feels cozier, it’s safer to walk, and the lounge area looks complete. And you can do it literally for ten dollars.
What You’ll Need
- Solar garden stake lights — 4–6 pieces. Example: Solar Garden Lights Outdoor – 6 Pack on Amazon.
- Knife or small shovel — to make a hole in the soil for the stakes.
- Free time — 10 minutes.
How to Do It
- Choose light spots. We placed lights in a circle around the fire pit — about 5–6 ft (1.5–1.8 m) from the center. The important thing is not to block walking paths or set them too close to the fire.
- Install. The lights simply push into the soil. If the ground is too firm, make a small hole first with a knife or shove.
- Test in the evening.
Solar lights charge during the day and switch on automatically after sunset. On the very first night, the fire pit area will glow with a soft ring of light.
Practical Safety
- Solar-powered lights — no wires, no electricity.
- The housings don’t heat up, so you can safely place them near the seating.
- Soft, diffused light doesn’t glare, but helps you move around safely.
With proper placement, this type of lighting is fully safe, even in small yards.
We first tried this as a temporary fix, but it turned out we didn’t need to improve much. Even the simplest lights from a local store for $10 gave enough glow to create coziness and highlight the fire pit zone. It’s simple, affordable, and requires no wiring.
Conversation by the Fire
There’s always a certain magic by the fire — it brings people together and makes an ordinary evening special. And you don’t need a contractor or expensive materials to feel that.
Just choose the option that fits you and give it a try.So which one of these 10 ideas would you try first? Share in the comments — it’s always fun to hear how others set up their backyards.
And if you already have a fire pit, tell us your story — maybe yours will inspire someone else.


