At first, the idea of a fire pit seemed complicated and expensive to me. But over time, I realized: a fire pit isn’t a luxury — it’s a part of outdoor life, and you can build it yourself. No concrete mixer. No contractors.
Here, I’ll show you how to create a real fire pit area — no matter what kind of yard you have: small, uneven, full of old stumps, or barely any space at all.
These 10 proven ideas have stood the test of time, are easy to build, and will fit into almost any backyard. Some are design-driven, some are clever hacks, and some are just pure inspiration to finally take that first step.
All of these projects are real, accessible, and don’t require any building skills — but they’ll truly help you make your dream outdoor space happen.
1. Fire Pit Blueprint from a Real Landscape Plan

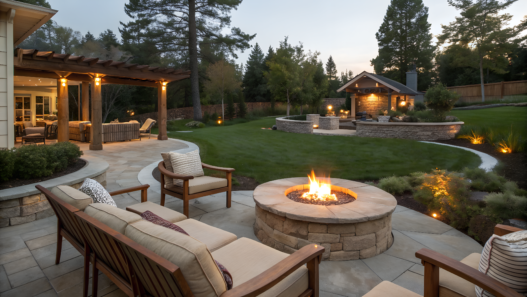
Our first fire pit corner appeared in our small Idaho yard. Every square foot mattered there — so we approached it like real designers: not “where do we put the fire pit,” but where do we actually live.
Where the evening shadows fall, the wind doesn’t blow out the flame, we can see the garden.
That’s how the idea was born — to make the fire pit not just a fire, but a part of the landscape.
We drew a plan of the house, paths, and garden beds — and added the future “fire zone.” It became our first real landscape discovery.
Draw Your Own “Living Zone”
We made our sketch to a 1:50 scale, marking even shadows and small slopes. It might sound silly, but later you realize — that level of detail saves weeks of fixing mistakes.
Size Matters
And here’s what we learned: proportions are everything.
- The diameter of the pit should be at least 36 inches (about 90 cm).
- The seating area around it — another 2–3 feet (60–90 cm).
- The distance to nearby plants — at least 6 feet (1.8 m), so the leaves don’t “roast.”
We learned this the hard way: at first, we made it smaller, and the heat was overwhelming — like standing next to an oven. We had to redo it.
Materials That Won’t Let You Down
The base — crushed gravel, ¾ inch (20 mm) fraction, layered 3–4 inches (8–10 cm) thick.
The border — stones or bricks about 12 inches (30 cm) high.
And most importantly — a metal ring insert. We chose the Sunnydaze Fire Pit Ring Insert, which protects the stonework from heat. Three years later, it still looks brand new.
We found most of the stones right on our land and ordered the rest online.
A Little Bit of Engineering (But Nothing to Fear)
Check the slope of your site. Even a slight incline affects drainage.
We just added a layer of gravel and a 2° slope — now water flows away, the fire stays dry, and there’s never any mud.
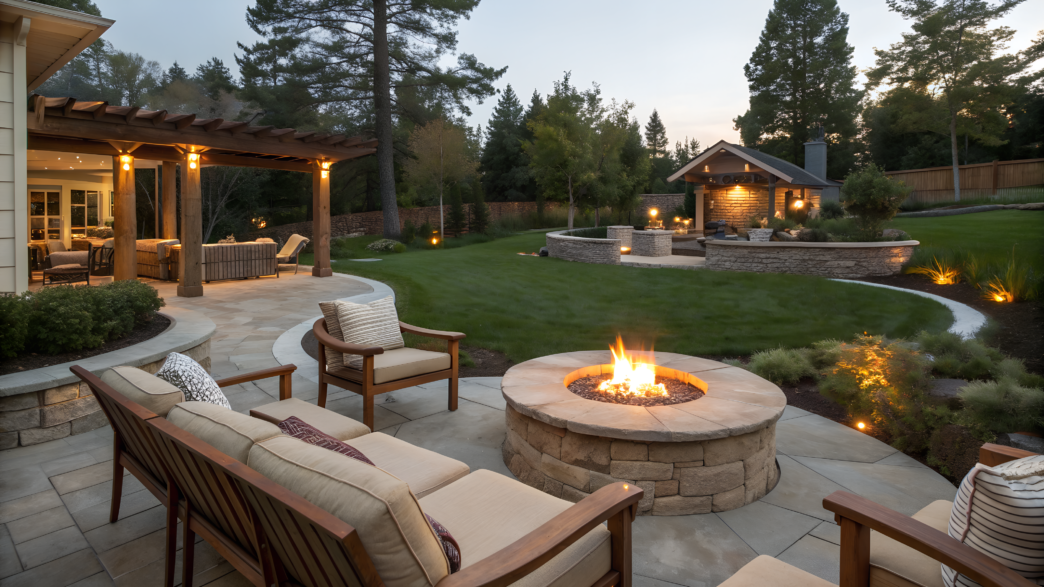
When everything’s ready — light that first fire. No decor, no frills. Just you, some wood, and the quiet crackle of flame.That little corner has become the place where we talk until midnight, roast vegetables, and sometimes just sit silently, watching the fire.
So if you’re dreaming of your own fire pit, start with a pencil and a piece of paper.
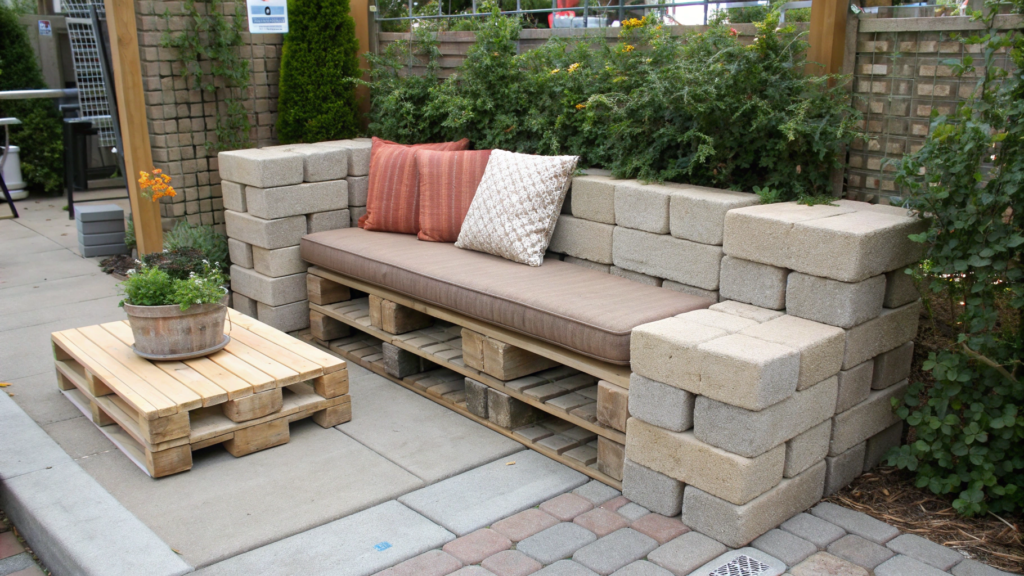
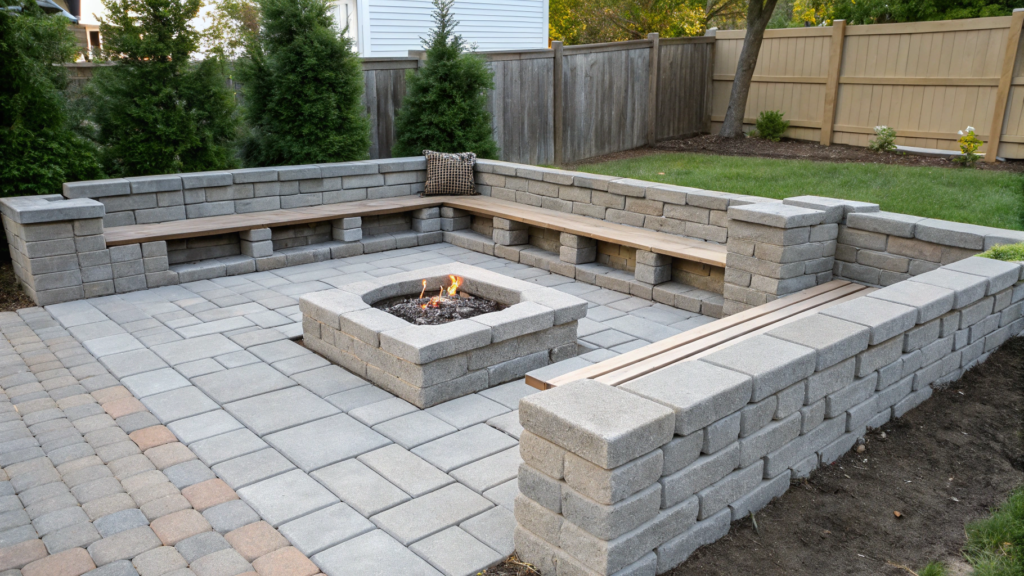
2. How to Use Retaining Wall Blocks for Seating
I’ve always loved those built-in seating areas — you know, the ones that look straight out of Pinterest.
But when I checked the price for materials and labor… let’s just say my coffee almost spilled.
So we decided to come up with our own version — using simple retaining wall blocks, the same kind that sit on pallets in every home improvement store. And believe me, you can make a really cozy spot out of them without any building skills at all.
Why Retaining Wall Blocks?
Because they are:
- Affordable — one block costs around $3–5;
- Heavy but obedient — no cement needed, just a level surface and some patience;
- Visually solid — if you arrange them right, they look like something from a design magazine.
We chose gray-beige blocks (12x4x8 inches / 30x10x20 cm) — neutral, timeless, and they blend with any background.
It took about 36 blocks to create a comfortable half-circle seat around the fire pit.
How to Build It
- Mark the Shape. Start by outlining the form. A half-circle about 5–6 feet (1.5–1.8 m) radius around the fire pit works best.
Use a rope and a stake to trace the curve. Don’t rush — this step defines everything that follows. - Prepare the Base. This part matters most. We removed the top layer of soil (around 2–3 inches / 5–7 cm) and filled it with ¾-inch (20 mm) gravel.
Then we tamped it down by hand.
It’s a bit boring, sure — but it’s the reason why the blocks stay rock-solid, never wobbling or cracking. - Lay the First Row. Arrange the blocks in a half-circle.If you want extra grip, add a line of construction adhesive between them — one tube is enough for the entire row.
Pro tip: place the wider back side of each block facing outward — it makes the structure look more grounded and stable. - Second Row and Finish. Lay the second row with staggered seams, just like brickwork. It’ll look cleaner and hold better.
On top, place a wooden board (2×8 inches / 5×20 cm) — it turns into a comfy bench.
We painted ours black and glued it down. It ended up looking like a small designer terrace, but built by hand. - Add the Details. We put woven cushions along the seating and added solar garden lights behind the blocks.
At night, they give off a soft glow, and the whole corner comes to life.
Why It Works
First, it’s budget-friendly — even the “basic” version looks impressive.Second, there’s no cement, saws, or stress — just a level, glue, and patience.
And finally, it looks expensive.Guests never believe we built it ourselves.
Now it’s one of our favorite spots in the yard. In the evening, you sit on those solid blocks, a cup of cocoa warming your hands, the fire reflecting off the lanterns — and suddenly, everything feels calm and right.
3. Euro-Inspired Circle Fire Pit with Herb Garden Border
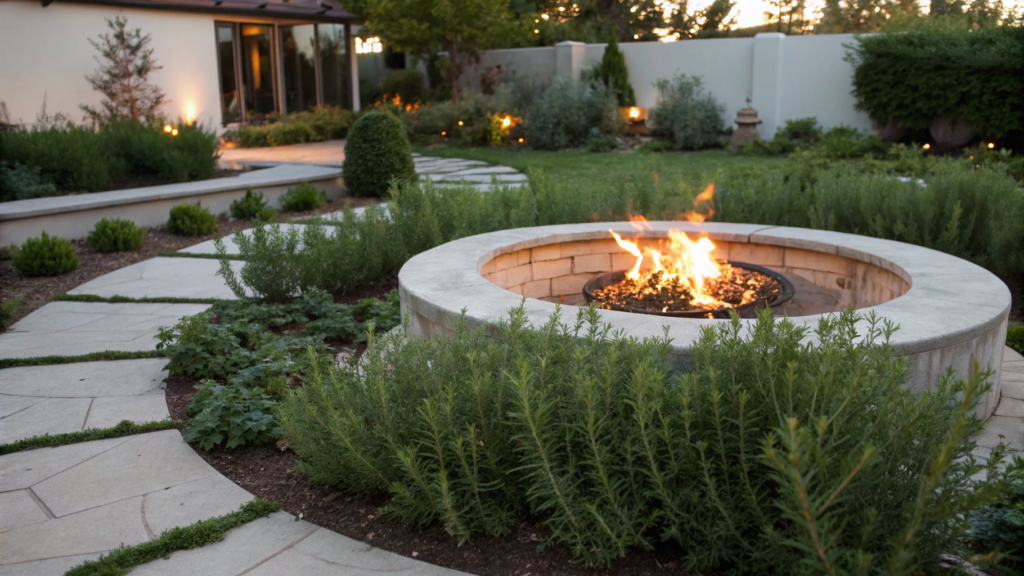
The idea of creating a round fire pit with an herb border is simple but elegant — a blend of functionality and aesthetics that turns a basic feature into a garden centerpiece.
What Makes This Idea Special
European style is all about that effortless look — as if everything “just grew that way.” But in truth, it’s a well-planned simplicity.
We wanted the fire pit to look like part of the garden, not something added later. So we surrounded it with a circle of aromatic herbs.
Thyme, rosemary, lavender, and sage — the perfect mix that smells amazing and naturally keeps mosquitoes away.
Materials and Dimensions
To keep the look clean and balanced, we started with the right proportions:
- Fire pit diameter: 40 inches (about 1 m)
- Herb ring width: 18–24 inches (45–60 cm)
- Total composition diameter: around 8 feet (2.4 m)
In the center, we used a metal fire bowl, like the Yaheetech Fire Pit Bowl — inexpensive yet sturdy.
Around it — a ring of gravel, and beyond that — our fragrant herb border.
How to Build It
- Mark the Circle. The easiest way is to hammer a stake into the center and tie a rope to it. Mark both the inner circle for the fire and the outer ring for the herbs.
- Build the Fire Base. Fill the inner section with gravel and tamp it down well.
Place your fire bowl in the middle.
If you want more structure, you can add concrete edging stones around it in a circle. - Plant the Herbs. We chose a mix: lavender, thyme, oregano, and sage.
- Thyme and oregano go near the stones — they spread low and soften the edges.
- Lavender sits slightly farther back, adding height and fragrance.
- Sage works as a colorful accent.
Keep 10–12 inches (25–30 cm) between each plant. Mix the soil with sand for good drainage.
Pro tip. Add a few terracotta pots with mint or shallow bowls of water around the edge — they visually “cool down” the area and amplify the scent in the evenings.
How to Keep the Herb Ring Safe
Looks matter, but safety comes first. We tested this setup and found a few simple rules to keep your herbs fragrant, not toasted:
- Keep distance. Leave at least 3 feet (90 cm) between the fire’s edge and the plants. This protects them from heat and forms a neat gravel barrier.
- Use gravel instead of mulch. Skip bark and wood chips — they burn. Gravel or crushed stone won’t, and they look natural.
- Choose heat-tolerant herbs. Thyme, sage, lavender, and rosemary handle the heat beautifully — they release more aroma in warm air.
- Watch the wind. Even with the perfect setup, don’t light a fire in strong gusts. Wait until evening — the flame will be calmer, and the herbs will smell stronger.
In the evenings, we toss a sprig of rosemary into the fire — it crackles softly and releases a resinous scent. The whole space glows in warm golden light, both from the fire and a few solar garden lights tucked among the herbs.It’s a natural, living kind of light — gentle, not harsh — and for a moment, it feels like there’s an accordion playing just around the corner.
4. Our Gravel Fire Zone with Metal Chairs + Fire Bowl
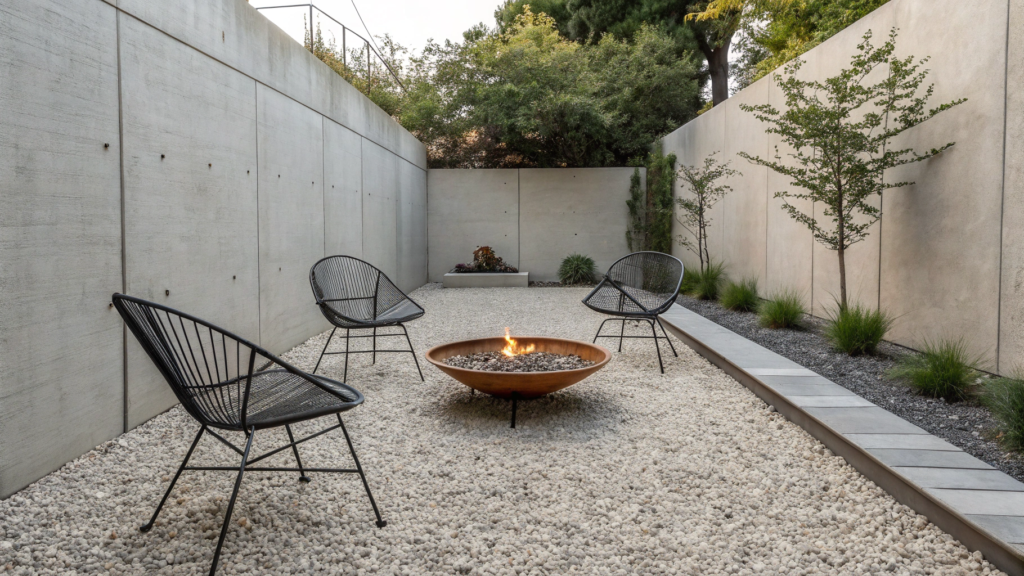
A Gravel Fire Zone is basically a minimalist fire pit corner — no concrete, no construction, no weeks of work. You can build it in a single day, and it still looks neat, modern, and well-designed.
Why a Gravel Zone Is Brilliantly Simple
First, there’s no hassle with foundations. Gravel naturally provides drainage and serves as a perfect base for furniture and your fire bowl.
Second, it’s the most flexible format: you can make it round, square, half-moon shaped — even diagonal if you want. Add a brick edge or leave a natural border. It all depends on your yard and your taste.
What You’ll Need
- Gravel — about 0.5 cubic yards (~400 kg). Go for ¾-inch (20 mm) size; it’s stable underfoot and doesn’t “float.”
- Landscape fabric — to keep weeds away.
- Metal fire bowl, like the Yaheetech Fire Pit Bowl. Simple, durable, and fits in any outdoor setup.
- Metal chairs, such as PHI VILLA Patio Metal Chairs Set. Affordable (not luxury), but they look high-end.
- Pebbles or large gravel for edge detailing (optional).
The total cost usually ranges between $180–$300, depending on your area and material quality — this is a budget-friendly version, not a luxury designer project.
How to Set It Up
- Mark the area. We made a circle about 10 feet (3 m) in diameter — enough for four chairs and a fire bowl in the middle. You can mark the outline using a rope and spray paint.
- Prepare the base. Remove 2–3 inches (5–8 cm) of sod. Lay down the landscape fabric — it’ll block weeds from growing. Pour in the gravel and smooth it out with a rake.
- Add the fire and comfort. Place your metal bowl or portable fire pit in the center. Some people like to add a brick border around it — not required, but it looks polished.
- Arrange the seating. Metal chairs are the best choice: they handle heat, resist rust, and look tidy. Add outdoor cushions or a couple of throws for cozy evenings.
Practical Tips
- Don’t skimp on fabric. Cheap landscape fabric tears easily and warps. Get a dense one — 5 oz or higher.
- Avoid deep gravel layers. 2–3 inches (5–8 cm) is enough. Any deeper, and the chairs will sink in.
- Add a fire ring insert if you’re using a stationary pit — it protects both the metal and the ground from heat.
- Keep safe spacing. Leave at least 3 feet (90 cm) between the bowl and the gravel edge — it looks clean and keeps everyone safe.
Minimal details, maximum calm — the whole area ends up feeling almost Scandinavian in style.Add a few solar stake lights, and in the evening, they cast a soft, even glow — turning the place into your own cozy outdoor café.
Plus, this setup is maintenance-free: it doesn’t mind rain, doesn’t get muddy, and doesn’t need repairs.Most importantly, it brings people together — friends with glasses in hand, kids roasting marshmallows, and you… just quietly enjoying the night.
5. DIY Corner Fire Pit for Small Yards
Not everyone has a spacious backyard, and that’s perfectly fine. Every yard has a little corner that’s rarely used — and that’s exactly where a fire pit fits best.
This setup looks tidy, adds a cozy atmosphere, and doesn’t “eat up” your space.
What You’ll Need (and Nothing Extra)
- Metal fire bowl — compact, up to 28 inches (70 cm) in diameter. For example, the Yaheetech Portable Fire Pit — affordable, lightweight, and safe (not luxury, but perfect for small-space projects).
- Pavers or tiles — to create a simple base platform.
- Gravel or sand — for drainage and leveling.
- Small chairs or a bench — ideally foldable, so they don’t take up space.
The total cost usually ranges from $120–$200, depending on materials and finishes — a budget project without unnecessary décor.
How to Build
- Find the “quiet corner.” Look for a spot protected from the wind, where you actually enjoy spending time.
Don’t place the fire pit too close to a fence or wall — leave at least 3 feet (90 cm) of space.
We often suggest setting up these zones diagonally across the yard — it visually opens up the area and makes it feel larger. - Build a solid but light base. Remove the top layer of soil and spread 1–2 inches (3–5 cm) of sand.
Level the surface, then lay pavers or bricks in a quarter-circle pattern — stylish and practical at once.
If you’d like, add a stone border — it creates a “frame” and gives the space a finished look. - Add the fire bowl. Set the bowl in the corner and sink it slightly into the ground for stability.
You can surround it with a low ring of stones to make it look more built-in. - Bring the space to life. To keep the corner from looking “boxed in,” add some texture and warmth:
- A pot with herbs or ferns on the sides;
- A solar light, like Gigalumi Solar Pathway Lights;
- A thin outdoor rug — it visually ties the area together and makes it feel like a small “outdoor room.”
A Few Design Tricks
- Use the diagonal. Angling the setup makes the yard feel bigger and more dynamic.
- Arrange chairs in a half-circle instead of a straight line — it gives a natural, nest-like effect.
- Add a small side table — perfect for a coffee cup or a glass of wine.
The beauty of this setup isn’t just in the cozy look — it’s in how practical it is.
You sit in your chair and everything’s within reach: the fire, a table, firewood, even herb pots you can pick from while cooking outdoors.
The fire brings more than just warmth — it turns the corner into a functional living zone.
You can sip your morning coffee there, read in the evening, or grill something simple right over the flame.
6. How to Make a Fire Pit Work in a Sloped Backyard
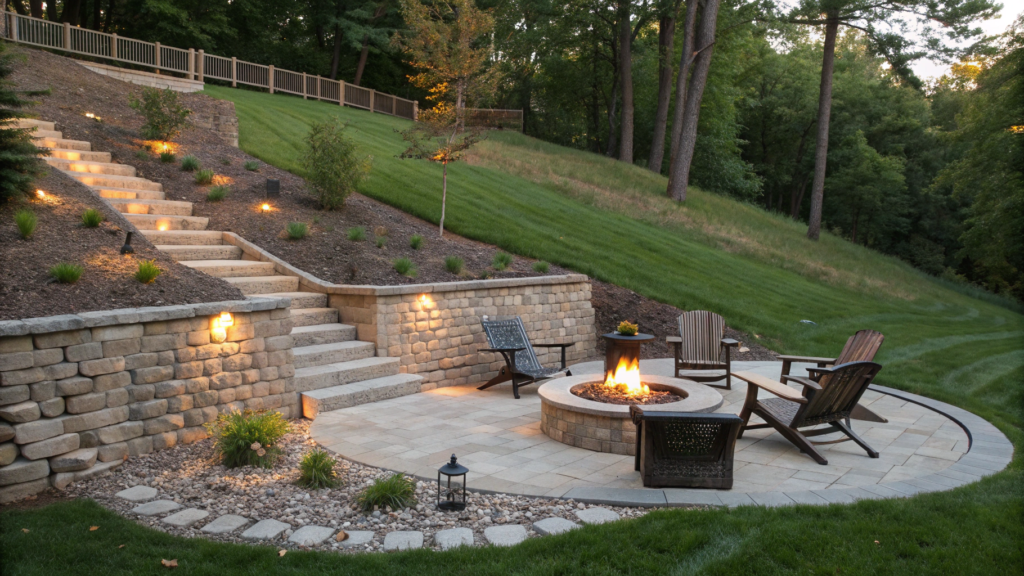
A lot of people think a sloped yard means saying goodbye to the idea of a fire pit. But honestly — it’s the opposite.
A slope isn’t a problem, it’s an opportunity to create one of the most picturesque outdoor zones you can have.
Fire against a natural incline always looks dramatic — and yes, you can make it both safe and practical.
Three Ways to Build a Fire Pit on a Slope
- 1. Terracing. If your slope is noticeable, create two short terraces — the lower one for the fire pit, the upper one for seating. Use retaining wall blocks (the same as in the previous project) to hold back the soil and form the step.
Two rows are usually enough to stabilize the ground and define the shape.
Each block costs $3–5, so even a full-length terrace stays budget-friendly, not luxury-level.
- 2. Built-In Fire Pit. If the slope is mild, you can slightly sink the fire pit into the ground. We used the Sunnydaze Fire Pit Ring Insert — it protects the edges and keeps the shape intact.
This semi-recessed design keeps the flame stable in the wind and makes the whole setup look organic, as if it’s part of the landscape. - 3. Platform or Wooden Deck. Perfect for those who don’t want to dig. Just build a small raised wooden platform on posts using pressure-treated 2×6 boards, and place a portable fire bowl, like the Yaheetech Fire Pit Bowl right on top.
The key is to leave ventilation space underneath the platform so moisture doesn’t get trapped.
How to Keep It Stable and Dry
Slopes often come with water runoff issues, so drainage is key.
Here’s how to keep things solid and mud-free:
- Add a ¾-inch (20 mm) layer of gravel, about 3–4 inches (8–10 cm) thick.
- Place geotextile fabric beneath it — this prevents the soil from shifting.
- Shape a slight outward slope so water drains away from the fire, not toward it.
Comfort and Safety
Set up your seating in tiers, like a mini amphitheater. If the incline is steep, create small level steps under each chair — around 3 feet (90 cm) wide. It’s enough to make every seat stable without flattening the natural landscape.
Add solar pathway lights to mark paths and steps — they’re practical and highlight the slope beautifully at night.
Working with a slope always feels more natural and grounded. Gravel steps, timber benches, a fire pit slightly below seating level — it all forms a relaxed outdoor amphitheater.
And it’s not just for looks: this setup is often more comfortable than a flat patio.
The key is simple — reinforce your terraces, plan the drainage, and don’t be afraid to use basic, affordable materials.
7. Fire Pit Built Around Tree Stumps as Seating
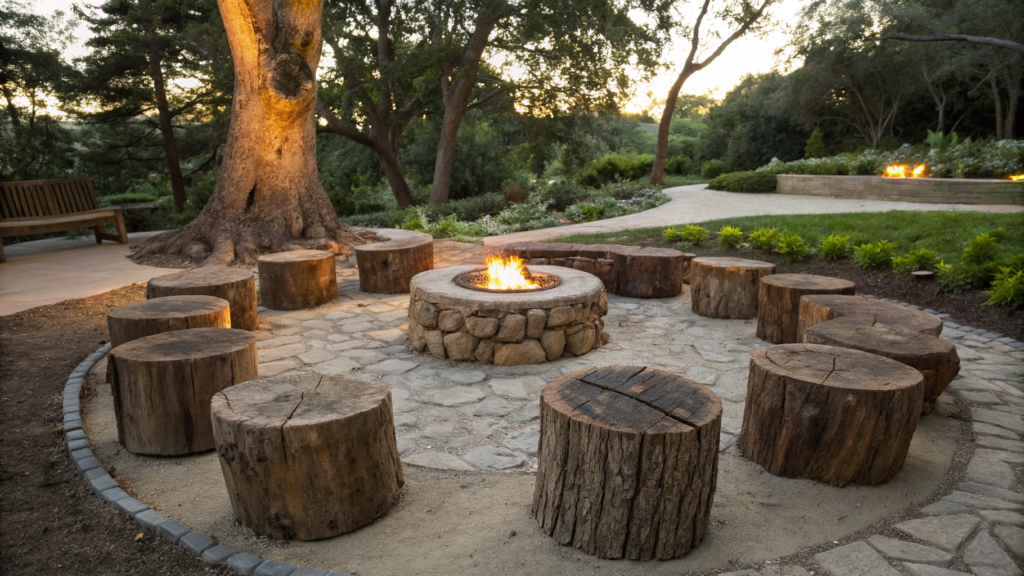
Old tree stumps make perfect natural stools — sturdy, rustic, and already part of the landscape. All you need is to fit them beautifully into your fire pit setup.
So if you still have a few stumps left in your yard from felled trees — don’t rush to dig them out!
This design works especially well if you love that natural garden look where everything feels like it grew there on its own.
We once saw a version like this at Oregon Garden — the stumps surrounded a metal fire bowl, and the whole thing looked like an outdoor art installation.
Turns out, it’s much easier to recreate than it seems.
How to Prepare the Stumps
- Trim the height. The sweet spot is 16–18 inches (40–45 cm) — a comfortable sitting height.
- Smooth the top. Sand the surface to remove splinters, then coat it with a wood sealant to protect against rot.
- Add cushions or covers. A simple outdoor cushion instantly makes the seat cozier and adds a pop of color.
Setting Up the Space
To make everything look cohesive, go for a clear shape — a circle or semicircle around the fire.The ideal diameter is about 10–12 feet (3–3.5 m).
Place a metal fire bowl, like the Yaheetech Fire Pit Bowl, in the center.
Use gravel or sand as the base — it drains quickly and keeps the stumps dry.
You can edge the fire pit with flat stones or retaining wall blocks for a clean, finished look.
It also makes the flame appear slightly recessed — visually lowering the fire zone compared to the seating.
No Stumps? No Problem
You can easily replicate the look:
- Buy acacia or oak log slices from a local lumberyard;
- Or get tree stump-style stools, like the Keter Resin Tree Stump Stool — lightweight, weather-resistant, and surprisingly realistic.
Why This Works So Well
- Stability. Real stumps don’t wobble and can easily hold adult weight — no assembly required.
- Eco-friendliness. You’re reusing what’s already in your yard.
- Warm aesthetics. Natural wood next to fire always gives that homey, grounded feel.
Just remember. Keep your stumps at least 3 feet (90 cm) from the fire bowl. That way, the wood won’t heat up, and your setup stays safe and comfortable.
Add a few solar lanterns, throw some wool blankets over the seats — and you’ll have a spot where you can sit for hours, forgetting about your phone and the city.
When the sun goes down and the flames light up the wood’s rough textures, the whole place feels alive again.
8. Layout Hack: Fire Pit That Doubles as a Dining Spot
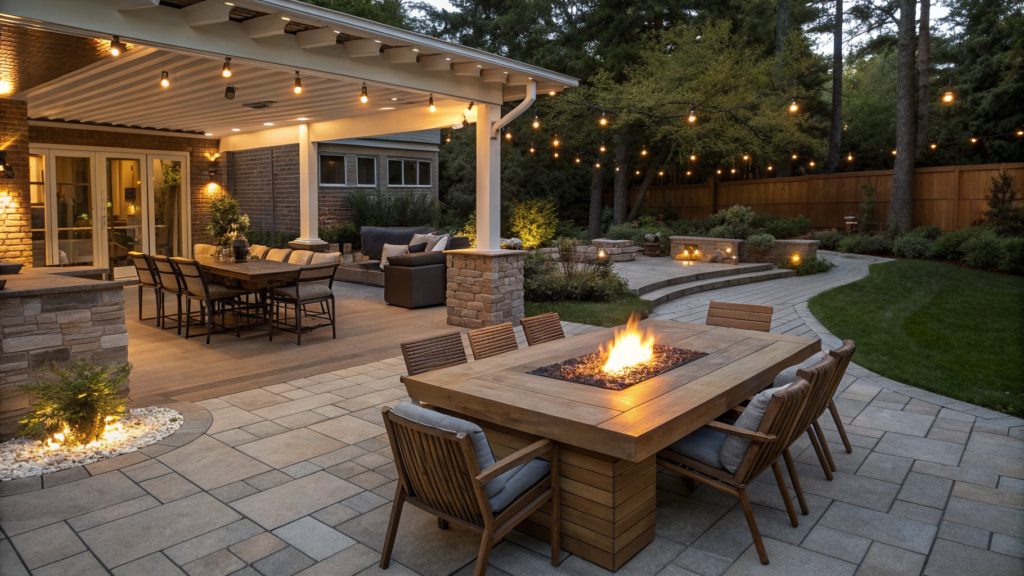
There’s something so satisfying about one space doing double duty — a cozy fire pit lounge at night and a dining area during the day.
And the best part? It’s absolutely doable if you plan your layout wisely.
Two Functions — One Space
The concept is simple: a fire pit in the center, surrounded by a round tabletop ring made of wood or concrete.
At night, it’s the perfect spot for drinks and conversations. During the day, when the fire is off, the same ring turns into a full outdoor dining table.
This setup saves tons of space (perfect for small backyards) and makes your yard truly functional — you’ll use it every day, not just on weekends.
How to Make It Work
- Choose the Base. You can go for either a stationary ring of bricks or concrete blocks or a metal fire bowl. If you prefer something light and portable, check out the Yaheetech Fire Pit Bowl. It sits securely on a leveled base of gravel or patio pavers, giving you both stability and safety.
Want a more built-in look? Create a low stone or block ring about 6–8 inches (15–20 cm) tall.
That way, the bowl sits slightly recessed, with the top flush to the future tabletop ring — visually clean and super practical for setting plates or glasses.
- Add a Removable Tabletop Ring. This is your key feature — a wooden tabletop ring, divided into 2–3 removable sections for easy lifting when you light the fire.
We made ours from pressure-treated 2×6 boards (5×15 cm) connected with metal hinges. - Arrange the Seating Smartly. Keep chairs about 2 feet (60 cm) away from the table ring — close enough for easy reach, but with space to move comfortably.
Folding chairs are ideal since you can tuck them away when not in use.
Design and Zoning Tips
- Raise the area slightly, even by 4 inches (10 cm) — it visually separates the “dining zone” from the rest of the yard.
- Frame it with gravel or pavers for crisp lines and easy cleanup.
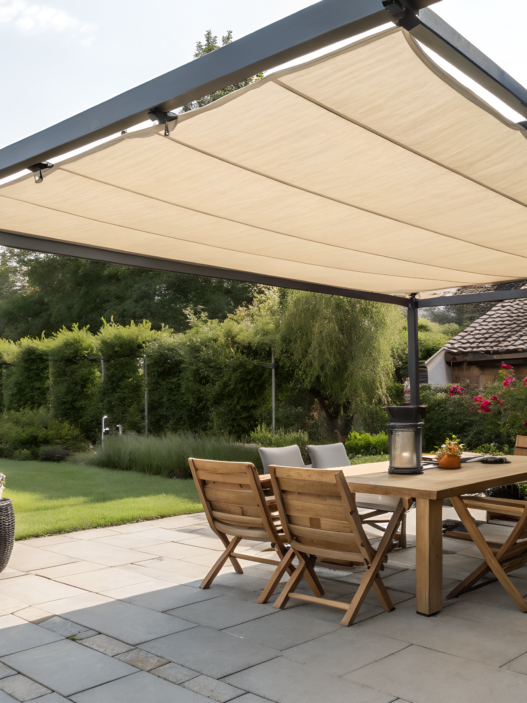
- If the spot gets a lot of sun, add a patio umbrella or pergola so you can enjoy it both day and night.
Switching Between “Day” and “Night” Modes
Here’s how to make the transition effortless:
- Daytime. Place the wooden tabletop cover over the pit — it becomes a full dining surface.
- Evening. Remove the cover, and your fire pit is instantly ready to go.
It takes less than a minute, no tools, no mess.
A Quick Word on Safety
Even if the fire pit is covered, always keep at least 3 feet (90 cm) between the center and your furniture.
If your tabletop is wooden, treat it with a fire retardant, like Eco Advance Fire Retardant Spray, to make it heat-safe.
This design shines in small backyards — elegant, efficient, and warm without overcomplication.
You get the best of both worlds: a family dining space by day and a fireside retreat by night.
9. Raised Fire Pit with Planting Beds Around It
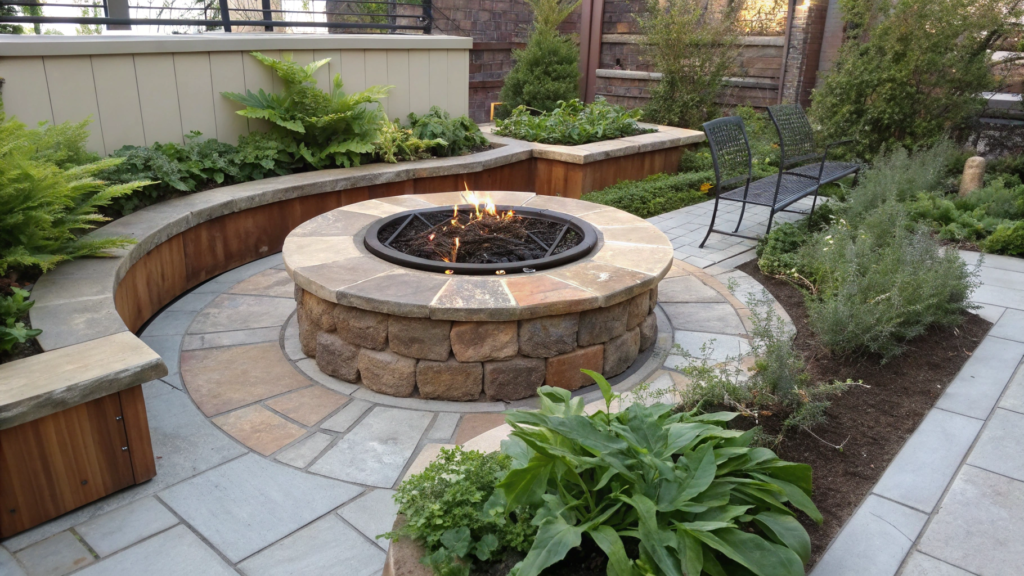
This setup looks thoughtfully designed — almost architectural — while also feeling warm and natural. The plants soften the stone and metal, turning a simple structure into a living landscape that feels both safe and inviting.
Why a Raised Fire Pit Is a Smart Choice
First, a raised fire pit is safer — kids and pets can’t get too close to the flames.
Second, at 18–24 inches (45–60 cm) high, it’s comfortable: you can sit on the edge, set down a cup, or even warm food without bending over.
And finally, it just blends beautifully with the landscape — the height creates structure, while the plants bring it to life.
What You’ll Need
- Concrete blocks or bricks (around 40–50 pieces)
- A fire ring — such as the Sunnydaze Fire Pit Ring Insert, protects the inner wall from heat (a practical, non-luxury option).
- Gravel for the base layer
- Plants — lavender, sage, heuchera, ornamental grasses, or thyme
- Landscape adhesive for securing the blocks
Step-by-Step Build
- Mark the Layout. Outline a circle about 5–6 feet (1.5–1.8 m) in diameter.
If you want planting beds around it, leave an extra 2 feet (60 cm) of space along the perimeter. - Prepare the Base. Remove the sod, add 3–4 inches (8–10 cm) of gravel, and compact it firmly. This provides both drainage and stability.
- Build the Walls. Lay the blocks in a circle, securing them with landscape adhesive.
The inner diameter should be 6–8 inches (15–20 cm) wider than your metal ring insert to leave a small gap.
When you reach the desired height (about 20 inches / 50 cm), drop in the fire ring and make sure it sits level. - Add Planting Beds. Fill the surrounding ring with good-quality soil and plant your chosen mix:
- Lavender, sage, thyme — fragrant, heat-tolerant, and bee-friendly.
- Add grasses like fescue or miscanthus for texture and movement.
This mix brings that soft, layered “garden amphitheater” vibe that feels both cozy and open.
Practical Perks
A raised fire pit isn’t just beautiful — it’s smart. It:
- Works as extra seating — you can sit right on the edge.
- Shields plants from direct heat thanks to the height difference.
- Hides uneven ground effortlessly.
- Naturally zones the space without cluttering it.
Add some low-voltage lighting — LED strip lights or small spotlights built into the edge — to highlight the shape and create a soft evening glow.
This setup strikes that perfect balance between form and function.
You don’t just get a pretty patio — you get a livable, thoughtful outdoor space that feels intentional and deeply relaxing.
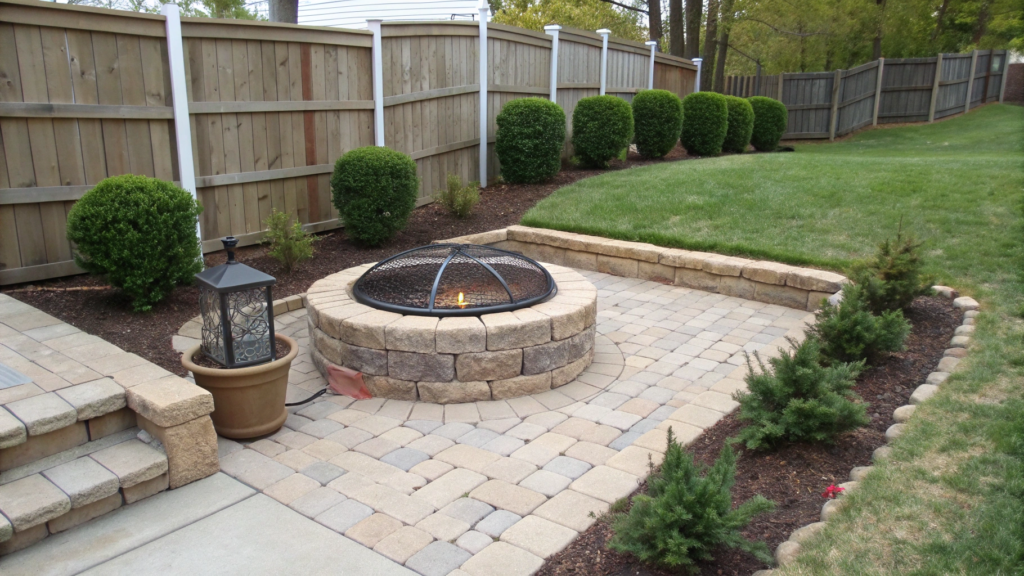
10. Budget-Friendly Built-In Look with Modular Pieces
Modular blocks aren’t just building materials — they’re ready-made shapes designed to fit together seamlessly.
With them, you can build a fire pit, benches, and borders in just a few hours — and easily rearrange or take them apart later.
It’s a flexible, affordable, yet visually cohesive setup that gives your backyard a professional finish without the cost.
What You’ll Need
- Modular concrete blocks or sections (many stores sell ready-made “fire pit kits”)
- A fire ring, such as the Sunnydaze Fire Pit Ring Insert.
- Gravel for the foundation
- Landscape adhesive
- Optional: modular capstones for the top layer to give it a clean, finished look
Budget: $150–$250 depending on the block style — a smart, non-luxury way to achieve a premium look on a modest budget.
How to Build the Zone — No Cement Required
- Start with a Level Base. Flatten the area and spread 2–3 inches (5–8 cm) of gravel.This provides drainage and stability for the entire structure.
- Lay the First Row. Arrange the blocks in your desired shape — circle or square.
If you’re using a kit, follow its layout guide. Check with a level — precision here defines the quality of the whole project. - Add the Second Row with Offset Joints. Stack the next layer with staggered seams — it adds strength and gives a solid, monolithic look.
Apply a thin layer of landscape adhesive — just enough to hold, but still easy to disassemble later if needed. - Finish with a Top Layer.Capstones create a smooth, polished edge.
You can paint them in a contrasting color or simply seal them with a protective outdoor coating. - Install the Fire Ring. The ring protects the interior from high heat and ensures your fire pit lasts for years.
Design Tricks for a “High-End” Effect
- Use two block shades. Try a gray-beige base with a warm sand-colored top row — it adds depth and a play of light.
- Add a wooden bench. A curved wooden seat on metal supports along the pit looks designer-level but is easy to make.
- Lighting is key. A few solar wall lights or stake lights can instantly transform the mood and highlight the stone texture.
Why This Setup Lasts
This type of fire pit is built to stand the test of time:
- Modular blocks don’t crack like poured concrete.
- The structure stays stable even on slightly uneven ground.
- And best of all — if you ever want to redesign your yard, you can take it apart and rebuild somewhere else.
This layout is for those who appreciate structure and order.You get a clean, balanced outdoor space, where every detail is thought through — all built with your own hands over a single weekend.
Add a couple of metal chairs, toss on some pillows and a blanket, and that’s it — a simple, solid design that looks expensive, works reliably, and requires no cement, no contractors.
Let’s Keep the Fire Going
If you’ve made it this far, chances are the idea of your own backyard fire pit has already taken root.
Maybe you’re drawn to that elegant European circle with herbs, or perhaps you’d rather keep it simple — a gravel pad and a sturdy metal bowl.
Either way, one thing’s true: a fire pit turns an ordinary yard into a living space — a place you actually want to spend time in.I’d love to hear what design speaks to you most.
Or maybe you’ve already built your own fire pit? Share your photos and stories in the comments — that’s how we keep each other inspired to create spaces that feel like home.