10 Unique Patio Deck Designs is a set of ideas that genuinely change how a backyard is used. A good deck does not have to be big or complicated. What matters much more is that it is clear where to sit, where to eat, where to relax, and that these areas do not get in each other’s way. And that everything works without constant rearranging and still looks neat after a few seasons.
Here, we look at options that solve specific backyard problems. In some cases, the view matters most. In others, storage. Somewhere else, zoning or a sense of order. All of these solutions can be scaled, combined, and adapted to different lots — from small backyards to large terraces. Every option can be adjusted to fit your own space, even if the yard is small and far from perfect.
1. Ground-Level Deck with Built-In Fire Pit
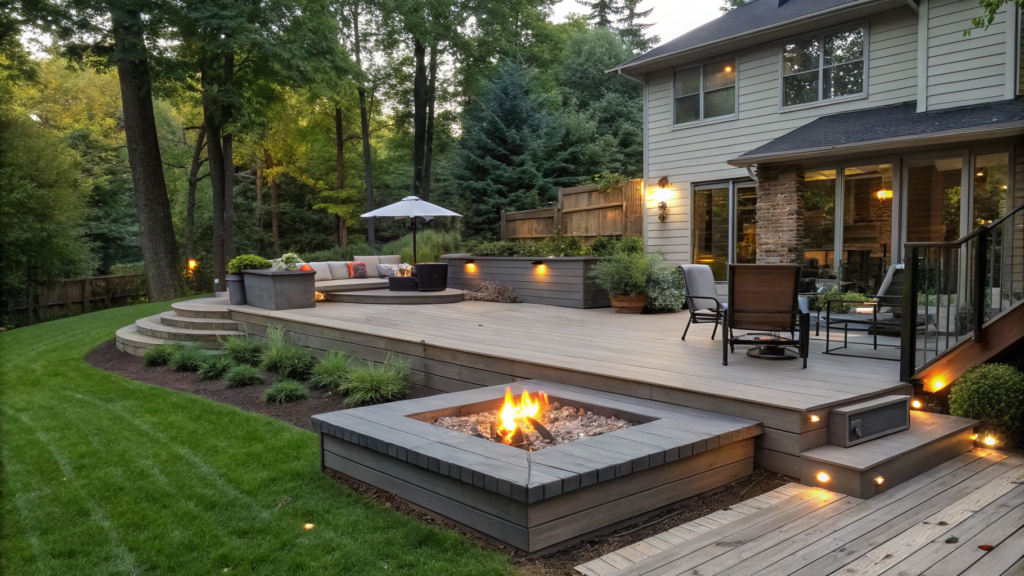
A ground-level deck with a built-in fire pit is one of those rare designs that people actually use. You bring out a cup of tea, sit down, turn on the fire — and the backyard suddenly feels like an extension of the house.
When the deck sits almost flush with the yard — about 8–16 inches (20–40 cm) above ground — the space stays visually open. No steps, no “stage” feeling, no barriers. A ground-level deck makes the yard feel wider and more connected.
Planning Around the Fire: What Matters Right Away
This is where things need to be planned carefully, because a fire pit layout does not forgive “we’ll fix it later.”
- The bowl diameter is best kept at 36–42 inches (90–105 cm) so the fire feels present but not aggressive.
- The typical bowl depth is 10–12 inches (25–30 cm), which allows the flame to sit properly.
- Clearance from wood should be at least 12 inches (30 cm), with 16–18 inches (40–45 cm) being more comfortable, especially for people who like to sit close.
This is not overthinking. It directly affects fire pit safety.
Gas or Wood — No Arguments
If the yard is part of everyday living, neighbors are close, kids run around, and the space will be used often, gas fire pits usually make more sense. They give a steady flame, turn off instantly, and do not turn the evening into a hunt for firewood. Wood-burning fire pits look great, but in reality they often mean smoke in your face and clothes that smell like a campfire for two more days.
If you go with gas, a built-in fire pit insert looks cleaner than a portable bowl. A good example is the Outland Living Fire Pit Burner Insert on Amazon.
How to Design Seating You Do Not Want to Get Up From
The secret is not designer chairs. The secret is proper seating dimensions — that is what keeps people sitting longer and makes the space work.
- Seat height of 16–18 inches (40–45 cm) is a comfortable standard.
- Seat depth of 18–20 inches (45–50 cm); anything less starts to feel like a stool.
- Distance from the fire to the seat edge is usually 24–30 inches (60–75 cm) — warm but not uncomfortable.
Built-in seating benches hold the layout together. They do not drift apart the way individual chairs do.
Hidden Storage
When there is hidden storage under the bench for blankets and cushions, you do not need to “prepare” to go outside. You just step out, open the bench, grab what you need, and sit down. That is it.
A practical drawer depth is 14–18 inches (35–45 cm). That easily fits cushions, throws, candles, and lanterns. The deck becomes a functional outdoor living space, not one that requires setup.
Mistakes That Make Even a Nice Deck Get Old Fast
- No drainage under the deck — one season later you get dampness, smells, and “why are the boards getting dark?”
- The fire pit placed where it fit, not centered — seating ends up awkward.
- Benches that are too narrow — they look good, but no one wants to sit there for long.
- No protective zone around the fire pit — the decking near the fire looks worn much sooner than expected.
If the lot is flat, the yard is small or medium-sized, and you want an evening hangout space without complicated construction, a ground-level deck with a built-in fire pit is a solid choice.
But if there is a strong slope, heavy water runoff during storms, or constant wind, the base and fire protection need to be planned carefully in advance — otherwise the comfort comes with conditions.
2. Two-Level Deck Overlooking a Pool
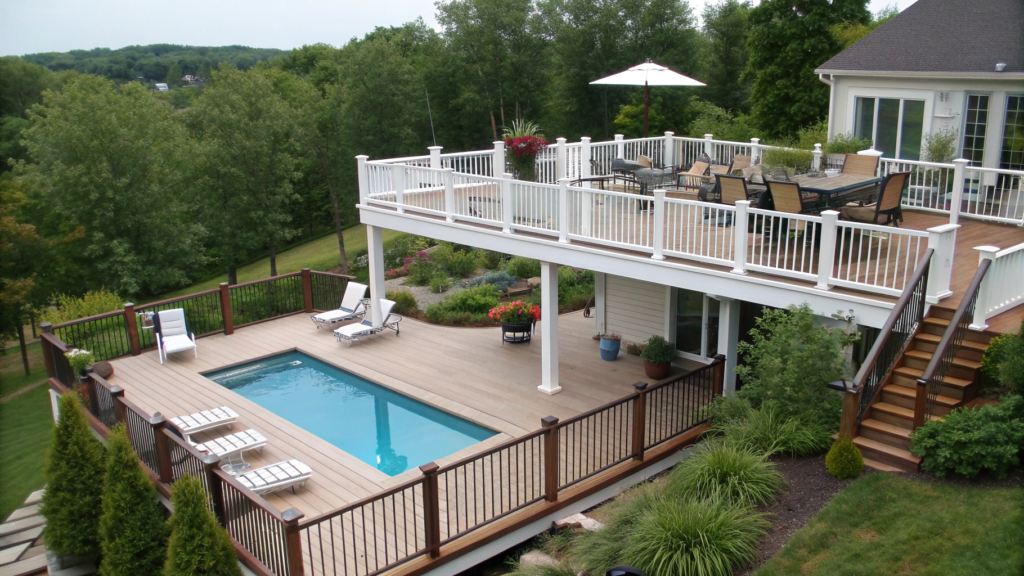
This design simply organizes the space around the pool in a logical way, and because of that, it looks more expensive and more thought-through.
When everything sits on the same level, the pool area quickly turns chaotic: someone is running around, someone is sitting, someone is looking for a towel. Splitting the space by height removes most of that mess almost automatically. Everything is built around different use scenarios that no longer interfere with each other.
Most often, the height difference between levels is 24–36 inches (60–90 cm). That is enough for each area to feel distinct, while still staying visually connected.
The main effects of this approach:
- activity stays closer to the water
- quiet relaxation moves to the upper level
- the backyard looks structured even without furniture
And all of this happens without strict rules or barriers.
Upper Level: View and a Sense of Distance
The upper level feels like a place where you do not need to stay alert all the time. It works well for sitting, watching the pool, and staying out of the main flow of movement. This is especially effective when the upper deck connects directly to the house — the backyard then feels like a natural extension of the interior.
It is important not to overload this area. Usually, a few fixed elements and some shade are enough. Railings should be chosen carefully so they do not block the view.
What usually works best on the upper level:
- sofas or deep lounge chairs
- a narrow table or coffee surface
- a pergola, canopy, or large umbrella
Glass railings at 36–42 inches (90–105 cm) help keep the view open and add a lighter feel, especially in the evening when the pool lighting is on.
Lower Level: Everything Connected to the Pool
The lower deck is the busiest and most active zone. People walk barefoot here, step out of the water, and move furniture around. Because of that, this level needs more attention to detail than it might seem at first.
There are a few dimensions that should not be reduced:
- walkway width — at least 36 inches (90 cm)
- step depth between levels — about 12 inches (30 cm)
- space for a lounge chair — minimum 72 inches (180 cm)
The decking surface here must handle moisture and slipping well. This is not an area where it makes sense to save on board texture or finish.
How to Tie the Levels Together
If the upper and lower decks feel like two separate projects, the overall sense of unity is lost. Connection is created not by shape, but by repeating details.
What works best:
- the same decking material on both levels
- repeating railing lines
- soft lighting along the steps
Step lighting becomes especially important at night. It highlights the change in height and improves safety without drawing too much attention.
A Note on Safety
A pool always requires awareness, but a two-level deck layout can actually make things simpler. When zones are clearly defined, movement becomes more predictable.
It is worth planning for:
- vertical railing elements instead of horizontal ones
- no furniture placed right next to level changes
- clearly visible deck edges
As a result, the backyard feels calmer and safer.
When This Design Works Best
A two-level deck overlooking a pool works best when the pool is partially set into the ground, the yard is elongated, and there is a view toward a garden or sunset side.
If the space is very compact, multiple levels can visually overload the yard. In that case, it makes more sense to keep a single level and make it wider and more open.
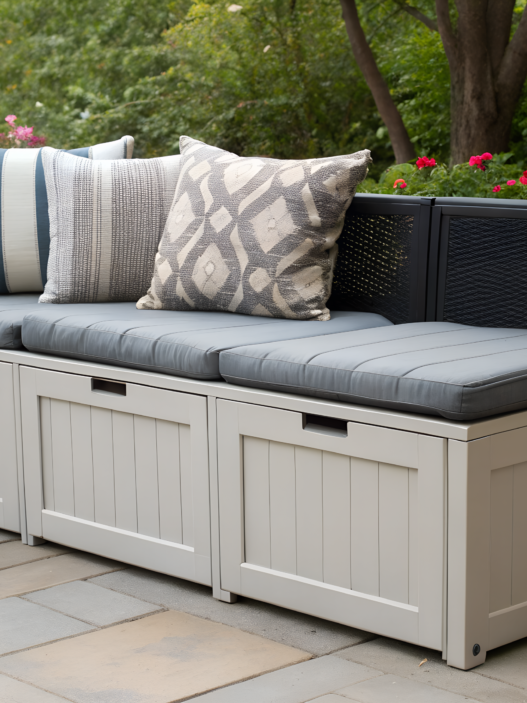
3. Deck Layout with Hidden Storage Benches
When you actually bring this idea to life, it suddenly becomes clear why the backyard looks put together and “clean,” even when it is used all the time.
We noticed this while visiting friends. A small yard, a simple deck, nothing flashy. But no cushions underfoot, no blankets scattered around, no constant question of “where do we put this?” When storage is built right into the seating, using the deck becomes easier. There is no running back into the house and no need to prepare in advance.
And yes, this strongly affects how often the backyard is used at all.
Well-Designed Benches with Hidden Storage
The best examples are the ones where storage does not stand out. No visible handles. No chest-like look. Just a bench that opens.
Most of the time, these dimensions work well:
- seat height 16–18 inches (40–45 cm)
- seat depth 18–20 inches (45–50 cm)
- interior storage depth 14–18 inches (35–45 cm)
The lid can be hinged or removable, but it is important that it opens easily. If it takes effort every time, the hidden storage stops being used.
Where These Benches Make Sense
Built-in benches with storage are not just for large decks. In fact, the smaller the yard, the more noticeable the effect.
They work especially well:
- along the deck perimeter
- near a fire pit
- around a dining area
- on narrow terraces where cabinets do not fit
At one friend’s place, the deck was surrounded by these benches on three sides. Visually, there was very little furniture. In reality, there was a huge amount of storage that completely solved the clutter problem.
Materials and Practical Details
It is important to remember that this is outdoor storage. Moisture, temperature changes, and dust will all find their way inside.
Because of that, the design should include ventilation gaps, drainage openings at the base, and moisture-resistant materials or liners. These small details make the difference between storage that works for years and storage that becomes a headache.
When Hidden Storage Is Not the Best Option
Sometimes built-in storage creates more problems than benefits. For example, if the deck sits in constant shade and dries poorly, or if the seating is rarely used and the lids tend to stick.
In those cases, it makes more sense to keep some benches standard and add one or two storage modules, instead of closing off the entire space.
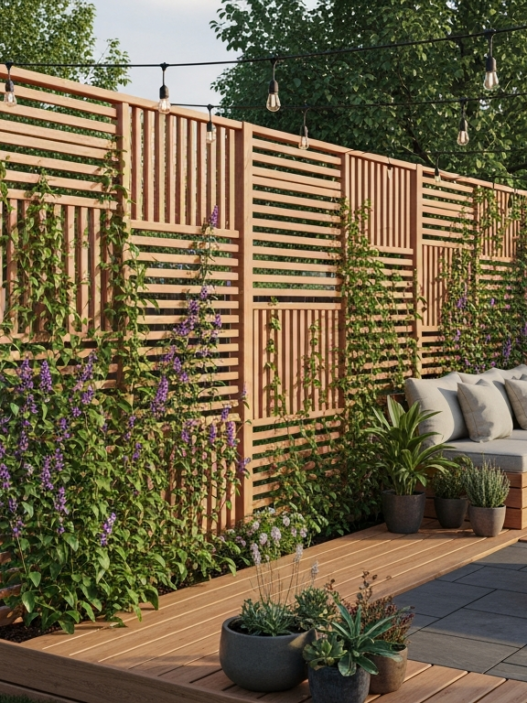
4. Small-Yard Deck with Vertical Garden Wall
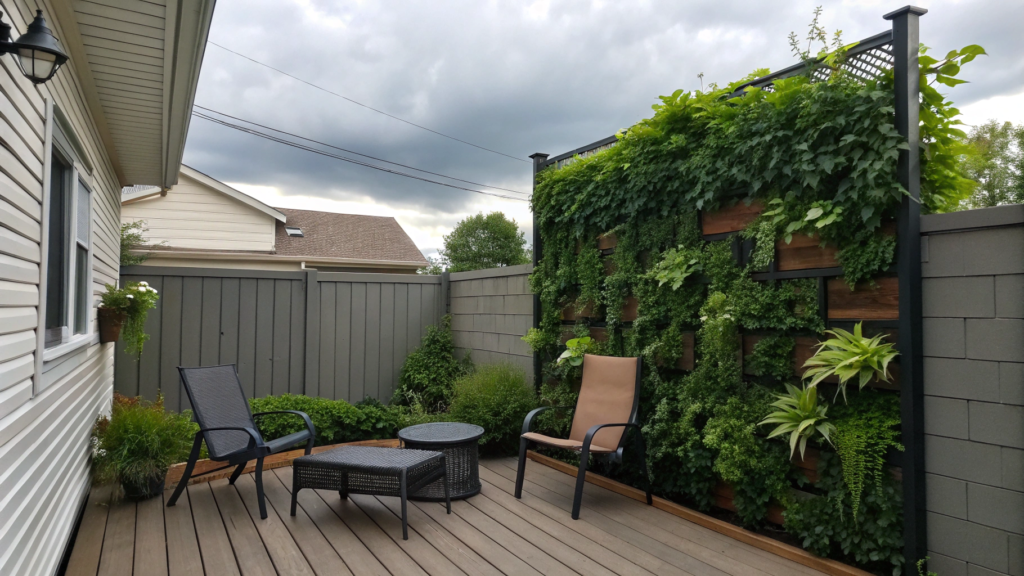
I first appreciated this kind of solution at friends’ place in Portland. They have a tiny backyard, almost no lawn at all, but a vertical garden wall running along the deck. The space did not feel overloaded. Quite the opposite — it felt put together. And very alive.
In small yards, horizontal space runs out fast. A couple of chairs, a table — and that’s it, no room left. A vertical garden wall solves this problem without expanding the deck itself.
It adds greenery without taking up usable floor space, creates a visual backdrop and depth, and removes that boxed-in feeling between the fence and the house.
How to Integrate a Vertical Garden
The most important thing is not to treat the wall as a separate object. It should feel like part of the deck, not an idea that was added later.
These approaches tend to work best:
- placing the wall along the narrowest side of the yard
- repeating the deck material in the frame or structure
- keeping the height within 6–8 feet (1.8–2.4 m) so it does not feel overwhelming
When a green wall gets too tall, the yard starts to feel like a well. In small spaces, this feeling shows up immediately.
Plants That Actually Work in a Vertical Setup
Here, less is better — but more reliable. Not everything that looks good in photos survives real life.
In successful projects, people usually choose:
- herbs with shallow root systems
- trailing or cascading plants
- decorative greenery without aggressive growth
We once saw a wall planted entirely with herbs — rosemary, thyme, oregano. It looked neat and was used daily, not just for appearance.
It is important to understand this upfront: a vertical garden does require maintenance, even if minimal. If there is no desire to keep an eye on watering, it is better to reduce the number of plants rather than abandon the idea completely.
Watering and Maintenance Mistakes
The most common mistake is skipping a watering system. In a small yard, it feels like “I’ll just water it myself.” In reality, vertical plantings dry out faster than garden beds.
What usually solves the problem:
- drip irrigation
- moisture-retaining growing medium
- removable modules that can be replaced
Without these, the wall quickly loses its look, and the idea stops being enjoyable.
How Vertical Greenery Changes the Feel of the Deck
When you sit on a small deck and look at a green wall instead of a fence, the space feels completely different. It stops feeling “small.” It feels enclosed and comfortable, but not tight.
This works especially well when combined with:
- built-in benches
- a compact table
- soft evening lighting
The green wall becomes the background that holds the whole space together.
When a Vertical Garden Is Not the Best Choice
If the yard is fully shaded and poorly ventilated, or if there is no willingness to provide even minimal plant care, a vertical wall can quickly turn into a problem. In those cases, partial greenery — separate modules or green panels instead of a continuous wall — is a more practical option.
5. Pergola-Covered Deck with String Lighting
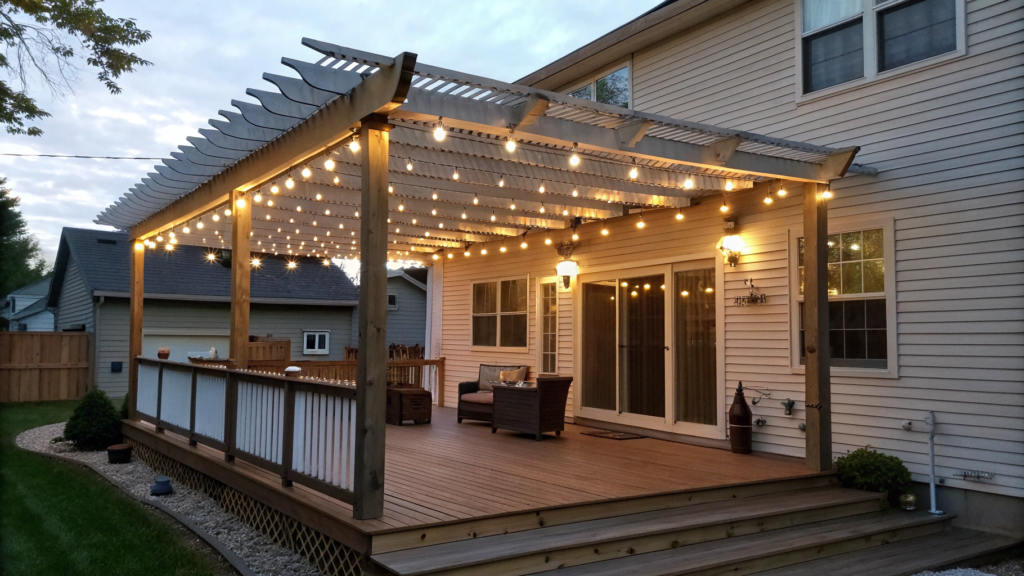
What draws me to this pergola-covered deck with string lighting is how it changes the space over the course of a day. During the day, it is just a regular outdoor area. In the evening, it turns into the center of the home.
A pergola adds vertical structure and creates a sense of a ceiling, even when the construction is very light. The deck stops feeling like just an open platform and starts to read as a defined zone with boundaries. The space is no longer something you pass through. It becomes a place where you want to sit and stay.
This is especially noticeable in yards without trees or natural shade. In those cases, a pergola structure literally holds the backyard together and keeps it from feeling scattered.
String Lighting Paired with a Pergola
String lights on their own are not very impressive. Most people have seen plenty of yards where lights are just hanging in the air — and they feel exactly like that. Under a pergola, everything changes. The light starts to highlight the structure, instead of competing with it.
There is also something hard to explain with diagrams. Light coming from above always feels softer than light from the side or below. It does not press on your eyes, does not demand attention. You simply exist inside it.
Details That Actually Matter
Even with such an atmospheric idea, small details determine whether it works or not. In practice, these choices tend to work best:
- warm light in the 2200–2700K range
- bulbs with frosted glass
- a slightly uneven, natural-looking layout
Too perfect — and the space starts to feel cold. Too chaotic — and the sense of order disappears.
How Not to Turn the Deck into a Café or a Stage
We have also seen the other side of this idea. When there is too much light, the backyard suddenly starts to resemble a restaurant terrace. It may look nice, but it loses that private, comfortable feeling most people want at home.
A pergola with string lights works best when the lighting stays in the background. It should not be the main feature of the space.
Balancing the Light
There are a few approaches that almost always help:
- string lights set the overall mood
- additional lighting is used very sparingly
- bright sources are kept out of direct sight
This keeps the backyard feeling warm and lived-in, not staged.
When This Option Works Especially Well
This design shines in spaces where evenings matter more than daytime. When the yard is used less during the day, but after sunset it becomes the main gathering place. A pergola does not require constant maintenance, and that alone has a big impact on how often the space is actually used.
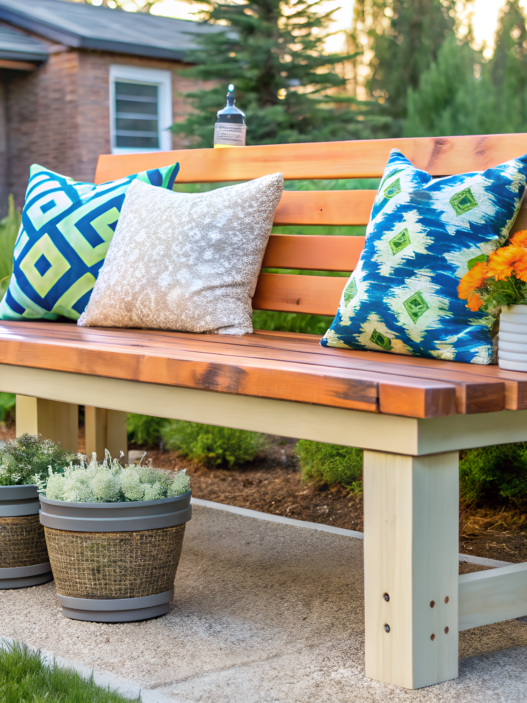
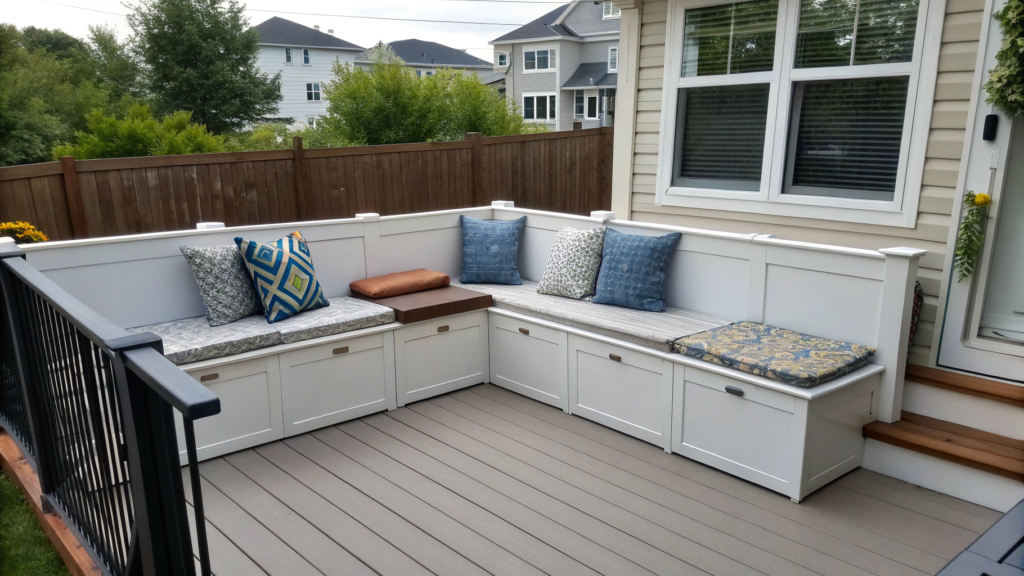
6. Deck with Wraparound Built-In Seating
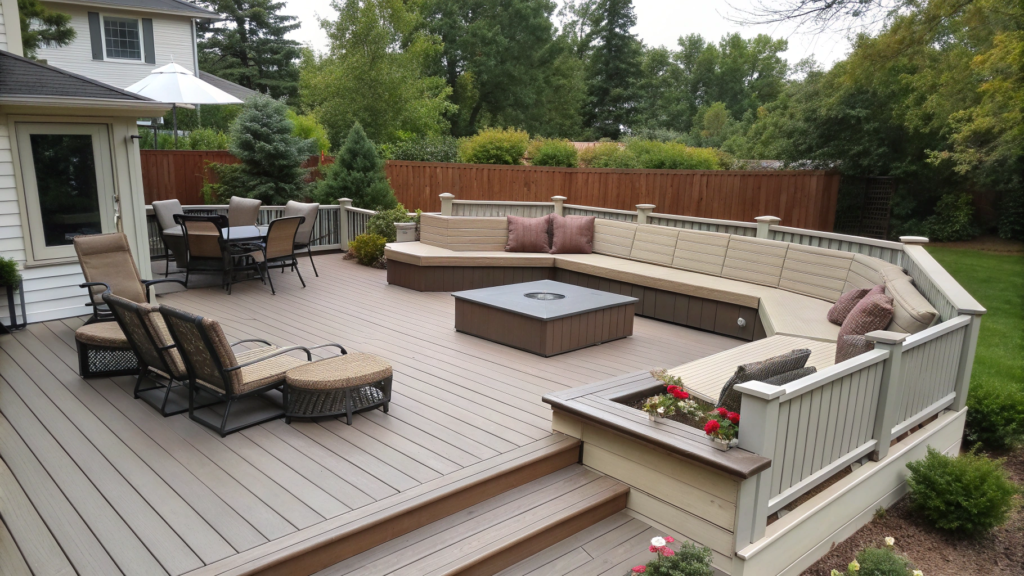
Wraparound built-in seating creates a sense of enclosure and protection. We have seen decks like this many times at other people’s homes, and every time the same thought comes up: no one asks where to sit. There is space for everyone, and the layout itself quietly suggests how the area should be used.
This idea works especially well when the yard is not very large. It removes the chaos of scattered chairs and makes the space feel more cohesive and calm.
This setup usually provides:
- more seating without visual clutter
- a sense of order, even with many people present
- the ability to use the deck without extra furniture
By the way, it is often possible to remove all standalone chairs altogether. Just built-in benches — and that turns out to be more than enough.
Comfortable Dimensions
Built-in seating has one important requirement: it needs to be comfortable right away. If the proportions are off, people will use it less.
In practice, these dimensions tend to work best:
- seat height 16–18 inches (40–45 cm)
- seat depth 18–20 inches (45–50 cm)
- backrest height 12–16 inches (30–40 cm), if included
When the depth is smaller, the seat feels temporary. When it is deeper, people naturally want to stay longer.
Deck Geometry
Wraparound seating softens the overall shape of the deck. Even a rectangular layout starts to feel more fluid, with fewer hard edges.
This is especially noticeable on decks with a fire pit or a table in the center. The seating seems to hold the area together, keeping attention inside the deck instead of letting it drift outward.
Hidden Storage
Very often, wraparound seating is combined with storage under the seats. This solution almost always proves useful.
This format allows you to:
- quickly store cushions and blankets
- keep the deck looking clean
- prepare the space for guests in minutes
This kind of hidden storage is often the reason people start using the deck more often. The logic is simple: nothing needs to be carried back and forth.
When Wraparound Seating May Not Work
There are situations where wraparound seating does not fully make sense. For example, if the deck is very narrow or used mostly as a walkway rather than a sitting area. In those cases, it is better to leave part of the space open and use linear benches instead.
Orientation also matters. If the seating faces directly toward a fence or a blank wall, the feeling of comfort can be lost.
A Small Observation
There are backyards where people constantly move furniture, rearrange chairs, and the space still feels unfinished. And there are others where seating is built in — and the question “where should I sit?” simply never comes up. A deck with wraparound built-in seating almost always belongs to the second group.
7. Deck with Hot Tub Sunken into the Floor
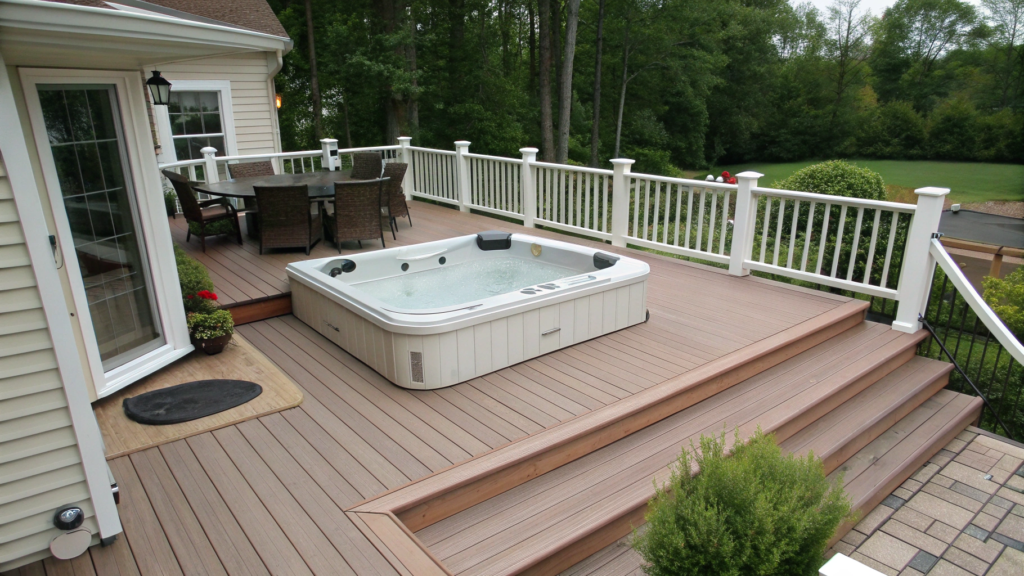
When a sunken hot tub is not sitting on top as a separate object but is built into the deck, the space immediately feels calmer. Nothing sticks out, nothing fights with the furniture, and nothing pulls too much attention. Everything looks like it was planned this way from the start.
There is no need to step up, grab railings, or carefully climb over a high edge. Movement becomes intuitive, almost unnoticeable. This matters even more in the evening or during colder months, when the body naturally looks for simplicity. Fewer steps mean more frequent use.
In these projects, the following usually works best:
- hot tubs with a low-profile edge
- neutral finishes without strong contrast
- access to the water from multiple sides
This is what makes the tub part of the deck, not the main focal point.
How This Solution Changes the Whole Backyard Scenario
What is interesting is that a sunken hot tub rarely becomes the “main attraction.” Instead, it creates a background that people return to again and again.
When the tub is integrated properly, the backyard starts to be used differently. There are more short, casual visits and fewer rare “special occasions.” This setup does not require preparation — and that is exactly why it works.
What Needs to Be Planned in Advance, Not Later
This format should not be treated as purely decorative. It requires proper calculation and an understanding of load, otherwise the deck will remind you of itself very quickly.
Typically, this includes:
- a reinforced frame for the weight of water and people
- proper drainage around the tub
- technical access to the equipment
A fully filled hot tub can easily weigh 3,000–4,000 lbs (1,360–1,800 kg). This is not a theoretical number. It is a constant load the deck must support.
Details That Make It Comfortable to Use
Comfort does not come from the tub itself, but from everything around it. When it is done right, you do not notice it — and that is the best sign.
These details usually work well:
- non-slip decking surface
- soft perimeter lighting
- a nearby place for towels and drinks
In very small yards, a sunken hot tub can take up too much usable space. In that case, it makes sense to reduce the size or combine levels. But if the deck allows it, this format almost always looks calmer and more refined than a raised installation.
When a Sunken Hot Tub Makes the Most Sense
This option fits best in yards where quiet and order matter more than visual effects. It works for people who want to use the tub often, but do not want it constantly standing out as an object.
In smaller spaces, people usually choose compact hot tub models with a low profile that are designed specifically for sunken installation.
8. Wood Deck with Chevron Pattern Flooring
This type of flooring immediately sets a clear visual structure and makes the space feel more put together, even when furniture and decor are kept to a minimum. As a result, the deck looks thought-through at a basic level, without needing extra elements.
A chevron pattern creates direction. The eye naturally moves along the diagonal lines, and the space stops feeling static. Depending on how the pattern is oriented, the deck can feel visually longer or wider.
- the surface looks more dynamic
- simple geometry becomes more expressive
- the decking stops being a neutral background
Because of this, the floor starts doing some of the design work that is usually pushed onto furniture or decor.
How This Pattern Feels in Everyday Use
Chevron is not just about appearance. It holds up well in real, daily use. The pattern does not fade into visual noise over time and does not demand constant attention like heavy decorative elements do.
At the same time, the flooring:
- does not look boring when the deck is empty
- keeps a clean, orderly look with active use
- reads clearly in both daylight and evening lighting
This matters for decks that are used regularly, not just occasionally.
What to Consider When Choosing Materials and Installation
This pattern does not forgive sloppy work. Any inaccuracy becomes noticeable right away because the layout is built on rhythm and symmetry.
Attention is usually paid to:
- consistent board width
- stable material geometry
- a clean, precise center seam
That is why chevron decking is often done with composite boards or thermally modified wood. These materials react less to moisture and temperature changes.
Precision miter saws with accurate angle settings, such as the DEWALT DWS779 Sliding Compound Miter Saw, help maintain consistent angles and clean cuts across repeating elements. Even when a contractor handles the installation, understanding this detail helps avoid compromises.
Where This Type of Flooring Works Best
Chevron flooring works best where the deck surface stays visually open and is not covered by rugs or crowded furniture layouts.
It is especially suitable:
- for terraces that are clearly visible from the house
- for lounge areas without bulky furniture
- for decks with clean, defined geometry
In these conditions, the pattern stays readable and does not overload the space.
Furniture and Styling
When the floor itself is visually strong, everything else should stay calm. This keeps the space balanced and prevents visual fatigue.
In practice, the best combinations are:
- furniture with simple shapes
- neutral color palettes
- a limited number of accessories
This approach keeps the deck looking tidy and reduces the need for constant updates or rearranging.
9. Raised Deck with Glass Railing Panels
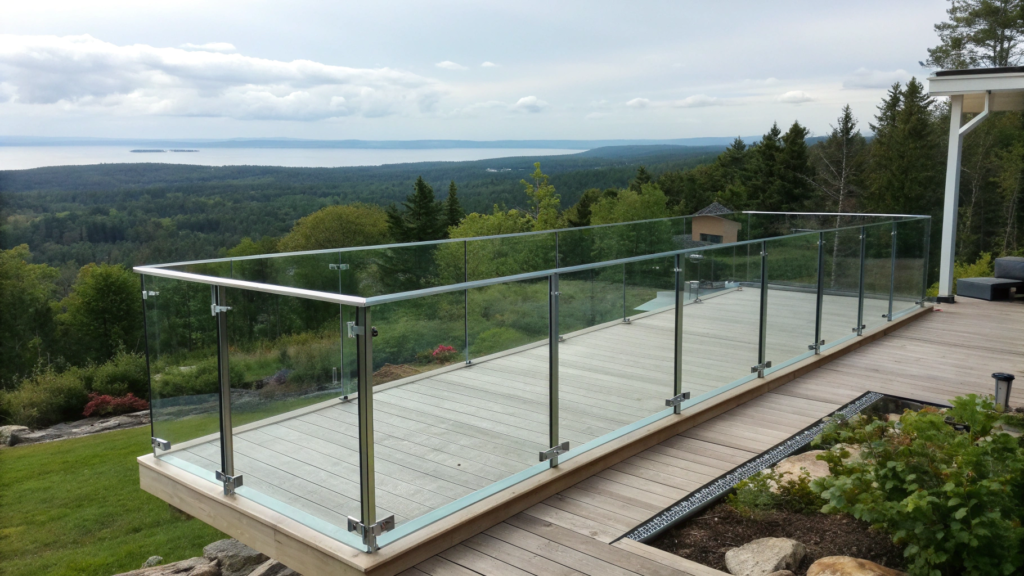
A raised deck with glass railing panels immediately makes it clear that the focus is not the structure itself, but what lies beyond it. When a deck is elevated and the railings stay transparent, the space does not stop at the edge. Your eye keeps moving — toward the garden, the forest, the water, or the horizon.
An elevated deck naturally increases the feeling of distance from the ground. Traditional railings tend to emphasize this and can make the structure feel heavier. Glass railing panels, on the other hand, soften that height difference and make the deck look visually lighter.
As a result:
- the deck feels less bulky
- the space beyond the railings remains part of the yard
- the height feels calmer and more secure
This effect is especially noticeable on sloped lots or areas with a downward view.
Where This Option Works Best
Glass railings are not universal. They work best where there is something worth seeing and lose their impact in fully enclosed yards.
They are most often chosen:
- for lots with natural views
- for homes built on a slope
- for raised terraces overlooking a garden or water
If the deck faces a fence or a neighboring house, the effect is minimal.
Practicality
The first concern is almost always the same: glass feels fragile and “not meant for real life.” In practice, modern panels are designed specifically for outdoor use and structural loads.
Typically used materials include:
- tempered or laminated glass
- thickness of 10–12 mm (about ⅜–½ inch)
- aluminum or steel posts
These railings handle wind, rain, and regular use without issues, while remaining visually unobtrusive.
Maintenance Without Extra Hassle
Yes, glass needs cleaning. But surprisingly, it is done less often than people expect. Dust and rain marks are less noticeable than fingerprints on dark wooden railings.
In reality, maintenance comes down to:
- washing a couple of times per season
- mild cleaning products
- avoiding harsh abrasives
The rest of the time, the panels simply stay in place and do not demand attention.
Safety and a Sense of Calm
For many, glass railings look less secure than wooden ones. But transparency often creates a stronger sense of safety. You can see the edge, see the height, and movement becomes more deliberate.
This is especially important:
- on narrow decks
- where there is a height difference
- in homes that often host guests
With proper installation, glass panels meet building codes and are just as reliable as traditional railings.
A Detail That Shapes the Final Look
With glass railings, transparency alone is not enough. The frame and mounting system matter just as much. They determine whether the railing feels light or heavy.
The best systems usually have:
- slim posts that do not draw attention
- minimal profiles without extra detailing
- clean glass attachment without bulky perimeter frames
Aluminum posts or point-fix systems are commonly used, where the glass is secured at specific points. These solutions keep views open and blend naturally with the house, regardless of architectural style.
A raised deck with glass railing panels removes visual barriers, lightens the structure, and allows the space to be used as originally intended — without the feeling that something is blocking the view.
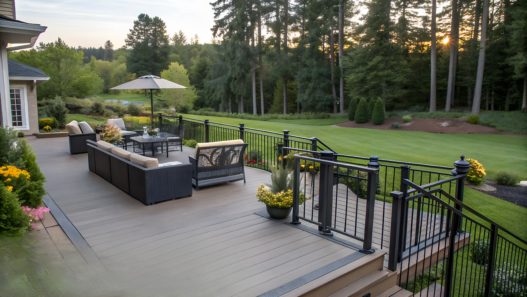
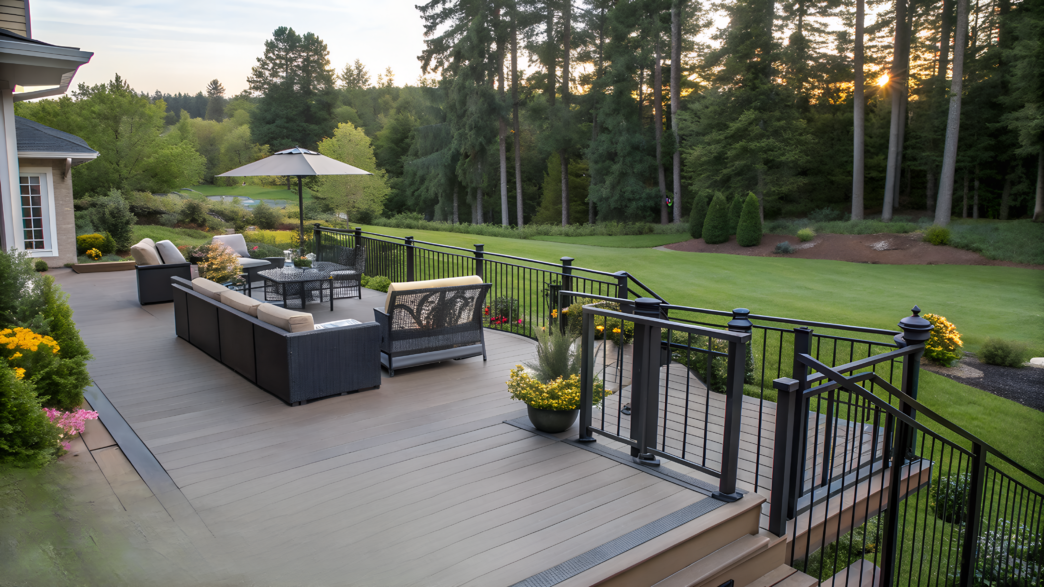
10. Contemporary Deck with Multi-Zone Layout
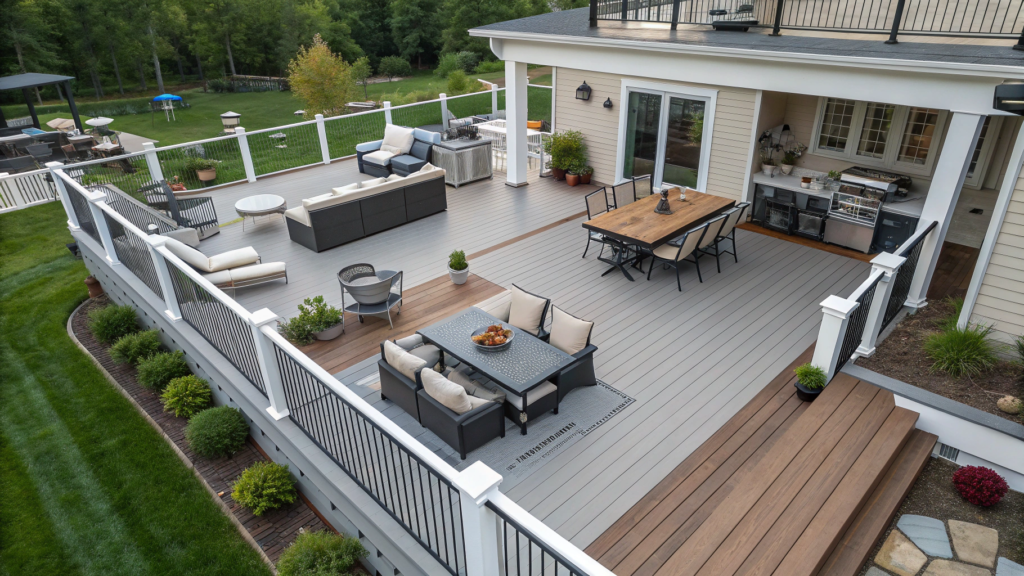
When the entire deck is one open area, there is a constant need to move things around, rearrange furniture, and adapt on the fly. In real life, that kind of multi-functionality often turns into compromise.
A multi-zone deck layout solves this differently:
- each zone has a clear purpose
- furniture stays in its place
- the space is used more often and more consistently
As a result, the deck starts working in a predictable way, without constant changes.
Zones That Are Usually Planned
The set of zones depends on lifestyle, but there are a few combinations that repeat over and over — simply because they work.
Most often, people include:
- a lounge zone with a sofa or chairs
- a dining area with a table
- a transition zone for movement and circulation
Even on a medium-sized deck, these zones can be defined without partitions — just through furniture placement and orientation.
How Zones Are Separated
It is important that the separation does not feel rigid. When zones are defined too strictly, the deck starts to resemble a floor plan instead of a place meant for living.
Well-designed multi-zone decks feel fluid. You move from one area to another without thinking about boundaries. This effect comes from spacing, furniture angles, and small changes in level or decking direction.
Techniques That Help Divide the Space
Zones do not need walls or screens. In most cases, simple solutions are enough.
Commonly used approaches:
- furniture turned at different angles
- rugs or a change in deck texture
- lighting with different intensity levels
These cues are read subconsciously and do not overload the space.
Furniture as a Zoning Tool
In a multi-zone layout, furniture defines the borders.
Modular sofas work especially well for contemporary decks because they can be positioned in a way that visually separates the lounge area from the dining space.
For example, the Modway Convene Outdoor Sectional has clean geometry and proportions that fit easily into a zoned layout. Even a single well-placed sofa can replace a visual divider.
Lighting for Different Scenarios
Using the same lighting across the entire deck breaks the idea of zoning. Modern multi-zone designs almost always rely on varied light levels.
In practice, this looks like:
- soft, diffused light in the lounge area
- brighter lighting above the dining table
- subtle, low-level lighting in walkways
This way, each zone keeps its purpose without competing with the others.
When a Multi-Zone Layout Makes the Most Sense
This format works best for decks that are actively used throughout the day and evening. It is practical for families, for hosting guests, and for situations where several things happen at the same time.
If the space is very small and usually serves one main purpose, dividing it into zones may be unnecessary. In most other cases, a contemporary deck with a multi-zone layout allows the space to be used more efficiently.
A Practical Approach to Design
When choosing a deck design, it is easy to focus on appearance and forget how it will be used every day. But this is exactly what determines whether the space feels truly comfortable or just looks good in photos.
The best solutions are the ones that do not require constant adjustments. No dragging furniture around, no thinking about where things should go, no seasonal reworking. The deck should simply function — in the morning, during the day, and in the evening.
If decisions are based on habits and real-life scenarios rather than trends, the backyard becomes more comfortable over time. And these are the spaces people end up using most often, without overthinking it.Leave a comment and share which option feels closest to your needs — or what problem you are trying to solve when planning your deck.