In winter, the entry area quickly loses its tidy look: containers turn empty, plants go dormant, and the space starts to feel a bit neglected.
But even in cold months you can keep things in order and create simple, affordable, and practical décor that still looks well-kept.
Here, we collected winter planter ideas you can make from accessible materials — evergreens, branches, pinecones, cold-tolerant plants, and a few practical accents.
Yes, we’ve tried all of these ourselves in regular northern-climate conditions. These options are perfect for anyone who doesn’t want “holiday” décor, but prefers clean, neat, and durable winter solutions for the porch and entry area.
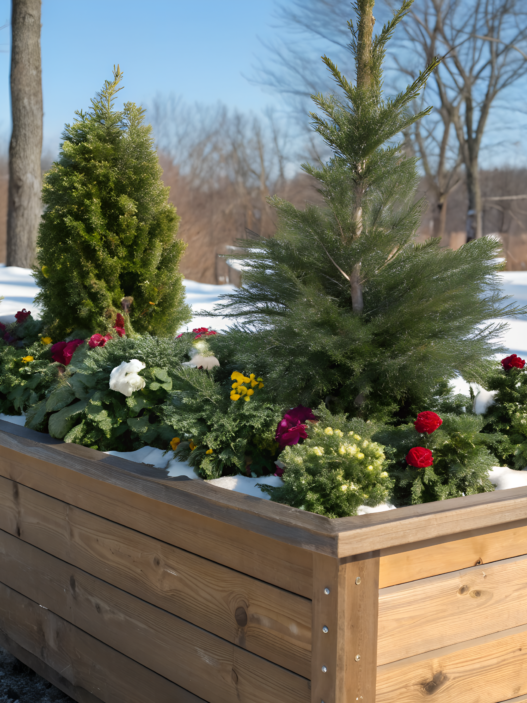
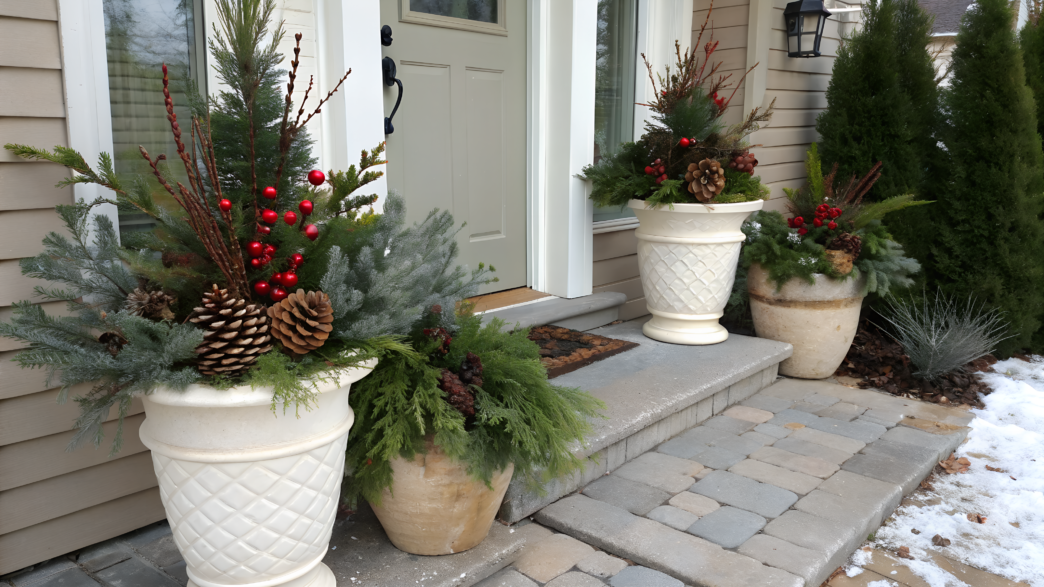
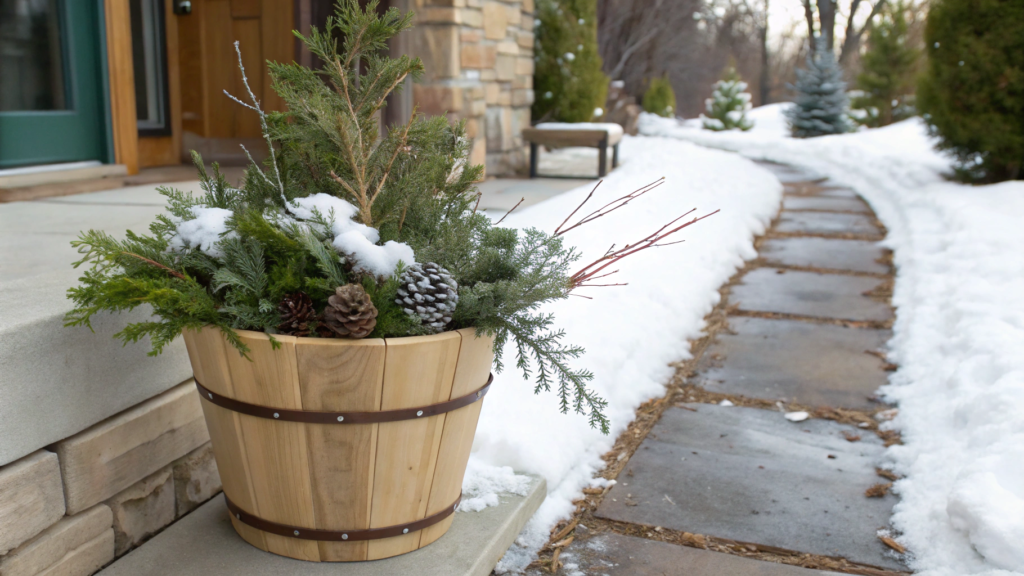
1. Frost-Proof Evergreen Urn
This option is one of the easiest and most impressive winter decorations.
An evergreen urn always saves the situation: it looks upscale and stays sturdy. The idea works even on very small porches.
Who this option is good for
- For those who want minimum maintenance
- For cold regions (zones 4–7 — absolutely zero stress)
- For those who love neat greenery without extra décor
- For anyone who doesn’t want to buy new plants and containers every season
What you’ll need
- A frost-proof outdoor urn, preferably composite, 3–5 gallons (11–19 liters)
- Outdoor potting soil
Main plants (evergreens):
- Dwarf juniper (Juniperus)
- Fir or pine branches (fresh or high-quality faux)
- Compact western arborvitae (Thuja occidentalis ‘Little Giant’ or similar)
Optional accents:
- Willow stems (2–3 pcs, 24–36 in / 60–90 cm)
- Eucalyptus
- Dark red berries (faux or real)
How to assemble the arrangement
- Fill the urn about two-thirds with soil. I like pressing the soil slightly with my hand — in winter it helps the arrangement stay firm and not shift with the wind.
- Set the main accent: a dwarf juniper or a mini arborvitae. Yes, you can plant a live one, and it will overwinter well if you choose the right variety. Height 12–18 in (30–45 cm) works best: the shrub looks substantial but doesn’t overpower the urn.
- Add volume with evergreen branches. Insert them at an angle. I like mixing textures: soft, long pine needles and denser fir. In real life this adds a more expensive look.
- Insert a couple of vertical elements. Willow or thin decorative branches help the arrangement stretch upward. From experience, stems about twice the height of the plant look the most balanced.
- Add a few color accents. Red berries or silver eucalyptus — anything that hints at winter without loud holiday décor. One year we used dried lavender stems — it turned out unexpectedly soft and very cohesive.
One December morning I ran out onto the porch to check whether the night wind had knocked over my arrangement.
And it was… perfectly intact, just a light crust of frost on the juniper branches.
It turned out that such a simple winter planter actually helps you keep track of the condition of your porch and entry area. When everything else on the property is hidden under snow, this green spot near the door quickly shows how strong the wind was, whether there’s ice, and if anything needs to be adjusted. A small, practical detail that works every day.
Why a frost-proof urn is a smart choice
We once left a regular ceramic pot outside in winter… and by spring it had cracked cleanly along a diagonal line.
Later I came across guidance from the Royal Horticultural Society, explaining that ceramic absorbs moisture, and when it freezes, expansion causes the material to fracture.
Frost-proof composite urns don’t absorb nearly as much water — which is why they survive winter much more reliably.
Plus, a sturdy urn lets you swap the contents every season: tulips in spring, grasses in summer, mums in fall.
2. Simple Pansy and Pine Combo
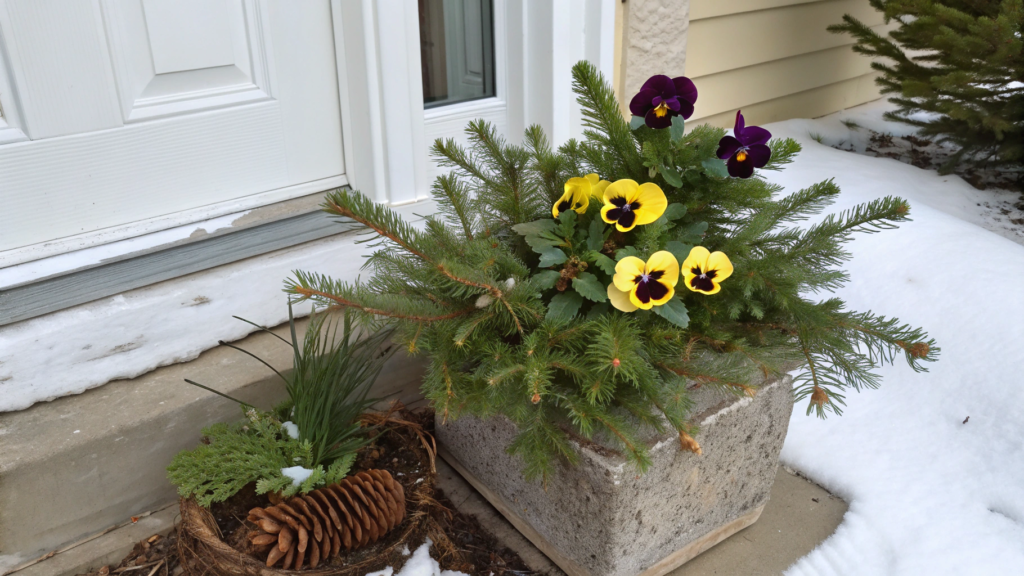
I always thought that any frost would knock pansies down instantly. But no! They turned out to be so tough that one of our containers stayed by the front door all winter… and looked a lot tidier than the neighbor’s plastic garland.
That’s pretty much how this idea came to life — a combo of pansies and pine branches that requires no effort, costs little, and stays neat even under snow.
Who this option is good for
- For those who want a minimal budget but a tidy winter look
- For those living in regions where winter hovers around 20–40°F (–6…+4°C)
- For anyone tired of heavy “Christmas-style” arrangements and wanting something fresher
This idea works best on small porches, in narrow entry zones, on steps — anywhere you want a bit of color.
Pansies give soft color patches, and pine branches create a stable background that doesn’t collapse after the first storm.
What you’ll need
- A 2–3 gallon container (7–11 liters) — any shape
- Pansies (4–6 plants) — these little “faces” can handle frost and perk up after warm spells
- Pine branches — preferably long, 18–24 in (45–60 cm)
- Potting soil for container plants
- Optional: natural burlap or ribbon if you want a soft textural detail
How to assemble this winter arrangement
- Fill the container with soil. Leave about 1–1.5 in (2–3 cm) at the top. Pansies do better in loose soil — in winter this helps keep their roots dry between thaws.
- Place the pansies closer to the front edge. Mixing purple and yellow shades makes the container noticeable from afar.
And yes, pansies handle temperature swings well; short frosts don’t scare them. - Insert pine branches along the back line of the pot. Angle them slightly so they create depth and a natural backdrop. Pine keeps its shape for a long time and doesn’t shed — hard to beat for practicality.
- Add a small finishing touch. You can wrap the base lightly with burlap or a warm-textured ribbon — a simple way to soften the transition between soil and container.
- If you want a bit more expression, lighting works wonders. We once used a small Solar String Lights garland — it ran all season without maintenance and gave a warm glow against the pine branches.
Pansies are frost-tolerant, and Royal Horticultural Society research confirms they can handle short freezes below 20°F (–6°C), especially when the soil isn’t overly wet.
And pine branches not only add volume but also offer a bit of wind protection, which is a small but useful practical bonus.
Short story
One late November, we stopped by the farmers’ market just for eggs and honey.And then the local farmer — the one who always tries to “send me home” with something unnecessary — hands me a flat of pansies: “Take them, they’ll survive this week better than I will,” she jokes. How could I refuse? I took them. Left them by the back door and… completely forgot.
A couple of days later I open the door — and the pansies look perkier after the frost than when I brought them home.
That’s when I decided: if they’re that tough, they deserve to be part of a winter container.
And yes, they actually outperformed many so-called “winter” plants that season.
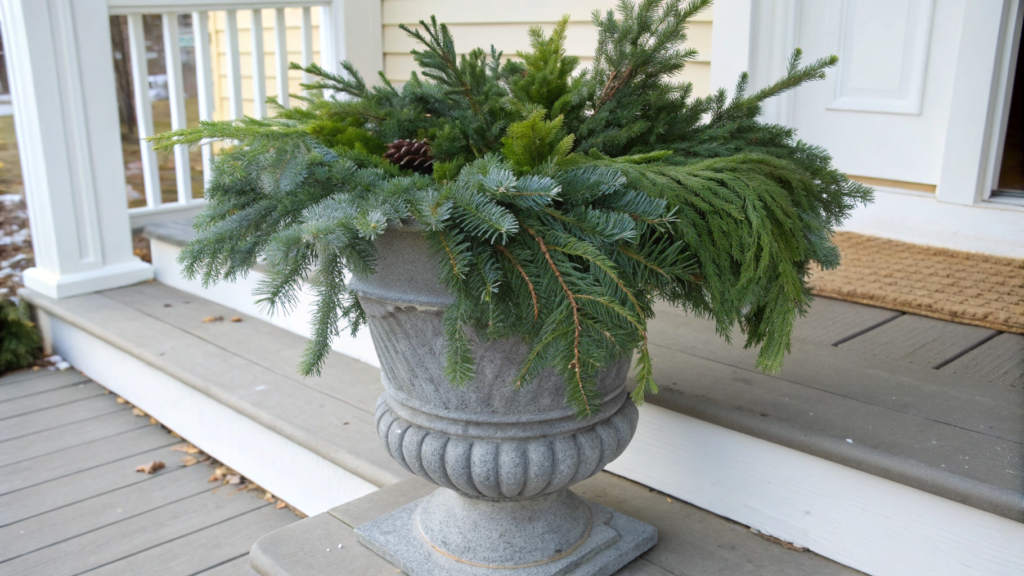
3. DIY Birch Branch Accent Pot
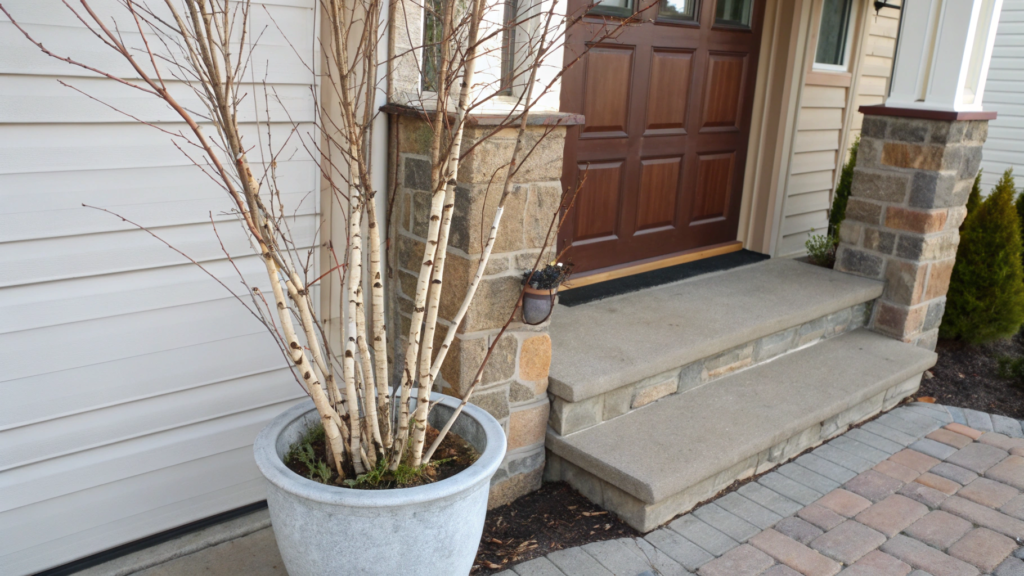
In this arrangement, birch branches look strict but warm, giving the vertical height that winter containers are often missing.
Yes, birch branches really are almost the perfect winter material: lightweight, sturdy, and they keep their appearance.
This composition works especially well in the entry area, along walkways, near the garage, on stairs, next to the mailbox — anywhere you want a vertical accent but don’t have space for a large container.
What to prepare in advance
- A container 3–5 gallons (11–19 liters)
- Birch branches 24–36 in (60–90 cm)
- Dense winter soil or sand (for stability)
- Evergreen material: fir, arborvitae, or pine — even trimmed lower branches from your yard will work
- A couple of decorative elements of your choice
- And if you want a small metallic touch, Gold Painted Curly Willow Decorative Twigs make a great accent
How to assemble the arrangement
- Fill the container with soil or sand about two-thirds full. Sand gives better stability — especially if the area is open and wind moves freely across the yard.
- Form the central frame from birch branches. Take 5–7 stems.
Insert them as a tight group — the tighter the bundle, the better the stability.
A height of 24–36 in (60–90 cm) creates a strong vertical element that stays visible even under snow. - Secure the branches with soil or sand. Just pack it around by hand — in winter this is especially important: once the soil freezes, it becomes firm and holds the structure like concrete.
- Add evergreen branches along the bottom edge. Arrange them in a circle — like a “collar.” Evergreens soften the composition visually and hide the technical part.
Evergreen materials also help reduce soil evaporation in winter, which is useful for container plantings. - If you want a light decorative detail, insert 2–3 metallic accents.
We once had a few birch branches left after pruning — just lying in the shed, nothing special.
And that winter I finally decided to use them: I placed them in an old container, added a bit of evergreen… and suddenly realized that this quick, “technical” container became the neatest-looking spot near the house.
No dramatic effects, no holiday themes — just a clean, steady winter accent.
Now we assemble these almost every year — too convenient to ignore.
Why this option performs so well in winter
Birch branches absorb almost no moisture and don’t crack in freezing weather because birch wood has a dense structure that handles freeze–thaw cycles more reliably.
Evergreens create lower visual volume and protect the top layer of soil from wind and drying out.
4. Outdoor Lantern Filled Planter

If you don’t really feel like dealing with plants, you can make a lantern filled with seasonal materials. We also made this kind of arrangement when snow arrived unexpectedly early and the containers were standing empty and dull.
This approach works best on wide steps, by the front door, next to a bench, near the garage, or by the mailbox.
A lantern creates a point of light and shape, and the filling makes the arrangement feel “alive” even when there are no plants around.
What to prepare
- A sturdy outdoor lantern, 12–18 in (30–45 cm) tall
- Small fillers: fir or pine branches, pinecones, small twigs
- A couple of decorative elements: berries, dried grasses, short birch sticks
- Optional: small LED lights that perform well in winter
How to make it — step by step
- Place the lantern inside a container or on its lid. If you’re using a pot as the base, secure the lantern with soil, sand, or heavy stones — winter stability matters more than aesthetics.
- Create a base layer of evergreens. Put a few pine or fir branches inside. They give volume and cover the lower part so the lantern doesn’t look empty.
- Add texture. Pinecones, small branches, pieces of birch — anything you have on hand.
Birch works especially well, because its white bark contrasts beautifully with the darker metal of the lantern. - Add a focal point. A cluster of red berries or a twig with an interesting shape creates a visual highlight. Dried grasses add softness and a slightly more “northern” character.
- Add lighting if needed. Place a short LED string light inside. They’re safe, last long, and give a soft glow without overheating anything.
For us, these lantern arrangements work like a winter quick-fix, perfect for the times when you don’t want to deal with soil and plants.
We placed the lantern directly into the container, added fir branches, tossed in a few pinecones — and that was it.
Why lanterns perform so well in winter
This isn’t a plant-based arrangement — which means freezing temperatures and moisture swings don’t affect it at all.
Plus, the container is enclosed with glass or side panels, so the filling doesn’t blow away even on windy days. This option is ideal when you want minimum maintenance with maximum neatness.
5. Faux Snow Cedar Bucket
There are winter arrangements you assemble almost on autopilot — and then look at them and think, “Wait… this actually looks great? And all of it came from scraps?”
We made this cedar bucket with a light faux-snow finish when we needed to close off an empty corner by the walkway, and all the good containers were already taken. We grabbed an old wooden bucket… and the result surprised us in the best way. And yes, we truly put this together almost without thinking.
This option works especially well along walkways, by the entry, next to a bench, on a terrace, by the garage — anywhere you want a full, soft winter arrangement without vertical accents or sticking branches.
What to prepare ahead
- A wooden bucket or metal tub, 2–4 gallons (7–15 liters).
The heavier the shape, the richer the final look. - Cedar branches, 12–24 in (30–60 cm) — at least 10–15 pieces.
- A bit of pine or fir if you want extra variation.
- Soil, sand, or even gravel — anything that stabilizes the branches.
- Light faux snow (decorative shavings or powder snow).
- Optional: a few pinecones or red berry stems.
- For a soft accent, Warm White Copper Wire Lights work perfectly.
How to assemble the arrangement
- Fill the bucket with your base material. One third to halfway, depending on depth. Sand adds weight, which helps if the bucket sits in an exposed spot. If the soil is frozen, just tamp down whatever you have — stability is all that matters.
- Create the lower ring of cedar. Take 6–8 branches and place them around the edge at a slight outward angle to form a “green skirt.” Cedar holds its color well even through freeze–thaw cycles.
- Fill the center with shorter branches. They should stand tighter and slightly higher, without any vertical sticks poking out.
The result should be rounded, a bit tousled, not overly structured. - Add texture. Lay 2–3 fir branches for density, tuck in a couple of pine pieces — the long needles make the shape look fuller.
If you have pinecones, scatter them on top as a natural woodland detail. - Apply a light layer of faux snow. Mist the branches with decorative snow or sprinkle a small amount of powder snow.
The key is a very thin layer — too much creates a plastic effect.
We always keep it minimal for a clean, natural look. - Add a small bonus — lighting. If you want evening depth, wrap the lower layer of branches with Warm White Copper Wire Lights.
They’re almost invisible during the day but give a warm, soft glow at night.
Why this arrangement lasts so long
Cedar is one of the most reliable evergreens for winter décor.
Cedar wood and foliage contain natural oils that slow down drying and help the material hold its shape and color in cold weather.
That’s why cedar wreaths and hanging arrangements look better than most other evergreens a month or two after installation.
6. Minimalist Modern Porch Box

For those who prefer clean geometry and calm lines that highlight the architecture of the house, a modern porch box is a perfect fit.
This type of container looks best in narrow or elongated spaces — along walls, between porch supports, by the entry door, next to a long step, on a terrace, or near the garage. Anywhere you want neatness and clean lines rather than fullness.
What you’ll need
- A long rectangular container: 24–30 in (60–75 cm) long, 8–10 in (20–25 cm) wide.
- Filling material: sand, gravel, or soil — anything that adds weight.
- Several contrasting branches: birch, red osier dogwood, black walnut — your choice.
- A small amount of fir or pine, only for the lower layer, not for fullness.
- A couple of decorative elements: pinecones, deep-toned glass ornaments, metallic accents.
- We sometimes add a thin strand of Silver Micro LED Wire Lights.
How to assemble the arrangement
- Fill the container halfway with sand or gravel. Minimalist boxes are often lightweight, so weight is your friend — especially in open areas.
- Set the vertical accents. Take 5–7 straight branches (dogwood, birch, walnut) and group them into a tight bundle near one corner.
This asymmetrical placement visually lifts the arrangement and looks more modern than symmetrical options. - Create a very minimal lower layer of evergreens. A couple of small fir or pine clusters along the front edge soften the strict lines without turning the arrangement into a “holiday” display.
- Add a small color accent. It can be one large pinecone, a piece of red dogwood, or a dark decorative ornament.
In minimalism, one expressive element works stronger than ten small ones. - If you want soft lighting, add a thin strand of LEDs. Run a light string such as Silver Micro LED Wire Lights along the front edge of the box.
Why this approach works so well
Minimalist containers handle winter beautifully because:
- there’s no dense greenery that collapses under snow;
- branches stay stable in frost — their structure hardly changes with temperature shifts;
- the arrangement requires zero maintenance, except occasionally adjusting the lower greenery.
This is one of those setups you can place at the end of November and forget until March — and it will look tidy the entire time.
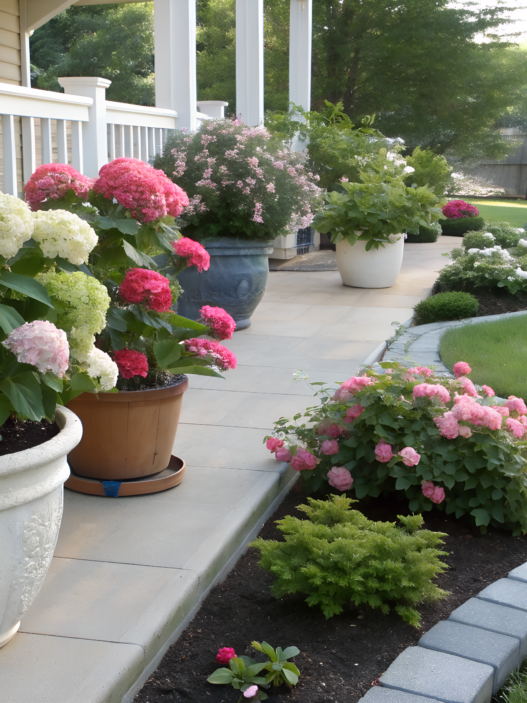
7. Classic Red Berry Display

Some winter arrangements work every single year without a single adjustment.
And red berries against evergreen branches are exactly that kind of option. Even if your home is minimalist, your porch lines are strict, or the northern light is cold, red berries on evergreens always look appropriate and fresh.
This arrangement became a staple for us, and the bright berry accent at the entrance looks better than any festive wreath.
This display looks especially good on tall pots by the entry, on wide steps, along the walkway, or near the garage — anywhere you want a pop of color in winter without flashy decor.
What you’ll need
- A container from 3 to 5 gallons (11–19 L).
- Evergreen base: 10–15 fir or pine branches.
- Berry branches: best options are red dogwood or high-quality faux stems.
- Several arborvitae branches for structure.
- A bit of sand or soil for stability.
- One small decorative element if you want.
- We sometimes use sturdy faux Red Winterberry Stems — they look realistic and handle any winter.
How to assemble the arrangement
- Fill the container halfway with sand or soil. This gives weight and stability. Sand works best if the spot is windy.
- Create the lower green layer of evergreens. Insert the branches outward at an angle to form a soft rounded “cushion.”
Evergreen always goes first — it creates the background that highlights the berries. - Build the vertical accent. This is the main feature — the berry stems.
Take 5–7 pieces and group them into a tight bundle in the center or slightly off-center.
A height of 20–30 in (50–75 cm) makes the arrangement visible from the street. - Add structure with arborvitae. Place a few branches around the base of the berries to make the transition between green and red clean and intentional.
- Refine the shape. Step back a few feet: if the berry cluster looks too “stick-like,” add 1–2 stems at different angles for volume.
- Add a small accent if needed. This could be one pinecone, a deep-toned ribbon, or subtle lighting.
One season we simply added a light strand at the bottom — and sometimes combine Red Winterberry Stems with warm light for an evening glow.
A berry centerpiece like this gives the entrance a tidy, finished look in minutes.
Why it looks so effective
Many outdoor-decor designers note that red stays visible even in cloudy winter light.
Evergreens hold their shape without collapsing under snow, and the berries add height and color without overwhelming the composition.
And dogwood — whether real or high-quality faux — keeps its form the entire season.
8. Fallen Branch Woodland Barrel
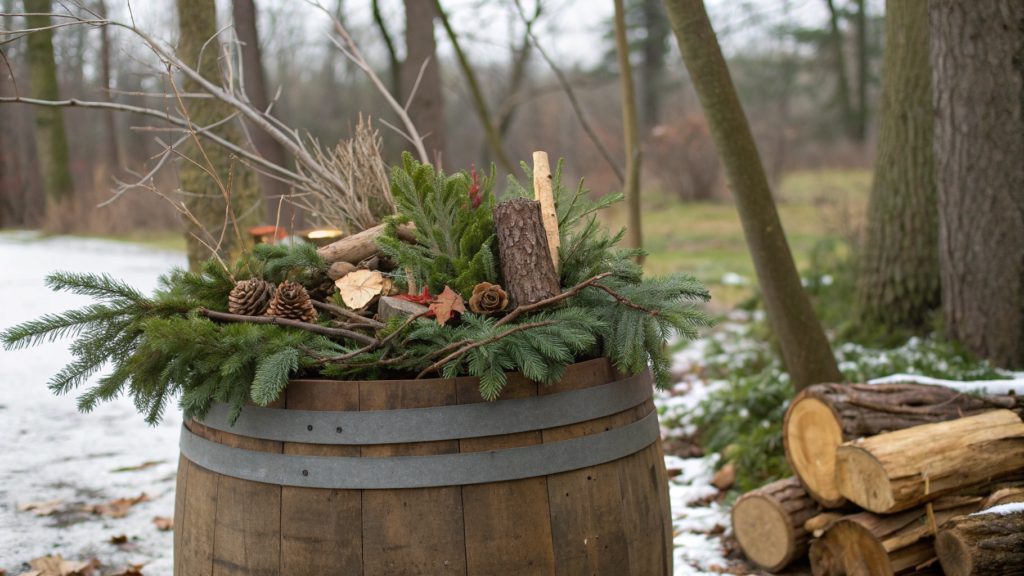
Creating an arrangement from fallen branches, bark pieces, evergreens, and wood scraps is simple and easy. Especially since you can find all of this on the property after a windy day. In a wooden barrel, this mix gives the feeling of a true winter woodland — without any artificial “gloss.”
This type of decor works best near a shed, along walkways, by the porch, near the veranda, or by the mailbox — anywhere you want natural texture, not a bright holiday accent.
It looks especially good on larger lots or near evergreen trees.
What you’ll need
- A wooden barrel-style container of 5–10 gallons (19–38 L).
- Fallen branches of various thicknesses: pine, birch, oak, alder — anything.
- Bark pieces and wood scraps.
- A bit of evergreen (arborvitae, pine, fir) for the lower layer.
- Sand or soil for stability.
- If you want an accent, a small light strand like Outdoor Rustic Wire Lights works well.
How to assemble the woodland arrangement
- Fill one-third of the barrel with sand or soil. The branches need support — especially if the area is windy.
Sand is heavier and makes the structure more stable. - Create the green base. Place some evergreen around the sides without trying to make a perfect circle.
Naturalness matters more than symmetry here: this is a woodland look, not a holiday display. - Add the large branches as the vertical skeleton. 3–5 broken branches at 18–30 in (45–75 cm) work perfectly.
Insert them at different angles, as if they fell naturally.
This controlled “messiness” is what creates the woodland effect. - Fill the space with medium branches. About finger-thick. Arrange them in a zigzag around the large branches to create layers and depth.
- Add bark and small wood pieces on top. This makes the barrel look visually dense and gives the feeling that the material is “alive,” not arranged by rules.
Birch, oak, or old pine bark looks especially good. - Add evergreen accents. Small bundles along the rim soften the arrangement and add fragrance.
In winter, evergreen keeps its shape longer, and arborvitae can be used even very dry — it holds beautifully. - Optional — subtle lighting. If you want some depth in the evening, weave Outdoor Rustic Wire Lights lightly through the branches.
The lighting should stay secondary, not take over.
Why this option is so winter-proof
These materials are naturally adapted to freezing temperatures — they’re just regular branches that already survive all weather cycles outdoors.
Plus, the absence of dense evergreen mass makes the arrangement practical:
- snow doesn’t break it,
- no need to check the greenery every weekend,
- the barrel doesn’t look “tired” even after a couple of months.
9. Glittered Pinecone Garden Pot
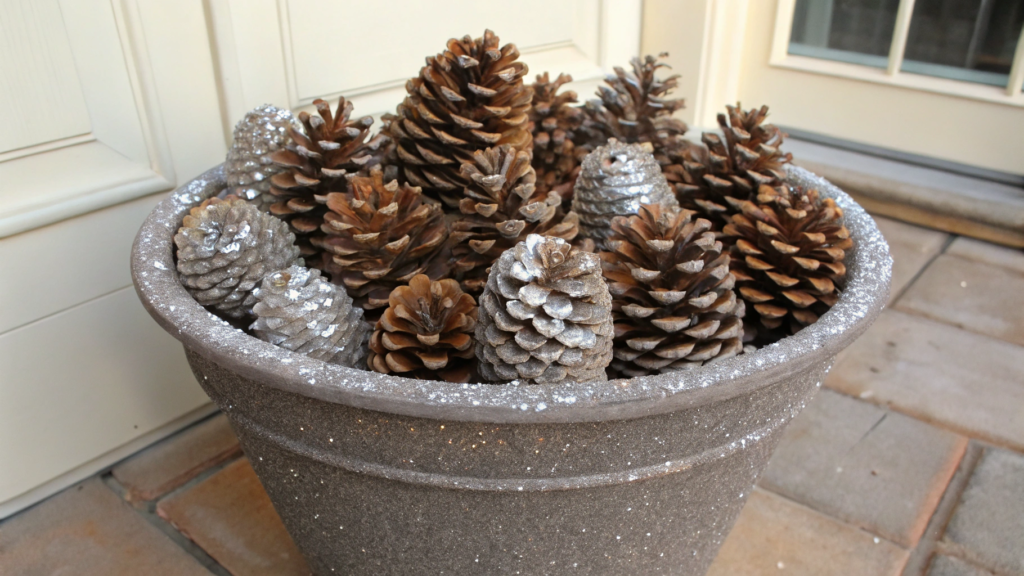
The idea of a pot filled with pinecones and a gentle shimmer can be brought to life in about 10 minutes, yet it looks like a neat winter arrangement straight out of an outdoor décor catalog.
What you’ll need
- A 2–3 gallon pot (7–11 L), preferably matte or wooden.
- 20–30 large pinecones — pine or spruce, mixed if you like.
- A handful of small cones to fill the gaps.
- Spray adhesive or aerosol sealant.
- A light shimmer — ideally a fine, mineral-like sparkle, not chunky glitter.
- For an evening touch, a mini light strand like Warm White Nano Wire Lights
How to assemble the glittered winter arrangement
- Prepare the base.Fill the pot about one-third full with any cones — even the unattractive ones.
This creates a foundation and reduces the number of pretty cones you’ll need for the top. - Select 10–12 cones for the top layer.Choose large, open, evenly shaped cones.
These will define the look of the entire arrangement. - Apply a light coat of sealant or spray adhesive.The cones should become slightly tacky so the shimmer will hold, but they shouldn’t look lacquered.
We usually do this outdoors — the smell is strong. - Add the shimmer — but minimally.The secret is not making them look like ornaments, but giving them a soft, subtle glimmer.
Sprinkle just a pinch of shimmer from 8–12 inches (20–30 cm) away. - Arrange the treated cones on top.Place them tightly but not symmetrically — a slightly random layout looks more natural.
Use the small cones to fill any empty spaces. - If you want an evening effect, weave in a tiny light strand.The Warm White Nano Wire Lights are flexible, nearly invisible during the day, and add a gentle glow that highlights the cones’ texture.
- Place the pot in a dry spot.This arrangement lasts all winter because there’s no greenery to shed and no materials sensitive to frost.
One winter we finally went through a big box of garden supplies, and at the bottom was a bag of old pinecones — crushed, dried out, all different sizes. Too good to throw out, but no idea what to do with them.
I poured them into a pot, added a touch of shimmer, stepped back… and suddenly it was exactly the “winter pot” our entryway was missing. Since then, we collect cones every season — you never know which simple material will become the next ready-made winter arrangement.
Why this option is so practical in winter
Pinecones are a natural material that doesn’t fear moisture, frost, or temperature swings.
The dense structure of the wooden scales doesn’t break down under snow and doesn’t lose shape.
And a light shimmer makes the arrangement look clean and wintery without turning it into holiday décor.
10. Copper Toned Outdoor Planter

Copper and evergreen materials make an ideal pair: greenery highlights the metal, and the metal makes the arrangement look cohesive and visually “expensive.” We were looking for something neutral for a narrow entry space, and that’s when we decided to try a copper container.
This planter works best next to a wooden façade, a brick wall, on a concrete pad, or by the garage — in places where you want to add warm metal without visual heaviness.
What you’ll need
- Copper or copper-toned container, 10–14 in (25–35 cm) tall
- Evergreen branches: arborvitae, spruce, pine — 10–12 pcs
- A couple of decorative branches: red twig dogwood, birch, or walnut
- A bit of sand or gravel for stabilization
- One or two warm-toned accents: pinecones, large nuts, small metal pieces
- Soft lighting in a copper tone works especially well
How to assemble the arrangement so the copper color stands out
- Fill the container with sand by about one third. Copper and metal containers are lightweight, so they need extra weight to stay upright in strong wind.
- Create the base layer of evergreens. Use arborvitae or pine branches. Place them at an angle to form a soft rounded shape, but avoid too much fullness — excess volume looks heavy in copper containers.
- Add vertical elements. Use 3–5 branches of dogwood or birch — straight, clean lines that contrast beautifully with the metal.
A height of 20–28 in (50–70 cm) is the most striking. - Refine the shape with a second layer of evergreens. Add a few spruce branches closer to the center to create depth.
Spruce adds density, pine adds air — balance them as you like. - Add one warm accent. A large pinecone, a metal nut, or a small decorative branch works well.
The main thing is not to overload the arrangement — copper is expressive on its own. - If you want soft evening light, add a thin copper-wire garland. A couple of loops along the front edge work great.
The wire matches the container’s tone and is almost invisible during the day. - Step back and look from a distance. Copper arrangements love clean forms.
If anything looks out of place, adjust the angle of a branch or remove an extra element.
Copper tones create a warm visual contrast against winter colors: white snow, gray concrete, dark wood. Greenery looks deeper in color, and branches look sharper. The arrangement appears more expensive than it is, even when made from simple materials.
Winter Porch
All these ideas follow one simple principle: in winter, arrangements must be stable, made from materials that hold their shape, and practical enough to last the entire season without maintenance.
If you have your own way to decorate containers in cold weather, or if you’ve tried one of the options described here, leave a comment and share what worked best.Your experience may help other readers choose what to use for their porch this winter.