
A fence is often the most difficult element of a yard. It’s long, very visible, and rarely looks the way we’d actually like it to. Adding privacy along a fence without turning the space into a solid wall is a challenge many owners of small yards and urban properties run into. Here are 10 affordable trellis designs along a fence that can be adapted to different conditions. We’re not offering one universal “best” solution. Instead, there are constructions that solve specific problems: blocking the view, adding greenery, creating a place to sit, or simply bringing visual order to the space.
Lindy and I have worked through most of these scenarios in real life — with mistakes, reworks, and clear takeaways. So everything below is strictly practical ideas that can be built by hand and adjusted to fit your own yard.
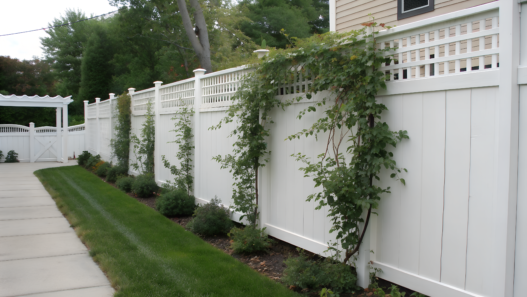
1. Rustic Wood Slat Trellis with Climbing Jasmine

A rustic wood slat trellis with climbing jasmine is a way to add privacy along a fence without making the space feel heavy or closed off. The structure looks simple and almost invisible at first, but over time it works better and better. Especially if the right plant is chosen.
What you need for this idea
The materials stay very grounded — everything can be found at a regular hardware store.
Basics:
- Wooden slats 2–3 inches wide (≈5–7.5 cm)
- Slat length 6–7 feet (≈180–210 cm), depending on fence height
- Stainless steel screws 1.5–2 inches long
- Drill or driver
- Level
- Tape measure and pencil
- Jasmine plants in 1–3 gallon containers
If you don’t want to cut and fit wood by hand, it’s convenient to use ready-made panels like Expandable Wooden Trellis for Outdoor Use — they’re easy to mount and extend along the fence.
How to build this trellis yourself
- Decide which section of the fence needs privacy. A practical reference point is 6 feet tall (≈180 cm) and a length that blocks the direct line of sight.
- Lay the slats on the ground and set a gap of about 2 inches (≈5 cm) between them. This spacing lets the plant grab on easily and avoids the feel of a solid wall.
- Attach the slats to the fence using stainless steel screws, checking vertical alignment with a level. Leave at least 1 inch (≈2.5 cm) between the trellis and the fence for airflow.
- Plant the jasmine 6–12 inches (≈15–30 cm) away from the base of the trellis. Immediately guide the shoots toward the slats and secure them loosely with soft twine.
- During the first few weeks, simply observe and gently adjust the direction of the vines. Frequent intervention isn’t needed — the plant figures it out quickly.
Why this construction settles in so well
- Wood doesn’t overheat the way metal does
- Climbing plants attach to it more easily
- The structure is simple to repair
- The trellis can be extended later without rebuilding everything
One detail that’s often overlooked: wooden slats visually “disappear” behind greenery. The fence stops being the focal point.
Why jasmine works especially well here
Jasmine is valued not only for its fragrance. It builds green mass quickly, confidently grips a wooden base, and forms dense coverage within one or two seasons. The plant handles pruning well, doesn’t require complicated care, and stays decorative for most of the year.
Over time, jasmine softens the fence line and turns it into a background rather than a boundary. This matters a lot in small yards, where every visual element carries weight.
A practical takeaway from our experience
This kind of trellis is not “decor.” It’s a working solution.
- Minimal cost
- Maximum control over the result
- The ability to start with one section and expand as needed
We built similar structures gradually, not in a single season. That approach turned out to be the most practical: first block the view, then thicken the greenery, then refine the details.
2. Vertical Cedar Panel Trellis for Narrow Yards
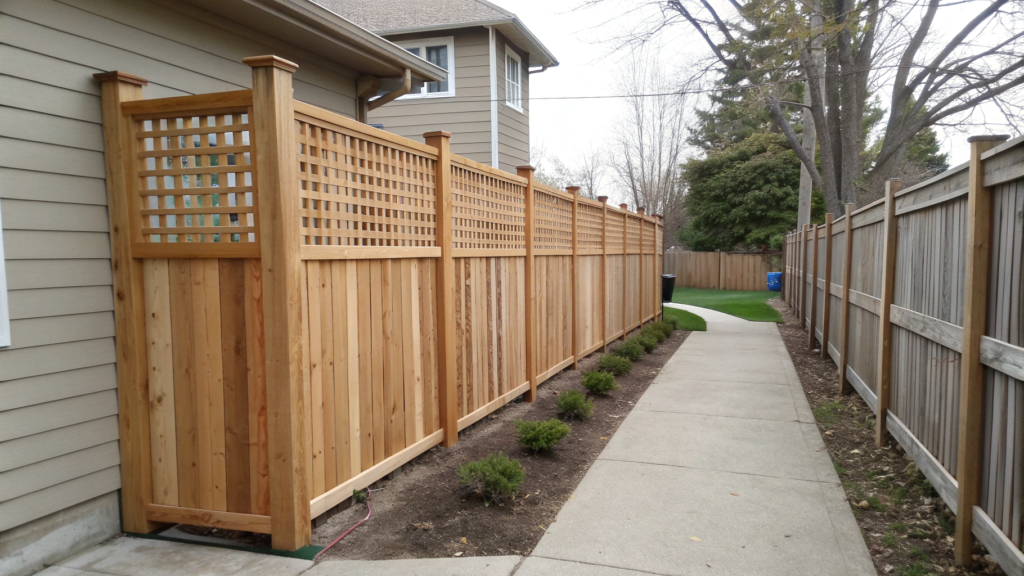
In narrow areas along a house or fence, classic privacy solutions simply don’t work. Lindy and I realized this pretty quickly. There’s not much room, no depth to play with, but you still need privacy from neighbors. That’s exactly why a vertical cedar panel trellis became one of the most practical options for us.
It takes up very little space in terms of depth, but gives you the height you need — which is exactly what works for narrow yards and side passages.
Cedar behaves well with changes in moisture, doesn’t warp easily, and handles constant shade — something that’s common in tight yards.
Another advantage is weight. Cedar panels are light enough not to overload a fence or thin wall, but they still look solid and intentional.
What you’ll need
- Cedar panels 12–18 inches wide (≈30–45 cm)
- Panel height 6–8 feet (≈180–240 cm)
- Stainless steel screws 1.5–2 inches long
- Drill or driver
- Level
- Tape measure
- Anchor fasteners or L-brackets (if the fence is thin)
How to install a vertical trellis
- Determine the mounting points. Check what exactly the panel will attach to: a fence, a wall, or posts. In narrow yards, the base needs to be solid — the trellis shouldn’t move when touched or in the wind. Usually one panel every 16–24 inches (≈40–60 cm) is enough, but in windy areas it’s better to reduce that spacing.
- Set the panel perfectly level. Vertical alignment is critical here. Even a slight tilt is immediately noticeable, especially in tight spaces where lines read faster. Spending an extra minute with the level saves the whole structure from looking off.
- Secure the panel with a ventilation gap. Use stainless screws or L-brackets and leave about 1 inch (≈2.5 cm) between the panel and the surface. This gap allows airflow and helps extend the life of the wood.
- Think about plants ahead of time. Even if you’re not planting right away, add temporary guides or leave open spots for future vines. This makes things easier later and avoids reworking the mounting.
- Check the rigidity of the structure. A light push with your hand is a good test. The panel should stay stable and not shift. In narrow walkways, this matters because contact is almost unavoidable.
Plants that work well
- Moderately climbing plants
They stay within the trellis footprint and don’t push outward into the walkway. - Container-grown vines with controlled growth
Ideal for narrow passages where shape matters. - Vertical ornamental grasses
Add density without spreading sideways. - Herbs in wall-mounted containers
Practical, shallow-rooted, and visually effective at eye level.
On small properties, this type of trellis makes it possible to:
- create privacy without losing usable space,
- zone a narrow area,
- use vertical space for plants without blocking the walkway,
- visually stretch the yard upward.
This solution works especially well where every inch counts and expanding outward simply isn’t an option.
Tip. Before installing panels in a narrow yard, pay attention to how the sun moves throughout the day. Vertical trellises can cast dense shade, and if the area is already shaded, it’s better to leave small gaps between panels or alternate them with open sections.
One more thing is the mounting itself. Make sure the panels are secured firmly from the start, without any looseness. That prevents constant small adjustments later on.
3. Modern Metal Grid Trellis with Planter Boxes
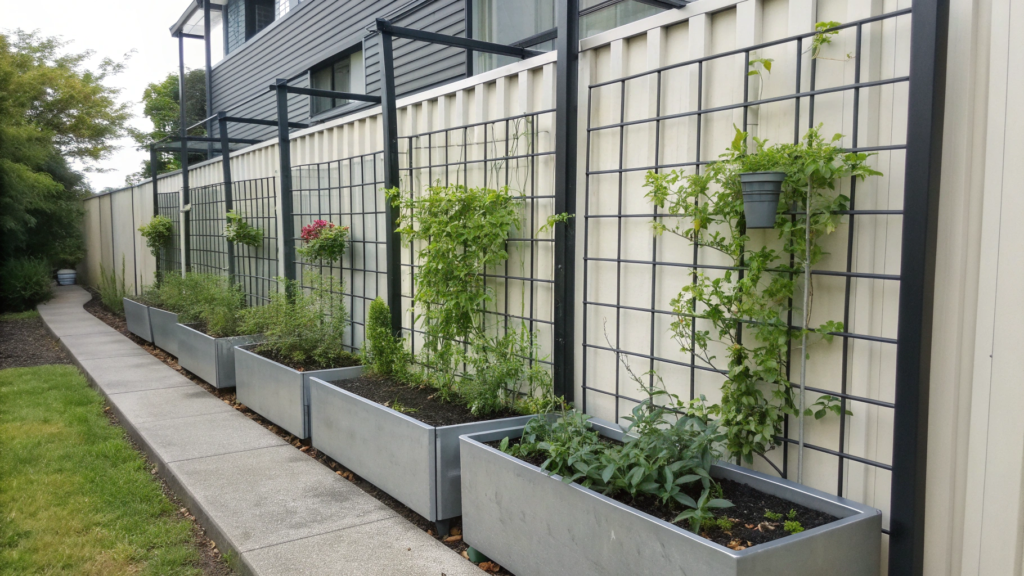
Of course, we all want privacy right away — without waiting for something to grow and finally cover the fence. That’s exactly when a modern metal grid trellis with planter boxes makes the most sense. Clean geometry, minimal depth, and greenery that works from day one instead of two seasons later.
A metal grid creates a clear rhythm and visual order. At the same time, metal doesn’t take up extra space. The structure stays slim, and privacy is achieved through the density of plantings in the planter boxes, not through bulky panels.
Another advantage is predictability. Metal doesn’t warp and doesn’t react to moisture the way wood does, which really matters when the structure runs along a fence for a long distance.
What you’ll need
- Metal grid panels 18–24 inches wide (≈45–60 cm)
- Panel height 6–7 feet (≈180–210 cm)
- Outdoor planter boxes 24–36 inches long (≈60–90 cm)
- Weight of one empty planter box: usually 8–15 lbs (≈3.5–7 kg)
- Stainless steel screws or bolts
- Drill / wrench
- Level
- Anchor fasteners (if the fence is lightweight)
How to install a metal trellis with planter boxes
- Calculate the load in advance. Take into account the weight of planter boxes filled with wet soil — it can reach 40–60 lbs (≈18–27 kg) per container. Check whether the fence can handle that load or if additional support is needed.
- Secure the metal grid level. The grid must be perfectly vertical. Even a small tilt will be noticeable, especially when planter boxes are aligned in a straight row.
- Leave a gap from the fence. Keep about 1 inch (≈2.5 cm) between the grid and the surface for ventilation and moisture drainage. This helps extend the life of both the metal and the fasteners.
- Install planter boxes at the bottom or mid-height. Bottom placement adds stability, while mid-height creates denser privacy at eye level. In narrow yards, we usually choose the mid-height option.
- Fill the containers right away. Use plants that build volume quickly: grasses, trailing plants, or compact climbing varieties. This gives a visual result immediately after installation.
Plants that work well
- Trailing plants
They quickly fill the space and soften the rigid geometry of the metal. - Compact shrubs in containers
Add density and stability, especially at the base of the structure. - Climbing plants with lightweight shoots
Easy to guide along the grid and don’t overload it with weight. - Herbs and edible greens
Add functionality and make it easy to change plantings by season.
This type of trellis creates privacy instantly while still looking permanent. The metal grid holds its shape, the planter boxes add greenery and weight, and the space stays visually clean.
It’s a strong option when you want a neat, modern look and the flexibility to swap plants seasonally without changing the structure itself.
Tip. If you decide to buy a grid, check the mesh size before choosing. A grid that’s too fine makes climbing plants harder to manage, while one that’s too large loses visual density. An ideal cell size is 4–6 inches (≈10–15 cm) — easy for guiding shoots and simple to maintain.
4. Reclaimed Pallet Trellis Wall for Instant Charm

With this option, Lindy and I have a very personal connection. A reclaimed pallet trellis wall is something we’ve seen many times — at neighbors’ places, on small farms, in compact backyards — and every time it looked different. But almost always, it worked.
This solution is especially good when a yard feels “empty,” the fence looks too exposed, and the budget doesn’t allow for complex structures. What matters here isn’t perfection, but character.
What you’ll need
- Standard wooden pallets 48 × 40 inches (≈122 × 102 cm)
- Pry bar or nail puller for disassembly
- Saw (hand or electric)
- Stainless steel screws 1.5–2 inches long
- Drill or driver
- Level
- Sandpaper or a sanding tool
- Work gloves
- Optional: exterior wood sealer
If you don’t have access to free pallets, it’s sometimes easier to use ready-made Reclaimed Wood Pallet Panels for Outdoor Projects — they’re already cleaned and safe for garden use.
How to build a pallet trellis yourself
- Disassemble the pallets carefully. Use a pry bar or nail puller and take your time. The goal is to keep the slats intact. We always try to select boards of similar width so the wall doesn’t look too chaotic.
- Sand the working surfaces. Perfect smoothness isn’t necessary, but sharp edges and splinters should be removed. This is especially important if the trellis is in a walkway area.
- Decide on the layout in advance. Lay the slats on the ground and see how they work together. A vertical layout adds height, while a horizontal one visually widens the space. We usually choose vertical.
- Attach the slats to the fence or frame. Use stainless steel screws, leaving a gap of about 1–1.5 inches (≈2.5–4 cm) between slats. This spacing is important for airflow and for plants.
- Check the stability of the structure. The trellis shouldn’t shift or wobble. If the pallet wood is light, add extra mounting points.
Plants that look especially good on this type of trellis
For a pallet wall, it’s best to choose plants that build volume quickly and don’t need complex supports. Climbing roses, honeysuckle, jasmine, and annual vines all grip the rough wood surface well.
Over time, the slats almost disappear behind the greenery, and the fence stops being a backdrop and starts feeling like part of the garden.
Why pallets work so well
- Accessibility — often free or very inexpensive
- Thicker wood gives a sense of solidity
- Mixed textures make the wall visually alive
- Easy to trim, replace, or extend sections
One more thing we really value: a pallet trellis doesn’t demand perfection. Small imperfections look natural here, not like mistakes.
Tip. Before using pallets, make sure they haven’t been chemically treated. Look for the HT (heat treated) mark and avoid pallets with strong odors or oil stains. This matters for both the plants and the surrounding soil.
5. Expandable Bamboo Trellis with String Lights
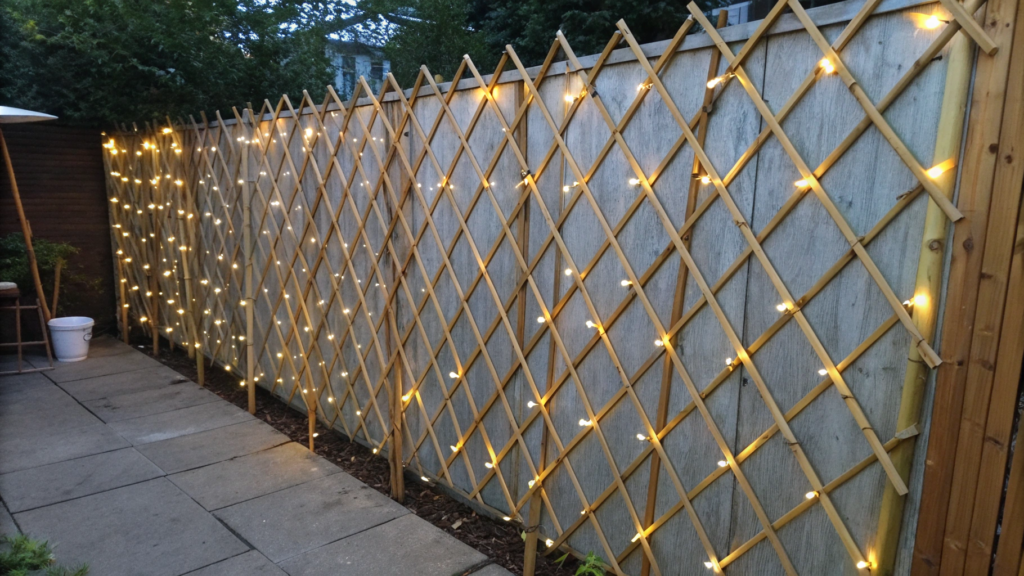
This option feels especially close to us and Lindy in terms of mood. An expandable bamboo trellis is a flexible solution. We were skeptical about bamboo for a long time, until we saw how well it works in seating areas, on patios, and along fences where you want soft light and a sense of completion — not heavy structures.
Bamboo is visually light. It doesn’t weigh the space down, even when the trellis takes up a large vertical area. In narrow or intimate zones, this is especially noticeable: the fence stays in the background instead of becoming a dominant element.
Another advantage is the expandable design, which lets you adjust the density of the pattern. In some areas you can leave more air, in others make the screen denser. This kind of flexibility is rare with trellises, and it’s exactly why we value bamboo.
What you’ll need
- Expandable bamboo trellis 24–72 inches wide (≈60–180 cm when expanded)
- Trellis height 6–8 feet (≈180–240 cm)
- Outdoor string lights 24–48 feet long (≈7–14.5 m)
- Weight of one bamboo panel: usually 6–10 lbs (≈2.7–4.5 kg)
- Stainless steel screws or hooks
- Drill or driver
- Mounting hardware for fence or posts
How to install a bamboo trellis with string lights
- Set the working width in advance. Expandable bamboo trellises look very different depending on how far they’re opened. Before mounting, lay the trellis on the ground and choose the pattern density. A tighter pattern gives more privacy, while a more open one allows more air and light through.
- Decide on mounting points and height. It’s important to determine the top height right away. We usually install it close to full height — 6–7 feet (≈180–210 cm) — so the string lights don’t shine directly into your eyes and instead cast a softer light downward.
- Secure the trellis with extra stability in mind. Use stainless screws or hooks and fix the trellis at least at four points. If the width is more than 60 inches (≈150 cm), use six points. Even lightweight bamboo can shift over time if it’s under-mounted.
- Leave a ventilation gap. Keep about 1 inch (≈2.5 cm) between the trellis and the fence or wall. This reduces moisture contact and helps the structure keep its shape longer.
- Add the string lights after full installation. Start at the top and work downward, loosely wrapping the lights around the bamboo grid. Don’t pull the wire tight — a slight sag makes the light softer and reduces stress on the fasteners.
- Check the lighting at night. In the dark, it’s easy to see where the light feels too dense or where dark gaps remain. It’s best to adjust the layout right away while everything is still accessible.
Plants for an Expandable Bamboo Trellis with String Lights
- Lightweight climbing plants
Pair well with bamboo and don’t overload the structure. - Annual vines
Build green mass quickly and are easy to replace when needed. - Trailing plants in containers
Enhance the cozy effect and work especially well with lighting. - Herbs and aromatic plants
Add life without overwhelming the visual balance.
A bamboo trellis with lighting creates privacy not through density, but through atmosphere. In the evening, the space feels visually enclosed, even if it stays semi-transparent during the day. This makes it a strong option for seating areas, outdoor dinners, and small patios.
We like that this kind of structure can be removed, moved, or adjusted if needed, without disrupting the entire yard. It doesn’t lock you into a single way of using the space.
Tip. Pay close attention to the quality of joints and fasteners on a bamboo trellis. If the connections look too fragile, the structure will lose its shape quickly. Also make sure the string lights are outdoor-rated — that avoids problems with moisture and temperature changes.
6. Painted Lattice Panel with Integrated Shelves
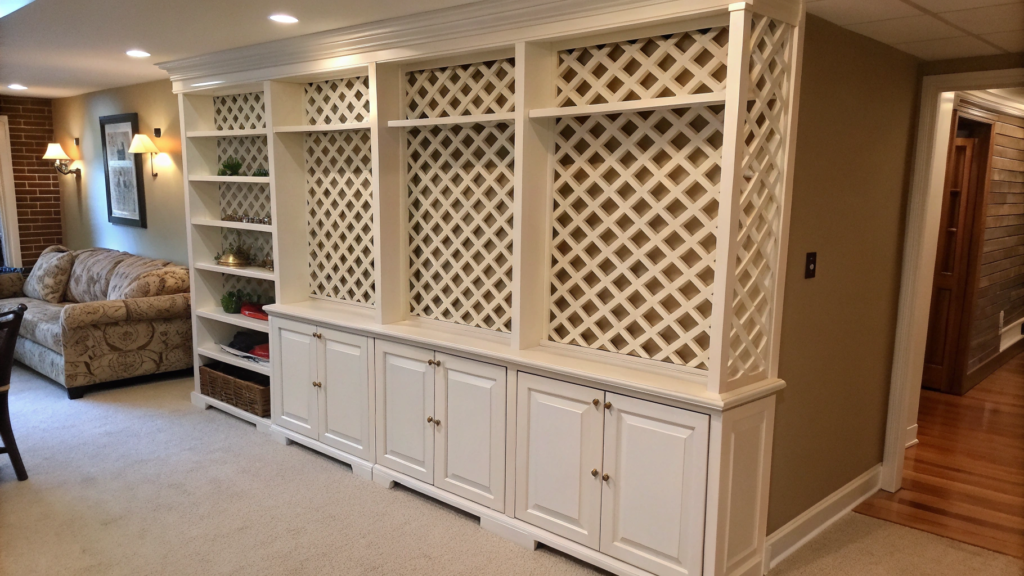
At first, a painted lattice panel felt a bit too “decorative” to us. But once integrated shelves are added, the structure stops being just a background element and starts working as a full part of the space — both visually and functionally.
What you’ll need
- Lattice panels 24–48 inches wide (≈60–120 cm)
- Panel height 6–7 feet (≈180–210 cm)
- Exterior paint or stain (satin or matte finish)
- Paintbrush or roller
- Shelves 6–8 inches deep (≈15–20 cm)
- Brackets or hidden shelf supports
- Stainless steel screws
- Drill or driver
- Level
Why a painted lattice gives you more flexibility
Color sets the mood right away. A painted lattice panel can either blend into the fence background or become a subtle accent. We usually go for calm tones — warm white, soft gray, muted green. They don’t compete with plants and still look good in winter.
The lattice lets light and air through, so the space doesn’t feel closed off. And once shelves are added, you can work in layers — placing some items higher, others lower — without turning the area into storage clutter.
How to install a lattice panel with shelves
- Prepare the panel in advance. Paint the lattice before installation. It’s much easier to reach all the corners and avoids paint drips on the fence. Let the paint dry completely — 24 hours is usually enough.
- Secure the panel level. Use stainless steel screws and leave about 1 inch (≈2.5 cm) between the panel and the fence. This gap is important for ventilation and long-term durability.
- Mark shelf placement.
We usually place the first shelf at 30–36 inches (≈75–90 cm) for easy reach, and a second one higher up for visual balance. - Install shelf supports. Brackets should be anchored into solid parts of the lattice or into an added support rail behind it. Shelves with plants gain weight quickly, especially after watering.
- Check the load. Before placing pots, press lightly on the shelf with your hand. If there’s any movement, reinforce the mounting right away — it’s harder to fix later.
Plants that work well here
- Container-grown herbs
Easy to maintain, practical, and perfect for shelf depth. - Small decorative potted plants
Let you change the look without dismantling the structure. - Trailing plants
Soften the lattice geometry and add depth. - Compact flowering plants
Work as accents without overloading the shelves with weight.
This setup works well because it combines a trellis with storage. Shelves can hold herbs in containers, small planters, garden tools, or lanterns. Everything can be rearranged easily, without taking the structure apart.
Tip. If the lattice will be in full sun, choose lighter colors — they heat up less and keep their appearance longer. And always use paint labeled exterior: interior finishes lose their look outdoors very quickly.
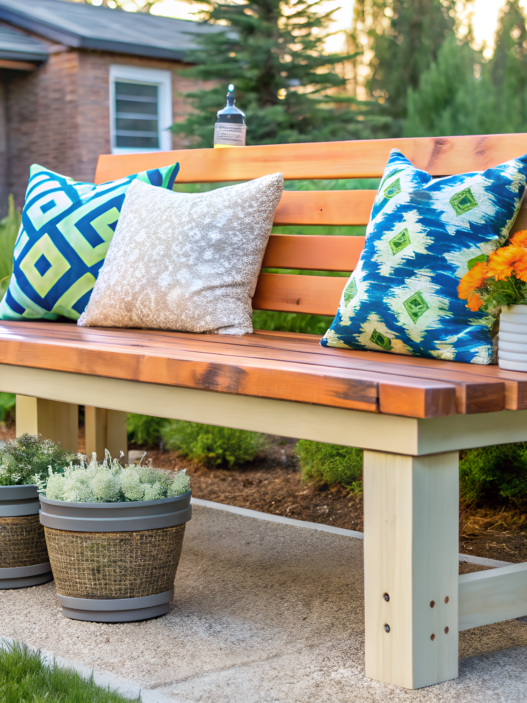
7. Privacy Trellis Divider with Built-in Bench

A privacy trellis divider with a built-in bench is one of those solutions where privacy stops being an abstract idea and starts working physically: you sit down, lean back, and stay.
We came to this option not because we wanted to “decorate the yard,” but out of simple practicality — we needed a place to sit without feeling exposed.
What you’ll need
- Vertical trellis or lattice panel 48–72 inches wide (≈120–180 cm)
- Trellis height 6–7 feet (≈180–210 cm)
- Bench boards 14–18 inches deep (≈35–45 cm)
- Seat height 17–18 inches (≈43–46 cm)
- 2×4 inch lumber for the frame
- Stainless steel screws and bolts
- Drill or driver
- Level
- Exterior wood sealer or paint
- Optional: outdoor cushions
When a trellis stands on its own, it solves one problem — blocking the view.
Once a bench is added, the structure stops being just a background element and becomes a destination. People sit there not because they “should,” but because it’s comfortable. We’ve noticed that these spots get used most often — not for special occasions, but for ordinary moments in between.
The seat adds weight and stability to the structure, while the vertical trellis creates a sense of protection from behind. This is especially noticeable in windy areas or where the fence sits close by.
How to build a privacy divider with a built-in bench
- Decide on the length and purpose of the zone. Think about how the bench will be used: a short break, reading, or outdoor meals. That determines the length. For one or two people, 48–60 inches (≈120–150 cm) is usually enough.
- Build the bench frame. Use 2×4 inch lumber to form a rectangular frame. Set the height right away to the standard 17–18 inches. The frame should feel rigid, with no wobble.
- Attach the trellis behind the bench. The trellis can be fixed to the back of the bench frame or to the fence, with additional fastening to the bench. The key is for both elements to work as one unit, not as separate pieces.
- Add the seat boards. Install the boards with a small gap of ¼–½ inch (≈0.6–1.2 cm) between them to allow water drainage. This significantly extends the life of the bench.
- Test the load. Before finishing, sit on the bench, shift your weight slightly, and lean back against the trellis. If there’s any movement, reinforce the connections immediately.
Plants that work well here
- Climbing plants with controlled growth
Create privacy behind the bench without hanging over the seating area. - Aromatic but non-aggressive plants
Improve how the space feels without overwhelming it. - Container plants on the sides
Add density and visually “anchor” the structure.
Tip. Don’t make the trellis too dense. Light permeability for air and sunlight makes the seating area more comfortable, especially in summer. If more privacy is needed, it’s better to add plants later than to block everything completely from the start.
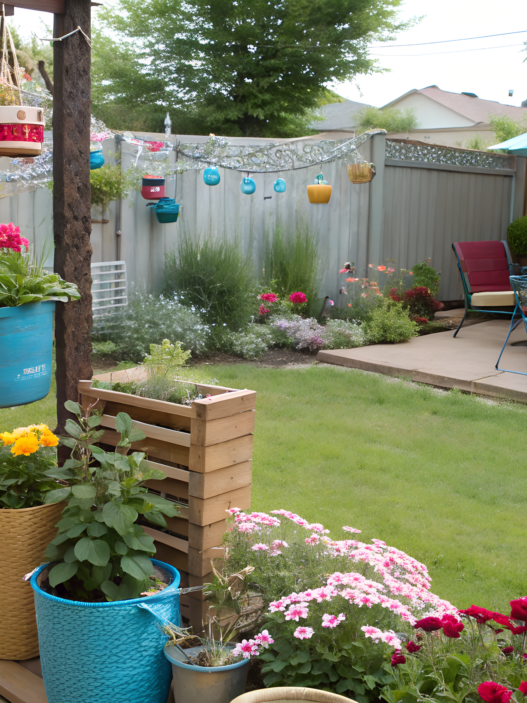
8. Freestanding Trellis Screen with Flower Planters

This is one of the options Lindy and I love for its sense of freedom. A freestanding trellis screen with planter boxes isn’t tied to a fence, a wall, or a fixed line in the yard. You can place it exactly where privacy is needed right now, and later move it without stress. For us, it became a solution for areas that constantly change — one week it’s a breakfast spot, then a seed-starting corner, then temporary wind protection.
What matters is that the screen doesn’t lock you into a single use. You can shift it, rotate it, remove it — and the space changes again.
The screen itself defines a boundary, while the flower containers immediately add life — no waiting and no “once it grows in.”
What you’ll need
- Freestanding trellis or grid screen 36–60 inches wide (≈90–150 cm)
- Screen height 5–7 feet (≈150–210 cm)
- Outdoor planter boxes 8–12 inches deep (≈20–30 cm)
- Weight of one empty planter box — 6–12 lbs (≈2.7–5.5 kg)
- Mounts for containers or a lower shelf
- Level
- Optional: base weights (gravel, concrete blocks)
Why a freestanding structure offers more flexibility
A freestanding screen works differently from a fixed one. It doesn’t force rigid geometry onto the yard. You can angle it, place it off a straight line, or use it as a visual filter rather than a wall.
Planter boxes placed at the bottom or waist height add weight and stability, while also letting you control density right away — with flowers, grasses, or compact shrubs.
How to install a freestanding trellis with containers
- Choose the placement point with wind and walkways in mind. A freestanding screen should block the view without obstructing movement. Pay attention to prevailing winds: if the area is exposed, it’s often better to place the screen closer to a fence, wall, or other stationary element, even if it’s technically freestanding.
- Check surface level. The screen must sit on the most even surface possible. On soil, compact it. On pavers or decking, make sure the legs aren’t resting on seams or height changes. Even small tilts get worse over time due to plant weight.
- Plan the ballast immediately. Even if the structure feels stable, planter boxes filled with wet soil add significant load. We usually plan ballast from the start:
- dense soil mix
- gravel added to the bottom layer of containers
- or hidden weights built into the base
This prevents wobbling after heavy watering or rain.
- Secure the containers instead of just placing them. Planter boxes are best fixed with bolts or metal brackets. Over time they can shift due to plant weight, wind, or accidental contact — especially if the screen sits in a high-traffic area.
- Distribute weight evenly. If there are multiple containers, avoid loading only one side. Uneven weight is the most common reason freestanding structures begin to lean.
- Test before planting. A gentle push or small nudge should not move the screen. If there’s any motion, reinforce the base immediately rather than fixing it later.
- Plant only after full stabilization. Always make planting the final step. This allows you to adjust positioning calmly and avoids damaging roots if something needs to be shifted.
Plants that work well
- Trailing flowers
Build volume quickly, drape beautifully, and visually weight the lower part of the screen, improving stability. - Ornamental grasses
Add movement and density, thrive in containers, and don’t require deep soil. - Compact perennials
Provide a stable backdrop, don’t spread aggressively, and are easy to control. - Moderately climbing plants
Easy to guide along the grid, help close the screen vertically, and don’t overload it with weight. - Herbs and edible plants in containers
Work in two ways at once: they add greenery and practical value while staying lightweight.
This combination makes it possible to create a dense, living screen without risking structural instability or overloading the containers.
Tip. Choose plants that build volume quickly but don’t require deep soil. Trailing flowers, ornamental grasses, and compact perennials perform best. They strengthen the privacy effect without adding excessive weight.
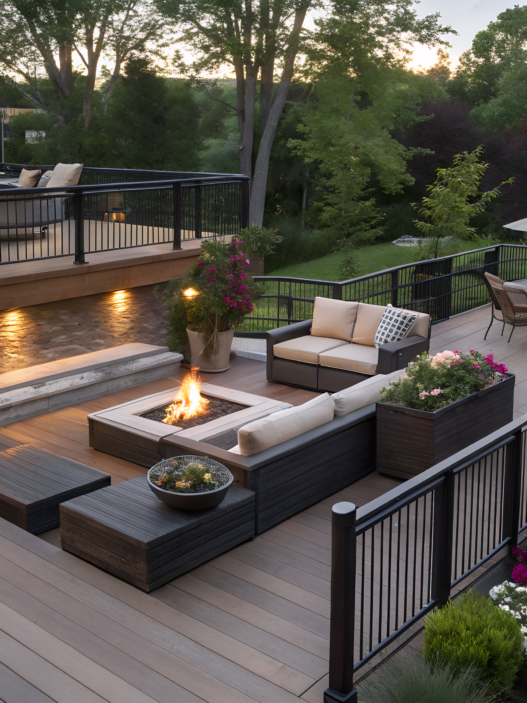
9. Vine-Covered Trellis Fence for Urban Decks
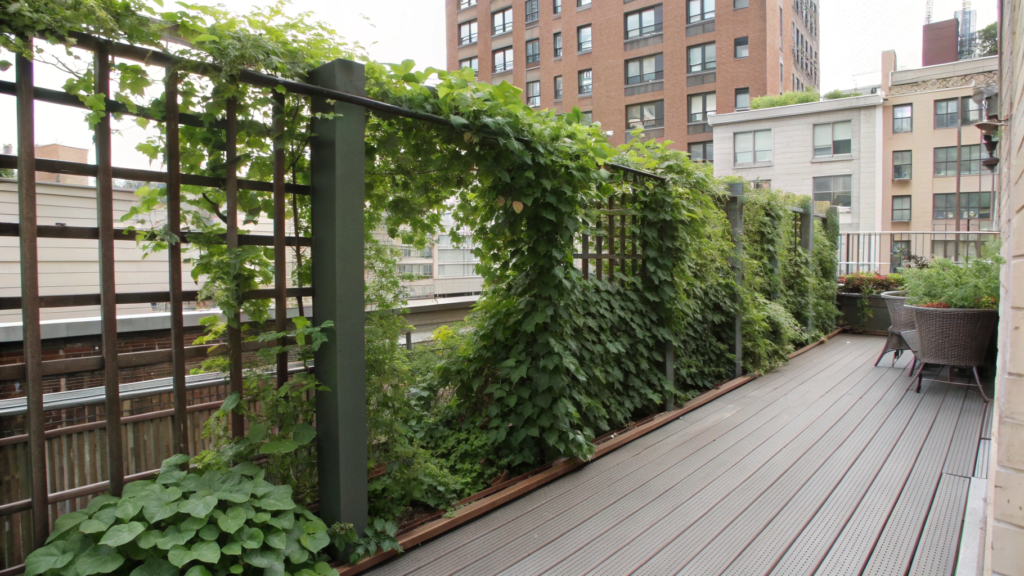
Urban decks and terraces are a world of their own. Lindy and I always feel that tension there: on one hand, you want air and light; on the other, there are too many neighbors, windows, and eyes. A vine-covered trellis fence became one of the calmest ways for us to deal with this — without solid screens and without the feeling that you’re hiding.
At first, the trellis reads as a separate element. Then the plants start to cover it. And at some point, the structure itself disappears, leaving only a green surface.
Here, the focus isn’t really on the construction, but on the plants that gradually take over all the visual work.
What you’ll need
- Trellis panels or sections 24–48 inches wide (≈60–120 cm)
- Trellis height 5–6 feet (≈150–180 cm), optimal for decks
- Stainless steel screws or railing mounts
- Drill or driver
- Containers or long planter boxes 12–16 inches deep (≈30–40 cm)
- Drainage layer (expanded clay, gravel)
- Potting mix for containers
- Selected vines
If you don’t want to deal with tools or you’re short on time, it’s convenient to use Outdoor Trellis Panel for Deck or Patio, which are designed specifically for mounting to railings and decking.
Why vines work especially well on urban decks
In city conditions, plants solve several problems at once. Vines block the view without creating the feeling of a wall. They let air through, soften sound, and visually dissolve the hard lines of railings and fences.
What we especially like is that over time, the greenery starts working above eye level, and you stop noticing where the deck ends and the city begins. It’s not an instant effect, but that’s exactly where its value lies.
How to install a trellis for vines on a deck
- Decide on the required height and density in advance. On decks, maximum height is rarely necessary. Usually 5–6 feet (≈150–180 cm) is enough to block views from nearby balconies and windows without cutting off light. If the trellis rises above eye level, the space can start to feel more closed than needed.
- Choose the mounting method before buying the trellis. It’s important to know what you’ll be attaching the structure to: railings, posts, or the deck base. Not all railings are designed for lateral loads, so sometimes it’s better to use separate supports placed close to the railing without loading it directly.
- Secure the trellis firmly, but with a gap. Use outdoor-rated fasteners and leave about 1 inch (≈2.5 cm) between the trellis and the surface. This reduces moisture buildup and gives vines room to grow.
- Plan container placement before installing plants. Planter boxes should sit firmly and close to the trellis so shoots don’t pull sideways. A container depth of 12–16 inches (≈30–40 cm) allows roots to develop without constant drying out.
- Ensure good drainage. On decks, standing water is a common issue. Always use a drainage layer and make sure water drains freely instead of pooling under the containers.
- Guide the first shoots by hand. Early on, vines need help. Gently secure the shoots and set a vertical direction. This speeds up coverage and makes growth more even.
- Check stability after watering. After the first full watering, the structure experiences maximum load. If there’s even slight movement, it’s better to reinforce the mounts right away.
Plants that work well for urban decks
- Clematis (container-friendly varieties)
Grows well in limited soil volume and adds a vertical accent. - Jasmine (container-suitable types)
Creates dense greenery and enhances the sense of comfort without aggressive growth. - Decorative grape (controlled varieties)
Builds volume quickly but requires regular pruning. - Annual vines
A great option for fast results without long-term commitment.
Tip. Always check the load capacity of railings and decking. Even a lightweight trellis with vines and wet soil can weigh more than expected. If there’s any doubt, it’s better to distribute the weight across several containers than overload a single point.
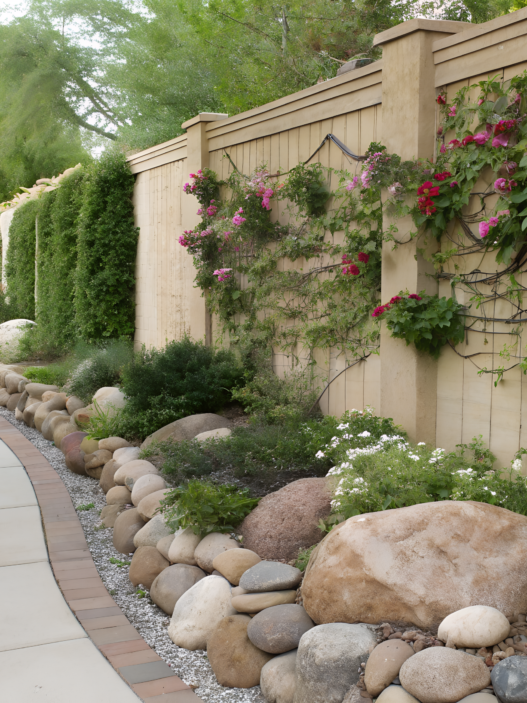
10. Low-Maintenance Vinyl Trellis Along a Fence Line
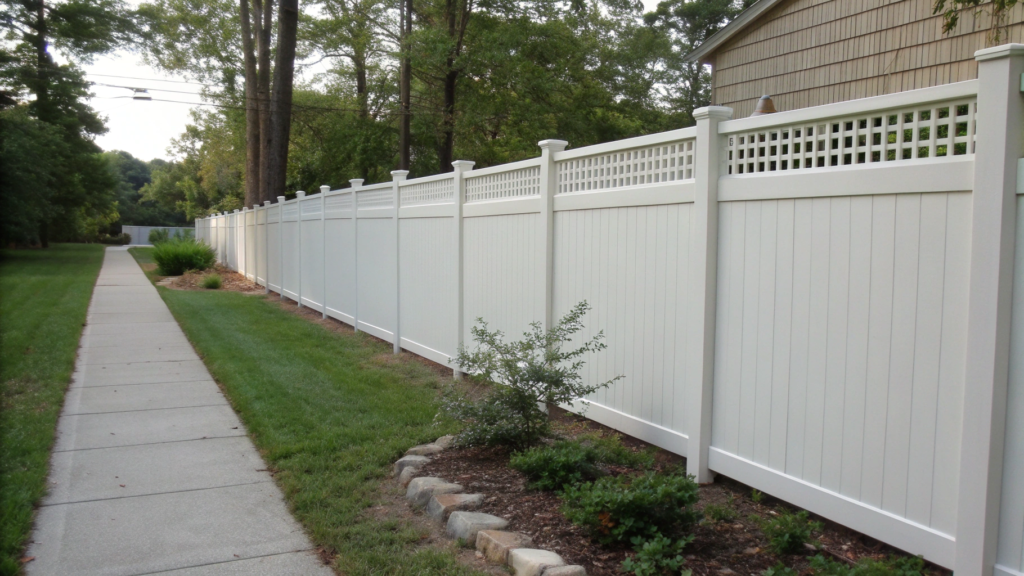
A vinyl trellis along a fence line isn’t the most soulful material, but it’s one of the calmest to live with. Install it — and forget about it. For long fence runs where clean lines and minimal maintenance matter, this often turns out to be a very reasonable choice.
What you’ll need
- Vinyl trellis panels 24–48 inches wide (≈60–120 cm)
- Panel height 6–7 feet (≈180–210 cm)
- Stainless steel screws
- Drill or driver
- Level
- Spacers for a gap (≈1 inch / 2.5 cm)
- Optional connector strips
Why vinyl works especially well along a fence
- No painting required and minimal visible fading
- Resistant to moisture and temperature changes
- Keeps its geometry over long distances
- Easy to wash and clean
Along a fence line, this matters even more: those areas usually get less attention and cover more length. Vinyl keeps a tidy look without constant involvement.
How to install a vinyl trellis along a fence
- Start with layout and a clear reference point. For a long fence run, the starting point matters. The first panel must be perfectly straight — everything else will align to it. We usually check both vertical level and the top edge in at least two spots to avoid drifting diagonally by the end.
- Build in a ventilation gap. Leave about 1 inch (≈2.5 cm) between the trellis and the fence. This isn’t only about moisture — visually, panels look cleaner when they don’t sit flush, especially over long stretches.
- Fasten more often than feels necessary. Vinyl is lightweight, and that’s exactly why it can start moving in the wind. It’s better to add extra fastening points right away than notice subtle panel movement a season later. This is especially important in open, windy areas.
- Keep the rhythm of connections consistent. If the trellis is assembled from multiple sections, spacing and joints should repeat evenly. With vinyl, even small inconsistencies stand out immediately — unlike wood, which tends to forgive minor imperfections.
- Check the entire line as one system. After installation, walk the fence and gently press on panels in different spots. The structure should feel solid, without vibration or flex. If movement shows up somewhere, reinforce that specific area instead of over-tightening everything.
- Only add plants after the structure is fully secure. Containers, vines, or base plantings are best added once the trellis is rigid. This helps distribute weight evenly and prevents the trellis from being pulled to one side.
Suitable plants
- Moderately climbing plants
Easy to guide along the grid and don’t require a rough surface to cling. - Container-grown vines
Allow for controlled growth and don’t overload the fence with roots. - Annual climbers
Provide quick coverage and are easy to replace without long-term commitment. - Decorative plants at the base
Soften the trellis line and make the vinyl visually less noticeable.
Tip. Pay attention to profile thickness. Panels that are too thin may look neat at first but often start to flex in the wind over time. For long fence lines, choose models with a stiffer frame — they hold a straight line for years.
Private Space
When you look at all the options together, one thing becomes clear: a trellis isn’t decoration — it’s a tool. In some areas, mobility matters. In others, stability and low maintenance are key. Sometimes density of greenery does the work; other times, it’s the ability to change things next season without tearing everything down.
You don’t have to do everything at once. Often, it’s enough to start with a single section, see how it works in real life, and only then scale the solution along the fence or deck. That’s how these structures become part of the space instead of a temporary project.If you’ve had experience with similar trellises — good or bad — share it in the comments. Which setups worked, and which ones had to be redone? This is exactly the kind of situation where practical experience matters more than any polished diagram.