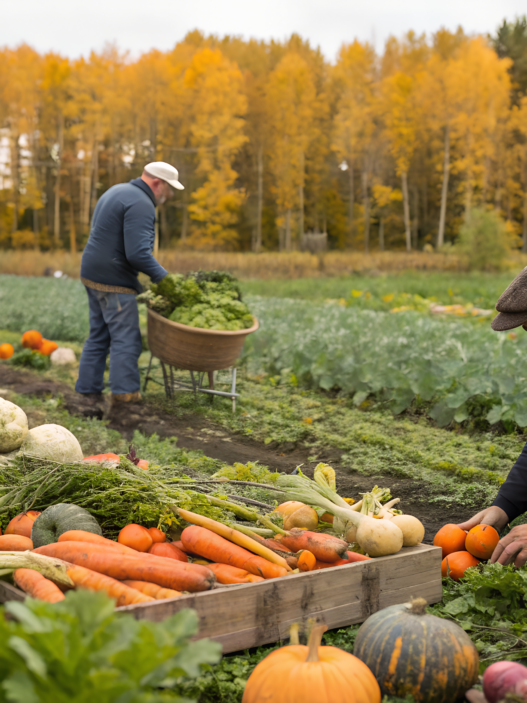
Fall is the season when I almost automatically reach for dried flowers, branches from the yard, seasonal blooms — as if my hands remember that right now is the perfect moment to bring the space to life with soft floral accents. I want to share 10 arrangements and wreaths that we make at home. This is something anyone can do if they have a bit of free time, a pair of clippers, and the desire to create something beautiful literally today.
In this article, you’ll find small tips, recommendations, and those little “tricks” we’ve collected over the years — from our first experiments in Idaho to life now in the Pacific Northwest (PNW).
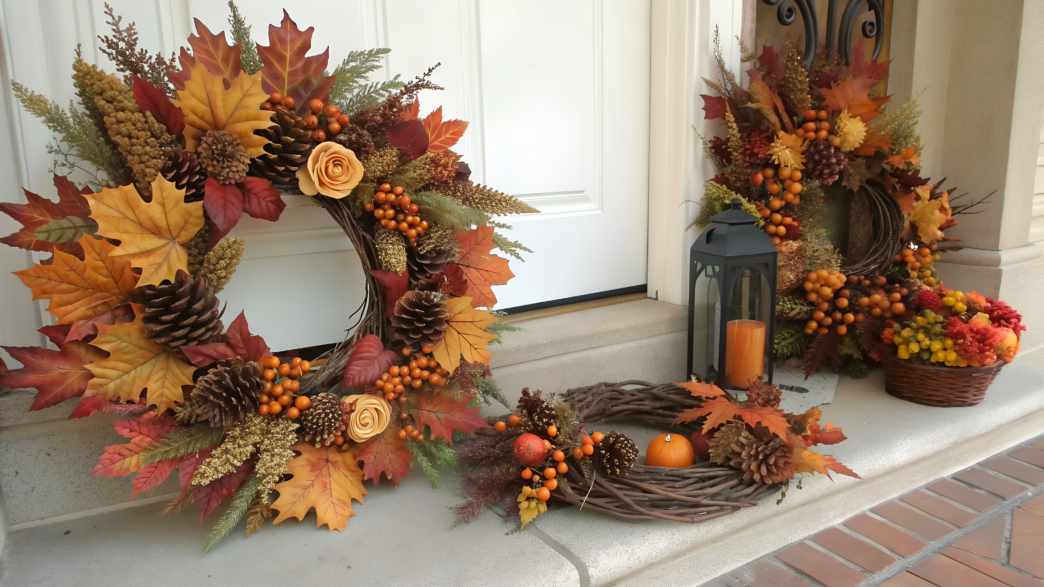
1. Pampas Grass & Eucalyptus Fall Wreath

This wreath is soft, full, beautiful, with great texture. And honestly, it’s one of the easiest fall arrangements you can make yourself. If you’ve ever held clippers in your hands — you’re already halfway there.
What You’ll Need
- Pampas grass — about 10–14 fluffy stems
- Stems 20–28 inches (50–70 cm). It’s best if they’re not too loose — dry “fluffies” can shed.
- Eucalyptus — 6–8 stems
Silver dollar eucalyptus works best — it’s textured, with larger leaves. - Wreath base — grapevine wreath form, 14 inches (35 cm)
It’s light but holds its shape perfectly. - Thin floral wire
- Scissors or clippers
How to Assemble the Wreath
- Prep the base. Run your hands over the grapevine form — lightly “ruffle” the twigs. It helps the pampas grip better. I always do this, especially if the base feels a bit stiff after storage.
- Lay out the materials in front of you. Divide everything into small piles: pampas separately, eucalyptus separately. It’s easier for your eyes, and the composition almost builds itself. Sometimes it feels like everything is already clear before you even start wiring.
- Start with the eucalyptus. It sets the direction. Lay the stems along the circle — left to right, as if you’re creating movement. Secure them with wire, but don’t tighten too much so you can adjust later.
- Add the pampas grass in layers. This is the most satisfying part.
— Lightly shake each stem (two times, no more).
— Smooth the fluffy part with your hand.
— Insert it at an angle so the ends point outward.
Move around the circle, varying the density. Let it build texture, not sameness. - Add small accents (optional). A couple of lavender or physalis stems — and the wreath instantly looks deeper. But this is up to you: sometimes I leave everything minimal if I want lightness.
- Final “styling.” Hang it on the door, step back a few steps, take a look. Adjust here, add a small stem there. Pampas is very flexible — it gives you the chance to make the wreath exactly the way you envisioned.
Where This Wreath Works Best
- On the front door (especially if it’s a contrasting color — charcoal blue, deep green, burgundy)
- Fireplace area
- Large hallway mirror
And it also looks great against wooden walls — like a true autumn vignette.
2. Burgundy Dahlia & Wheat Centerpiece
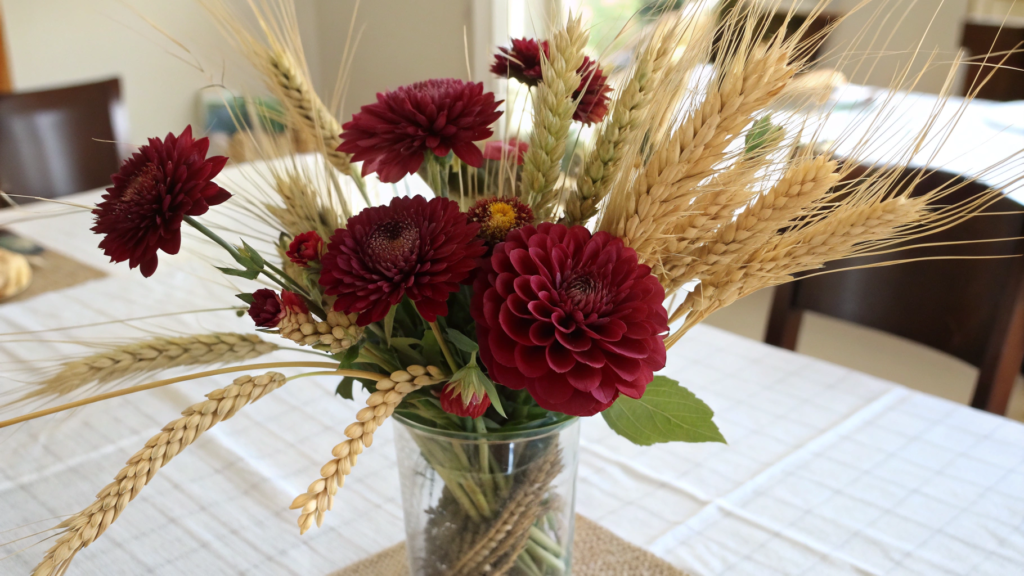
Burgundy dahlias and wheat stems — these two ingredients make the arrangement feel so… real. Alive. Homey. With a twist.
And yes, it looks like it was created by a professional. Though you can assemble it in 15 minutes — well, sometimes 20, if the dahlias get moody.
What You’ll Need
- Burgundy dahlias — 5–7 large heads
Preferably with dense petals. - Wheat stems — 10–14 pieces
Height 12–18 inches (30–45 cm). - Greenery for the base: eucalyptus, ruscus, or even decorative carrot tops.
- Medium-width vase — low cylinders work well.
- Scissors or clippers.
- Optional: you can add a couple of tall feathers (they won’t ruin the arrangement if you keep the proportions right).
If you need a good set for greenery and dried elements — take a look at Dried Wheat Stalks Bundle for Floral Arrangements. I bought this one last year, and it really keeps its shape for months.
How to Assemble the Arrangement
- Prep the vase. Pour in warm water (dahlias last longer this way), add a drop of lemon juice or floral preservative.
- Create the greenery base. Just spread the greenery in a fan shape. It creates a “nest” that holds the flowers in place.
I almost always have eucalyptus in the kitchen — I love its scent, and it works well in any arrangement. - Add the dahlias. Start with three: one closer to the center, two slightly to the sides.
Dahlias tell you themselves how they want to stand. Rotate them, look at the volume. If one “faces” the wrong direction, simply trim the stem at an angle. - Insert the wheat. I use it as vertical accents.
The main thing is not to overdo it.
If you insert too much, the arrangement becomes too “spiky.” Keep the lightness. - Check the balance. Step back from the table. See where the eye goes.
You may need to add one small dahlia on the side — usually this fixes the asymmetry. - Final touch. Insert two or three wheat stems with shorter stalks closer to the base — it ties the whole arrangement into one rhythm.
Where This Arrangement Looks Especially Good
- On a long wooden table
- In the center of a kitchen island (if the kitchen is bright, burgundy looks stunning against white walls)
- Next to pumpkins and candles (even simple candles — the effect is still strong)
3. Minimalist Gold Hoop Wreath with Dried Florals
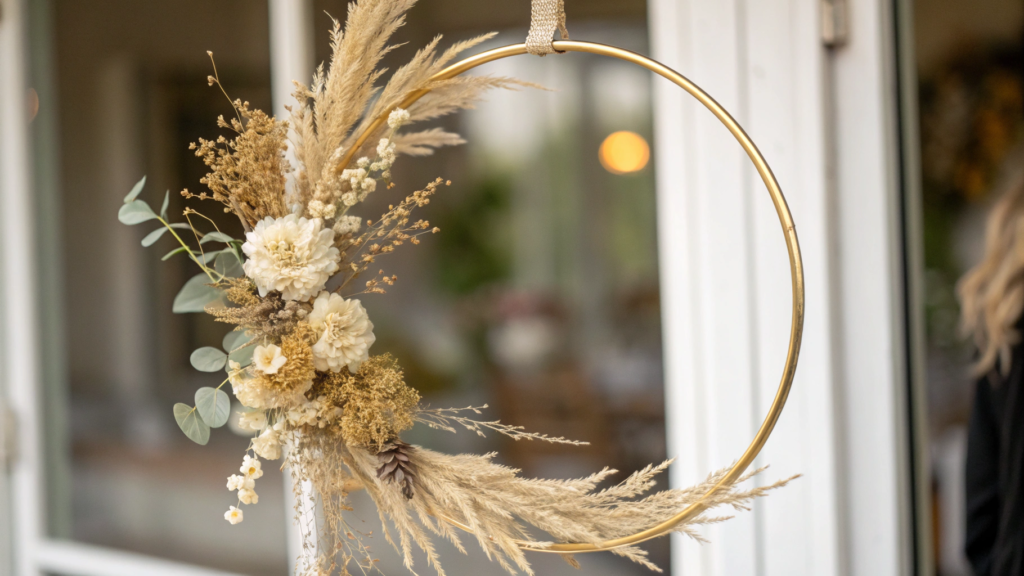
Sometimes you look at all those massive fall wreaths around and think: you can go simpler, right? And prettier, actually.
A minimalist wreath on a gold hoop — light, neat, very fall-like, but calm.
What You’ll Need
- Metal gold hoop 12 inches (30 cm)
You can go bigger, but 12 is the most universal. - Set of dried florals:
white or cream bunny tails, a couple of thin eucalyptus stems, a bit of rhipsalis or cotton. - Thin floral wire
- Ribbon or twine for hanging
- Clippers
How to Assemble the Wreath
- Define the bottom point of the arrangement. Take the hoop in your hands and rotate it for a few seconds — just look at how it “sits.” Usually there’s a side that feels slightly heavier or even has a tiny scratch — that becomes the bottom point. This makes the wreath look more harmonious.
- Start with the eucalyptus. Take one long stem and place it along the curve of the hoop. Don’t try to press it flat — let the bend follow the metal.
Secure the stem with two small pieces of wire. Try to position them so the leaves cover the attachment points.
Then add a second stem slightly higher to create a bit of “movement.” It’s the eucalyptus that creates the framework and sets the mood of the entire arrangement. - Add the bunny tails. Leave some stems long — they “shoot out” beautifully.
Shorten others almost halfway — the shorter ones create volume near the base of the wreath.
I usually insert them in clusters of three: two long, one short. And I fix everything with thin twists of wire.
The main thing is not to place them symmetrically. Let them go a bit uneven, but still look like one cohesive shape. - Insert the accent elements. This can be cotton, a small dried rose, or a light lunaria stem. One element — and the wreath instantly becomes more defined.
But here’s the nuance: the accent should sit closer to the middle of the composition area, not at the edge.
Otherwise it pulls the eye too strongly. - Secure the final details. Step closer and look at any stem that sticks out and catches the eye. Sometimes it’s enough to gently bend it with your fingers — dried florals are flexible, you can work with them safely.
If there’s an empty spot, add a small eucalyptus trimming or one bunny tail — single elements help “finish” the arrangement.
Try to hide the wire under the leaves or under the fluffy parts — this keeps the wreath looking clean. - Hang and evaluate. And here’s the important part: a wreath always looks different when it’s hanging vertically.
Sometimes what felt perfect on the table “slips” to one side once it’s up. Just adjust the wire a little or add one small element on top to balance the visual weight.
I almost always do a tiny correction once it’s on the door — that’s normal.
Where This Wreath Looks Especially Striking
— On white or dark doors (the contrast works in your favor).
— On the wall near a mirror — a perfect pair.
— In the bedroom above the headboard, if the tones are light.
— On a kitchen wall — the minimalism does its job without overwhelming.
4. Cream Rose & Dusty Miller Table Arrangement
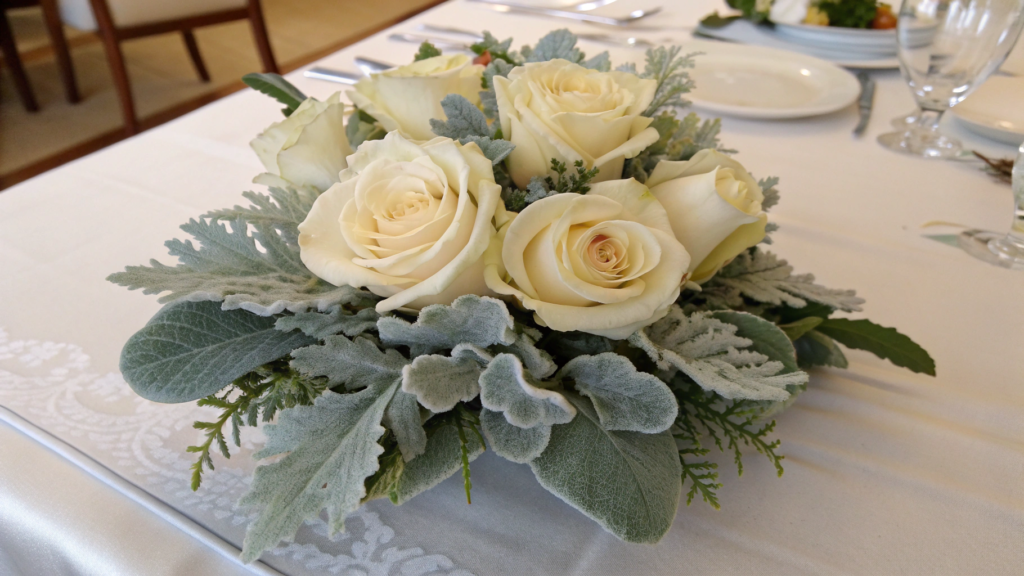
The idea to make a soft, calm arrangement with cream roses and dusty miller — that same silvery, velvety leaf that creates a feeling of gentle depth — came to me recently. This isn’t formal floristry. This is an arrangement about a space where you can exhale.
What You’ll Need
- Cream roses — 5–9 stems, preferably with large dense buds
10–15 inches (25–38 cm) stems work great. - Dusty miller — 4–6 stems, sometimes called “senecio.”
- A bit of family greenery — eucalyptus, ruscus, even soft Italian rosemary works.
- Low wide vase (bowl vase), about 6–8 inches (15–20 cm).
- Floral foam or a flower frog if you want a more stable shape.
- Clippers, knife.
If dusty miller isn’t available — a good set comes in Premium Fresh-Cut Dusty Miller Stems for Floral Arrangements. It has even color and soft velvety leaves — exactly what this style needs.
How to Assemble the Arrangement
- Prep the vase. Pour in warm water and add a bit of preservative.
Roses open slightly faster in warm water and look richer — this is an old trick I picked up from florists in Seattle.
If you’re using floral foam, let it soak fully — don’t push it down with your hands, let it sink on its own. - Create the silvery base. Dusty miller here is for the background. Arrange the stems along the rim of the bowl so they slightly hang over. They create that smoky frame that makes the cream roses look almost illuminated later.
I like tearing some leaves so the sizes vary — the arrangement ends up more natural. - Insert the first roses. Don’t start with the largest ones.
Place a couple of medium ones closer to the center, at an angle. Let them face different directions — one slightly left, one forward, one downward.
At this stage the arrangement still looks messy, but that’s normal — it will come together later. - Add greenery for volume. Take a couple of eucalyptus or ruscus stems and insert them between the roses.
This not only fills the empty spots, but also sets the “breath.” I don’t like overloading with greenery — two or three touches are enough, like you’re holding a watercolor brush and adding strokes by mood. - Now — the main roses. Take the densest buds and place them higher and closer to the center.
They create the focus.
If the arrangement is low, you can trim the stems to 5–7 inches (12–18 cm).
I sometimes turn the roses so the prettiest petal becomes the “face” of the arrangement. Yes, it’s a bit finicky, but the result is worth those extra three seconds. - Finishing details. Look at the arrangement from table height — that’s how guests will see it.
If something looks too flat, insert a small dusty miller trimming.
If it looks too dense — remove one rose. Yes, remove it — sometimes lightness is worth more than quantity.
This arrangement with cream roses and dusty miller looks great on a long wooden table. On a kitchen island it works perfectly: especially if you place a linen napkin or a wooden board nearby.
In the bedroom it has its own magic: on a bedside table this arrangement becomes almost intimate, quiet, it truly softens the space. And if you place it on a hallway dresser where the walls are light, the silvery dusty miller leaves illuminate the whole space and make the entrance to the home more… composed, I guess.
5. Sunflower & Sage Fall Wreath
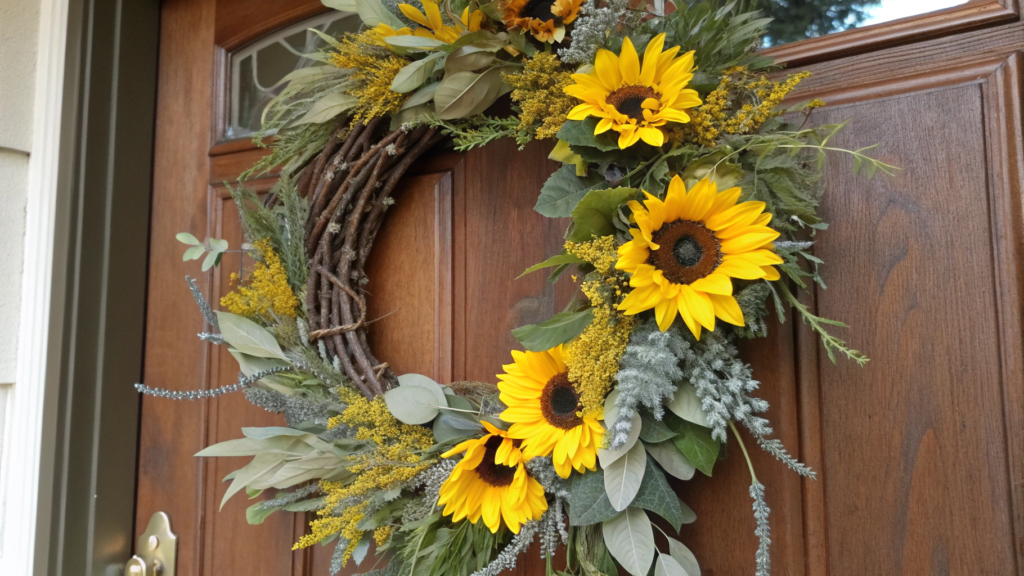
One day I walked through the garden and ended up holding a bundle of sage, a few sunflowers, a couple of wormwood stems, and I immediately understood that all of this needed to be gathered into one composition.
What You’ll Need
- Sunflowers — 3–5 large heads
It’s better to choose dense ones, with bright petals and a heavy center. - Fresh or dried sage — 8–12 stems
Length 8–10 inches (20–25 cm).
Both garden sage and purple sage work great. - Dusty greenery (optional): wormwood, lunaria, eucalyptus.
- Grapevine wreath base — 14 inches (35 cm)
A base that holds everything without extra effort. - Floral wire and clippers
How to Assemble the Wreath
- Prep the base. Place the grapevine hoop on the table and “comb” it with your hands to open small pockets between the twigs. This small preparation will later save you a lot of effort — sage and greenery will slide in like into soft natural grooves.
- Lay out the sage. Sage is aroma and structure.
I usually start with it, creating an arc from bottom to top, as if the leaves are hugging the lower third of the circle.
Don’t worry if the leaves stick out unevenly. That’s their beauty — a light wild texture. - Add the sunflowers. Here it’s important not to turn the wreath into a “sunflower field.”
Three large heads are enough.
Place one sunflower closer to the bottom point, the second slightly higher on the left or right, the third closer to the middle of the arc.
Sunflowers are secured with tighter wire than sage — they have heavy centers, so give them solid support. - Fill the gaps. Now look at the wreath and search for “holes” — they are always there.
Fill them with small wormwood, lunaria, or eucalyptus stems. They create depth, as if you’re looking into layers.
Sometimes inserting just one stem suddenly makes the whole wreath look more structured. - Add volume at the top. To avoid the composition being heavy at the bottom, I always add literally 2–3 small sage or wormwood stems on the opposite side.
This way the wreath looks balanced, without that one-sided weight that seasonal decor wreaths often have. - Final “fitting”. Hang the wreath on the door and look for a couple of seconds.
Sometimes a sunflower is angled wrong and should face slightly forward instead of sideways — trim the stem or tighten the wire, and the wreath comes to life.
I always make the last adjustments in a vertical position — only then you see the true final shape.
Where This Wreath Looks Especially Beautiful
This wreath reveals itself especially well on wooden doors in warm tones — the sunflowers literally start glowing.
If the door is dark, the sage creates a soft silvery contrast — very calm, almost smoky.
And on a porch with fall pumpkins and a pot of herbs nearby — well, that’s exactly where it belongs, as if it grew there on its own.
6. Autumn Market-Inspired Centerpiece with Hydrangeas
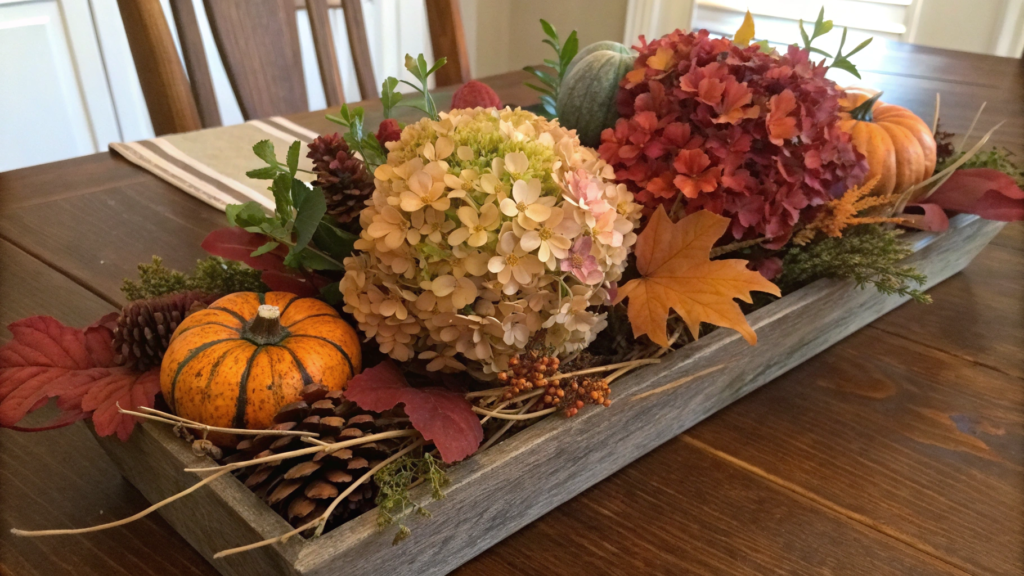
Hydrangeas during this period seem to dry out just enough to become decorative without losing their color. And that’s when they become a full participant in the composition we place on the table almost every season.
What You’ll Need
- Hydrangeas — 3–5 large blooms
Fall shades work best: dusty rose, soft green, slightly lavender. - Seasonal fruits: small pears, mini pumpkins, apples — 4–6 pieces total
They create a market-like liveliness. - Eucalyptus or seeded eucalyptus — 2–3 stems
- Dried grasses: oats, millet, thin sorghum stems
- Low wide basket or bowl-vase
Diameter about 10–12 inches (25–30 cm). - A piece of floral foam (if you want more stability)
- Clippers
How to Assemble the Composition
- Prep the base. Place floral foam in the center of the basket (if using), but don’t fill the entire space — let the fruits later “sink” between the layers.
If there’s no foam, just use a crossed greenery grid — it works just as well. - Build the greenery frame. Take eucalyptus and lay it along the edge of the basket as if drawing a soft wave.
The leaves should hang a bit — this creates that natural market feel rather than a neat studio arrangement.
I love using seeded eucalyptus — the small beads look like peppercorns, adding texture. - Place the hydrangeas. Start with the largest one — place it slightly off to the side, not in the center.
Let the second one sit lower, closer to the edge.
The third — higher and closer to the center.
Hydrangeas hold space well, so the arrangement starts looking full within minutes. - Add seasonal accents. Take a small pear and place it right between the green leaves.
Then add a mini decorative pumpkin — but don’t set it on top; let it half-rest on the side, as if you just set the basket down and didn’t start “fixing” anything.
Fruits make the arrangement warm and homey, not museum-like. - Highlight the verticals with dried grasses. Insert a few thin stems of oats or millet.
They shouldn’t stick out like antennas — place them at an angle, slightly turning the head outward.
These grasses create a sense of movement, like the composition is “breathing.” - Balance the color. If the hydrangeas turned out cooler in tone, add one warm element: a small yellow apple, one brown-gold grass blade.
I always look at the arrangement as a palette — which tone dominates, and which one needs a little support. - Final touch. Step away from the table.
If one hydrangea stands too vertically — just trim the stem.
If the fruits are collapsing — tuck a small twig underneath.
These small adjustments make the arrangement look exactly the way you imagine it.
How This Composition Feels in the Home
When you place it in the center of the table, it feels like you’ve just returned from an autumn market day.
The fruits add warmth, the hydrangeas — calm softness, and the grasses create that “air movement” you get at markets in the PNW when the wind slightly lifts the dry leaves.
In the kitchen it looks almost like a quiet sculpture — it doesn’t demand attention, but constantly draws the eye. And if you place it on a hallway dresser, everyone who walks in gets a small autumn greeting.
7. Cozy Living Room Arrangement in Amber Glass Vase
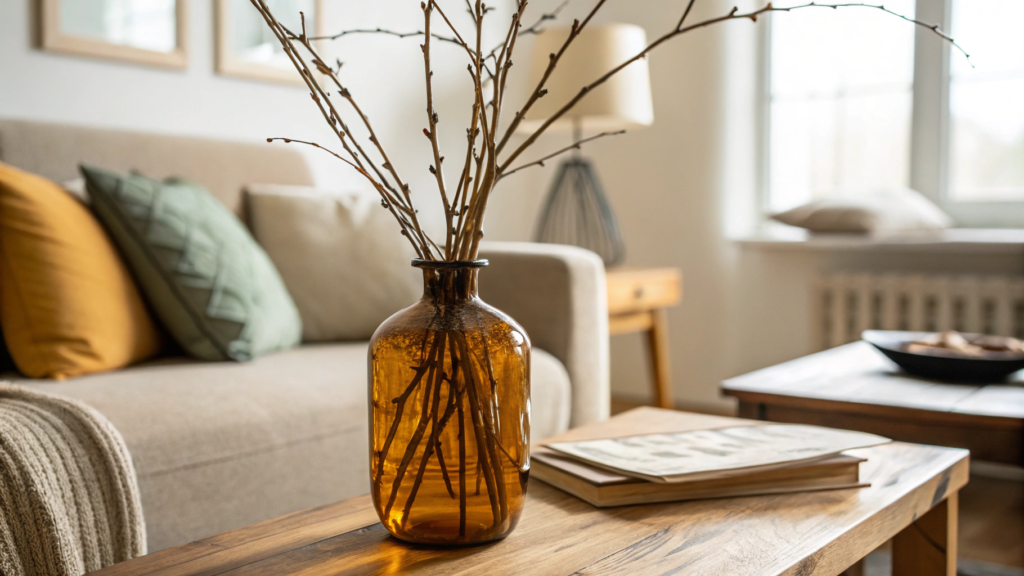
An amber vase works like a filter on its own: through honey-dark glass everything looks deeper and quieter. Even simple branches become part of some kind of story. It seems like nothing special, yet the atmosphere changes.
What You’ll Need
- Amber glass vase — 8–12 inches (20–30 cm) tall
Narrow neck, wide body — a classic shape for fall arrangements. - Dried or fresh florals:
a couple of stems of brown sorghum plumes, some rowan berries, 2–3 eucalyptus branches, dried grasses. - 1–2 large warm-toned flowers: orange chrysanthemum, terracotta gerbera, even a slightly dried rose works.
- A few branches from the yard — I often use what’s left after pruning: ligustrum, dogwood, autumn quince-bush.
- Clippers
How to Assemble the Arrangement
- Fill the vase one-third with water. If you’re making a mixed arrangement (part dried, part fresh), don’t add too much water so the dried elements don’t get wet.
I usually place a small “raft” inside — a piece of branch or greenery — so the stems don’t slip. - Create the greenery base. Place 2–3 eucalyptus branches inside, building a light little house.
Don’t try to make it symmetrical. Let one branch face upward, another sideways. This slight disorder makes the arrangement alive rather than decorative. - Add texture with dried florals. Sorghum stems, dried oats, and any light plumes work perfectly.
Place them at an angle so they create upward movement.
I like when the dried elements sit a bit higher — it adds verticality. - Insert the main flower. A chrysanthemum or a large gerbera is your focus.
Place it not in the center but slightly to the side.
This way the arrangement doesn’t look like an office display but something homey.
I sometimes trim the stem slightly so the flower turns toward the direction where it “sounds” better. - Fill the gaps with branches. Fall branches can be crooked, uneven, with small leaves — and this works beautifully with amber glass.
Insert them where the water is too visible — they add structure. - Visual balance. Step back a couple of steps.If the arrangement “leans” to the right — simply pull one long branch to the left.
If it feels too low — add one dried plume higher.
I’m serious: sometimes one move solves everything and gives the whole arrangement a finished balance.
Where to Place the Arrangement
When you set it on a coffee table, the amber glass starts catching the warm lamp light — and the entire arrangement looks slightly deeper.
On the mantel it works perfectly: dried florals reflect the fiery tint of the flame, and the pink or warm-orange petals blend well with the glow.
On a windowsill in fall this arrangement also looks wonderful — you walk into the room, and your eye immediately catches it.
8. European-Inspired Front Door Wreath with Olive Branches

In this composition there’s no decor for the sake of decor — just small details that hit exactly the mood of the season.
Lindy and I were once walking through a small town in Portugal (on the way to the market, of course), and on one door hung a simple wreath made of fresh olive branches, as if gathered in five minutes. Nothing extra, everything to the point. Since then, I’ve been making this version at home every fall.
What You’ll Need
- Fresh or faux olive branches — 8–12 stems
Length about 10–14 inches (25–35 cm).
If fresh — choose branches with flexible stems, they follow the circle more easily. - Grapevine wreath base — 12–14 inches (30–35 cm)
Light, natural, and doesn’t compete with the leaves. - Small accents (optional):
a couple of small decorative lemons, a bay branch or eucalyptus, thin cotton ribbon. - Floral wire, clippers.
If you need high-quality faux branches that look real, check out Real-Touch Olive Branch Stems for Mediterranean Wreaths — they have a beautiful matte leaf without the artificial shine.
How to Assemble the Wreath
- Prep the base. Place the grapevine hoop on the table and gently “separate” the twigs with your fingers — not too much, just enough to create small pockets.
Olive branches like space; they sit beautifully when there’s room to tuck in the stems. - Create the first layer of branches. Take the fullest branch and lay it along the arc of the hoop.
Secure it with wire at the base of the leaves — that way the attachment is invisible.
Then add a second branch at a slightly different angle so the leaves overlap and the composition becomes more natural and alive. - Build the circle gradually. Olive branches are material with character — they don’t like symmetry.
So don’t move strictly clockwise; work in small segments.
Add 2–3 branches on the left, one at the top, one at the bottom.
The composition should look like it’s naturally “wrapping around” the base, not glued to it. - Add texture. If you want more depth, add a couple of bay branches — they have a rich, saturated color.
Sometimes I insert thin eucalyptus just to add a cooler shade.
These small details make the wreath less flat. - Accents (if needed). Some people make a completely green wreath — it’s gorgeous.
But if your door is dark, you can add one or two small decorative lemons.
I usually secure them at the bottom edge — they give a light southern accent that works unexpectedly well. - Final adjustment. Hang the wreath on the door and step back a few steps.
Olive leaves react differently to light, so sometimes you need to rotate a branch so it catches a sun highlight.
I often add one thin branch at the top to create a diagonal — it gives that European “light and effortless” feel.
How Olive Branches Transform the Space
Olive branches have this incredible ability to calm a space.
On light doors their matte leaves give contrast; dark doors — depth; wooden doors — they create the feeling that you’re somewhere in Tuscany or southern France, even if the world around you isn’t actually like that.
9. Thanksgiving Table Runner of Mixed Fall Florals
Our first runner was made literally from leftovers: a couple of dried chrysanthemums, a few eucalyptus branches, some rosemary from the yard, and one wrinkled mini pumpkin that somehow survived until the holiday.
But when we laid everything along the table… it looked, I’ll tell you, simply unbelievably good. Since then, I’ve been making this runner every year — it’s lively, warm, and incredibly grateful to work with.
What You’ll Need
- Mixed fall florals:
— warm-toned chrysanthemums (3–5 pcs.)
— dried hydrangeas (2–3 pcs.)
— small sunflowers or gerberas (2 pcs.) - Greens and fillers: eucalyptus, ruscus, asparagus
- Dried accents: small stems of oats, sorghum, lunaria
- Seasonal produce: mini pumpkins, pears, apples, nuts
- Floral wire (if something vertical needs securing)
- Long table or sideboard — a runner works specifically along the length
For beautiful dried accents, the Assorted Dried Fall Stems for Table Centerpieces set works perfectly — good shades and varied texture.
How to Assemble the Runner
- Start with the base. Place a thin strip of eucalyptus in the center of the table — just a couple of long stems, slightly overlapping.
They set the direction and act as the “road” along which everything else will go. I like when the leaves hang slightly over the edges — it adds movement. - Lay out the large elements. Take the biggest flowers — chrysanthemums or hydrangeas — and spread them across the table so they’re not at equal distances.
One closer to the beginning of the table, a couple near the center, one almost at the end.
This way the runner looks natural, as if assembled gradually rather than measured with a ruler. - Add seasonal accents. Place mini pumpkins between the chrysanthemums. A couple of pears or apples — closer to the edge so they create a homey food feeling.
Nuts are perfect: they add texture, and you can just scatter a small handful.
I like when I see guests absentmindedly rolling a pear with their fingers — it’s always a good sign. It means the runner is alive rather than decorative. - Fill the space with greenery. Now walk along the table and see where the gaps are.
Insert small branches of ruscus, asparagus, or even thin dried grasses.
Don’t try to make everything uniform — the runner should feel like a market: denser in some places, lighter in others. - Add verticals. You can stick in a couple of dried sorghum or oat stems at an angle.
Don’t add verticals along the whole runner — two or three points are enough for the eye to “travel back and forth.” - Adjust for the tableware. When you start placing plates, utensils, and glasses, the runner changes.
Sometimes a flower ends up too close to a plate — just move it slightly to the right; it’s a living object, it moves easily.
I often make the final adjustments right before calling the guests.
How This Runner Feels on the Table
When the whole composition lies along the table, a very interesting feeling appears: guests don’t look at the center but along the length. The table feels inviting, as if it’s opening up.
Warm flowers against wood, small pears, silvery eucalyptus leaves… all of it turns the table into a true autumn canvas.
And the nicest part — every guest sees the runner differently, because each one has their own little stretch of this small “autumn road” right in front of them.
10. Grocery Store Flower Arrangement with Seasonal Touches
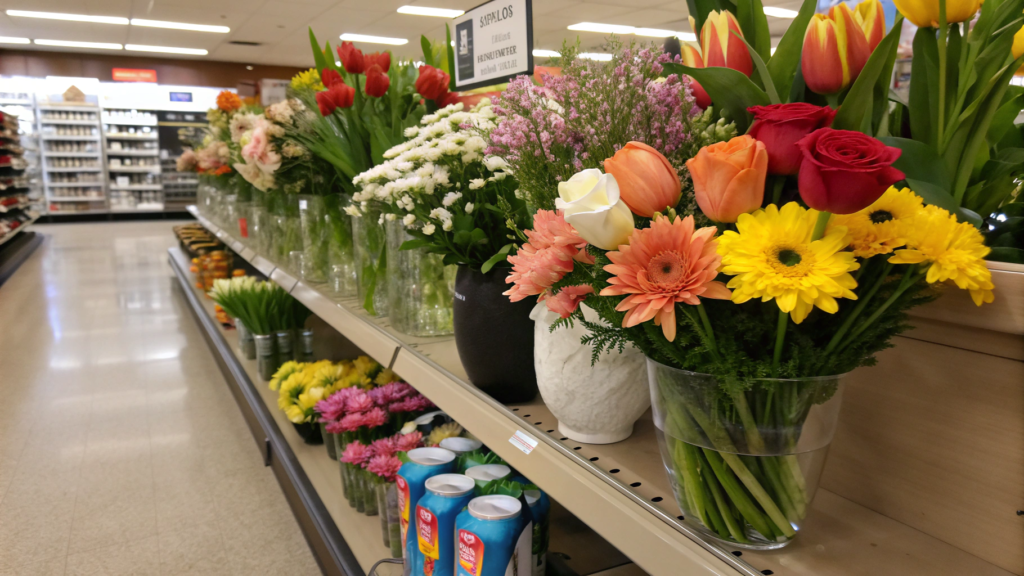
Often in a regular supermarket you see a shelf with flowers. And you look at them and think: you could make something beautiful right today.
That’s how I developed the habit of bringing home a “grocery store bundle” once a week and turning it into a full seasonal arrangement. It’s my kind of meditation.
What You’ll Need (and all of this is truly easy to find in a regular store)
- One mixed bouquet — they usually have chrysanthemums, mini carnations, greenery
- A couple of single flowers (if available): gerbera, rose, sunflower — anything warm-toned
- Greenery: eucalyptus or ruscus (often sold separately)
- Seasonal touches:
— mini pumpkin
— small pear
— a few sprigs of rosemary or sage - Medium glass vase — 7–10 inches (18–25 cm)
- Clippers or knife
How to Assemble the Arrangement
- Free the bouquet from the cellophane. This is probably the most important step.
The supermarket loves wrapping everything in bright plastic — at home it only gets in the way.
Remove it completely, lay all the flowers out in groups.
Sometimes at this point you can already see that the bouquet can be split into two different ones — I do this quite often. - Cut off everything extra. Trim the stems by at least 1 inch (2–3 cm), preferably at an angle.
Supermarket flowers often sit in water for a long time, their stems are tired.
After trimming, they start drinking water again, and the arrangement lasts longer. - Create the greenery base. Insert 3–4 eucalyptus or ruscus stems into the vase in a dome shape.
Don’t try to make it perfect — let one branch face upward, another sideways, the third hang slightly.
This “chaos” becomes the natural structure that makes grocery flowers look like farmer’s flowers. - Divide the bouquet into groups. Take the chrysanthemums — place two closer to the center, one angled lower.
Mini carnations — toward the edge, they create a soft transition.
Brighter flowers — gerbera or rose — let them work as accents.
Leave one flower aside: it will help “close” an empty spot at the very end. - Add a seasonal accent. Place a small pear right on the edge of the vase so it looks like it’s “supporting” the arrangement.
Or place the mini pumpkin nearby — yes, it’s not part of the arrangement itself, but visually it works perfectly.
A couple of rosemary sprigs make the arrangement aromatic. - Final adjustments. Step away from the vase. Look. If the arrangement leans to the right — add one greenery stem to the left.
If it’s too flat — place that “reserved” flower slightly higher than the others.
Let everything look natural, not perfect — as if you brought it from a market, not from a supermarket.
Why This Arrangement Always “Works”
You take ordinary things you’ve seen a thousand times and suddenly gather them into something different, using your own imagination and mood.
In the living room, this arrangement catches lamp light especially well — the chrysanthemums start glowing, and the greenery sets a calm background.
On the kitchen island it looks completely different: more lively, a bit chaotic, but that’s exactly its charm.
Fall Accent
Every time I finish a seasonal arrangement, I step back a couple of steps, look at the result, and almost always feel satisfied. Because it’s not the arrangement that creates fall… but the mood it sets.
Glance around the room — where do you see a place for one of these versions? On the door, kitchen island, long table that’s been asking for attention?
If even one idea from this article made you pause and think, then my mission is accomplished. And I would really love to hear: how did yours turn out? Were you happy with it?
If you make something — tell me in the comments. Truly. Stories like these inspire far more than any master class.