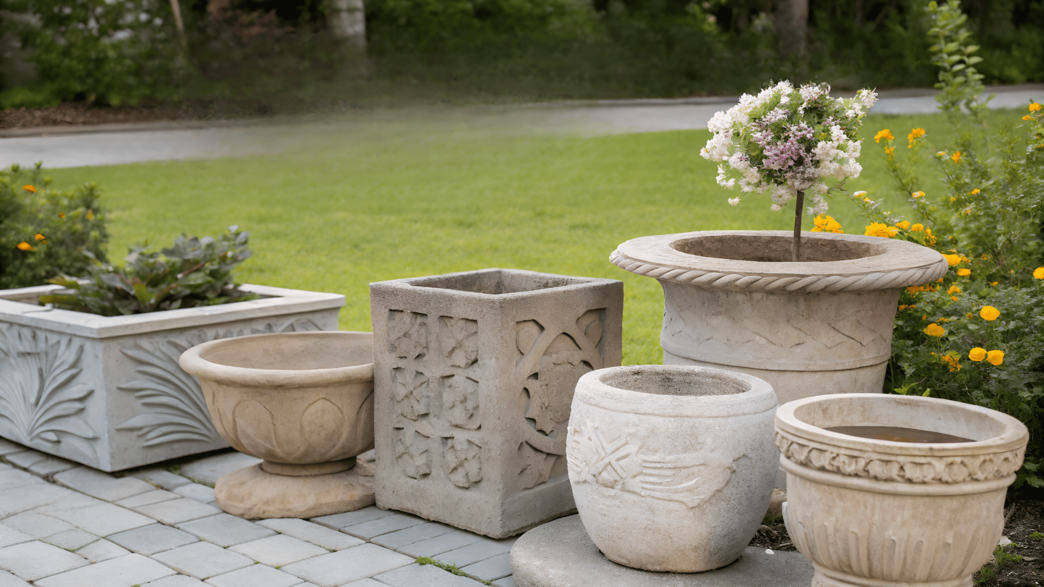
Often you want to add something noticeable to the garden, but not something made of plastic and not something from a big-box hardware store. Something that feels like a real material.
Hypertufa gives exactly that result. It looks like stone, but it’s easier to work with than it seems. No complicated molds, no professional equipment — just basic materials, patience, and the right wall thickness.
In this collection — 10 projects that look neat and “like someone who’s been doing this for years made them,” but are still beginner friendly. From stepping stones to herb bowls and shallow bird baths.
Everything is realistic to recreate in your own yard. Experiment!
1. Leaf Imprint Hypertufa Stepping Stones
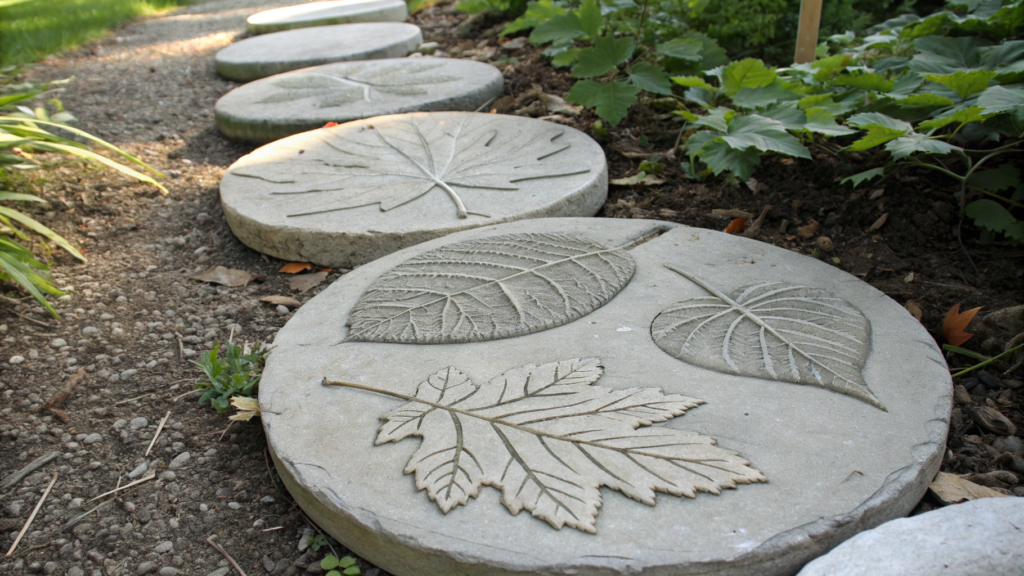
This is the project many people start their journey with. And for good reason. Because here you see the result right away. Not just a gray stone, but the imprint of a real leaf — with veins, curves, texture.
I still remember the first stone we made on our Idaho property. A rhubarb leaf lay on the table, the mix was too wet, and I was worried nothing would work. But when we flipped the form the next day… the veins showed up clearly, like they had been carved by hand. And I thought: this is it — the feeling of a real garden. Not bought. Made.
What Is Hypertufa
Hypertufa is a lightweight mix of Portland cement, peat moss, and perlite or vermiculite. It is about 25–40% lighter than regular concrete at the same thickness (depending on proportions), yet it remains strong and frost resistant.
Mix Proportions for Stepping Stones
Here is the formula we use most often:
- 1 part Portland cement
- 1.5 parts peat moss
- 1.5 parts perlite
- Water — slowly, until it reaches the consistency of thick dough
If you make stones 2–2.5 inches (5–6 cm) thick, one stepping stone 16–18 inches (40–45 cm) in diameter will weigh about 15–20 lb (7–9 kg). Heavy enough so it won’t shift in the soil, but light enough to move without straining yourself.
And here’s an important point. The mix should not be runny. If it flows — the veins will blur. I always test it the same way: I squeeze a handful. If it holds its shape and doesn’t release water — perfect.
Choosing the Leaf
Not every leaf will give a clear imprint. The best ones are:
- rhubarb
- hosta
- burdock
- large ferns
- squash leaves
The leaf should be firm and fresh. Size — from 14 to 22 inches (35–55 cm), depending on the diameter of the stone you want.
Once we tried using a thin pumpkin leaf — in the heat it wilted within half an hour, and the imprint turned out blurry. Since then, I always keep the leaves in the shade right up until working time.
How to Make Leaf Imprint Hypertufa Stepping Stones
- Prepare a flat, shaded workspace
Choose a level surface where the stone can stay undisturbed for at least 48 hours. Lay down thick plastic so the mix doesn’t stick. Keep water and gloves nearby — hypertufa mix is messy and dries on hands quickly. - Shape a damp sand mound to form the base
Build a mound of moist sand about 3–4 inches (8–10 cm) high. Press it gently so it holds its shape. This creates a slight dome, which prevents water from pooling on the finished stepping stone. Cover the sand with plastic. - Place the leaf vein-side up
Lay a fresh, firm leaf on top of the plastic with the veins facing upward. These veins create the imprint. Keep the leaf in shade until use so it doesn’t wilt. - Apply the hypertufa mix in layers
Press a thin first layer firmly into the leaf to capture detail. Then build up the thickness to about 2 inches (5 cm) in the center and no less than 1.5 inches (4 cm) at the edges. For added strength, embed a small piece of fiberglass mesh in the middle. - Cover and let it cure slowly
Cover the stone with plastic and leave it in shade for at least 48 hours. After that, gently remove the leaf and cover again. Allow it to rest 7–10 days before use. Full cement strength develops around 28 days.
I usually spread the mix by hand, gently pressing it into the veins. Thickness — at least 2 inches (5 cm) in the center. Edges can be slightly thinner, but not less than 1.5 inches (4 cm).
Sometimes I add reinforcement — a piece of fiberglass mesh about 10×10 inches (25×25 cm) in the center. This reduces the risk of cracking, especially if the stone will sit on uneven ground.
Curing
This is where many people ruin the result. The stone needs to dry slowly.
- Cover it with plastic
- Leave it in shade for at least 48 hours
- After removing the leaf, let it rest another 7–10 days
Full cement curing takes about 28 days. That timeline is listed in technical standards.
Yes, waiting is hard. But a garden is not a fast project.
Finishing
After full drying you can:
- lightly brush the edges with a metal brush
- rinse the surface with water
- apply a diluted yogurt or kefir solution to encourage natural moss growth
On a rough and porous surface, moss attaches more easily than on smooth concrete or plastic. These materials retain moisture better — and moss needs that.
Over time the stone starts to look like it has been in the garden for decades.
Where to Use These Stepping Stones
These stones are not just decorative — they’re practical. They help prevent trampling grass, tracking mud, and make pathways cleaner. This is especially noticeable in spring and after rain.
They work best where you walk regularly:
- on the path to the vegetable garden
- around the compost area
- at the entrance to the greenhouse
- between garden beds so you don’t step on the soil
It’s important to sink them slightly into the ground and place them on a firm base — then they won’t wobble and will last longer.
2. Rope Handle Hypertufa Trough Planter
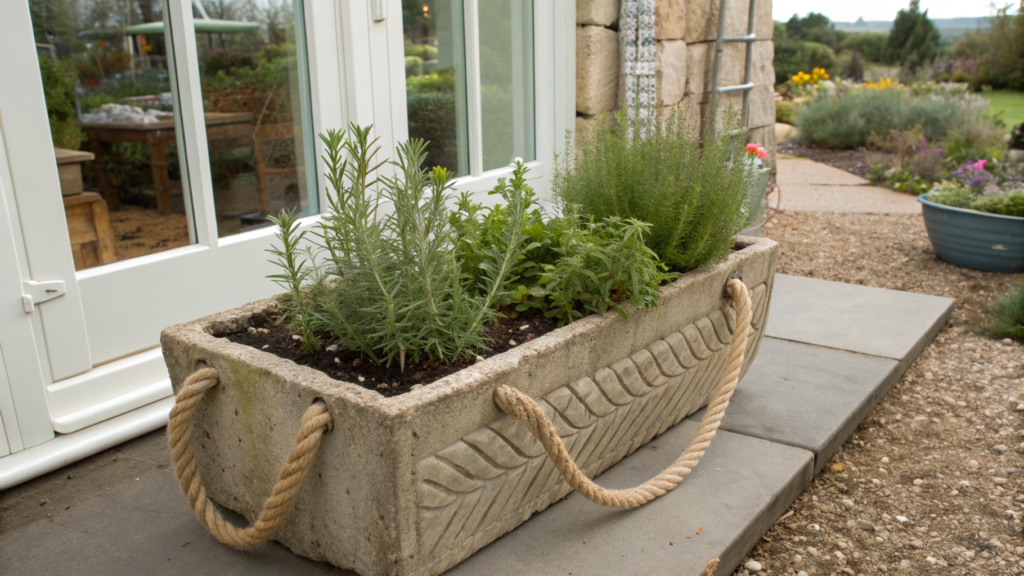
Rope Handle Hypertufa Trough Planter — totally doable even if you’re new to hypertufa.
The first time I saw one was at friends’ place in Oregon. It stood by the greenhouse entrance, planted with rosemary and thyme. And honestly — at first I thought it was expensive designer concrete. Then they showed me how it was made.
Why the “trough” shape works
The long shape feels intentional:
- it holds a composition of several plants well
- it fits narrow spaces — railings, steps, entry zones
- it dries out slower than separate pots
- it looks solid even if it’s just basil inside
Optimal starter size — 24–30 inches long (60–75 cm), 8–10 inches wide (20–25 cm), 8–10 inches high (20–25 cm).
An empty hypertufa planter of this size weighs about 20–30 lb (9–14 kg). With wet soil and plants it can reach 60–80 lb (27–36 kg). That’s where the rope handles stop being decorative and start being practical.
What matters about the material
Hypertufa is a cement-based mix. And cement gains strength gradually. The standard benchmark for strength evaluation is 28 days. That’s common construction practice (Portland Cement Association).
So if someone says “you can carry it after three days” — you can, but carefully. Full load is better after proper curing.
Materials
Nothing fancy here:
- Portland cement (a regular construction type works, for example Sakrete 50 lb. Type I/II Portland Cement)
- peat moss
- perlite
- thick natural rope (not synthetic — it looks artificial and breaks down in sun)
- two plastic containers (one larger, one smaller — like a “box inside a box”)
- a little vegetable oil or spray release
How to Make It
- Prepare the molds
Place the smaller container inside the larger one. Leave 1.5–2 inches (4–5 cm) between the walls for thickness. Grease both molds well — otherwise removing the planter will be a fight. - Form the base
Add a layer of mix about 2 inches (5 cm) thick to the bottom. Press it firmly with your hands. Thin bases crack more often, especially once filled with wet soil. - Build the walls
Fill the space between the molds gradually, in layers. Lightly compact each layer by hand or with a stick so there are no air gaps. Keep wall thickness at least 1.5 inches (4 cm). - Insert the rope handles
Cut rope pieces 12–14 inches (30–35 cm). Slightly fray the ends. When the walls are about halfway filled, press the rope ends into the mix and cover with another layer. The ends should go in at least 2 inches (5 cm) deep — otherwise the handles won’t hold weight. - Create drainage holes
While the mix is still wet, insert two sticks or tubes about 0.5 inch (1–1.2 cm) in diameter into the bottom. Once the mix sets slightly, remove them — this forms drainage openings. - Dry it correctly
Cover with plastic and leave in shade for at least 48 hours. Then remove the molds and let the planter cure quietly another 7–10 days. Full weight is best added closer to day 28 — before that, don’t drag or drop it.
Where it looks best
A long planter fits naturally where there are already lines — steps, railings, terrace edges.
I’ve seen them:
- by the front door with lavender
- along a wooden deck with sage
- on steps with low succulents
- on railings with strawberries
The key is stability and not blocking movement. In those spots, the planter doesn’t look homemade — it looks intentional.
I like the idea of making one for a summer kitchen — with basil, thyme, and oregano. Step outside barefoot in the morning, pick a few leaves, no scissors needed.
3. Stacked Bowl Hypertufa Water Feature

Stacked Bowl Hypertufa Water Feature — in this multi-level water setup made of bowls placed one on top of another, water gently flows from top to bottom. The sound is calm. Not a fountain splash — more of a soft, steady trickle.
In a small garden of friends in Washington, this kind of feature stood between beds of sage and echinacea. No dramatic effect. Just water, birds, and a kind of quiet you feel in your body.
Why use hypertufa for water
Hypertufa is lighter than regular concrete, and that matters when you’re stacking bowls on top of each other.
But remember: it’s still a cement-based mix, which means:
- it needs time to gain strength
- it remains porous
- it’s better to seal it
The standard curing time for cement is 28 days (a construction benchmark used to evaluate strength). So the bowls should fully cure before you keep water in them long term.
What shape works best
Bowls that perform well usually have:
- diameter of 14–20 inches (35–50 cm)
- depth of 3–5 inches (8–12 cm)
- wall thickness not less than 1.5 inches (4 cm)
For three levels, you’ll need a large bottom bowl, a medium one, and a smaller top bowl.
The total weight of the structure without water can be around 60–90 lb (27–40 kg). With water — more. So the base must be stable.
How to Make It
- Form the first bowl
Shape a dome from damp sand and cover it with plastic. Apply the mix about 1.5–2 inches (4–5 cm) thick. Slightly raise the edges to form the bowl shape. Don’t make it too thin — water adds weight. - Repeat for the other levels
Make the middle and top bowls using the same method, just smaller in diameter. Each upper bowl should be lighter and more compact than the one below. - Create openings for tubing
Insert a plastic tube about 0.5–0.75 inch (1–2 cm) in diameter in the center of each bowl. After the mix sets, remove it carefully — later the pump hose will run through this opening. - Let the bowls cure fully
Cover with plastic for 48 hours, then gently remove forms and leave them in shade at least 7–10 days. For constant water contact, it’s better to wait closer to 28 days. - Seal the inside surface
Hypertufa is porous. Without sealing, water will slowly seep through. Use a water-safe cement-based sealer or an acrylic pond sealer. This extends the lifespan of the feature. - Install the pump and assemble
A small submersible pump rated around 60–120 GPH (gallons per hour) works well for a gentle flow.
Important details people often miss
- The base must be level and stable
- Bowls are better secured together with exterior-grade construction adhesive
- In cold climates, drain water for winter to prevent damage
- Water expands when it freezes — that’s physics. Even strong materials can crack
Where this water feature feels natural
A stacked bowl cascade works best where it complements the space instead of dominating it.
- near the greenhouse entrance where there is already movement
- in a seating area near herbs
- in the center of a round flower bed as a soft focal point
- against a gravel background where the water sound carries better
The base should be stable and perfectly level — that helps water flow evenly. And avoid placing it too close to a wall or corner. A little open space around it makes the sound cleaner.
Honestly, I’ve been thinking about building one near a future sitting area. Not for impact. For the sound. Do you think it would work?
4. Chicken Wire Hypertufa Sphere Sculpture
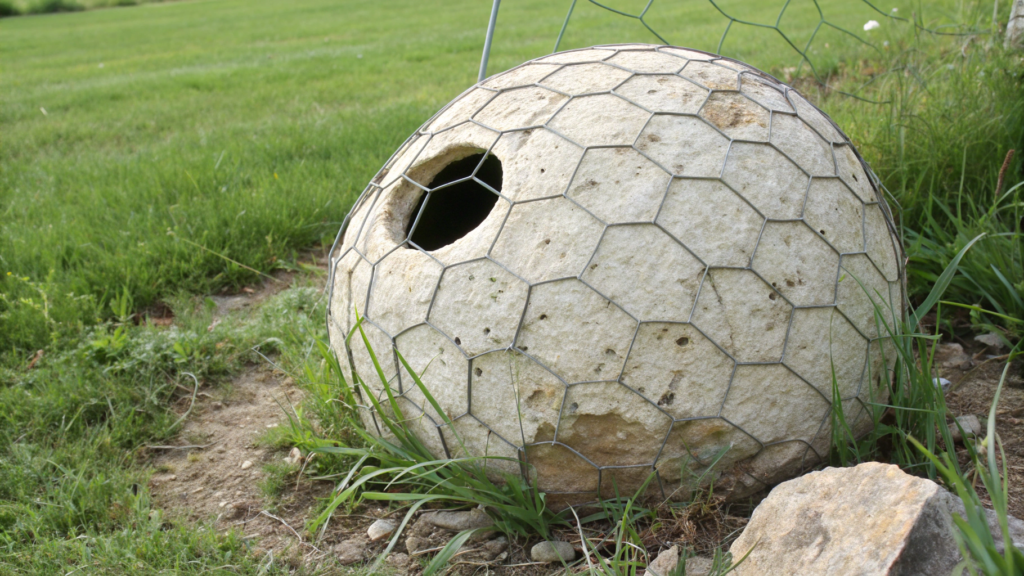
This is that hypertufa sphere that looks like an old garden stone, but it’s light, hollow, and actually pretty simple to make.
I saw one like this in a small private garden in Oregon. It was lying in the grass, almost unnoticed. At first I thought it was a real boulder. I walked closer — no. It was a hollow hypertufa ball. Light. Slightly uneven. And because of that, even more natural.
Why choose a sphere
The shape of a sphere works very softly in a garden. It:
- balances the straight lines of raised beds
- adds a “stone” accent without heavy weight
- looks natural among grasses and groundcovers
- can act as a base for moss
For a first project, I would suggest a diameter of 16–20 inches (40–50 cm) and wall thickness of at least 1.5 inches (4 cm). A sphere that size usually weighs around 15–25 lb (7–11 kg) — depending on thickness. Noticeably lighter than a real stone of the same size.
What to keep in mind
Hypertufa is a cement-based mix. Cement reaches its design strength around 28 days — that’s a standard construction benchmark. So don’t rush installation.
And one more thing: the sphere is hollow. That means the inner structure needs to be stable.
Materials
- Portland cement
- peat moss
- perlite
- chicken wire (galvanized metal mesh)
- gloves (required)
- plastic sheet
How to Make It
- Build the wire frame
Cut circles from chicken wire and bend them into hemispheres. Join them with wire to form a ball. Don’t aim for perfect geometry — slight irregularity adds natural character. Wear thick gloves. The mesh is sharp. - Prepare the workspace
Lay down plastic and place the sphere on a stable surface. Sometimes it helps to rest it on a bucket or a ring of sand so it doesn’t roll. - Apply the first layer of mix
Start with a thin layer just to cover the mesh. Press the mix firmly into the openings so it grips the structure. Don’t apply it thick right away. Let the first layer set slightly. - Add the main layer
When the first layer firms up (but isn’t fully dry), apply more mix until the walls reach about 1.5 inches (4 cm) thick. Work gradually, rotating the sphere. If the mix is too wet, it will slide down. - Create surface texture
While the mix is still damp, lightly brush it with a stiff brush or sponge. A slightly rough finish looks better than a smooth one. It helps the sphere blend into the garden. - Let it cure properly
Cover with plastic and leave for at least 48 hours. Then turn the sphere and let the other side finish drying. Full curing happens closer to 28 days. Until then, don’t place it permanently or expose it to impact.
Where spheres look natural
A sphere is a simple form. Placement makes the difference. If you put it in the center of a lawn, it looks decorative. If you integrate it into space, it becomes part of the landscape.
- in tall grass near a path, slightly peeking through
- partially buried in gravel, as if it has been there for years
- among sedums and groundcovers flowing around its edges
- near a wooden greenhouse or fence where there’s a natural backdrop
These forms work best not alone, but paired with other elements — stones, grasses, shadows. That’s when the sphere feels like part of the environment.
Some people lightly “age” them — brushing on diluted kefir or yogurt to encourage moss growth. Hypertufa is porous, and moss attaches more easily to rough surfaces.
5. Mini Fairy Garden Hypertufa Pots
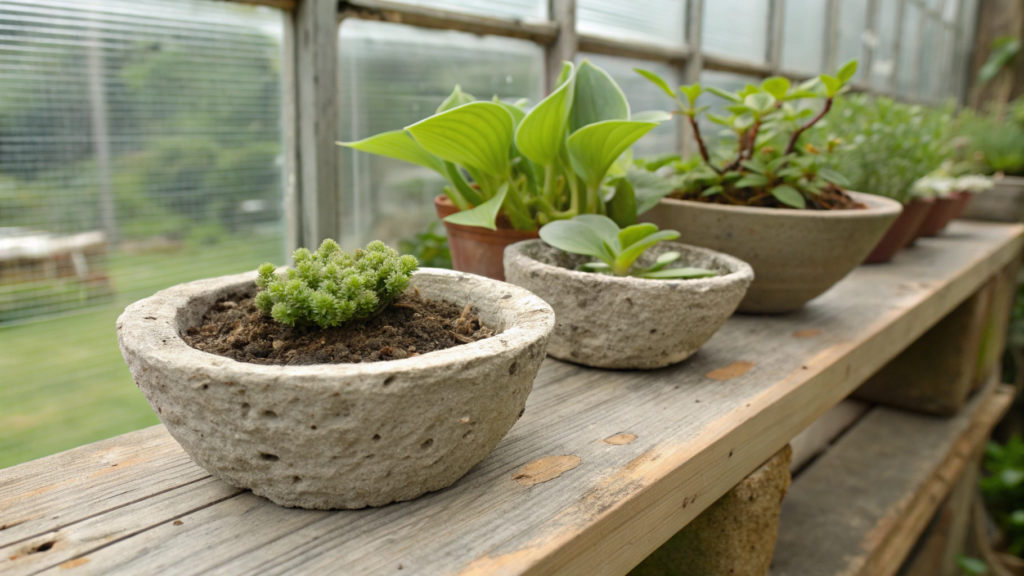
I first saw these tiny hypertufa pots at a friend’s place who grows moss and miniature ferns. They were sitting on a wooden shelf by the greenhouse. Small. Rough. In one — sedum. In another — a tiny hosta. They looked like old stone bowls found somewhere along a trail. Nothing overly whimsical, but that was the feeling.
Why the mini format works
Small pots behave differently. They:
- are perfect for succulents and sedums
- look especially good with moss
- fit naturally into alpine-style compositions
- can sit even on a narrow shelf
A good starter size is 4–6 inches (10–15 cm) in diameter, 3–4 inches (8–10 cm) high, with wall thickness of at least 0.75–1 inch (2–2.5 cm).
One pot usually weighs only 1–3 lb (0.5–1.3 kg). You can easily make several at once.
Materials
- Portland cement
- peat moss
- perlite
- small plastic containers or disposable cups
- plastic sheet
How to Make It
- Choose your molds
Plastic cups, yogurt containers, small bowls — all work. The outer mold should be slightly larger than the inner one so the walls come out even.
Before starting, grease both molds lightly with oil or spray release. Skip this and the pot may stick — and you’ll end up prying instead of lifting. - Form the base (not too thin, not brick-thick)
Add about 1 inch (2.5 cm) of mix to the bottom of the outer mold. Press it firmly with your fingers and level it.
If you want a more natural, “found stone” look, leave the bottom edge slightly uneven. But keep the base compact — it takes the most stress during moving and watering. - Insert the inner mold and secure it
Place the inner mold in the center and press lightly. It may try to float up, especially if the mix is wet. A simple trick: put a small stone or some sand inside as weight.
Then fill the space between the molds slowly. Add mix, press, adjust. Wall thickness should stay within 0.75–1 inch (2–2.5 cm). That’s strong enough without looking bulky. - Create drainage (this is essential)
While the mix is still wet, insert a stick or tube about 0.25 inch (6 mm) in diameter into the center of the base.
Don’t make the hole too small — it will clog. Don’t make it too large — soil will wash out.
After a few hours, when the mix holds shape but isn’t fully hard, remove the stick carefully. You’ll get a clean hole without cracks. - Add texture (this makes it look non-store-bought)
Lightly brush the outer surface with a damp sponge or stiff brush. Don’t aim for perfect smoothness. Keep it organic.
For a more stone-like look, gently press some peat fibers into the surface. Just lightly — too much and the edge can crumble. - Let it cure properly (no heat, no draft)
Cover everything with plastic and leave in shade for at least 24–48 hours. Then carefully remove the molds and let the pot continue curing for about 7 days.
For active watering and planting, it’s better to wait closer to 28 days, since cement gains strength gradually.
What to plant inside
In small pots, choose compact and low-maintenance plants. There isn’t much soil volume, so large or fast-growing species won’t work.
- Sedum acre — low-growing, dense, quickly covers the surface
- small Sempervivum — hold their shape and tolerate sun
- miniature ferns — if the pot stays in shade
- moss — especially in moist, low-sun areas
With mini formats, less is better. One clear accent looks stronger than several crowded plants.
After a couple of weeks, the pots feel noticeably sturdier and can be handled without worrying about hairline cracks. Before planting, rinse them with water and let them dry — that’s enough.
6. Mossy Hypertufa Rock Cluster Accents
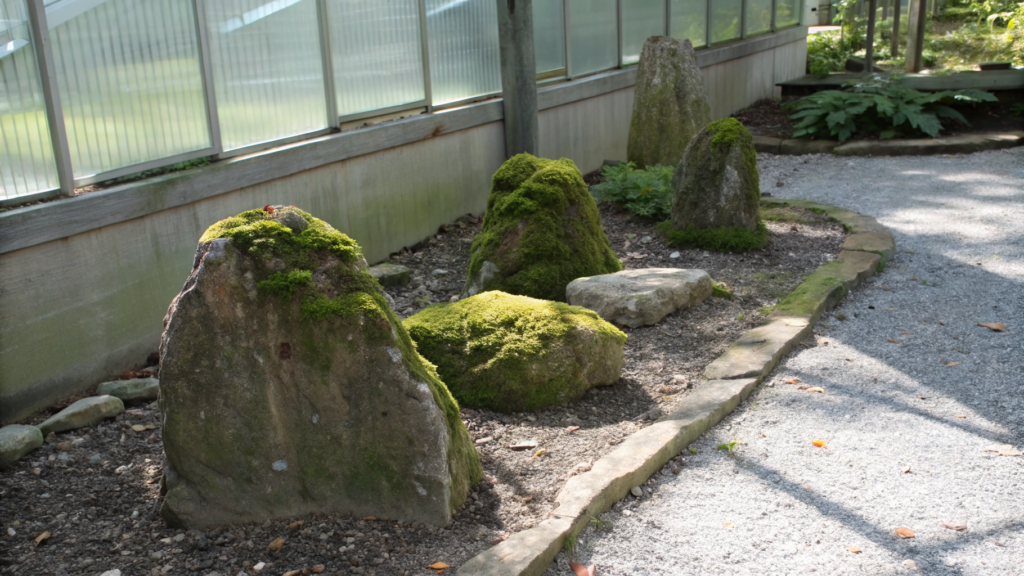
I really like a group of “stone” forms made from hypertufa. They look like a natural rock outcrop. Not a single decorative object, but a cluster. Several different-sized pieces gathered into one composition.
Our neighbors have a group like this in a shaded spot near their greenhouse. Three “rocks,” different heights, slightly sunk into gravel. Moss has already started to appear on them. No decoration. Just texture and shadow.
Why a cluster instead of one “stone”
One piece often looks decorative. A group of three to five forms starts to look like part of the landscape.
A good proportion:
- one larger “rock” about 14–18 inches (35–45 cm) in diameter
- one medium 10–12 inches (25–30 cm)
- one smaller 6–8 inches (15–20 cm)
Wall thickness — not less than 1.5 inches (4 cm). Each piece usually weighs between 8–20 lb (3.5–9 kg) depending on size.
Materials
- Portland cement
- peat moss
- perlite
- heavy plastic sheet
- gloves
How to Make It
- Shape the base carefully, not randomly
Build a damp sand mound in the size you need. If you want a “rock” about 10 inches (25 cm) tall, make the sand form slightly higher — the mix will settle a bit. The sand should be damp, not wet. If it’s too wet, the form will collapse. Cover it with heavy plastic so the hypertufa doesn’t stick. - First layer — bonding, not bulk
Press a layer of mix about 1 inch (2.5 cm) thick onto the plastic surface. This layer should follow the shape closely. Don’t try to build volume right away. If you add too much at once, it can slide down the sides. - Build thickness gradually
Once the first layer firms up (not sticky, but still soft), add more mix until you reach 1.5–2 inches (4–5 cm) thick. Work in small sections. If you notice the mix starting to slide, pause for 20–30 minutes and continue later.
For larger rocks (over 16 inches / 40 cm), you can place a piece of fiberglass mesh inside for reinforcement. - Keep the shape uneven — intentionally
Don’t make a perfect half-sphere. A slight shift of the center, one side a little higher — that makes it feel natural. But avoid thin spots. Minimum thickness anywhere should stay at 1.5 inches (4 cm) for strength. - Create texture while it’s still wet
While the mix is damp, lightly work it with your hands, a brush, or even crumpled fabric. Don’t smooth it out completely. Small dips and irregular edges will look like natural stone breaks later. Once it’s dry, texture is harder to change. - Cure in stages
Cover with plastic and leave in shade for at least 48 hours. Then gently flip the “rock” and remove the plastic underneath. Let it dry at least another 7–10 days.
Full cement strength develops around 28 days, so don’t place the cluster immediately in a high-traffic area and avoid dropping it.
Moss
Hypertufa has a porous surface, and moss attaches more easily to rough materials than to smooth concrete.
If the area is shaded and moist, moss will appear naturally over time. If not, simply place the cluster where there is less direct sun.
After installation
After a few weeks, the surface will begin to change — becoming more matte and slightly lighter. That’s normal. If the “rocks” sit firmly and don’t wobble, they won’t need much else. Just make sure water doesn’t pool underneath them during freezing weather.
7. Italian Herb Bowl Hypertufa Planter
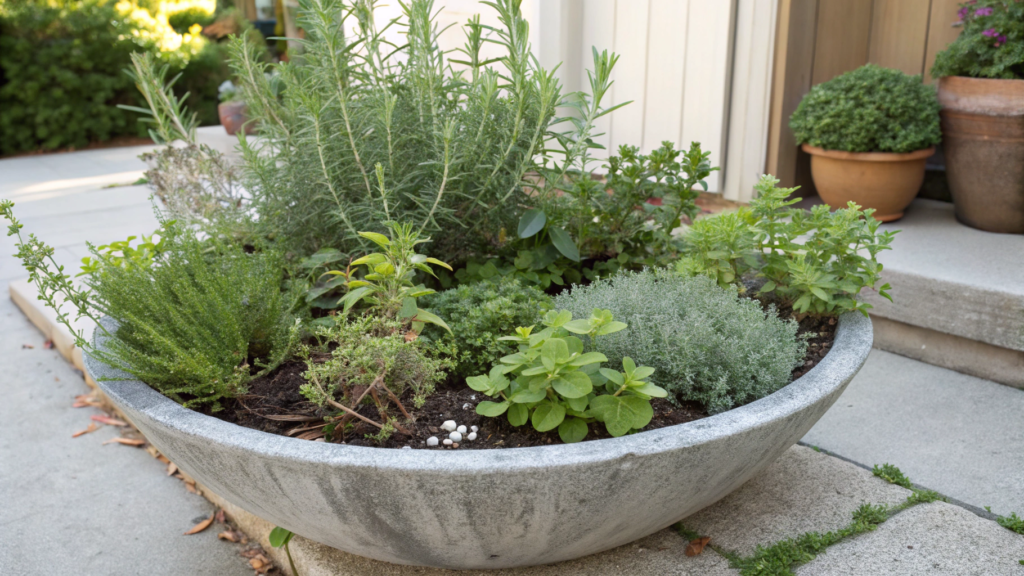
Have you seen a wide, shallow bowl where several Mediterranean herbs grow together? Not separately in pots — but together. Like a small edible island.
I saw a composition like this during a visit to a small private garden in Northern California. No decorative statues. Just a wide gray bowl, and inside — rosemary, thyme, oregano. You could smell it already from the path.
And that’s when it became clear that the bowl shape works better than a tall pot.
Why choose a bowl
A wide and shallow form gives herbs exactly what they need:
- good drainage
- faster soil warming
- a compact root zone
- stability in wind
For a first project, I’d recommend a diameter of 16–20 inches (40–50 cm), depth of 4–6 inches (10–15 cm), and wall thickness of at least 1.5 inches (4 cm).
An empty bowl weighs around 15–25 lb (7–11 kg). With soil, noticeably more.
Materials
- Portland cement
- peat moss
- perlite
- sand for shaping the dome
- plastic sheet
- wooden stick for drainage
How to Make It
- Shape the sand base
Build a damp sand dome about 18 inches (45 cm) in diameter and 4–5 inches (10–12 cm) high. The dome defines the bowl shape. Don’t make it too steep — herbs need a wide surface. - Apply the bonding layer
Cover the sand with plastic and add a layer of mix about 1 inch (2.5 cm) thick. Press it firmly by hand to follow the curve. This forms the base layer. - Build up the thickness
Add more mix until the walls reach 1.5–2 inches (4–5 cm) thick. Work gradually so the mass doesn’t slide downward. For larger bowls, you can add a piece of fiberglass mesh in the center for reinforcement. - Form the rim
The rim should not be thin. Keep it at least 1.5 inches (4 cm) thick. A slightly uneven edge looks more natural. - Create drainage
Insert a stick about 0.5 inch (1–1.2 cm) in diameter in the center of the bowl. After partial setting, remove it carefully to create a clean hole. - Cure properly
Cover with plastic for at least 48 hours. Then gently flip and remove the sand. Let the bowl dry another 7–10 days. For active use, it’s better to wait closer to 28 days.
What to Plant Inside
In a wide bowl, herbs with similar soil and watering needs work best. Mediterranean species do especially well in shallow, well-drained containers.
- Rosmarinus officinalis (rosemary) — place closer to the center; it spreads over time.
- Thymus vulgaris (thyme) — along the edges; it flows nicely over the rim.
- Origanum vulgare (oregano) — fills the space between.
- In summer, you can add some basil if the bowl stands in full sun.
The soil mix should be light and breathable — with added perlite or fine gravel. Herbs don’t tolerate standing water. Drainage and loose soil structure matter more than soil volume.
This kind of bowl works best where you actually use herbs — near the kitchen entrance, by an outdoor table, or next to the grill. Then it becomes part of daily cooking, not just decoration.
Three things matter: good drainage, light soil, and regular pruning. In a wide bowl, roots fill the space quickly, so once a season it’s good to thin or divide the plants slightly.
8. Geode Look Hypertufa Garden Art Slab
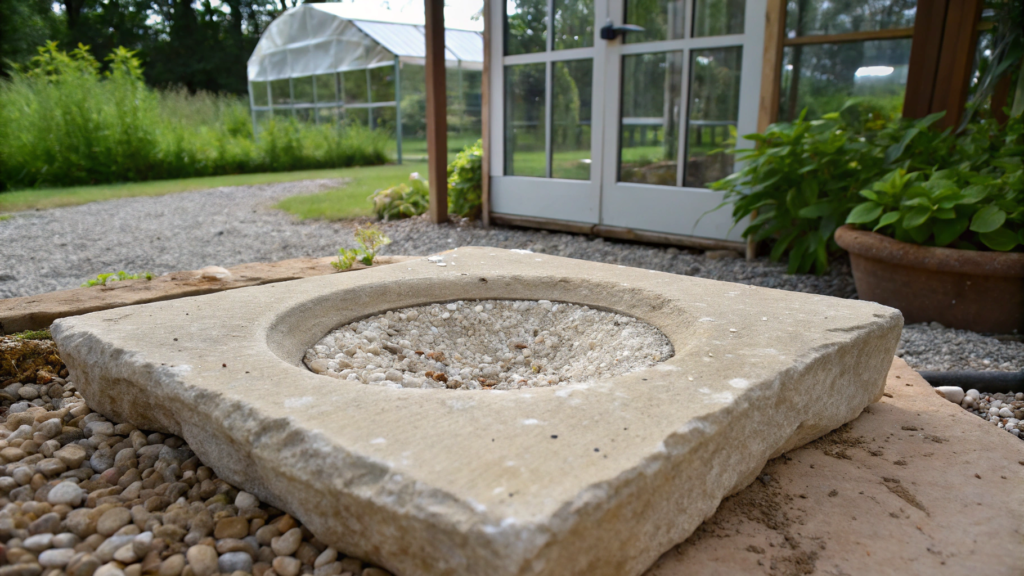
The idea here is simple — make a flat slab, but give it structure. The result isn’t shiny store-bought decor, but a matte, slightly rough surface with a shallow recess in the center.
I saw a slab like this in a small garden in Utah. It was placed near the greenhouse entrance, lightly dusted with gravel. In the center — a hollow filled with fine crushed stone. From a distance it looked like a natural fracture. Up close — hypertufa.
Why choose a slab
Unlike spheres or planters, a hypertufa slab works differently:
- it can lie on the ground as a decorative accent
- it can serve as a base under a pot
- it can become a step on a gravel path
- it doesn’t require excessive thickness
A practical size to start with is 18–24 inches (45–60 cm) long, 12–16 inches (30–40 cm) wide, and at least 1.5 inches (4 cm) thick.
Such a slab usually weighs around 20–35 lb (9–16 kg) depending on size and thickness.
Materials
- Portland cement
- peat moss
- perlite
- plastic sheet
- a piece of fiberglass mesh (for reinforcement)
How to Make It
- Prepare the base
Lay thick plastic on a flat surface. You can place plywood or a rigid plastic board underneath to keep the bottom even. Mark the approximate size of your slab. - Create the base layer
Spread the mix about 1 inch (2.5 cm) thick and level it by hand. Don’t make the edges perfectly straight — slight irregularity looks more natural. - Add reinforcement
If the slab is longer than 20 inches (50 cm), place a piece of fiberglass mesh in the center. This reduces cracking risk, especially if the slab sits on slightly uneven ground. - Build up thickness
Add more mix until the total thickness reaches at least 1.5 inches (4 cm). Keep the thickness even — thin spots can crack when moving the slab. - Create the “geode” center
While the mix is still damp, form a recess in the center about 0.5–1 inch (1–2.5 cm) deep. Make the edges uneven, as if the slab has split naturally.
Later you can fill this recess with small gravel, glass chips, or leave it empty for a raw fracture effect. - Cure properly
Cover with plastic for at least 48 hours. Then gently flip the slab and allow it to dry another 7–10 days. Full weight-bearing use is best after 28 days, since cement gains strength gradually.
Practical Use
This kind of slab can serve different purposes depending on what your garden needs.
- as a decorative step on a gravel path
- as a base under a large planter so it doesn’t sit directly on soil
- as the center element in a gravel circle
- as a calm accent among groundcover plants
The key is placing the slab on a firm, level base and avoiding voids underneath. That prevents shifting and cracking.
If the slab stays outdoors year-round, make sure water doesn’t pool underneath it. Water expands when frozen, and even durable hypertufa can crack under repeated freeze–thaw cycles.
This slab doesn’t require maintenance. No paint. No sealers. Just correct thickness and proper curing.
9. Shallow Bird Bath Hypertufa Basin
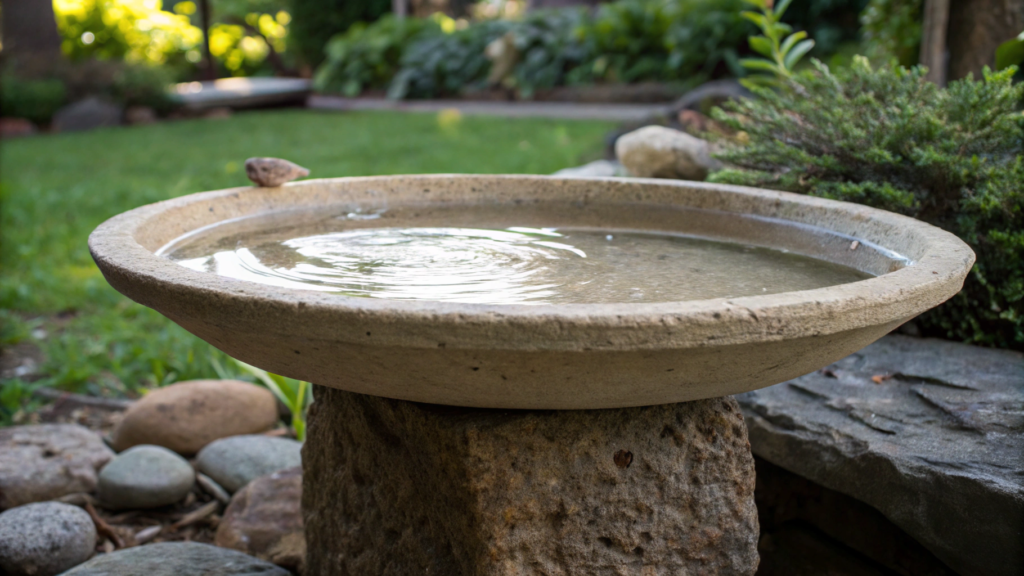
This shallow bird bath basin can be placed directly on the ground, on a stone base, or on a low pedestal. No columns, no classical shapes — just a wide plate of water.
Shallow, matte, slightly rough. Birds land on the rim without hesitation. And it becomes obvious right away — depth matters.
Why a shallow form
For birds, simple things matter:
- water depth of 1–2 inches (2.5–5 cm)
- a stable rim
- a rough surface so they don’t slip
- a slight slope at the bottom
A deep bowl doesn’t work. Birds bathe in shallow water.
For this project, a practical size is 18–22 inches (45–55 cm) in diameter, 2–3 inches (5–8 cm) deep, with wall thickness of at least 1.5 inches (4 cm).
An empty basin weighs around 20–30 lb (9–14 kg).
Materials
- Portland cement
- peat moss
- perlite
- sand for shaping the dome
- plastic sheet
How to Make It
- Shape a shallow sand dome
Build a wide, low mound of damp sand about 20 inches (50 cm) in diameter and no more than 3 inches (8 cm) high. The dome should be smooth, without sharp angles. It defines the bowl’s depth. - Cover with plastic and apply the first layer
Cover the sand with plastic so the mix doesn’t stick. Apply a layer about 1 inch (2.5 cm) thick, pressing it firmly into shape. Don’t add a thick layer right away — it can slide. - Build thickness and reinforce the rim
Add more mix until the total thickness reaches at least 1.5 inches (4 cm). Make the rim slightly thicker — birds will sit on it. The rim should not be sharp. Round it gently with your fingers. - Create a safe surface
While the mix is still wet, lightly brush the bottom with a stiff brush or sponge. The surface should stay rough so birds don’t slip. - Add a gentle slope toward the center
The bottom should not be perfectly flat. Create a slight slope so water collects in the center and is easier to refresh. - Cure properly
Cover with plastic for at least 48 hours. Then carefully flip the basin and remove the sand. Let it dry another 7–10 days. Full strength develops closer to 28 days.
Installation
Place the finished basin on a firm, level base — compacted soil, gravel, or a wide stone work well. If the ground is soft, the bowl may tilt over time, and water will collect on one side. Even a small tilt becomes noticeable — water shifts to the edge and birds avoid it.
If the basin stays outdoors year-round, make sure water doesn’t sit inside during freezing weather. Frozen water expands, and repeated freeze–thaw cycles can crack even durable hypertufa. In winter, empty the bowl and slightly elevate it so moisture doesn’t collect underneath.
One more detail: don’t place the basin too close to dense shrubs. Birds need visibility to feel safe. Choose an open area, but not far from cover.
10. Patina Washed Hypertufa Pots With Natural Texture
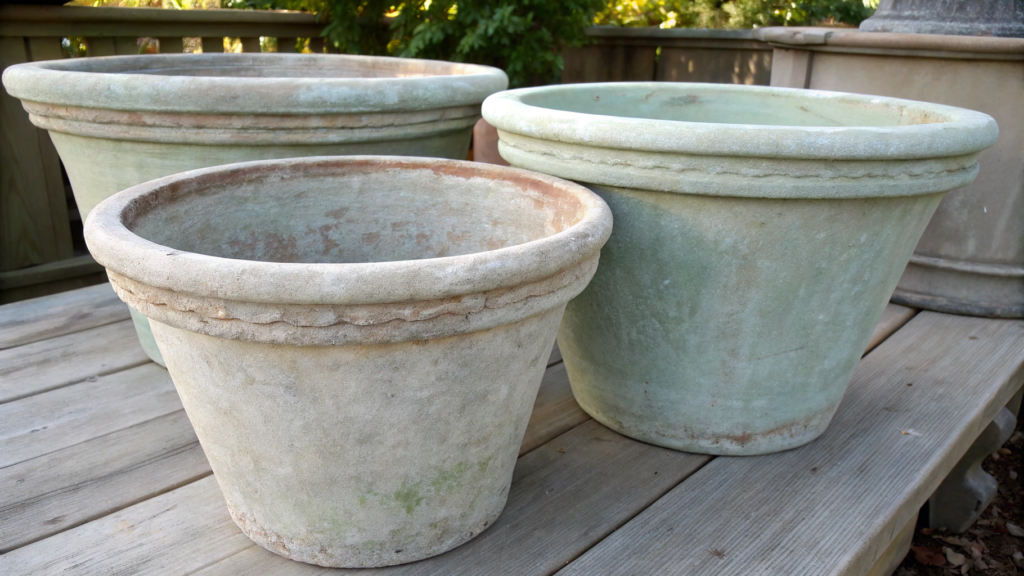
These hypertufa pots with a soft aged tone aren’t painted solid gray and aren’t sealed with glossy varnish. They’re lightly tinted, and the effect makes them look like they’ve been sitting in the garden for years.
Why patina works better than regular paint
Regular paint hides texture. Patina highlights it.
Hypertufa naturally has a rough, porous surface. If you fully coat it with thick paint, you lose depth. A light wash treatment allows you to:
- preserve natural texture
- add a soft tone
- visually age the piece
- make the color less harsh
Patina looks best on pots 10–16 inches (25–40 cm) in diameter with wall thickness of at least 1.5 inches (4 cm).
Materials
- fully cured hypertufa pot (ideally close to 28 days)
- water
- natural pigments or exterior acrylic paint
- sponge or wide brush
If using ready pigments, mineral oxides or diluted concrete-safe acrylic paint work well.
How to Make It
- Make sure the pot is fully cured
If the piece hasn’t cured long enough, the surface may still be too alkaline. Minimum 2–3 weeks after forming, better closer to 28 days. - Prepare the wash solution
Dilute the paint or pigment with water until it has the consistency of liquid milk. This matters. The mixture must stay semi-transparent. Thick paint will look like a solid coat. - Apply the first layer
Use a sponge or brush to cover the surface evenly. Don’t aim to cover everything perfectly. Let parts of the texture stay lighter. - Remove excess immediately
After 1–2 minutes, wipe the surface with a damp cloth, especially on raised areas. The color should remain in the recesses, while edges become lighter. - Add depth if needed
You can apply a second, even more diluted layer in a slightly different shade — soft gray-green or muted brown works well. But keep it subtle. Patina should stay thin. - Let it dry naturally
Leave the pot in shade for at least 24 hours. Don’t speed it up with heat or direct sun.
Which tones work best
Patina color should look like it developed naturally over time, not like it was brushed on in one evening. It’s better to lean toward tones you see outdoors — wet stone, old clay, moss-covered surfaces. These shades support texture instead of competing with it.
- soft gray-green
- muted olive
- warm gray-brown
- diluted charcoal
The key is transparency. A dense layer turns patina into regular paint. The goal here is different — keep the feeling of natural material, not new decoration.
From experience
Patina is a visual layer. It doesn’t replace protection. If the pot stays under constant rain, you can apply a breathable concrete sealer to extend durability.
Avoid glossy finishes — hypertufa looks better matte.
Hypertufa in the Garden
Hypertufa works because it doesn’t demand perfection. It allows uneven edges, slight asymmetry, visible hand marks. That’s what makes it feel natural outdoors.
I hope at least one project stood out to you. Write in the comments which one you’d start with.
I’m curious which option feels most practical for your own space.