Fall is the season when you want to bring a little extra warmth and bright accents into your home and yard. And the best way to achieve this is with homemade seasonal decor.
You don’t need to spend a fortune at stores: everything you need can be found in your garden, at a farm, or even at the local hardware shop. Pumpkins, hay, corn stalks, wooden crates, lanterns, and even dry leaves can all turn into eye-catching decorations that make your porch and yard feel alive.
In this article, you’ll find 10 ideas for outdoor fall décor. Each project is simple, full of atmosphere, and can be done in an evening while enjoying the process with your family.
1. Pumpkin Tower Porch Display

Instead of just placing pumpkins by the door, try making a pumpkin tower — a striking decoration that instantly grabs attention from neighbors and guests.
I tried this option for the first time about five years ago. Lindy brought home three huge orange pumpkins from the store, and we ended up stacking our very first tower. It turned out so sturdy and festive that it quickly became a yearly tradition.
How to Make a Pumpkin Tower
- Choosing pumpkins. For the tower, you’ll need 3–4 pumpkins of different sizes. It’s better to choose sturdy varieties with flat bottoms and tops — they stack much easier. Classic Jack-o’-Lanterns (around 10–15 lbs each, or 4.5–7 kg) work perfectly. Add in some decorative types — white or striped — to break up the orange color.
- Base. The tower should sit on something strong. We usually use a large ceramic planter or a wooden bucket (about 18–20 inches / 45–50 cm in diameter). Fill the bottom with a bit of sand or stones — this adds weight and keeps the whole thing stable in the wind.
- Stacking. Place the largest pumpkin at the bottom. Put the medium one on top. Finish with the smallest pumpkin at the very top. To keep them from slipping, slide in a strip of non-slip mat (like a piece from an old bathroom rug) between each layer.
- Decorating. Fill the spaces between pumpkins with dry leaves, artificial berries, or even a string of battery-powered lights. At night, it looks absolutely stunning.
Tips from Experience for Fall Decorations
- To make the tower last longer, don’t carve the pumpkins — keep them whole. This way, they’ll stay fresh for 6–8 weeks.
- For extra stability, spray stems and surfaces with clear acrylic spray. It creates a thin protective layer against moisture.
- For more impact, don’t stop at one tower. Place a pair — one on each side of the porch.
This kind of Pumpkin Tower Porch Display is both simple and impressive. Every year, we notice neighbors slowing down by our yard just to take a closer look at the towers. And honestly, that’s the best compliment for any home-loving permaculture fan.
2. Hay Bale and Scarecrow Corner
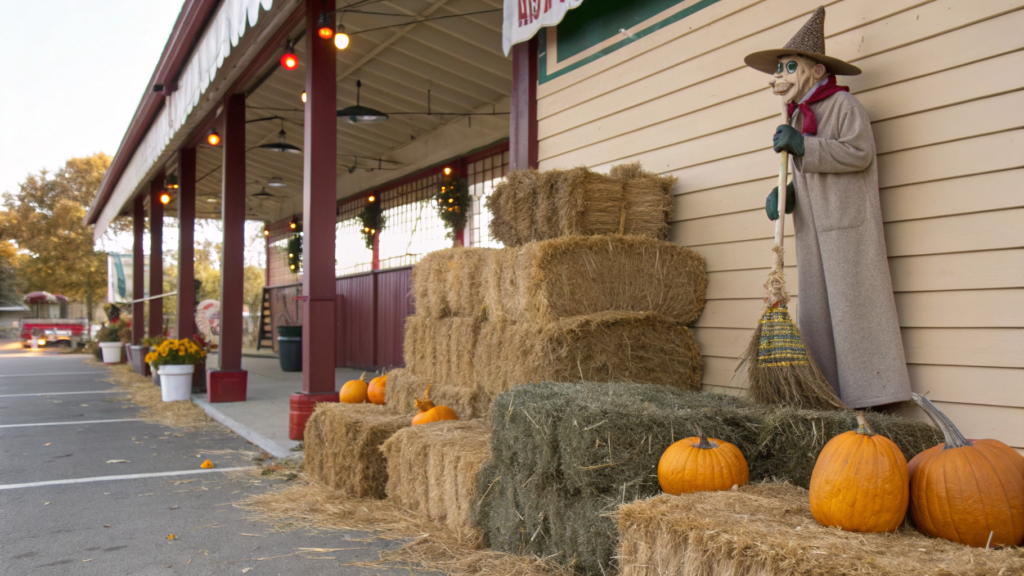
If you’ve ever been to an American fall decorations fair, you’ve probably seen those corners with hay bales and scarecrows. A bit of rustic charm, the smell of dry grass, the vibe of harvest season… and the best part is that you can easily bring this atmosphere right to your own home.
Getting Started
- Hay bale or straw bale. A standard rectangular bale weighs about 40–50 lbs (18–22 kg) and usually measures 36 x 18 x 14 inches (90 × 45 × 35 cm). You can find them at local farms or garden centers. And if you don’t have farm connections, you can order a Decorative Straw Bale on Amazon.
- Scarecrow. This is where you can get creative. Our first scarecrow was made from an old pair of jeans and a plaid shirt stuffed with straw, sitting proudly next to pumpkins. Nowadays, you’ll find plenty of ready-made options — cute, slightly cartoonish figures with friendly faces.
- Placement. Put the bale near your porch entrance or in a corner of the yard so it becomes the “stage” for the whole setup. Add a pot of mums or a basket of apples on top of the bale. Place the scarecrow beside it, leaning casually against the wall or fence for a natural look.
Details That Set the Mood
- Add a couple of mini decorative pumpkins or colorful squashes. White pumpkins mixed with orange ones create a striking contrast.
- Lay a plaid blanket across the bale — it brings warmth and texture, making the whole scene feel more inviting.
- Hang an old metal lantern or place a bucket with a candle inside next to the bale. In the evening, this little corner comes alive in a completely new way.
Pro Tip. If you don’t want the straw flying all over the yard, wrap the bale with transparent garden netting. It’s barely visible but keeps everything in place, even on windy days.
Hay Bale and Scarecrow Corner is a cozy fall scene for your home. Every time you walk past it, you’ll feel like you’ve stepped into a countryside fair — even if you live right in the middle of the city.
3. Painted Wooden Crates With Fall Produce

When we first moved to Idaho, we didn’t have much proper storage furniture. And guess what we used instead? That’s right — wooden crates! At first, they were inside the house, but soon they moved onto the porch and became a big part of our seasonal décor.
Prepping the Crates
- Choosing the base. Standard wooden crates work perfectly, about 18 x 12 x 9 inches (45 × 30 × 23 cm). You can find them at flea markets or buy new ones online.
- Painting. To make them pop and blend with fall colors, use matte acrylic paint in warm burgundy, mustard yellow, or deep green. Sometimes we leave part of the wood unpainted to create a vintage look.
Tip. If you use the “dry brush” technique, the paint goes on unevenly and gives a stylish distressed finish. - Sealing. Don’t forget to coat the surface with clear outdoor varnish. That way, the crates will hold up all season even in the open air.
Filling — the Heart of the Display
- Apples and pears. Place them in a basket and tuck it inside the crate. Their natural colors create a vibrant focal point.
- Squash and pattypan. Their unique shapes add playfulness to the setup.
- Mini pumpkins. They always deliver that strong fall vibe.
- Bundles of corn cobs. The dried husks add beautiful texture and depth.
We usually combine items so that each crate has three layers of color: something orange (pumpkins), something green (squash), and something warm red or yellow (apples or corn).
You can also stack crates to build a “staircase” effect: light fruits on top, heavier veggies on the bottom. Sometimes we flip one crate on its side and place a flower pot inside — it creates a dynamic display that looks intentionally casual.
Painted Wooden Crates With Fall Produce are a simple but stunning way to turn everyday fall harvest into outdoor décor. And the best part? In spring, the same crates can easily double as seed-starting containers for flowers and herbs!
4. String Light and Lantern Combo
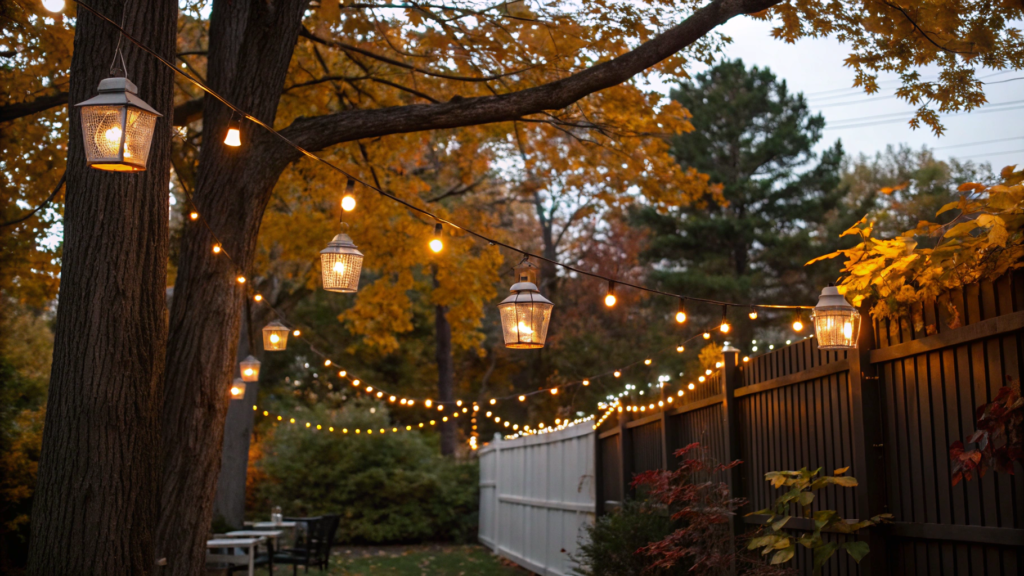
In fall, light plays a special role. Days get shorter, evenings cooler, and that’s when string lights and lanterns really shine. Even a simple strand of bulbs can turn an ordinary evening into a small celebration.
Getting Started to create this Fall Decorations
- String lights. Outdoor string lights with G40 or Edison-style bulbs work best. They give off a soft but bright enough glow. A length of 25–50 feet (7–15 m) is usually perfect for wrapping porch railings or stretching along a fence. We use Globe String Lights, and they’ve lasted three seasons already without a hitch.
- Lanterns. Go for metal or wooden outdoor lanterns that you can place on porch steps or hang from hooks. They look especially cozy with LED candles on batteries — no hassle with open flames, but the effect is just as beautiful.
A Note on Safety
Electricity outdoors always requires care. Always choose string lights labeled outdoor use, stick with extension cords rated for outdoor work, and don’t overload outlets. If you’re using lanterns with real candles, keep them in protective glass covers and never leave them unattended. For maximum peace of mind, use LED versions — the glow is lovely, and there’s no risk of open flames near straw or dry leaves.
How to Combine Them
Picture this: a strand of warm lights draped along your porch railing, wrapping around the corner of the house, and finishing at an old apple tree. The glow falls in gentle waves, highlighting every detail. Now bring in the lanterns — don’t just “set and forget,” but play with different levels. One on the steps, another on a low table, a third hanging by the door.
String Light and Lantern Combo is a quick and powerful way to transform your porch into an outdoor fall lounge. Hang them up once, and you’ll wonder how you ever spent evenings without them.
5. Rustic Wagon Wheel Decor
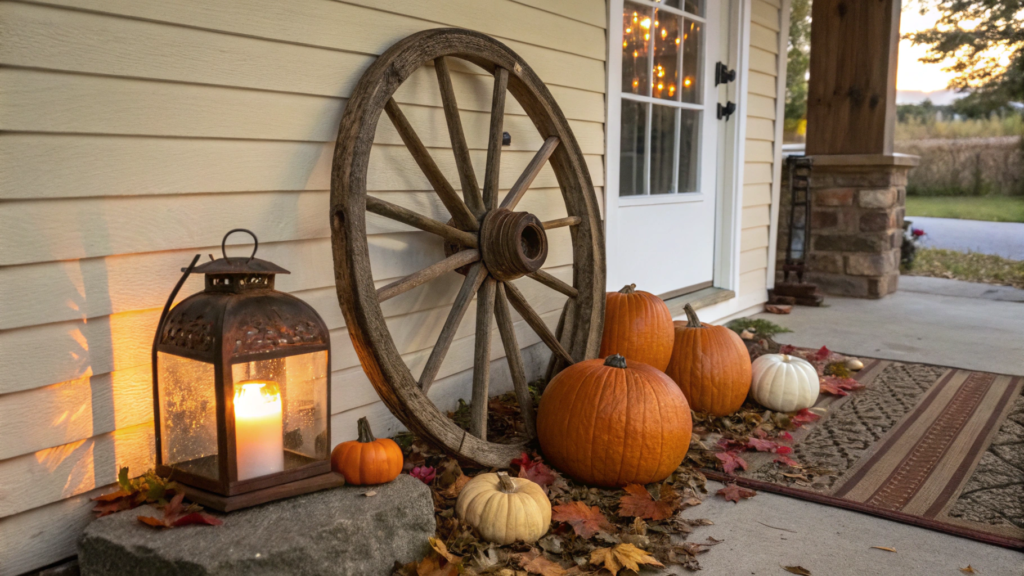
A rustic wagon wheel may look simple, but it’s such a striking detail that it can set the tone for your entire fall display on the porch or in the yard. We found our first wheel at a garage sale for $20 — it looked like useless junk. But once we placed it by a pile of pumpkins and lit it with a lantern, the whole yard was instantly transformed.
Where to Find a Wheel
- Farmers’ markets and flea markets are the best places to dig up an authentic vintage wheel.
- If you’re less lucky, order a replica like a Decorative Rustic Wagon Wheel. These usually measure 24–36 inches (60–90 cm) in diameter, are lightweight, and easier to hang or move around.
How to Use in Décor
- Prepping the wheel. If you’ve got a real vintage wheel, make sure to clean it thoroughly first. We usually scrub with a stiff brush to remove dirt and rust. Wooden parts can be lightly sanded and sealed with clear outdoor varnish to prevent decay and withstand rain. For metal parts, use an anti-rust spray. This not only extends its life but also makes it safe to use near the home.
- Backdrop for a display. Place the wheel against a wall or fence, then arrange pumpkins, baskets of apples, and pots of mums in front. The wheel acts as a frame, adding depth to the whole scene.
- Vertical accent. Hang the wheel on a porch wall or shed. We once mounted one by the door and strung string lights through the spokes — it turned into a unique glowing “sun.”
- Pairing with natural elements. A wheel looks perfect alongside dried corn stalks, straw, and wooden crates. Together they create the look of an old farmstead, even in the middle of a suburban neighborhood.
Pro Tip. If the wheel is authentic, it can be heavy (20–30 lbs / 9–13 kg). Always secure it firmly if you plan to hang it. If you’re using it on the ground, set it in a way that prevents it from rolling off steps.
Rustic Wagon Wheel Decor is a statement piece for fall decorating. It immediately draws attention, adds historic character, and works both by day and at night. Most importantly, it reminds you of your connection to the land and traditions — even in a modern home.
6. DIY Corn Husk Bunting
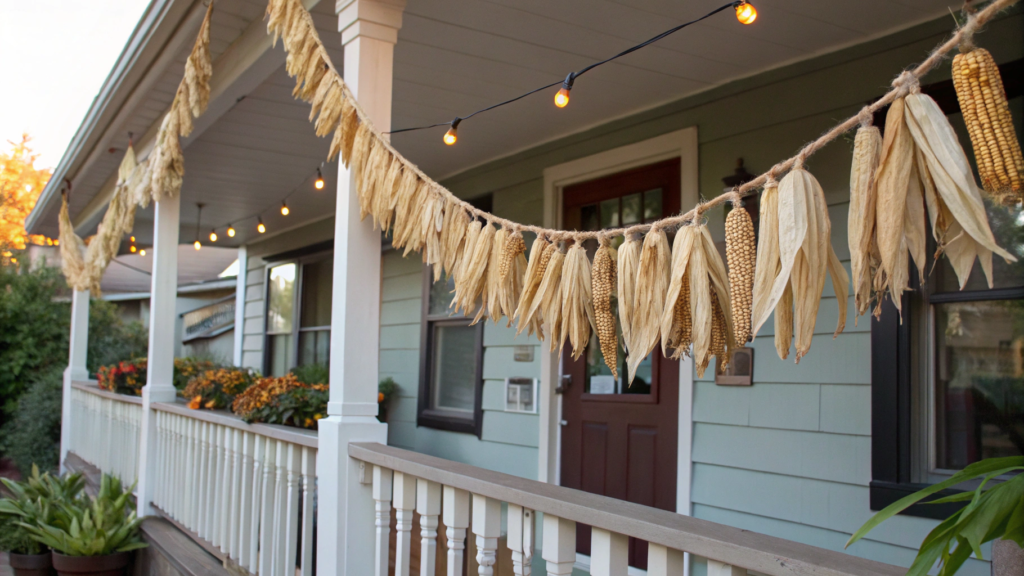
Every fall, farmers leave behind piles of corn husks after harvest — but they can be turned into beautiful seasonal décor. One of the easiest and most stunning ideas is to make a corn husk bunting for the porch.
What You’ll Need for this Fall Decorations
- Dried corn husks — about 40–50 pieces for a garland 6–8 feet long (1.8–2.5 m).
- Strong twine or jute string (natural jute works best).
- Hot glue gun or thin wire for securing.
- Optional: decorative accents like foam mini pumpkins, pinecones, or faux berries.
How to Make
- Prep the husks. If the husks are fresh, dry them indoors for 3–5 days. Once they’re dry and brittle, soak them in warm water for 10–15 minutes so they become flexible again. Sort them afterward: large husks for the base, smaller ones as fillers.
- Assemble the bunting. Tie off one end of your twine. Start layering husks in pairs, slightly overlapping them to create volume. Secure each pair with wire or a drop of glue. Continue until you reach the desired length.
- Add accents. Slip in mini corn cobs, small decorative pumpkins, or pinecones between the husks. For extra charm, tuck in a strand of battery-powered fairy lights — the garland will softly glow at night.
On the porch railing or framing the front door, the bunting instantly sets a festive tone. It also looks great on a wooden fence or along a gazebo or pergola. Under soft evening light, the husks seem almost alive.
Pro Tip. If the bunting will hang outside, spray the husks with clear acrylic sealer. This protects them from moisture and extends their lifespan. Also, make the bunting slightly longer than needed — the natural drape adds to its charm.
DIY Corn Husk Bunting is a budget-friendly and eco-friendly fall decoration you can finish in just one evening. It’s the perfect example of turning leftover harvest scraps into seasonal beauty.
7. Potted Mums in Painted Tins
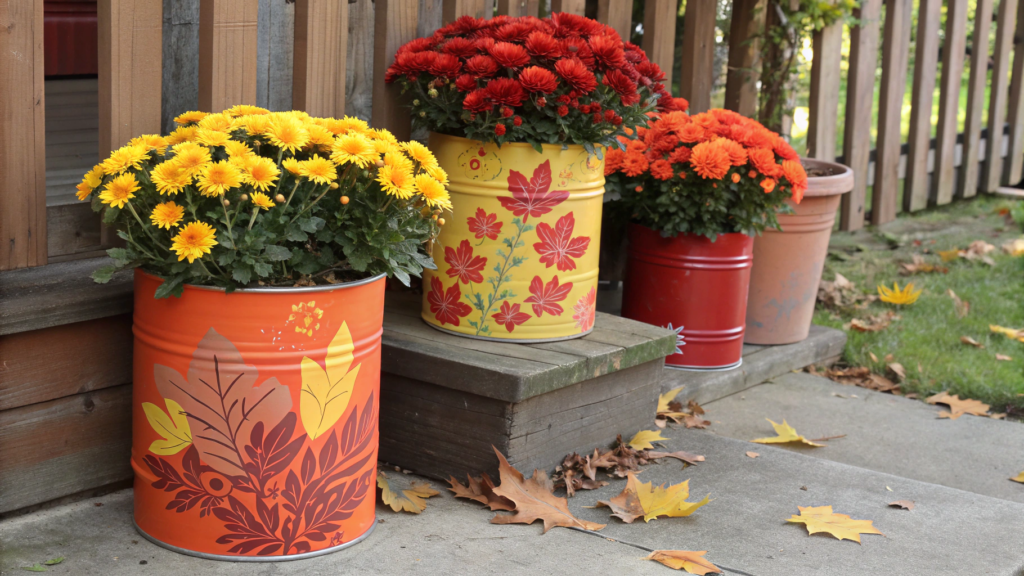
I can’t imagine fall without chrysanthemums. These bright, resilient flowers feel like they were made to decorate porches and yards. Every year, Lindy and I buy a couple of pots, but leaving them in plain plastic containers just isn’t fun.
That’s why I started collecting tin cans and buckets, painting them, and turning them into planters for our favorite autumn blooms.
What You’ll Need
- Tin cans or metal buckets — anything from large food cans to 1-gallon (3.8 L) pails.
- Paint — acrylic or spray paint for outdoor use. Warm shades like terracotta, dark green, or burgundy look stunning.
- Potted mums — usually sold in containers 8–12 inches (20–30 cm) in diameter.
- Drill or hammer and nail — for drainage holes.
How to Make this Fall Decorations
- Clean the cans. Remove all labels first. If the glue is stubborn, soak the cans in warm water with baking soda and scrub with a stiff sponge. A clean surface means smoother paint and longer-lasting color.
- Make drainage. Punch 3–4 small holes in the bottom using a drill or a hammer and nail. This allows excess water to drain so the mum roots don’t rot.
- Paint the cans. Work outside or in the garage. Apply two thin coats for a rich, even finish without drips. I love mixing colors — burgundy next to deep green always stands out beautifully. For a vintage vibe, use the dry-brush technique so a bit of metal peeks through.
- Seal the surface. Once the paint is dry, spray on clear outdoor acrylic sealer. It only takes a few minutes, but it keeps rust away and makes the cans last through rain.
- Plant the flowers. Drop the mum pot right into the can. If it’s smaller than the tin, add straw or stones at the bottom to raise it up. That way, the blooms look fuller and sit higher.
We usually place our painted tins of mums right by the porch steps, greeting guests with a burst of color.
A cluster of them by the front door creates a festive focal point. And lining them along the pathway? In the evening, with lanterns nearby, the flowers almost seem to glow on their own.
Potted Mums in Painted Tins are a budget-friendly and creative solution that can brighten any porch or yard. Quick to make, yet they look like a designer project.
8. Outdoor Pumpkin Candle Pathway
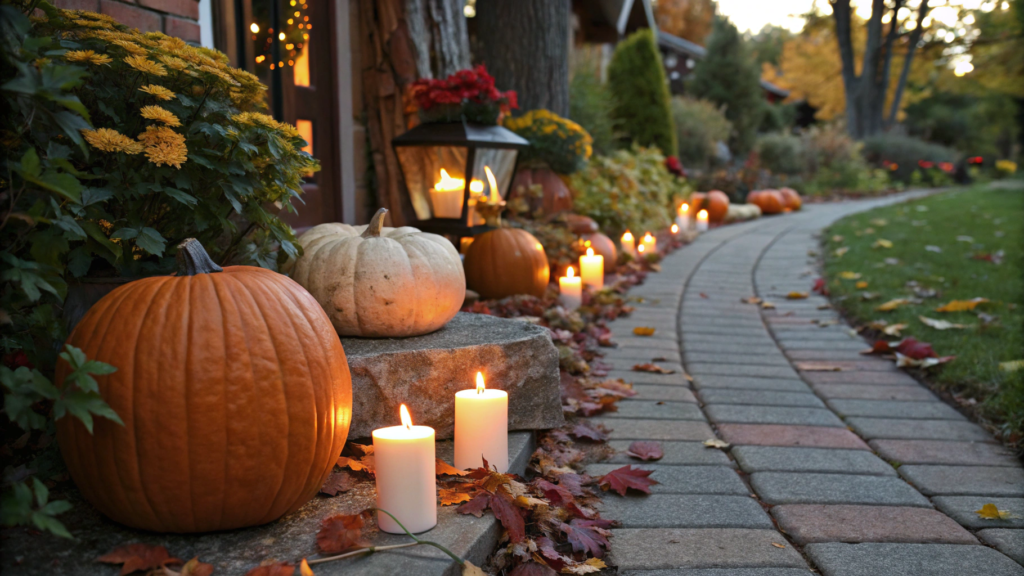
In fall, the pumpkin becomes true outdoor décor. A candle-lit pumpkin pathway is one of the simplest yet most striking ways to highlight your porch or garden walkway. During the day, the pumpkins blend into the seasonal setup, and by evening they glow, creating a warm, inviting atmosphere.
What You’ll Need
- Pumpkins — about 6–10 medium ones (8–12 inches / 20–30 cm in diameter).
- Knife and spoon — for cutting openings and scooping out the inside.
- Jar candles or LED candles — for safety, LED is best, especially with kids or hay around.
- Gloves — to protect your hands while scooping.
- Optional: decorative accents like pinecones, leaves, or mini pumpkins.
How to Make this Fall Decorations
- Choose and prep pumpkins. Go for firm pumpkins with thick skins. They last longer without rotting. Wipe the surface with a damp cloth before carving. To extend life, brush the cut edges with a diluted bleach solution (1 tbsp per 1 quart of water).
- Cut the openings. Slice off the top or cut a neat circular hole. Use a sharp knife for clean lines. Scoop out the seeds and flesh with a spoon, leaving about 1 inch (2–3 cm) thick walls to help the pumpkin hold its shape.
- Add the candles. The easiest method is jar candles — they’re windproof and stable. For hassle-free décor, use Flameless LED Candles. They look just like real ones but are far safer.
- Arrange along the path. Place pumpkins 2–3 feet (60–90 cm) apart. On longer walkways, mix in one large glowing pumpkin with smaller decorative ones for contrast.
- Add final touches. Scatter dry leaves or tuck in bundles of corn stalks between pumpkins. Small lanterns placed nearby create a layered, textured look.
A pumpkin candle pathway works beautifully at the porch entrance or along a garden walkway. By the fence, pumpkins highlight autumn leaves, and by the steps, the glowing path feels like it leads straight into the home.
Pro Tip. To keep pumpkins fresh longer, rub the cut edges with petroleum jelly or vegetable oil. It slows down drying. And whenever possible, stick with LED candles — they’ve become a must-have for safe, realistic lighting.
9. Leaf Pile Scarecrow Setup
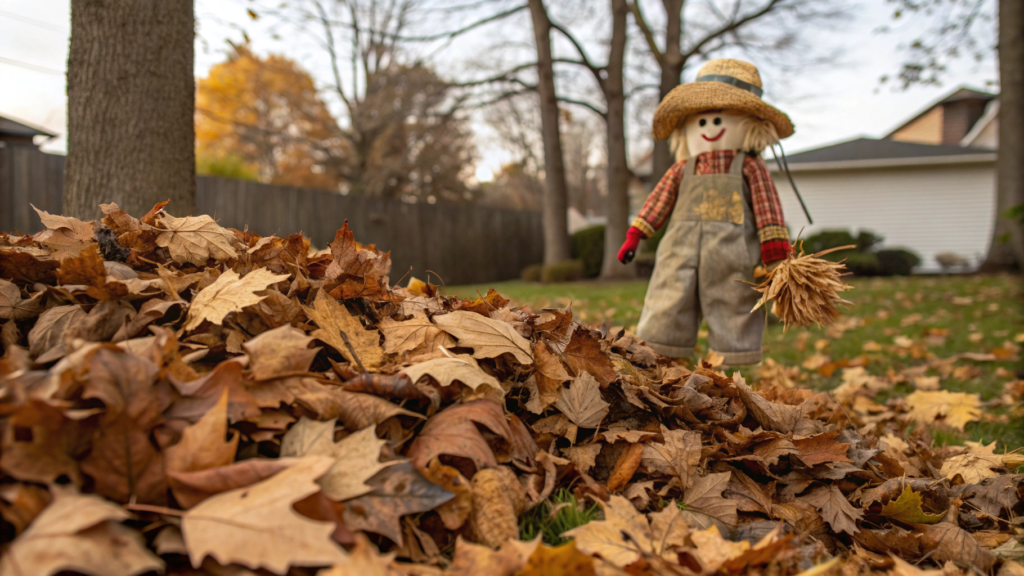
A pile of dry autumn leaves and a scarecrow is a combo that instantly brings back childhood: the rustle of leaves, backyard games, and that bittersweet feeling of the season’s end. And the best part? You can set up this corner in just about an hour.
What You’ll Need
- Leaves — raked into one big pile. Oak or maple are best since they’re dense and hold their shape longer.
- Clothes for the scarecrow — old shirt, jeans, and a hat.
- Stuffing — straw, hay, or even the leaves themselves.
- Sticks or a wooden cross frame — for the scarecrow base.
- Optional: decor accents like a lantern, bucket of apples, or pumpkins.
How to Make this Fall Decorations
- Rake the leaves. Use a rake or blower to gather them into a pile about 4 ft wide and 2–3 ft tall (120 × 60–90 cm). Make sure they’re dry, otherwise the structure will collapse.
- Build the scarecrow. Cross two sticks into a frame, dress it in a shirt and jeans, and stuff with straw or leaves until it holds shape. A hat or scarf adds personality. For the head, use burlap or an old pillowcase with a face drawn on.
- Seat the scarecrow. Place it so it looks like it’s sitting in the pile — or just jumped in. Pull some leaves up around the body to blend it in naturally.
- Add details. Surround with pumpkins, a bucket of apples, or a lantern. At night, the soft glow makes the whole scene feel warm and festive.
This display looks best by the walkway or near a fence line. In sunlight, the leaves glow golden, and in the evening, the setup turns into a cozy, storybook-like corner.
Pro Tip. To keep leaves from blowing away, mist them lightly with water or weigh down the edges with a couple of rocks. For the scarecrow, choose sturdy fabrics like denim or cotton — they hold shape better and look more natural.
Leaf Pile Scarecrow Setup is a budget-friendly, fun way to decorate the yard. Here it’s not about perfection — it’s about a lively, seasonal atmosphere.
10. Front Door Cornstalk Bundle
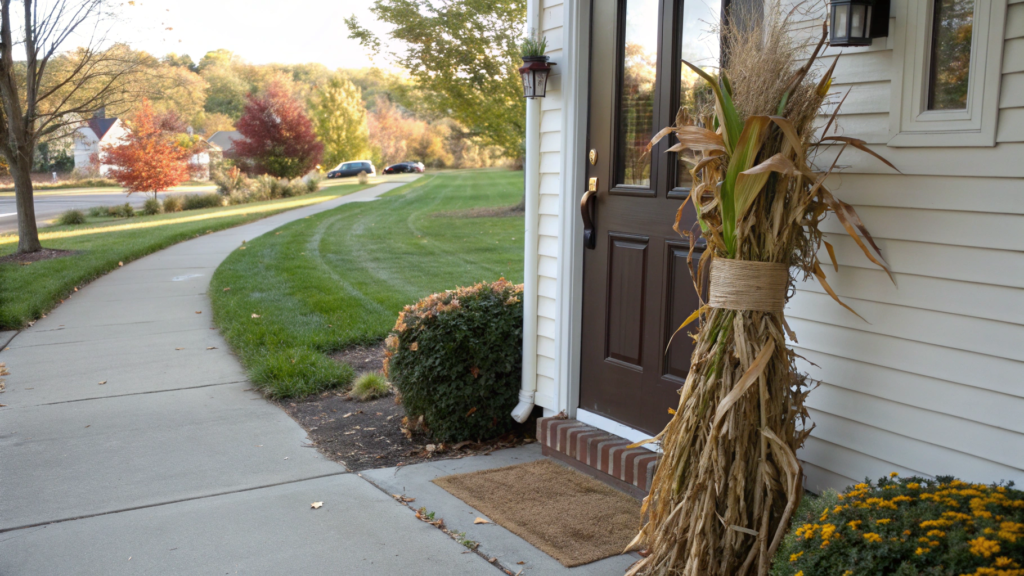
In fall, a bundle of cornstalks by the front door creates a vertical accent that looks festive while staying completely natural. You’ll often see this trick on farmyards, but it’s just as effective in a suburban neighborhood.
What You’ll Need
- Cornstalks — 8–12 medium ones, about 6–8 feet (1.8–2.5 m) tall.
- Twine or jute rope — for tying.
- Scissors or pruners — to trim the base.
- Optional: decorative accents like ribbons, garlands, or mini pumpkins.
How to Make this Fall Decorations
- Gather the stalks. Cut them at the base, cleaning off soil and dry roots. Leave some of the leaves attached — they add texture.
- Form the bundle. Group the stalks together into a “fan.” Trim the bottoms even, but let the tops stay uneven — it looks more natural.
- Tie securely. Wrap the bundle with twine about 2–3 feet (60–90 cm) from the bottom. Pull tighter than you think you need — stalks shrink as they dry.
- Decorate. Add a wide ribbon in autumn tones, a small bouquet of dried flowers, or even a mini pumpkin garland. This little touch makes the bundle more polished and welcoming.
A pair of cornstalk bundles looks best flanking the front door. On wide porches, add two more near the steps to form a corn “arch.” They immediately give the entrance a festive and inviting look.
Pro Tip. If wind is an issue, secure the bundle to a wall or railing with thin wire. It’s barely visible but very sturdy. In rainy climates, spray stalks with clear outdoor acrylic sealer to keep their color and shape longer.
Fall Spirit
Fall décor isn’t about perfect catalog pictures — it’s about the feeling you create at home. Some people love symmetry, others prefer a touch of playful imperfection. Either way, these ideas help turn your porch or yard into a place that feels welcoming at the end of the day.
Everyone has their own little rituals: a basket of apples by the door, pressed leaves saved for a scrapbook, or even just one simple garland that marks the season’s arrival.
And now I’d love to hear from you: what are your fall traditions for decorating your porch or yard? Share in the comments — your stories are what truly inspire!