
A TV is naturally strict, “cold” tech with sharp geometry, and if you leave it without any support, the whole wall starts to look either empty or, on the contrary, way too heavy. I started to experiment — little by little, nothing dramatic. With candlesticks, with frames… and one by one the elements started to fall into place.
A TV wall is just as much a part of the interior as any other corner of the house — it just needs a bit more attention. And if you use the right tricks, it stops being a technical blot and turns into a stylish, very lively piece of the room.
Here I’ve gathered ideas that worked best for us, for our friends, and even in a few projects where we helped with styling. Everything is simple, accessible and totally doable in a regular home — no major remodels or complicated solutions. They work just as well on a simple TV wall as they do when the screen hangs above the mantel, so you can use these ideas in any setup.
1. Balancing Screen and Decor Accents

When the TV takes over the main wall, your eyes keep getting pulled upward, the rectangle of the screen becomes the only focus point, and everything around it seems to just disappear. We had almost the same thing happen in the PNW: we hung the new screen, stepped back — and the feeling was… well, you know. Something felt off.
Sometimes one long object is enough, sometimes a bit of asymmetry — and suddenly the interaction between the screen and the decor starts to work.
What to Keep in Mind
There’s no universal formula here, but there are a few things that consistently help pull the space together:
- The screen shouldn’t be the only large object on the wall.
Otherwise it eats up the sense of scale. - You need horizontal visual balance.
Elongated pieces under the TV or on the sides give your eye something to rest on. - Asymmetry makes the wall feel more alive.
Two perfectly identical objects on both sides are boring. One tall + one low is already more interesting. - You need a soft transition between tech and decor.
A small plant, a candlestick, a stack of books — something that connects the different levels. - The height of the objects matters.
If everything is too low, the screen grabs all the attention again.
When these things come together, the wall doesn’t need much decor — even two or three objects create structure.
How to Do It
- Create a horizontal base.
A media console, a narrow sideboard, or a long wooden tray about 36″ (90 cm). This is the support line that brings the overall balance back. - Add an asymmetric pair of objects.
For example, a vase 16–18″ (40–45 cm) high on one side and a low decorative box on the other.
The main thing is that one object “pulls” and the other “calms things down.” - Use a couple of horizontally oriented pieces.
Candlesticks, a stack of books, a flat ceramic plate — anything that visually balances the vertical feel of the TV. - Bring in a small transition piece closer to the lower edge of the screen.
A small plant 6–8″ (15–20 cm) tall does a great job softening the border between the screen and the decor below. - Check the result not only from straight on but also from the side.
Sometimes from an angle you can see that the composition is “tilting” — and it’s enough to move an object just a couple of inches for everything to fall into place.
And the most interesting part is how differently all of this works in different styles. In a more modern interior, balance is built on clean lines and a couple of precise accents.
In homes with a warm, homey feel, it’s usually the opposite — you want a few more layers, a bit of texture, a bit more life. And every time, the wall with the TV turns into a small puzzle that you can solve in a dozen different ways.
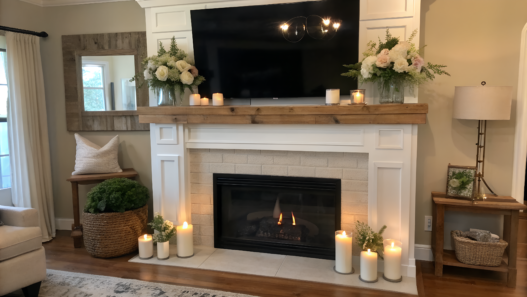
All these techniques work just as well when the TV is placed above the mantel. The right balance of lines and accents helps connect the fireplace area and the screen into one cohesive, harmonious composition.
2. Choosing Slim Candlesticks Around the TV
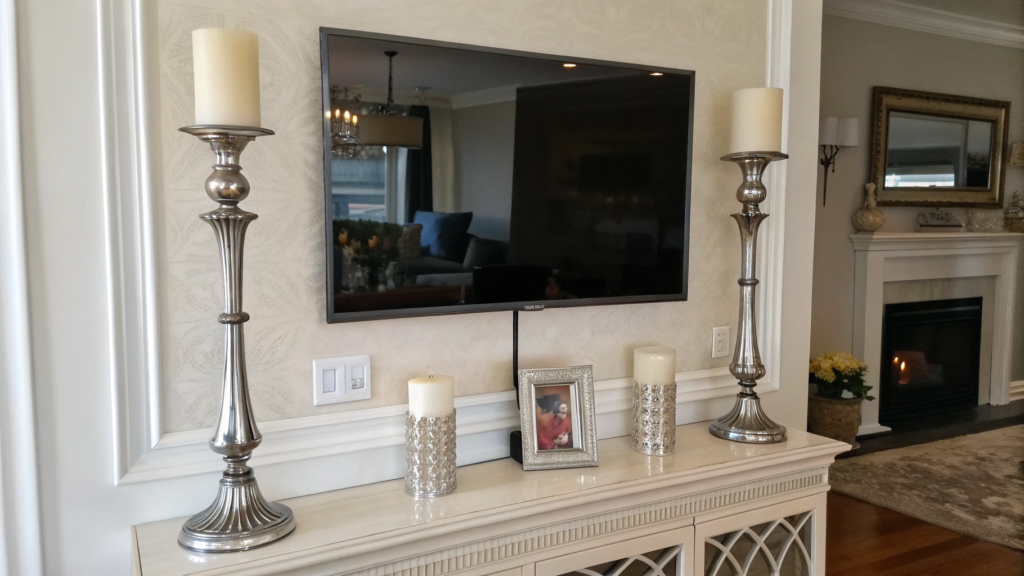
There’s a very simple way to bring more life to a TV wall — add slim candlesticks. They create soft vertical lines and help connect the tech with the rest of the decor, especially when the space looks empty or too stretched. We’ve returned to this trick many times: you place a pair of candlesticks — and suddenly the room feels calmer, more even, more collected.
What You’ll Need
- Slim candlesticks about 14–18″ (35–45 cm) tall
- Taper candles 10–12″ (25–30 cm)
- A small balancing object: a 6–8″ (15–20 cm) plant, a mini vase, or a decorative box
- A surface: console, shelf, sideboard — any grounding line under the TV
Elegant brass versions like the Brass Slim Taper Candle Holders on Amazon work beautifully: thin silhouette, stable base, clean shape
How to Do It
- Choose the spot for your candlesticks.
Look at the whole wall: candlesticks work best where the eye passes by the TV but doesn’t compete with it. Often it’s the edge of the console or the area closer to a corner. If you place them too close to the screen, the composition becomes rigid — leave a bit of breathing room. - Set two candlesticks of different heights.
A few inches of difference makes the line feel alive. You don’t need one to be a “tower” and the other tiny — just a gentle shift. We usually choose about 2–3″ (5–7 cm) of difference — enough for the vertical line to feel moving, not static. - Add a third object to tie them together.
A small plant or a low vase creates the connection so the pair of candlesticks doesn’t look like “two random items.” This is especially important when the console is long: one small object in the middle of the group makes the composition feel complete. - Choose candles that match the proportions.
Taper candles 10–12″ (25–30 cm) tall create a beautiful upward extension of the candlestick. If the candles are too tall, the line gets heavy; if too short, the candlesticks lose their effect. Sometimes we pick candles with a slight texture to add a bit of movement. - Assess the composition from a distance.
Step back 5–7 paces and look at the wall the way you normally see it when walking into the room. If one side feels visually heavier, just shift the elements 1–2″ (2.5–5 cm). It changes the perception — and it surprises us every time.
Slim candlesticks work in almost any interior. In lighter rooms they add structure, in warmer ones they help set the rhythm, and in stricter spaces they soften the edges of the tech and make the wall feel less rigid.
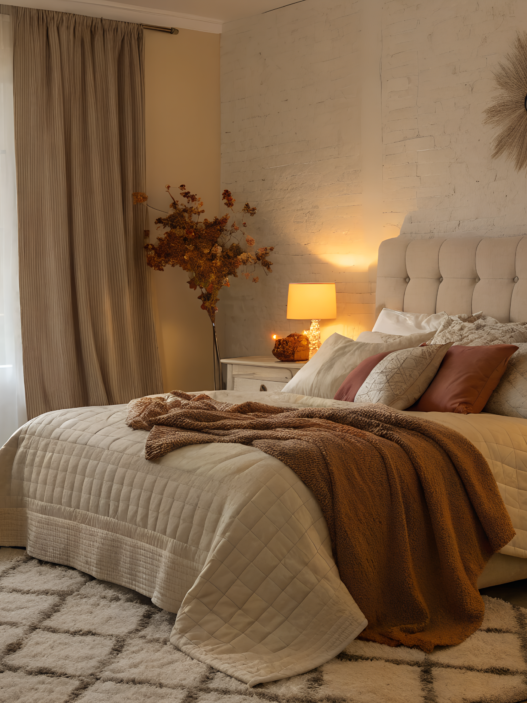
3. Using Plants to Soften the Area
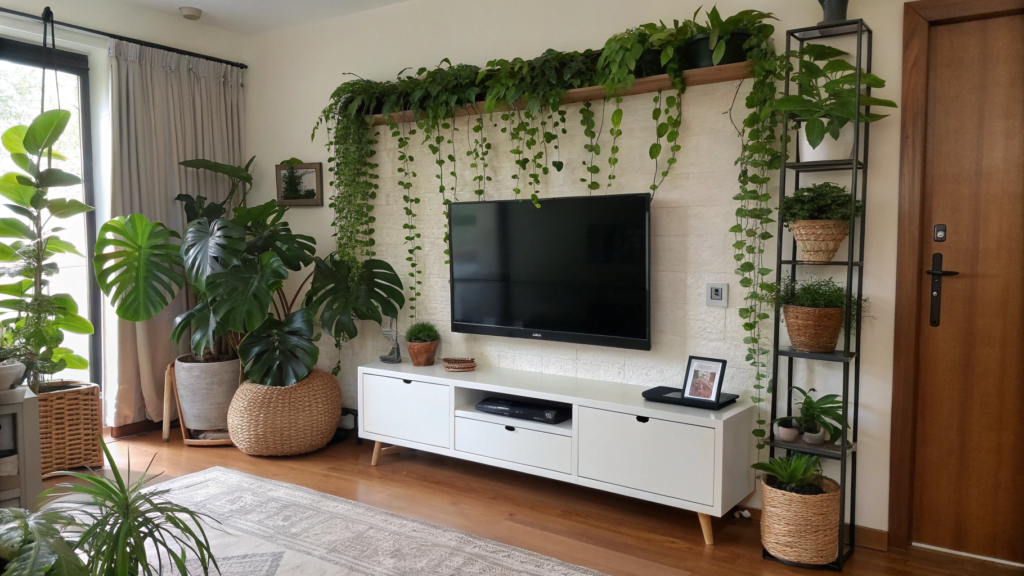
When a TV wall feels too strict — straight lines, hard geometry, all that… adding plants is an incredibly effective fix. They soften the edges, add life, and make the composition feel more natural.
What You’ll Need
- Medium-sized plants: 8–14″ (20–35 cm) tall
- Small mini-plants for grouping: 4–6″ (10–15 cm)
- Pots in calm tones: matte ceramic, concrete, light wood
- A stand or console under the TV
- Optional: a decorative tray to unite the group
For smaller areas under the TV, sturdy plants work best: sansevieria, a small zamioculcas, or a mini ficus. We often use matte ceramic mini-pots — they look quiet and don’t distract from the overall composition.
How to Do It
- Choose one plant as the main accent.
A pot 8–14″ (20–35 cm) tall works best. It creates a soft vertical line without pulling attention above the TV. Place it slightly off-center — this way it acts as a connector between the screen and the horizontal decor. - Add one or two small plants next to it.
A height of 4–6″ (10–15 cm) creates a pleasant stepped transition. If they’re too close or too far apart, the composition falls apart — keep about 3–5″ (8–12 cm) between them and everything comes together. - Use a tray or board as a unifying base.
A long wooden board or a small decorative tray keeps the group contained. We do this often so the plants don’t look like a “scattered collection of pots.” - Mix leaf shapes.
One plant with a dense structure (like a small zamioculcas) and one with softer or longer leaves (a peperomia or a small scindapsus). This combo adds movement without creating chaos. - Step back and evaluate the composition in motion.
Sometimes we move plants literally 1–2″ (2.5–5 cm) to make the line look smoother. Especially if the TV is large — it’s important that the plants don’t feel frozen on the sides but act as a soft visual background.
Plants change the mood of a room faster than any other decor. They work especially well with a TV — softening, energizing, adding a natural rhythm. Even in a strict or minimalist interior, a single well-chosen plant makes the space warmer without overload or unnecessary details.
4. Hiding Cords with Style
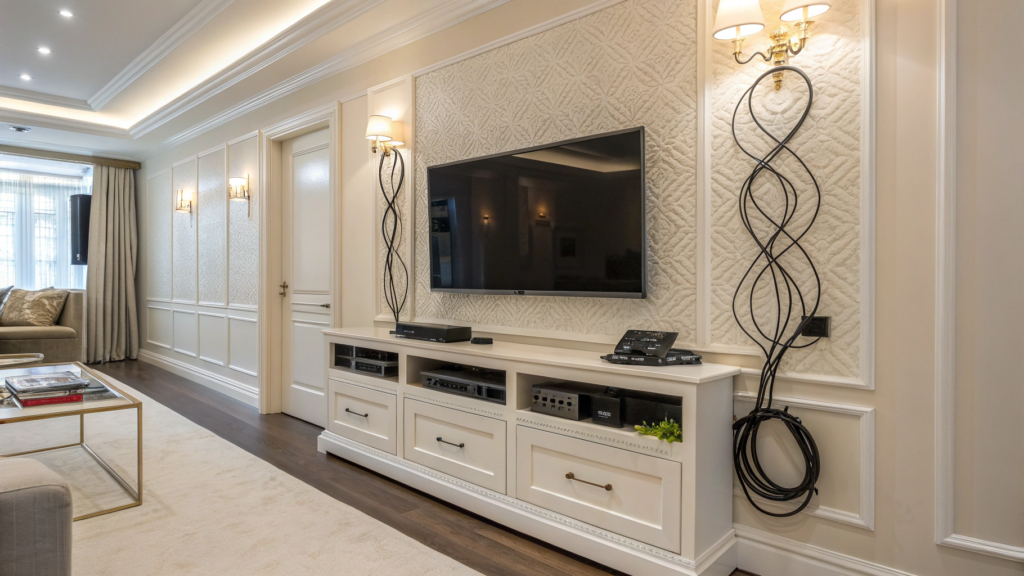
Cables can ruin even the most beautiful TV wall setup. Those thin black lines seem to live their own life and absolutely refuse to blend into the room. I ignored them for a long time… until one day I finally saw how clean and intentional the wall looked once the wires were hidden. The TV stopped feeling “attached.”
It simply became part of the composition.
What You’ll Need
- A cord cover in the same color as the wall (1–1.5″ wide works perfectly for TV wires)
- Cable clips for organizing wires
- Soft fabric cable sleeves if you don’t want a hard channel
- Double-sided tape or mounting clips if you don’t want to drill
- Optional: a slim decorative trim or shelf to hide the vertical line
- A small screwdriver or scissors
We often use flexible cord covers, especially when we don’t want to drill. Amazon has plenty of options, but we really liked sets similar to CordMate III — visually calm, not bulky, and easy to paint to match the wall tone.
How to Do It
- Decide the exact line the cord cover will follow.
TV wires usually go straight down or to the side — the goal is to choose a direction that looks natural. We try to align the channel with existing visual lines: the edge of the console, or a clean vertical of the wall. That way the line doesn’t look random. - Measure the length and test it on the wall.
Even if it feels like a formality — test it. Sometimes the angle creates the effect of a narrower or wider wall. This is when you’re literally choosing the “character” of the line. - Attach the cord cover gently at first.
We usually fix just the top and bottom two inches. This way you can adjust the slope or height. When the line is perfect — then press it fully. If you stick it all at once, the chance of a crooked line is 99% (tested many times). - Bundle the wires before hiding them.
A small trick: when the wires are grouped with a soft textile strip or clips, the channel closes smoother and doesn’t end up hiding a chaotic mess. You place it in — and everything looks organized, even if later you need to add or remove a wire. - Add a small decorative object where the cable exits.
A mini plant, a book, or a low box works perfectly. A tiny object makes the exit point less noticeable and gives the impression that the detail is intentional. We often use a little peperomia pot — it naturally hides the spot where the cable comes out. - Check the wall in both daylight and evening lighting.
Sometimes the channel catches a bit of glare under a lamp — in that case, one quick brush of matte wall-colored paint solves it. Two minutes, and the channel practically disappears.
Hidden wires aren’t just about order. When there’s less visual noise, everything else works better — candlesticks, plants, frames, the wall itself. It feels like turning off background noise and finally hearing the music.
And truly, don’t worry: cord covers fit any style if you choose the right thickness and color.
In modern interiors they almost melt into the wall; in warmer styles they feel like a small, tidy detail. The key is to give yourself a couple of minutes for the fitting.
5. Floating Shelf Additions

Floating shelves help break up the vertical line of the TV and add layers and structure. You’ve probably noticed how, once you hang a couple of light shelves on a blank wall, the whole area suddenly gains depth. And the best part — they don’t require complicated installation, yet the result is instantly noticeable.
What You’ll Need
- Floating shelves 18–36″ (45–90 cm) long, 1–2″ (2.5–5 cm) thick
- Mounting hardware or hidden brackets (most sets include them)
- A set of light decor: books, mini plants, small frames
- A level (really saves you from that “barely crooked” that’s always visible)
- A drill or even a simple screwdriver
How to Do It
- Decide where the shelf sits relative to the TV.
Sometimes it’s better to hang the shelf slightly above the lower edge of the TV, sometimes to the side to create asymmetry. We usually test several positions before drilling. Just hold the shelf up and “try it on,” stepping back 2–3 steps — that’s the easiest way to see where it naturally fits. - Leave enough space from the TV.
Keep at least 4–6″ (10–15 cm) so the shelf doesn’t feel “stuck” to the screen. When the gap is too small, you get that heavy-cap effect over the TV. Give it a bit more air — and the wall breathes. - Keep the horizontal line at all costs.
A floating shelf can be perfect, but if it’s even half a degree lower on one side, your eye notices immediately. Use a level, mark your line, double-check — and only then mount it. - Choose decor that adds layers without clutter.
A couple of books, a neat 5×7″ frame, a small 6–8″ plant — that’s enough. The shelf shouldn’t turn into a mini-museum. If you place too many things, the composition starts to compete with the TV. And we want harmony, not rivalry. - Create gentle asymmetry.
If there’s one shelf — place the decor slightly off-center. If there are two — vary their heights. We often place the lower shelf visually “wider” by 2–3″ (5–7 cm) than the upper one to create a natural stair-step effect. Works perfectly.
Floating shelves add depth to the wall, and they work especially well in modern interiors, where clean lines matter but you still want a touch of softness.
6. Frame Ideas That Match TVs

Frames placed around or next to the TV help connect the tech with the interior. They create structure and a sense of intention.
We were visiting friends — and I noticed how their TV looked… just naturally there, as if it had always belonged. And the key was the frames: thin, calm, different in size but matching in mood. They softly outlined the TV, creating structure without visual overload.
What You’ll Need
- Frames of different sizes but in a unified style
- Frame formats 5×7″, 8×10″, 11×14″ (and one larger one for balance, if needed)
- Prints, posters, or abstract artwork
- A small set of nails or command strips
- A level and painter’s tape
How to Do It
- Decide the role of the frames: outlining the TV or creating a side composition.
If you want to visually integrate the TV into a gallery, frames go around it — forming a “family” of rectangles. If you want to soften just one side, build a group off to the side. - Lay out a test composition on the floor.
This is our favorite stage. You spread the frames, shift them, change angles. It’s much easier to see rhythm and balance on the floor than trying to imagine the wall. And most importantly — you can see where frames start competing with each other. - Mix vertical and horizontal formats.
The TV itself is very horizontal. Adding a couple of vertical frames gives the right counterbalance. This creates a soft visual balance, making the TV feel less like it pulls all the attention. - Keep the spacing between frames at 1.5–2″ (4–5 cm).
Less feels cramped and restless. More looks disconnected. We found our sweet spot exactly in this range. - Choose the right visual weight.
If the TV is black, matte black frames echo its silhouette perfectly. If the interior is light, white or pale wood frames work well — but in that case, it’s better to keep the composition to one side to avoid excessive contrast. - Evaluate everything from a distance before mounting.
We lift each frame to the right height, attach a small piece of painter’s tape to the wall, and check from different angles. This helps reveal whether any element “sticks out” visually.
Frames are a way to integrate the TV into the interior, not hide it. In warm, textured homes they add softness; in minimalism — a graphic touch; in modern interiors — that subtle architectural line. Sometimes one well-chosen frame on the side is enough for the TV to stop feeling like a foreign object on the wall.
7. Layering Small Artwork Around a Screen
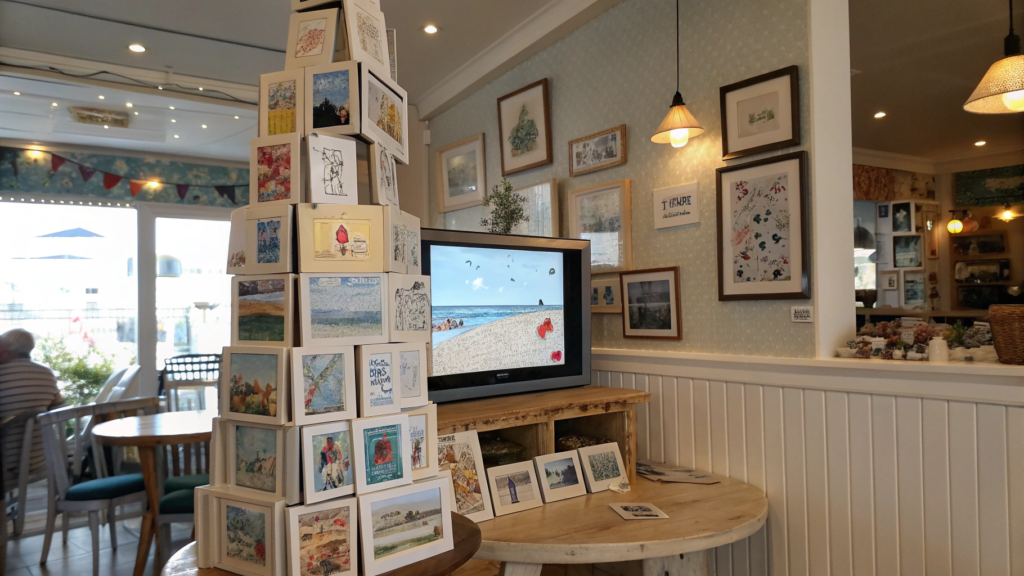
Multi-layered small artwork creates a sense of depth, softness, and a bit of playful creative disorder.
We first saw this not in a magazine and not in someone’s perfect home, but in a small coastal café. Next to the screen hung a whole “story” made of tiny drawings, postcards, mini-prints. And the TV felt like just part of the visual rhythm. This approach often works much better than strict symmetry.
What You’ll Need
- Small frames: 4×6″, 5×7″, and up to 8×10″
- A couple of micro-images or postcards (you can print them at home)
- Command strips or small nails
- One textured object: mini-panel, fabric element, small mirror
- Painter’s tape for initial layout
How to Do It
- Choose one main small element.
This can be a mini-poster or an 8×10″ framed photo. It becomes the anchor. Place it closest to the TV — but leave 3–5″ (8–12 cm) of breathing room so the objects don’t merge. - Add two or three small artwork pieces around it.
4×6″ or 5×7″ is ideal. Place them not in a strict straight line but slightly staggered so the composition feels alive. Imagine the pieces “talking” to each other. - Mix formats and orientations.
One vertical, one horizontal, one square — this set gives a gentle sense of motion. If all are the same, the look becomes rigid, and we want softness around the TV. - Introduce a textured element.
It could be a tiny fabric panel, a small embossed disc, a mini plate — anything that adds depth. Texture makes the composition more dimensional and eases the flatness of the TV. - Create a sense of layering.
You don’t need to overlap frames, but 1–1.5″ (2.5–4 cm) of spacing is perfect. This is the moment when everything turns into one cohesive visual gesture. - Check from different points in the room.
Small pieces sometimes “disappear” from certain angles. If something gets lost, move it closer or raise it 1–2″ (2.5–5 cm). It’s normal — such compositions rarely settle into place on the first try.
Small artwork around the TV isn’t a museum or a gallery — it’s a light touch of life: a postcard from a trip, a tiny sketch, a printed photo, a movie ticket. All these pieces create a rhythm the TV doesn’t break — it actually supports it.
This composition works especially well in warm, lively interiors where character matters more than perfection.
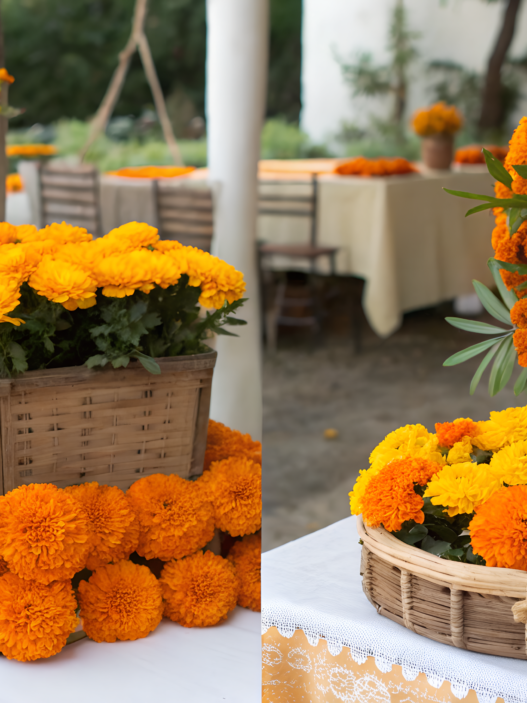
8. Adding Seasonal Decor Without Clutter
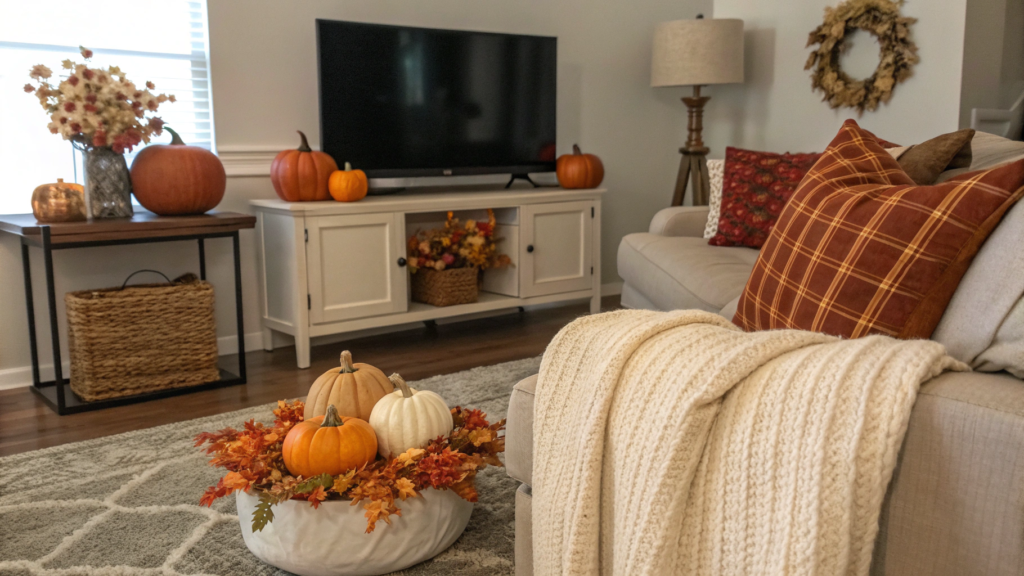
Seasonal decor is a tricky thing. You want warmth in fall, freshness in spring, a bit of sparkle in winter… and suddenly you realize there’s real chaos happening around the TV.
Seasonal decor works perfectly when it supports the composition around the TV instead of shouting over it. A few precise touches — and the atmosphere changes completely. The main thing is not to turn this zone into storage for seasonal emotions.
What You’ll Need
- One large seasonal accent (a pumpkin, eucalyptus branch, winter wreath, cotton stem)
- A couple of small objects that match the season
- A tray or shallow board to unify the composition
- Candles or small candlesticks
- A thin string light or light textile detail (optional)
- One neutral object to balance the brighter ones
How to Do It
- Start with one strong seasonal accent.
It can be a fall pumpkin 6–8″ (15–20 cm), a winter wreath 12″ (30 cm) in diameter, or a spring branch in a vase. One element sets the tone without overloading the wall. Place it slightly to the side of the TV to give the screen visual breathing room. - Add two small elements for rhythm.
Something 3–5″ (7–12 cm) tall — mini acorns, a small candle, a tiny vase with a branch. The key is to keep them near the main accent so they work as a group instead of spreading across the console. - Use a tray or small board.
It unites the seasonal decor into one cohesive composition and keeps it from looking scattered. We often use a wooden tray about 12–16″ (30–40 cm) — it makes the items look intentional, not random. - Balance the brightness with a neutral element.
If the seasonal decor is too contrasty, add something calm: a matte vase, a light-colored book, a small ceramic figure. This helps maintain visual order and prevents the colors from becoming noisy. - Add soft lighting if you want more atmosphere.
A small candle or a thin string light 3–6 ft (90–180 cm) gives warmth without stealing attention. The trick is not to overdo it. One string — cozy. Two — festive. Three — full market fair. - Check the composition in daylight and evening light.
We once noticed that small elements disappear at night but become too bright in the morning. Sometimes simply shifting an object 1–2″ (2.5–5 cm) makes the whole picture settle.
Seasonal decor around the TV is like a small accessory in clothing: a scarf, a brooch, a ring. One element can completely shift the mood — but if there are too many, the style disappears.
And the nice part is that this kind of decor changes in five minutes. Swap the tray, add another accent — and you have a new mood without clutter or searching for places to store all the seasonal bits.
9. Neutral Palettes for Modern Fireplaces

Neutral tones around the fireplace create a calm foundation where the TV, decor, and the architecture of the room look cleaner and more collected.
I first understood the power of a neutral palette when we visited a showroom near Seattle. There was a fireplace surrounded by soft grays and warm whites, with no sharp contrasts. And the TV above it didn’t draw attention at all — it simply became part of the composition.
What You’ll Need
- Main neutral shades: warm white, light gray, greige, sand
- Textures: matte ceramic, wood, stone, linen
- Decor in calm tones: books, candlesticks, plants with soft foliage
- One slightly darker element (a black frame, for example) for balance
- Optional: a small tray or light-toned basket
How to Do It
- Choose two or three main shades.
For example: soft gray, warm white, and light wood. You don’t need more — extra colors start breaking up the space. A neutral palette works precisely because of its simplicity. If the fireplace is modern, stay in the range from cool gray to greige — they highlight the form perfectly. - Create layers using textures.
In neutral palettes, texture plays the leading role. A wooden board, matte ceramic, soft linen — all of this adds depth without overwhelming the wall. If you place a vase, choose matte. If it’s a tray — go for light wood. On this background, the TV looks integrated rather than “stuck on.” - Add one darker element for balance.
A black frame or dark candlestick works well. This tiny detail grounds the composition and visually stabilizes the fireplace. Without it, everything may look too airy, almost washed out. - Use decor in small groups.
Neutrals love order. A group of three objects — a ceramic vase, a small bowl, and a book — looks much better than many individual items. Place them closer to one edge of the fireplace or console, leaving some open space. - Add a bit of greenery for softness.
A houseplant in a calm pot removes the strictness of the neutral palette. Not bright green — something softer: peperomia, eucalyptus, calathea with gentle leaves. Greenery adds life where the colors are intentionally quiet. - Evaluate the combination in different lighting.
Neutral tones behave differently in morning and evening light. Sometimes warm white turns yellowish under lamps — then you can swap one object for something cooler. And vice versa. Small things, but they make a modern fireplace feel well-styled.
A neutral palette lets the fireplace, TV, and decor coexist without competing for attention. In modern interiors, it highlights the architecture; in warmer styles, it adds softness.
And what’s especially convenient: a neutral base changes easily with the seasons. Want fall? Add warm texture. Spring arrives? Swap in a couple of lighter objects. The fireplace stays cohesive, and the mood shifts without noise or clutter.
10. Mixing Textures for Cozy Balance
When the TV hangs on the wall or sits on a console, the area around it can sometimes look too flat — as if it’s missing depth and tactile warmth. And this is exactly where mixing textures works better than any decorative trick.
What You’ll Need
- Three to four textures that differ but don’t clash:
— matte ceramic
— wood (light or dark, depending on the palette)
— fabric or woven elements
— stone or concrete for contrast - Small decorative objects of different shapes
- One unifying element: a tray, board, or small basket
- A plant to add living texture
Sets like a Neutral Textured Decor Set (similar to what you find on Amazon) work perfectly as a base — you get ceramic, wood, and a small textile element, which is an ideal starting point for a TV area.
How to Do It
- Start with one “calm” texture.
This is usually wood or matte ceramic. Place a single object — a vase, ceramic cup, or wooden board — and see how it interacts with the TV. This becomes the base that sets the tone. - Add a contrasting texture for depth.
Stone, concrete, or a woven piece works great here. The contrast doesn’t need to be strong — just enough tactile difference. Wood + stone or ceramic + woven elements always create layers without turning into a jumble. - Bring in something soft.
A textile basket, a linen cloth beneath a group of objects — anything that adds a gentle transition between harder surfaces. Even a tiny textile touch near the TV makes the setup warmer and more inviting. - Group objects into a small cluster.
A trio — ceramic + wood + a plant — looks intentional without being stiff. Make sure the items differ slightly in height: 6–8″ (15–20 cm), then 4–6″ (10–15 cm), then a small texture closer to the bottom. This keeps the cluster dynamic. - Add one slightly heavier object to ground the group.
A ceramic vase 10–12″ (25–30 cm) tall or a wooden stand works well. It creates an “anchor,” letting the smaller textures work around it instead of drifting visually. - Add a plant for living texture.
Soft, rounded foliage (peperomia, scindapsus) creates an ideal transition between the smooth surface of the TV and rougher textures. Plants in matte pots work especially well. - Look at the area during evening lighting.
Textures come alive in warm lamp light. Sometimes all you need is to shift an object closer to the light source to make the composition more dimensional.
Mixing textures adds warmth, softness, and friendliness to the space — especially around a TV, which is naturally a smooth, cold, very technical object.
Three textures already change the mood. Four bring depth. And from there, it’s just about finding the balance that fits the room: modern, warm, minimalist, farmhouse — textures adapt to any style.
Your Space
The TV zone sets the whole mood of the room. It makes the space not just functional, but warm, grounded, and alive.
Each idea in this list works in its own way: candlesticks add rhythm, plants soften the edges, frames build a story, textures add depth, and neutral palettes calm the eye.If you’d like, share in the comments which tricks work in your home. These little stories tend to stick with you for a long time and often become the starting point for new decisions.
And the best part — you can move things around, try something different, switch it up anytime. Homes love a bit of experimenting.