
2025 still keeps throwing us new home decor ideas that look like they came straight from a designer, but in reality can be done in just a couple of hours and on a very small budget.
In this article, I put together 10 of the most viral ideas that inspired hundreds of thousands of people this year: from glowing clouds and mushroom shelves to rainbow windows and flower chandeliers. All of them are simple, accessible, and, most importantly, actually work.
And this is only the first part! In Part 2 I’ll share more finds that are just as impressive: with even more creative projects for different occasions.
Welcome!
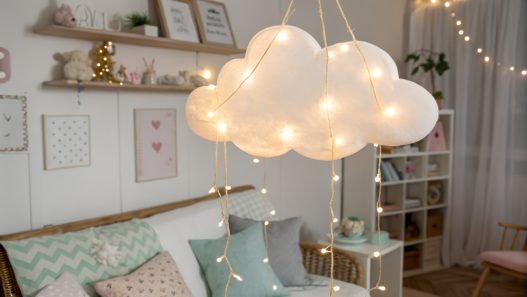
1. Floating Cloud Light DIY
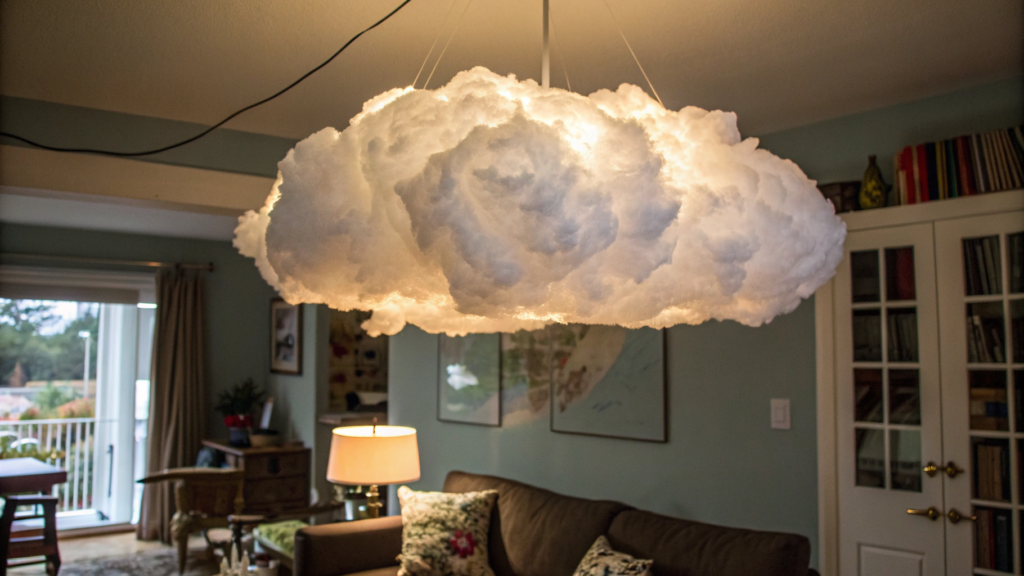
If there’s one idea that literally took off on Pinterest in 2025, it’s the cloud light. And the best part — making one is way easier than it looks at first.
I tried building my first “cloud lamp” in spring. It was hilarious: the whole kitchen was covered in polyfill fluff, and the cat decided it was his new toy. But after a couple of hours, we were already sitting in the living room and it felt like a piece of the sky was floating above our heads.
What you’ll need for Whimsical Decor
- Light paper lanterns (10–16 inches / 25–40 cm in diameter). You can use one big one or a few smaller ones.
- Polyfill stuffing — this creates the fluffy cloud effect. Around 16 oz (450 g) is enough for one medium lantern.
- LED string lights or a lamp with cool white light. Always go for LEDs, since they don’t heat up and are safer.
- Hot glue gun or clear spray adhesive.
- Strong fishing line or transparent thread for hanging.
How to make it
- Assemble the base. Open up the paper lantern and install the frame so it holds its shape.
- Attach the light. Place an LED bulb inside the lantern or carefully weave in a string of lights. The cool white LEDs will make it look like the cloud is glowing from within.
- Make it fluffy. Use hot glue to attach bits of polyfill onto the lantern’s surface. Work in small pieces so the texture looks natural and three-dimensional.
- Build a composition. For a real “sky in the room” effect, hang several lanterns of different sizes together. You can even run one light string through multiple clouds.
- Final touch. Hang the whole piece from the ceiling with fishing line. The higher it’s placed, the more magical the look — just make sure the light stays soft and cozy.
You know what, this is really cheap. One lamp costs around $20–30 (or even less if you already have some of the materials at home). And second, it’s such a great way to bring life to a room: the cloud instantly gives the space a playful and light vibe.
And one more idea: if you add a string light with a flashing mode inside, you’ll get a storm cloud effect — tiny lightning bolts that will definitely surprise everyone.
2. Mushroom Shelf from Repurposed Wood
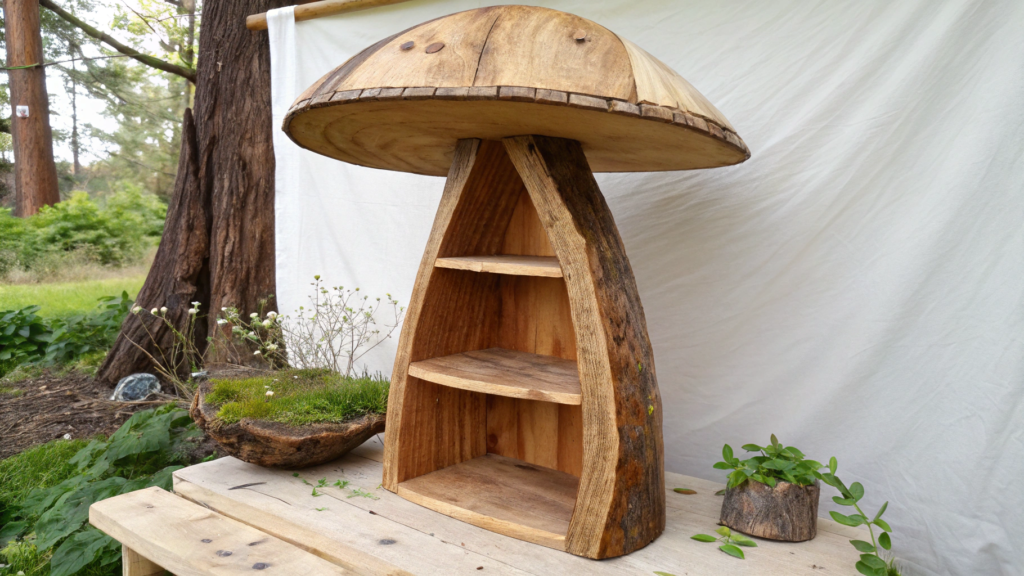
A shelf shaped like a mushroom, made from simple wood, looks like a little piece of forest art. And yes, it instantly landed in the whimsical DIY Decor category and went viral.
The idea is simple: take scrap wood (old boards, pieces of plywood, even leftover shelving after a remodel) and turn them into enchanting mushroom shelves.
What you’ll need for Whimsical Decor
- Wooden boards or plywood about 0.5–0.75 inches (1.2–2 cm) thick. Old furniture wood works perfectly.
- Jigsaw or hand saw.
- Sandpaper or sander.
- Paint or wood stain — to give color to the stem and cap.
- Wall brackets (like small metal angles).
- Optional — acrylic paints for decoration (to add classic white dots to the red cap).
For convenience, you can grab a ready-made set of brushes and acrylics, like this Amazon paint set.
How to make it
- Cut the base. Sketch the outline of the stem and cap on the board. For starters, try a small size: cap diameter 8–10 inches (20–25 cm), stem height 10–12 inches (25–30 cm). Cut carefully with a jigsaw (or a hand saw for straight lines) and smooth the edges with sandpaper.
- Prepare the wood. Sand all the pieces thoroughly to remove splinters.
- Assemble the mushroom. Place the cap on top of the stem so it sticks out slightly in front. Secure it with short screws through the back of the stem, or use small metal brackets underneath — the easiest and sturdiest method.
- Paint. The classic version is a red cap with white dots and a beige stem. But you can go for a cottagecore style: soft pastel tones like pink or mint.
- Mount on the wall. Attach the stem to the wall using brackets or hidden mounts so the cap doubles as a small shelf.
I saw one girl on Instagram who made a whole collection of mushroom shelves in different sizes and hung them in her kitchen. On one sat spice jars, on another a little basil pot. It looked so organic, like a piece of forest sneaked indoors.
At our place, one mushroom lives in the hallway. We keep a key holder and a tiny vase with dried flowers on it. Guests always smile when they see this “little woodland thing.”
3. Whimsical Fairy Decor Light Headboard
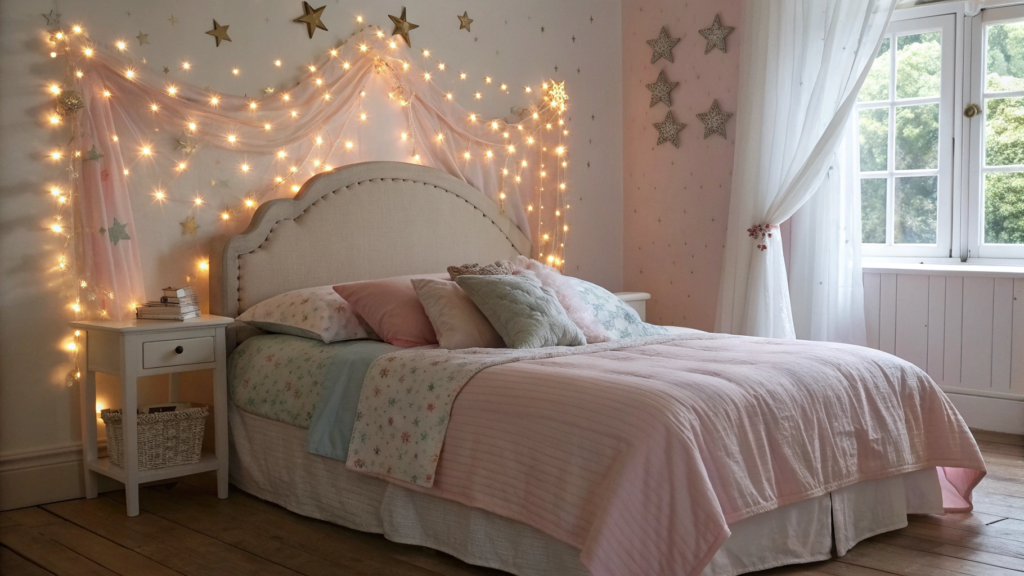
A bed headboard is usually something standard. Wood, fabric, or just an empty wall. But then I stumbled across the fairy light idea on Pinterest, and my heart skipped a beat. The light was soft, cozy, and suddenly you felt like you were stepping into another space.
By 2025, these glowing headboards had become a true must-have for everyone who loves whimsical decor.
What you’ll need for Whimsical Decor
- Fairy lights with warm white glow (LED is best). For one bed, you’ll need 2–3 strings, each about 9–10 ft (3 m) long.
- Mounting supplies: small clear hooks or removable adhesive strips.
- Fabric — like lightweight tulle or sheer linen. Cut around 54 inches (1.3 m) wide and 8–9 ft (2.5–2.7 m) long.
- Optional: decorative branches or faux flowers if you want more of that enchanted vibe.
Here’s a good set of warm lights: Amazon fairy lights.
How to make it
- Prepare the base. If your bed already has a solid headboard, attach the lights directly to it. If not, make a simple frame from thin wooden slats, or just use the wall.
- Attach the lights. Hang the strings vertically or horizontally. The most popular style is vertical “waterfall” lines, but you can also create patterns: a heart, arcs, or free-form waves.
- Add fabric. Drape a layer of tulle or linen over the lights. The glow will turn soft and diffused, making the setup romantic.
- Decorate. Attach faux ivy, dried flowers, or branches along the top edge. I once added eucalyptus branches, and the scent lingered for two weeks — sleeping was extra pleasant.
- Check safety. Always use LEDs that don’t heat up. Never use old incandescent string lights.
This idea gives you three things at once: a light source, a decoration, and a headboard. And it costs next to nothing compared to store-bought furniture versions.
In our bedroom, this headboard stuck right away: at night it sets the mood, and in the morning it doubles as the backdrop for photos (yes, I admit, I often shoot things there).
4. Vintage-Inspired Cottagecore Mirror Frame
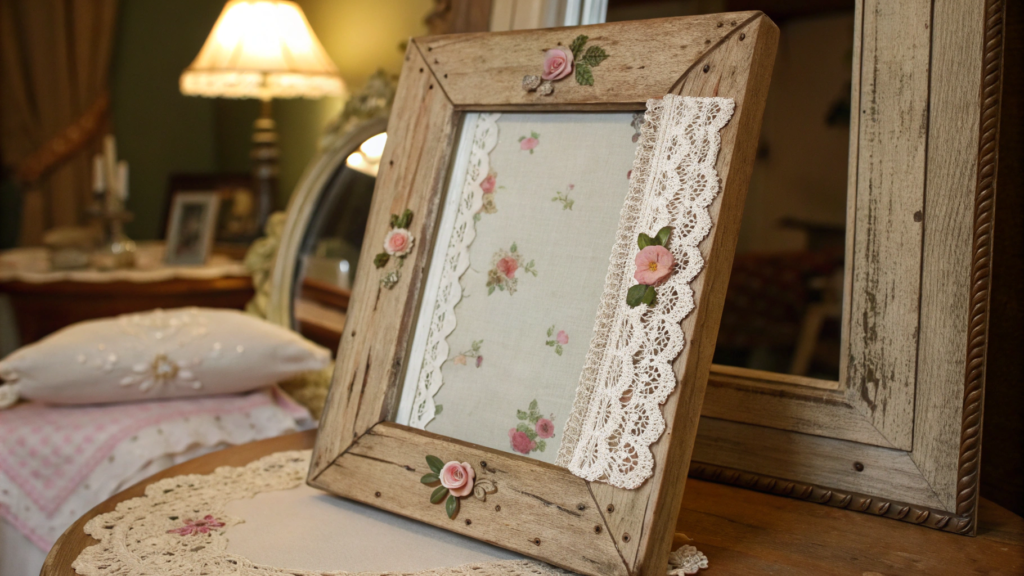
I first spotted this idea from a friend who loves everything vintage: her old IKEA mirror turned into a “grandma’s treasure,” as if it had just been carried out of a cozy English cottage. And I instantly wanted to try it myself.
The result is that perfect blend of vintage romance and modern upcycle.
What you’ll need for Whimsical Decor
- A simple-framed mirror (or frameless).
- Decorative elements: carved wooden appliqués, plaster moldings and corners, seashells in different sizes, beads, bits of old plasterwork, ceramic shards, decorative metal corners, lace, or even pressed flowers sealed with varnish for durability.
- Chalk paint for that aged look.
- Brushes of different sizes.
- Wood glue or multipurpose craft adhesive.
- Optional: clear varnish to protect the finish.
How to make it
- Prepare the surface. If the mirror already has a frame, lightly sand it so the paint sticks better. If not, cut a thin plywood base where the mirror can later be glued.
- Add the whimsical decor. Glue decorative pieces along the edges. Mix large and small items to create layered depth.
- Paint it. Use chalk paint in soft pastel tones — beige, sage green, dusty pink. For a vintage effect, lightly sand the corners once the paint dries.
- Seal it. Apply a thin coat of clear varnish to protect your work.
- Display it. Cottagecore-style mirrors look great leaning against a wall on a dresser or even standing on the floor.
At our place, one such mirror ended up in the hallway. It instantly gave the space a sense of character — like it’s telling you people with a love for detail live here.
And that’s the beauty of it: every frame turns out unique. Even if two people start with the same set of materials, the results will always be different, each with its own personality.
5. Magical Lanterns Made from Recycled Glass
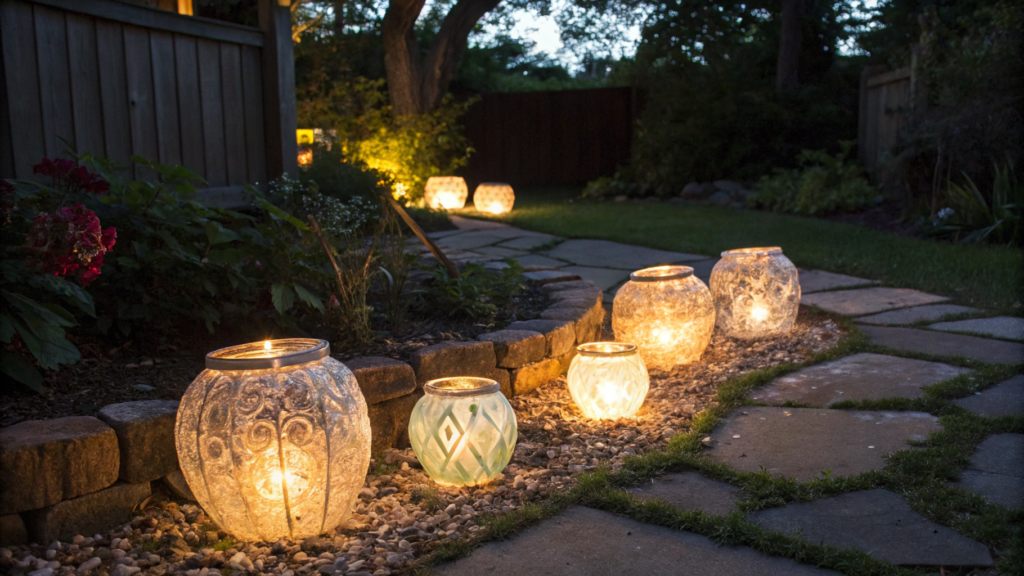
The idea of turning recycled glass into magical lanterns didn’t just occur to me — it’s a trend that makes you feel like fireflies have moved into your backyard.
What you’ll need for Whimsical Decor
- Glass jars or bottles — jam jars, beer bottles, wine bottles, even old apothecary jars. The more variety in shapes, the more interesting the display.
- Glass paints or stained-glass markers — to add patterns. Semi-transparent shades of blue, amber, and green work beautifully.
- Metal wire (18–20 gauge) for handles and hanging.
- Battery-operated tea lights or LED string lights. Never use real candles in closed jars — it’s unsafe.
- Whimsical Decor for lids and necks: jute twine, lace, brass rings, beads.
- Optional: pressed flowers, pieces of colored glass, or chandelier crystals.
Here’s a great set of safe candles: Amazon LED tea lights.
How to make it
- Prep the glass. Wash jars and bottles thoroughly, removing all labels. The old trick works best: soak them overnight in warm water with baking soda.
- Add color. If you want vibrancy, use glass paints or acrylics. Cover fully or create abstract spots and streaks. Once the light is inside, the colors will glow softly.
- Make handles. Wrap wire around the neck and shape into a loop. For tree-hanging lanterns, use thicker wire.
- Decorate. Wrap twine around the neck, add lace, beads, or even an old key. Once, I glued seashells around the lid — it gave off a lovely seaside mood.
- Light it up. Place an LED tea light inside or drop in a string light. For bottles, cork string lights are perfect — they’re made for narrow necks.
- Arrange. Hang them on tree branches, line them along a pathway, or cluster them on a table.
At our place, these lanterns first appeared one summer when we hosted a picnic by the fire. We set about ten colorful jars around the seating area — by nightfall, everything sparkled like a little festival. And I picked up another idea from a friend: she made lanterns only from wine bottles, painted them in soft pastel shades, and hung them above her garden table. The result was a boho-style chandelier.
The best part — this is an absolutely eco-friendly project. You don’t buy new materials, you reuse what would otherwise go to recycling. And every lantern turns out one-of-a-kind — even the maker couldn’t replicate it exactly.
6. DIY Hanging Flower Chandelier
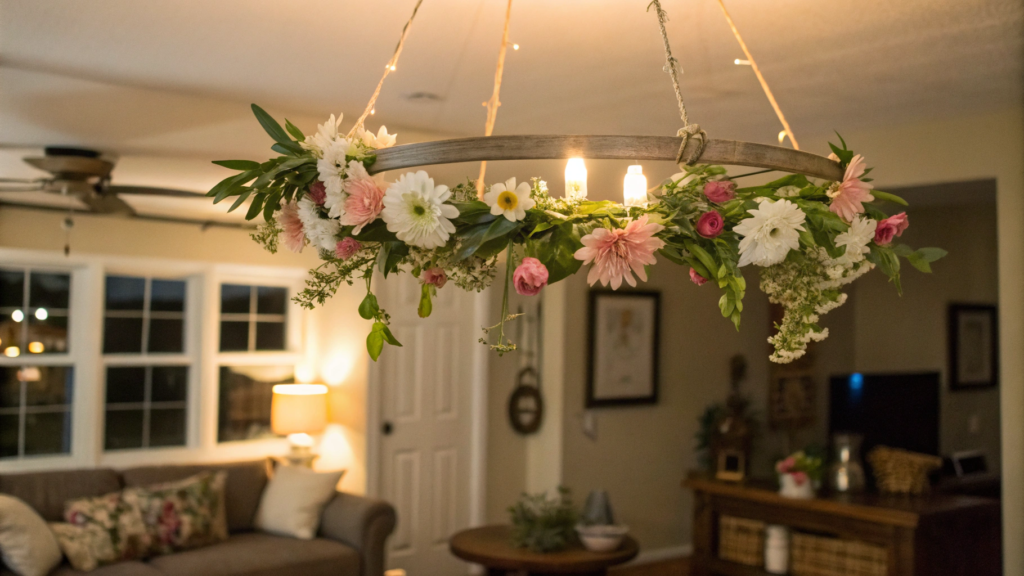
This project sat in my bookmarks for ages — it’s so airy it instantly falls into the “must-try-right-now” category. And honestly, nothing stops you from making your own version at home — in the bedroom, on the porch, or even above the dining table.
I made one of these flower chandeliers for Lindy’s birthday. You’d think it’s just flowers and a hoop, but in the end our living room turned into a little fairy tale. And the project cost barely anything!
What you’ll need for Whimsical Decor
- Metal or wooden hoop 12–18 inches (30–45 cm) in diameter. You can even repurpose an old hula hoop wrapped in fabric.
- Artificial flowers — roses, peonies, hydrangeas, wildflowers. I like mixing large blooms with small branches so it doesn’t look too “plastic.”
- Greenery: faux ivy, eucalyptus, or ferns for the base.
- Fishing line or decorative chains for hanging.
- Hot glue gun or floral wire for attaching pieces.
- Optional: battery-powered string lights to add a gentle glow.
How to make it
- Prepare the base. If using a hula hoop, wrap it with ribbon or twine for a neat look. A metal hoop can be left bare.
- Build the greenery layer. Start by attaching ivy, eucalyptus, or ferns — this creates the volume and backdrop.
- Add flowers. Begin with large blooms, spacing them evenly. Fill in between with smaller flowers and grasses. A good rhythm: 1–2 large, then 3–4 small.
- Secure everything. Use floral wire for big flowers and hot glue for smaller accents.
- Light it up. Wrap the hoop with a string of tiny LED lights. Once turned on, it feels like a “floating garden.”
- Hang it. Use three or four lengths of fishing line, attached evenly around the hoop, so the chandelier hangs straight.
We hung our first flower chandelier above the living room table. But I’ve seen others use them on porches — imagine dining under one of these on a summer evening! Or in the bedroom, above the bed, where the lights create a soft cocoon.
A friend of mine even surprised me with her take: she made mini chandeliers just 8 inches (20 cm) wide and hung three of them at different heights. The cascading look was so stunning that everyone at her party lined up to take photos under them.
Even with faux flowers, the chandelier still looks fresh and alive. And if you want a touch of fragrance, tuck in a few sprigs of dried lavender or eucalyptus.
7. Enchanted Garden Wall for Bedroom Corners
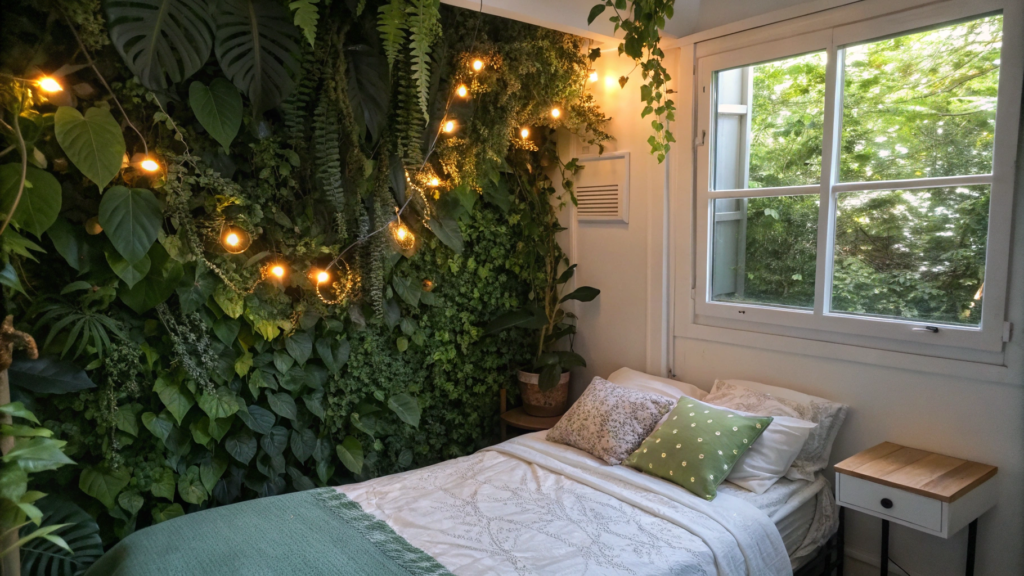
What do we usually find in the corner of a room? Dust gathering or maybe a lonely shelf. But here’s a way to bring life into a space that’s often ignored.
A small area suddenly becomes the center of attention: lush green leaves, the soft glow of fairy lights, and that feeling that you’re sitting in a garden arbor rather than inside your home.
What you’ll need for Whimsical Decor
- Artificial greenery panels (ivy, monstera, fern). Panels are usually 20×20 inches (50×50 cm). You’ll need 4–6 for a corner.
- Extra faux plants: ivy, eucalyptus, or wisteria for added volume.
- Fairy lights with warm glow or thin neon strips.
- Mounting supplies: double-sided tape for light elements or screws with mesh backing for heavier ones.
- Whimsical Decor accents: small wooden shelves, hooks for hanging candles, posters, or framed photos.
For convenience, here’s a ready-made set: Amazon greenery wall panels.
How to make it
- Mark the area. Corners near a bed or a reading chair work best. Measure the wall to estimate how many panels you’ll need.
- Build the base. Attach the greenery panels to the wall, starting from the bottom up. If the corner is uneven, trim the panels with scissors.
- Add depth. Insert extra branches or flowers so the wall looks three-dimensional instead of flat. I love trailing ivy that seems to cascade from the top.
- Light it up. Weave fairy lights between the leaves. At night, turning them on creates the feel of a truly enchanted nook.
- Decorate. Add a small shelf for a candle or a jar of dried flowers.
When I finished the first version of our “garden wall,” it instantly became Lindy’s favorite spot for morning coffee. Later we even placed a small wooden bench there. Now that corner is our own mini-park inside the house.
And here’s the best part: the whole setup cost about $60–80. It really transforms a room — and unlike live plants, it requires zero maintenance. The greenery will always look fresh.
8. Painted Pastel Mason Jar Planters
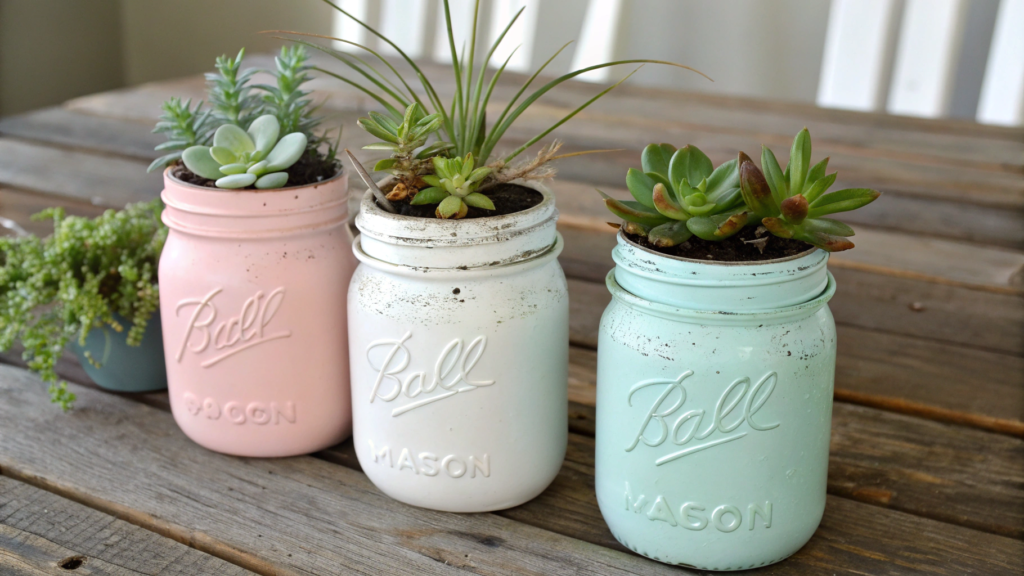
If you’ve got some empty glass jars tucked away in a cupboard (I always do!), here’s your chance to give them new life. The idea is genius in its simplicity: take old mason jars, add a bit of paint — and suddenly you have whimsical décor that looks like it came straight from a boutique store.
What you’ll need for Whimsical Decor
- Mason jars — any size, from small 8 oz (240 ml) to large 32 oz (950 ml).
- Acrylic paint in pastel shades: baby blue, pink, mint, peach.
- Sponge or brush for applying paint.
- Clear acrylic sealant to protect the finish.
- Soil and plants (herbs, succulents, flowers).
- Optional: jute twine, lace, or stickers for decorating.
How to make it
- Prep the jars. Wash and dry them. Remove any labels.
- Apply paint. Use a sponge to dab on thin layers of acrylic paint. The first coat may look streaky — that’s fine. Let it dry, then add a second or third coat.
- Create a vintage look. For shabby chic style, lightly sand the raised lettering on the jar once the paint is dry.
- Seal it. Coat the jars with clear acrylic sealant. This is important if they’ll be used in the kitchen or outside.
- Decorate. Wrap the neck with twine or lace, or add a tag with the plant’s name.
- Plant greenery. Fill the jars with soil and add herbs or succulents.
Where to use them
- In the kitchen. We keep three jars with basil, mint, and parsley. When cooking, you just reach over and snip fresh herbs.
- In the bedroom. A small jar of lavender on the nightstand adds a relaxing mood.
- In the garden. Hang several jars along a fence or balcony rail — pastel colors pop beautifully against greenery.
The funny part? My first set of jars was such a hit with my neighbor that she “ordered” a whole collection for her porch. I made six shades: from soft yellow to dusty blue. Now every time I pass her house, I see those jars lined up and it makes me smile.
And here’s another twist: instead of plants, drop in LED candles and they become glowing night lanterns. Perfect for cozy evenings outdoors.
9. Dreamy Yarn-Wrapped Moon Mobile

The first time I made a moon mobile was for my niece. We hung it above her crib, and when she was falling asleep, she would gently touch the dangling threads with her little fingers. It looked so touching that I promised myself to make another one — this time for our own bedroom.
What you’ll need for Whimsical Decor
- Metal or wooden hoop 10–12 inches (25–30 cm) in diameter.
- Thick yarn or thread in pastel or neutral shades: gray, cream, light blue.
- Cardboard cut into a crescent moon shape.
- Hot glue gun or strong craft glue.
- Hanging accents: yarn tassels, small beads, feathers, or mini stars.
- Fishing line or clear thread for ceiling mounting.
How to make it
- Build the base. Cut a crescent moon shape out of cardboard. Wrap it with yarn, going around in circles and fixing the ends with glue. For a fluffier look, use thicker yarn.
- Attach to hoop. Fix the moon to the hoop with glue or by tying it on. This helps the whole piece hold its form.
- Add hangings. Cut yarn in varying lengths to make tassels or add beads and feathers. The more textures you mix, the more interesting it looks.
- Decorate. Weave in tiny LED string lights or stick on glitter stars so the mobile glows in the dark.
- Hang it up. Find a spot on the ceiling and suspend the mobile with fishing line. It looks best if it sways gently with the air.
Where to use it
- In a nursery. This mobile creates a soothing, dreamy atmosphere. I saw one mom make three moons in different sizes and hang them together — it looked like a whole night sky above the crib.
- In an adult bedroom. We keep ours near the window. When moonlight comes in at night, it feels like the mobile becomes part of the real sky.
- In the living room. Perfect for boho style: yarn, natural materials, and a soft glow from little lights.
This project is budget-friendly — the hoop, yarn, and accents cost around $15–20. It’s versatile: you can keep it minimalist or go full “moon-and-stars show.” And the most important part — it carries emotion. Every time I look at our mobile, I feel the whole room calm down.
10. DIY Rainbow Window Film for a Whimsical Glow Decor
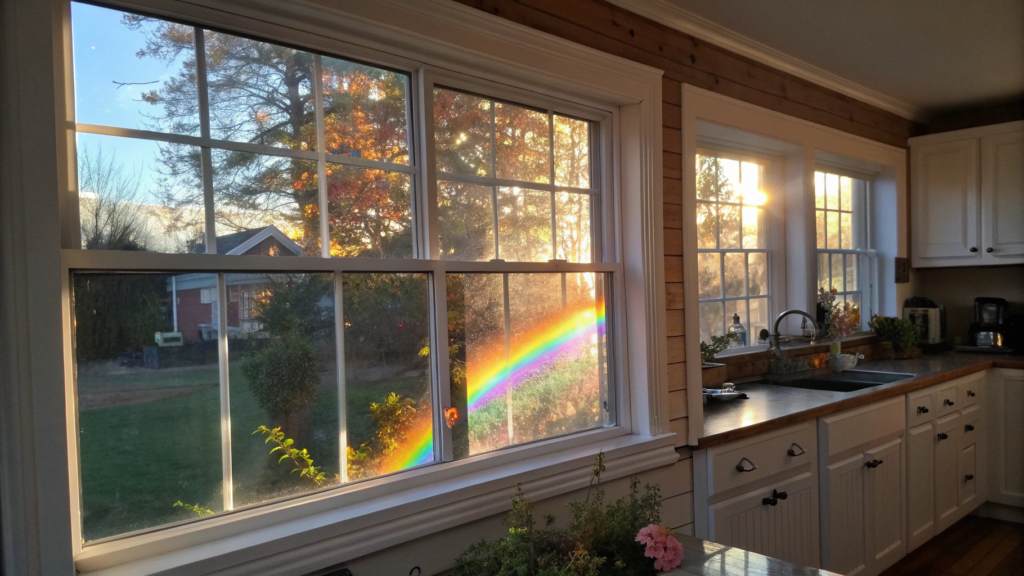
Some projects win you over instantly. For me, it happened the first time I saw a window shimmering with all the colors of the rainbow. Not stained glass, not expensive film — but a simple, budget-friendly roll of rainbow film that you can cut and install yourself in minutes.
By 2025, rainbow windows had become a full-on Pinterest phenomenon, and I get why: it’s super simple, and the result is mesmerizing.
We tried this film last spring. First, we put it on the kitchen window to test it out. The moment the morning sun hit the glass, the whole room filled with soft rainbow reflections. Lindy just said: “We’re keeping this! And we’re doing the bedroom next.”
What you’ll need for Whimsical Decor
- Transparent rainbow window film — sold in rolls 17–24 inches (43–60 cm) wide (Amazon rainbow window film)
- Spray bottle with water and a drop of dish soap.
- Plastic card or squeegee for smoothing.
- Scissors or utility knife for trimming.
- Optional: washi tape or decorative border to frame the edges.
How to make it
- Prep the glass. Wash the window until it sparkles, removing all dirt and spots. This is key — otherwise, bubbles will form under the film.
- Wet the surface. Spray water mixed with a drop of soap. The film will slide easily and “sit” better on the glass.
- Apply the film. Cut a piece to fit your window, leaving about 0.5 inch (1 cm) extra. Place it against the glass.
- Smooth it out. Use a card or squeegee to push out water and bubbles, working from the center outward.
- Trim excess. Cut the edges neatly with a utility knife.
- Enjoy! When the sun shines through, the whole room fills with rainbow light.
Where to use it
- In the kitchen. Morning coffee tastes twice as good when colorful lights dance around you.
- In the bedroom. Imagine waking up to rainbows on the walls. Instant mood boost.
- In the bathroom. Not just pretty but also adds a touch of privacy, since the film diffuses light.
When the sun hits at just the right angle, our living room floor gets covered in rainbow spots. The cat chases them like they’re alive. And in the evening, as the sun sets, the rainbow softens into pastel shades — super cozy.
Another big plus: the film is easy to remove. You can swap it out every season if you like — each time bringing a brand-new vibe.
Ideas for your home
That’s all 10 ideas from Part 1. As you can see, most projects only need jars, scrap wood, yarn, and a bit of inspiration. And suddenly your home turns into a space you’ll want to photograph and share with friends.
But we’re not stopping here. In Part 2 I’ve gathered even more ideas that will spark your creativity — projects for the garden, the kitchen, and even outdoor whimsical décor. For now, tell me in the comments: which idea grabbed you the most? Maybe the cloud light? Or the rainbow window? I’d love to know which one inspired you the most!


