Fall always pushes us toward creativity. We start small — hang a couple of string lights, place some candles, add a few cozy touches. And then suddenly we notice we’re hooked: we want to try bold accents, play with colors, and turn an ordinary room into a space with a special mood.
Step by step, our simple ideas grew into a whole collection of projects. And now it’s not just “a few cozy touches,” but 20 Whimsical DIY Experiments that took over Pinterest in 2025. Here you’ll find everything: from quick DIY projects you can do in an evening to more complex ideas that can completely transform the atmosphere of a room.
These ideas differ in style, but they all have one thing in common — they create a mood. And all of this is something you can easily bring to life at home.
1. Handmade Paper Leaf Garlands

I still remember how Lindy and I gathered armfuls of maple leaves in Idaho and brought them home. But real leaves dry out quickly, break, and lose their color. That’s when I first tried making a paper leaf garland. And guess what, it became our permanent fall décor.
The idea is simple: instead of collecting new leaves every year and getting upset when they fade, you can cut them out of paper, paint them, string them together — and get a lasting DIY fall decoration.
What you’ll need:
- Colored heavy paper or cardstock (scrapbooking sets work great, size about 8.5 x 11 in / 21 x 29 cm).
- Scissors or a utility knife.
- Thread or thin twine (jute twine looks especially cozy).
- Glue or double-sided tape.
- Optional: acrylic paints or markers for leaf veins.
How to make it whimsical DIY decor:
- First prepare the base: draw or print leaf templates. The most expressive shapes are maple, oak, and birch. Best to make different sizes: from 2 to 6 in (5–15 cm).
- Cut the paper leaves and gently bend them with your fingers so they don’t look flat. You can even slightly notch the edges to imitate natural details.
- Add the veins. Use markers or acrylic paint with a fine brush. Gold and copper shades look especially striking, creating a subtle autumn glow in the evening light.
- Prepare the thread or jute twine: stretch it across your table, taping down the ends so it doesn’t slide. Now start attaching the leaves. The best spacing is 4–5 in (10–12 cm), but you can vary it depending on the effect you want.
- Let the glue dry completely, then gently remove the garland and hang it along a window, shelf, or above the bed.
When the soft evening light turns on, the paper leaves cast shadows and gently sway in the air. That’s when the room gets that cozy fall glow — warm and homelike.
To make the garland stand out even more, you can pair it with small battery-powered LED string lights. They’re light, safe, and easy to weave into the paper décor. Important: always use LED bulbs — they don’t heat up and won’t damage the paper.
Pro tip. Make your garland longer than you planned. Usually it feels like 3–4 feet (about 1 m) is enough, but for a window or mantel you’ll actually need 8–10 feet (2.5–3 m). Better to prep more leaves right away — it’s quicker than going back to cut out extras later.
2. Cozy Knitted Pillow Covers

You probably noticed that pillows instantly change the mood of a room. One fall, Lindy and I decided to just throw on a couple of new covers — and suddenly our old sofa felt like a completely different piece of furniture.
For fall, knitted pillow covers work best. Their texture immediately creates a sense of warmth, even if the heaters aren’t on yet. The soft knit adds depth and contrast, especially next to smooth fabrics like linen or cotton.
What you’ll need for this whimsical DIY decor:
- A few standard pillows: 18 x 18 in (45 x 45 cm) or 20 x 20 in (50 x 50 cm).
- Knitted or jersey pillow covers — you can buy them ready-made or knit them yourself.
- Optional: decorative details — wooden buttons, tassels, cords.
How to update the interior:
- Pick a color palette. For fall, terracotta, mustard, olive, and beige shades work beautifully. White or cream covers can serve as the base, while brighter ones make perfect accents.
- If you’re buying ready-made covers, check the fabric composition. Acrylic blends are easier to wash, while 100% cotton feels softer but needs gentler care.
- For those who knit: use needles size 8–10 (5–6 mm). For an 18 x 18 in (45 x 45 cm) cover you’ll need about 2–3 skeins of medium-weight yarn.
- Slip the new covers onto the pillows and arrange them in groups of 2–3 pieces. The secret is mixing textures: smooth linen, knitted patterns, velvet.
We noticed that such pillows don’t just decorate the room, they actually affect our daily habits. Suddenly we found ourselves spending more time in the living room. Simply because it was so soft and comfortable.
If you use candles near the sofa or blankets, always choose LED options to avoid any risk.
If you want a ready solution, check out MIULEE Pack of 2 Decorative Knitted Throw Pillow Covers on Amazon. They have a classic knit design and a convenient zipper on the side. These covers are easy to wash and switch out with the seasons.
Pro tip. Add one or two oversized pillows, like 24 x 24 in (60 x 60 cm). They double as mini poufs and look amazing in the corner of the sofa or on the floor next to a low table.
3. Rustic Mason Jar Lanterns

In fall, Mason jars are especially perfect as little lanterns. The light shining through glass gives a soft glow, and if you add a few details — they turn into real decorative accents.
One evening, the power went out at our place. Lindy and I quickly dropped some candles into jars and spread them around the room. It looked so beautiful that we decided to keep them as part of our décor even after that night.
What you’ll need:
- Mason jars — pint size (16 oz / 470 ml) or quart size (32 oz / 950 ml).
- Small LED candles or tea lights (much safer than an open flame near fabrics).
- Jute twine, lace, or ribbon for decoration.
- Dried flowers, leaves, pinecones — for filling or outside accents.
- Optional: acrylic paints or glass markers.
How to make it whimsical DIY decor:
- Wash and dry the jars thoroughly. The glass should be completely clear, with no trace of labels.
- Decorate the tops. Wrap the rim with jute twine and tie a bow, or add lace or wooden beads.
- Place LED candles inside. I love warm-toned ones that give off a soft amber light. This is much safer than an open flame: with fabric and dry leaves nearby, you can leave the lanterns glowing even overnight.
- For extra coziness, add a few pinecones, dried leaves, or a mini battery string light inside.
- Arrange the lanterns on a windowsill, mantel, or group them together on a tray for a centerpiece.
These lanterns are easy to switch up depending on the season. In fall you can add yellow leaves and acorns, in winter — spruce branches and cinnamon sticks, in spring — flowers. They’ll always feel fresh and new.
Pro tip. Make a few lanterns in different sizes and group them. A set of 3–5 jars always looks more impressive than just one. Especially when placed on the dinner table — the soft light creates that very atmosphere we all love about fall.
4. Autumn-Themed Photo Wall

All of us have tons of photos from memorable trips, forest walks… All of these are our memories. So why keep them only on your phone? From these shots you can create a photo wall that becomes the centerpiece of your room for the whole season.
What you’ll need:
- Printed photos (square 4×4 in or classic 5×7 in).
- Frames of different sizes or simply clothespins and string.
- Fall décor elements: leaves (paper or real), mini pumpkins, pinecones.
- A small fairy light string for extra glow.
How to make it whimsical DIY decor:
- Choose the spot. A free wall in the living room or a corner in the bedroom works best. The background should be simple so the photos and décor stand out. For us, it’s always the wall by the window where natural light falls in.
- Plan the composition. I love mixing different sizes: a few larger frames and many small photos around them. If you don’t have frames, hang a string horizontally and clip the photos with clothespins. It creates a living “memory line.”
- Add autumn accents. Between the photos you can place paper leaves, small twigs, or even dried orange slices. One time I slipped real red leaves between the glass and a photo — it turned out surprisingly beautiful!
- Lighting matters. Warm light makes even the simplest photo part of the décor. I use a thin string of Minetom Fairy Lights Plug in 200 LED String Light on Amazon sand weave it right between the photos. In the evening, the wall literally glows with memories.
- Don’t be afraid to change it. In fall the wall comes alive with picnic and forest shots, while in winter you can fill it with holiday photos and cozy gatherings with friends. Once we even changed the theme every three months — and it turned into a little family tradition.
And the most important part: such a wall reminds you that home is not just walls and furniture, it’s the story of your life. In fall, it feels especially right to see it in front of you.
Pro tip. If you host many guests, leave a few empty frames or clothespins on the wall. Let everyone print and add their own photo — then your memory collection will grow all by itself.
5. Whimsical Fairy Light Canopy
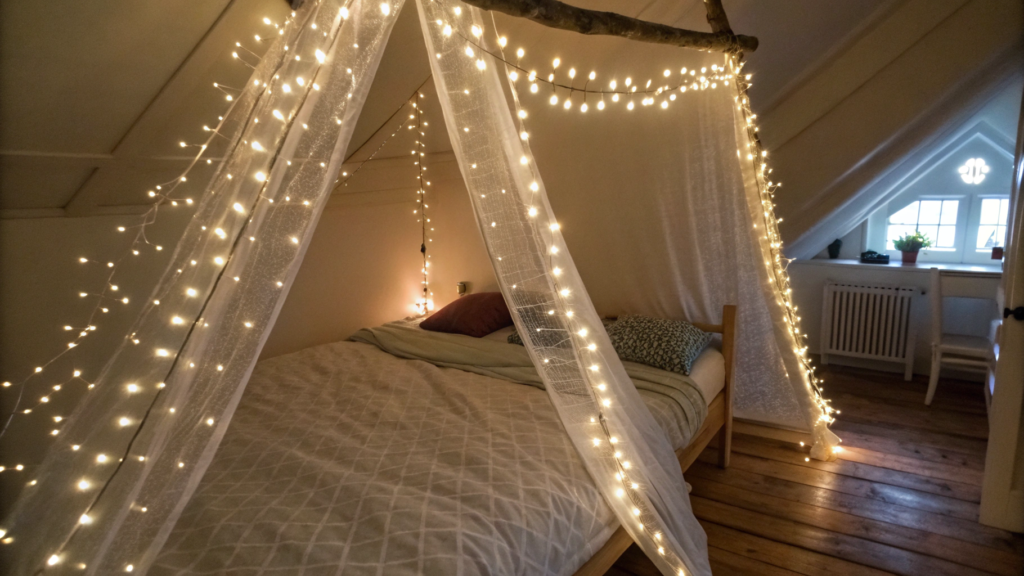
One time Lindy and I strung a fairy light garland right above the bed — and the whole bedroom suddenly turned into a little tent. Sleeping under that glow felt just like being at the cabin as a kid, when mom left the nightlight in the hallway and its soft light slipped through the door crack.
What you’ll need:
- Fairy lights (warm ones work better than cool). The optimal length for a room is 33–66 ft (10–20 m).
- Hooks with adhesive backing or special holders for string lights.
- Light fabric — tulle or gauze — for the “canopy effect.”
- Optional: transparent Command Hooks or small nails.
How to make it whimsical DIY decor:
- Pick the spot. The most striking option is above the bed or sofa. But once we did it in the living room: we stretched fabric corner to corner and wove in the lights. It turned into a tent inside the house.
- Attach the base. First, secure the fabric to the ceiling or walls using transparent Command Hooks or small nails. Let it drape slightly, creating soft folds. Don’t stretch it too perfectly — that light asymmetry makes everything feel alive.
- Add the lights. Carefully weave the string lights into the fabric or fasten them right on top. Use small clear clips for lights or thin plastic ties — they’re almost invisible and hold well. The more loops, the denser the glow. I love leaving the bulbs along the edges too, so it creates a “glowing frame.”
- Create layers. Try combining two types of lights: one long string and several small battery strands. This gives depth — the room doesn’t just look lit, it looks filled with light.
- The final touch. Place a blanket and a couple of pillows nearby. In the evening, the whole family ends up in this very corner — tested and true!
Twinkle Star 300 LED Window Curtain String Lights are perfect for this project. You can hang them as a whole “wall of light” or use them in sections. They plug into an outlet, not batteries, so they run steadily and brightly. And since they’re LED-based, they barely heat up — safe to use right next to fabric.
By the way, we stopped turning on the overhead light and noticed we spend time more calmly. It even feels like tea tastes slower under this glow.
Pro tip. If you want a real wow effect, add dried orange slices or paper leaves to the lights. When the light shines through them, it creates a golden shimmer — it looks beautiful and cozy.
6. Pumpkin Centerpiece Arrangement
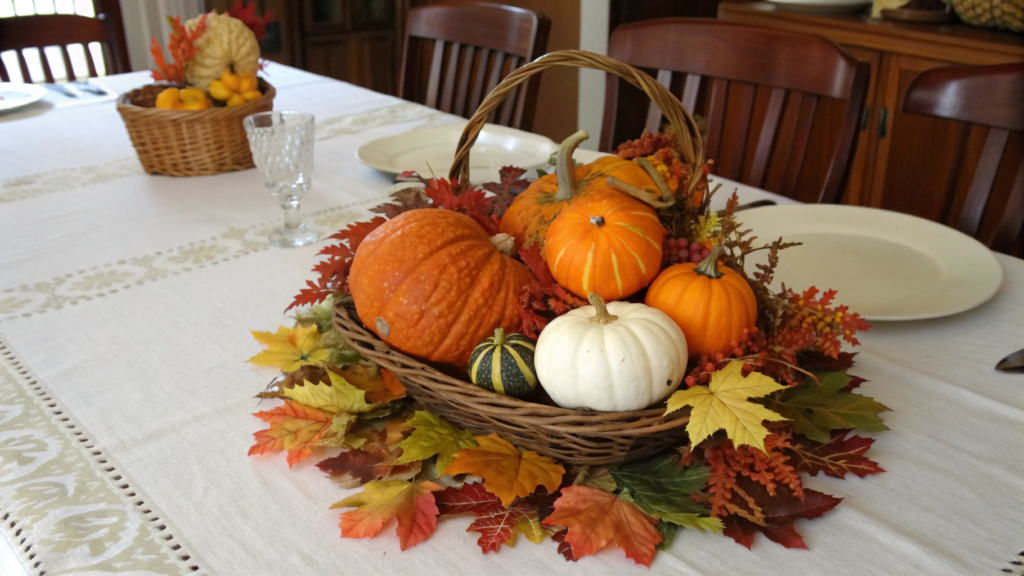
Fall without pumpkins is like pie without cinnamon. If in summer our table usually holds bouquets of wildflowers, then in fall the centerpiece is always a pumpkin arrangement.
I first tried putting one together about five years ago. It looked so good that every guest kept asking where we bought it.
What you’ll need:
- Mini pumpkins (baby boo, jack be little) — about 4–6 pieces, each 3–4 in (7–10 cm).
- One or two medium pumpkins for the center, 8–10 in (20–25 cm).
- A wooden tray, basket, or long rectangular box.
- Greenery: eucalyptus, sagebrush, rosemary sprigs.
- Optional: glass candle holders or LED candles.
How to make it whimsical DIY decor:
- Choose the base. For a long table, a rectangular box or basket works best. For a round table, use a wide tray.
- Place a large pumpkin in the center. It becomes the focus of the arrangement. Pick a classic orange one or go with white if you want a more neutral style.
- Add the mini pumpkins. Arrange them on the sides, alternating colors. White and orange together look especially harmonious.
- Weave in the greenery. A couple sprigs of eucalyptus or rosemary give a fresh accent and add fragrance.
- Light up the centerpiece. Place small candles between the pumpkins. For safety, it’s best to use Homemory Flameless Votive Candles on Amazon. Their flickering glow looks like real flames but without the fire hazard.
This kind of decoration works not only for dinners. We’ve placed it on the mantel and even on the porch — it holds up well for a couple of weeks outdoors.
And when the season ends, you can still use the pumpkins. Medium ones are great for soup or pie, and the little ones can go to the chickens (if you’ve got them, like we do). No waste — everything is put to
7. Painted Acorn Jars
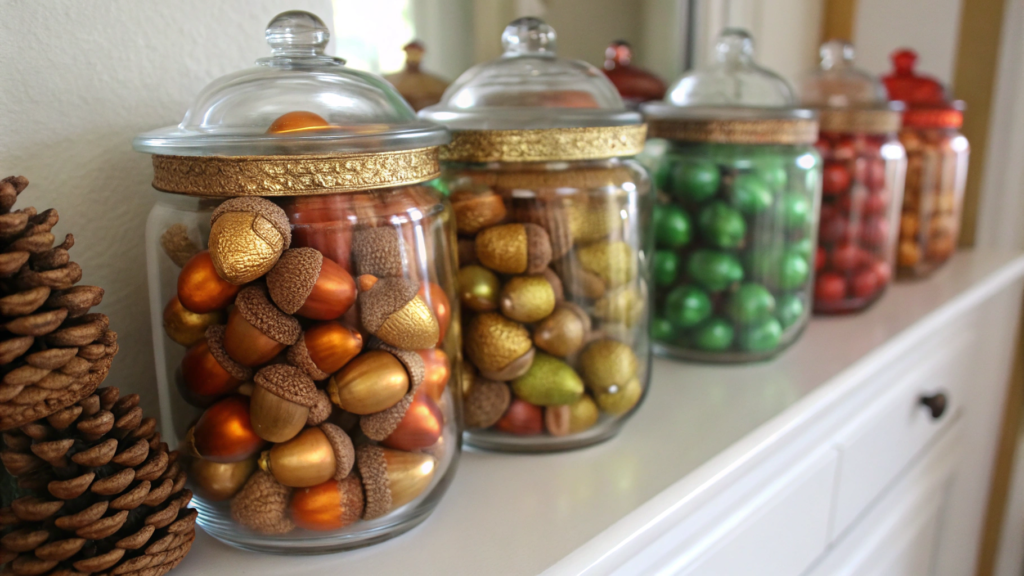
I’ll be honest: this idea isn’t mine. I first saw it at a friend’s place in Portland. We stopped by for tea, and on her shelf were glass jars full of acorns. But not just regular ones — they were painted gold, copper, and warm green. It looked so unexpectedly stylish that at first I didn’t even realize they were just acorns!
The next day I went to the nearest park and collected a whole bag. And yes, now we also have jars filled with colorful acorns that fit perfectly into our fall décor.
What you’ll need:
- Acorns — collected in the park or bought (usually 30–40 per jar is enough).
- Glass jars (Mason jars or any clear glass jars, 16 oz / 470 ml).
- Acrylic paints: gold, copper, green, burgundy.
- Small brushes.
- Newspaper or paper to cover the table.
How to make it whimsical DIY decor:
- Prepare the acorns. Wash them and dry them in the oven at low heat (200°F / 90°C, about 30 minutes). This kills insects and extends shelf life.
- Paint the caps or the acorns themselves. I like leaving the nut natural and painting just the cap — it creates a beautiful contrast. But my friend, the one I got the idea from, painted the whole acorn — it gave an almost jewelry-like effect.
- Let them dry completely. Acrylic paint usually needs just a couple of hours.
- Fill the jar. Start with the larger acorns at the bottom, smaller ones on top.
- Decorate the jar. Tie the rim with twine or ribbon, or attach a small tag with the date or a note like “Fall 2025”.
We keep ours on the windowsill and near the fireplace. In the evening, when the lights are on, the gold and copper acorns sparkle — such a simple idea, but it looks like high-end décor.
Pro tip. Paint the acorns in different shades of the same palette — for example, from dark gold to light champagne. That way the jar will look more layered and dimensional.
8. Fall-Themed Dreamcatcher
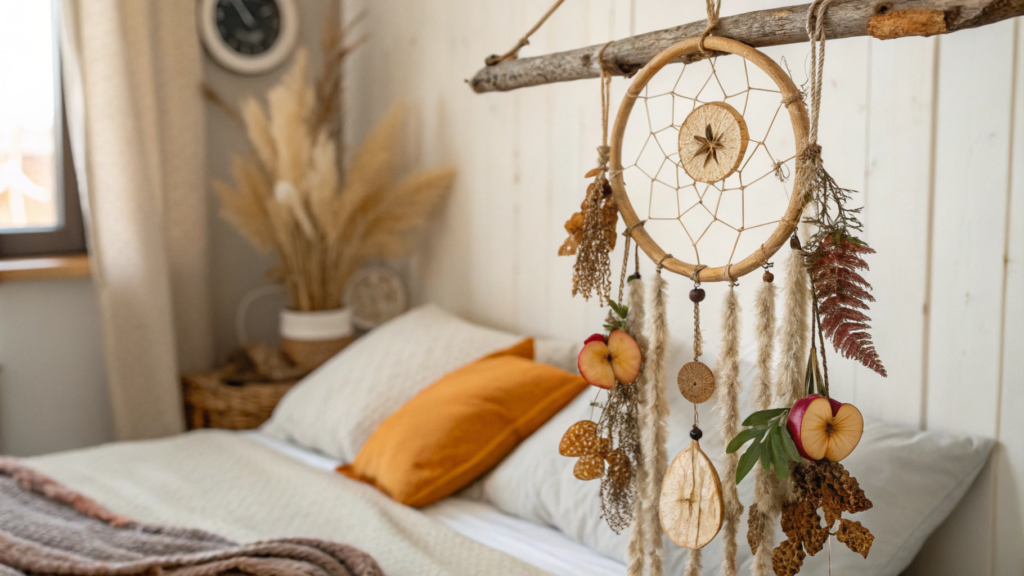
I “stole” this idea in the most unexpected place — at a craft fair in a small Washington town. There was a woman making dreamcatchers out of simple materials: dried herbs, yarn, and even dried apple slices. I stood at her booth for ten minutes just staring at all the weaving, and realized a dreamcatcher could be easily adapted for fall.
When we got home, we made our own fall dreamcatcher. And it’s still hanging in our bedroom, even though the season has long since changed.
What you’ll need:
- Base ring: metal or wooden, 8–12 in (20–30 cm).
- Yarn or thick thread in warm shades (burgundy, olive, mustard).
- Dried leaves, feathers, acorn caps, small pinecones.
- Hot glue gun.
- Optional: lace or ribbons.
How to make it whimsical DIY decor:
- Wrap the ring with yarn. Pick a base color, like dark green. The thread should cover the whole frame tightly.
- Create the web. This is the most meditative part. Start weaving the thread from the center, forming a pattern. Don’t chase perfect symmetry — the slight unevenness adds charm.
- Add fall accents. Attach ribbons and dried leaves to the bottom of the dreamcatcher. You can glue on pinecones or even small twigs. I saw one version at the fair with dried orange slices — in the light they looked like stained glass.
- Decorate with feathers or acorns. Hang them on threads of different lengths. It creates a sense of movement, especially when the window is open and a little breeze flows through.
- Pick the spot. Above the bed or near a window works best. In the evening, with the lights on, it comes to life.
For convenience, you can use a ready-made base like LOKMAN 8 Inch Metal Craft Rings on Amazon. They’re much easier to work with than branches if it’s your first time making a dreamcatcher.
In fall, this piece doesn’t just decorate the room — it actually creates a sense of calm and coziness.
Pro tip. Use several small rings and make a whole composition of three dreamcatchers. They’ll look like a mini fall gallery on your wall.
9. DIY Woven Wall Hanging

On the wall of a small shop Lindy and I once stopped at, there were the most beautiful woven wall hangings. The prices, though, were way too high. I remember thinking: “I could make something like this myself!” So I tried. The result even surprised me: a simple but authentic woven wall hanging in fall colors.
What you’ll need:
- A wooden stick or branch (12–16 in / 30–40 cm).
- Thick yarn in different shades: mustard, burgundy, cream, olive.
- Scissors.
- Hot glue gun (optional, for securing the ends).
How to make it whimsical DIY decor:
- Choose the base. The best option is a straight, dry branch — it gives the piece a natural “woodland” vibe. If that’s not available, a smooth wooden dowel works just as well.
- Prepare the yarn. Cut strands about 20–30 in (50–75 cm) long. Make sure to alternate colors. Lindy and I usually use 6–8 strands of each shade.
- Attach the yarn to the stick. Fold a strand in half, loop it over the stick, and pull the ends through the loop. This creates a neat knot that holds well.
- Build the composition. Alternate the colors to form vertical stripes. You can cut the bottom edge straight or shape it into a triangle — the triangle version looks more dynamic.
- Add finishing touches. Include a couple of decorative details: beads, small feathers, or dried grasses. Once I wove in a thin gold thread — in the evening light, it shimmered just a bit.
If you’ve never made one before, the Craft Crush DIY Woven Wall Hanging Kit on Amazon is super convenient. It comes with bases and instructions — a great place to start.
A woven wall hanging instantly brings life to a blank wall. We keep one in our entryway, and every time someone visits, they stop and look closely at it.
Pro tip. Use different yarn textures — fluffy, smooth, or knotted. That way the hanging won’t look flat, but instead almost alive.
10. Pressed Leaf Frames
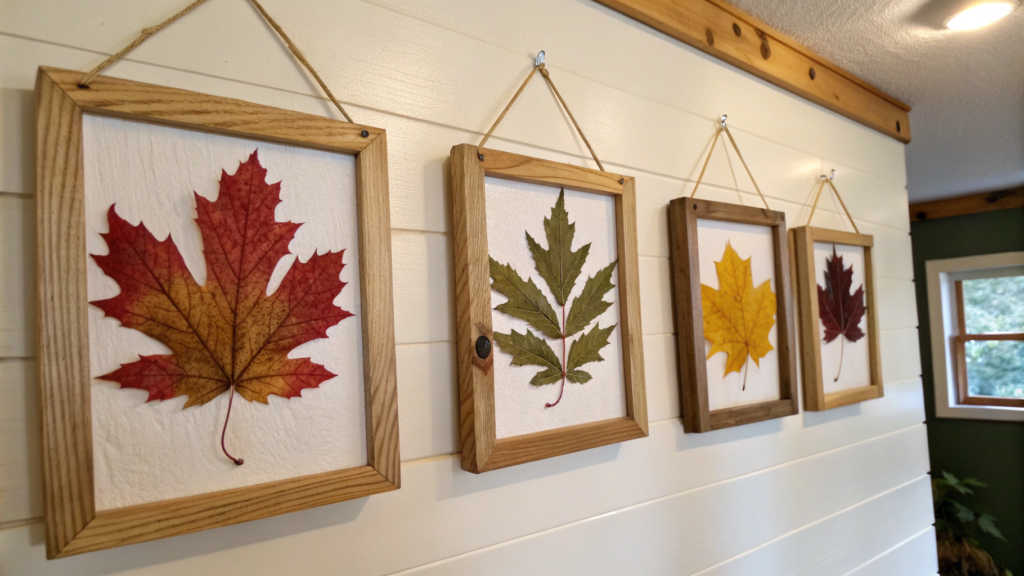
At my neighbor’s house, where we brought over an apple pie, I noticed frames on the wall with leaves inside. And not store-bought posters, but actual leaves collected outside. Red maple, yellow birch, dark green oak — it all looked so natural and beautiful, like an open-air art gallery. It was simply stunning!
What you’ll need:
- Pressed leaves (you can collect and dry them between books for 5–7 days).
- Glass frames — 8×10 in (20×25 cm) or larger, in different sizes.
- White or black paper for the background.
- Optional: marker for notes (tree name, date).
How to make it whimsical DIY decor:
- Collect the leaves. Pick bright and undamaged ones. Best to collect during the day, when they’re dry.
- Dry them. The classic method is pressing them between book pages. If you need it faster, iron them through paper on low heat.
- Prepare the frame. Remove the glass, place the background paper, and carefully arrange the leaves. Try not to overlap them completely — let each have its own space.
- Assemble everything back. The glass will press the leaves flat, keeping them preserved for a long time.
- Hang the frames. They look best as a series of 3–4 together, especially if the leaves are different colors and shapes.
Now we have a whole leaf collection at home: birch and maple in the living room, oak and chestnut in the bedroom. It’s not just beautiful, it’s also a reminder of what fall looked like that year.
If you’d like to make it easier, get a ready-made gallery frame set. With different sizes, you can create a real wall composition.
Pro tip. Leave one space for a family photo next to the leaves. It becomes a “memory frame”: a fall leaf and your family picture from the same day. Things like this feel especially heartwarming on long winter evenings.
12. Felt Pumpkin Garland
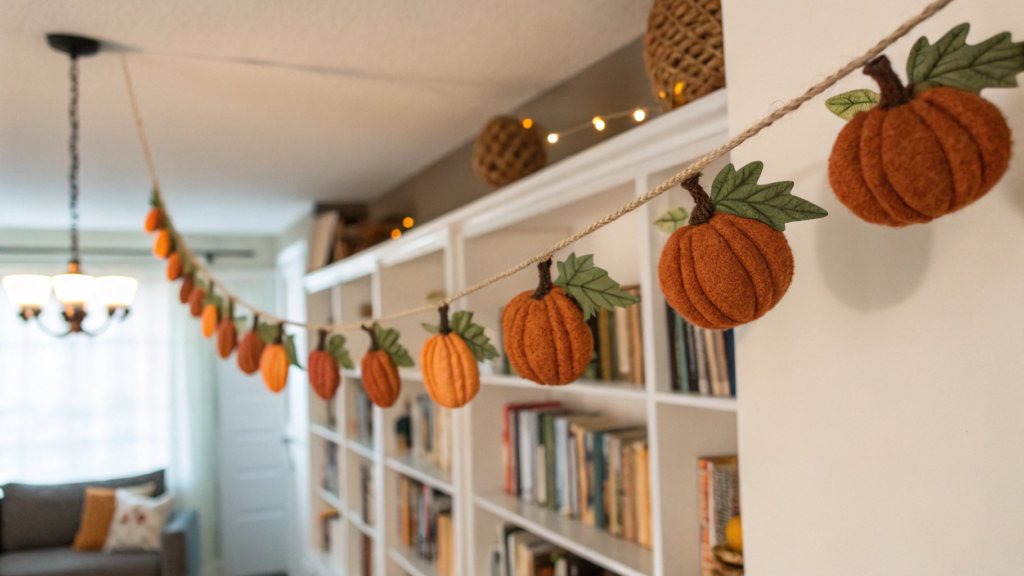
A felt garland with mini pumpkins is probably the simplest and at the same time the warmest autumn decoration for a room. It may seem like a small thing, but once you hang it above the bed, the fireplace, or even along a bookshelf, the atmosphere in the home changes instantly.
What you will need
- Felt sheets in warm tones: orange, dark yellow, brown, and beige.
- Sharp scissors or a craft knife.
- Needle and thread (or fabric glue).
- Thick twine or cotton cord, 6–8 feet long (about 2–2.5 m).
- A bit of batting or cotton for volume.
- Optional: wooden beads or dried leaves for accents.
How to make this DIY room decor
- Cut out the pieces. Draw small circles 2.5–3 inches (6–7 cm) in diameter. For one pumpkin you will need 4–5 circles.
- Assemble the shape. Stack the circles together and stitch them in the center. Then spread the edges to create volume. For a plumper shape you can add a piece of batting inside. It is like a small trick: just five minutes and you have a tiny fabric pumpkin in your hand.
- Add the stem. Cut a rectangle from brown felt, roll it up, and glue it on top. The stem immediately brings the shape to life, without it the pumpkin looks unfinished.
- Assemble the garland. Thread the finished mini pumpkins onto the twine, alternating them with beads or leaves. Leave about 3–4 inches (7–10 cm) between the elements. At this moment the garland already starts to “breathe” and turns from a set of details into a full decoration.
This garland feels at home in any part of the house. It looks beautiful above the headboard, it can be placed along the fireplace where it enhances the feeling of warmth. It also looks wonderful on bookshelves or along the window, where you want a bit more color and brightness on gray days. Wherever you hang it, it will always create a sense of warmth and softness.
12. Candlelit Lantern Cluster
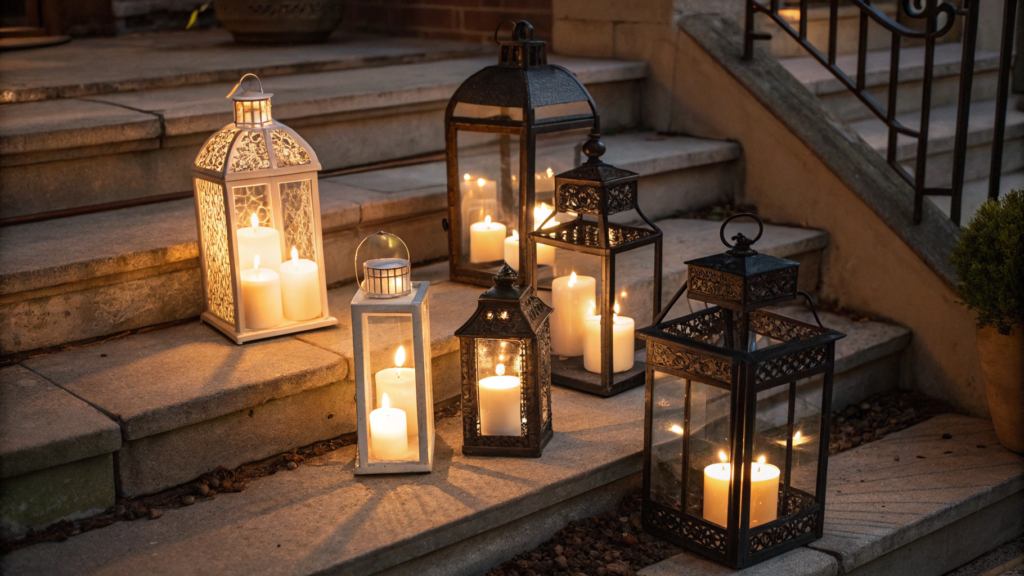
There are ideas that are noticed somewhere by chance. With lanterns it happened to me exactly this way at a craft fair in a small town in Oregon. One stall was selling outdoor lanterns, and the owners simply grouped them in a cluster on the steps. And when the candles were lit inside, it was very atmospheric.
You take several lanterns of different sizes and shapes, combine them into one composition, and fill them with the soft light of candles. Due to the different height and scale, a feeling of depth and warmth is created.
What you will need for this DIY room decor
- 3–5 lanterns of different sizes: small about 8–10 inches (20–25 cm), medium 12–15
inches (30–38 cm), and at least one large up to 20 inches (50 cm). - Candles. It is better to use LED candles on batteries. They are safe, especially if there is textile or animals nearby.
- Optional: dry branches, mini pumpkins, pinecones, or leaves for accents.
How to assemble the composition
- Choose a place. A corner of the room, a windowsill, the space near the fireplace, or even the middle of the dining table will work.
- Arrange the lanterns in steps. Put the tall one at the back, the lower ones closer to the edge. This way the composition will look natural and voluminous.
- Add liveliness. Slightly move the lanterns closer to each other, as if they are “talking.” This small detail makes the picture more homely.
- Put candles inside. For a soft effect, use LED candles with warm yellow light.
- Decorate if desired. In one lantern you can pour some pinecones and place a candle right among them, or add mini pumpkins around.
The cluster looks best where family or friends spend evenings: near armchairs in the living room, on a dresser in the bedroom, on a wide windowsill where the light can even be seen from the street. In the evening these lanterns are like beacons, attracting everyone to the center of coziness and warmth.
13. Hand-Stitched Autumn Quilt
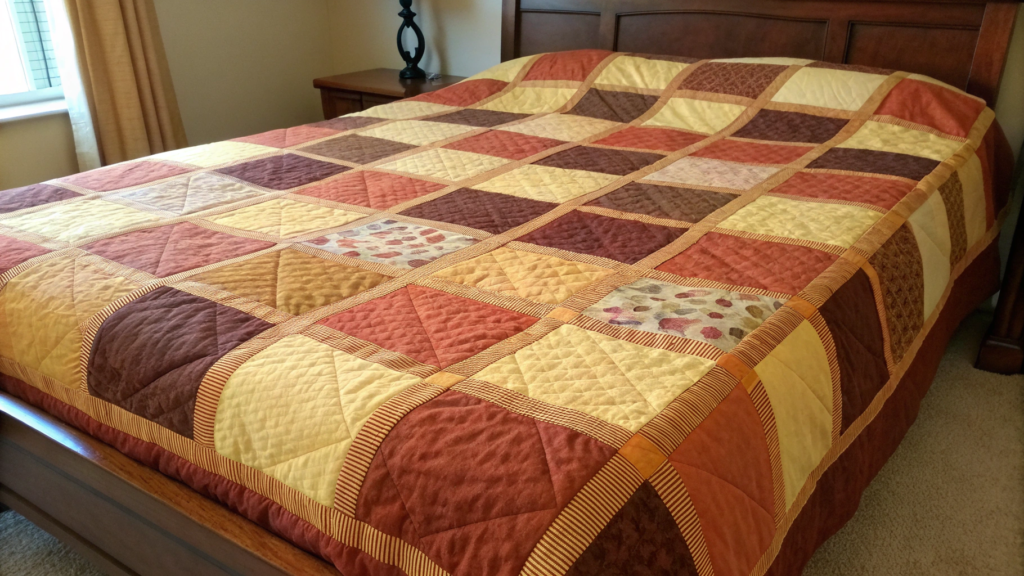
A patchwork quilt hand-stitched does not only keep you warm, it feels like it tells a story. After all, each piece of fabric is a memory of something that has already lived in the house.
In this quilt it is not necessary to have perfectly even squares. On the contrary, when the pieces are a little different, the colors slightly clash with each other, it becomes a living and real piece. The main thing is to keep a consistent palette: warm terracotta, yellow, and brown shades.
What you will need for this DIY room decor
- Fabric scraps (cotton, flannel, linen) about 10–12 inches (25–30 cm) on each side.
- Strong thread, preferably polyester.
- Sewing machine (it can also be done by hand, but it will take more time).
- Batting: cotton or polyester, 1/4–1/2 inch thick (0.5–1.2 cm).
- Backing fabric (preferably solid color).
- Needles, pins, scissors, ruler.
By the way, you can also find convenient pre-cut fabric sets if you do not want to spend time on preparation.
How to sew
- Lay out all the scraps. Do this on the floor or a large table. This is probably the most exciting moment — you can move the squares, try different combinations until you get a harmonious pattern. Usually I photograph several options on my phone and compare, it is easier to notice the best combination this way.
- Sew the squares into rows. Then connect the rows together. The seam width is about 1/4 inch (0.6 cm). After each seam it is better to iron the fabric, so the canvas will be smoother and the seams neater. Even if it is not perfect somewhere, do not worry: this is the charm of handmade.
- Prepare the sandwich. On top is the patchwork canvas, in the middle is the batting, and at the bottom is the backing. Carefully align all three layers. To prevent shifting, pin them around the edges and in several places in the center.
- Quilt through the seams. You can also make diagonal lines across the whole quilt. Such quilting will secure the batting and give the surface texture. The more lines there are, the denser and more durable the quilt will be.
- Finish the edges. Use bias tape or a wide ribbon. This is the final touch: the quilt immediately looks complete and neat. I like to use bias tape in a contrasting color, so it frames the entire work.
As a result you get a quilt that carries both the warmth of the hands and the spirit of autumn.
Such a quilt works perfectly as a utilitarian item and as a decor element. It can lie on the bed, creating the feeling of a cozy nest. You can just throw it on the sofa to wrap yourself in during the evenings with a cup of tea. And if you fold the quilt and place it on a wicker chair or a trunk in the hallway, it will immediately attract attention.
14. Rustic Wooden Shelf Accents
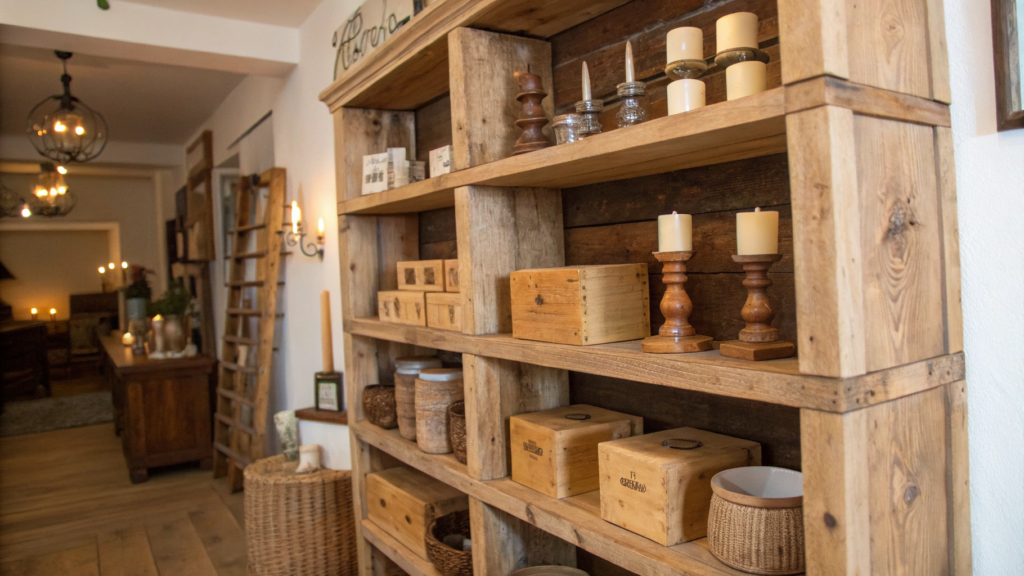
Have you noticed that it is enough to add a few small wooden details to the shelves — and the space starts to look completely different? A few small wooden boxes, candle holders, and carved boards on the shelves made the room truly lived-in.
Such accents add texture and bring a feeling of warmth. Wood does not get old in the interior over the years — on the contrary, it becomes an important part of the design.
What you will need for this DIY room decor
- Small wooden boxes or decorative storage containers for visual height.
- Decorative cutting boards or trays (preferably with a noticeable wood grain pattern).
- Wooden candle holders or ones with wooden elements.
- Natural details — wood slices, small blocks, or log-style shelves.
- Optional: warm textile accents (napkins, fabric mats).
I often use the Flameless LED candles set on Amazon, they run on batteries and are safe, yet their light is soft and warm, almost like a real flame.
How to arrange
- Start with the base. Take a small wooden box, a container, or a tray and place it on the shelf. Such a base helps to set the structure and unify the composition. Inside you can put candles, jars, or dry branches, and on top use it as a stand for smaller details.
- Add vertical accents. Place a carved cutting board, a narrow candle holder, or a wood slice. Different heights bring the picture to life and prevent the composition from looking flat.
- Weave in soft details. A linen napkin, a small plaid, or a piece of fabric casually hanging from the shelf immediately softens the strict lines of wood. This is a technique that makes the interior warmer and closer to a homely style.
- Finish with small touches. Scatter some pinecones, dry leaves, or small candles. These details work like spices in food: just a little, but they set the mood and the autumn atmosphere.
Such accents look especially beautiful on open shelves in the living room or kitchen. A wooden board next to a jar of autumn spices, a candle holder near a stack of books, a small box with dry branches — all this together turns an ordinary shelf into a stylish interior element.
15. DIY Pinecone Wall Art

Pinecones are one of my favorite autumn materials. They are free, beautiful, and absolutely versatile. Every year Lindy and I collect them during walks: she puts the largest and most even ones into the basket, and I am already thinking on the way how we can use them.
And so I made a wall art piece from pinecones for our living room. It turned out so impressive that it now hangs all year round. Each pinecone has its own shade and shape, and the whole composition comes out lively and voluminous.
What you will need
- Base for the panel: plywood or a ready-made wooden frame.
- Strong wood glue or a hot glue gun.
- Pinecones of different sizes (it is better to collect from 30 to 50 pieces).
- Acrylic paints in gold, copper, and white (optional).
- Hook or hanger for attaching to the wall.
If you do not want to look for a base yourself, you can use a ready-made Wooden craft board on Amazon — they are sold in different sizes and shapes.
How to make this DIY room decor
- Prepare the pinecones. First sort through all the collected material: remove cracked or too small ones. Wash the rest in water and dry them in the oven at a low temperature (200 °F / about 90 °C) for an hour. This way they will open more beautifully and get rid of moisture and insects.
- Determine the composition. Lay out the pinecones on the base without gluing them yet. Try several options: a strict circle, a chaotic pattern, or, for example, a heart shape. I often photograph the layout on my phone — it is easier to compare and choose the best option this way.
- Glue the base. Apply glue in small portions and immediately press the pinecones to the surface. It is better to start from the center and gradually move to the edges — then the pattern will be more even. Work in rows so that the composition looks organized.
- Add accents. When the base is ready, take acrylic paint and lightly brush the tips of the pinecones with gold or copper. The main thing is not to overdo it: just a few light strokes with the brush, and the wall art immediately comes alive.
- Secure the hanger. Install a hook or hanger on the back. Sometimes I use two small hooks on the sides — this way the piece hangs more securely and does not tilt. That is it! Done!
This wall art looks especially good in the living room above the sofa or the fireplace. But in the bedroom it also gives the feeling that a piece of the forest is in your home. We have ours hanging right across from the window, and when the evening sun falls on the pinecones, they start to shimmer. It turns out simple, atmospheric, and reminds you that beauty often lies right under your feet.
16. Layered Plaid Throws
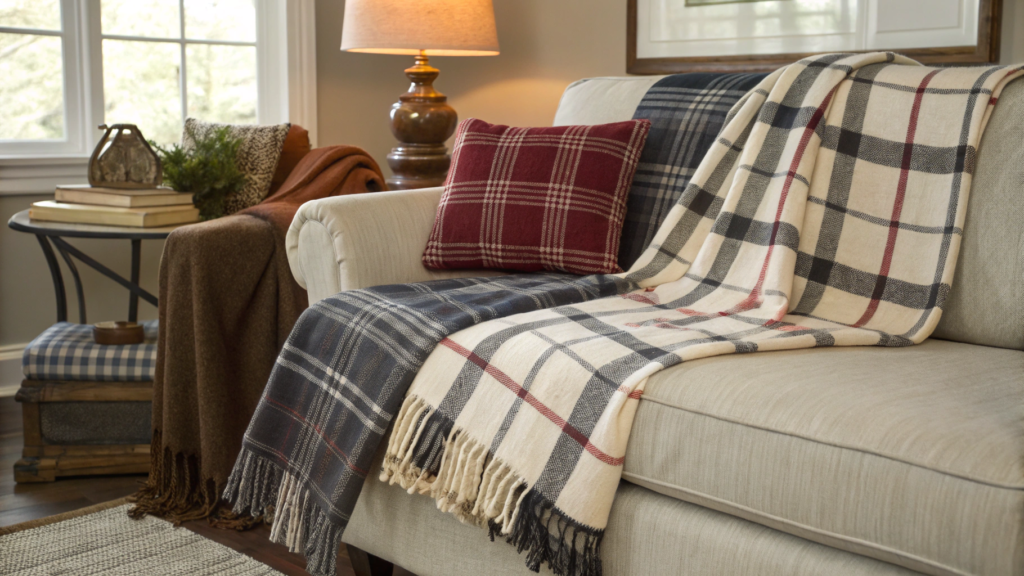
I love plaid throws. One already feels cozy, but if there are several layered together, the atmosphere of the room immediately changes. That is why layered plaid throws have become my favorite way to add warmth and comfort to the home without big expenses.
What you will need
- 2–3 throws of different textures: wool, flannel, or acrylic.
- Colors in one palette: for example, red + burgundy + cream, or yellow + brown + beige.
- One accent throw (can be with fringe or in a larger check pattern).
- Neutral-toned pillows to support the composition.
How to make this DIY room decor
- Choose the base. The first throw should be the largest and the calmest in pattern. Lay it fully on the sofa or chair so that it sets the background. For example, a solid cream or one with a small check.
- Add the second layer. Place this throw a little more casually — diagonally, with a corner hanging down. Here you can choose a brighter color or a larger check. The layers should contrast, but not clash.
- Play with textures. The third layer is the most “free.” You can simply drape it over the armrest or place it on the back of the chair. Flannel, wool, or even knitted acrylic create volume and add tactile coziness.
- Make accents. Add a couple of pillows in neutral tones so that they visually “ground” the composition. And if you want even more softness and warmth, choose one pillow in the color of the brightest throw.
- Find the balance. Do not be afraid of casualness: a slight asymmetry makes the interior feel alive. It is important that the layers look as if they have been there for a long time and naturally.
Layered throws look great in the living room where the family gathers in the evenings, and in the bedroom — at the edge of the bed. I especially like placing them on a chair by the window: on a gray day you can simply wrap yourself in one of them and feel like another layer of tranquility and warmth has appeared in the home.
17. Golden Leaf Mason Jar Vase
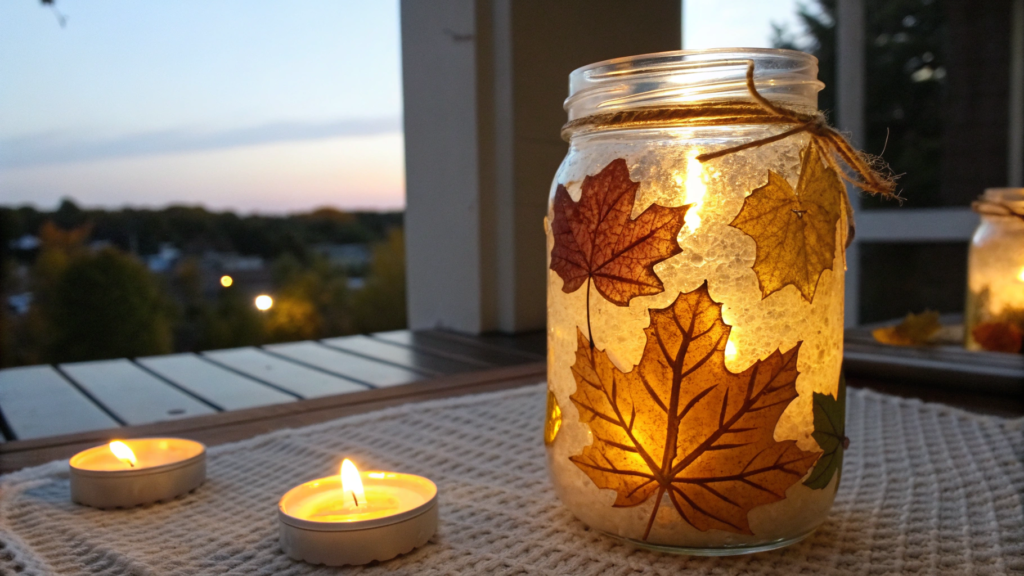
A simple jar, but if you play a little with paint and light — it turns into an autumn accent that looks both stylish and homely.
I first tried this trick in 2020, when we had just moved into our house in Oregon. There wasn’t much money for decor then, so I took a couple of glass jars from the pantry, golden acrylic paint, and maple leaves gathered in the yard. In the evening I lit a candle inside — and since then these vases have become a true symbol of the fall season for me.
What you will need
- Glass Mason jars (any size, but 16 oz / about 470 ml is most convenient).
- Dried leaves (maple, oak, birch).
- Acrylic gold paint or spray.
- Brush or sponge for applying.
- Spray glue or Mod Podge.
- Candle (I love the flameless LED candles set).
How to make this DIY room decor
- Prepare the jar. Wash it with soap and degrease the surface. Remove stickers and glue residue — on clean glass the leaves will stick better, and the light will shine more evenly.
- Choose the leaves. Use small and thin leaves — birch, rowan, ash. They lay flatter and look neater. If the leaves are fresh, dry them in a book for 4–5 days and iron them through paper so they become straight.
- Glue the leaves. Apply a thin layer of Mod Podge or spray glue on the outer surface of the jar and attach the leaves one by one. Place them not in a solid carpet but with small gaps, so the light can shine through the glass. When the glue dries, gently brush another thin layer on top for fixation.
- Add a golden accent. With light strokes, apply gold paint only on the edges or veins. This way the leaves remain partly semi-transparent, and the veins glow beautifully when the candle is lit.
- Seal the result. After drying, cover the leaves with another thin coat of Mod Podge or clear varnish. This will create a protective layer so you can safely hold the jar. Place an LED candle inside. The light will shine through the gaps and the semi-transparent veins, creating a soft golden glow.
These vases look wonderful on a windowsill, where the sun highlights the golden patterns during the day, and in the evening they come alive with candlelight. Several jars of different sizes can be placed on the fireplace or gathered in the center of the table.
18. Warm-Toned Origami Cranes

In Japan, origami cranes are considered a symbol of happiness and long life, and if you fold several dozen and hang them together, they start to sway gently with the slightest movement of air. For autumn, warm-toned papers are perfect: terracotta, ochre, brown, burgundy.
At first mine turned out a bit crooked, but that was the charm — each figure looked “alive.” After a couple of days I had a whole garland and hung it in the bedroom.
What you will need
- Origami paper 6×6 inches (15×15 cm) in warm shades.
- Thick needle or awl.
- Thread (cotton or nylon works best).
- Wooden beads for accents (optional).
- Small branch or thin dowel for hanging.
Beautiful Warm tone origami paper set is easy to find on Amazon.
How to make this DIY room decor
- Prepare the paper. Choose 10–15 sheets of different shades but within the same palette. In autumn, orange mixed with burgundy and brown looks especially nice. If you want, add a couple of golden sheets — they will work as accents.
- Fold the cranes. The classic origami crane fold is not difficult but requires attention. The first couple may turn out uneven — that’s normal. I usually fold a whole stack in an evening while watching a movie or listening to a podcast.
- Assemble the garland. Pierce the finished cranes with a needle and thread them. Between them you can add beads — they give weight and help the figures hang straighter.
- Make the hanger. Tie several strings with cranes to a thin branch or dowel. Leave different lengths — this way the composition looks more airy.
- Add highlights. If you like, gently brush the edges of the wings with gold paint or a marker. Just a touch — so that under the light they softly shimmer.
Cranes look beautiful above the bed or desk. You can hang them near a window — then with a draft they begin to move smoothly, as if coming to life. I love keeping such a garland in the bedroom: in the evening, the dim light falls on the paper, and the figures seem to float in the air, creating a feeling of lightness and coziness.
19. Fireplace Mantel Pumpkin Display
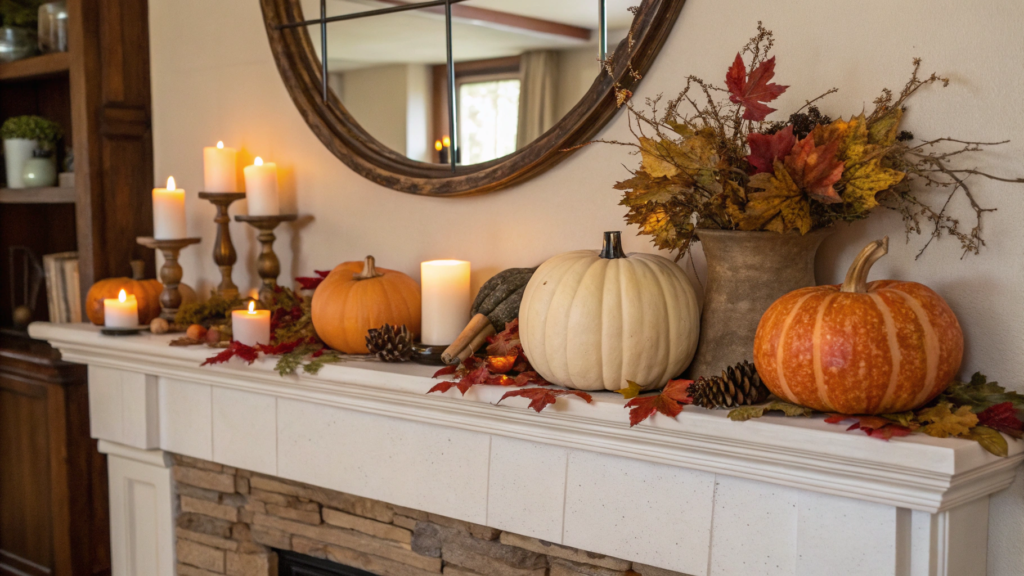
A pumpkin display on the mantel always looks beautiful: even just a couple of mini pumpkins already create the mood. And if you add candles, leaves, and a few wooden details, it turns into a truly warm centerpiece of the room.
You can change the decor every week if you want, varying colors, sizes, and small details.
What you will need
- Pumpkins of different sizes: from mini (3–4 inches / 7–10 cm) to medium (8–10 inches / 20–25 cm).
- Candles (I love flameless LED candles set, they are safe and give a soft glow).
- Dried leaves, twigs, or an artificial garland.
- Wooden or metal trays for creating levels.
- Optional: pinecones, lanterns, small signs with text.
How to make this DIY room decor
- Decide on the base. First, choose if the composition will be symmetrical or freeform. If you like order, place matching items at the edges and leave the center for the main pumpkin. If you want more of a “forest story,” go for asymmetry — it looks more natural.
- Arrange the pumpkins. Place the largest one in the center or slightly to the side, and add smaller ones around it. I always try to make the colors echo each other: for example, a white mini pumpkin next to a medium orange one. The contrast makes the composition more interesting.
- Add height. Use wooden trays or books to raise some of the pumpkins. Different levels create depth, and the eye doesn’t just slide in a straight line — it lingers on the details.
- Weave in natural accents. Place dried leaves or small twigs between the pumpkins. Sometimes I make a little “path” of maple leaves that leads the eye from the edge of the mantel to the center.
- Light it up. Put candles between the pumpkins or inside jars. With LED candles it’s safer. The light brings the display to life: in the evening the pumpkins look as if they’re glowing from within.
This kind of decor naturally belongs on the mantel. But if you don’t have a fireplace, you can use a console table in the entryway or a wide bookshelf. The main thing is to choose a spot that’s visible as soon as you enter the room. In our living room, pumpkins always sit on the mantel and everyone smiles when they see this display. Simple vegetables, yet they create a sense of celebration and coziness better than any store-bought decorations.
20. DIY Autumn Wreath for Above the Bed
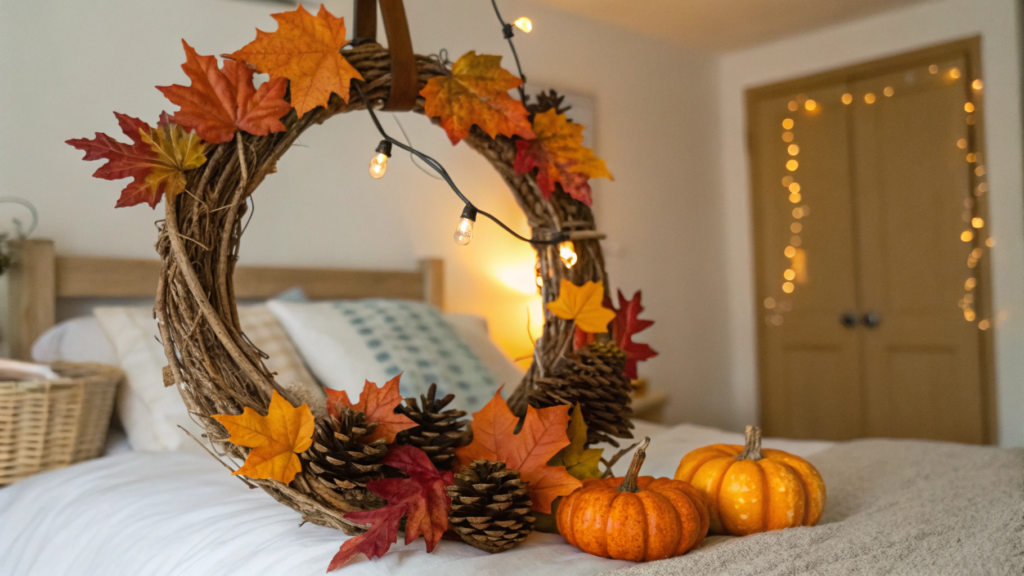
For a long time, wreaths were associated only with Christmas. But one day I tried making an autumn wreath — and it turned out surprisingly nice. Warm leaves, dry twigs, a few pinecones, and a couple of decorative mini pumpkins — and suddenly the room feels like autumn is not only outside the window, but inside the home too.
What you will need
- Wreath frame base (metal or wooden ring 14–18 inches / 35–45 cm).
- Dried leaves, twigs, pinecones.
- Decorative mini pumpkins or berries.
- Hot glue gun.
- Ribbon for hanging (warm burgundy or golden tones work well).
Ready-made Wreath frame ring is easy to find on Amazon.
How to make this DIY room decor
- Prepare the base. If you are using a metal ring, wrap it with twine or a strip of fabric — this makes it easier for the glue to stick and gives the wreath a neater finish.
- Build the greenery base. Start with twigs: secure them around the ring to create the foundation. They can overlap slightly; the main goal is to set direction and shape.
- Add the leaves. Glue dried maple or oak leaves in rows, moving along the circle. Leave small overlaps so the wreath looks full and lush.
- Insert the accents. Between the leaves, place pinecones, decorative pumpkins, or artificial berries. The principle here is “a little goes a long way” — just a few accents make the design come alive.
- Finish it off. Attach the ribbon on top and tie a bow or simply make a loop for hanging. I love using plaid fabric — it instantly adds “autumn character.”
The best place for this wreath is right above the bed. It works as a soft accent and makes the bedroom visually warmer. But if you want to experiment, you can also hang it above a dresser or the back of a chair. In our home, the wreath stays above the bed through October and November. It’s a reminder that autumn isn’t just outside — it can be alive and beautiful inside the home too.
Cozy Home Vibes
When you look at the finished results — garlands, lanterns, pinecone wall art, or a layer of plaid throws — you realize it’s not just about decor, but about the attention to the home, to the little details that set the mood. Just a couple of jars with golden leaves or a few origami cranes, and suddenly the house feels warmer and more cared for.
Each of these projects can be done in an evening or over a weekend. And I’m sure that once you start, you’ll want to keep going. Because creating coziness isn’t a goal — it’s a process full of joy.
Try at least one idea from this list and then share in the comments which one you liked the most. I’m always curious to see how differently we all find our own ways to express our love for autumn.